EvenMidi H9 User manual

2 - MIDI SETTINGS MODE
EvenMidi H9 can control two MIDI units on dierent
channels. You can set the MIDI channel on the two
ways.
Press the «UP» footswich for 5 seconds -> All leds
will blink for 3 seconds. Now you are in MIDI
SETTINGS MODE. Here is how it works :
LED blink correspond to Midi channel number. If
you set at 3 The LED will blink 3 times. If the knob is
on the left it means 0, else it add the value. If all
knobs are at left, it’s channel 1.
E.g. if you want your 1st H9 on the channel 3, just
add (+2) on the rst knob range.
If you want to save, press the «UP» footswich for 2
seconds -> All leds will ash 10 times.
If you want to exit without save, press any other
switch (except «PSW» check 6-Resetting».
Notice - English
Thank you for purchasing our Midi controller. We work on it since the Eventide® H9 release : improving,
switching technology, create specic demands... First it was a DIY project and now it’s a professional tool.
Specications
X1
Psw
Ch1/2
Looper
Solo
Midi
On
MIDI OUT
MIDI IN
EXP
DC 9V 2,1mm
Xnob Depth Speed Filter
Depth/Key Speed / Scale Xnob Ynob
Depth Mod Speed Mod Mod Rate Mod source
Xnob Ynob FxMix Contour
Dly Mix Dly Time A Dly Time B Fdbk A Fdbk BMix
Pitch Mix Pitch A Pitch B Delay A Delay BMix
Type Depth Speed Shape XnobIntensity
Decay Size Delay Low HighMix
Connect a power supply 9V DC
2,1mm - negative center 200mA
TRS - Expression pedal
From 10k to 50k Ohms
MIDI IN
(routing THRU)
MIDI OUT/THRU
to Eventide® H9 MIDI IN
3 - EXPRESSION PEDAL CALIBRATION
Connect an expression pedal with a stereo cable
6.35mm. Potentiometer value: 10kOhms recom-
mended (75kOhms max).
Press «Down» footswitch for 5 seconds -> LEDs will
light up as scrolling to indicate access to the
Calibration Mode. Here's how it works:
- The blue LED ashes according to the pedal
position. Vary the position on the minimum or
maximum.
Press the "Down" button again to save this value:
green LED ashes during recording.
- Then yellow LED will ash in the same way. This
time, set the pedal to the opposite extreme position
(Min if Max or Max if Min depending on what you
did previously).
- Press "Down" to save your settings and return to
the previous mode.
If you want to exit calibration mode without saving,
press any other footswitch.
Note: To prevent incorrect calibration, if you do not
move the pedal (or too little) between the 2 values,
the factory settings are recalled.
4 - MODE SOLO/DUAL
You can control 2 H9 at the same time or switch
between the 2 units.
Press the «PSW» footswitch for 2 seconds to switch
from Dual to solo and vice-verca.
If you’re on Dual mode, there is no particular LED. If
you’re on SOLO mode, the yellow LED turns ON. The
«PSW» footswitch switch the H9 units. If the Green
Led is o, you control the 1st H9, if the green LED is
ON, you control the 2nd H9. So, «PSW» footswitch
doesn’t send Midi message in Solo Mode.
5 - MODE LOOPER
You can set your Eventide H9 to load Looper
Preset on Program Change 127. Press
Hotknob+Right Footswitch :
MIDI>RCV.MAP>127.YourLooperPresetNumber
You can also access to looper like a simple preset.
You have to put the EvenMIDI H9 controller in
LOOPER MODE.
Press the «X1» footswitch for 2 seconds to switch
from Standard to Looper Mode and the «UP»
footswitch for 2 seconds to Exit Looper Mode (by
loading previous or next preset).
The Green LED is ON and Yellow LED is OFF in
Looper Mode .
Check 1-SETTINGS to set the MIDI CC on the
Eventide ® H9
You can not access Midi channel settings or
expression pedal calibration in Looper mode.
TRICK: If you are in SOLO Mode and entering in
Looper MODE, the «PSW» footswitch isn’t active
for CC Midi message like in DUAL MODE. Press
«PSW» footswitch to switch to SOLO Mode to
control your Second Eventide H9 while your
Looper is Playing. Press again the «PSW» and
you’re back to Looper :). Denitive exit by
Holding down «UP» footswitch.
6 - LIVE MODE
Live mode allows you to directly load 6 presets in
DUAL mode or 3 presets by Eventide® in SOLO
mode. To enter or exit Live Mode, enter in the Midi
settings (Press the footswitch "UP" for 5 seconds)
then press the footswich X1 for 2 seconds. The
green LED and the yellow LED will blink. The PSW
footswitch allows access to the 2nd bank in DUAL
mode or to switch to the other Eventide® in SOLO
mode. The 3 footswitches send Program Change:
PC0 PC1 PC2 (PC3 PC4 PC5 in DUAL mode if the
PSW footswitch is activated). By re-pressing on the
same footswitch the eect is bypassed (PC125).
The LEDs have a special behavior: the 3 LEDs on the
right (red, blue and yellow) respectively correspond
to the activation of each preset. When the preset is
bypassed the LEDs are o.
All EvenMidi functions are retained in Live Mode
(access to Looper mode, access to midi settings
etc.). When you exit Looper mode, the Eventide is
bypassed (PC125).
You can access your wanted presets by setting
the Eventide®. Hold Down Hotknob + right
Footswitch: MIDI> RCV.MAP> [0 or 1 or 2 or 3 or 4
or 5] .PresetNumberWanted. Do not change
PC125, that's the Eventide® default bypass.
7 - RESETTING
Enter in MIDI Settings Mode (Hold «UP» 5 seconds)
and press the "PSW" footswitch for 5 seconds. The
red LED will blink. MIDI channels, calibration and
Modes will be reset by default.
8 - WARRANTY
One year warranty for a normal usage. Don’t put it
on the water and do not apply an excessive voltage
(max 12V). If the warranty time is over we can x it
at your cost.
9 - MAINTENANCE
You normally don’t have any maintenance. Clean
the controller with a damp cloth.
10 - CONCLUSION
Well it’s time to play! Hope it will t perfectly on
your pedal board. Send us a cool picture with you
and the controller on your rig or tag us on
Facebook/Instagram/Twitter, we will appreciate ;).
Have fun and all the best!
EvenMidi team
Eventide® is a trademark by Eventide inc. EvenMidi
has no connection or aliation with Eventide® inc.
The TimeFactor PitchFactor ModFactor et Space
products are eects created by Eventide®.
www.evenmidi.com
WARNING
TO REDUCE THE RISK OF FIRE OR ELECTRIC
SHOCK DO NOT EXPOSE THIS EQUIPMENT TO
RAIN OR MOISTURE
AVIS: RISQUE DE CHOC ELECTRIQUE-NE PAS
OUVRIR.
CAUTION
RISK OF ELECTRIC SHOCK
DO NOT OPEN
AVERTISSEMENTS
Use only with 9V DC 200mA 2,1mm negative center
power supply. Avoid spilling liquids onto/into the unit. Do
not expose to excessive heat or moisture. Do not open –
there are no user serviceable parts inside.
This equipment has been tested and found to comply with the limits for a Class B digital
device pursuant to Part 15 of FCC rules. Operation is subject to the following two
conditions: (1) This device may not cause harmful interference, and (2) this device must
accept any interference received, including interference that may cause undesired
operation.
MADE IN FRANCE

2 - MIDI SETTINGS MODE
EvenMidi H9 can control two MIDI units on dierent
channels. You can set the MIDI channel on the two
ways.
Press the «UP» footswich for 5 seconds -> All leds
will blink for 3 seconds. Now you are in MIDI
SETTINGS MODE. Here is how it works :
LED blink correspond to Midi channel number. If
you set at 3 The LED will blink 3 times. If the knob is
on the left it means 0, else it add the value. If all
knobs are at left, it’s channel 1.
E.g. if you want your 1st H9 on the channel 3, just
add (+2) on the rst knob range.
If you want to save, press the «UP» footswich for 2
seconds -> All leds will ash 10 times.
If you want to exit without save, press any other
switch (except «PSW» check 6-Resetting».
X1
Psw
Ch1/2
Looper
Solo
Midi
On
MIDI OUT
MIDI IN
EXP
DC 9V 2,1mm
Xnob Depth Speed Filter
Depth/Key Speed / Scale Xnob Ynob
Depth Mod Speed Mod Mod Rate Mod source
Xnob Ynob FxMix Contour
Dly Mix Dly Time A Dly Time B Fdbk A Fdbk BMix
Pitch Mix Pitch A Pitch B Delay A Delay BMix
Type Depth Speed Shape XnobIntensity
Decay Size Delay Low HighMix
+8
CH1
+8
CH2
+4
CH1
+4
CH2
+2
CH1
+2
CH2
+1
CH1
+1
CH2
CH1
BLUE LED
YELLOW LED
CH2
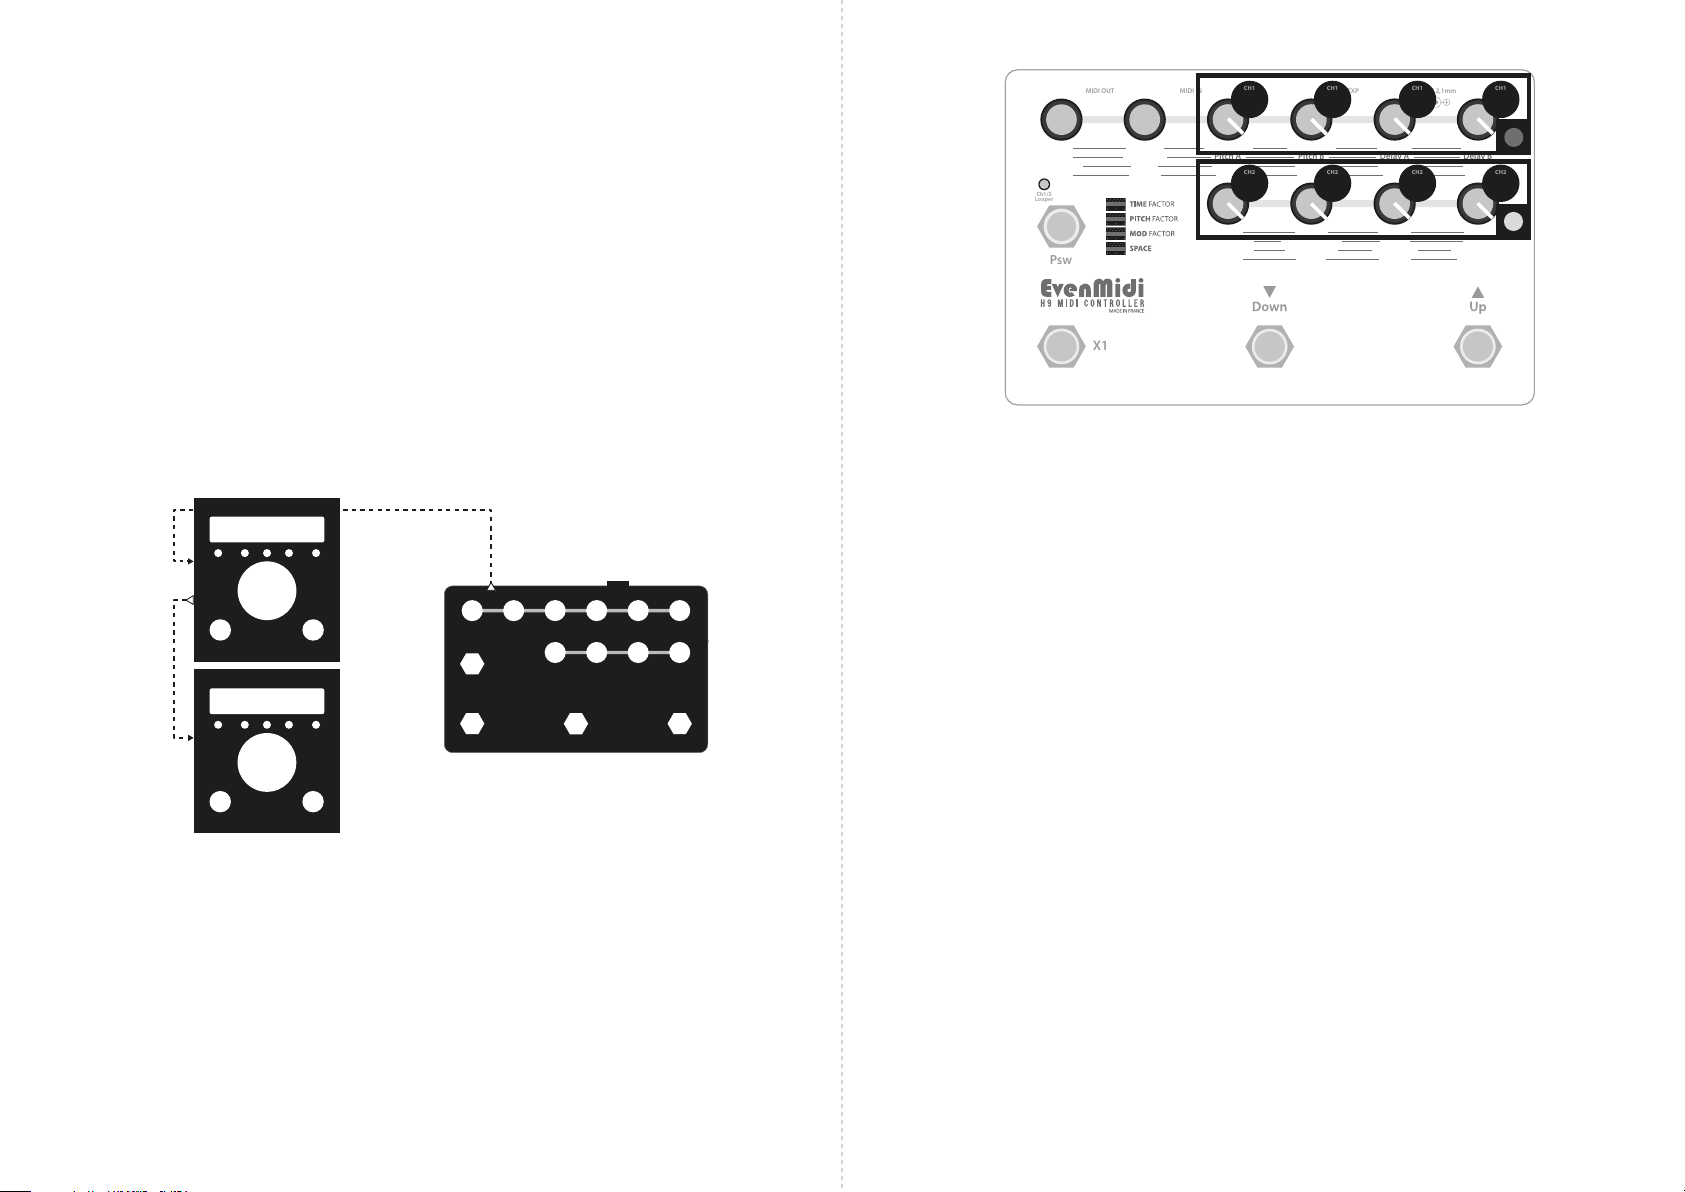
1 - SETTINGS
You have to set your Eventide® H9 to work properly
with the controller. Use the H9 control software is
easy to set parameters. You can also press Hotknob
and Tap simultaneaously during 3s. to access
settings.
1) Set your 1st H9 on channel receive 1 and
Midi Output THRU. Optional : Set your 2nd H9 on
channel receive 2. (MIDI channel can be changed,
check MIDI settings MODE)
2) Set control changes for your 2 H9 :
1A - STANDARD CONTROLS
[PSW] -> C0
[FS1: LEFT FOOTSWITCH] -> C1
[PROGRAM-] -> C2
[PROGRAM+] -> C3
[KB0-KB9] -> C22-C31
[EXP] -> BND (PitchBend)
1B - LOOPER CONTROLS
[EMPTY] ->C4
[REC] -> C5
[PLAY] -> C6
[STOP] -> C7
[NXT] or [LST] -> C8 (exit looper by loading previous
or next preset)
Use MIDI cable (5DIN) to connect the MIDI controller
to the Eventide® H9(s) :
MIDI OUT
MIDI INMIDI THRUMIDI IN
1
2
3 - EXPRESSION PEDAL CALIBRATION
Connect an expression pedal with a stereo cable
6.35mm. Potentiometer value: 10kOhms recom-
mended (75kOhms max).
Press «Down» footswitch for 5 seconds -> LEDs will
light up as scrolling to indicate access to the
Calibration Mode. Here's how it works:
- The blue LED ashes according to the pedal
position. Vary the position on the minimum or
maximum.
Press the "Down" button again to save this value:
green LED ashes during recording.
- Then yellow LED will ash in the same way. This
time, set the pedal to the opposite extreme position
(Min if Max or Max if Min depending on what you
did previously).
- Press "Down" to save your settings and return to
the previous mode.
If you want to exit calibration mode without saving,
press any other footswitch.
Note: To prevent incorrect calibration, if you do not
move the pedal (or too little) between the 2 values,
the factory settings are recalled.
4 - MODE SOLO/DUAL
You can control 2 H9 at the same time or switch
between the 2 units.
Press the «PSW» footswitch for 2 seconds to switch
from Dual to solo and vice-verca.
If you’re on Dual mode, there is no particular LED. If
you’re on SOLO mode, the yellow LED turns ON. The
«PSW» footswitch switch the H9 units. If the Green
Led is o, you control the 1st H9, if the green LED is
ON, you control the 2nd H9. So, «PSW» footswitch
doesn’t send Midi message in Solo Mode.
5 - MODE LOOPER
You can set your Eventide H9 to load Looper
Preset on Program Change 127. Press
Hotknob+Right Footswitch :
MIDI>RCV.MAP>127.YourLooperPresetNumber
You can also access to looper like a simple preset.
You have to put the EvenMIDI H9 controller in
LOOPER MODE.
Press the «X1» footswitch for 2 seconds to switch
from Standard to Looper Mode and the «UP»
footswitch for 2 seconds to Exit Looper Mode (by
loading previous or next preset).
The Green LED is ON and Yellow LED is OFF in
Looper Mode .
Check 1-SETTINGS to set the MIDI CC on the
Eventide ® H9
You can not access Midi channel settings or
expression pedal calibration in Looper mode.
TRICK: If you are in SOLO Mode and entering in
Looper MODE, the «PSW» footswitch isn’t active
for CC Midi message like in DUAL MODE. Press
«PSW» footswitch to switch to SOLO Mode to
control your Second Eventide H9 while your
Looper is Playing. Press again the «PSW» and
you’re back to Looper :). Denitive exit by
Holding down «UP» footswitch.
6 - LIVE MODE
Live mode allows you to directly load 6 presets in
DUAL mode or 3 presets by Eventide® in SOLO
mode. To enter or exit Live Mode, enter in the Midi
settings (Press the footswitch "UP" for 5 seconds)
then press the footswich X1 for 2 seconds. The
green LED and the yellow LED will blink. The PSW
footswitch allows access to the 2nd bank in DUAL
mode or to switch to the other Eventide® in SOLO
mode. The 3 footswitches send Program Change:
PC0 PC1 PC2 (PC3 PC4 PC5 in DUAL mode if the
PSW footswitch is activated). By re-pressing on the
same footswitch the eect is bypassed (PC125).
The LEDs have a special behavior: the 3 LEDs on the
right (red, blue and yellow) respectively correspond
to the activation of each preset. When the preset is
bypassed the LEDs are o.
All EvenMidi functions are retained in Live Mode
(access to Looper mode, access to midi settings
etc.). When you exit Looper mode, the Eventide is
bypassed (PC125).
You can access your wanted presets by setting
the Eventide®. Hold Down Hotknob + right
Footswitch: MIDI> RCV.MAP> [0 or 1 or 2 or 3 or 4
or 5] .PresetNumberWanted. Do not change
PC125, that's the Eventide® default bypass.
7 - RESETTING
Enter in MIDI Settings Mode (Hold «UP» 5 seconds)
and press the "PSW" footswitch for 5 seconds. The
red LED will blink. MIDI channels, calibration and
Modes will be reset by default.
8 - WARRANTY
One year warranty for a normal usage. Don’t put it
on the water and do not apply an excessive voltage
(max 12V). If the warranty time is over we can x it
at your cost.
9 - MAINTENANCE
You normally don’t have any maintenance. Clean
the controller with a damp cloth.
10 - CONCLUSION
Well it’s time to play! Hope it will t perfectly on
your pedal board. Send us a cool picture with you
and the controller on your rig or tag us on
Facebook/Instagram/Twitter, we will appreciate ;).
Have fun and all the best!
EvenMidi team
Eventide® is a trademark by Eventide inc. EvenMidi
has no connection or aliation with Eventide® inc.
The TimeFactor PitchFactor ModFactor et Space
products are eects created by Eventide®.
C0
C4
C1
C5 C2
C6
BND
C22 C23 C24 C25 C26 C27
C28 C29 C30 C31
C3
C7
C8

Notice - Français
Merci d’avoir acheté notre contrôleur Midi. Nous travaillons sur sa conception depuis la sortie de l’Eventide®
H9 : Améliorations, changement de technologie, création de demandes spéciques… Au début c’était un
projet“Do it yourself” et çà présent c’est un outil professionnel.
Caractéristiques
MADE IN FRANCE
X1
Psw
Ch1/2
Looper
Solo
Midi
On
MIDI OUT
MIDI IN
EXP
DC 9V 2,1mm
Xnob Depth Speed Filter
Depth/Key Speed / Scale Xnob Ynob
Depth Mod Speed Mod Mod Rate Mod source
Xnob Ynob FxMix Contour
Dly Mix Dly Time A Dly Time B Fdbk A Fdbk BMix
Pitch Mix Pitch A Pitch B Delay A Delay BMix
Type Depth Speed Shape XnobIntensity
Decay Size Delay Low HighMix
Connecté un transformateur
9V DC 200mA 2,1mm - centre négatif
TRS - Pédale d’expression
De 10k à 50k Ohms
MIDI IN
(routé à THRU)
MIDI OUT/THRU
à l’Eventide® H9 MIDI IN
www.evenmidi.com
2 - MODE RÉGLAGES MIDI
L’EvenMidi H9 peut contrôler 2 Unités sur diérents
canaux. Vous pouvez régler le canal MIDI sur ces 2
voix.
Appuyez sur le footswitch «UP» pendant 5 secondes
-> Les LED vont s’allumer pendant 3 secondes pour
indiquer l’accés au Mode réglages Midi. Voici
comment ça marche :
Le clignotement des LED correspond au numéro du
canal Midi. Si il est à 3, la LED clignotera 3 fois.
Si le bouton est à gauche, on ajoute rien (+0), sinon
on ajoute la valeure du bouton
Si tous les boutons sont à 0, on est sur le canal
Midi 1.
Ex: si vous voulez que le canal MIDI de votre 1er
Eventide H9 soit 3, ajoutez (+2) sur la première
rangée de boutons.
Pour sauvegarder, appuyer sur le footswitch «UP»
pendant 2 secondes -> Toutes les Leds vont
clignoter 10 fois.
Si vous voulez sortir du Mode sans sauvegarder,
appuyer sur n’importe quel autre footswitch (sauf
«PSW», voir 6-Remise à zéro).
3 - CALIBRAGE PÉDALE D’EXPRESSION
Connecter une pédale d’expression avec un câble
stéréo Jack 6,35mm. Valeure du potentiomètre :
10kOhms conseillé (75kOhms max).
Appuyez sur le footswitch «Down» pendant 10
secondes -> Les LED vont s’allumer en délement
pour indiquer l’accés au Mode Calibrage. Voici
comment ça marche :
- La Led bleue clignote en fonction de la position de
la pédale. Faites varier la position sur votre
minimum ou maximum de course.
Appuyer à nouveau sur le bouton «Down» pour
enregistrer cette valeur : La Led verte clignotte
pendant l’enregistrement.
- La Led jaune va à son tour clignoter de la même
façon. Cette fois positionner la pédale sur la position
extrême contraire (Min si Max ou Max si Min selon
ce que vous avez fait précédemment).
- Appuyer sur «Down» pour sauvegarder vos
paramètres et retourner au mode précédent
Si vous voulez sortir du mode calibrage sans
sauvegarder, appuyer sur n’importe quel autre
footswitch.
Note : An de prévenir une mauvaise calibration, si
vous ne bougez pas la pédale (ou trop peu) entre les
2 valeurs, les réglages d’usine sont rappelés.
4 - MODE SOLO/DUAL
Vous pouvez contrôler 2 Eventide H9 en même
temps ou switcher entre les 2 unités.
Appuyer sur le footswitch «PSW» pendant 2
secondes pour passer du Mode Dual au mode Solo
et vice-verca.
Si vous êtes en mode Dual, il n’y a aucune Led
particulière allumée. Si vous êtes en Mode Solo la
Led jaune est allumée. Le footswitch PSW permet
alors de switcher d’un H9 à l’autre. Si la Led Verte est
éteinte, vous contrôlez le 1er H9, si la Led verte est
allumée, vous contrôlez le 2e H9. Le footswitch
«PSW» n’envoie alors plus de message Midi en Mode
Solo.
5 - MODE LOOPER
Vous pouvez paramétrer votre Eventide H9 an
qu’il charge votre preset Looper sur le «Program
Change» 127. Laissez appuyer Hotknob + le
Footswitch de droite:
MIDI>RCV.MAP>127.LeNumérodePresetdeVo-
treLooper
Vous pouvez aussi accéder au looper de la même
façon qu’on charge un Preset. Vous devez passer
l’EvenMidi en Mode Looper.
Appuyez sur le footswitch «X1» pendant 2 seconds
pour passer du mode Standard au mode Looper et
sur le footswitch «UP» pour sortir du Mode Looper
(en chargeant le preset précédant ou suivant).
WARNING
TO REDUCE THE RISK OF FIRE OR ELECTRIC
SHOCK DO NOT EXPOSE THIS EQUIPMENT TO
RAIN OR MOISTURE
AVIS: RISQUE DE CHOC ELECTRIQUE-NE PAS
OUVRIR.
CAUTION
RISK OF ELECTFIC SHOCK
DO NOT OPEN
AVERTISSEMENTS
Utilisez uniquement un adaptateur secteur de 9V DC
200mA 2,1mm centre négatif. Évitez de verser des
liquides sur ou dans l’appareil. Ne pas exposer à une
température ou une humidité excessive. Ne pas ouvrir -
l’appareil ne contient aucune pièce pouvant être réparée
par l’utilisateur.
Suite aux tests eectués, cet appareil a été reconnu conforme aux limites applicables aux
appareils numériques de classe B prescrites dans l'alinéa 15 du règlement de la FCC. Son
utilisation est soumise aux deux conditions suivantes : (1) cet appareil ne doit pas causer
d'interférences nuisibles et (2) cet appareil doit accepter toute autre interférence reçue, y
compris les interférences pouvant entraîner un fonctionnement non désiré.
La Led verte est allumée quand on est en Mode
Looper et la jaune est éteinte.
Lisez le 1-Réglages pour régler les changements de
contrôle MIDI dans l’Eventide ® H9.
On ne peut pas accéder aux réglages des canaux
Midi ou de la calibration de la pédale en Mode
Looper.
Astuce : Si vous êtes en MODE SOLO et que vous
entrez en MODE LOOPER, le footswitch «PSW»
n'envoie pas de CC MIDI comme en MODE DUAL.
Appuyer sur «PSW» pour revenir au mode SOLO
pour contrôler votre deuxième Eventide H9
pendant que votre Looper est en cours de
lecture. Appuyez à nouveau sur «PSW» pour
revenir au LOOPER. Sortie dénitivement du
looper en laissant appuyé 2 secondes le
footswitch «UP».
6 - MODE LIVE
Le Mode Live vous permet de charger directement 6
presets en mode DUAL ou 3 presets par Eventide®
en mode SOLO. Pour entrer ou sortir du Mode Live,
entrez dans les réglages Midi (Appuyez sur le
footswitch «UP» pendant 5 secondes) puis appuyez
sur le footswich X1 pendant 2 secondes. La Led
verte et la Led jaune vont clignoter. Le footswitch
PSW permet d’accéder à la 2e bank en mode DUAL
ou bien de passer à l’autre Eventide® en mode
SOLO. Les 3 footswitchs envoient des Program
Change : PC0 PC1 PC2 (PC3 PC4 PC5 en mode DUAL
si le footswitch PSW est activé). En réappuyant sur
un même footswitch l’eet est bypassé (PC125).
Les Leds ont un comportement particulier : les 3 Led
de droite (rouge, bleue et jaune) correspondent
respectivement à l’activation de chaque preset.
Quand le preset est bypassé les Leds sont éteintes.
Toutes les fonctions de l’EvenMidi sont conservées
en Mode Live (accès au mode Looper, accès aux
réglages Midi etc...). Lorsque vous quittez le mode
Looper, l’Eventide® est bypassé (PC125).
Vous pouvez accéder aux presets que vous
voulez en congurant l’Eventide®. Laissez
appuyer Hotknob + le Footswitch de droite:
MIDI>RCV.MAP>[0 ou 1 ou 2 ou 3 ou 4 ou
5].LeNuméroduPresetdésiré. Ne modiez pas
PC125 qui par défaut bypass l’Eventide®.
7 - REMISE À ZÉRO
Passez en Mode Réglages MIDI (laissez appuyer
«UP» pendant 5 secondes) et appuyez sur le
footswitch «PSW» pendant 5 secondes. La LED
rouge va clignotter. Les canaux MIDI, la calibration
et les Modes seront remis par défaut.
8- GARANTIE
L’EvenMidi est garantie un an en usage normal. Ne
le mettez pas dans l’eau et ne l’alimentez pas avec
une tension supérieure à 12 V. Une fois la période de
garantie terminée, nous pourrons réparer le
contrôleur à vos frais.
9- MAINTENANCE
Vous n’avez aucune maintenance particulière à faire.
Nettoyez l’appareil avec un chion humide.
10 - CONCLUSION
À présent il est temps de jouer. On espère que le
contrôleur s'intégrera parfaitement à votre
pedalboard. Envoyez-nous une belle photo de vous
et votre EvenMidi avec votre matériel de scène ou
taggez nous sur Facebook/Instagram/Twitter, ça
nous fera vraiment plaisir ;).
Amusez-vous bien et on vous souhaite le meilleur !
L’équipe EvenMidi
Eventide ® est une marque déposée par Eventide
inc. EvenMidi n’a aucun lien ou aliation avec la
marque Eventide ®. Les produits TimeFactor
PitchFactor ModFactor et Space sont des eets
créés par Eventide ®.
2 - MODE RÉGLAGES MIDI
L’EvenMidi H9 peut contrôler 2 Unités sur diérents
canaux. Vous pouvez régler le canal MIDI sur ces 2
voix.
Appuyez sur le footswitch «UP» pendant 5 secondes
-> Les LED vont s’allumer pendant 3 secondes pour
indiquer l’accés au Mode réglages Midi. Voici
comment ça marche :
Le clignotement des LED correspond au numéro du
canal Midi. Si il est à 3, la LED clignotera 3 fois.
Si le bouton est à gauche, on ajoute rien (+0), sinon
on ajoute la valeure du bouton
Si tous les boutons sont à 0, on est sur le canal
Midi 1.
Ex: si vous voulez que le canal MIDI de votre 1er
Eventide H9 soit 3, ajoutez (+2) sur la première
rangée de boutons.
Pour sauvegarder, appuyer sur le footswitch «UP»
X1
Psw
Ch1/2
Looper
Solo
Midi
On
MIDI OUT
MIDI IN
EXP
DC 9V 2,1mm
Xnob Depth Speed Filter
Depth/Key Speed / Scale Xnob Ynob
Depth Mod Speed Mod Mod Rate Mod source
Xnob Ynob FxMix Contour
Dly Mix Dly Time A Dly Time B Fdbk A Fdbk BMix
Pitch Mix Pitch A Pitch B Delay A Delay BMix
Type Depth Speed Shape XnobIntensity
Decay Size Delay Low HighMix
+8
CH1
+8
CH2
+4
CH1
+4
CH2
+2
CH1
+2
CH2
+1
CH1
+1
CH2
CH1
BLUE LED
YELLOW LED
CH2
1 - RÉGLAGES
Vous devez régler votre Eventide® H9 pour qu’il
marche correctement avec le contrôleur. L’utilisation
du logiciel H9 Control est facile pour faire les
réglages. Vous pouvez aussi appuyer sur Hotknob et
Tap simultanément pendant 3s. pour accéder aux
réglages.
1) Régler le canal Midi de réception de votre 1er H9
sur 1 et la sortie MIDI sur THRU. Optionnel : Régler
votre 2e H9 sur le canal 2 (Le canal MIDI de
l’EvenMidi peut être modié, allez à la rubrique 2 -
MODE RÉGLAGES MIDI)
2) Régler les CC pour vos H9 :
1A - CONTRÔLES STANDARD
[PSW] -> C0
[FS1: LEFT FOOTSWITCH] -> C1
[PROGRAM-] -> C2
[PROGRAM+] -> C3
[KB0-KB9] -> C22-C31
[EXP] -> BND (PitchBend)
1B - CONTRÔLES LOOPER
[EMPTY] ->C4
[REC] -> C5
[PLAY] -> C6
[STOP] -> C7
[NXT] or [LST] -> C8 (sortie du looper en chargeant
le preset précédant ou suivant)
Utilisez un câble MIDI (5DIN) pour connecter le
contrôleur MIDI à l’Eventide® H9 :
pendant 2 secondes -> Toutes les Leds vont
clignoter 10 fois.
Si vous voulez sortir du Mode sans sauvegarder,
appuyer sur n’importe quel autre footswitch (sauf
«PSW», voir 6-Remise à zéro).
3 - CALIBRAGE PÉDALE D’EXPRESSION
Connecter une pédale d’expression avec un câble
stéréo Jack 6,35mm. Valeure du potentiomètre :
10kOhms conseillé (75kOhms max).
Appuyez sur le footswitch «Down» pendant 10
secondes -> Les LED vont s’allumer en délement
pour indiquer l’accés au Mode Calibrage. Voici
comment ça marche :
- La Led bleue clignote en fonction de la position de
la pédale. Faites varier la position sur votre
minimum ou maximum de course.
Appuyer à nouveau sur le bouton «Down» pour
enregistrer cette valeur : La Led verte clignotte
pendant l’enregistrement.
- La Led jaune va à son tour clignoter de la même
façon. Cette fois positionner la pédale sur la position
extrême contraire (Min si Max ou Max si Min selon
ce que vous avez fait précédemment).
- Appuyer sur «Down» pour sauvegarder vos
paramètres et retourner au mode précédent
Si vous voulez sortir du mode calibrage sans
sauvegarder, appuyer sur n’importe quel autre
footswitch.
Note : An de prévenir une mauvaise calibration, si
vous ne bougez pas la pédale (ou trop peu) entre les
2 valeurs, les réglages d’usine sont rappelés.
4 - MODE SOLO/DUAL
Vous pouvez contrôler 2 Eventide H9 en même
temps ou switcher entre les 2 unités.
Appuyer sur le footswitch «PSW» pendant 2
secondes pour passer du Mode Dual au mode Solo
et vice-verca.
Si vous êtes en mode Dual, il n’y a aucune Led
particulière allumée. Si vous êtes en Mode Solo la
Led jaune est allumée. Le footswitch PSW permet
alors de switcher d’un H9 à l’autre. Si la Led Verte est
éteinte, vous contrôlez le 1er H9, si la Led verte est
allumée, vous contrôlez le 2e H9. Le footswitch
«PSW» n’envoie alors plus de message Midi en Mode
Solo.
5 - MODE LOOPER
Vous pouvez paramétrer votre Eventide H9 an
qu’il charge votre preset Looper sur le «Program
Change» 127. Laissez appuyer Hotknob + le
Footswitch de droite:
MIDI>RCV.MAP>127.LeNumérodePresetdeVo-
treLooper
Vous pouvez aussi accéder au looper de la même
façon qu’on charge un Preset. Vous devez passer
l’EvenMidi en Mode Looper.
Appuyez sur le footswitch «X1» pendant 2 seconds
pour passer du mode Standard au mode Looper et
sur le footswitch «UP» pour sortir du Mode Looper
(en chargeant le preset précédant ou suivant).
MIDI OUT
MIDI INMIDI THRUMIDI IN
1
2
C0
C4
C1
C5 C2
C6
BND
C22 C23 C24 C25 C26 C27
C28 C29 C30 C31
C3
C7
C8
La Led verte est allumée quand on est en Mode
Looper et la jaune est éteinte.
Lisez le 1-Réglages pour régler les changements de
contrôle MIDI dans l’Eventide ® H9.
On ne peut pas accéder aux réglages des canaux
Midi ou de la calibration de la pédale en Mode
Looper.
Astuce : Si vous êtes en MODE SOLO et que vous
entrez en MODE LOOPER, le footswitch «PSW»
n'envoie pas de CC MIDI comme en MODE DUAL.
Appuyer sur «PSW» pour revenir au mode SOLO
pour contrôler votre deuxième Eventide H9
pendant que votre Looper est en cours de
lecture. Appuyez à nouveau sur «PSW» pour
revenir au LOOPER. Sortie dénitivement du
looper en laissant appuyé 2 secondes le
footswitch «UP».
6 - MODE LIVE
Le Mode Live vous permet de charger directement 6
presets en mode DUAL ou 3 presets par Eventide®
en mode SOLO. Pour entrer ou sortir du Mode Live,
entrez dans les réglages Midi (Appuyez sur le
footswitch «UP» pendant 5 secondes) puis appuyez
sur le footswich X1 pendant 2 secondes. La Led
verte et la Led jaune vont clignoter. Le footswitch
PSW permet d’accéder à la 2e bank en mode DUAL
ou bien de passer à l’autre Eventide® en mode
SOLO. Les 3 footswitchs envoient des Program
Change : PC0 PC1 PC2 (PC3 PC4 PC5 en mode DUAL
si le footswitch PSW est activé). En réappuyant sur
un même footswitch l’eet est bypassé (PC125).
Les Leds ont un comportement particulier : les 3 Led
de droite (rouge, bleue et jaune) correspondent
respectivement à l’activation de chaque preset.
Quand le preset est bypassé les Leds sont éteintes.
Toutes les fonctions de l’EvenMidi sont conservées
en Mode Live (accès au mode Looper, accès aux
réglages Midi etc...). Lorsque vous quittez le mode
Looper, l’Eventide® est bypassé (PC125).
Vous pouvez accéder aux presets que vous
voulez en congurant l’Eventide®. Laissez
appuyer Hotknob + le Footswitch de droite:
MIDI>RCV.MAP>[0 ou 1 ou 2 ou 3 ou 4 ou
5].LeNuméroduPresetdésiré. Ne modiez pas
PC125 qui par défaut bypass l’Eventide®.
7 - REMISE À ZÉRO
Passez en Mode Réglages MIDI (laissez appuyer
«UP» pendant 5 secondes) et appuyez sur le
footswitch «PSW» pendant 5 secondes. La LED
rouge va clignotter. Les canaux MIDI, la calibration
et les Modes seront remis par défaut.
8- GARANTIE
L’EvenMidi est garantie un an en usage normal. Ne
le mettez pas dans l’eau et ne l’alimentez pas avec
une tension supérieure à 12 V. Une fois la période de
garantie terminée, nous pourrons réparer le
contrôleur à vos frais.
9- MAINTENANCE
Vous n’avez aucune maintenance particulière à faire.
Nettoyez l’appareil avec un chion humide.
10 - CONCLUSION
À présent il est temps de jouer. On espère que le
contrôleur s'intégrera parfaitement à votre
pedalboard. Envoyez-nous une belle photo de vous
et votre EvenMidi avec votre matériel de scène ou
taggez nous sur Facebook/Instagram/Twitter, ça
nous fera vraiment plaisir ;).
Amusez-vous bien et on vous souhaite le meilleur !
L’équipe EvenMidi
Eventide ® est une marque déposée par Eventide
inc. EvenMidi n’a aucun lien ou aliation avec la
marque Eventide ®. Les produits TimeFactor
PitchFactor ModFactor et Space sont des eets
créés par Eventide ®.

QUICK SETTINGS - ENGLISH
MADE IN FRANCE
www.evenmidi.com
EVENTIDE®H9
MIDI CHANNEL RECEIVE
►Hold Hotknob+Tap>MIDI>RCV CH
Channel 1(factory default EvenMidi)
(if 2nd H9: Channel 2(factory default EvenMidi))
Don’t put your Midi channel in OMNI.
MIDI THRU (if you use 2 H9)
►Hold Hotknob+Tap>MIDI>OUTPUT>THRU
MIDI CC (same for your 2 H9's)
►Hold Hotknob+Tap>MIDI>OUTPUT>RCV.CTL
STANDARD CONTROLS
[PSW] -> C0
[FS1: LEFT FOOTSWITCH] -> C1
[PROGRAM-] -> C2
[PROGRAM+] -> C3
[KB0-KB9] -> C22-C31
[EXP] -> BND (PitchBend)
LOOPER CONTROLS
[EMPTY] ->C4
[REC] -> C5
[PLAY] -> C6
[STOP] -> C7
[NXT] -> C8
MIDI PC (same for your 2 H9's) Program MAP
►Hold Hotknob+Tap>MIDI>OUTPUT>RCV.MAP
PC127 -> YourLooperPresetNumber
PC125 -> Bypass (Do not change)
PC0 -> YourPresetNumberWanted(not Looper)
PC1 -> YourPresetNumberWanted(not Looper)
PC2 -> YourPresetNumberWanted(not Looper)
PC3 -> YourPresetNumberWanted(not Looper)
PC4 -> YourPresetNumberWanted(not Looper)
PC5 -> YourPresetNumberWanted(not Looper)
EVENMIDI H9 Midi Controller
MIDI CHANNEL SETTINGS
Hold Down UP for 5 seconds and set the number of
ashes of blue Led with pots to desirated midi
channel number for 1st Eventide® and Yellow Led
for 2nd Eventide®. Hold Down UP for 2 seconds to
save or Press DOWN to exit without save. Refer to
the detailed notice to understand pots behavior.
STANDARD MODE(CC) / LIVE MODE(PC)
Factory default is Standard Mode. Hold Down UP for
5 seconds. Hold Down X1 for 2 seconds. Same thing
to switch between Live and Standard Mode.
DUAL/SOLO MODE
Hold Down PSW for 2 seconds
SWITCH MIDI CHANNEL IN SOLO MODE
Press PSW
ACCESS LOOPER MODE
Hold Down X1 for 2 seconds
EXIT LOOPER MODE
Hold Down UP for 2 seconds
HARD RESET SETTINGS
Hold Down UP for 5 seconds.
Hold Down PSW for 5 seconds.
EXPRESSION PEDAL CALIBRATION
Hold down DOWN for 5 seconds. Set the pedal to
the extreme position wanted. Press DOWN to
record. Set the pedal to the extreme opposite
position wanted. Press DOWN to record. Too short
interval will not be saved.

RÉGLAGES RAPIDES - FRANÇAIS
MADE IN FRANCE
www.evenmidi.com
EVENTIDE®H9
CANAL MIDI DE RÉCEPTION
►Hold Hotknob+Tap>MIDI>RCV CH
Canal 1(réglage de base pour l’EvenMidi)
(Si 2e H9: Canal 2(réglage de base pour l’EvenMidi))
Ne pas régler le canal Midi sur OMNI.
MIDI THRU (si vous utilisez un 2e 2 H9)
►Hold Hotknob+Tap>MIDI>OUTPUT>THRU
MIDI CC (similaires pour les 2 H9)
►Hold Hotknob+Tap>MIDI>OUTPUT>RCV.CTL
CONTRÔLES STANDARD
[PSW] -> C0
[FS1: LEFT FOOTSWITCH] -> C1
[PROGRAM-] -> C2
[PROGRAM+] -> C3
[KB0-KB9] -> C22-C31
[EXP] -> BND (PitchBend)
CONTRÔLES LOOPER
[EMPTY] ->C4
[REC] -> C5
[PLAY] -> C6
[STOP] -> C7
[NXT] -> C8
MIDI PC (similaires pour vos 2 H9) Program MAP
►Hold Hotknob+Tap>MIDI>OUTPUT>RCV.MAP
PC127 -> LeNuméroDePresetDuLooper
PC125 -> Bypass (Ne pas changer)
PC0 -> LeNuméroDePresetVoulu(Pas le Looper)
PC1 -> LeNuméroDePresetVoulu(Pas le Looper)
PC2 -> LeNuméroDePresetVoulu(Pas le Looper)
PC3 -> LeNuméroDePresetVoulu(Pas le Looper)
PC4 -> LeNuméroDePresetVoulu(Pas le Looper)
PC5 -> LeNuméroDePresetVoulu(Pas le Looper)
EVENMIDI H9 Contrôleur Midi
RÉGLAGE DES CANAUX MIDI
Appuyer sur UP pendant 5 sec. puis régler le
nombre de clignotement de la Led bleue avec les
potentiomètres = canal Midi du 1er Eventide®. Led
jaune = canal Midi du 2e Eventide®. Appuyer sur UP
pendant 2 secondes pour sauver ou appuyer sur
DOWN pour quitter sans sauver. Référez-vous à la
notice complète pour comprendre le comporte-
ment des potentiomètres.
MODE STANDARD (CC) / MODE LIVE (PC)
Le réglage par défaut est le Mode Standard.
Appuyer sur UP pendant 5 sec. Appuyer sur X1
pendant 2 sec. Même chose pour passer sur mode
Live au mode Standard.
MODE DUAL/SOLO
Appuyer sur PSW pendant 2 sec.
BASCULER DE CANAL MIDIEN MODE SOLO
Appuyer sur PSW
ACCÉDER AU MODE LOOPER
Appuyer sur X1 pendant 2 sec.
SORTIR DU MODE LOOPER
Appuyer sur UP pendant 2 sec.
REMISE À ZÉRO
Appuyer sur UP pendant 5 sec.
Appuyer sur PSW pendant 5 sec.
CALIBRAGE DE LA PÉDALE D’EXPRESSION
Appuyer sur DOWN pendant 5 sec. Régler la pédale
à la position extrême voulue. Appuyer sur DOWN
pour sauver. Régler la pédale sur la position extrême
contraire voulue. Appuyer sur DOWN pour sauver. Si
la course est trop petite, le calibrage ne sera pas
sauvé.
This manual suits for next models
1
Table of contents
Languages:
Other EvenMidi Recording Equipment manuals


