EVERSPRING HSE03 User manual

e anual - Manuale utente - ua e uua

1
HSE03 Voice Siren
Installation Instructions
General Introduction
The HSE03 Voice Siren is a two-way wireless alarm device which functions
not only as a siren, but also a strobe light with voice indicator functions. Its
great compatibility with our U-Net family security products makes it suitable for
smart home cloud based platforms such as Homesys.
HSE03 includes the following functions:
* Tamperproof protection
* Green and red flashing strobe light
* Visual and audible alarm indications
* 6 indicating beep sounds for identification
* EEPROM for non-volatile memory facility
* LED for identification, visual command confirmation and battery status
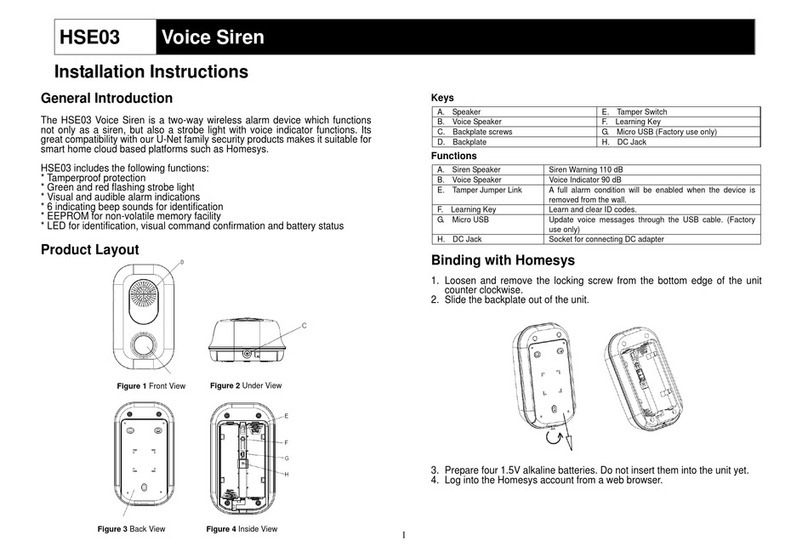
Product Layout
Keys
A. Speaker E. Tamper Switch
B. Voice Speaker F. Learning Key
C. Backplate screws G. Micro USB (Factory use only)
D. Backplate H. DC Jack
Functions
A. Siren Speaker Siren Warning 110 dB
B. Voice Speaker Voice Indicator 90 dB
E. Tamper Jumper Link A full alarm condition will be enabled when the device is
removed from the wall.
F. Learning Key Learn and clear ID codes.
G. Micro USB Update voice messages through the USB cable. (Factory
use only)
H. DC Jack Socket for connecting DC adapter
Binding with Homesys
1. Loosen and remove the locking screw from the bottom edge of the unit
counter clockwise.
2. Slide the backplate out of the unit.
3. Prepare four 1.5V alkaline batteries. Do not insert them into the unit yet.
4. Log into the Homesys account from a web browser.
Figure 1 Front View
Figure 4 Inside View
Figure 2 Under View
Figure 3 Back View

2
5. Select “System”, then “Add a Device”,
6. Select “Voice Siren”.
7. The following screen will appear. This means the gateway is entering
binding mode.
8. Insert the batteries with correct polarity at this point.
9. The screen below will appear in 10 seconds if the process is successful.
10. Time-out will occur if the binding process was unsuccessful. Please check
“Manual Binding”.

3
Manual Binding
1. Repeat steps 6 to 8 of the Binding with Homesys section.
2. Press and hold the learning key “F” (as shown in Figure 4) for more than 3
seconds until the green strobe LED turns off, then quickly release the
learning key. The Green LED will flash repeatedly. This implies HSE03
has now entered the binding mode and is waiting to receive binding
signals from the gateway.
3. Within 5 seconds the green LED will stop flashing indicating the learning
procedure is completed. The screen below will appear indicating the
process is successful.
Testing
HSE03 can be tested with Homesys smartphone App by changing the security
mode between ARM and DISARM on the App and the listening for voice
indication from HSE03.
If there is no response from HSE03 please check the “Troubleshooting”.
Mounting the HSE03
The HSE03 should be mounted inside the building in a position that is clearly
visible and at a height which is relatively inaccessible to an intruder. It is also
suggested not to mount the unit in the basement to avoid poor transmission.
1. Use the backplate as a template to mark and drill the position of 3 mounting
holes on the wall. Fix the backplate to the wall using the plastic wall plugs and
fixing screws provided.
2. Slide the unit down to the backplate and fasten the locking screw clockwise.

4
Tamper Protection
Tamper switch is set inside the housing of HSE03 to prevent it from being
forcibly removed from the wall. Removing the unit from backplate will release
the tamper switch and generate a full alarm condition.
Install Power Adapter (Optional)
The power adapter is an optional accessory. An optional 600mA @ 6V DC
power adapter can be purchased if needed. A cable track is set inside the unit
for you to secure the power adapter. Please install the power adapter as
follows:
Maintenance
* Do not immerse this unit in water or any other liquid.
* Four 1.5V Alkaline LR14 batteries are supplied in the HSE03. When battery
is low, a red LED will flash every 30 seconds. When this situation occurs,
replace the batteries as soon as possible.
Troubleshooting
The troubleshooting table lists some possible causes and solutions. Please
contact your original retailer or nearest service center if the below solutions
cannot solve your problem.
Symptom Possible Cause Recommendation
HSE03 LED indicator
stops displaying
No battery is inserted or
battery is flat
Check if 4 batteries are inserted
properly
HSE03 failure Send the unit to the service
center and do not open it
The display function of
HSE03 LED indicator
is operating properly,
but the siren doesn’t
respond to alerts and
system changes.
1.The binding process
has failed
2.The siren cannot
communicate with the
Homesys gateway.
1.Please follow the instructions
for Manual binding.
2.Place the siren closer to the
gateway.
Reset to factory default:
To reset HSE03 back to factory default state:
1. Insert the batteries into the unit
2. Press and hold the learning key “F” (as shown in Figure 5) for more than 3
seconds until the green strobe LED turns off, then release the learning key.
The Green LED will flash repeatedly. This implies HSE03 has now entered
binding mode and is waiting to receive binding signals from the gateway.
3. Press and hold the learning key for more than 6 seconds and release
within 30 seconds, during which it will sound every 0.5 seconds with green
LED turned on. The learning procedure is completed when a longer beep
tone has sounded and the LED will flash orange every 2 seconds.
Specifications
** Specifications are subject to change and improvement without notice.
www.everspring.com
3F., No. 50, Sec 1, Zhonghua Rd., Tucheng Dist.,
New Taipei City 23666, R.O.C
A501112386R01
Power adaptor (option) 600 mA@6V DC
Battery Type 1.5V LR14 x 4
Battery Life About one year in standby mode at 25°C
Operating Frequency 868MHz (EU)/ 923MHz (America)
1.
Connect the plug of power
adapter to the DC jack
inside the unit.
2.
Route the cable along the
cable track.

5
HSE03 Sirena vocale
Guida all’installazione
Introduzione
HSE03 è una sirena vocale con segnale wireless bidirezionale che oltre ad
avere la funzione di sirena è anche indicatore luminoso e riproduce messaggi
vocali.Il dispositivo funziona nel sistema smart home basato su cloud
Homesys.
Queste sono le funzioni disponibili in HSE03:
*Protezione anti-vandalismo
* Lampeggiante rosso e verde
*Indicazioni d’allarme visive ed acustiche
* 6 diversi tipi di suoni per indicatori acustici
* EEPROM per memoria non-volatile
* Segnale LED per conferma comandi e stato batterie
Descrizione
Componenti
A. Autoparlante sirena E. Sensore anti vandalismo
B. Autoparlante messaggi vocali F. Bottone di ricerca
C. Vite di chiusura G. Porta micro USB
D. Placca posteriore H. Porta alimentazione DC
Funzioni
A. Allarme sirenaSuono allarme a 110 dB
B. Messaggi vocali Suono messaggi vocali a 90 dB
E. Sensore anti vandalismo Se il dispositivo viene rimosso dalla parete o dalla base, il
sistema attiva all’istante un allarme
F. Bottone di ricerca Ricerca o rimuove codice ID di una centrale
G. Porta micro USB Per caricare file audio tramite cavo USB.
H. Porta alimentazione DC Porta per collegare alimentatore esterno
Aggiungere ad Homesys
1. Svitare in senso antiorario la vite posta sotto il dispositivo.
2. Trascinare la placca posteriore per aprire la sirena.
3. Preparare 4 batterie 1.5V alkaline. Per il momento non inserire le batterie.
4. Accedere al proprio account Homesys da pagina web.
Img 1 Vista frontale
Img 4 Vista interna
Img 2 Vista inferiore
Img 3 Vista dadietro

6
5. Selezionare “Sistema”,quindi “Aggiungi dispositivo”.
6. Selezionare “Sirena vocale”.
7. Appare la seguente schermata.Significa che la centrale IPBOX ha iniziato
la ricerca di dispositivi.
8. A questo punto inserire le batterie con la polaritá corretta nel dispositivo.
9. Se il processo ha successo, entro 10 secondi appare la seguente
schermata.
10. Se la ricerca non dá esito, dopo un po il conteggio scade. Procedere con la
procedura di "Ricerca manuale".

7
Ricerca manuale
1. Ripetere le fasi da 6 a 8 della procedura Aggiungere ad Homesys.
2. Tenere premuto il bottone di ricerca “F”per piu di 3 secondi fino a che il
LED si spegne ed inizia a lampeggiare. Questo significa che la sirena ha
iniziato la ricerca della centrale IPBOX..
3. Se dopo 5 secondi l'LED si spegne, significa che la ricerca ha avuto
successo. Questa è la schermata che appare.
Prova
Per provare la sirena HSE03, spostarsi nella sezione SICUREZZA, armare e
disarmare il sistema verificando se la sirena riproduce il messaggio vocale
relativo.
Se la sirena non risponde, consultare la sezione “Domande frequenti”.
Montaggio HSE03
La sirena HSE03 deve essere montata all’interno di un edificio in una
posizione visibile ma ad un altezza difficile da raggiungere per un eventuale
intruso. Si consiglia di non installare la sirena ai piani sotto terra per evitare di
indebolire troppo il segnale wireless.
1. Usare la placca posteriore come riferimento per segnare i 3 fori da eseguire
sulla parete. Fissare la placca alla parete utilizzando le viti e i tasselli inclusi
nella confezione.
2. Apporre la sirena sulla placca e trascinarla in basso per fissarla. Avvitare la
vite di chiusura posta sotto la sirena.
Protezione anti vandalismo
Il sensore anti vandalismo è installato all’interno della sirena per impedire che
la stessa venga rimossa dalla parete. Separare la sirena dalla sua base attiva
immediatamente un allarme.

8
Collegare alimentazione esterna (Opzionale)
L’alimentatore esterno 600mA @ 6V DC per la sirena vocale è un accessorio
opzionale che può essere acquistato in caso di necessità. Sul fondo della
sirena c’è uno spazio per fare passare il cavo.Installare l’adattatore come
segue:
Precauzioni
Non immergere il dispositivo dentro acqua o in altri liquidi.
Sono necessarie 4 batterie 1.5V LR14 Alkaline per alimentare il dispositivo.
Quando le batterie stanno per scaricarsi, il LED lampeggia ogni 30 secondi. In
questo caso, sostituire le batterie appena possibile.
Non gettare dispositivi elettronici come normali rifiuti,utilizzare servizi di
raccolta differenziata.
Contattare il proprio comune per informazioni sul tipo di raccolta differenziata
svolto nella propria zona.
Dispositivi elettronici che vengono gettati in natura,possono rilasciare nelle
falde aquifere sostanze dannose pericolose per la salute di persone e di altri
esseri viventi.
In caso di sostituzione di vecchi dispositivi, il venditore è obbligato a prendere i
vecchi dispositivi e gratuitamente deve farsi carico dello smaltimento.
Domande frequenti
La lista con le domande frequenti mostra alcuni problemi ricorrenti, le cause e
soluzioni. Se non si trova una risposta al proprio problema, contattare il
proprio fornitore o il servizio asistenza piu vicino.
Sintomi Possibili cause Soluzioni
Il LED non si accende Batterie scariche o
inserite al contrario.
Verificare le batterie e il corretto
posizionamento.
Malfunzione. Inviare il sensore al centro
riparazioni.
L’indicatore LED
funziona correttamente,
ma la sirena non
risponde ad allerte e
cambi di sistema
1La sirena non è stata
aggiunta correttamente
alla centrale HSC04.
2 La sirena non comunica
con la centrale.
1.Seguire le istruzioni per la
Ricerca manuale.
2.Spostare la sirena piu vicino alla
centrale.
Ripristino a valori iniziali:
Per ripristinare la sirena HSE03 a valori iniziali:
1. Inserire le batterie.
2. Tenere premuto il bottone di ricerca “F” per piu di 3 secondi fino a che il
LED verde si spegne, quindi rilasciare il bottone. Il LED verde ora
lampeggia veloce. Questo significa che la sirena è entrata in modo
ricerca.
3. Ora tenere premuto il bottone di ricerca per piu di 6 secondi ma comunque
per meno di 30 secondi,durante questo tempo la sirena emette un
segnale acustico ogni 0.5 secondi con il LED acceso.La procedura è
terminata quando il LED inizia a lampeggiare di arancione ogni 2 secondi.
Specifiche tecniche
** Le specifiche sono soggette a modifiche senza preavviso.
www.everspring.com
3F., No. 50, Sec 1, Zhonghua Rd., Tucheng Dist.,
New Taipei City 23666, R.O.C
A501112386R01
Adattatore (opzionale) 600 mA@6V DC
Batterie 1.5V LR14 x 4
Temperatura operativa Tra -10°C e 40°C
Frequenza wireless 868MHz (EU)/ 923MHz (America)
1.
Collegare l’alimentatore
alla porta DC all’interno
della sirena.
2.
Far passare il cavo
attraverso il foro sul fondo
della sirena.

9
HSE03 Sirena vocal
Guía de instalación
Introducción
HSE03 es una sirena inalámbrica con señal radio en dos sentidos y funciona no
solo como sirena sino también como notificador vocal. Gracias a la
compatibilidad de todos los productos U-Net, es fácil añadir mas accesorios a
su sistema smart home Homesys basado en la nube.
Estas son las principales funciones deHSE03:
* Sistema anti manipulación
*LED verde y rojo para notificación, confirmacion y estado baterias
* Notificación visual y sonora
* 6 tipos de señales acusticos
* Memoria non volatil EEPROM
*LED para identificación, confirmación visual y estado batería
Vista producto
Detalles
A. Altavoz E. Botón anti manipulación
B. Altavoz mensaje vocal F. Botón de búsqueda
C. Tornillos tapa trasera G. Micro USB (Solo para el fabricante)
D. Tapa trasera H. Conector alimentación DC
Funciones
A. Altavoz sirena Sonido alarma 110 dB
B. Altavoz mensaje vocal Mensaje vocal 90 dB
E. Botón anti manipulación Un alarma completo se activa en seguida cuando se quita el
equipo de la pared.
F. Botón de búsqueda Cancela las viejas ID y busca de nuevas
G. Mic ro U SB Para subir los mensajes vocales por cable USB. (Solo para
el fabricante)
H. Conector DC Para conectar la fuente de alimentación DC
Imagen 2 Vista fontal
Imagen 5 Vista interna
Imagen 3 Vista abajo
Imagen 4 Vista trasera

10
Añadir a un sistema Homesys
1. Aflojar y remover el tornillo de abajo
2. Arrastrar la tapa trasera para quitarla.
3. Preparar 4 baterías 1.5V alkalina. De momento no poner las baterias.
4. Ingresar a su cuenta Homesys por navegador web
5. Seleccionar “Sistema”.
6. Seleccionar “Añadir un nuevo equipo”,Y “Sirena vocal”.
7. Esta pantalla significa que la gateway Homesys está buscando dispositivos..
8. Poner las baterías con polaridad correcta.
9. Si dentro de 10 segundos el operación tiene éxito aparece la siguiente
pantalla.

11
10. Si el operación de búsqueda no tiene éxito. Chequear “búsqueda manual”.
Búsqueda manual
1. Repetir los pasos 6 ~ 8 de “Añadir a sistema Homesys”.
2. Presionar y detener el botón de búsqueda “F” (como indicado en el imagen
4) por 3o mas segundos hasta que el LED verde se apaga, soltar en
seguida el botón de búsqueda.El LED verde ahora parpadea rápido. El
unidad entra en modo búsqueda de gateway Homesys por 30-segundos.
3. Dentro de 5 segundos el LED verde deberia apagarse indicando que la
búsqueda tuvo éxito. Esta es la pantalla de confirmación.
4. Estado búsqueda:
Indicador
Estado
Éxitosa
LED
LED verde se eciende 1 segundo
luego se apaga
Sin éxito
LED
LED verde parpadea 4 veces
Notas:
Cuando se enciende por la primera vez, el LED parpadea color naranja cada 2
segundos.
Utilización y prueba
Se puede averiguar el corrector funcionamiento de HSE03 utilizando el
aplicación Homesys para móvil: ARMAR o DESARMAR el sistema HSE03
debería confirmar el acción con un mensaje vocal.
Si no hay respuesta de HSE03 puede significar que el accesorio esta fuera de
alcance del señal radio de la gateway Homesys.Debido al material de
construcción de cada edificio,la distancia maxima del señal puese ser menos
de 250 metros.Hacer pruebas con el unidad para averiguar la distancia efectiva
del señal radio.
Instalar HSE03
El HSE03 se debería instalar dentro de un edificio en una posición visible, pero
inaccesible para un intruso. Se aconseja también de no instalar el dispositivo en
sotanos para evitar problemas de transmisión.
1. Utilizar el panel posterior como referencia para marcar la posición de los 3
tornillos en la pared. Asegurar el panel trasero a la pared utilizando los tarugos
de plástico y los tornillos ofrecidos.

12
2. Arrastrar la sirena sobre el panel posterior y cerrarlos con el tornillo de abajo
rotando en sentido anti horario.
Protección anti manipulación
El botón anti manipulación en el interno de HSE03 para evitar que un intruso la
quite de la pared.Si se separa la sirena de su tapa trasera el botón antipanico
se abre y dispara un alarma –la camara reproduce una notificación vocal y
visual seguida por el sonido de alarma.Para terminar el alarma, desarmar el
sistema por navegador, Móvil o control remoto.
Utilizar un adaptador de corriente (Opcional)
El adaptador de corriente 600mA @ 6V es un accesorio opcional, que se puede
comprar en caso de necesidad.La sirena lleva un hueco donde puede pasar el
cable para para conectar el adaptador a un enchufe. Chequear esta imagen
para la instalación:
Manutención
* No introduzca el aparato dentro del agua o líquidos varios.
* HSE03 utiliza 4 baterías 1.5V Alcalina LR14. Cuando la baterías se descargan
el LED parpadea cada 30 segundos. Remplazar las baterías lo antes posible.
Preguntas frecuentes
En esta lista aparecen las preguntas mas frecuentes. Si no se encuentra
solución, llame a su tienda o al centro servicios mas cercano.
Síntomas
Causa
Solución
El LED de HSE03 no da
señal
No hay baterías o se
agotaron
Chequear si se pusieron
correctamente las baterías
Falla interna
Enviar el producto al centro
servicios sin abrirlo.
El LED de HSE03
funciona, pero no es
posible aprender códigos
ID o no se puede
controlar el dispositivo.
HSE03 no se añadió
con éxito a la gateway
Homesys
Seguir otra vez las instrucciones:
“Añadir a sistema Homesys”
Intentar con las “
búsqueda
manual”.
1.
Enchufar el conector del
adaptador en el conector
DC dentro al equipo.
2.
Pasar el cable a traves de
la via indicada.

13
HSE03 no puede recibir
el señal o no se puede
controlar por la gateway
Homesys
HSE03 está fuera de
alcance de la gateway
Homesys
Cambiar la posición de la
gateway Homesys
Restablecimiento a valores de fábrica
Para resetear HSE03 a valores de fábrica:
1. Poner las baterías
2. Presionar y detener el botón de búsqueda (F) por 3 o mas segundos, hasta
cuando el LED parpadea verde rápido. Soltar el botón. El unidad entra en
modo búsqueda por 30-segundos.
3. Presionar y detener el botón de búsqueda por mas de 6 segundos y soltar
dentro de 30 segundos.El procedimiento ha terminado cuando el LED
parpadea color naranja. Quitar las baterias antes de buscar otros
dispositivos.
Especificaciones
** Las especificaciones están sujetas a cambio sin previa notificación.
Adaptador (opcional)
600 mA@6V DC
Baterías
1.5V LR14 x 4
Vida baterías
Un año en modo espera a 25°C
Distancia señal
200 metros en espacio abierto
Frecuencia radio
868.30 MHz
Other manuals for HSE03
1
Table of contents
Languages:
Other EVERSPRING Security System manuals

EVERSPRING
EVERSPRING ST113 User manual

EVERSPRING
EVERSPRING SE812 User manual

EVERSPRING
EVERSPRING EVR_SE812 User manual

EVERSPRING
EVERSPRING SE132 User manual

EVERSPRING
EVERSPRING SE203 User manual

EVERSPRING
EVERSPRING USC423A User manual

EVERSPRING
EVERSPRING HA 51U User manual

EVERSPRING
EVERSPRING AC136-1 User manual

EVERSPRING
EVERSPRING HSE03 User manual

EVERSPRING
EVERSPRING SE813 User manual