Everything Attachments ETA Compact User manual

ADDITIONAL COPIES AVAILABLE

ETA Compact, ETA 6900, ETA 6900-HD
COURTESY OF: T.C Corriher Implement Co. Inc. DBA: Everythingattachments.com
12 South Ashe Avenue Newton, NC 28658
2
MACHINERY CAN HURT YOU
WARNINGS
DO NOT PERMIT RIDERS ON MACHINERY
MACHINERY, IN A LIFT POSITION, CAN FALL WHILE OPERATING OR WHEN
SITTING STILL
STAY AWAY FROM OPERATING MACHINERY - KEEP OTHERS AWAY
* Observe and follow instructions obtained on decals attached to farm machinery. The wide
variety of warning, caution, and instructional decals are placed on machinery for YOUR
safety. Always keep hands, feet, and clothing away from all moving pads.
* Make certain that everyone is clear of the machine before starting power unit or activating any
drive mechanism.
* Keep hands, feet, and clothing away from moving parts of the machine. Do not wear loose
clothing.
* Keep children off, and away, from all machinery.
* Be sure that all shields or guards are in place before any machine is started.
* Replace any damaged or misplaced guards or shields.
* Keep all machinery free of excessive accumulation of crop material or other debris.
* Stay alert from obstructions, ditches and other hazards when operating machinery.
* Operate machinery at a speed to match the field and crop condition and/or operator
proficiency.
* Shut off the tractor engine or power unit before attempting to refuel. DO NOT SMOKE!
Refuel in a well ventilated area and avoid spilling fuel.
* Always shut off the engine before leaving the operator's platform to adjust, lubricate, clean or
unclog a machine, unless otherwise specified in the operator's manual.
* Wait until all power driven pads have stopped before attempting to perform any inspection or
servicing of the machine.

ETA Compact, ETA 6900, ETA 6900-HD
COURTESY OF: T.C Corriher Implement Co. Inc. DBA: Everythingattachments.com
12 South Ashe Avenue Newton, NC 28658
3
* Provide a temporary guard for knives when working with them.
* After servicing equipment, be sure all tools, parts, or servicing equipment are moved before
starting the machine.
* Before restarting operation, replace or secure all safety shields that you have removed or
opened for access when making field repairs.
* Have a fire extinguisher available and in good operating condition. Also take first aid kit.

ETA Compact, ETA 6900, ETA 6900-HD
COURTESY OF: T.C Corriher Implement Co. Inc. DBA: Everythingattachments.com
12 South Ashe Avenue Newton, NC 28658
4

ETA Compact, ETA 6900, ETA 6900-HD
COURTESY OF: T.C Corriher Implement Co. Inc. DBA: Everythingattachments.com
12 South Ashe Avenue Newton, NC 28658
5

ETA Compact, ETA 6900, ETA 6900-HD
COURTESY OF: T.C Corriher Implement Co. Inc. DBA: Everythingattachments.com
12 South Ashe Avenue Newton, NC 28658
6
ETA Compact –ETA 6900 –ETA 6900 HD Post Hole Digger
OPERATOWS MANUAL AND SAFETY WARNING MESSAGE
!! DANGER! SAFETY FIRST, READ ALL PAGES.
1. GENERAL INFORMATION
Your Everything Attachments posthole digger has been manufactured of quality materials
and components. Care has been taken to make this implement as safe as possible to operate;
HOWEVER, any machine with moving parts can present a hazard if the operator does not follow
common sense rules of safety while operating the machine.
The purpose of this manual is to help you understand the instructions of how to use the
equipment safely and be familiar with the safety warning message in order to minimize risks that
may occur if the machine is not used properly and if the minimum precautions or attentions are
not paid.
The manual will assist you in setting up, operating, and maintaining your digger. Read it
carefully and thoroughly; it furnishes information and instruction that will help you achieve
many years of dependable performance. These instructions have been compiled from extensive
field experience. Some Information may be general in nature due to unknown and varying
conditions. However, through experience and these instructions, you should be able to develop
procedures suitable to your particular situation.
The illustrations and data used in this manual were current at the time of printing, but due
to possible in-line production changes; your machine may vary slightly in detail. Our current
production model includes as standard equipment, guards or shields for auger adapters, driveline,
input shafts, and safety signs. If you have a machine that does not have current standard safety
equipment please contact Everything Attachments about bringing your machine up to the current
level of safety. We reserve the right to redesign and change the machines as may be necessary
without notification.
2. ASSEMBLY INFORMATION
To attach the A-frame (#1) with the lift pins (#2) to the boom pole (#4) put the bolt
provided, into the middle adjustment hole on the boom pole. For adjustment to your tractor, you
may have to move the A-frame to another hole so the auger will lift clear of the ground. Tighten
the bolt but not excessively. This allows the A-frame to pivot when the digger is raised and
lowered by the tractor.
Slide the socket of the lower LEFT lift arm of the tractor over the lift (#2) on the
A-frame, then slide the right lift arm onto the lift pin, using the adjustment crank lever to
position the lift arm at the correct height. Now attach the boom to the tractor where the top-link
mounts behind the tractor seat. The top link is not required for operation. Stabilizers should be
used to prevent side motion (available from your tractor manufacturer). Remove both sides of
auger safety shield (#13) and take auger shear bolts from auger. Use the tractor to raise the
boom pole until you are able to slide the auger onto to the gearbox output shaft (#18 on
gearbox listing). Now lower the lift on the tractor to slide the output shaft inside the auger. KEEP
HANDS CLEAR OF AUGER IN CASE OF LIFT FAILURE TO REVENT PINCHING OF
OPERATOR'S HANDS BETWEEN THE AUGER AND THE DIGGER. Align the hole for the

ETA Compact, ETA 6900, ETA 6900-HD
COURTESY OF: T.C Corriher Implement Co. Inc. DBA: Everythingattachments.com
12 South Ashe Avenue Newton, NC 28658
7
shear bolt and replace the shear bolts. Tighten lock washers and hex nuts. (CAUTION: USE OF
SHEAR BOLT HARDER THAN GRADE TWO 2 FOR ETA COMPACT AND ETA 6900 OR
GRADE 3 FOR ETA 6900 HD COULD CAUSE DAMAGE TO YOUR GEARBOX). NOTE: A
longer or protruding shear bolt is more likely to grab loose clothing or gloves, which can result in
serious injury or death. Replace two halves of auger safety shield and secure with wing nuts.
Depress the locking spring on the (PTO) shaft (#11) and slide coupler onto tractor output shaft
until the PTO locking pin clicks in place. Make sure set screw (#10) is tight on PTO shaft at
gearbox. The setscrew holds the PTO shaft on the gearbox shaft if the PTO shear pin breaks. Fill
gearbox with 90W-gear oil. Unscrew ½” fill plug on top of gearbox and 1/4'' overflow plug on
side. Fill until oil runs out of side plug (about 1 Qt.). Install both plugs. Grease the PTO universal
joints, the metal PTO shaft and spray lube the plastic cover tube so that both will slide in and out
freely. Fasten chain on plastic PTO cover at gearbox to the hole in side of PTO shield. Fasten
PTO chain at the tractor end of the cover to the lift arms of the actor. This allows the shaft to turn
but the outside plastic shield remains stationary to protect the operator from becoming entangled
in the PTO shaft and thus causing personal injury.
3. PRE-USE CHECK LIST
Inspect the digger thoroughly after assembly to be certain it is set up properly before operation
and use the following checklist as a reminder of points to inspect. Check off each item as it is
found satisfactory or after proper adjustment is made.
- Check that all safety shielding is in place.
- Check all bolts to be sure they are tight.
- Check gearbox oil level. It is full when oil runs out of the overflow hole on side of gear
box (1/4 inch pipe plug). Use 90 weight gear oil.
- Check that all lubrication points and that all grease fittings have been lubricated
(2 fittings).
- Check that cutting edges have been properly installed on auger.
4. PREPARATION
- Always wear relatively tight and belted clothing to avoid entanglement in moving
parts. Wear sturdy, rough-soled work shoes. Never operate tractor or implements in bare
feet sandals, or sneakers.
- Clear area of branches or other debris that might be thrown by the auger, causing
personal injury or damage to the machine.
-NEVER ALLOW ANYONE AT REAR OF TRACTOR OR NEAR AUGER
WHILE OPERATING. The posthole digger was designed for one-man operation from
the tractor seat. It is the responsibility of the operator to see that no one is within twenty
five feet (25’) of the digger when it is in operation.
- Operate only in daylight or good artificial light.
- Ensure digger is properly mounted, adjusted and in good operating condition.
- Ensure all safety shielding is properly installed.
- Remember, stabilizers should be used to prevent side swing.

ETA Compact, ETA 6900, ETA 6900-HD
COURTESY OF: T.C Corriher Implement Co. Inc. DBA: Everythingattachments.com
12 South Ashe Avenue Newton, NC 28658
8
5. OPERATION
This digger is designed for use only on tractors with a 540-RPM power takes off. The auger is
designed to operate just above idle speed. Clear the work area of objects that might be picked up
and thrown or entangled in the auger such as vines, tree limbs, wire, etc.
The auger is of the pendulum swinging type and should hang in a vertical position when
raised clear of the ground. On the ETA 6900 and ETA Compact there is an Optional directing
rod (#15) attached to the gearbox to control the swing of the gearbox. It can be moved in or out
by loosening the setscrew on the side of the gearbox. This allows the tractor operator, from his
seat to straighten the angle of the auger to dig a straight hole. Due to the design of the ETA
6900-HD gearboxes, the directing rod is not required. To prevent possible instantaneous
driveline failure, never move digger from hole to hole or transport it while auger is rotating. This
could lead to injury from flying pieces of the failed driveline. With auger raised clear of ground
drive into position and engage PTO with tractor idling; lower digger slowly and permit it to dig
one foot (1ft.) deep. Raise digger and allow auger to clear itself by operating PTO, lower digger
and dig another foot deep. Repeat this until hole is to desired depth. To prevent entanglement and
possible serious injury or death all persons except for the operator seated on the tractor, should
maintain a minimum safe distance of twenty five (25’) feet from the auger at all times. In loose
and sandy soil, you get a cleaner hole by stopping rotation of the auger before lifting it from the
hole and starting it just before it clears the hole to throw the soil on the auger out and away from
the hole. DO NOT SHOVEL dirt away from a rotating auger as the shovel can be caught and
thrown by the auger causing serious personal injury. In wet clay, be very careful not to let the
auger go too deep as it may get stuck If the auger is stuck either in wet clay, roots, or stones,
DISENGAGE PTO, shut off tractor engine and use large wrench on auger and reverse rotation of
the digger. One complete turn of the auger will usually free the auger. Then gently lift the auger
with the tractor lift. If it is not free, continue reversing procedure until it can be lifted clear.
Do not operate digger on steep hillsides. When digging on uneven or hilly terrain, position the
tractor with the posthole digger uphill. If the posthole digger is pointed downhill, the tractor
could tip over when attempting to pull the auger from its hole.
!!!!WORK SAFELY-FOLLOW THESE RULES!!!!
6. DAILY CHECK LIST
- Check that digger is properly and securely attached to tractor.
- During inspection, check that all nuts and bolts are secure.
- Check conditions of auger Cutting edges and security of attachment.
- Check that all safety shields are in place.
7. MAINTENANCE
*keep tractor and digger in good operating condition and all safety devices in
place.
*Periodically tighten all bolts, nuts and screws to ensure digger is in a safe
condition to operate.
*The shear bolt is where the PTO (power take off) shaft yoke fits to the gearbox

ETA Compact, ETA 6900, ETA 6900-HD
COURTESY OF: T.C Corriher Implement Co. Inc. DBA: Everythingattachments.com
12 South Ashe Avenue Newton, NC 28658
9
input shaft. Check it for wear before each use.
*Never replace the shear bolt or auger retaining bolt with any length other than
what Everything Attachments specified in the manual.(A longer or protruding fastener is
more likely to grab loose clothing or gloves, which can result in serious injury or death).
*Check that retaining screw in the PTO yoke is in place and tight. It keeps the PTO yoke from
coming off the gearbox input shaft if the shear bolt breaks.
*Use ONLY GRADE 2 SHEAR BOLTS ON ETA COMPACT AND ETA 6900. USE ONLY
GRADE 3 SHEAR BOLTS ON ETA 6900-HD.
*Always use, and maintain in place, all power take off guards furnished with the tractor as well
as the power take off-guards and shield furnished with the digger. If a safety shield or
guard is removed for any reason, it must be replaced before the machine is operated
again.
*Spray lubrication on both halves of PTO so the cover freely slides in and out.
*Check point and width of auger bit. If bit is worn to the place that it is smaller in width than the
round flighting on the auger then replace the bit. If point is bent or dull then replace bit.
8. STORAGE
* When removing digger from tractor, (A) stand digger upright and brace it to prevent it from
falling, (B) chain digger upright by hanging from loop on top of boom, (C) back digger
up to a post and chain it upright.
*In storage position lower the boom end to ground level so no one can bump their head or trip
over unit.
* Do hot leave auger drilled in ground as moisture may rust auger and bit.
* Clean all accumulated debris from digger to prevent rust.
* To prevent moisture damage during storage, lubricate all lubrication points on digger.
* Coat auger with oil as needed.
* Do not lay digger on ground as personnel injury may occur in pushing the digger into an
upright position.
9. Training
*Know your controls and how to stop the tractor engine and digger quickly in an emergency.
*To avoid injury, do not allow anyone to operate this equipment without proper instructions.
Any Person who operates this equipment must be instructed in and be capable of safely
operating this unit, attachments and controls.
*Always use two (2) people to handle heavy, awkward components during assembly,
installation, removal or moving the digger.
*Do not move the tractor while the auger is turning.
*Do not move tractor while auger is still in the ground. The final responsibility for safety rests
with the operator of the machine. He or she is ultimately responsible for safety of himself
or herself as well as others in the operating area of the digger.

ETA Compact, ETA 6900, ETA 6900-HD
COURTESY OF: T.C Corriher Implement Co. Inc. DBA: Everythingattachments.com
12 South Ashe Avenue Newton, NC 28658
10
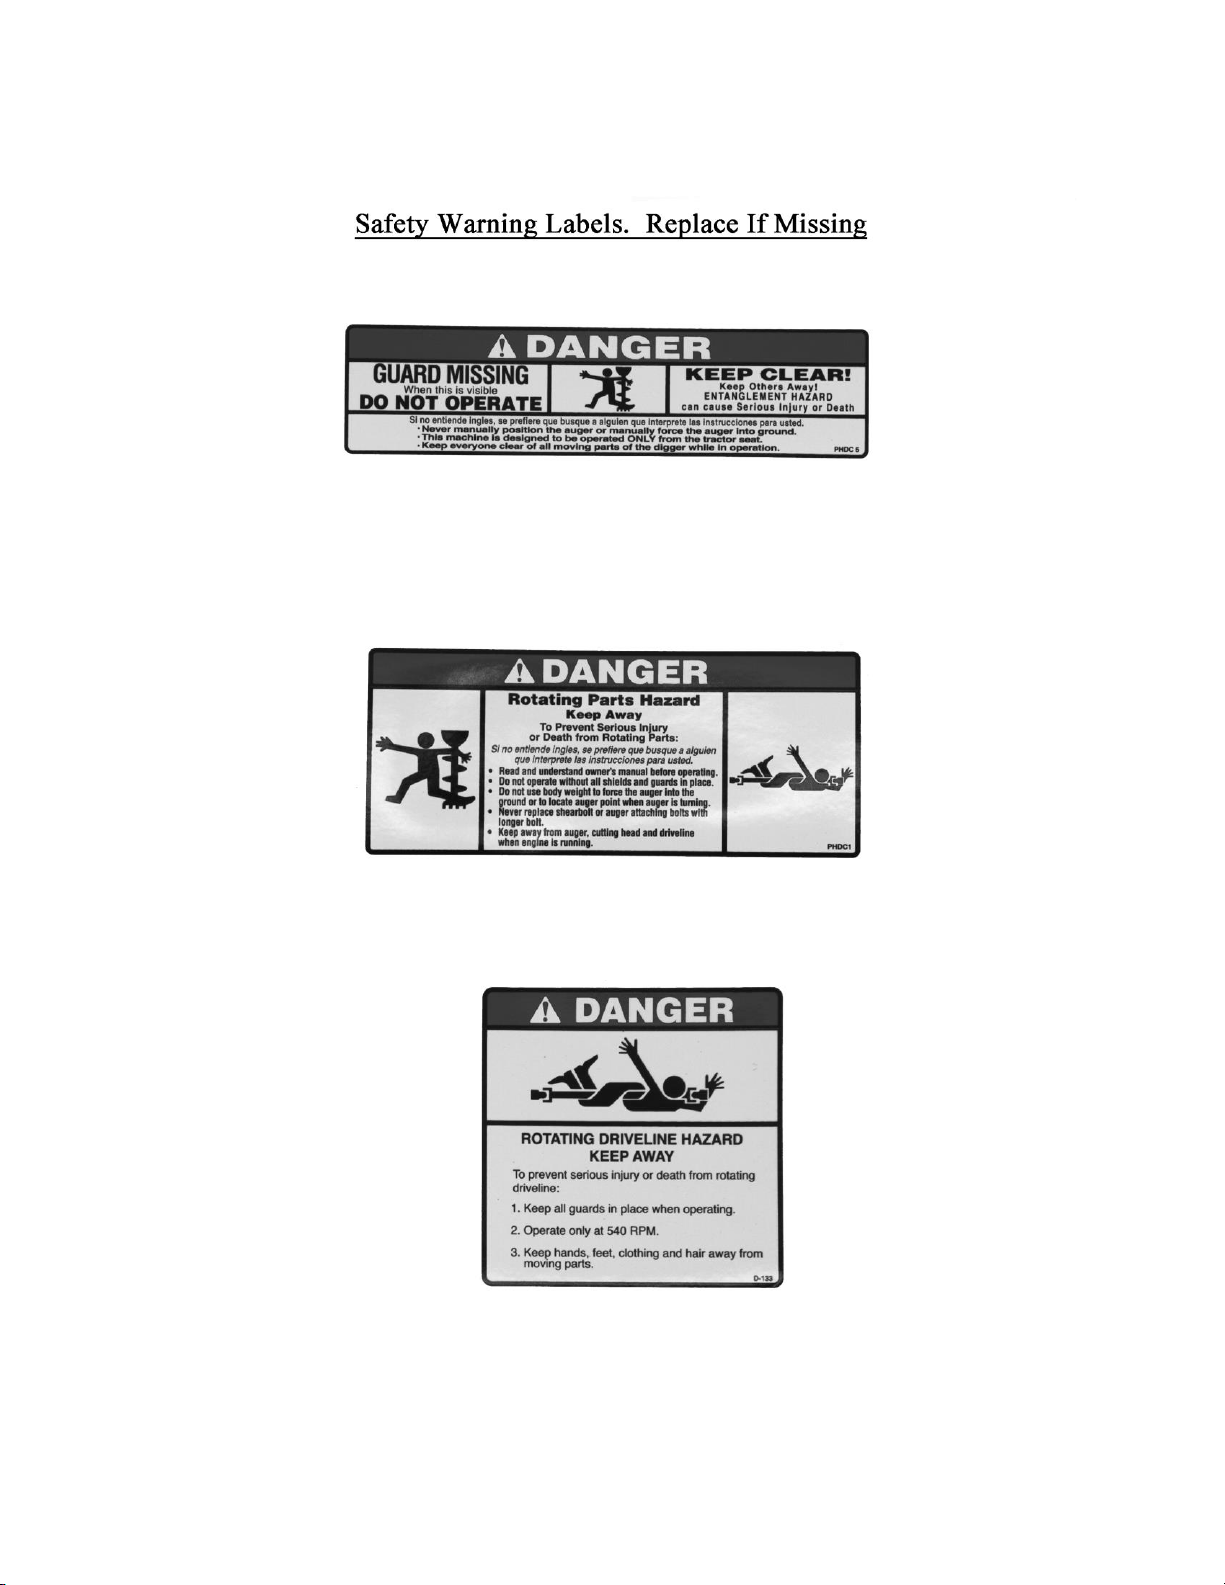
10. SAFETY WARNING MESSAGE
Carefully read thoroughly and understand your operator's manual as well as the safety-warning
message. Failure to understand and obey a safety warning, or recognize a safety hazard, could
result in an injury or death to you or others around you.
- This posthole digger was designed for one man operation from the tractor seat. It is the
responsibility of the operator to see that no one is within twenty-five feet (25') of the
digger when it is in operation.
- Do not operate the digger with another person near, or in contact with any part of the digger,
PTO driveline, or auger. Serious personal injury or death may result if any attempt is
made to assist digger operation by hand.
- A Person who has not read or understood the owner's manual and safety signs is not qualified
to operate the machine. If you do not have an owner's manual or current production
safety signs, contact the Everything Attachments.
- Be careful and make sure that everyone who operates this machine knows and understands that
it is a very powerful piece of machinery, and if used improperly, serious injury or death
may result.
- All things with moving parts are potentially hazardous. There is no substitute for a cautious,
safe minded operator who recognizes potential hazards and follows reasonable safety
practices. The manufacturer has designed the machine to be used with all its safety
equipment properly attached, to minimize the chances of accidents.
- Personal protection equipment including hardhat, safety glasses, safety shoes, and gloves are
recommended during assembly, installation, operation, adjustment, maintaining,
repairing, and removal or moving the digger.
12. OPERATIONAL SAFETY
*Disengage power take off (PTO) and shift tractor into neutral before attempting to start the
engine. NEVER ALLOW ANYONE NEAR AUGER WHILE OERATING. STAY 25
FEET AWAY.
* Never make an adjustment while engine is running; operator must dismount from tractor.
* Keep children and pets a safe distance away, at least 25 FEET.
* Always comply with all state and local lighting and marking requirements when operating on
highways.
* Watch for traffic when crossing roads.
* Consult local utility companies to make certain there are no buried gas lines, electrical cables,
etc. in the work area before beginning operation.
* Stop digger and tractor immediately upon striking an obstruction. Turn engine off, inspect
digger and repair any damage before resuming operations.
* Disengage power to digger and stop engine before dismounting from tractor, making
adjustments or unclogging digger.
* NEVERPLACE HANDS OR FEET NEAR DIGGER WHEN TRACTOR ENGINE IS
RUNNING. STAY CLEAR OF ALL MOWNG PARTS
* Do not walk or work under a raised digger or attachment unless it is securely blocked or held
in position. Do not depend on the tractor hydraulic system to hold the digger or
attachment in place.

ETA Compact, ETA 6900, ETA 6900-HD
COURTESY OF: T.C Corriher Implement Co. Inc. DBA: Everythingattachments.com
12 South Ashe Avenue Newton, NC 28658
11
* Do not allow anyone who is not familiar with the safety rules and operational instructions to
use the machine.
* Never allow children to operate or be around this digger.
*Never place a part of your body where it would be in danger if movement should occur during
assembly, installation, operation, mounting removing or moving a digger.
* Keep in mind that all things with moving parts are potentially hazardous.
* Never allow the digger to operate while the operator is off the tractor.
* The digger should be operated with the tractor motor just above idle speed. Faster speeds
could be damaging and dangerous.
* Take all possible precautions when leaving the tractor unattended; Stop engine and remove the
key from ignition, disengage PTO, lower digger, shift into gear, set parking brake.
*Use stabilizer bars, adjustable sway chains, or sway blocks on your tractor lift arms to keep the
posthole digger from swinging side to side. Adjust as tightly as possible for best performance.
WARNING!
DO NO LET TRACTOR
MOVE OR ROLL
WITH AUGER IN GROUND
THE AUGER WILL BEND
AND VOID THE WARRANTY.

ETA Compact, ETA 6900, ETA 6900-HD
COURTESY OF: T.C Corriher Implement Co. Inc. DBA: Everythingattachments.com
12 South Ashe Avenue Newton, NC 28658
12
Reference #
Quantity
Description
Fits Models
1
1
A-frame
ETA Compact
1A
A-frame
ETA 6900
1B
A-frame
ETA 6900-HD
2
1
Category I pull pin w/lock washer and nut
All
3
1
¾” x 2½” bolt, lock washer and nut (A-frame to boom)
All
4
1
Boom Pole
ETA Compact
4A
1
Boom Pole
ETA 6900
4B
1
Boom Pole
ETA 6900-HD
5
1
Hanger shaft w/2 cotter pins
All
6
1
Gearbox
ETA Compact
ETA 6900
6B
1
Gearbox
ETA 6900-HD
7
1
⅜x 3 ¼ grade 2 bolt w/nut
ETA Compact
ETA 6900
7B
1
⅜x 3 ¼ grade 2 bolt w/nut
ETA 6900-HD
10
1
¼” x ¾” cone point set screw w/jam nut
All
11
1
Complete class 4 PTO shaft
All
12
1
PTO safety shield
ETA Compact
ETA 6900
12A
1
PTO safety shield
ETA 6900-HD
13
2
Auger safety shield
All
14
2
Brackets for auger shields
All
15
1
Optional Guide rod w/set screw
Continued on next page
ETA Compact
ETA 6900

ETA Compact, ETA 6900, ETA 6900-HD
COURTESY OF: T.C Corriher Implement Co. Inc. DBA: Everythingattachments.com
12 South Ashe Avenue Newton, NC 28658
13
BOLTS-Buy Local
1 ¾” x 2½” bolt w/lock washer/nut, A-frame to boom.
4 5/16”Wing nut w/lock washer, Auger safety shield to brackets.
1 ⅜” x 3 ½” Bolt w/lock washer/nut, PTO shaft to gear box. Grade 2 on ETA Compact and ETA
6900, Grade 3 on 6900 HD.
1 ½” x 3” Grade 2 bolt w/lock washer/nut, Auger to gear box.
2 7/16 “ x 1½” Carriage bolt w/lock washer/nut, Cutting head to auger.
4 5/16” x ¾” Bolt w/lock washer/nut, Shield bracket to gear box.
4 ⅜” x ¾” Continuous thread bolt w/lock washer/nut, Shield bracket to gear box. ETA Compact
and ETA 6900.

ETA Compact, ETA 6900, ETA 6900-HD
COURTESY OF: T.C Corriher Implement Co. Inc. DBA: Everythingattachments.com
12 South Ashe Avenue Newton, NC 28658
14
WARRANTY AND DISCLAIMER
Everything Attachments (hereafter the “Company”) and sellers of its products warrant products
and parts of products it manufactures to be free from defects in material and workmanship for a
period of (90) days from date of purchase when such products and parts of products are
maintained and used in a customary and ordinary manner.
No warranty is made by the Company either expressed or implied on products manufactured by
others.
THIS WARRANTY IS THE SOLE
WARRANTY
AND IS IN LIEU OF ALL OTHER WARRANTIES,
EXPRESSED OR IMPLIED, INCLUDING ANY
IMPLIED WARRANTY OF MERCHANTABILITY
OR WARRANTY OF FITNESS
FOR A PARTICULAR PURPOSE.
The exclusive remedy for breach of this Warranty is repair or replacement of parts upon delivery,
postage and freight prepaid to the Company at 12 South Ashe Avenue Newton, NC 28658
U.S.A. or refund of purchase price if repair or replacement cannot be practically provided.
In no event shall the Company or the Sellers be liable for consequential or incidental damages,
direct or indirect(including but not limited to loss of crops or livestock), due to defects in
workmanship or defects in products
manufactured by it.
This is the only warranty of the Company. No Seller or any other person has authority to alter or
waive any provision of this Warranty as it applies to the Company or to make or add warranties
on behalf of the Company. The Company expressly disclaims all liability due to the use or resale
of its products or parts of products manufactured by it whether based on contract, negligence,
strict liability in tort or otherwise except as expressly provided for in this Warranty as set forth
above.
This manual suits for next models
3
Table of contents
Popular Tractor Accessories manuals by other brands

Land Pride
Land Pride RCF3696 Operator's manual

Original Tractor Cabs
Original Tractor Cabs 10121 Assembly instructions

Cover My Tractor
Cover My Tractor Bimini Assembly instructions

Classic Accessories
Classic Accessories 52-136-380201-00 Instructions & Care

BE Ag & Industrial
BE Ag & Industrial CAR-TM Series Operations & parts manual

Field Tuff
Field Tuff FTF-60LSR3PT owner's manual