Evolights 36x15 RGBW WALL WASHER User manual
36x15 RGBW WALL WASHER
User Manual
Instrukcja obsługi

English
Menu
Dimensions.................................................................................................. 2
Before Using................................................................................................ 3
What’s inside........................................................................................... 3
Open box instruction .............................................................................. 3
A C power supply .................................................................................... 3
Safety Instruction.................................................................................... 3
Introduction ................................................................................................ 4
Specification............................................................................................ 4
Product features...................................................................................... 5
Product Introduction................................................................................... 6
Installation .................................................................................................. 7
Installation requirements........................................................................ 7
Power supply connection ....................................................................... 8
DMX Signal connection........................................................................... 8
DMX Address setting............................................................................... 9
Operating instruction.................................................................................. 10
Control board function ........................................................................... 10
Menu Map .............................................................................................. 11
Menu Instruction .................................................................................... 12
DMX Channel Table..................................................................................... 20

Dimensions
All dimensions are in millimeters
Before Using
What’s inside
⚫Equipment x 1
⚫Power cable with Plug x 1
⚫User manual x 1
⚫Iron holder x 2
Open Instruction
Please open the equipment carefully ,and check all the spare parts are
included or not. If any part of the cause of the failure due to improper
transportation or carton, please keep the packing materials and immediately
inform the shipper to check. If the equipment must be returned to the factory,
the equipment should be use the original carton and packaging.
AC Power Supply
The equipment power supply is able to adapt to the wide input voltage.
Please confirm the input voltage is in the scale of rated voltage。The equipment can
adapt to100V-240V AC voltage ,Frequency50-60HZ 。It cannot run a
rheostat(variable resistor) or dimmer circuits.
Safety Instruction
This product is I level protection equipment, so it is must be connected well
and connected by the professional people.
⚫Make sure the voltage don’t be above or below which the user manual
rated values.

⚫Confirm the power cord is not a sword cut or damaged.
⚫Must be cut off the power supply in the condition of no using or cleaning.
⚫Only allowed with the power cord plug connection. Please do not force
when unplug the power cord to pull the plug.。
⚫Be careful in the process of installation of equipment. Avoid touching the
bare wire, otherwise it will suffer fatal shocks.。
⚫Don’t look the light source directly, otherwise it will hurts the eyes.
⚫When choosing installation position of equipment and the equipment
must be more than 0.5m distance between objects.
⚫Please use the equipment wires appropriate.
⚫Without the manufacturer’s authorization or laypeople don’t remove,
repair and modification of equipment.
⚫The maximum operating temperature is 40℃,don’t operate the
equipment when it is over 40℃
⚫Do not connect the equipment to the dimmer equipment
⚫Under 120V voltage, output power don’t series more than 4 pcs
equipment, voltage 230V.Output power don’t series more than 8 pcs
Introduction
Specification
⚫Rated Voltage:AC100V~240V 50-60HZ
⚫Rated Power: 450W
⚫LED Qty: 36x15W High power RGBW LEDs
⚫LED Drive Current: 1A
⚫Beam Angle: 10°(25°,40°optional)
⚫IP Class: IP65
⚫DMX Mode:2/3/4/13/16/29CH

⚫Packing Size:585x220x425mm
⚫Net weight:13.2Kg
⚫Gross weight:15.5Kg
Product features
⚫Dmx input:3 pin electronic J3F2C-W .
⚫Dmx output:3 pin electronic K3F2C-W.
⚫Power connection: electronic powerCON in(SAC3MPX)/ powerCON
out(SAC3FPX)
⚫3 kinds of control model: DMX512,WDMX,Master/slave.
⚫2.4G Wireless DMX control.
⚫Setting and Addressing: RDM
⚫DMX function: Dimmer, Strobe, RGBW, Macro color, Color jump, Color fade,
Rainbow, Auto Program choice, Auto speed, Curve dimmer select, Function
setting
⚫Stand-alone mode: Color step, Color shade, Auto, Slave, Macro color, Static
color setting, Rainbow, Auto program choice.
⚫Housing: aluminum.
⚫Housing color: Black .
⚫2.4inch TFT color display screen
⚫Refresh rate:3000Hz.
⚫Operation temperature:-20°C~+40°C.
⚫6 Kinds of DMX modes:2/3/4/13/16/29CH.
⚫Dimmer mode: 2 kinds.
⚫4 kinds of curve dimmer: Linear Dimmer, Square Dimmer, I. Square Dimmer, S-Curve
Dimmer.
⚫Display board can be 180°in turn,it can be fitted in different setting.
⚫Strobe effect: Plus Random, Ramp up Random, Ramp down Random, Random
strobe, Strobe Break Effect,5s......1s, Strobe 0-20Hz.
⚫Perfect mixing color and rainbow effect
⚫Cooling system: fan cooling (Auto&high-speed).
⚫Certificate: CE,ROHS

Product Introduction

Installation
Installation Requirements
⚫This equipment can be used in many places, it can hang and put on the
ground。
⚫Choosing a suitable place to put or hang the equipment when installation.
Must be use the special screws and hook to make sure the lamp’s weight
is in the weight range。
⚫When installing the equipment, ensure no inflammable and explosive
goods at 0.5 meter distance.
⚫Please ask the professionals to install the equipment, any improper
installation will cause personal injury or material damage.
⚫To prevent others entering the working areas below, the installation or
maintenance of equipment with suitable and stable platform
⚫The equipment must be placed in ventilated place, at least 50 cm from the
ground, please ensure that the vent without clogging.
Power supply connection
The equipment can be used in the wide voltage input。Please make sure the

voltage is the scale of rated voltage when connecting the power. The
equipment can adapt to 100V to 240 V AC voltage and 50-60 Hz.
s
Connection
Pin
Brown
AC Live
1
Blue
AC Neutral
2
Green/Yellow
AC Ground
3
DMX Signal Connection
1. Use DMX512 controller, use the DMX signal(male )to plug into the first
light(female)3 pin。
2. Put out of the equipment of the first signal wire(head),connected to the
equipment of the next 3 pin plug(female),so on. See below pictures.
terminator
How to turn the controller line from 3-pins into 5-pins (plug and socket).
3.DMX to DMX:

4:Wireless to DMX
5:Wireless Control
6:Master/Slave
DMX Address setting

Operating Instruction
Control board function
Button
Function
Mode
Choose mode or function exit
ENTER
Current show menu or enter into the current selected function
UP
Increase the value
DOWN
Decrease the value
• When the spotlight is properly connected to the mains, “Software Update ,Please Wait”
(only for internal purposes), “Welcome to LED Wash”, the model name and software
version appear successively on the display during the start-up process. After this operation,
the spotlight is ready for use and starts in the mode that was previously selected.
• If one of the DMX operating modes is activated and there is no DMX signal at the DMX
input, the display starts to flash after a few seconds.
• After approximately 30 seconds of inactivity, the display will automatically show the
currently active operating mode.
• Fast Access Feature: In order to simplify the menu guide, the device has an intelligent
menu structure which allows menu and sub-menu items
that were last selected to be accessed directly. 1. Pressing MODE and ENTER simultaneously
will take you directly to the sub-menu item that was last edited and allows you to instantly
change the corresponding value as desired (DMX start address and all operating modes). 2.
Pressing MODE will take you directly to the menu item that was last selected and edited;
now press ENTER to instantly access the sub-menu item that was selected and edited last
(DMX start address and all operating modes).
Menu Map

Menu Instruction:
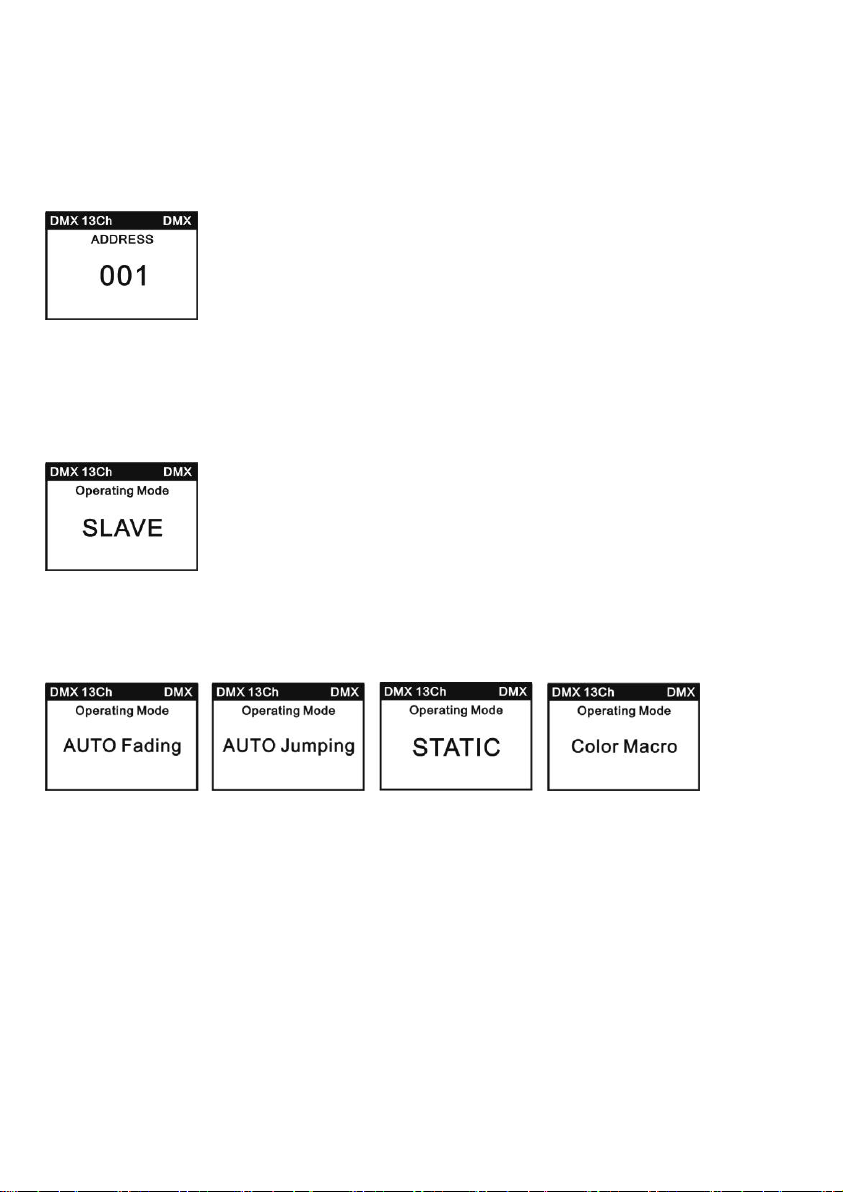
MAIN DISPLAY DMX MODE
In the upper line of the display, the DMX (DMX 2Ch,3Ch1,3Ch2,4Ch,13Ch,16Ch,29Ch)is display and the
DMX start address is prominently shown in the center (for example DMX13Ch and ADDRESS 001).As
soon as the DMX signal is interrupted, the display starts flashing;if the DMX signal is present again, the
display stops flashing.
MAIN DISPLAY SLAVE MODE
In the upper line the display, the preset DMX is displayed and “SLAVE” is prominently shown in the
center. As soon as the control signal is interrupted, the display starts flashing; if the control signal is
present again, the display stops flashing.
MAIN DISPLAY STANDALONE MODE
In the upper line of display, the preset DMX mode is displayed and the currently activated Auto mode,
static mode STATIC, or colour macro mode COLOUR MACRO.
SETTING THE DMX START ADDRESS(ADDRESS)
Pressing MODE will take you the selection menu for system setting. Using UP and DOWN, select the
menu item “ADDRESS”(colored background)and confirm with ENTER. This is followed by the display of
the menu item“Set DMX Address”.Press ENTER again to select the DMX start address as desired button
using the UP and DOWM button. If the start address is changed, the address color changes to red.
Confirm with ENTER and Press MODE twice to return to the main display. The main display is
automatically activated if no input is made within about 30 seconds.
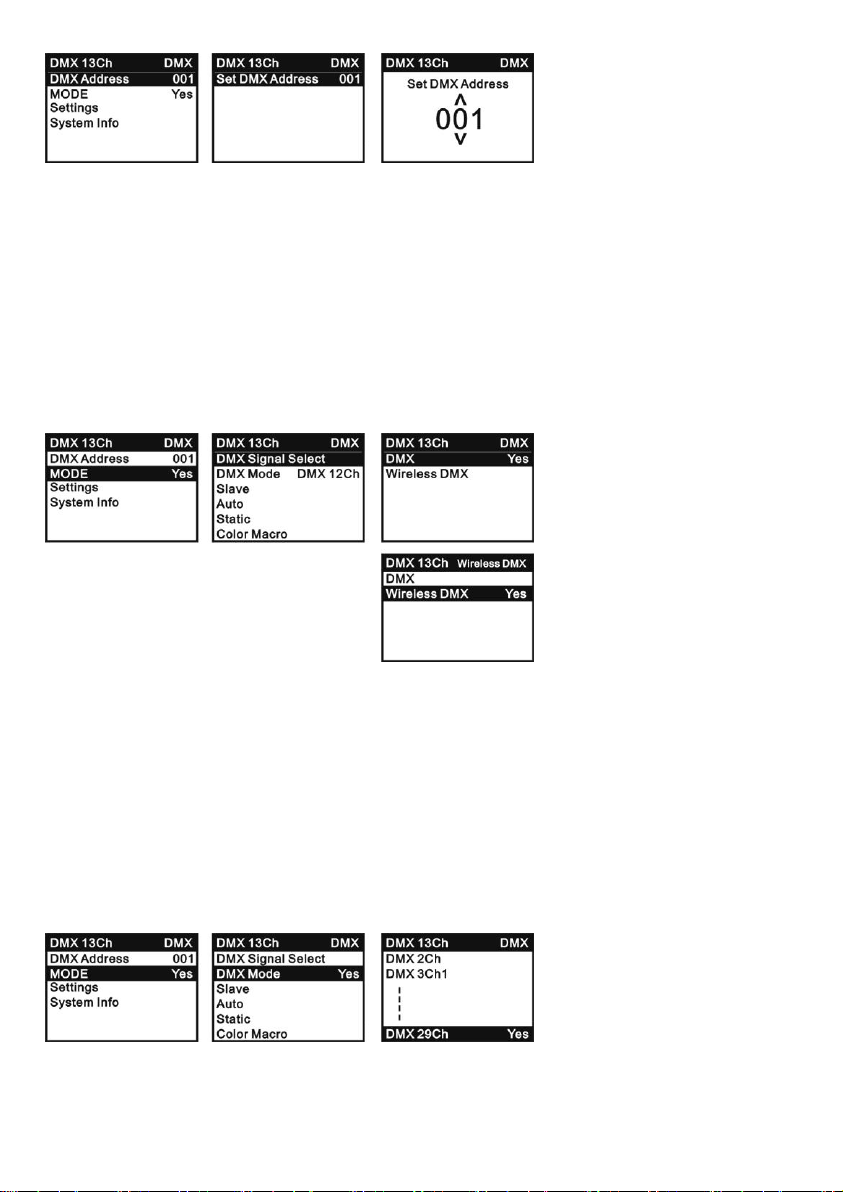
SETTING THE DMX SIGNAL SELECT(DMX SIGNAL SELECT)
Pressing MODE will take you to the selection menu for system settings. Using UP and DOWN, select
the menu item “MODE” (colored background) and confirm with ENTER. Now use the UP and DOWN
buttons once more to select the “DMX SIGNAL SELECT”sub-menu item and confirm button pressing
ENTER. Using UP and DOWN, select the desired DMX mode(DMX, Wireless DMX)and confirm with
ENTER. Press MODE twice to return to the main display. the main display is automatically activated if
no input id made within about 30 seconds. You will find tables with the channels of the different DMX
Signal in this manual under DMX SIGNAL CONTROL.
SETTING THE DMX MODE(DMX MODE)
Pressing MODE will take you to the selection menu for system settings. Using UP and DOWM, select
the menu item“MODE” (colored background) and confirm with ENTER. Now use the UP and DOWN
buttons once more to select the “DMX MODE”sub-menu item and confirm button pressing ENTER.
Using UP and DOWN, select the desired DMX mode(DMX 2Ch,DMX 3Ch1,DMX 3Ch2,DMX 4Ch,DMX
13Ch,DMX 16Ch,DMX29 Ch)and confirm with ENTER. Press MODE twice to return to the main display.
the main display is automatically activated if no input id made within about 30 seconds. You will find
tables with the channels of the different DMX modes in this manual under DMX CONTROL.

SETTING THE SLAVE MODE(Slave)
Pressing MODE will take you to the selection menu for system settings. Using UP and DOWN, select
the menu item“MODE” (colored background) and confirm with ENTER. Now use the UP and DOWN
buttons once more to select the “DMX MODE”sub-menu item and confirm button pressing ENTER and
press MODE twice to return to the main display. The main display id automatically activated if no id
made within about 30 seconds, Connect the slave and the master unit(same model)with a DMX cable
and activate one of the standalone modes(Auto, Static, Color Macro)on the master unit. Now the slave
unit follows the master unit.
SETTING THE AUTOMATIC CONTROL MODE(Auto)
Pressing MODE will take you to the selection menu for system settings. Using UP and DOWN, select
the menu item“MODE” (colored background) and confirm with ENTER. Now use the UP and DOWN
buttons once more to select the “Auto”sub-menu item and confirm button pressing ENTER, Using UP
and DOWN ,you can now select between Auto additional sub-menu items“Auto Fading”and“Auto
Jumping”.Select“Auto Fading”, Press ENTER again to select the auto fading speed(000-255) as desired
button using the UP and DOWM button. If set the “Auto Jumping”, Press ENTER again to select the
auto jumping speed(000-255) as desired button using the UP and DOWM buttons.
STATIC MODE(Static)
In the same way as with a DMX control unit, the static mode allows you adjust an functions such as
Dimmer, Red, Green, Blue, White and Strobe directly on the device with values from 000 to 255.Thus,
an individual scene can be created without an additional DMX controller ,pressing MODE will take you
to the selection menu for system settings .Using UP and Down, select the menu item “Static” (colored
background) and confirm with ENTER, Use the UP and DOWN buttons to select the function of the LED
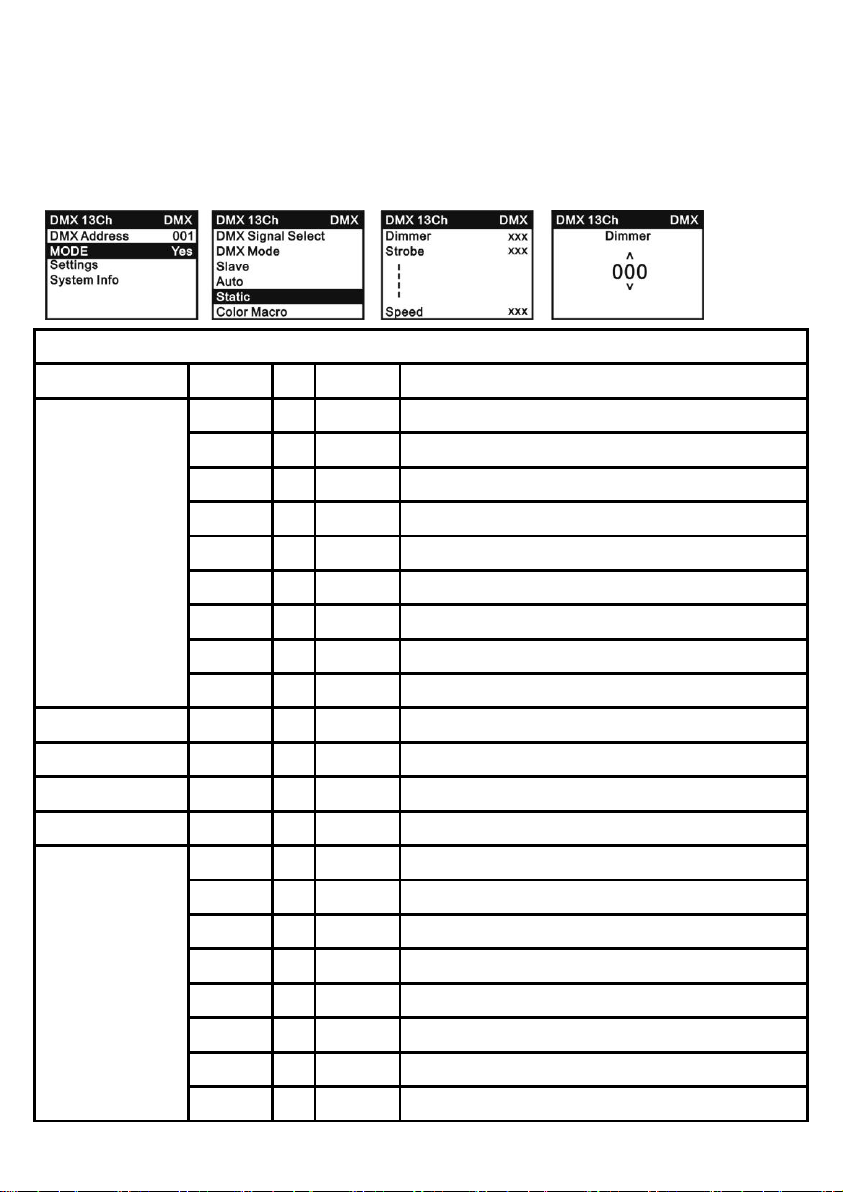
Wash that you wish to edit and confirm button pressing ENTER. The value (dimmer, Red, Green, Blue,
White, etc.)of the corresponding function can now be set from 000-255 and press ENTER to confirm
the input. Once all of the parameters have been set as desired, press MODE three to the main display.
The main display is automatically activated if no input made within 30 seconds.
STATIC
Dimmer
000
-
255
0% to 100%
Strobe
000
-
005
Strobe open
006
010
Strobe closed
011
-
033
Plus Random, slow->fast
034
-
056
Ramp up Random, slow -> fast
057-
-
0796
Ramp down Random, slow -> fast
080
-
102
Random Strobe Effect, slow -> fast
103
-
127
Strobe Break Effect, 5s…..1s (Short burst with break)
128
-
250
Strobe slow -> fast <1Hz - 20Hz
251
-
255
Strobe open
Red
000
-
255
0% to 100%
Green
000
-
255
0% to 100%
Blue
000
-
255
0% to 100%
White
000
-
255
0% to 100%
Rainbow
000
-
005
Rainbow off
006
-
021
Rainbow1
022
-
037
Rainbow2
038
-
053
Rainbow3
054
-
069
Rainbow4
070
-
085
Rainbow5
086
-
101
Rainbow6
102
-
117
Rainbow7

118
-
133
Rainbow8
134
-
149
Rainbow9
150
-
165
Rainbow10
166
-
181
Rainbow11
182
-
197
Rainbow12
198
-
213
Rainbow13
214
-
229
Rainbow114
230
-
255
Rainbow15
Auto Program
000
-
005
No function
006
-
030
Auto Program1
031
-
055
Auto Program2
056
-
080
Auto Program3
081
-
105
Auto Program4
106
-
130
Auto Program5
131
-
155
Auto Program6
156
-
180
Auto Program7
181
-
205
Auto Program8
206
-
230
Auto Program9
231
-
255
Auto Program10
Auto speed
000
-
255
Auto speed
SETTING THE COLOR MACRO MODE(Color Macro)
Pressing MODE will take you to the selection menu for system settings. Using UP and DOWN, select
the menu item“MODE” (colored background) and confirm with ENTER. Now use the UP and DOWN
buttons once more to select the “Color Macro”sub-menu item and confirm button pressing ENTER,
Using UP and DOWN ,you can now select 15 different color macros are available as presets: “Red”,
“Amber” ,“Yellow Warm”, “Yellow” ,“Green” ,“Turquoise” ,“Cyan” ,“Blue”, “Lavender”,
“Mauve” ,“Magenta” ,“Pink” ,“Warm White”, “White”and“Cold White”,Press ENTER and exit. press
MODE three to the main display. The main display is automatically activated if no input made within 30
seconds.

DEVICE SETTINGS(Setting)
Pressing MODE will take you to the selection menu for system settings. Using UP and DOWN, select
the menu item“Setting” (colored background) and confirm with ENTER. You will then be taken to the
sub-menu to set the sub-menu items(set list).The main display is automatically activated if no input is
made within about 30 seconds.
setting
Display Rev
=
Flip Display
ON
=Rotation of the display by 180°
(e.g.over head installation)
OFF
=no rotation of the display
Display
=
Display lighting
ON
=permanently on
OFF
=deactivation after approx.1
minutes of inactivity
DMX Fail
=
Operation status with
DMX
signal interruption
Hold
=last command is held
Blackout
=activates Blackout
Dimmer Curve
=
Dimmer Curve
Linear
=The light intensity increases
linearly with the DMX value
Exp
=Adjustment of the light intensity is
finer in the lower DMX value range
and coarser in the upper DMX
value range
Log
=Adjustment of the light intensity is
coarser in the lower DMX value
range and finer in the upper DMX

value range
S Curve
=Adjustment of the light intensity is
finer in the lower and upper DMX
value ranges and coaster in the
middle DMX value range
Dimmer Response
=
Dimmer response
LED
=The spotlight responds abruptly to
changes in the DMX value
Halogen
=The spot behaves in a manner
similar to that of a halogen lamp
with gentle changes in brightness
White Balance
=
White balance
Red, Green,
Blue, White
=Individual white balance. Cross-operating
mode setting of the 4 RGBW LED groups
Fan Set
=
Fan speed
Auto
=According to the LED temperature
to control the fan speed
High
=The fan at high speed
Wireless DMX
=
Reset Wireless DMX
Memory
No
=do not reset wireless DMX
Yes
= Reset Wireless DMX Memory
Test
=
Function test
OFF
=stops the function test
ON
=step-by-step function test of LEDs
Factory Reset
=
Reset to factory set
OFF
=do not perform reset
ON
= Reset to factory setting
Key lock
=
The key lock switch
OFF
=Key lock closure
ON
= Key lock closure, As the key lock
opens, display screen backlight 30
seconds out, button is locked, need
operation buttons, first to ENTER a
password to unlock, ENTER the
password to operation display
panel buttons UP, DOWM, UP,
DOWN, press ENTER to unlock,
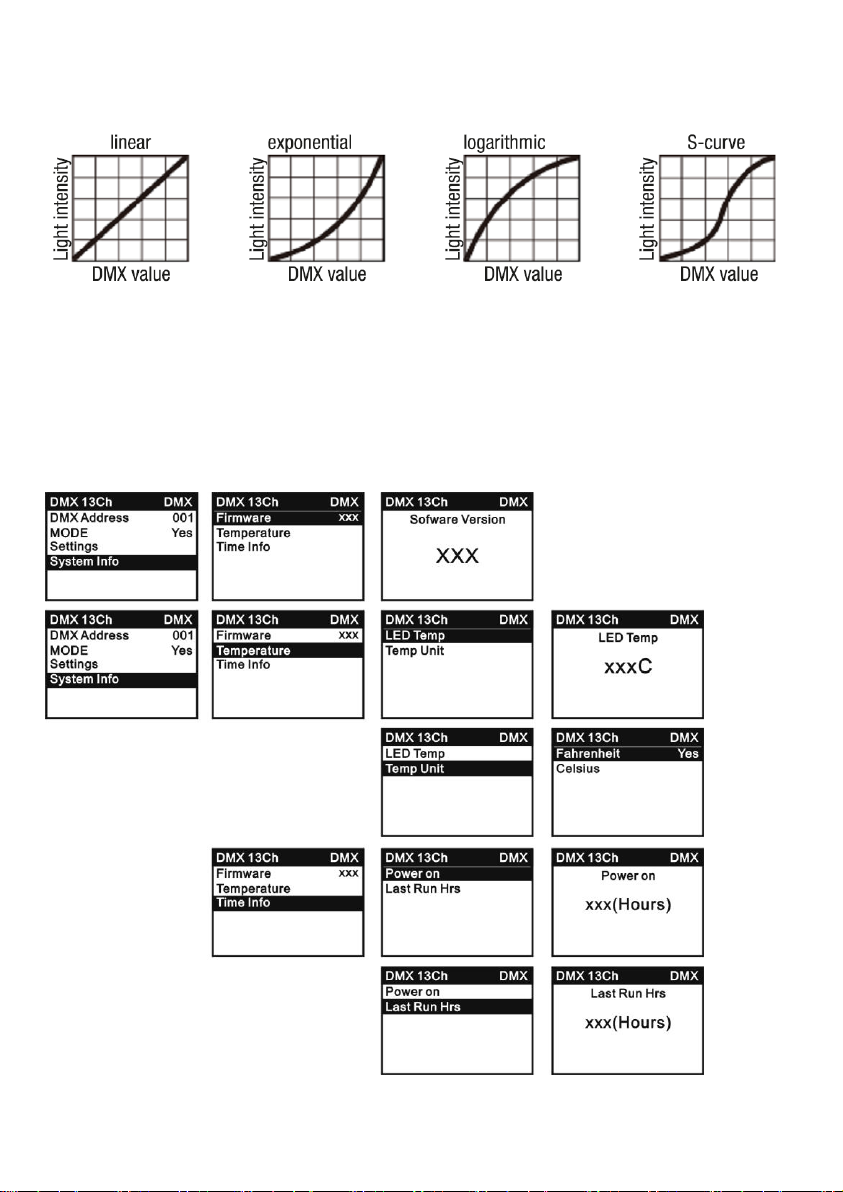
DIMMER CURVES
DEVICE INFORMATION(System Info)
Pressing MODE will take you to the selection menu for system settings. Using UP and DOWN, select
the menu item“System Info” (colored background)and confirm with ENTER. You will then be taken to
the sub-menu to display the device information. Use the UP and DOWN panels again to select the
desired sub-menu item and then press ENTER to retrieve the information.
Table of contents
Languages:
Other Evolights Lighting Equipment manuals


Popular Lighting Equipment manuals by other brands


LIGMAN
LIGMAN Mic 3 Installation and service manual

Velleman
Velleman VDLNS7 quick start guide

Glow Bricks
Glow Bricks Disney Castle Lego 43222 installation guide

Kichler Lighting
Kichler Lighting EYRIE instruction manual

Milwaukee
Milwaukee HEAVY DUTY M18 HOAL Original instructions

Commercial Electric
Commercial Electric 0018-0005 Use and care guide


