Elumen8 Kudos 2RE Beam User manual

Order code: ELUM701
Kudos 2RE Beam
User Manual

www.prolight.co.uk Kudos 2RE Beam User Manual 2
Safety advice
WARNING
FOR YOUR OWN SAFETY, PLEASE READ THIS USER MANUAL
CAREFULLY BEFORE YOUR INITIAL START-UP!
• Before your initial start-up, please make sure that there is no damage caused during transportation.
• Should there be any damage, consult your dealer and do not use the equipment.
• To maintain the equipment in good working condition and to ensure safe operation, it is necessary
for the user to follow the safety instructions and warning notes written in this manual.
• Please note that damages caused by user modications to this equipment are not subject to warranty.
IMPORTANT:
The manufacturer will not accept liability for any resulting damages caused by the non-observance
of this manual or any unauthorised modication to the equipment.
CAUTION!
KEEP THIS EQUIPMENT
AWAY FROM RAIN,
MOISTURE AND LIQUIDS
CAUTION!
TAKE CARE USING
THIS EQUIPMENT!
HIGH VOLTAGE-RISK
OF ELECTRIC SHOCK!!
• Never let the power cable come into contact with other
cables. Handle the power cable and all mains voltage
connections with particular caution!
• Never remove warning or informative labels from the unit.
• Do not open the equipment and do not modify the unit.
• Do not connect this equipment to a dimmer pack.
• Do not switch the equipment on and off in short intervals,
as this will reduce the system’s life.
• Only use the equipment indoors.
• Do not expose to ammable sources, liquids or gases.
• Always disconnect the power from the mains when
equipment is not in use or before cleaning! Only handle
the power-cable by the plug. Never pull out the plug by
pulling the power-cable.
• Make sure that the available mains supply voltage is
between 100~240V AC, 50/60Hz.
• Make sure that the power cable is never crimped or
damaged. Check the equipment and the power cable
periodically.
• If the equipment is dropped or damaged, disconnect the
mains power supply immediately and have a qualied
engineer inspect the equipment before operating again.
• If the equipment has been exposed to drastic
temperature uctuation (e.g. after transportation),
do not connect power or switch it on immediately.
The arising condensation might damage the equipment.
Leave the equipment switched off until it has reached
room temperature.
• If your product fails to function correctly, stop use
immediately. Pack the unit securely (preferably in the
original packing material), and return it to your Prolight
dealer for service.
• Only use fuses of same type and rating.
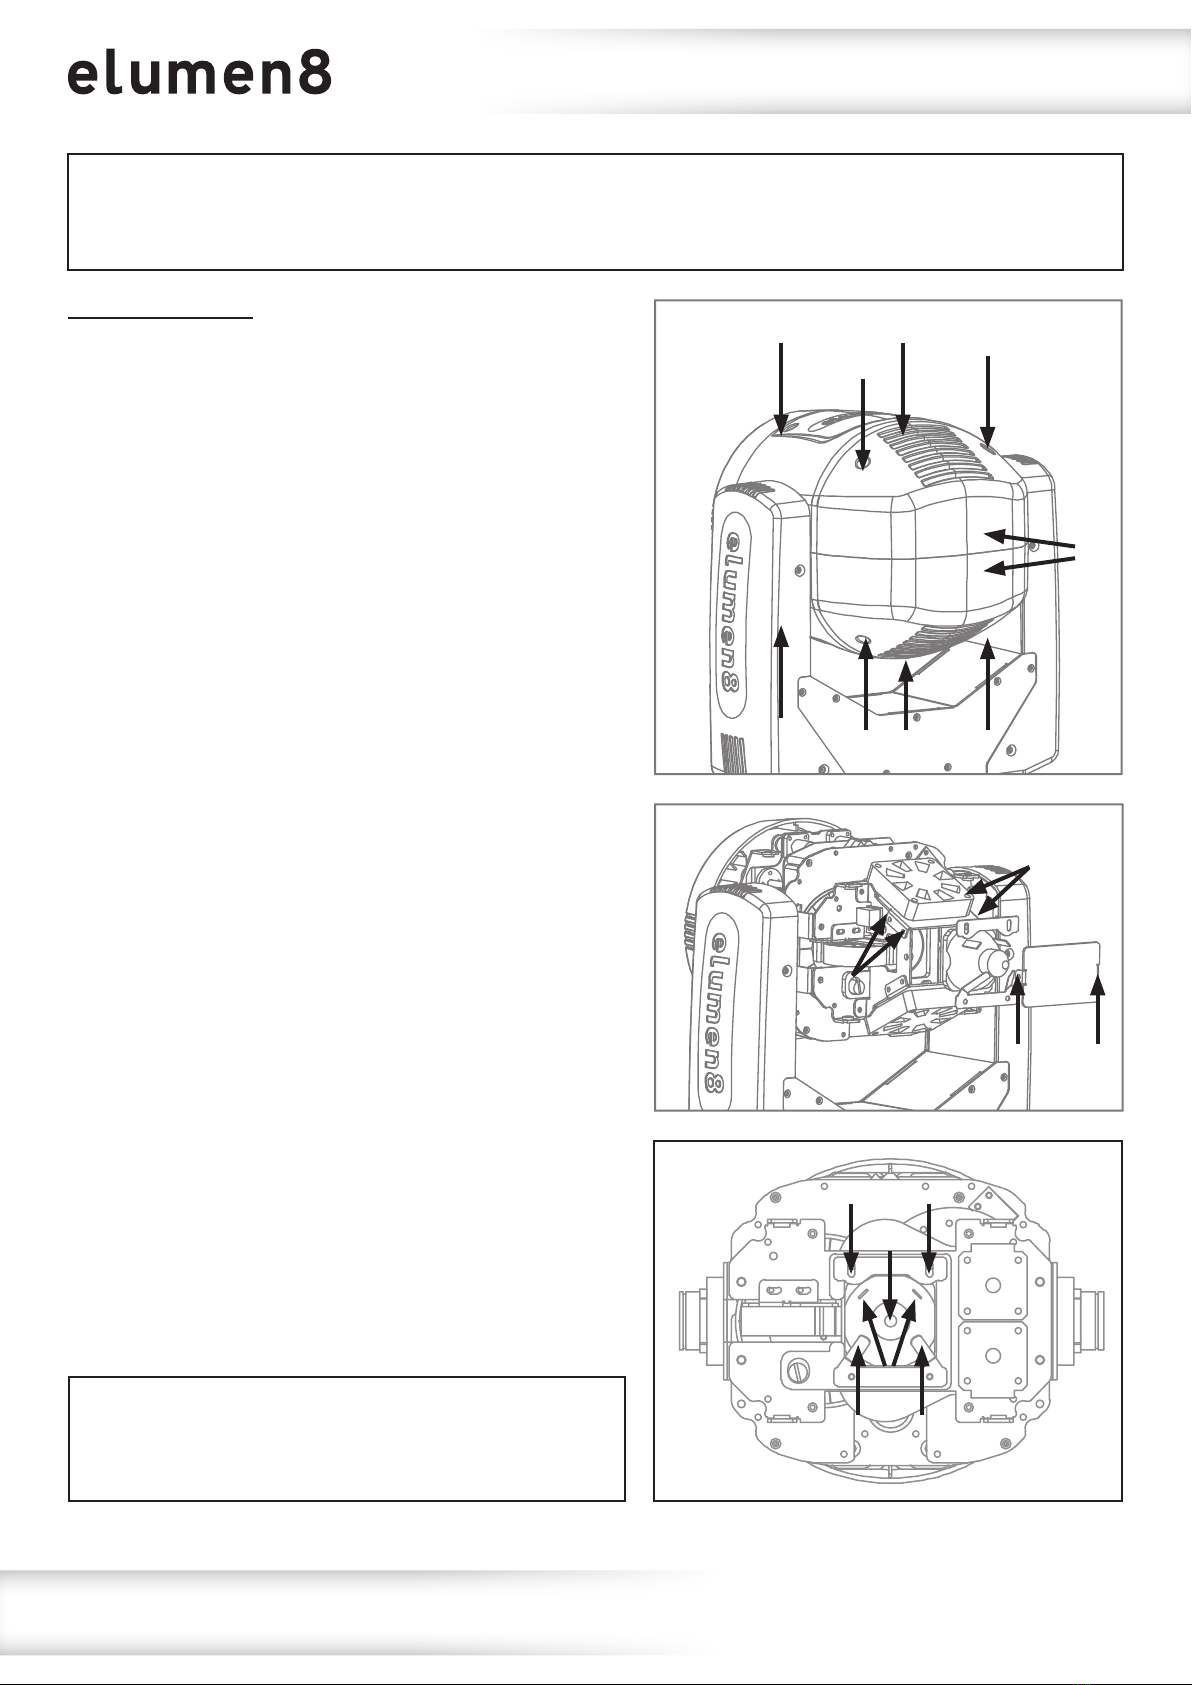
• We recommend this xture should be serviced at least
once every 3 months to prevent build-up of dust, dirt and
debris that could affect the xtures operation.
• Repairs, servicing and power connection must only be
carried out by a qualied technician. THIS UNIT CONTAINS
NO USER SERVICEABLE PARTS.
• This lighting xture is for professional use only - it is
not designed for or suitable for household use. The
product must be installed by a qualied technician in
accordance with local territory regulations. The safety of
the installation is the responsibility of the installer. The
xture presents risks of severe injury or death due to re
hazards, electric shock and falls.
• Warning! Risk Group 2 LED product according to
EN 62471. Do not view the light output with optical
instruments or any device that may concentrate the beam.
• High power lighting xtures are capable of producing
powerful, concentrated beams of light that can create a
re hazard or a risk of eye injury if the safety precautions
are not followed.
• WARRANTY: Two years from date of purchase.
OPERATING DETERMINATIONS
If this equipment is operated in any other way, than
those described in this manual, the product may suffer
damage and the warranty becomes void. Incorrect
operation may lead to danger e.g: short-circuit, burns
and electric shocks etc. Do not endanger your own
safety and the safety of others!
Incorrect installation or use can cause serious damage
to people and/or property.

www.prolight.co.uk Kudos 2RE Beam User Manual 3
Safety advice
This xture falls under Protection Class 1, therefore it has to be connected
to a mains socket with a protective earthing connection.
Risk group 2, RG-2: CAUTION!
Do not stare at exposed lamp in operation as it may damage/be harmful to
the eyes. Avoid looking directly into the light source.
WARNING!
The minimum distance between the light output and illuminated objects/surfaces
must be equal to or greater than 10 meters (33ft).
CAUTION!
If the lens gets damaged ie. cracks or deep scratches so the output is impaired
then it must be replaced.
CAUTION!
The maximum ambient temperature (Ta) of 40° must not be exceeded.
CAUTION!
The lamp must be replaced if damaged or deformed!
CAUTION!
Turning the xture on and off in short intervals will reduce the lamp life.
CAUTION!
To avoid damage to internal parts ie. optics, colour lters, gobos, prisms, frost
lters, shutters, motors, belts, wiring or lamps. Never expose the lens to direct
sunlight, lighting xtures or lasers even when the xture is not in use.

www.prolight.co.uk Kudos 2RE Beam User Manual 4
Product overview
• 2 year warranty
• 1 x Osram® SIRIUS HRI 132W (2R) discharge lamp (9200K)
• Beam angle: 4°
• 103,000 Lux @ 10m
• Motorised focus
• CRI: 60
• 8 facet circular rotating prism
• Frost lter
• Gobo wheel: 15 static gobos + open
• Colour wheel: 14 colours + open
• DMX channels: 2/12 or 16 selectable
• Auto, sound active, manual control and master/slave modes
• Forward facing show mode
• Pan/tilt auto correction
• 16-Bit pan/tilt positioning
• Pan: 540°, Tilt: 270°
• 0 - 100% dimming
• Variable strobe
• Quick release omega clamps included
• 4 push button menu with 2.6” LCD display
• PowerCON TRUE1 input/output
• 5-Pin XLR input/output
• Fan cooled
Kudos 2RE Beam
Specications Kudos 2RE Beam
Power consumption 213W
Power supply 100~240V, 50/60Hz
Fuse F4A 250V
Dimensions 405 x 305 x 190mm
Weight 9kg
Order code ELUM701
Loaded with an intense Osram® SIRIUS HRI 132W (2R) discharge lamp (9200K), the eLumen8 Kudos 2RE Beam
features 14 colours (plus open) and 15 static gobos (plus open). A tight 4° beam angle and motorised focus
allows users to create sharp, well dened beams. This compact moving head also features an 8 facet rotating
prism for multi beam effects along with a frost lter enabling the lighting designer to select a host of options to
creating stunning light shows. An on-board 4 push button menu with 2.6” LCD display, and selectable 16-Bit pan
and tilt with auto correction make the Kudos 2RE Beam a truly ‘event ready’ xture.
0m 5m 10m 15m 20m
3° - Lux 412000 103000 45778
3°
25750

www.prolight.co.uk Kudos 2RE Beam User Manual 5
Technical specications
230mm
405mm
380mm
190mm
305mm
280mm
96mm
336mm
282mm 180mm
90mm
POWER INPUT
100-240V~50/60Hz
POWER OUTPUT
FUSE:
F4A 250V
DMX INPUT DMXOUTPUT
POWERCONSUMPTION: 217W
www.prolight.co.uk
+
POWER INPUT
100-240V~50/60Hz
POWER OUTPUT
FUSE:
F4A 250V
DMX INPUT DMX OUTPUT
POWERCONSUMPTION: 217W
www.prolight.co.uk
+

www.prolight.co.uk Kudos 2RE Beam User Manual 6
Technical specications
In the box: 1 x xture,
2 x omega clamps
& 1 x power cable
0604 07
POWER INPUT
100-240V~50/60Hz
POWER OUTPUT
FUSE:
F4A 250V
DMX INPUT DMX OUTPUT
POWER CONSUMPTION: 217W
www.prolight.co.uk
+
POWER INPUT
100-240V~50/60Hz
POWER OUTPUT
FUSE:
F4A 250V
DMX INPUT DMX OUTPUT
POWER CONSUMPTION: 217W
www.prolight.co.uk
+
02 0301 05 08
01 - Status LEDs
02 - LCD display
03 - Function buttons
04 - 5-Pin DMX input
05 - 5-Pin DMX output
06 - PowerCON TRUE1 input
07 - PowerCON TRUE1 output
08 - Fuse F4A 250V
09 - Fans
0909

www.prolight.co.uk Kudos 2RE Beam User Manual 7
Installation
Before installing the xture, the supporting structure (ie. truss) must be able to hold a minimum of 10
times the xtures weight without any deformation (eg. 15kg - 150kg point load). The xture must be
secured with a secondary safety attachment when being installed (ie. an appropriate safety cable).
Never stand directly below the xture when mounting, removing, and/or servicing.
Overhead installation requires experience and qualications to calculate working load limits, the
material being used at the installation area and periodic safety inspections of the xture and installation
material. If you do not have the relevant experience and/or qualications please do not attempt the
installation yourself. The installation should be checked annually by a qualied person.
The Kudos 2RE Beam can be operated where the base of the xture is horizontally orientated, this
includes standing the xture upright on a at, level surface or hanging the xture upside down. Do
NOT install the xture in a sideways position or in a position where the base of the xture is orientated
vertically or at an angle. Always use a safety wire as an extra safety precaution to prevent damage/injury
in the event a clamp fails (see the next page for clamp installation). Never use the carry handles for
secondary attachments.

www.prolight.co.uk Kudos 2RE Beam User Manual 8
Installation
Installation:
1. Fasten each clamp to the omega clamps with a bolt and lock nut through the hole in the
omega clamp.
2. Align and insert the omega clamp quick-lock fasteners with the respective holes on the bottom
of the unit.
3. Tighten both locking fasteners clockwise on each omega clamp ensuring they’re fully secure.
4. Mount the xture onto your truss system via the clamps and tighten to ensure secure.
5. Pull the safety cable through the safety cable holes located on the metal base plate on the
underside of the xture and around the truss.
1
2
5
3
4

www.prolight.co.uk Kudos 2RE Beam User Manual 9
Discharge Lamp Warnings/Replacement
Discharge Lamp Warning:
This xture is tted with a OSRAM SIRIUS HRI 132W (2R) Discharge Lamp, which is highly prone to
damage if improperly handled. NEVER touch the lamp with your bare hands, as the oil from your hands
will shorten the life of the lamp. NEVER move the lamp until the unit has had the appropriate time to
cool. Discharge lamps are NOT covered under the warranty that comes with this xture. Avoid switching
the xture ON and OFF repeatedly in short durations as this will reduce the lamps life and intensity. To
achieve the intensity discharge lamps are renowned for, the lamp uses gas sealed in a high pressure
environment.
Due to this high pressure involved with the manufacture of the lamp, it MAY EXPLODE DURING
PROLONGED EXTENSIVE USE. This risk is increased with age and we recommend extra care is taken
when dealing with older lamps. The lamp must be replaced at the end of its recommended duty cycle.
Extreme caution should be taken when operating this or any xture tted with a discharge lamp.
Lamp replacement:
To ensure a safe lamp change please read the following instructions carefully.
The OSRAM SIRIUS HRI 132W (2R) Lamp MUST be replaced every 6,000 hours or when damaged
and/or deformed. When the lamp needs replacing the Error menu will show “Lamp Error”.
See page 10 for instructions on changing the lamp. Only use GENUINE OSRAM Lamps.
Other branded lamps will cause damage and will void the xtures warranty.
Disconnect the xtures power supply before replacing the lamp. Let the xture cool for a minimum
of 60 minutes before replacing the lamp.
Never touch the lamp with bare hands, always wear gloves as oil from hands will shorten the lamps life.
Make sure all covers/casings are replaced/secured before operating the xture to prevent risk and/or
damage to the eyes retina.
Discharge Lamp Installation:
2. 3.1.

www.prolight.co.uk Kudos 2RE Beam User Manual 10
Inserting a new lamp:
1. Disconnect the xture from the mains and allow it to cool for
a minimum of 60 minutes.
2. Loosen the 8 screws (1) on the head and remove the head
housing (2) to access the lamp compartment.
3. Loosen the 6 screws (3) on the back of the head and remove
the two metal plates (4) to access the lamp compartment.
4. Remove both Fastons (terminal connectors) (5) from the at
blades of the lamp.
5. Loosen the 2 screws (6) on the metal latch holding the lamp (do
not remove these totally, a half turn will sufce.)
6. Holding the lamp by the ceramic base (7), gently slide the metal
latch upwards and pull the lamp outwards and upwards at the same
time to release it from the spring clips (8).
7. Holding the new lamp by its ceramic base (7), gently inset the
lamp into the lamp compartment with the bottom side rst to t into
the spring clips. (The Fastons should be facing upwards.)
Only use the recommended lamp. Damages caused by not following
the guidelines outlined in this manual are not subject to warranty.
Please follow the lamp manufacturers notes.
Warning! Do not touch the lamp envelope with bare hands. Should
this happen the bulb must be cleaned with a cloth soaked in alcohol
and dried once cleaned.
8. Slide both Fastons (5) onto the lamp ensuring the correct wires
are attached to the correct Faston (black - left and red - right).
9. Re-tighten the metal latch ensuring it has been pushed
downwards to stop the lamp coming loose (6) and re-insert both
metal plates (4) with the 6 screws (3).
10. Fit the head housing back onto the chassis (2) and tighten with
the 8 screws (1).
11. Connect the xture to the mains.
12. Reset the ‘Lamp Hours’ in the xtures menu. (See page 15
‘Lamp Time’ for instructions on how to clear the lamp hours.)
Changing the Lamp
DANGER!
Unplug the xture from the mains before replacing the lamp!
Never operate this xture without the lamp!
Do not operate this xture without all
external covers!
1
11 1 1
3
3
3
5
8 8
7
6 6
3
4
4
1
1
1
2

www.prolight.co.uk Kudos 2RE Beam User Manual 11
Lamp Adjustment
Lamp adjustment:
The lamp holder is aligned at the factory. Due to slight differences between lamps, the ne adjustment
of a lamp may improve the light performance.
For lamp adjustment please use the 4 screws on the lamp assembly plate marked A and the adjustment
screw marked B.
To adjust the lamp in the xture:
1. Connect the xture to the mains and switch on the lamp, open the shutter (strobe) and dimmer and
set the focus. Colour wheel and gobo wheel should be open and check the image on the wall.
2. Disconnect the xture from the mains.
3. Loosen the 8 screws (1) on the head and remove the head housing (2) to access the lamp
compartment.
4. Loosen the 6 screws (3) on the back of the head and remove the two metal plates (4) to access the
lamp compartment.
5. Loosen the 4 screws on the lamp assembly plate labelled (A).
(Do not remove these totally, a half turn will sufce.)
6. Move the lamp into the required position (left/right) by using a suitable at headed screwdriver
inserted into the adjustment screw labelled B and rotate clockwise (lamp moves left)/anti-clockwise
(lamp moves right) until the lamp has been adjusted to your requirements.
7. Tighten the 4 screws on the lamp assembly plate (A).
8. Re-insert both metal plates (4) with the 6 screws (3).
9. Fit the head housing back onto the chassis (2) and tighten with the 8 screws (1).
10. Connect the xture to the mains and check the adjustment is now correct.
11. If the xture needs further adjustment repeat steps 2-10.
Image on the wall
Centred Lamp
The lamp MUST be adjusted with the xture disconnected from the mains!
Do not operate this xture without all external covers!
A
B
A
A
A

www.prolight.co.uk Kudos 2RE Beam User Manual 12
Lamp Adjustment
Lamp adjustment continued:
Due to light refraction, the lamp should be moved in the direction of the hotspot to centralise it.
Please see diagram below.
Image on the wall
Move the lamp
to the right
Image on the wall
Move the lamp
to the left
Please note: The adjusted hotspot may move during the rst 100 hours of lamp
operation as the lamp stabilises whilst its burning. Please adjust the lamp if the
hotspot moves out of the centre.

www.prolight.co.uk Kudos 2RE Beam User Manual 13
Operating instructions
Control Panel Menu:
The LCD control panel situated on the front of the xture allows the user to access the menu system to
adjust the xtures settings.
When the unit has been powered on the display will show “Software Update” elumen8 Kudos 2RE
Beam. The blue progress bar indiates the xture performing a motor reset. The xture will then return to
its home screen.
Pressing the “ENTER” button once will take the user to the xtures main menu. Using the “UP” and
“DOWN” buttons you can then navigate between the different options in the main menu. Pressing the
“ENTER” button on one of these options allows you to access the sub menu where you can use the “UP”
and “DOWN” buttons to select option/value required. Once the option/value has been selected press
the “ENTER” button once more to conrm the setting.
To exit out of any of the above options, press and hold the “MENU” button.
Error Codes:
When the unit is powered on it will automatically perform a motor reset. If there is a problem with any of
the motors this will show under the error log in the main menu. Please power the unit off and on to reset
the motors again. (The full list of errors codes can be found below).
Kudos
2RE Beam
DMX
SOUND
MENU
UP
DOWN
ENTER
POWER INPUT
100-240V~50/60Hz
POWER OUTPUT
FUSE:
F4A 250V
DMX INPUT DMX OUTPUT
POWER CONSUMPTION: 217W
www.prolight.co.uk
Errors
Pan Error Error with Pan Reset/Pan Opto Sensor
Tilt Error Error with Tilt Reset/Tilt Opto Sensor
Shutter Error Error with Shutter Reset/Shutter Sensor
Colour Wheel Error Error with Colour Wheel Reset/Colour Wheel Sensor
Gobo Wheel Error Error with Gobo Wheel Reset/Gobo Wheel Sensor
Prism Error Error with Prism Reset/Prism Sensor
Frost Error Error with Frost Reset/Frost Sensor
Focus Error Error with Focus Reset/Focus Sensor
Lamp Startup Fail No Lamp tted/Lamp has Failed
Lamp Too Hot Lamp is too hot, (turns lamp off automatically)
Temperature Error Fixture too hot/temperature sensor error
Fan Error Fan has failed

www.prolight.co.uk Kudos 2RE Beam User Manual 14
Operating instructions
Main Menu Sub Menu Options/Values (Default Settings in BOLD) Description
1. DMX Address 001-512 DMX Address Setting
2. Channel Mode
02CH
DMX Channel Mode12CH
16CH
3. Show Mode
Show 1
Show Modes
Show 2
Show 3
Show 4
4. Master/Slave
Master Master Setting
Slave 1 Slave 1 - Copies the master
Slave 2 Slave 2 - Copies the master
with pan invert
5. Sound Off Sound Mode
On
6. Sound Sensitivity 000-100 (080) Sound Sensitivity Setting
7. Manual Control
Pan
000-255 Manual Control Setting
Pan Fine
Tilt
Tilt Fine
PT Spd
Colour
Gobo
Strobe
Dimmer
Prism1
Prism1.R
Frost
Focus
8. Pan Invert Off Pan Invert Setting
On
9. Tilt Invert Off Tilt Invert Setting
On
10. DMX Fail
Hold
DMX Fail SettingBlackout
Show Mode
11. Lamp On Off Lamp On Setting
On
12. Lamp On Power
Off For the lamp to come
on when the xture is
powered on
On

www.prolight.co.uk Kudos 2RE Beam User Manual 15
Operating instructions
Main Menu Sub Menu Options/Values (Default Settings in BOLD) Description
13. Off Via DMX Off Sets whether lamp control is
accessible via DMX
On
14. On if DMX On
Off Sets whether the lamp is
switched on when connected
to DMX
On
15. Off if DMX Off
Off Sets whether the lamp
is switched off when
disconnected from DMX
On
16. Ignite Delay 000-255 (30s)
Sets the delay time in
seconds before the lamp
ignites from power on
17. BL.O P/T
Off Sets whether the xture
blacks out whilst panning/
tilting
On
18. BL.O Colour
Off Sets whether the xture
blacks out whilst changing
colour
On
19. BL.O Gobo
Off Sets whether the xture
blacks out whilst changing
gobo
On
20. Display Backlight Off Sets the display backlight
On
21. Display Invert
Off
Sets whether the display is
inverted or auto inverts
On
Auto
22. Auto Test Testing Tests functions and motors
23. Fixture Time x:xx Fixtures total run time
(hours:minutes)
24. Lamp Time
Lamps total run time
(hours: minutes)
x:xx
Password xxx Password (088)
Lamps total run time
(hours: minutes)
No Does not clear lamp time
Yes Clears lamp Time
25. Version Vx.x Software Version
26. Motor Reset No Motor Reset Setting
Yes
27. Factory Settings No Factory Defaults Setting
Yes

www.prolight.co.uk Kudos 2RE Beam User Manual 16
Operating instructions
Main Menu Sub Menu Options/Values (Default Settings in BOLD) Description
28. Offset
1. Static Gobo -128 - 127
Offset Menu
2. Colour -128 - 127
3. Focus Adj -128 - 127
4. Pan Adj -128 - 127
5. Tilt Adj -128 - 127
6. XY Scan Spd -128 - 127
7. Prism Half -128 - 127
8. Frost Half -128 - 127
9. Dimmer Offset -128 - 127
10. Pan Route -128 - 127
11. Tilt Route -128 - 127
12. Focus Route -128 - 127
13. Prism1 Route -128 - 127
14. Frost Route -128 - 127
15. 7color Route -128 - 127
16. Dimmer Route -128 - 127
17. Check lamp On/ Off
29. Errors Please see page 9 for
error codes

www.prolight.co.uk Kudos 2RE Beam User Manual 17
Operating instructions
Channel Value Function Default Values
2CH 12CH 16CH
- 1 1 000-255 Pan movement (8 bit) 127
- - 2 000-255 Pan ne (16 bit) 127
- 2 3 000-255 Tilt movement (8 bit) 000
- - 4 000-255 Tilt ne (16 bit) 000
- 3 5 000-255 Pan/tilt speed (fast-slow) 000
- 4 6
Colour Wheel
000-004 Open
000
005-008 Open/Red
009-012 Red
013-017 Red/Deep Yellow
018-021 Deep Yellow
022-025 Deep Yellow/Sky Blue
026-029 Sky Blue
030-034 Sky Blue/Green
035-038 Green
039-042 Green/Lime Green
043-046 Lime Green
047-051 Lime Green/UV
052-055 UV
056-059 UV/Pink
060-063 Pink
064-068 Pink/Yellow
069-072 Yellow
073-076 Yellow/Magenta
077-081 Magenta
082-085 Magenta/Blue
086-089 Blue
090-093 Blue/3200K
094-098 3200K
099-102 3200K/Amber
103-106 Amber
107-110 Amber/5600K
111-115 5600K
116-119 5600K/Deep Blue
120-123 Deep Blue
124-127 Deep Blue/Open
128-190 Colour wheel CW rotation (fast-slow)
191-255 Colour wheel CCW rotation (slow-fast)
DMX channel modes:

www.prolight.co.uk Kudos 2RE Beam User Manual 18
Operating instructions
Channel Value Function Default Values
2CH 12CH 16CH Gobo Wheel
- 5 7
000-004 Open
000
005-009 Gobo 1
010-014 Gobo 2
015-019 Gobo 3
020-024 Gobo 4
025-029 Gobo 5
030-034 Gobo 6
035-039 Gobo 7
040-044 Gobo 8
045-049 Gobo 9
050-054 Gobo 10
055-059 Gobo 11
060-064 Gobo 12
065-069 Gobo 13
070-074 Gobo 14
075-079 Gobo 15
080-084 Gobo 1 Shake (slow to fast)
085-089 Gobo 2 Shake (slow to fast)
090-094 Gobo 3 Shake (slow to fast)
095-099 Gobo 4 Shake (slow to fast)
100-104 Gobo 5 Shake (slow to fast)
105-109 Gobo 6 Shake (slow to fast)
110-114 Gobo 7 Shake (slow to fast)
115-119 Gobo 8 Shake (slow to fast)
120-124 Gobo 9 Shake (slow to fast)
125-129 Gobo 10 Shake (slow to fast)
130-134 Gobo 11 Shake (slow to fast)
135-139 Gobo 12 Shake (slow to fast)
140-144 Gobo 13 Shake (slow to fast)
145-149 Gobo 14 Shake (slow to fast)
150-154 Gobo 15 Shake (slow to fast)
155-204 Gobo wheel CW rotation (fast-slow)
205-255 Gobo wheel CCW rotation (slow-fast)
- 6 8
Strobe
000-007 Blackout
000
008-015 Open
016-131 Strobe (slow-fast)
132-139 Open
140-181 Strobe (slow open, fast close)
182-189 Open
190-231 Strobe (fast open, slow close)

www.prolight.co.uk Kudos 2RE Beam User Manual 19
Operating instructions
Channel Value Function Default Values
- 6 cont. 8 cont.
Strobe cont.
232-239 Open
000240-247 Random Strobe (slow-fast)
248-255 Open
- 7 9 Dimmer
000-255 Dimmer (0-100%) 000
- 8 10
Prism
000-007 No function 000
008-255 Prism
- 9 11
Prism Rotation
000-127 Prism Indexing
000128-191 Prism rotation CW (fast-slow)
192-255 Prism rotation CCW (slow-fast)
-10 12
Frost
000-007 No function 000
008-255 Frost
-11 13 Focus
000-255 Focus 000
1 - 14
Show Modes
000-015 No function
000
016-075 Show 1
076-135 Show 2
136-195 Show 3
196-255 Show 4
2 - 15
Sound Sensitivity
000 No function 000
001-255 Sound Sensitivity (low-high)

www.prolight.co.uk Kudos 2RE Beam User Manual 20
Operating instructions/gobos & colours
Static gobos:
Colours:
Channel Value Function Default Values
- 12 16
Settings
000-017 No function
000
018-034 Enable blackout whilst pan/tilt
035-051 Disable blackout whilst pan/tilt
052-068 Enable blackout whilst colour changing
069-085 Disable blackout whilst colour changing
086-102 Enable blackout whilst gobo changing
103-119 Disable blackout whilst gobo changing
120-136 Enable blackout whilst pan/tilt/gobo/colour
change
137-153 Disable blackout whilst pan/tilt/gobo/colour
change
154-170 No function
171-187 Lamp On
188-204 Lamp Off
205-221 No function
222-328 Motor Reset (hold for 5s)
239-255 No function
This manual suits for next models
1
Table of contents
Other Elumen8 Lighting Equipment manuals

Elumen8
Elumen8 Evora 1000 BSW User manual

Elumen8
Elumen8 TZ 250F User manual

Elumen8
Elumen8 Alu Quad Par 64 MKII User manual

Elumen8
Elumen8 ELUM043 User manual

Elumen8
Elumen8 Meteor 150 RGBW IP Pixel Batten User manual

Elumen8
Elumen8 COB Tri 4 Pixel Batten User manual

Elumen8
Elumen8 Virtuoso 600 Profile RGBAL User manual

Elumen8
Elumen8 Kudos 250ZS User manual

Elumen8
Elumen8 Liberty 1T36 Battery Uplighter User manual

Elumen8
Elumen8 ELUM450 User manual