FLOW RATES
Your evoUV will withstand operating pressures of 20 metres head. This means that
evoUVs are able to operate with most of the circulating pumps commonly used.
Please note: For optimum performance we recommend that you pass the entire
volume of your pond through the evoUV unit approximately once every two hours.
Please also note that we recommend a minimum flow rate equivalent to passing
the entire pond volume through the unit once every three hours.
It is important to note that there are factors that affect how you select the right size
of evoUV for your pond.
Your evoUV will keep your pond clear of green water up to its maximum capacity as
stated on the box for the evo30 and evo55. The evo110 is an effective unit and has
multiple uses. It can be used on large ponds, retail installations, Aquaculture and
other commercial Aquaria installations. Please see your local Evolution Aqua dealer
for details.
evo30 evo55 evo110
PONDS UP TO 30,000 litres 55,000 litres See EA Dealer
You will need to take into consideration such things as stocking levels, sunlight /
shade, daily sunshine amounts etc. This is not always possible to calculate, and if
this is the case, apply the rules of thumb below as a guide.
USA - Southern States / Mediterranean 3 Watts UV per 1,000 litres
Northern Europe 2 Watts UV per 1,000 litres
USA - Northern States / Canada 1 Watts UV per 1,000 litres
It must be stressed however, that these are only guidelines, and you should take
advice from your local Evolution Aqua dealer.
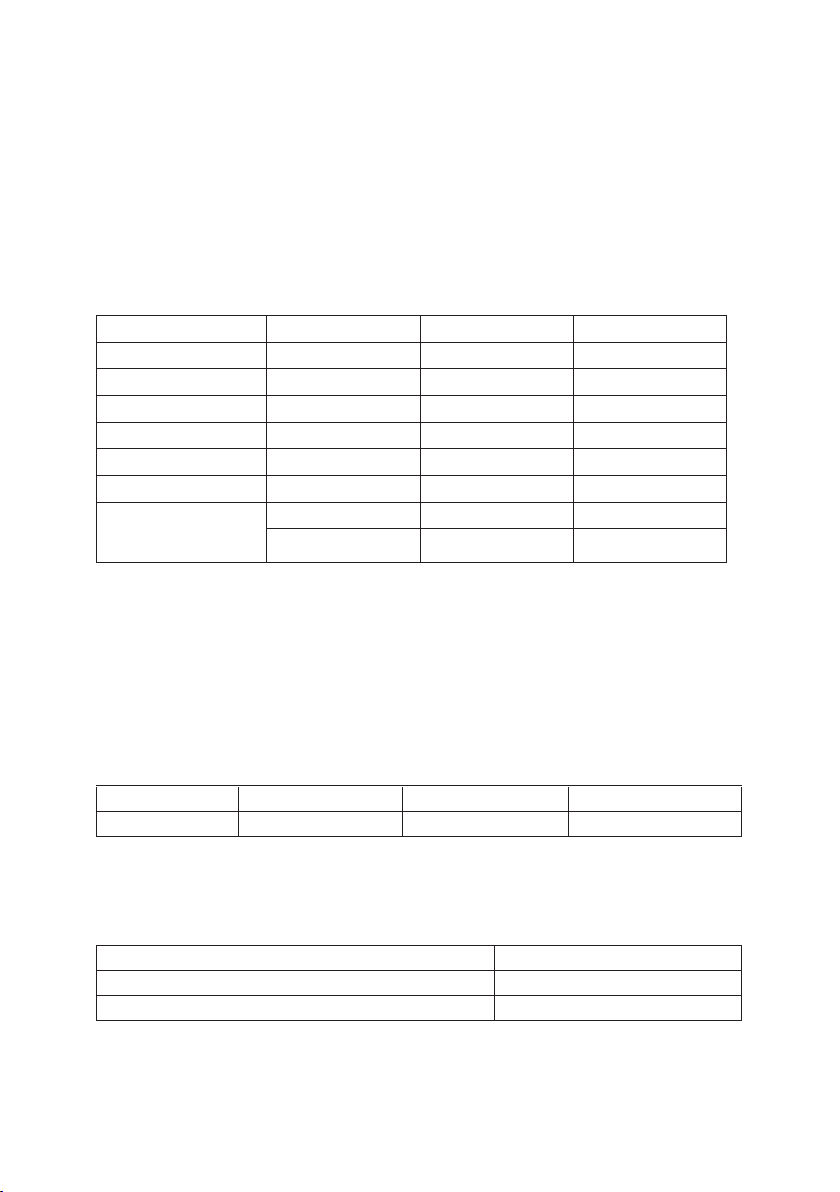
Description evo30 evo55 evo110
Maximum Pump Head 20 metres head 20 metres head -----------------------------
Maximum Flow Rate 15,000 litres/hour 27,500 litres/hour -----------------------------
Bulb life 9000 hours 9000 hours 9000 hours
Bulb – with EA code 1 x 30 Watt EVO30B 1 x 55 Watt EVO55B 2 x 55 Watt EVO55B
Inlet / Outlet 1½” BSP male thread 1½” BSP male thread 2” BSP male thread
Inlet / Outlet USA Models N/A 2” NPT male thread 2” NPT male thread
Evolution Aqua order
codes for UK hardpipe
fittings only
Adaptor– K82-23-55 Adaptor– K82-23-55 Adaptor– K82-23-66
Union – K82-78-55 Union – K82-78-55 Union – K82-78-66
6