EVOLUTION MEASUREMENT EvoScann CANDI ELE-CANDI-CANDI01 Specification sheet

EvoScann® CANDI
©Evolution Measurement Ltd 2021. All rights reserved Doc.No: M-90223 Iss.1 Rev 1
Page | 1
Evolution Measurement Ltd
Product User Guide
EvoScann® CANDI
CANbus to USB Converter
(P# ELE-CANDI-CANDI01)
Revision History:
Issue: 1 Revision: 0
First issued –August 2020
Issue: 1 Revision: 1
Updated Logging Information / GUI Info

EvoScann® CANDI
©Evolution Measurement Ltd 2021. All rights reserved Doc.No: M-90223 Iss.1 Rev 1
Page | 2
Content:
Section: Page:
1 Introduction………………………………………………………….……………………..3
1.1 Scope & Definitions
1.2 Description
2Technical Data……………………………………………………………..………..4
2.1 Specification
2.2 Dimensions
3Installation & Use…………………………………………………….……………..6
3.1 Unpack and Inspect
3.2 Drivers and GUI Installation
3.3 Electrical Connection
4Operation……………………..………………………………………………….…..8
5 Maintenance……………………………………………..…………………………..8
5.1 General Information
5.2 Safety Information
5.3 Fault finding
5.4 Repair and Recalibration
6 Storage and Disposal…………………..……………………………………..……9
6.1 Storage
6.2 Disposal
7 GUI - Graphical User Interface Use………………………………………………10
EvoScann® CANDI
©Evolution Measurement Ltd 2021. All rights reserved Doc.No: M-90223 Iss.1 Rev 1
Page | 3
1. Introduction
1.1 Scope & Definitions
This manual provides installation, operation and maintenance instructions for the EvoScann® CANDI
CANbus to USB Converter
1.2 Description
EvoScann® CANDI is designed for use with our range of P-Series Pressure Scanners and allows for
integration of a single scanner with a personal computer running our Graphical User Interface (GUI).
The CANDI is powered over a USB port on your personal computer and operation is enabled by
installation of the required drivers and software provided on the USB Drive.
The CANDI and GUI allow for set-up and configuration of an individual EvoScann® P-Series Pressure
Scanner, where access to a CANbus enabled system is not possible, and provides for simple scanning
and logging, or to allow troubleshooting and fault identification.
Electrical connection can be made to the EvoScann® P-Series Pressure Scanner either via the green
4-way terminal block or fixed ASX Circular Connector. Note, only one scanner should be attached at a
time, using only one connection method.

EvoScann® CANDI
©Evolution Measurement Ltd 2021. All rights reserved Doc.No: M-90223 Iss.1 Rev 1
Page | 4
2. EvoScann® CANDI CANbus to USB Converter Technical data
2.1 Specification
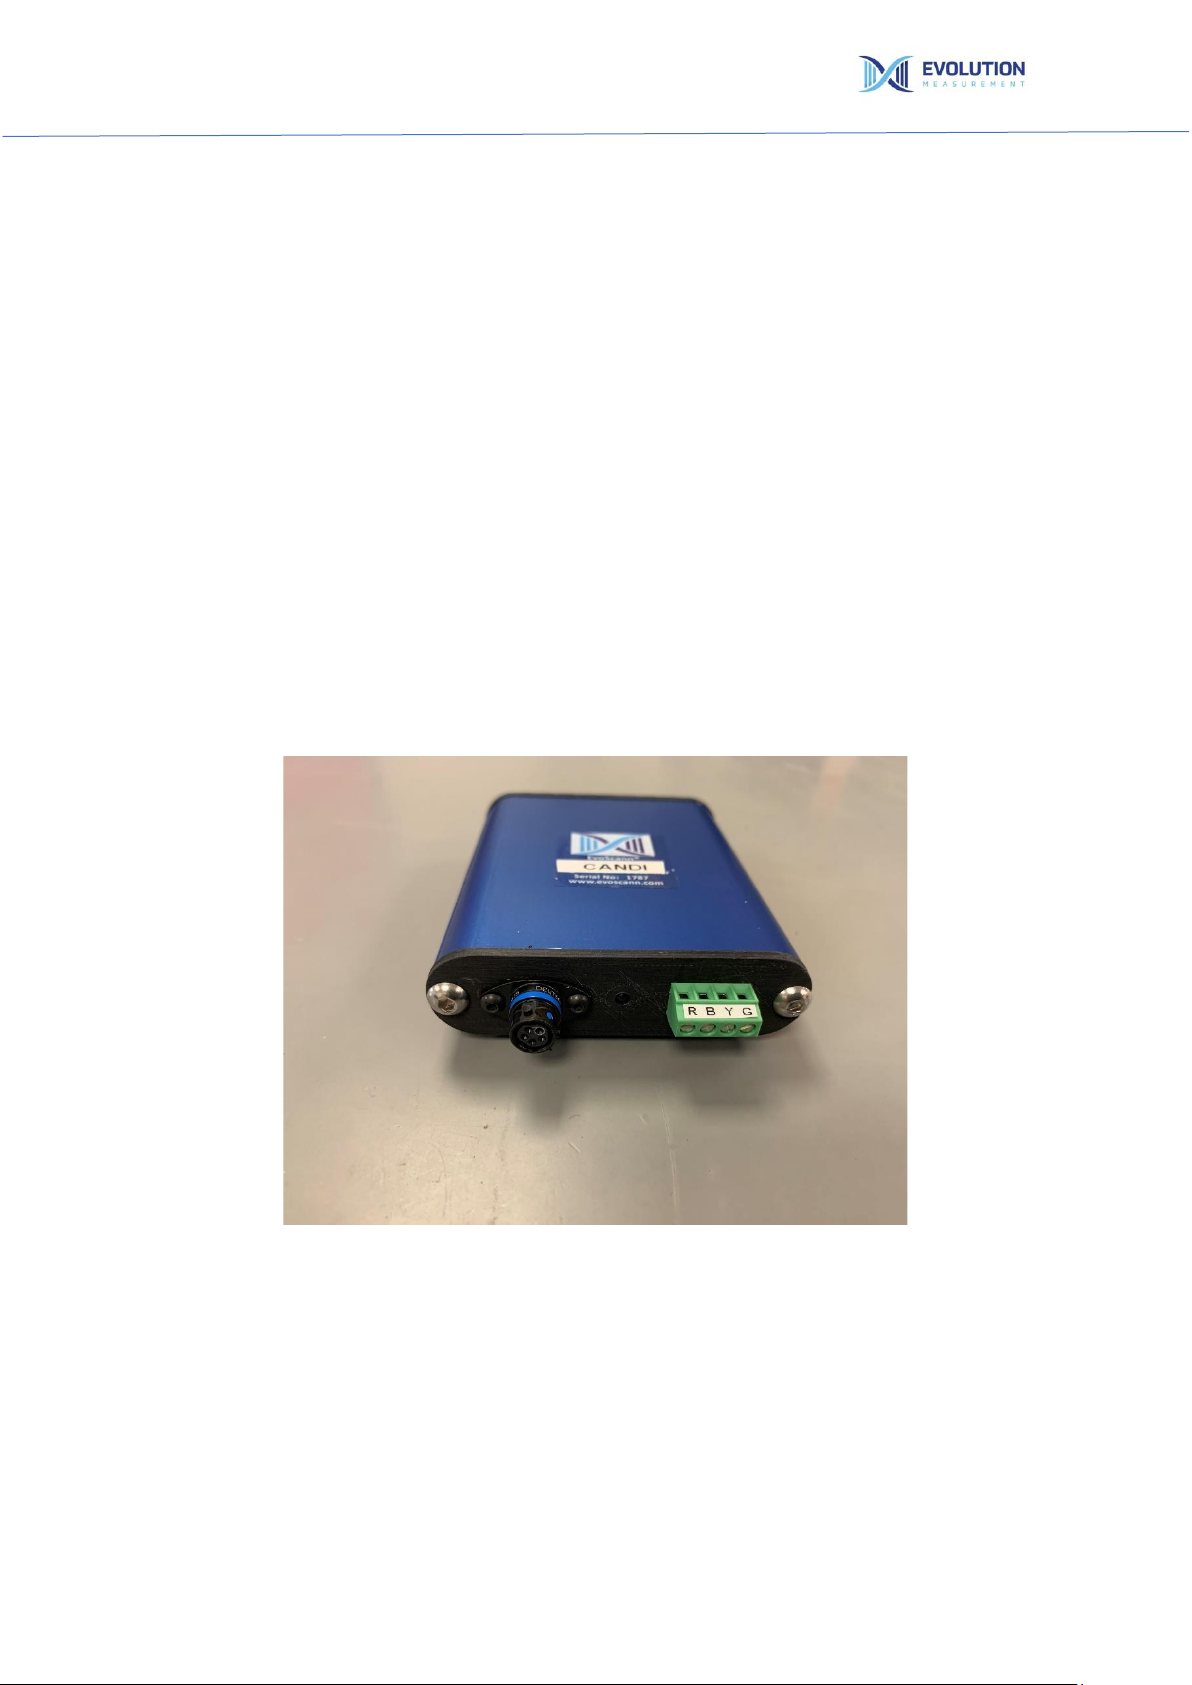
Standard Supply: Peli 1040 Micro Case
EvoScann® CANDI Converter
1 m USB Lead
ASX Mating Connector
USB Drive with Files
P-Series Inputs: CANDI - ASX Connector –ASX002-05SB-HE-R (Socket)
P-Series –ASX Connector –ASX602-05PB-HE-R (Plug)
CANDI –Screw Terminal –MKDS ¼-3,5
USB Connection: CANDI –Micro USB Type B Female, USB 2.0
PC –USB A Female
(Supplied Lead Male USB A to Male USB Micro B –1 m)
Power Requirement: USB 5 V ± 5%
Note: CANDI has an internal 12V DC Voltage Converter
Construction materials: Aluminium / Plastic / Stainless Steel
Operating Temperature: +10°C to +60°C
Communication: CANbus over USB
Operating System: Windows®10, 8.1 (32/64-bit)
Driver Requirement: PEAK-System Installation Package (Supplied)
National Instruments™ Runtime Engine (Supplied)
Software: Evolution Measurement Node Tool (P-Series Specific)
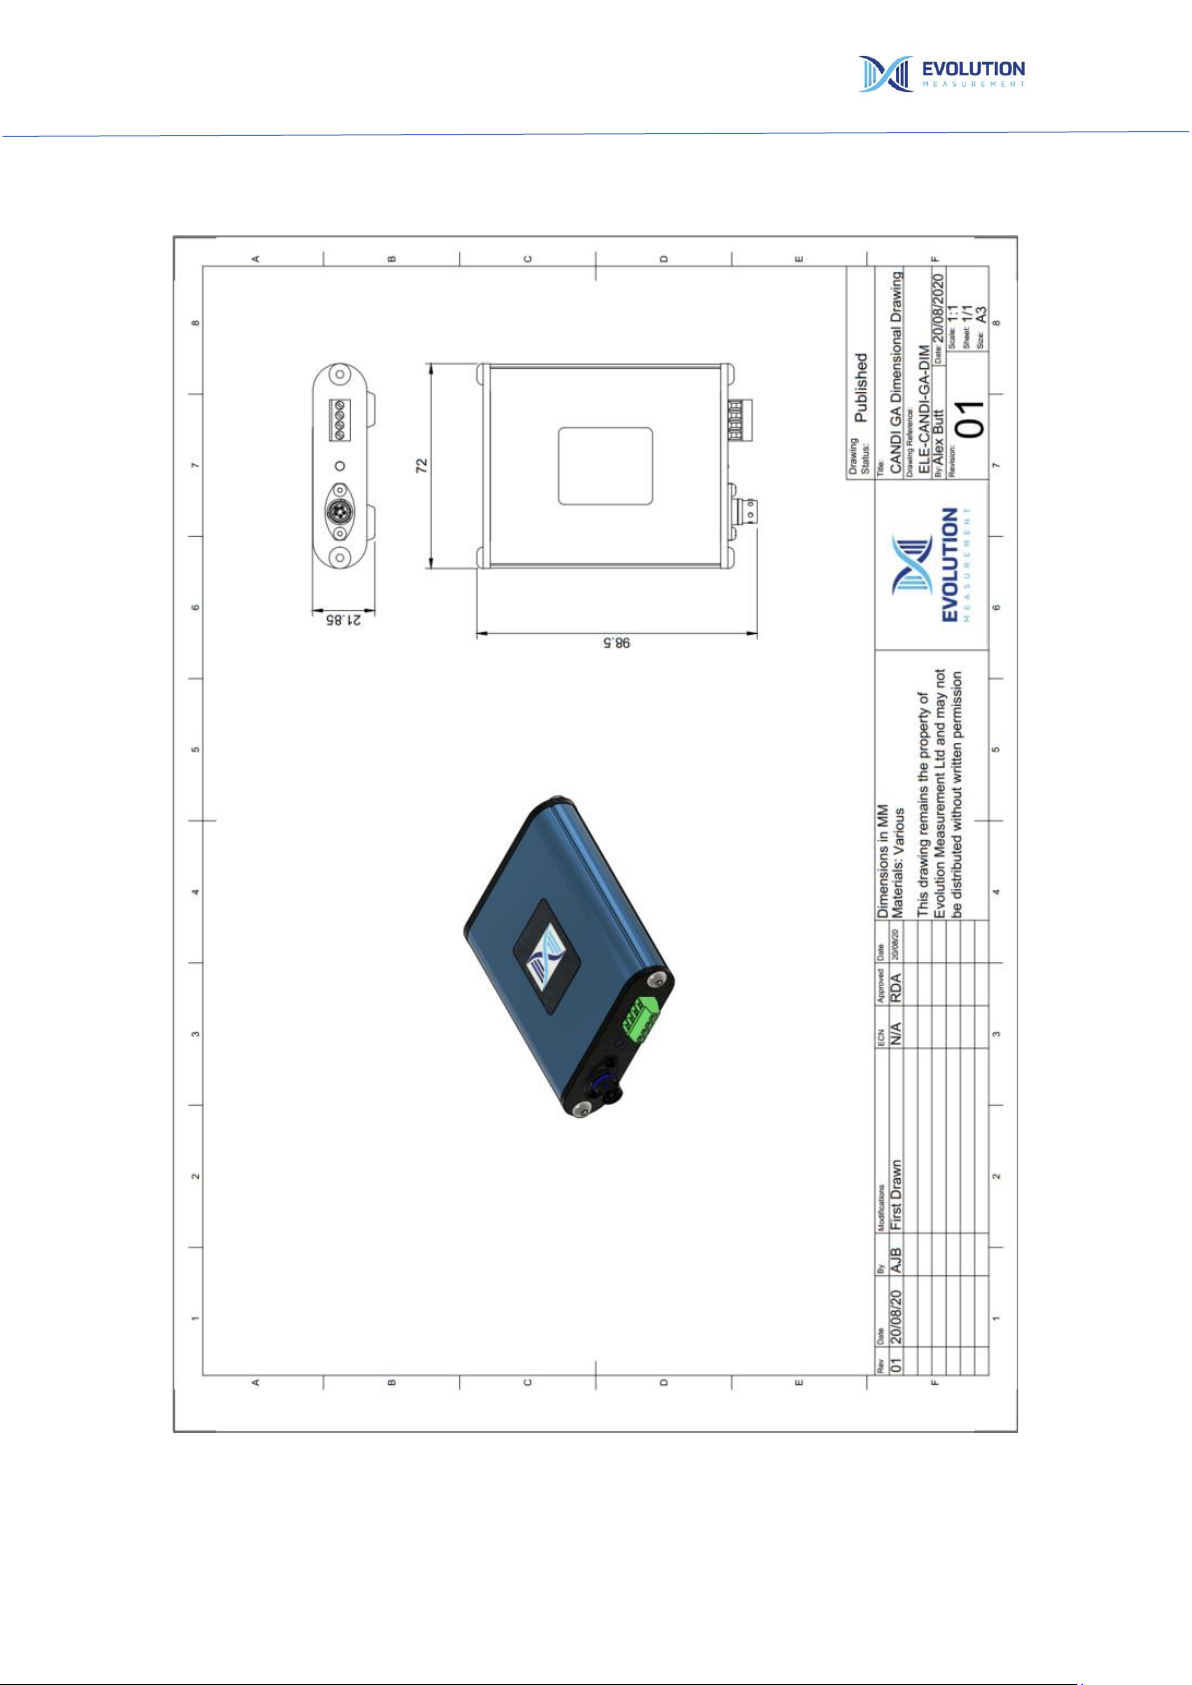
Dimensions:
Outer case: 85 x 75 x 20 mm
EvoScann® CANDI
©Evolution Measurement Ltd 2021. All rights reserved Doc.No: M-90223 Iss.1 Rev 1
Page | 5
2.2 Product Outline Dimensions EvoScann® CANDI CANbus to USB Converter
EvoScann® CANDI
©Evolution Measurement Ltd 2021. All rights reserved Doc.No: M-90223 Iss.1 Rev 1
Page | 6
3. Installation & Use
EvoScann® CANDI is ideal for use as a desktop tool, or as part of a remote measurement package.
Consideration of mounting position and use will ensure optimal performance and instrument longevity.
The EvoScann® CANDI is designed to be robust but should be handled and installed with all reasonable
and usual precautions necessary for a measurement instrument.
3.1 Unpack and Inspect
Remove all packaging materials from the unit and check for any damage.
If the unit has been damaged, notify the supplier and carrier in writing within three days of delivery,
stating the item number, serial number and order number.
Retain all package materials for further inspection. Do not use the unit if it has been damaged.
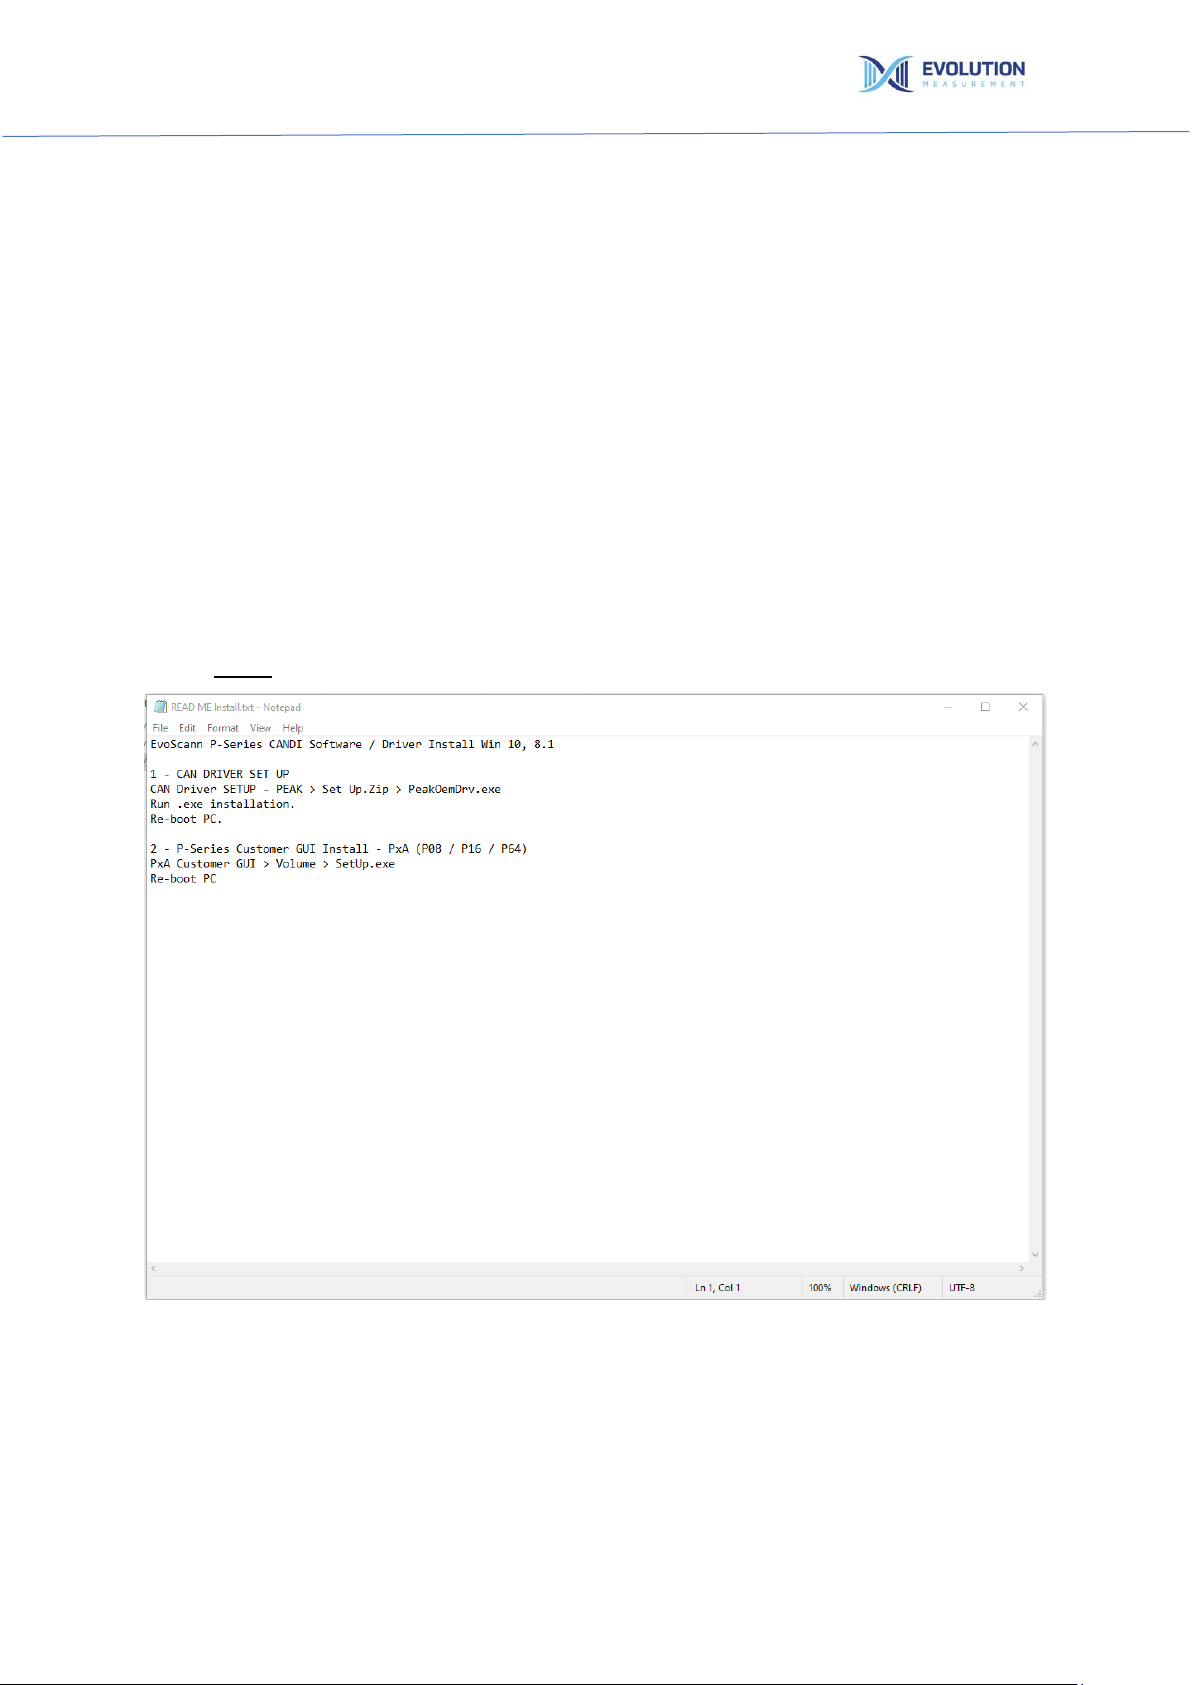
3.2 Drivers and GUI Installation
Refer to the supplied USB Drive for files and Readme.txt regarding installation of the Drivers and GUI
version before any connection to the EvoScann® P-Series Pressure Scanner is attempted.
EvoScann® CANDI
©Evolution Measurement Ltd 2021. All rights reserved Doc.No: M-90223 Iss.1 Rev 1
Page | 7
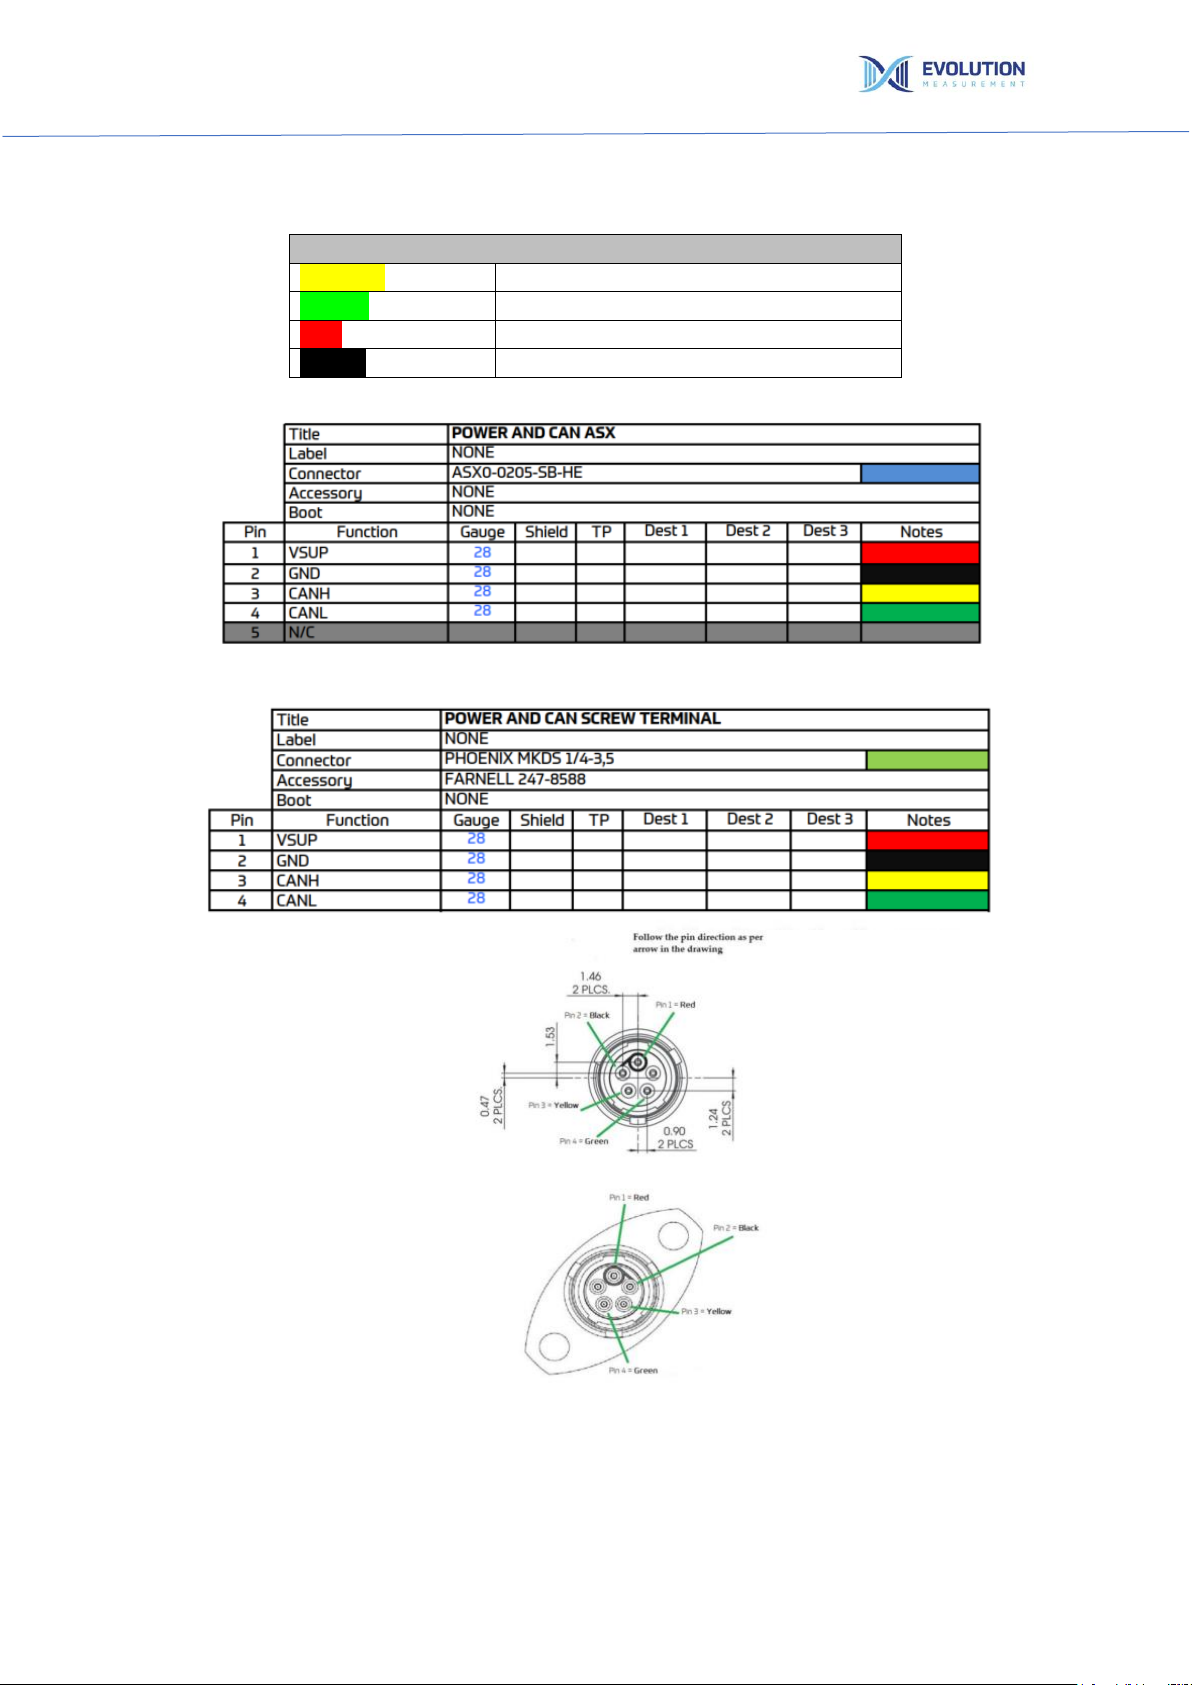
3.3 Electrical Connection
Electrical Cable Identification
Cable Identification
YELLOW
CANH
GREEN
CANL
RED
SUPPLY (VSUP)
BLACK
GND
(Note: Check direction indication marked on the one fitted to your CANDI)

EvoScann® CANDI
©Evolution Measurement Ltd 2021. All rights reserved Doc.No: M-90223 Iss.1 Rev 1
Page | 8
4. Operation
Operation of the EvoScann® CANDI is simple and straightforward. With the GUI running and the P-Series
electrically connected the scanner will immediately start to scan.
Below is a screenshot of a typical display from the EvoScann® GUI, with EvoScann®
(P-Series P8-A for information). Refer to Section 7 for use.

EvoScann® CANDI
©Evolution Measurement Ltd 2021. All rights reserved Doc.No: M-90223 Iss.1 Rev 1
Page | 9
5. Maintenance
5.1 General Information
EvoScann® CANDI is designed to require no user intervention other than checking electrical
connections are sound for the connected equipment
5.2 Safety Information
Observe all appropriate safety precautions when operating any electrical equipment. Always ensure
wiring is done by competent persons in strict accordance with the electrical connection details in this
document.
Do not use abrasive or solvent substances to clean the unit.
Do not attempt to open the EvoScann® CANDI. The unit is factory sealed and opening the unit will result
in removal of any and all warranty.
5.3 Fault finding
Symptom:
Check likely cause:
Scanner not functioning
Ensure Drivers are fully installed and operational.
Ensure correct wiring connections are made.
Ensure USB is connected to a functional Port
Scanner reading incorrect pressures
Check correct range is selected
Scanner reading intermittently
Check correct version of GUI is being used for P-
Series connected
5.4 Repair & Recalibration
Field repair is not possible with EvoScann® CANDI. All repairs must be carried out by Evolution
Measurement Ltd.
To ensure optimum service and performance, return to Evolution Measurement Ltd.
See contact us page.

EvoScann® CANDI
©Evolution Measurement Ltd 2021. All rights reserved Doc.No: M-90223 Iss.1 Rev 1
Page | 10
6. Storage and Disposal
6.1 Storage
EvoScann® CANDI should be placed in its supplied case when not in use and store in a clean, dry, dust
and moisture-free area, avoiding temperature extremes. Avoid the risk of droppage, vibration or other
unnecessary impact.
6.2 Disposal
At end of life, dispose of EvoScann® CANDI in full accordance with all local procedures and practices, or
return the unit to Evolution Measurement Ltd for disposal. Do not incinerate as the product may emit
noxious fumes.

EvoScann® CANDI
©Evolution Measurement Ltd 2021. All rights reserved Doc.No: M-90223 Iss.1 Rev 1
Page | 11
7. GUI –Graphical User Interface Use
Sensors Tab
Main Screen - Shows display of channels selected from channel list available 1…..>.
Sensor No. –Serial Number
Firmware –P-Series Firmware Revision
Period –Set Period of P-Series
CAN ID –Set CAN ID of P-Series (Hex)
CAN ID SR –Set CAN ID of the Slow Row data when in 7-Byte mode. [Auto] sets CAN ID +1 (Hex)
Temperature display - shows sensor temperature for internal compensations.
Length –8 Byte / 7 Byte (8 Byte Default)
Range –Selected Range
Pressures –Shows live channel pressures in selected pressure range mode
EvoScann® CANDI
©Evolution Measurement Ltd 2021. All rights reserved Doc.No: M-90223 Iss.1 Rev 1
Page | 12
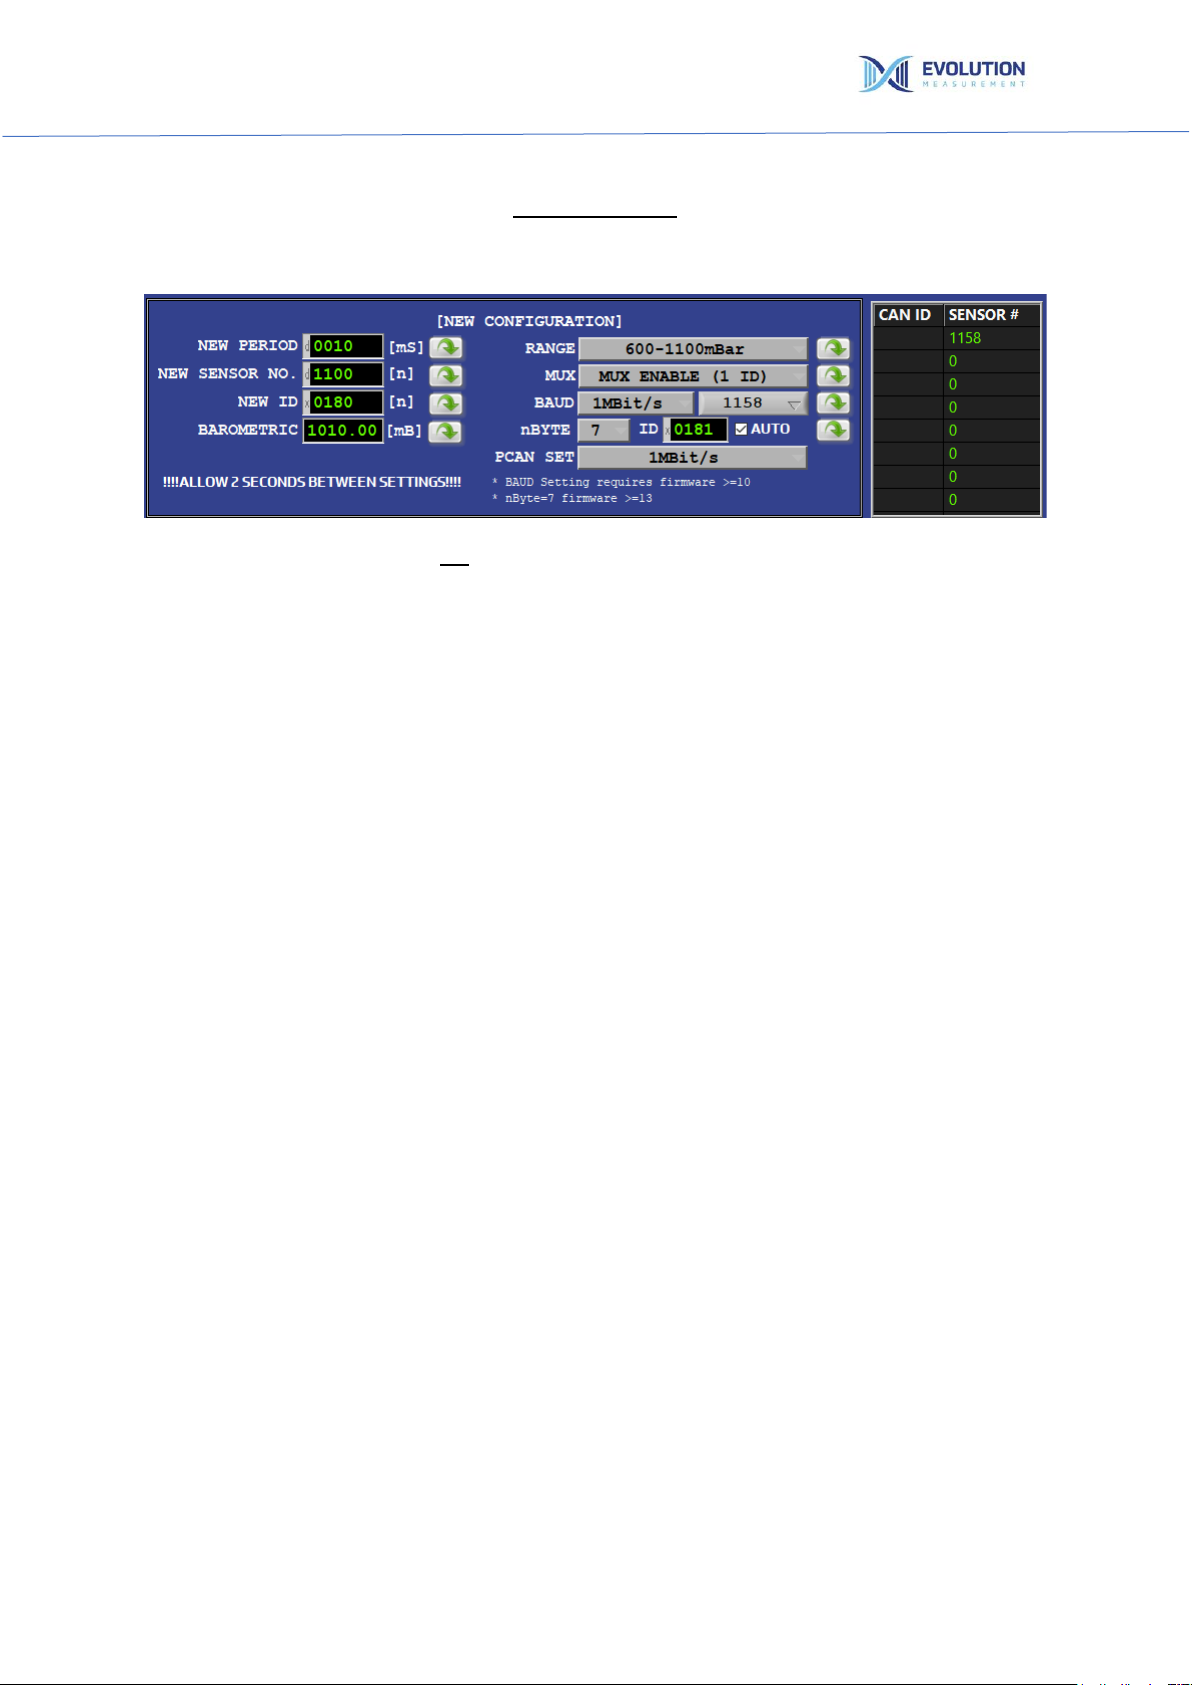
New Configuration
Changing data and pressing the green download button saves the entry into the connected P-Series.
Care should be taken as there is no ‘restore to factory’ function.
Note: Screen shows generic data not ‘As Set’ data
New Period –Limits 0002 (2 m/s) to 00100 (100 m/s)
New Sensor No. - Changes Serial Number (Not Recommended)
New ID –Changes Can ID
Barometric –Allows user to enter barometric pressure read from a transfer standard, or similar, to
enable correction of output (Absolute Units Only).
Range –Allows user to change from selectable ranges depending on GUI version.
Mux –Allows the user to change from Multiplexer Enabled (1 ID) or Multiplexer Off (3 ID). Refer to your
EvoScann® P-Series Manual for further details
BAUD –Allows rate to be set –Sensor ID Number (>=Ver 10 Firmware Required)
nBYTE –8 Byte / 7 Byte (8 Byte Default)
ID –User configurable (Hexadecimal)
PCAN –Period Setting Options
EvoScann® CANDI
©Evolution Measurement Ltd 2021. All rights reserved Doc.No: M-90223 Iss.1 Rev 1
Page | 13
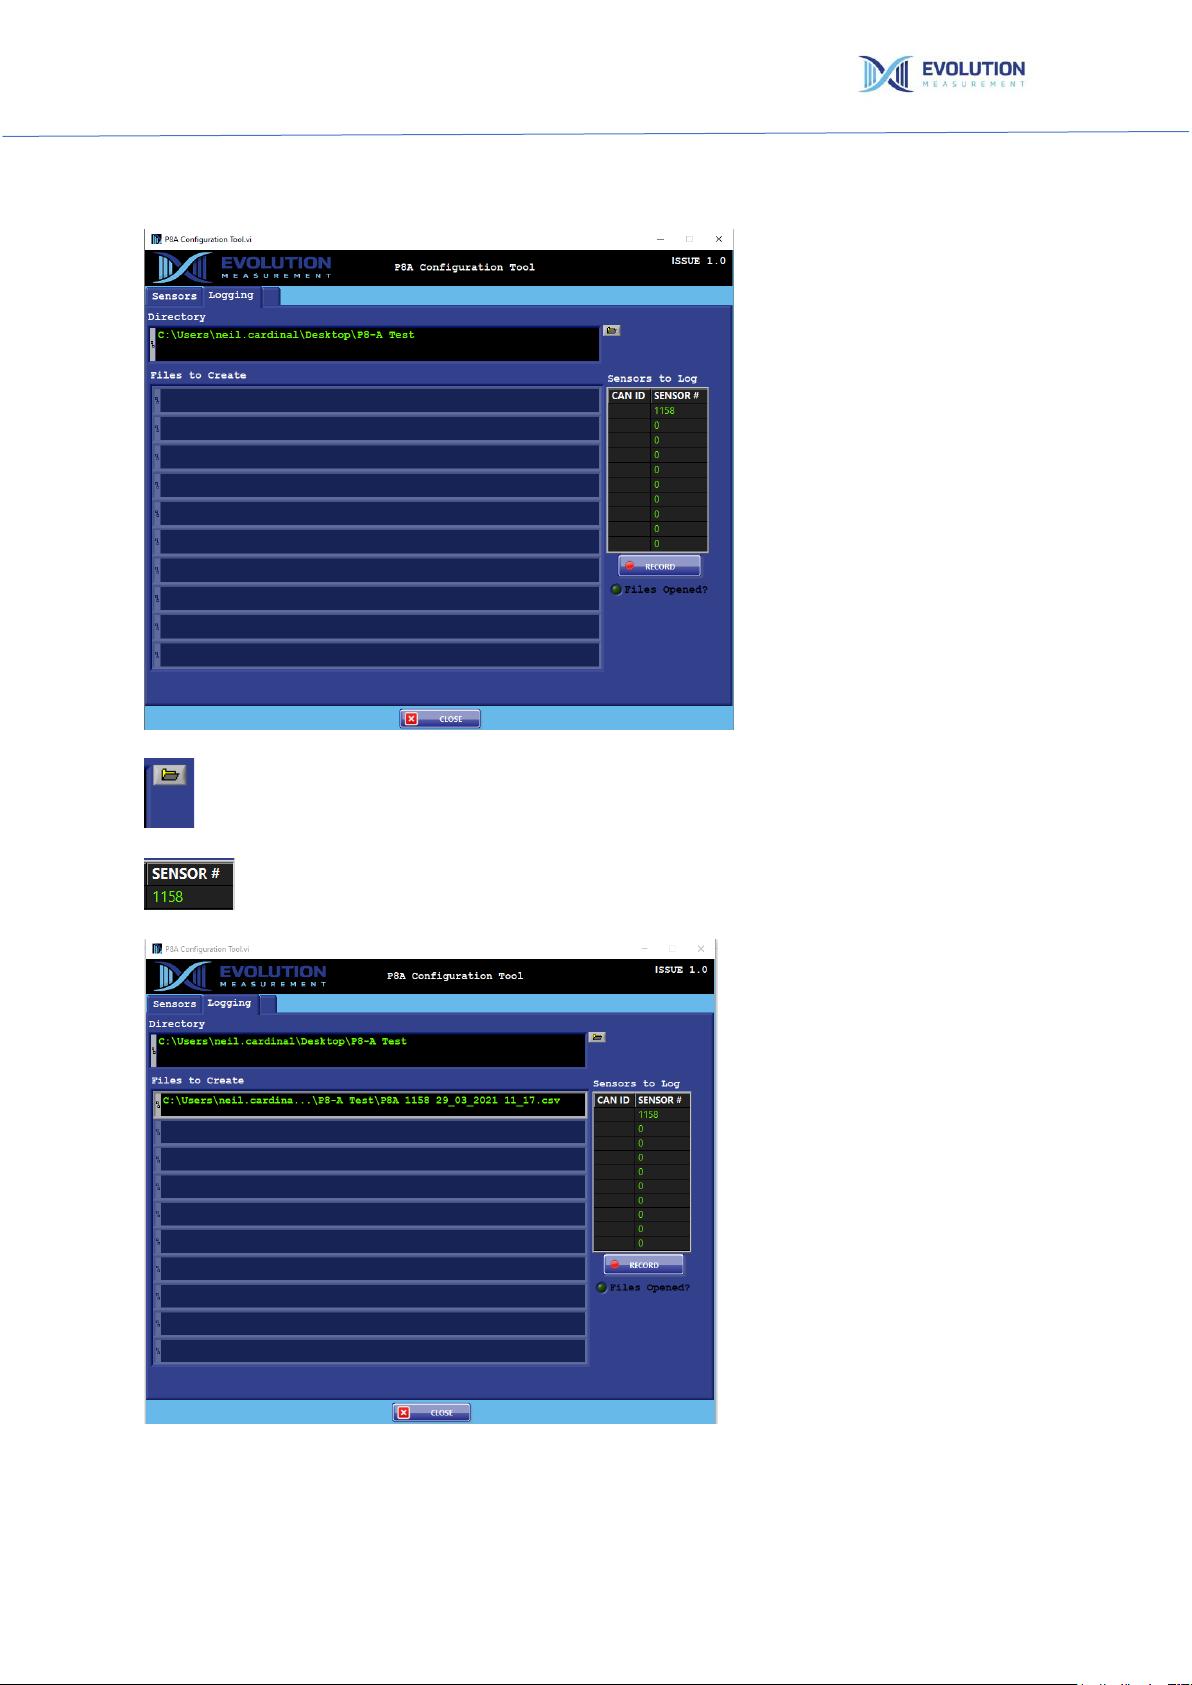
Logging Tab
Press the file icon, the route path can now be set for the log file.
Click Sensor Number to create individual log file…
Record –Starts the current log file / Logging - Stops the current log file.

Table of contents


