DCS Vivaldi DAC User manual

This product incorporates the following dCS proprietary technology:
Ring DAC™
© Data Conversion Systems Ltd. 2012-2016 Price UK £10.00
All rights reserved. No part of this publication may be reproduced, stored in or introduced into a retrieval system,
or transmitted in any form, or by any means (electronic, mechanical, photocopying, recording or otherwise)
without the prior written permission of dCS1. Any person who does any unauthorised act in relation to this
publication may be liable to criminal prosecution and civil claims for damages.
Information contained in this manual is subject to change without notice, and whilst it is checked for accuracy, no
liabilities can be accepted for errors.
1dCS is Data Conversion Systems Ltd. Company registered in England No. 2072115.
dCS Vivaldi DAC
Stereo Digital to Analogue Converter
User Manual
Software Release 2.0x
November 2016

dCS Vivaldi DAC User Manual Software Issue 2.0x
November 2016
Vivaldi DAC Manual v2_0x Page 2 English version

dCS Vivaldi DAC User Manual Software Issue 2.0x
November 2016
Vivaldi DAC Manual v2_0x Page 3 English version
Contents
Using the dCS Vivaldi DAC for the first time.......................................................................................5
What’s in the box? 5
Positioning the unit 5
Important Safety Instructions 6
Safety Notice 7
Step-by-Step Guide ................................................................................................................................8
Preliminaries 8
Fitting the Remote Control handset batteries 9
STEP 1 – Connecting a PCM Input 10
Connecting to a Dual AES Source 10
Connecting to a Single AES or SPDIF source 11
Connecting to an SDIF/DSD Source 11
STEP 2 – Setting up the USB source 12
Compatibility 12
Connecting the USB interface 12
Loading the Windows driver for USB Class 2 12
Basic setup with a PC 13
A word about Music Playing Software 13
Selecting the Vivaldi DAC as your Audio Output device 14
STEP 3 – Connecting the Analogue Outputs 15
STEP 4 - Setting the Output Level 15
STEP 5 – Choosing a Sync Mode 16
Using the DAC’s AES & SPDIF inputs in Master Mode 16
Using a Master Clock in a CD/SACD system 17
A full Vivaldi system 18
Advanced options 20
Customising the input configuration 20
Front Panel............................................................................................................................................21
Remote Control Receiver 21
Display 21
Power Button 22
Menu Button 22
Filter Button 22
Input button 23
Mute Button 23
Rotary Control 23
Rear Panel .............................................................................................................................................24
Analogue Outputs 24
AES Digital Inputs 24
SPDIF Digital Inputs 25
SDIF-2 Digital Interface 25
USB Interface 25
Word Clock Inputs and Output 26
Test interface 26
Mains inlet 26
Label 26
Remote Control.....................................................................................................................................27
The Menu...............................................................................................................................................28
Using the Menu 29
INFORMATION Menu 30
Unit Status 30
Version 30
Contact 30
Update 30

dCS Vivaldi DAC User Manual Software Issue 2.0x
November 2016
Vivaldi DAC Manual v2_0x Page 4 English version
SETTINGS Menu 31
Mapper 31
Sync Mode 31
Output Level 32
Dual AES1+2 32
Dual AES3+4 32
Phase 32
Channel Swap 32
Balance 32
USB Class 33
Buffer 33
EasyPlay 33
RS232 Mode 33
CONFIGURATION Menu 34
Settings Lock 34
Save Configuration 34
Restore Configuration 34
Reset Input Names 34
Factory Reset 34
DISPLAY SETTINGS Menu 35
Brightness 35
Display On/Off 35
GENERATOR Menu 35
Channel Check 35
Phase Check 35
Burn In 35
Specification .........................................................................................................................................36
Maintenance and Support....................................................................................................................38
Service and Maintenance 38
Replacing a Blown Mains Fuse 38
Cleaning the case 38
Limited Warranty 39
If you need more help 40
Software History 41
Index ......................................................................................................................................................42

dCS Vivaldi DAC User Manual Software Issue 2.0x
November 2016
Vivaldi DAC Manual v2_0x Page 5 English version
USING THE dCS VIVALDI DAC FOR THE FIRST TIME
Congratulations on purchasing your dCS Vivaldi DAC.
Before using your unit, please read this section and the Step by Step Guide. This will enable you to
set the unit up quickly and safely with your hi-fi system.
From time to time, dCS will release updated software on CD that you can install yourself using the
Update feature. Please check our web-site occasionally to see if new Vivaldi DAC software is
available, or consult your dealer.
What’s in the box?
Check that the box contains the following items:
•dCS Vivaldi DAC
•Manual and Menu / Setup Guide
•Power cable
•2 AES/EBU cables
•BNC cable
•USB cable
•2 spare fuses
•dCS Premium Remote Control Handset with 2x AAA batteries
Notify your dealer as soon as possible if anything is missing or damaged. We suggest that you retain
the original packaging for possible future use. If this is not possible, replacement packaging can be
ordered from dCS or our distributors. Details can be found on our web site at www.dcsltd.co.uk.
Positioning the unit
For best sound quality, the units in the Vivaldi range are designed to be mounted on separate shelves
of a rack, although they may be stacked directly on top of each other if this is absolutely necessary.
Place each unit on a firm, vibration free base, allowing convenient connection to the other parts of
your system. To prevent overheating, we recommend that you leave some free space around the unit
to allow for ventilation.
The unit is supplied with 4 feet fitted. If you prefer a 3-feet layout, unscrew the two back feet, remove
the two black cores using a 2.5mm A/F Allen key, fit one of the cores in the middle position and
replace the foot. Take care not to cross-thread the foot!
With all feet screwed fully home, the unit will sit level on a flat surface. If you need to do
any levelling, you can unscrew any of the feet up to 3 complete turns, to give up to 3mm
(1/8”) of height adjustment.

dCS Vivaldi DAC User Manual Software Issue 2.0x
November 2016
Vivaldi DAC Manual v2_0x Page 6 English version
Important Safety Instructions
The following statements are required to comply with U.S. safety standard UL60065.
•Read these instructions.
•Keep these instructions.
•Heed all warnings.
•Follow all instructions.
•Do not use this apparatus near water.
•Clean only with dry cloth.
•Install in accordance with the manufacturer’s instructions.
•Do not install near any heat sources such as radiators, heat registers, stoves, or other apparatus
(including amplifiers) that produce heat.
•Do not defeat the safety purpose of the grounding-type plug. A grounding type plug has two blades
and a third grounding prong. The third prong is provided for your safety. If the provided plug does
not fit into your outlet, consult an electrician for replacement of the obsolete outlet.
•Protect the power cord from being walked on or pinched particularly at plugs, convenience
receptacles, and the point where they exit from the apparatus.
•Only use attachments/accessories specified by the manufacturer.
•Unplug this apparatus during lightning storms or when unused for long periods of time.
•Refer all servicing to qualified service personnel. Servicing is required when the apparatus has
been damaged in any way, such as power-supply cord or plug is damaged, liquid has been spilled
or objects have fallen into the apparatus, the apparatus has been exposed to rain or moisture, does
not operate normally, or has been dropped.

dCS Vivaldi DAC User Manual Software Issue 2.0x
November 2016
Vivaldi DAC Manual v2_0x Page 7 English version
Safety Notice
In the event of the unit developing a fault, please contact your dealer in the first instance.
If you decide to remove safety covers for any reason, disconnect the power cable first. Note that
removing covers voids the warranty.
To maintain protection from electric shock, the unit MUST be connected to mains earth (ground) via
the power cable. Also, unearthed systems do not give the best sonic performance.
Protect the product from dripping or splashing liquids. Liquid-filled objects such as vases must not be
placed on the product.
This product is not suitable for operation at altitudes above 2000m.
This product is lead-free and complies with the RoHS directive.
Before connecting the power cable to the unit for the first time, please check that it has been set to the
correct operating voltage for your mains supply. The unit’s voltage setting is shown on the serial
number label. If this does not match your local supply voltage, DO NOT attempt to use the unit.
Contact your dealer to have the unit reset. Using the unit with the wrong mains setting for your local
supply may result in serious damage to the unit and will invalidate the warranty. Do not attempt to
reset the voltage yourself.
We do not recommend the use of mains regenerators. However, if you do wish to use a mains
regenerator with variable voltage and frequency, we recommend that you set the voltage to match
your local voltage and the frequency to either 50Hz or 60Hz ONLY.
!
Damage caused to your Vivaldi DAC by misuse of a mains regenerator or by a
malfunctioning mains regenerator is not covered by the warranty.
Disposal at end-of-life: the symbol indicates that this product should not be treated as
normal household waste. It should be recycled, so please take it to an approved
collection facility.

dCS Vivaldi DAC User Manual Software Issue 2.0x
November 2016
Vivaldi DAC Manual v2_0x Page 8 English version
STEP-BY-STEP GUIDE
This section guides you through setting up the unit for basic operation.
Preliminaries
The Menu Guide sheet details the menu structure.
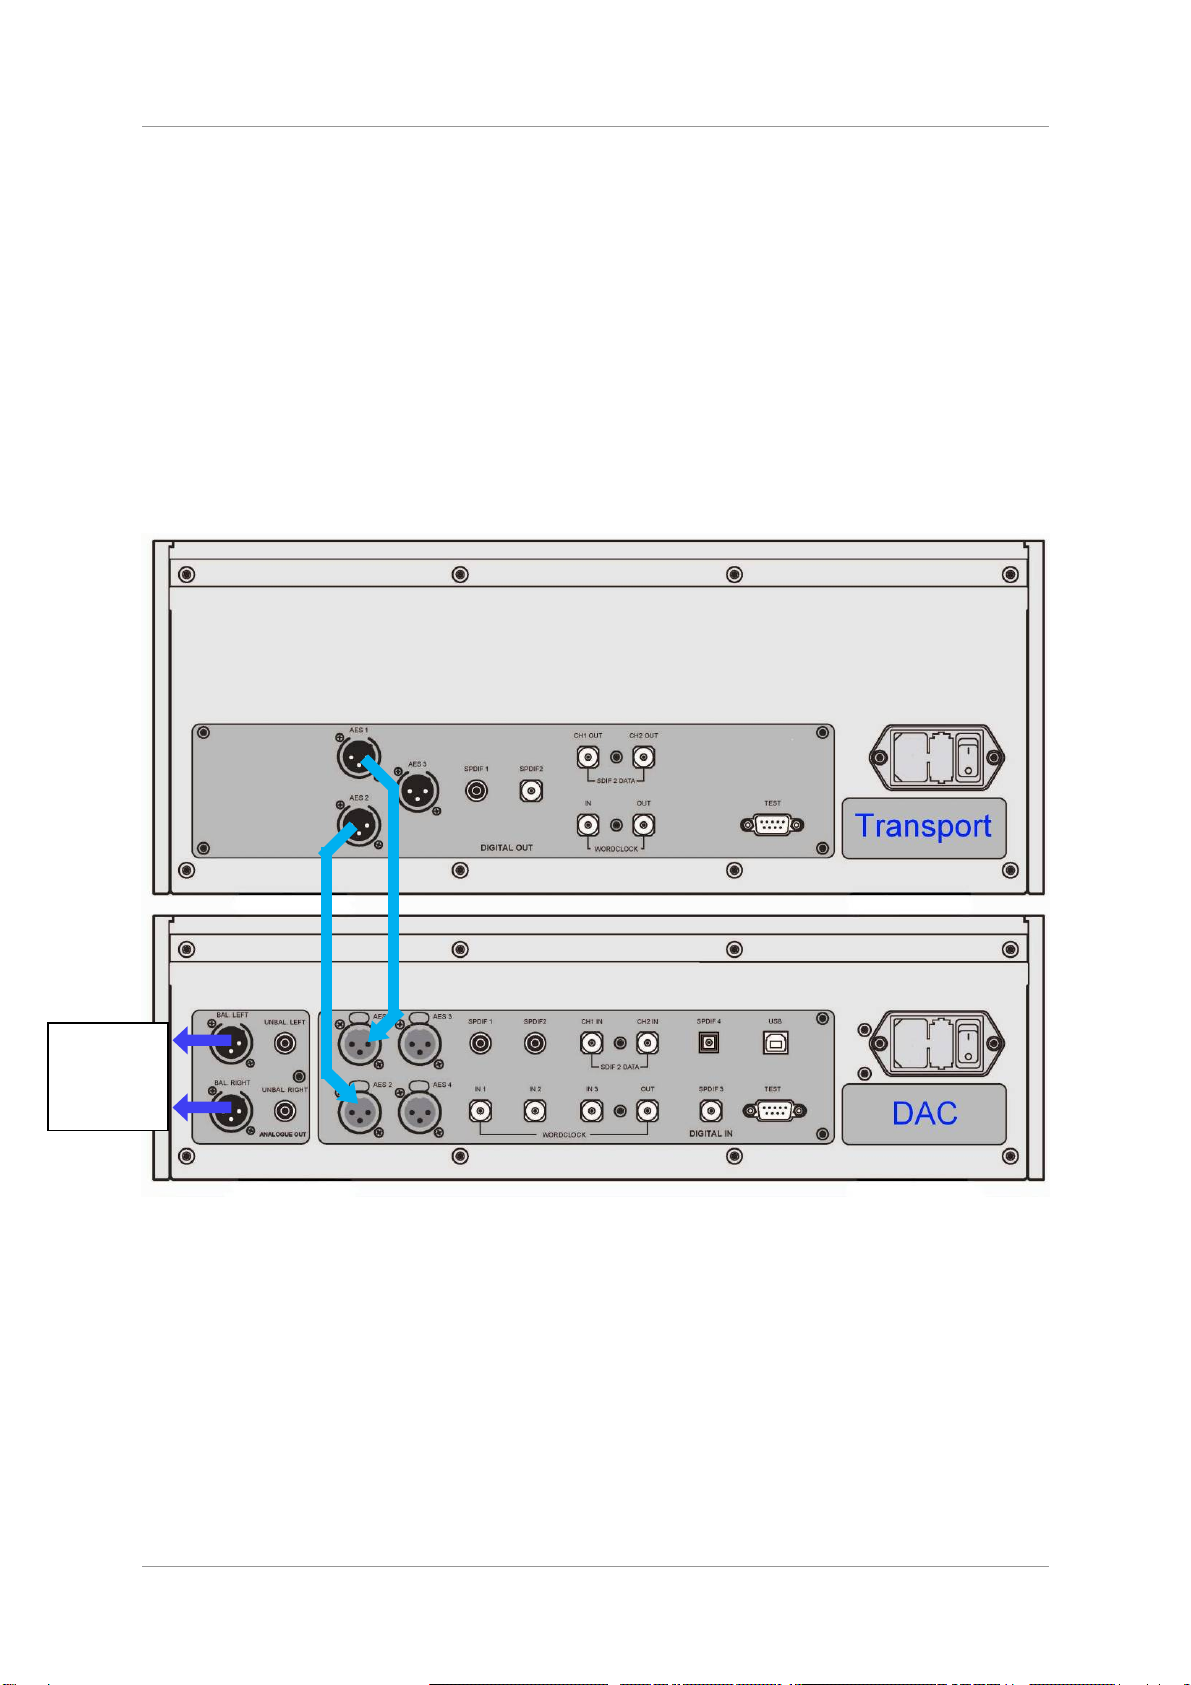
For digital interfaces, use with cables designed for digital audio:
•for AES/EBU interfaces use 110Ωscreened, twisted pair cables fitted with one male XLR
connector and one female XLR connector.
•for SDIF-2, Word Clock or SPDIF BNC interfaces, use 75Ωcoax cables fitted with BNC plugs.
!
SDIF-2 and Word Clock interfaces require a simple DC-coupled connection. The
interfaces may malfunction or not work at all if capacitor coupled cables or cables with
built-in networks are used.
•for SPDIF RCA interfaces, use 75Ωcoax cables fitted with RCA Phono plugs.
•for TOSLINK optical interfaces, use Toslink fibre-optic cables.
•for the USB interface, use a standard USB2.0 cable fitted with one type A and one type B
connector. The internal screen must be connected at both ends.
For analogue outputs, use with screened cables of the correct type:
•for balanced outputs, use screened, twisted pair cables fitted with one male XLR connector and
one female XLR connector.
•for unbalanced outputs, use coax cables fitted with RCA Phono plugs.
Connect the power cable to the power inlet on the DAC rear panel, plug the other end into a
convenient power outlet.
!
Please do not use an excessively heavy or inflexible power cable as this may damage
the power inlet connector.
The cables supplied with the unit are “commercial grade”, because most owners will
have their own “audiophile grade” cables or will prefer to make their own cable choices.
Press the Power button – the unit will display Vivaldi DAC. Wait about 30 seconds while the DAC
configures itself.
If the unit is likely to be set in an unfamiliar state, you can run the Factory Reset routine by pressing
the buttons in this sequence: Menu, ►, ►, Menu, ◄, ◄, Menu.
Wait a few seconds while the unit resets itself.

dCS Vivaldi DAC User Manual Software Issue 2.0x
November 2016
Vivaldi DAC Manual v2_0x Page 9 English version
Fitting the Remote Control handset batteries
Use a small coin to
release the screw
securing the back
plate.
Lift the screw a little
and slide the back
plate off.
Fit 2 AA size batteries by pressing
the flat end (-) against the spring
and pressing the battery into the
slot, so that the + end makes
contact with the stud.
Slide the back plate
into place and
tighten the screw.
If the remote control does not appear to work after fitting the batteries, make sure that the batteries are
fitted the correct way, as shown above. If in doubt, please ask your dealer for advice.
!
Failure to fit the batteries correctly can damage your Remote Control. Such damage is
not covered by the warranty.
Please dispose of used batteries properly at a waste disposal site, not in the household
waste.

dCS Vivaldi DAC User Manual Software Issue 2.0x
November 2016
Vivaldi DAC Manual v2_0x Page 10 English version
STEP 1 – Connecting a PCM Input
If you want to use the USB input only, go to Step 2.
Switch on the source equipment. If appropriate, load a disk / tape and set the machine in PLAY mode
to ensure it is generating a digital audio data stream.
Choose one or more of the following sections:
Connecting to a Dual AES Source
•Check that your source equipment (probably a dCS SACD Transport or a dCS Upsampler) is
capable of Dual AES operation and is set up correctly.
•Connect the AES1 output on your source equipment to the AES1 input on the DAC rear panel and
the AES2 output to the AES2 input, using two XLR cables. Ensure the cables are not swapped.
•Press the Input button repeatedly until AES1+2 is displayed.
Figure 1 – Using the Vivaldi Transport with the DAC
The DAC will lock to the source, displaying 24/352.8 for example, if the source is generating 24 bit
data at 352.8kS/s.
The Vivaldi DAC has a second Dual AES input on AES3 and AES4. You can connect a second Dual
AES source to these inputs and use the Input button to select AES3+4.
The most common set-up is to connect a Vivaldi Transport to AES1+2 and a Vivaldi Upsampler to
AES3+4.
Analogue
Outputs
to
A
m
p
lifier

dCS Vivaldi DAC User Manual Software Issue 2.0x
November 2016
Vivaldi DAC Manual v2_0x Page 11 English version
Connecting to a Single AES or SPDIF source
Most source equipment (such as CD transports, DVD players) is fitted with a single wire digital output,
usually on an RCA phono connector.
•Connect your source equipment to the matching input on the DAC rear panel using a suitable
cable.
•Press the Input button repeatedly until your chosen input is displayed. This will be either AES1,
AES2, AES3, AES4, SPDIF1 (RCA), SPDIF2 (RCA), SPDIF3 (BNC), or Toslink.
The DAC will lock to the source, displaying 16/44.1 for example, if the source is a CD player.
Connecting to an SDIF/DSD Source
Check that your source equipment is capable of SDIF PCM or DSD operation.
!
SDIF (Sony Digital InterFace) is not the same as SPDIF (Sony/Philips Digital InterFace)
and the two are not compatible.
Please ensure that you connect to the correct BNC sockets.
•Connect the CH1 output on your source equipment to the CH1 input on the DAC rear panel and the
CH2 output to the CH2 input, using two BNC cables. Connect the word clock output on your source
equipment to one of the Word Clock Input connectors on the DAC rear panel.
•Ensure the cables are not swapped.
•Press the Input button repeatedly until SDIF-2 appears on the display.
Set the Settings > Sync Mode menu page to Word Clock 1, 2 or 3 as appropriate.
PCM or DSD mode is automatically detected. The DAC will lock to the source, displaying 16/44.1 for
example, if the source is a CD player. DSD is displayed if the source is sending DSD data.

dCS Vivaldi DAC User Manual Software Issue 2.0x
November 2016
Vivaldi DAC Manual v2_0x Page 12 English version
STEP 2 – Setting up the USB source
If you do not want to use a USB source, go to STEP 3.
Compatibility
The USB interface can be connected to Windows™ 10, Windows™ 8.1, Windows™ 7 (SP1),
Windows™ Vista (SP2), Mac™ OSX (10.5.4 or later) systems or a sound server, running music
streaming software.
The interface should work with Linux Ubuntu servers and computers fitted with USB 2.0 interfaces that
natively support USB Audio Class 1 or Class 2 operation, but this has not been extensively tested.
Connecting the USB interface
One of the USB Audio classes must be set during system set-up. The DAC is shipped set to USB
Audio Class 2.
USB Audio Class 1:The interface operates without a special driver at up to 96kS/s.
To select Class 1, open the menu, navigate to the Settings > USB Class menu page. The
button sequence is: Menu, ►, Menu, ◄, ◄, ◄, ◄, and then use the Menu button to
select the Class 1 icon. Wait 10 seconds while the Class 1 code is loaded.
USB Audio Class 2:The interface operates at up to 384kS/s (including DSD/64 & DSD/128 over
PCM).
For Mac OSX, version 10.6.3 or later is required.
For Windows, the dCS USB Class 2 Driver 2016 must be installed onto the computer before
use (see below).
To select Class 2, open the menu, navigate to the Settings > USB Class menu page. The
button sequence is: Menu, ►, Menu, ◄, ◄, ◄, ◄, and then use the Menu button to
select the Class 2 icon. Wait 10 seconds while the Class 2 code is loaded.
The Vivaldi DAC / Upsampler v2.0x onwards is not compatible with the 2014 version of the
USB Class 2 driver.
Loading the Windows driver for USB Class 2
•If ASIO4ALL or any other ASIO driver (e.g. for a sound card) is loaded on your computer, please
uninstall it - otherwise the dCS driver will not work correctly.
•Power up the DAC and the computer.
•Make sure the DAC is set to USB Audio Class 2 - otherwise the driver installation will fail.
•Connect the DAC’s USB port to the computer’s USB port.
•Go to http://www.dcsltd.co.uk/products/vivaldi-dac/, click the Support link, then click the Download
button next to USB Class 2 Driver 2016.
•Unzip the file dCS_USBAudio_Driver_DriverSetup_v3.34.0.exe to a temporary directory and run
the file.
•Follow the on-screen prompts.
•When prompted, connect the DAC’s USB port to the computer’s USB port.
•Wait until installation is complete, then re-start the computer.
!
If you connect a Vivaldi DAC set for USB Audio Class 2 to a Windows computer without
first loading the driver, the computer will not be able to find the DAC.

dCS Vivaldi DAC User Manual Software Issue 2.0x
November 2016
Vivaldi DAC Manual v2_0x Page 13 English version
Basic setup with a PC
Figure 2 – Connecting the USB interface.
•Connect one of the computer’s USB ports to the USB port on the DAC’s rear panel.
•Press the Input button repeatedly until USB is displayed. If the source is transmitting PCM data,
the DAC will lock to the source and the sample rate will be displayed.
The DAC’s USB interface operates in asynchronous mode. This allows the clock inside the DAC to
control the delivery of data from the computer, avoiding the use of the computer’s inaccurate and
jittery clock.
A word about Music Playing Software
There are countless programs that can play music on WindowsTM PC and Apple MacTM OSX systems.
Unfortunately, not all of them present the data completely unprocessed to the USB ports. For
example, Windows Media Player re-samples all data to 24 bits at the original sample rate, while
iTunes converts data as necessary to the output sample rate set in the OSX Audio MIDI Set-up panel.
With such a proliferation of playing software, and updates being issued frequently, it is impossible for
dCS to be fully up-to-date with the behaviour and performance of all programs. If you have questions
or problems, we would urge you to take them up with your software vendor. What we will say is that
different programs operate very differently and it is well worth finding out exactly how your particular
program processes the audio.
We suggest that you use a premium music streaming program, such as JRiver Media Center
(Windows or Mac) or Audirvana (Mac), rather than relying on the software bundled with the operating
system.

dCS Vivaldi DAC User Manual Software Issue 2.0x
November 2016
Vivaldi DAC Manual v2_0x Page 14 English version
Selecting the Vivaldi DAC as your Audio Output device
Whichever program you are using to play your music, your computer may not automatically select
your Vivaldi DAC as the preferred playback device. You can correct this as follows:
Mac OSXTM - Open Finder, click on the Go tab and select Utilities > Audio MIDI Setup. Select
dCS Vivaldi… from the list on the left-hand side, right-click on it, and choose Use this device for
sound output from the drop down list. Set the Format to 384000.0Hz and 2ch-24bit Integer. Close
Audio MIDI Setup.
Windows 10TM / Windows 8.1TM / Windows 7TM / Windows VistaTM - Go to Start > Control Panel >
Sound. In the Playback panel, right-click dCS Vivaldi or dCS Vivaldi DAC Audio and choose Set as
Default Communication Device. Click the Enhancements tab and check Disable all
enhancements. Select the Advanced tab, choose 24 bit, 192000 Hz (Studio Quality) from the drop-
down box. Check the 2 boxes under Exclusive Mode, click OK and OK again to close the Sound
panel.
This is basic setup information.
Open your streaming program, select the Vivaldi DAC in the Options or Preferences panel and play
some music.

dCS Vivaldi DAC User Manual Software Issue 2.0x
November 2016
Vivaldi DAC Manual v2_0x Page 15 English version
STEP 3 – Connecting the Analogue Outputs
Choose one of the following two sections:
Using a preamplifier
•Set the preamplifier volume control to a low level.
•Connect either the balanced (XLR connectors) or unbalanced (RCA phono connectors) outputs on
the DAC’s rear panel to matching line level inputs on your preamplifier (probably labelled CD or
AUX).
•Turn the DAC’s rotary control clockwise to set the Volume to maximum (- 0.0dB on the display).
Slowly increase the preamplifier volume until the music is at the right level.
Using a power amplifier directly
•Turn the DAC rotary control counter-clockwise to set the Volume to around -40.0dB as shown on
the display.
•Connect either the balanced (XLR connectors) or unbalanced (RCA phono connectors) outputs on
the DAC rear panel to matching inputs on your power amplifier. Switch on the power amplifier.
•Turn the DAC rotary control slowly clockwise until the music is at the right level.
Play some music, you should have audio.
!
The most common fault reported when using our balanced outputs is hiss, unstable
levels and a thin sound on both channels. This is caused by connecting the DAC’s
balanced output stage to an unbalanced input on an XLR connector with pin 3 left
unconnected. This does not work correctly with a balanced and floating output stage –
you must connect pin 3 to pin 1 (ground) to complete the signal path.
Another possible cause of this fault (probably on one channel only) is a broken cable.
The Vivaldi DAC has independent balanced and unbalanced output stages, so you can
connect them to different amplifiers if you wish.
STEP 4 - Setting the Output Level
If the preamplifier volume setting for a comfortable listening level is too high or too low, you may need
to change the Output Level setting.
!
Setting the Output Level to 6V can cause some preamplifiers to overload and distort. For
this reason, we recommend the 2V setting if a preamplifier is used.
Similarly, if you are driving a power amplifier directly and the DAC Volume setting for a comfortable
listening level is higher than –10.0 or lower than –30.0 try changing the Output Level setting by
pressing the buttons in this sequence: Menu, ►, Menu, ►, Menu.
If the setting is 2V and the DAC Volume is still set well below –30.0, your power amplifier or
loudspeakers must have a very high sensitivity. Try the 0.6V or 0.2V settings.

dCS Vivaldi DAC User Manual Software Issue 2.0x
November 2016
Vivaldi DAC Manual v2_0x Page 16 English version
STEP 5 – Choosing a Sync Mode
So far, the system has been set up to lock to the clock generated by the source. If you are using the
SDIF-2 interface, the DAC will lock to a word clock generated by the source. The basic Sync Mode for
the USB interface is Master Mode because it is an asynchronous interface. This is the simplest
arrangement, but it does not give the best sonic performance due to clock jitter.
If your source equipment has a word clock input, you may be able to reduce the jitter in your system
by either setting the DAC to Master Mode or locking the system to a Master Clock. If not, you can miss
out this section.
The Sync Mode setting must be set separately for each input that is used. This
arrangement is necessary to allow a mixture of clocked and un-clocked sources to be
used in the same system.
Using the DAC’s AES & SPDIF inputs in Master Mode
!
You can use Master Mode ONLY if your source equipment can lock to a 44.1kHz word
clock and the DAC is receiving data at 44.1, 88.2, 176.4 or 352.8kS/s or DSD. If the
system is not set up correctly and fails to lock, you will hear clicks / noises from the
speakers and the signal may be distorted.
•Connect the equipment as shown, taking special care to connect the clock cable correctly.
Figure 3 – Using the Vivaldi Transport with the DAC in Master Mode
To select Master Mode, open the DAC’s menu, navigate to the Settings > Sync Mode menu
page. The button sequence is: Menu, ►, Menu, and then use the Menu button to select
the Master Mode icon.
Analogue
outputs
to
Amplifier

dCS Vivaldi DAC User Manual Software Issue 2.0x
November 2016
Vivaldi DAC Manual v2_0x Page 17 English version
Using a Master Clock in a CD/SACD system
The performance can be improved further by adding a Vivaldi Clock to the system as shown below.
Figure 4 – Using the Vivaldi Transport, DAC and Clock together
•Connect one of the Clock’s Word Clock Group 1 Outputs to the Word Clock Inputs of the
Transport and DAC.
•Use the Clock’s Freq1 button to set the Group 1 Outputs to 44.1kHz, to suit the CD Transport.
To sync the DAC to Word Clock 1, open the menu, navigate to the Settings > Sync Mode
menu page. The button sequence is: Menu, ►, Menu, and then use the Menu button to
select the Word Clock 1 icon.
The system will re-lock and un-mute.
Please consult the Vivaldi Clock manual for more information on using a Master Clock.
Please consult the Upsampler manual if your system includes a Vivaldi Upsampler.
The next step is crucial – sit back and enjoy the music.
Analogue
outputs
to
A
m
p
lifier

dCS Vivaldi DAC User Manual Software Issue 2.0x
November 2016
Vivaldi DAC Manual v2_0x Page 18 English version
A full Vivaldi system
The Vivaldi’s clocking system has been designed to be very comprehensive to cope with multiple
sample rates with a mixture of clocked and un-clocked sources. This applies particularly to streaming
computer audio files with different sample rates, or using an Upsampler with a variety of output sample
rates.
Figure 5 – A 4-box Vivaldi system plus computer audio sources
The system shown above makes excellent use of the Vivaldi’s facilities. The Upsampler can be
sourced from the Transport, a PC, a NAS drive, an iPod/Phone/Pad or a USB flash drive. The multiple
clock connections (shown in green) ensure that the DAC and Upsampler can always access a suitable
clock, despite changing file sample rates and changing Upsampler output rates.
The Vivaldi Master Clock has 2 Groups of outputs, each of which can be set to any of 6 standard clock
frequencies. The DAC and Upsampler have 3 and 2 Word Clock inputs respectively, to ensure they
can have access to a suitable clock despite changing sample rates in the system.
Analogue
outputs
to
Amplifier

dCS Vivaldi DAC User Manual Software Issue 2.0x
November 2016
Vivaldi DAC Manual v2_0x Page 19 English version
•Set Master Clock Freq1 to 44.1kHz and Freq2 to 48kHz.
•Connect one of the Clock Group 1 outputs (44.1kHz) to the Word Clock Input of the Transport –
it will automatically sync.
•Connect one of the Clock Group 1 outputs (44.1kHz) to the DAC’s Word Clock In1 input and one
of the Clock Group 2 outputs (48kHz) to the DAC’s Word Clock In2 input.
•Connect one of the Clock Group 1 outputs (44.1kHz) to the Upsampler’s Word Clock In1 input
and one of the Clock Group 2 outputs (48kHz) to the Upsampler’s Word Clock In2 input.
Set the DAC and Upsampler Sync Mode menu pages to Auto. Remember that this must
be set separately for each active input.
•Connect the Upsampler’s AES1+2 output to the DAC’s AES3+4 input.
•Connect the Transport’s AES1+2 output to the DAC’s AES1+2 input.
•Computer audio sources as required can be connected to the Upsampler’s Asynchronous USB
interfaces and a NAS drive may be connected via a router to the Upsampler’s Network input (also
Asynchronous). Please see the Upsampler manual for more information.
•Set the Clock’s Settings > Dither menu pages On or Off as you prefer.

dCS Vivaldi DAC User Manual Software Issue 2.0x
November 2016
Vivaldi DAC Manual v2_0x Page 20 English version
Advanced options
Customising the input configuration
The Vivaldi DAC’s inputs can be renamed to suit your particular system using a computer running a
terminal emulator program. The Vivaldi Upsampler has the same feature. The procedure using a
Windows PC with TeraTerm is described here, but other programs such as PuTTY or ZTerm can be
used. If you have difficulty with this, please ask your Dealer for help.
•Power up the DAC and a Windows PC.
•If necessary, download Tera Term from http://en.sourceforge.jp/projects/ttssh2/releases/ and install
it on your PC. (If the link is broken, please search for the latest version of Tera Term online.)
Set the DAC’s Settings > RS232 menu page to the Text option.
•Use a USB-to-RS232 adapter cable to connect the
DAC’s Test port to one of the PC’s USB ports.
•Run ttermpro.exe.
•Click the Serial button – Tera Term will
automatically select the port connected to the DAC.
Click OK.
•Click Setup > Serial Port, set the Baud rate to
4800 and click OK.
•In the terminal window, type the command: NAME n = newname where:
- nis the number corresponding to the standard input name in the list below and
AES1 0 AES2 1 AES1+2 2
AES3 3 AES4 4 AES3+4 5
SPDIF1 6 SPDIF2 7 SPDIF3 8
Toslink 9 SDIF-2 10 USB 11
- newname is the personalised name you want to use for that input, such as CD-SACD, TV or
COMPUTER. It can be up to 8 characters long, consisting of:
capital letters A-Z, numbers 0-9 or + - / = . : ? ! @ &
•Press Enter.
For example:
- to rename the AES1+2 input to CD-SACD, type: NAME 2 = CD-SACD and press enter.
- to rename the USB input to COMPUTER, type: NAME 11 = COMPUTER and press enter.
Later on, if you want to revert to the standard input names (AES1, SPDIF2, etc.), select the
Configuration > Reset Input Names menu page.
Your customised input names will be permanently deleted.
Table of contents
Other DCS Media Converter manuals

DCS
DCS Vivaldi Upsampler User manual

DCS
DCS Elgar Plus User manual

DCS
DCS Delius User manual

DCS
DCS Debussy DAC User manual

DCS
DCS Elgar Plus User manual

DCS
DCS Paganini Upsampler User manual

DCS
DCS LDT-M1 User manual

DCS
DCS Rossini Transport User manual

DCS
DCS Scarlatti Upsampler User manual

DCS
DCS 900E User manual
Popular Media Converter manuals by other brands

Lenz
Lenz Digital plus STANDARD Information

Cross Technologies
Cross Technologies 2117-8485 instruction manual

Tactical technologies
Tactical technologies TPC1 installation manual

Cisco
Cisco TwinGig CVR-X2-SFP Installation notes

infobit
infobit iTrans DP-T-22 user manual

Sensata
Sensata Newall Spherosyn & Microsyn 300 Quick install guide