EVOLV PRO V2 User manual

USER MANUAL

Contents
Key Features .......................................... 1
Dashboard Instructions ........................... 2
Password Access ................................... 5
Menu Settings ......................................... 6
Running Lights ........................................ 7
How to Unfold .......................................... 8
How to Fold ............................................. 9
Safe Riding Tips ..................................... 10
How to Charge ........................................ 11
Battery Safety ......................................... 12
Care & Maintenance ............................... 14
Product Specication .............................. 15
Limited Warranty .................................... 16

Charge Up Your Journey

Front Pneumatic Tire
Front Signal
Light
Pro V2 / Pro-R V2
1
Front Hydraulic
Disc Brake
Rear Pneumatic Tire
Rear Signal
Light
Deck Running
Lights
Steering Column
Running Lights
Display + Throttle
Front + Rear
Brake Lever
ECO / Turbo
Button
Single / Dual
Button
+
Quad Lock
Clamp
Rear Hydraulic
Disc Brake
Rear Suspension
Spring
Front Suspension
Spring
Folding Deck
Hook
Folding Latch

2
Power Switch
Press and hold the power button for 1 second to turn on scooter. The scooter turns off
automatically if not used for 10 minutes.
Speed Control
While stationary, and with the power on, press the “ + “ and “ - “ button to change
speed levels from 1 to 3. Use the throttle to control the speed within each speed level.
Main Headlight
Hold down the “ + “ button to turn on or off the steering stem and deck running lights.
The main headlight and taillight will always stay on. The taillight will ash automatically
when braking.
Data Zero Out
To zero the data, including AVG Speed, Max Speed, Trip, and Time, press and hold
both “ + “ and “ - “ buttons for a few seconds.
Trip / Dual Motor Display
Press the “ M “ button once to switch between Trip and Dual Motor information screen.
Menu Setting
Please see page 6 for menu and advance settings.
Dashboard Instructions
PowerPlus
Minus
Menu
Turn
Signals
Trip Info Screen
Dual Motor Info Screen
Power Switch Cluster
Main Headlight

Dashboard Instructions
3
Power Status
Speed Levels
Brakes Engaged
Speed
Time
Front Motor On / Off
Error Codes
1 Motor phase
2 Hall sensor fault
4 Handle turning fault
6 Controller error
7 Communication error
8 Over temperature protection
Front Motor Power
Rear Motor Power
Rear Motor On / Off
Current Amperage
Controller
Temperature
Error Code

ECO: Maximizes range. Limits riders to a set speed limit at each speed level but
enables you to ride longer. Eco mode is turned on when the “ ECO / TURBO “ button
is pressed once.
When Eco mode is engaged, speed is limited to:
Speed 1: 15 km/h / 9 mph
Speed 2: 20 km/h / 12 mph
Speed 3: 25 km/h / 15 mph
TURBO: Maximizes power and allows riders to reach top speed. Turbo mode is turned
on when the “ ECO / TURBO “ button is decompressed.
1. Do not press ECO mode when riding fast because the scooter will slow
down immediately.
2. Only activate ECO mode when not in motion.
SINGLE / DUAL
DUAL: Engages the front motor allowing riders to use both motors. Dual mode is
turned on when the “ SINGLE / DUAL “ is pressed once. The display will show
“ R : ON “ and “ F : ON “ when dual is pressed.
1. Do not start riding on DUAL mode. Engage DUAL mode when riding so you are
accustomed to the power change.
CAUTION:
CAUTION:
Dashboard Instructions
4

Password Access
Press “ M “ button to enter the password setting menu.
Enter the default password “ 0000 “.
Adjust the numbers by pressing “ + “ or “ - “ buttons. Press “ M “ to save the settings.
5
Start password option: Turn on this option to enable the password screen whenever
the scooter is turned on. Turn it off to disable it.
To reset the password, you will need to enter the current password.

Press the “ M “ button twice quickly to enter the settings. Press the “ M “ button twice again to exit.
Click “ + “ or “ - “ to switch pages.
To change parameters. press “ M “ and the page will start ashing. Adjust the settings by clicking “ + “
or “ - “ buttons. Press “ M “ to save settings.
Menu Settings
Advance Settings
Enter the advanced setting screen with password “ 2112 “.
Cruise
(Optional)
OFF AUTO: Cruise control enabled
MANUAL:
OFF: Cruise control disabled
ABS OFF Do not change
Speed Magnets 15 Do not change
Assist Parameter > Do not change
Export NO Do not change
Wheel 10.0 Do not change
Power System 52V / 60V Do not change
Zero Start
(Optional)
N N: Kickstart enabled
Y: Kickstart disabled
Temp Protection 120 Degree Celcius Do not change
Exit Press Exit or “ POWER “ button to exit menu
Brightness Adjust brightness levels from 1 to 5.
Unit System Metric / Imperial
Auto Off Adjust auto off time from 1 to 10 minutes or turn off completely.
Clock Adjust time value.
Start Password Turn on / off password access when starting vehicle
Informations Overview of vehicle information.
Advance Settings Please see table below.
Factory Settings Pressing “ Yes “ will restore all parameters to factory settings except ODO.
Exit
6

Running Lights
Static Colors
Increases / Decreases
the brightness of the lighting
Power
Plus
Turn On
Press and hold the “ + “ button on the power switch cluster. The running lights on the
deck and steering stem will turn on.
Turn Off
Pressing the “ OFF “ button or holding down “ + “ on the power switch cluster will turn
off the running lights.
The lighting system will save its last displayed pattern.
S+ / S - Increase or decrease the speed of the pattern progression.
M+ / M - Changes through the lighting modes. Switch through 100+ different colour /
pattern combinations.
Random colour patterns
Power Switch Cluster
7

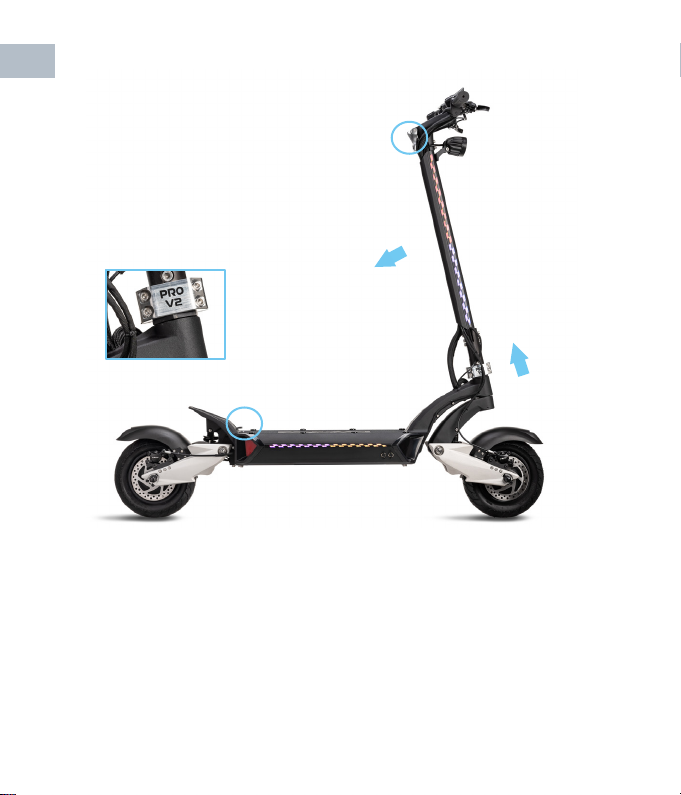
How to Unfold
1. Release the steering column latch from the hook on the deck.
2. Raise the steering column and slide the quad lock clamp downward.
3. Tighten the 4 hex screws on the quad lock clamp.
4. You should feel minimal play in the steering column if secured properly.
Note: An optional quick release clamp is also included.
Steering Column
Latch & Deck Hook
8
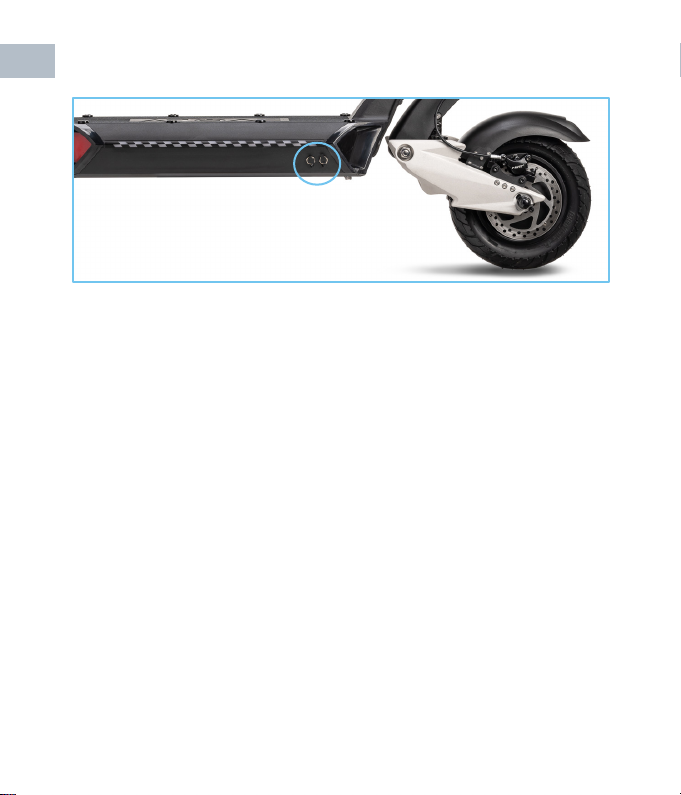
How to Fold
1. Turn off the power.
2. Loosen the 4 hex screws on the quad lock clamp.
3. Slide the quad lock clamp upward. Push down the steering column toward the kick
plate to fold.
4. Slide the steering column latch into the hook on the deck to lock it in place.
Note: An optional quick release clamp is also included.
Quad Lock Clamp
9
Deck Hook
Steering Column Latch

Safe Riding Tips
10
1. To prevent injury, wear safety gear such as closed toe shoes, a helmet, and knee /
elbow padding.
2. Stay alert when riding! Don’t wear headphones. Use the scooter bell to notify
other riders on the road.
3. Always ride in bike lanes or the right side of the road. Stay off sidewalks.
4. The scooter is not waterproof. Never use it in the rain or snow. Do not use it if the
road is wet or icy. Water damage is not covered by warranty.
5. Changing the dashboard settings may result in malfunction. If you need to change
the settings, please ask for help from an expert or authorized dealer.
6. When turning left and right, make sure that there are no obstacles and then turn
slowly, keeping a wide turning radius.
7. Before every ride, check the scooter for loose bolts and nuts. Check if the brakes,
headlights and taillights are working. Ensure your battery is charged and tires are
inated to the correct pressure.
8. An operating age of 16 years old and over is strongly recommended.
Always plug the charger into a household outlet before connecting to the scooter,
to safely start charging. Sparks may occur due to the voltage difference when
attaching the connector to the charging port, but this is normal.
Open scooter charging port cover to connect the charger to the scooter.
Charging status indicator on the charging brick.
Red: Charging Green: Fully charged
If the charging indicator is green, the scooter is fully charged and can be
disconnected.
It doesn’t matter which charging port you plug the charger into.
1.
2.
3.
4.
5.
1.
2.
3.
4.
CAUTION:
We recommend that you always use the original charger. Performance and safety
may be compromised when using a different charger.
Charger failure may cause a re while charging.
Do not leave your scooter charging unattended.
After unplugging the charger, charging connectors may be hot.
How to Charge
11

Only use the original charger that was supplied with your product to charge the
lithium-ion battery. The use of a third party charger could cause serious damage
to the battery and can cause a re.
To prevent overcharging, unplug the charger once the charger light indicates the
battery is fully charged. Do not charge the scooter overnight. Instead, resume
charging when you are available to unplug the charger once the battery is
fully charged.
Do not leave the lithium-ion battery exposed to direct sunlight or high
temperature. Do not store it in wet places. Always store it in dry places.
Charge lithium-ion batteries in dry, open, and well-ventilated places. Do not
charge the battery near ammable goods.
In the winter, keep the scooter stored inside, away from extreme temperatures.
Do not let the battery run at. The scooter must have at least 20% charge on it at
all times. Please see page 14 of user manual for storage instructions.
If the battery protection circuit is damaged, the battery may emit an unusual
smell. Contact your authorized service center immediately for technical support.
Do not reverse the polarity on a battery and short-circuit. Exposing the battery to
excessive shock can result in an explosion of the battery.
Do not try stunts or jumps on the product on bumpy surfaces. Exposing a battery
pack to excessive shock can result in a battery re. If in an accident contact your
service center to ensure that the battery is not compromised.
1.
2.
3.
4.
5.
6.
7.
8.
Battery Safety
12

Connecting the charger when the product is waterlogged will run the risk of an
electric shock and possible re. Do not charge the battery and contact your
service center.
Do not disassemble or incinerate the lithium-ion battery. To safely dispose of the
lithium-ion battery, label it as industrial waste and be careful of a short-circuit
occurring in terminals.
If the battery requires replacement after long-term use, always replace it with one
that is purchased from an authorized dealer.
Do not use the battery if it leaks or gives off an odor. Avoid charging the battery
without proper care.
Depending on the model, riding conditions, and rider’s weight, range will vary on
a full charge. Please note that batteries operate optimally at around 25 degrees
Celsius. In colder weather, it is normal for your scooter to experience a shorter
than normal range on a full charge.
When the scooter needs to be stored for a long period of time, make sure the
scooter has at least 20% charge at all times.
If a product with a lithium-ion battery overheats and there is smoke or ignition,
you should stop charging or using it immediately. Move the product outdoors and
use a re extinguisher to diffuse it. Do not spray or immerse the product in water
to diffuse the re.
9.
10.
11.
12.
13.
14.
15.
Battery Safety
13

Adjusting Brakes
Hydraulic brake systems require less maintenance, but do need to be bled from time
to time in order to stay at peak performance levels. Bleeding the system involves
removing any built up air in the hoses and topping off the hydraulic uid and requires a
hydraulic brake bleeding kit.
If you are not comfortable doing this yourself, reach out to your dealer for further
directions.
Cleaning
To clean the scooter, wipe or scrub with a damp cloth. Do not use a hose to spray it
with water. Make sure the electric scooter is powered off and the cover of the charging
port is closed when cleaning.
Storage
During the winter months store the scooter indoors in a cool, dry place, and away
from extreme temperatures. Do not let the battery run at. The scooter must have at
least 20% charge on it at all times. When storing for a long period, place the scooter
on a stool or lie it on its side to take weight off the tires. Keep the tires pumped to the
recommended PSI.
Folding
Turn the electric scooter off. Please see pages 8 and 9 for instructions on folding and
unfolding.
Inating Tires
Please keep the tires inated to 50 - 55 PSI to avoid punctures and damage
to the tires.
Note: PSI level can usually be found on scooter tires.
Care & Maintenance
14

Product Specication
Product Name EVOLV Pro V2 / Pro-R V2
Motor (Individual) 52V Dual 1,200 Watt per Motor (Pro V2)
60V Dual 1,400 Watt per Motor (Pro-R V2)
Peak Power Output (Combined) 2,600W Peak (Pro V2)
3,600W Peak (Pro-R V2)
Max Speed 70 km/h / 44 mph (Check local laws before use)
Max Mileage 50 - 60 km / 31 - 37 mi. (Pro V2)
70 - 80 km / 43 - 50 mi. (Pro-R V2)
Battery Type Lithium-ion Battery (21700 Cells)
Battery Capacity 52V 20.4AH (Pro V2)
60V 25 AH (Pro-R V2)
Lights Main Head Light, Front Fender Light, Taillight, Running Lights,
and Turn Signal Lights
Braking Front and Rear Hydraulic Disc Brake System
Tires 10 Inch Pneumatic Front and Rear Tires
Hill Grade Ability 35 Degree Slope
Suspension Front and Rear Spring
Dashboard Smart Display
Display Functions Battery, Trip, ODO, Speed, Mode, Voltage, Controller Temperature,
Motor Status, Error Codes, and Current Amperage
Folding Quad Lock Clamp with optional Quick Release
Body Frame Aluminum Alloy
Max Rider Weight 140 kg / 308 lbs
Product Size 137 * 70 * 120 cm
Product Weight 39 kg / 85 lbs
Box Size 142 * 30 * 55 cm
Colour Black and Silver (Pro V2)
Black (Pro-R V2)
15

Limited Warranty
BY USING THIS PRODUCT YOU AGREE TO THIS LIMITED WARRANTY. PLEASE
READ THIS LIMITED WARRANTY CAREFULLY.
To benet from the Limited Warranty, the customer is advised to read EVOLV Rides.
Limited Warranty terms together with the “care and maintenance” sections provided
in the user manual. This Limited Warranty applies to the extent permitted by law and
unless restricted or prohibited by law.
Limited Warranty Details
EVOLV warrants that EVOLV Electric Vehicles (“Products” or “Product”), distributed
by EVOLV, are free from defects in material and workmanship. Limited Warranty is
applicable under the following terms and conditions:
1.
2.
This Limited Warranty extends to the original purchaser (name listed on the
shipping address) of the Product only, during the rst twelve (12) months or rst
3000 km, whichever comes rst, beginning on the date the purchaser received
the Product (“Warranty Period”). An original purchase receipt is required to
proceed with warranty repairs.
This Limited Warranty is terminated on the rst day of the second year of
ownership, when the scooter mileage reaches 3001 km, or when the scooter is
resold to another individual. This Limited Warranty is non-transferable.
3. This Limited Warranty covers the Product and each of its following component parts
(“Components”) only:
Hub motor;
Battery packs;
Controller;
Throttle and battery indicator unit;
Charger unit;
Scooter frame;
Scooter stem;
LED lights; and
All other electrical wiring and components.
a.
b.
c.
d.
e.
f.
g.
h.
i.
16

Limited Warranty
During the Warranty Period, EVOLV Rides or its authorized service centers will
repair or replace, at EVOLV Rides’ option and without costs to the customer,
any defective Components with new or factory rebuilt replacement items, and
return the Products to the customer in working condition, provided that the
terms and conditions of this Limited Warranty are met. All defective Products or
Components that have been replaced shall become the properties of EVOLV
Rides.
Products and/or Components that have been repaired or replaced according to
the paragraph above will be covered by this Limited Warranty for the balance of
the Warranty Period.
This Limited Warranty will only be effective when presented together, to either
EVOLV Rides or its authorized centers, with proof of date and place of purchase
of Products such as the purchase receipt.
4.
5.
6.
17
The following components are covered only if defects are reported within the rst 30
days or 10 km of use (whichever comes rst):
Rims;
Brake calipers;
Brake discs; and
Kickstand
a.
b.
c.
d.
This manual suits for next models
1
Table of contents
Other EVOLV Scooter manuals


