Ewig TRM80 User manual
TRM80
Soldering Gun with Solder Feed
Congratulations on purchasing an EWIG product! This soldering iron has been designed listening to the needs
of thousands of electronic users and operators and has been produced in compliance with safety and quality
standards. All this in order to give you the best possible product.
We recommend that you read these instructions before you start using your new EWIG TRM80.
ATTENTION – FIRST USE
On first use the soldering gun may produce smoke, this is just grease used in manufacturing burning off. It is
not harmful to the product or user.
SPECIFICATIONS
•Voltage: 220V-240V AC 50Hz
•Power: 40W (Max. 80W)
•Temperature: 150-500°C
•Compatible solder wires: OD 0.5-1.5MM
•Heating time: Melts solder in 1min and reaches max temperature in 4mins.
FEATURES
•Easy to use single-handed and feed solder.
•Long life and heats up quickly with big power and internal heating.
•All-purpose for soldering and repairing of various electronic products.
•Ideal for long time use with a handle made of colloid and plastic, which is slip resistant and pleasant
to hold.
•Heatproof rubber power cord.
•Compatible with solder of different diameters and feeding length can be adjusted. The solder feed can
be adjusted up and down.

WARNING
Please note the following safety notes to avoid malfunctions, damage or physical injury:
•This appliance can be used by children aged from 8 years and above and persons with reduced
physical, sensory or mental capabilities or lack of experience and knowledge only if they have been
given supervision or instruction concerning use of the appliance in a safe way and understand the
hazards involved. Children shall not play with the appliance. Cleaning and user maintenance shall not
be made by children without supervision.
•If the supply cord is damaged, it must be replaced by the manufacture, its service agent or similar
qualified persons in order to avoid a hazardPersons with limited physical, sensory or mental abilities
are not allowed to use the item, unless they are supervised for their safety by a qualified person or are
briefed by the responsible person how to use the item.
•Keep the packaging materials out of children's reach.
•Do not leave the item unsupervised while it is turned on. Keep children away while it is in use.
•Do not use it if the item or its power cord has been damaged.
•Do not run the power cord around sharp edges or over hot surfaces.
•Be warned of being burned: Do not touch the metal part of the item when it's in use as its temperature
will be quite high.
•Be extra careful when using the item around combustible materials.
•Protect your eyes and body from splashing hot solder by wearing suitable protective gears.
•Turn off the item and unplug it when it's not in use or before cleaning. Do not pull on the power cord,
always grasp the plug itself.
•Allow the item to cool down naturally before cleaning or storing.
•Do not immerse the item in liquids of any kind. Do not use the item to heat plastic or liquids.
•Do not disassemble the item or try to repair it yourself. It does not contain serviceable parts for you.
•It is suggested to loosen the screw on the tip every twenty hours' or a week's use. Use pliers to rotate
the tip back and forth, then tighten the screw. It can prevent the tip from sticking to the stainless steel
pipe.
OPERATION
•Unpack the soldering gun and check all parts. It must not be put into operation if there's any damaged
part.
•Put it on the stand.
•Plug it into the socket. The green LED and red LED will light up when it is working. The green LED is
the power indicator, which means it is powered up. The red LED is the heating indicator: when it is on,
the gun is heating up; when it is off/flashing, the gun has reached the setting temperature.
•Test the temperature by touching the gun's tip with solder. If the solder melts easily, you can start
soldering.
•Apply some tin to the heated tip when you use the item for the first time.
•Pull the trigger to do your soldering work.
•Put the item back onto the stand after your work is done.
•For larger soldering points, set the temperature higher to better perform the soldering.
•Lower the temperature during breaks, which saves energy and extends the life of the tip.
•Do not file off the tip, or it will be damaged.
•Always put the item on the stand when it is heating up or during breaks.
•Keep your working environment clean during your soldering work.
•Only use dedicated solder for electronics. Acidic solder can damage the tip or other components.

FUNCTIONS
•Transparent plastic window: Check the tin process
•Solder diameter adjuster: Adjust it to allow solder of different diameters (0.5-1.5mm) through.
•Back solder feed: Thread the solder from the solder reel through the back solder feed and then pull
the trigger.
•Temperature knob: Turn the knob to set the temperature.
•Solder length adjuster: It is used for adjusting the solder length which is fed to the tip. Turn clockwise
to make it shorter and counter-clockwise to make it longer.
•Solder feed adjuster: It is used for adjusting the position of solder which is fed to the tip up and down.
•Solder diameter adjuster: Before feeding solder, turn counter-clockwise to make the solder wire getting
in; Then turn clockwise to make the solder wire well-fitted.
•Trigger: Pull the trigger to feed solder through the tube.
•Power indicator: Power on with green light on. BE CAREFUL WITH HOT TIP!
•Heating indicator:
a) Red light on- The gun is heating up.
b) Red light off/ flashing - The gun has reached the temperature.
•Tip fixings: The ring and mini screw to fix the tip tightly.
•Solder reel: With its hexagonal hole, you can wind the solder wire by a 6mm
hex key, or by its own hexagonal rod/an electric screwdriver.
TIP REPLACEMENT
Note: Tip replacement or cleaning should be done only when the soldering gun is powered down and at room
temperature. After taking out the tip, remove any oxide dust that may have formed in the barrel. Be careful not
to get dust into your eyes. Install a new tip and tighten the screw.
GENERAL CLEANING
The outer casing of the soldering gun could be cleaned with a damp cloth using small amounts of liquid
detergent. Never submerse it into liquid or allow any liquid to enter its casing. Never use solvent to clean the
casing.
SUPPLIED WITH
•Long Life soldering tip chisel 2.5mm MR25
•Metal soldering iron rest support
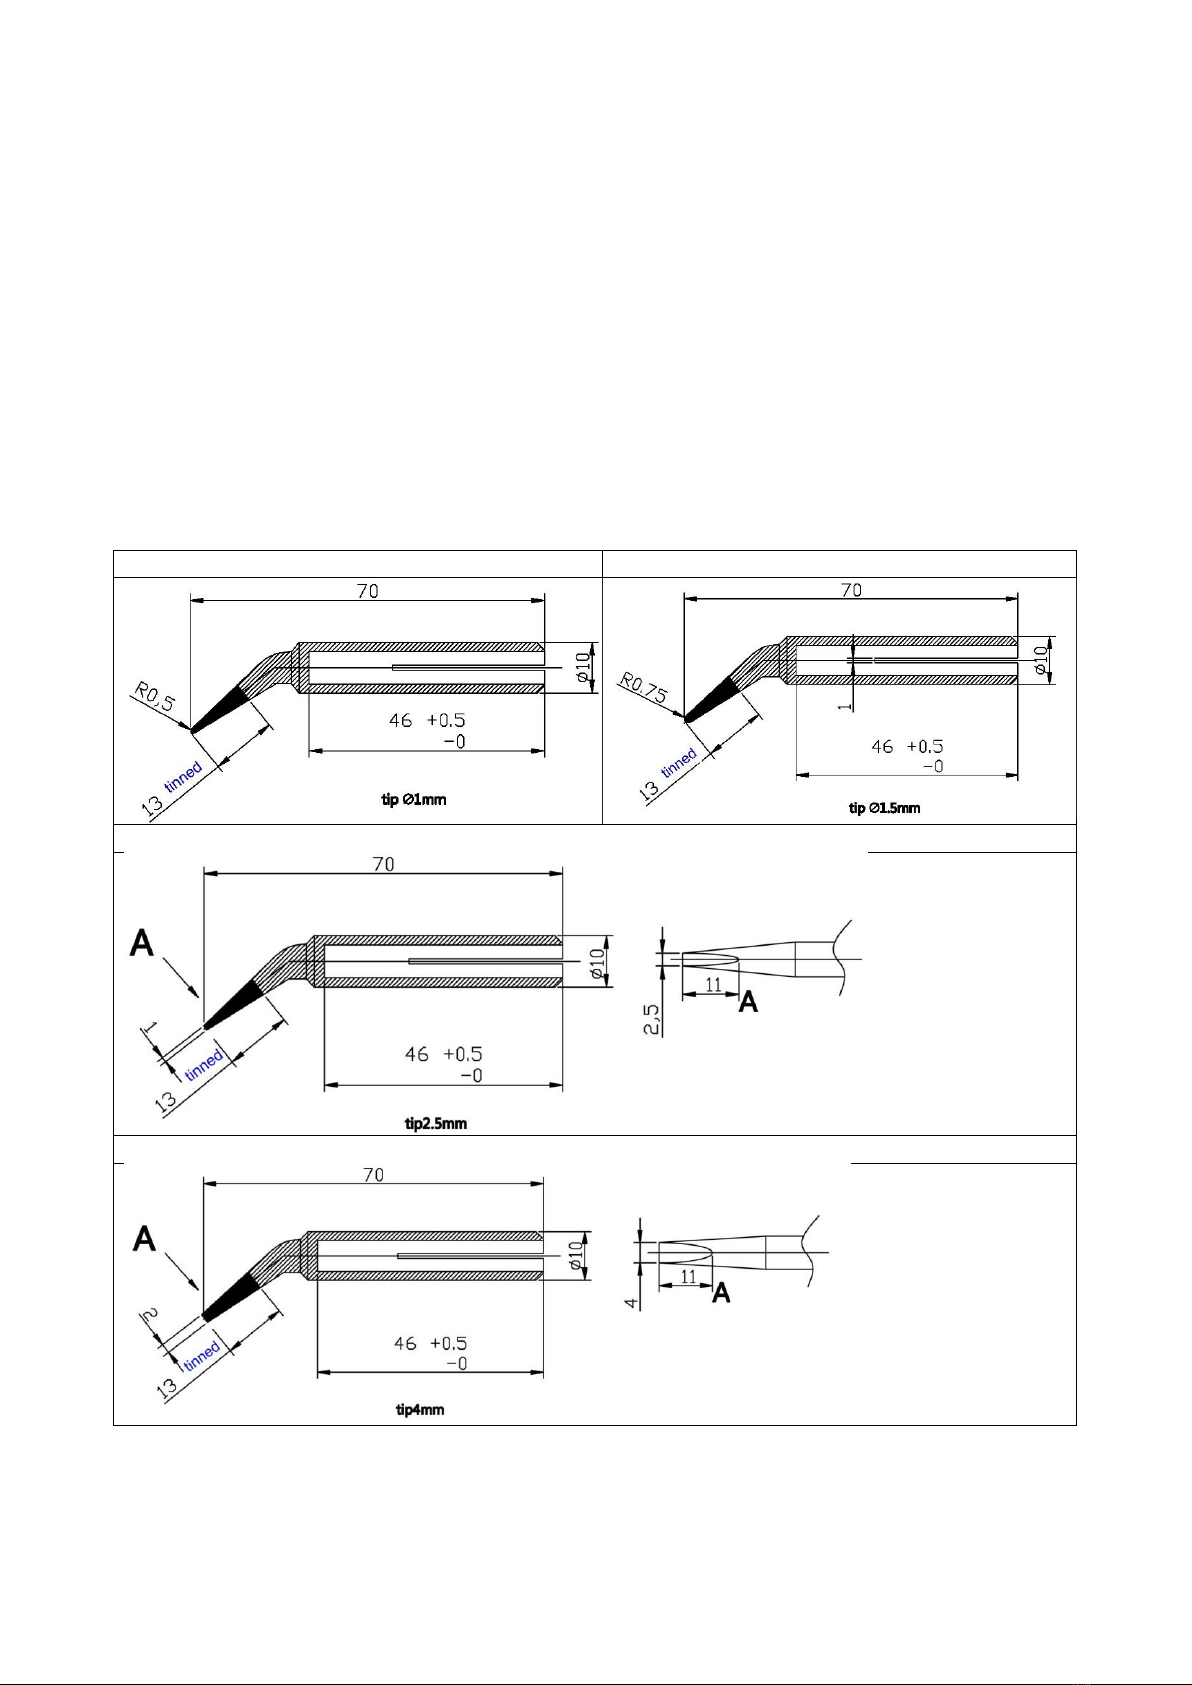
TIPS SELECTION
MR10 Long Life soldering tip conical 1.0mm
MR15 Long Life soldering tip conical 1.5mm
MR25 Long Life soldering tip chisel 2.5mm
MR40 Long Life soldering tip chisel 4.0mm

DISPOSAL
IWaste electrical products should not be disposed of with household waste. Please recycle
where facilities exist. Check with you local Authority or retailer for recycling advice
IMPORTED AND DISTRIBUTED BY:
Freelux Srl Unipersonale – Via per Mombello 45 - 21033 Cittiglio (VA) – info@ewigtools.com
This manual suits for next models
1
Table of contents


