eXact eXact Micro 20 User manual
Smart Photometer System
®
with
U.S. Patent No 7,333,194, U.S. Patent No 7,491,546, Euro Pat No 1 725 864 DE FR UK,
and South African Pat No 2007/0628
2
eXact®Micro 20 with Bluetooth®Photometer Overview 3
About your eXact®Micro 20 photometer 4
About Bluetooth®4
About the Sample Cell (built–in 4 mL) 5
How to install or replace “AAA” batteries 5
2–Year Limited Warranty 5
eXact®Micro 20 Test Specifications 6 – 7
Select group overview 8
eXact®Micro 20 meter messages 8
About eXact®Strip Micro 9
Compliance verification 9
eXact iDip®app overview 10 – 11
eXact iDip®app for eXact®Micro 20 with Bluetooth®12
Managing data with the eXact iDip®app 13
Using eXact®Strip Micro (reagent strips) Test Procedure
Acid pH, Total Alkalinity, Biguanide, Bromine, Calcium Hardness, Chloride,
Total Chlorine High, Chromium, Copper, Total Hardness High,
Total Hardness Low, Hydrogen Peroxide, Nitrate, Nitrite, Ozone,
Peracetic Acid, Permanganate, pH, Phosphate,
Quaternary Ammonia Compound QAC, & Sulfate
14 –15
Using eXact®Reagent (liquid drops) Test Procedure
Cyanuric Acid (III), Fluoride, Metals, & pH-BT 16 –17
Acrylic Calibration Stick 17
Free or Total Chlorine 18
Combined Chlorine 19
Aluminum, Ammonia, Molybdate & Sulfide 20
Calcium Ultra High Marine & Total Hardness Ultra High Marine 21
Cyanide 22
Total Iron 23
High Range Chloride 24
Chlorine Dioxide 25
Manganese 26
Turbidity 27
Tips for Best Accuracy 28
About the Accuracy/Calibration of the eXact®Micro 20 System 29
eXact®Strip Micro (DPD–1) Accuracy 29
Accessories / Kits 30
Available Reagents / Reorder Information 31
Contact Information Back Cover
Contents
3
eXact®Micro 20 with Bluetooth®Photometer Overview
Your new eXact®Micro 20 is ideal for testing Drinking Water, Pools, Spas, Ponds,
Aquariums, Food Process Water, Environmental Waters, and more!
Technical Specifications eXact®Micro 20 with Blutooth®(486700BT)
Measurement method Photometric Sample required 4mL (0.13oz)
Light source Light Emitting Diode
(LED) with precision filter
Cell chamber Custom–molded, proprietary, PET
plastic fused into chamber,
non–removable
Wavelength Dual—525nm & 638nm Operating temp range 0°—50°C (32°—122°F)
Transmission range 100 — 0.00%T Operating temp range 0°—50°C (32°—122°F)
Photometric precision +/– 0.1/0.01 %T Power supply (4) AAA alkaline batteries
Automatic range selection See specifications below Battery life >2000 tests
Cell path–length 20 mm Waterproof Rating Exceeds IP67
Display 3–digit customized liquid
crystal display with
annunciators
Electromagnetic
compliance (EMC)
Emitted interference – EN61326
Immunity to interference –
EN61326
Reagent system
Utilizes patented eXact
®
strip
micro reagent delivery system
with our EZ–3™ method
Dimensions 5 x 3.5 x 16.5 cm
(2 x 1.4 x 6.5) in
W x D x H
Wireless
Bluetooth®(requires Bluetooth®4.0 and Android 4.4 and up or Apple iOS 9 and up)
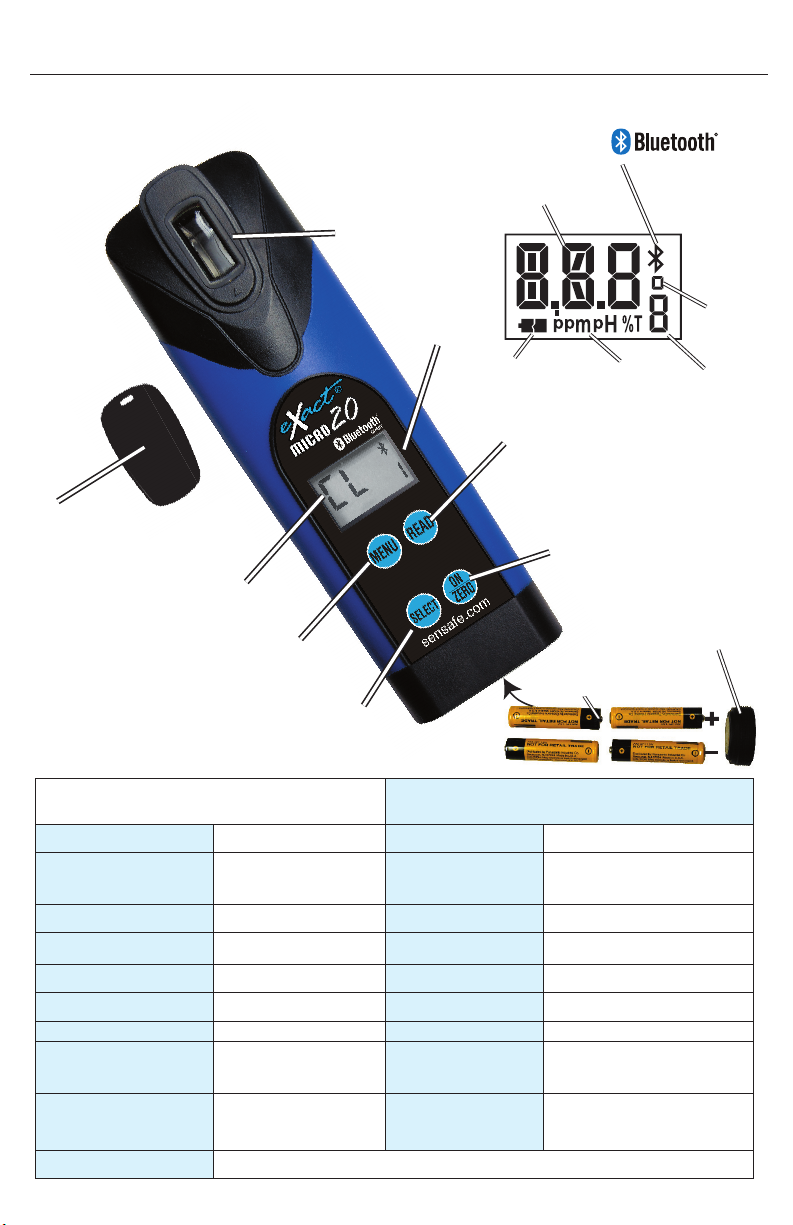
CELL COVER
RESULT
IN PPM
BATTERY
LEVEL
MENU
SELECT
GROUP
4th DIGIT
for >999
SAMPLE CELL
LCD
SCREEN
READ BUTTON
ON/ZERO BUTTON
MENU BUTTON
SELECT BUTTON
BATTERY
COMPARTMENT
COVER
AAA BATTERIES x4
(NOT INCLUDED)
Covers the cell for mixing
and bright light situations
Use to select desired test
within Select groups.
Use to select group number
(7 available)
Built–in plastic 4mL
cell for collecting your
water sample
Appears when meter
is connected with
eXact iDip®app.
Turns the meter on and creates
a baseline for your water testing
Starts test timer
MENU
Shows currently selected
test to be run
4
About your eXact®Micro 20 photometer
In order to save power, the meter is designed to turn off after 5 minutes (timed from the last button
pressed). Should the meter turn off in the middle of a test, the last stored zero in the meter will remain
valid when the meter is turned on again. Also, the test result is stored in memory for easy retrieval.
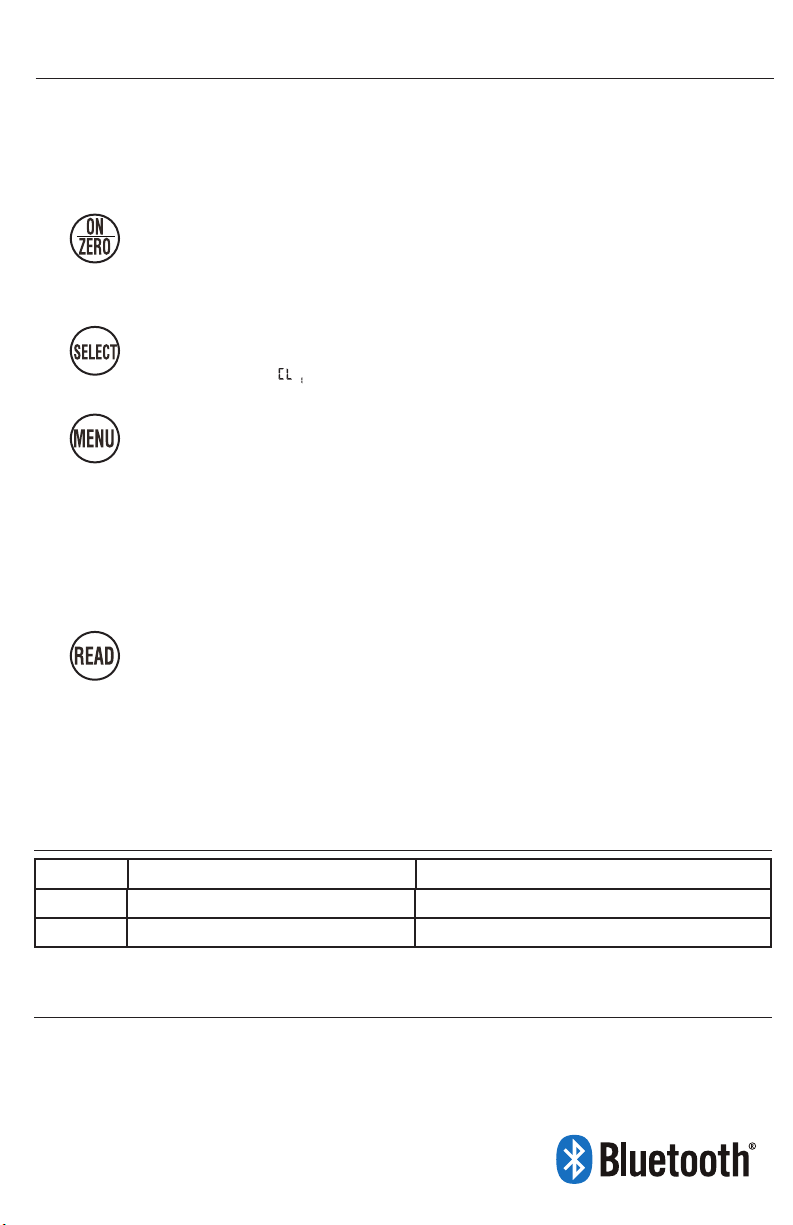
The eXact®Micro 20 meter is controlled by four buttons:
Version Serial Numbers Instruction Manual
v2.0 M20BTA00001 – M20BTA00483 sensafe.com/instruction-manuals/
v3.1 M20BTA00484 and up This manual
When first pressed, the ZERO/ON button powers the meter. When the meter is on
and this button is pressed, it zeros the sample in the cell. It is recommended that
each new water sample analyzed is zeroed before testing, to maximize sensitivity
and accuracy.
With each press, the SELECT button advances through the Select Group 1 through
7. The current Select Group will appear as a small digit to the right of the selected
MENU (example: ).
With each press, the MENU button advances through the tests available in the
current Select Group. Each test menu can store up to 20 results. To retrieve the
stored results, go to the desired test using the MENU key. When the desired test is
displayed, press and hold down the MENU key. Continue holding down the MENU
key to scroll the stored results for that test, starting with the most recent result. The
meter will display, from memory, the last 20 readings in sequence beginning with
–20, which is the latest result, followed by 19, which is the 2nd latest result, etc; and
finally –01, which is the oldest result retained. Only the last 20 readings are stored in
each menu.
When READ is pressed once, this button starts the timer for the parameter being
tested. When pressed a second time the meter exits the timer and immediately
prepares to measure the sample. The meter will simultaneously store the
measurement in memory.
If the parameter being measured is below or above the detection range, the display
will show “LO” (Under Range) or “HI” (Over Range), respectively. This feature is menu
specific and does not apply to all parameters.
Micro 20 Version
About Bluetooth®
Bluetooth®is a low–power wireless networking standard which uses short radio waves to allow
electronic devices to communicate with each other. The eXact® Micro 20 with Bluetooth®comes
standard with Bluetooth®4.0 technology, a class 2 device with a wireless working distance of up
to 30 feet (10 meters) and a 2.1 Mbps data transfer rate. This allows a seamless transfer of data
between a smart device and the eXact® Micro 20 with Bluetooth®.

5
About the Sample Cell (built–in 4 mL)
How to install or replace "AAA" batteries
2–year limited warranty
The built–in Sample Cell (CELL) is transparent plastic and, when filled to the top, contains 4 mL. The
sturdy CELL design will last for over 20,000 readings. Scratches on the CELL will not interfere or
compromise the accuracy of the readings because of its fixed position. For best accuracy, rinse cell
with clean water immediately after a test is completed. Do not use solvents, such as acetone, to clean
the cell. When the CELL becomes stained or cloudy from repeated testing, or when the meter does
not blank when you press the ZERO/ON button, the cell needs to be cleaned. Clean as follows: Fill cell
with clean water and move the Cell cleaning brush up–and–down and back–and–forth along the walls
of the cell. Afterwards, rinse the cell and the meter is ready for use again. Cleaning the cell regularly is
especially recommended after you run a test that is using turbidity or precipitation chemistry for analysis
(Calcium Hardness, Sulfate, Chloride, and Cyanuric Acid).
Registration of your eXact®photometer must be received within 30 days from date of purchase to
activate the warranty. The eXact®photometer is warranted to be free from defects in materials and
workmanship for a period of two (2) years from the date of purchase by the customer. ITS will repair
or replace any part of the product which is deemed to be faulty or otherwise defective. The non–
transferable warranty does not cover product damage caused by abuse (such as crushing a tablet in
the cell) or improper use. If the meter is faulty or otherwise defective contact ITS by phone (+1–803–
329–9712 Ext. 0) or email (its@sensafe.com) to describe the problem and obtain a return authorization
form before returning the photometer to ITS. Damage caused by improper packing of the photometer for
return shipment to ITS will not be covered by the warranty. Customer is responsible for shipping charges
to ITS. ITS pays postage when photometer is returned to customer. A maximum processing fee of $125
will be charged for repair or replacement of non–registered photometers and damages not covered by
this warranty. Registration is available over the phone (+1–803–329–9712 Ext. 0) or online at
sensafe.com/warranty (Personal data is kept confidential).
Unscrew the O–ring sealed battery cover counter–clockwise. Use proper sized pliers if necessary.
Do not disturb the sealing O–ring.
Remove the used batteries and install 4 new AAA batteries following the diagram for correct polarity
(see diagram). We recommend high quality AAA alkaline batteries be used.
Replace the battery cover. Be sure to tighten the cover securely. This is necessary for meter to
ensure it is waterproof.
Dispose of the used batteries in accordance with your local regulations.
Press button to confirm the meter turns on.
The meter is now ready for operation.
Perform Acrylic Calibration Stick procedure (see page 14).
Batteries are not included. The meter requires (4) AAA in order to function.
1
2
3
4
5
6

6
# Parameter / Test Part No. Pg
1 Alkalinity, Total (fresh) 486641 14 AL 1AL 4
2 Alkalinity, Total (pool) 486641 14 AL 3
3 Alkalinity, Total (marine) 486641 14 AL 5
4 Aluminum (AI3+)1486821 20 Al 2
5 Ammonia (NH3) 486654 20 NH 4NH 5
6 Biguanide 486810 14 bG
3
7 Bromine, Total (DPD–4) 486644 14 bR 6
8 Calcium (as CaCO3) 486629 14 CA 3CA 4
9 Calcium, Ultra High (marine) 486668-K 20 CAH5
10 Chloride (as NaCL) 486757 14 CH 1
11 Chloride, HR (as NaCL) 486757 23 CHH3
12 Chlorine Dioxide (DPD–1) 486633 25 Cd 6
13 Chlorine, Combined 486637 & 486638 19 CL 1CL 3CL 6
14 Chlorine, Free (DPD–1) 486637 18 CL 1CL 3CL 6
16 Chlorine, Total (DPD–4) 486670 18 CL 1CL 3CL 6
15 Chlorine, Total High (II) 486672-II 14 CLH6
17 Chromium (VI) 486614 14 CR 2
18 Copper (Cu2+) 486632 14 CU 2CU 3
19 Cyanide 486812 21 CN 7
20 Cyanuric Acid (III) 481652–III 16 CY 3
21 Fluoride 486643 16 F 1
22 Hardness, Total HR (as CaCo3) 486656 14 THH1THH4
23 Hardness, Total LR (as CaCo3) 486630 14 THL1
24
Hardness, Total Ultra High Marine
486669-K 20 THU5
25 Hydrogen Peroxide 486648 14 HP 6
26 Iron, Total 486650 22 FE 2
27 Manganese (Mn2+) 486606 24 MN 2
28 Metals 486604 16 Mt 2
29 Molybdate 486653 20 Mo 2
30 Nitrate (NO3) (fresh) 486655 14 NO34
31 Nitrate (NO3) (marine) 486655 14 NO35
32 Nitrite (NO2) 486623 14 NO24NO25
33 Ozone (DPD–4) 486634 14 O 6
34 Peracetic Acid 486675 14 PA 6
35 Permanganate (DPD–1) 486626 14 PM 6
36 pH (fresh) 486639 14 PH 1
37 pH (salt/pool) 486639 14 PH 3
38 pH-BT (fresh) 486657 16 PPH4
39 pH-BT (marine) 486657 16 PPH5
40 pH, Acid 486624 14 PHA7
41 Phosphate (PO4) 486814 14 PO43PO44PO45
42
Quaternary Ammonia Compound QAC
486823 14 QA 6
43 Sulfate (SO4) 486608 14 SO47
44 Sulfide (S2–) 486818 20 S
7
Group
&
1 2 3 4 5 6 7
For select group & menu overview, see page 8.
eXact®Micro 20 Test Specifications
7
#Count–up
Time Reagents Used Range
(ppm) Resolution | Best Accuracy
1 Immediate AL Strip
10
–
210
0.1(10.0–50.0), 1(51–210) 7.5
2 Immediate AL Strip
8
–
200
0.1(8.0–50.0), 1(51–200) 7.5
3 Immediate AL Strip
25
–
200
17.5
4 80 seconds 5 Drops AL Buffer & AL Strip
0.01
–
1.20
0.01 13
5 500 seconds 3 Drops NH (fresh) or 10 Drops NH (salt), & NH Strip
0.02
–
2.40
0.01 5
6 Immediate BG Strip
1.6
–
210
0.1(1.6–20.0), 1(21–210) 7.5
7 Immediate bR (DPD–1) Strip
0.01
–
12.0
0.01(0.01–2.00), 0.1(2.1–12) 5
8 Immediate CA Strip
20
–
400
16
9 Immediate CAH Strip and 2 drops CAH
710
–
1500
1(710–999), 10(1000-1500) 10
10 Immediate CH Strip
3
–
270
18
11 Immediate 1:20 Dilution of sample & CH Strip
60
–
5400
20 15
12 Immediate Glycine Srip & Cd (DPD–1) Strip
0.04
–
7.00
0.01(0.04–2.00), 0.1(2.1–7) 5
13 Immediate CL (DPD–1) Strip & CL (DPD–3) Strip
0.01
–
6.20
0.01 3
14 Immediate CL (DPD–1) Strip
0.01
–
6.20
0.01 3
16 Immediate CL (DPD–4) Strip
0.01
–
6.20
0.01 3
15 120 seconds CLH Strip
1
–
270
0.1(1–20.0), 1(21–270) 5
17 240 seconds Cr Strip
0.01
–
1.80
0.01 5
18 120 seconds CU Strip
0.01
–
10.0
0.01(0.01–4.09), 0.1(4.1–10) 2
19 600 seconds CN–1 Strip & CN–2 Strip
0.01
–
1.10
0.01 13
20 60 seconds 8 Drops CY
1
–
110
18
21 Immediate 10 Drops F
0.04
–
1.50
0.01 15
22 Immediate THH Strip
60
–
600
112
23 Immediate THL Strip
1
–
80
110
24 Immediate THU Strip and 10 drops THU
4000
–
8100
10 8
25 100 seconds HP Strip
0.3
–
100
0.1(0.3–10.9), 1(11–100) 8
26 40 seconds EZ Open Reducer (Powder) & FE Strip
0.03
–
6.0
0.01(0.03–2.59), 0.1(2.6–6.0) 3
27 120 seconds MN#1 Strip, MN#2 Strip, & 3 Drops MN
0.01
–
1.50
0.01 6
28 120 seconds 2 drops Mt
0.05
–
2.50
0.01 6
29 120 seconds MO Strip, 5 drops MO
0.01
–
3.00
0.01 5
30 600 seconds NO3 Strip
0.12
–
30.0
0.01(0.12–5.00), 0.1(5.1–30) 15
31 580 seconds NO3 Strip
1.00
–
20
0.01(1.00–20) 15
32 360 seconds NO2 Strip
0.01
–
1.80
0.01 5
33 Immediate O3 (DPD–4) Strip
0.01
–
2.00
0.01 4
34 Immediate PA Strip
0.01
–
430
0.01(0.01–9.99), 1(10–430) 7
35 Immediate PM (DPD–1) Strip
0.01
–
5
0.01 2
36 Immediate PH Strip
6.4
–
8.4 pH
0.1 0.2
37 Immediate PH Strip
6.4
–
8.4 pH
0.1 0.2
38 Immediate 2 Drops P-pH
5.1
–
9.2
0.1 0.2
39 Immediate 2 Drops P-pH
5.1
–
9.2
0.1 0.2
40 Immediate Acid PH Strip
3.2
–
6 pH
0.1 0.3
41 120 seconds PO4 Strip
0.03
–
4.0
0.01(0.03–2.50, 0.1(2.6–4.0) 4
42 Immediate QA Strip
2
–
80
16
43 Immediate SO4 Strip
2
–
210
110
44 180 seconds 4 Drops S & S2 Strip
0.01
–
1.6
0.01 6
1Performance verified with various salt systems and water samples
with optimal water temperature at 10°–40°C / 50°–104°F. Optimal
water temperature for Total Alkalinity test is 15°–35°C /59°–95°F.
2For example: If the sample has 1 ppm of Free Chlorine,
the meter may read 0.97 ppm or 1.03 ppm. Contact sales
department for detailed meter accuracy values.
† Value provided represents best possible accuracy under laboratory conditions, but may vary throughout the detec-
tion range. For a complete list of accuracies throughout all ranges please visit sensafe.com/micro20/specifications.
†

8
1 Drinking Water 2 Metals 3 Pool & Spa 4 Pond/Aquarium (Fresh)
AL — Alkalinity, Total (fresh)
CH — Chloride
CL — Free/Combined/Total
Chlorine
F — Fluoride
PH — pH
THH — Total Hardness High
THL — Total Hardness Low
Al — Aluminum
CU — Copper
CR — Chromium
FE — Iron, Total
MN — Manganese
Mo — Molybdate
Mt — Metals +2
AL — Total Alkalinity
bG — Biguanide
CA — Calcium Hardness
CHH — Chloride High Range
CL — Free/Combined/Total
Chlorine
CU — Copper
Cy — Cyanuric Acid (III)
PH — pH
PO4 — Phosphate
AL — Total Alkalinity (fresh)
CA — Calcium
NH — Ammonia
NO2 — Nitrite
NO3 — Nitrate (fresh)
PO4 — Phosphate
PPH — pH-BT (fresh)
THH — Total Hardness High
5 Marine 6 Sanitizers 7 Miscellaneous 8 Transmission
AL — Total Alkalinity (marine)
CAH — Calcium UH (marine)
NH — Ammonia
NO2 — Nitrite
NO3 — Nitrate (marine)
PO4 — Phosphate
PPH — pH-BT (marine)
THU — Total Hardness UH
(marine)
bR — Bromine
Cd — Chlorine Dioxide
CL — Free/Combined/Total
Chlorine
CLH — Total Chlorine High
HP — Hydrogen Peroxide
O — Ozone
PA — Peracetic Acid
PM — Permanganate
qA — Quaternary Ammonia
CN — Cyanide
PHA — pH, Acid
S — Sulfide
SO4 — Sulfate
TR1 — Transmission (525nm)
TR2 — Transmission (638nm)
LCD Message Description Corrective Action
HI In READ mode: test sample concentration is above the
measurement range (test specific).
Dilute and retest. Dilution kit available
(Part No. 487200)
LO In READ mode: test sample concentration is below the
measurement range (test specific).
Sample value is below
measurement range.
LO In ZERO mode: sample absorbency (due to a cloudy
or colored sample or a dirty cell) is too high to zero, the
meter will read “LO” or low battery
Dilute sample, filter sample or clean
cell. One of these options should
remedy the problem.You may need
to replace batteries if low battery
indication.
ER Excessive stray light detected. Normally this does not
occur, even when testing in sunlight.
Place the light blocking CAP over the
CELL for zeroing and for reading result.
Moving to a shaded can also fix
this problem.
Low battery indication during testing
(meter may not zero)
Replace batteries immediately. Otherwise
meter may read LO while testing.
Flashing result
on LCD
Lost connection to eXact iDip®app
Press ON/ZERO to stop flashing. Remove
and replace the battery cover if flashing
continues for future tests.
Select group overview
eXact®Micro 20 meter messages
Below is a list of Menu and selection choices with abbreviations.
The following are some of the common messages that may display on your photometer, including error
messages. If an error message other than those listed below is displayed, please contact technical
support in the USA at (803) 329–0162 (ext. 0).

9
About
Compliance Verification
This DPD test system is accepted by most health departments globally because this test is USEPA
(DIN Standard 38 408 G4, ISO 7393/2) accepted for testing requirements for Free and Total Chlorine.
The eXact®Micro 20 meter uses a wavelength of 525 nm; and the compliance requirement is that
the colorimeter wavelength is between 490 nm to 530 nm. The eXact®Strip Micro CL (DPD–1) uses
the same reagents and proportions, and the resulting solution pH is maintained between 6.2 and
6.5 as specified by AWWA (American Water Works Association) method 4500–Cl G. It should be
understood that the USEPA does not “approve” commercial DPD delivery systems such as reagent
powder pillows, tablets, dispensers, or eXact®Strip DPD delivery devices. The eXact®Strip Micro
CL (DPD–1) for Free Chlorine, and the eXact®Strip Micro CL (DPD–3), the eXact®Strip Micro CL
(DPD–4) for Total Chlorine, and the eXact®Strip Micro Cd (DPD–1) for Chlorine Dioxide meet your
reportable testing requirements because the eXact®Strip Micro strips deliver the required chemicals/
components in correct proportions (see table below).
Likewise, AWWA proportions are followed as required for Total Chlorine measurements using
Potassium Iodide. The eXact®Strip Micro Chromium is compliant because it uses the correct
wavelength and delivers the same chemicals in the same proportions as AWWA method 3500–Cr B.
This is also true for Phosphate (Ascorbic Acid method, AWWA 4500–P E.) and Sulfide (Methylene
Blue method, AWWA 4500–S–2 D). Our Ammonia tests are based on the Nitroprusside/phenate
method found in Standard Methods. Interferences are controlled by EDTA and sodium potassium
tartrate. Standard Methods requires an instrument reading
in the range of 630 to 660nm. The Micro 20
reads the reacted sample at 638nm.
Component
(Free Chlorine)
AWWA
4500–CI G
eXact®
DPD–1
Anhydrous DPD sulfate 1.5% 1.5%
Anhydrous Na2HPO433.4% 33.4%
Anhydrous KH2PO4Na264.0% 64.0%
EDTA 1.1% 1.1%
For a complete list of eXact®Strip Micro reagent strips we offer, please see page 31.
The eXact®Micro 20 with Bluetooth®is designed to work with our line of eXact®Micro Strips. This type
of reagent delivery method is designed to give the most precise accuracy reading for testing various
water quality parameters.
eXact®Strip Micro has been designed to offer the user a more “Green” and cost–effective alternative
to testing. Instead of using a 10 mL water sample, eXact®Strip Micro uses a 4mL water sample,
which uses up to 60% less chemical per test. The accuracy of the meter is maintained by designing
the photo cell with a 20 mm path–length.
e
ea
ct
ct
Strip
e a
ct
ct
eact StripStrip

10
eXact iDip®app overview
GET IT ON
HISTORY:
Accesses
saved results
which can be
sorted, edited,
and emailed.
Also accesses
History Map
CALENDAR:
Displays your
schedule/
appointments
STORE:
Opens store
to unlock
additional tests
CUSTOMERS:
Attaches
results to
people and/or
locations from
your
smart
device contacts
TEST:
Initiates water
testing
RESULTS:
Accesses temporary
results that have
not been saved to
history
MENU:
Opens
slide-out for
easy access to
all app features
HOME SCREEN
BLUETOOTH
DEVICE
TESTING
PARAMETER
TEST RESULT
TEST RESULT SCREEN
TEST
ABBREVIATION
PARAMETER
UNIT OF MEASURE
Scroll unit of measure values.
Some tests offer results in
multiple units of measure.
DOTS INDICATE
MULTIPLE UNITS OF MEASURE
(Available for some tests)
®
M20BT B00007v69.02

11
eXact iDip®app overview
Download the App
Using your smart device, download the eXact iDip®app. To see if your smart device is compatible, please
see our compatibility list at sensafe.com/compatible-devices/.
We are constantly improving the eXact iDip®app and welcome your suggestions to help make our
product even better. Visit www.sensafe.com/idip or e-mail your feedback to exactidip@sensafe.com.
Menu
The Menu slide-out is available from any screen within the app. The Menu allows you
to access any of the app’s features with ease.
HOW TO VIEW YOUR GPS LOCATION
ln the Settings screen you can view your current GPS coordinates.
ABOUT
Access the End-User License Agreement and contact information to reach our offices in the USA and
Europe from the About section located in the Menu slide-out.
Located in the About section you can find which version of the app you are running. Be sure to check
for updates and install the latest version before running a test as we are constantly updating and adding
more features to the app!
Test
You can utilize two different testing methods under Test;Manual Entry or Bluetooth Device.
BLUETOOTH TEST
Tests will be performed with your eXact®Micro 20.
MANUAL TEST
This feature allows you to utilize other testing methods and manually enter your results into the app. Begin
by selecting ‘Test’, ‘Manual entry’, then ‘Change value’ to enter.
History
The History stores all your saved test result information and allows you to sort by date,
customer name, or test type.
HOW TO SORT BY CUSTOMER
To sort by Customer begin by clicking ‘RESULTS’, then ‘Sort by’, ‘Customer’. You can then scroll
through your list of customers, by name, to find a specific test result.
HOW TO SORT BY DATE
To sort by Date begin by clicking ‘RESULTS’ then ‘Sort by’, ‘Date’. You can then scroll through a list of
tests performed by date. You can also set a specific date range period by selecting ‘Date range’.
Then set your From and To date ranges.
HOW TO SORT BY TESTS
To sort by Test begin by clicking ‘RESULTS’ then ‘Sort by’,‘Test’. You can then scroll through a list of
tests sorted in alphabetical order.
HOW TO ACCESS HISTORY MAP
The History Map stores GPS locations of testing sites. See page 13 for instructions on utilizing this feature.
12
eXact iDip®app for eXact®Micro 20 with Bluetooth®
The benefits of purchasing an eXact Micro 20 with Bluetooth®are the ability
to connect your photometer to a smartphone or tablet and use our specially
designed app to easily save, send, and share your test results. First, select your
test using the menu selections on your Micro 20 then run the test and the results
will simultaniously display on the app and on your Micro
20 with Bluetooth®. From the app, you can save, send,
and share the results directly linked to your customers information and GPS
location to include date/time stamp. The eXact iDip®app is available for use
on both Apple and Android devices. The app is compatable with Bluetooth
4.0 devices (Android 4.4 and up and Apple iOS 7.0 and up) For a full list of
compatible devices please visit sensafe.com/compatible–devices/.
GET IT ON
When using your eXact®Micro 20 with Bluetooth®and the eXact iDip®app, you
will need to complete the following steps after you have rinsed and filled your
cell with the water sample and prior to zeroing your meter and dipping your strip.
Please note that batch uploading tests saved on your eXact Micro 20 to a smartphone/tablet is not yet available.
If you want to save a test result from your Micro 20 to the app, you will need to run the test while connected to the app
or enter the result manually.
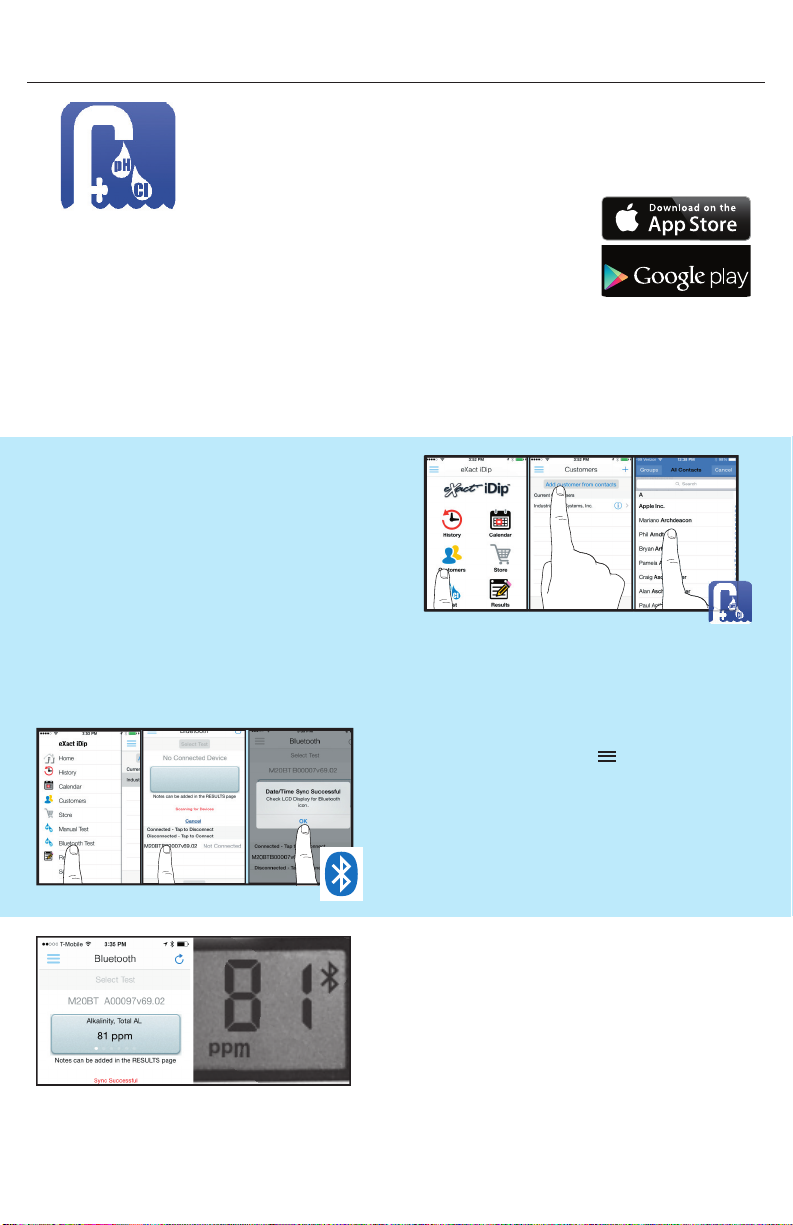
READ RESULTS
Results will display simultaneously on the
Micro 20 photometer and app.
HOW TO SELECT A CUSTOMER
From your smartphone/tablet, launch the eXact iDip®
app. Select ‘Customers’ from the home screen. From
the Customers list ‘Add customer from contacts’ or
create a new contact by selecting the ‘+’ in the upper
right hand corner.
HOW TO CONNECT VIA BLUETOOTH
Tap the menu slide out screen ‘ ’ and select
‘Bluetooth Test’. Select your eXact®Micro 20 from
the list located at the bottom of the screen. Verify it
has connected and tap ‘OK’.
The serial number is located on the back of your device, this
will display in the app. Refer to the serial number
to ensure you are connected to the correct device.
Please Note: When you select a new customer, this customer will not appear in the list until you have run and saved
a test using the app and your eXact®Micro 20 with Bluetooth®photometer.

13
Managing data with the eXact®iDip app
MANAGING DATA (SAVE/SEND/SHARE)
When all tests have been performed, select ‘Results’ at
the bottom of the screen. To add notes tap the desired
test result.
TYPE NOTES
Add any notes you wish into the
‘Notes’ box. The additions will
be automatically saved.
MANAGING DATA (SAVE/SEND/SHARE)
Go back to ‘Results’ and select ‘Save’ to store the test
results with notes into ‘RESULTS’
HOW TO MANAGE DATA IN HISTORY
In History, you can edit, select, and email your results.
To email, you can either tap an individual result, or use
the ‘Select’ button to access multiple data points.
HOW TO EMAIL RESULTS FROM HISTORY
(1) Press the blue envelope icon from a single
result selection.
(2) To select multiple test results, tap ‘select’, choose
results, and then’email’ to send the result information
for all selected results. The app will automatically
attach your test result information and a .csv file
to the email.
Add recipients and tap send to complete.
ACCESSING RESULTS FROM HISTORY MAP
Tap ‘Map’ on ‘RESULTS’ page to access the History Map. Double tap or use fingers to zoom
into an area. Select a pin by tapping to bring up results. From the specific location you can bring
up the test results details page.
After you have run your test, you can save, send, and share your results, by following the steps below.
14
Using eXact®Strip Micro Standard strip test procedure
Used for Total Alkalinity
1
, Biguanide, Bromine, Calcium Hardness
2
, Chloride
3
, Chlorine High Range
4
, Chromium
5
, Copper,
Total Hardness High Range
6
, Total Hardness Low Range
6
, Hydrogen Peroxide
7
, Nitrate
8
, Nitrite, Ozone, Peracetic Acid
9
,
Permangante, pH
10
, Acid pH, Phosphate
11
, Quaternary Ammonia Compound QAC, Sulfate
(SEE NEXT PAGE FOR SPECIAL NOTES)
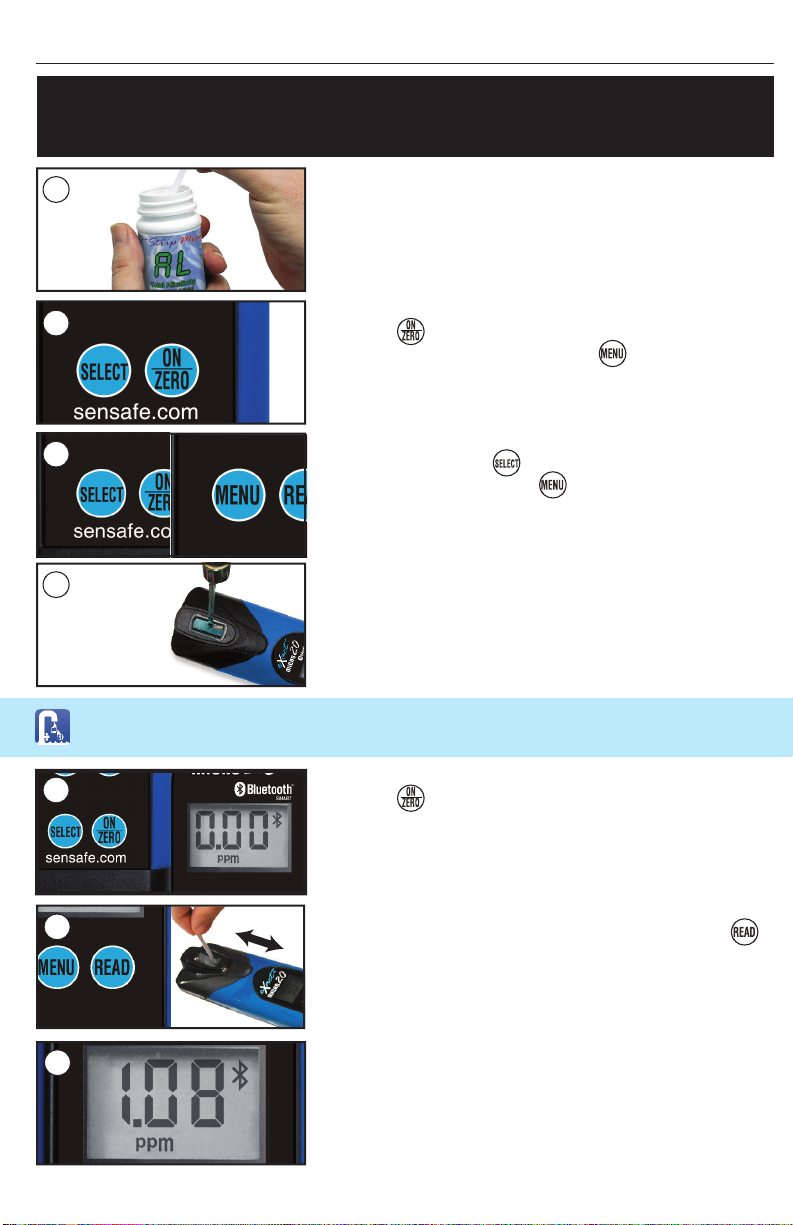
REMOVE STRIP
Remove 1 eXact®Strip Micro (ex.Total Alkalinity) from
the bottle before beginning the test. Set the strip in a dry,
convenient place and recap the bottle immediately.
TURN METER ON
Press the button to power the meter on; the display will
show all annunciators, then the current selection, followed
by the last reading.
RINSE CELL AND FILL WITH SAMPLE
Rinse the CELL at least 3 times with the water sample you
will be testing (rinsing minimizes the potential for cross–
contamination from a previous test). Finally, fill the CELL to
capacity with the water sample.
ZERO METER*
Press the button. The cursor will move across the display
followed by a display reading of 0.00 PPM. This indicates the
sample is ready for testing.
1
2
SELECT GROUP AND MENU
Press and re–press the button to Select your group.
Then, press and re–press the button to select the test
parameter (see chart on pages 6–7).
4
5
DIP STRIP & PRESS READ
Dip the required strip into the CELL, and immediately press
This will start a 20 second countdown timer. During this time,
move the strip in a gentle back and forth motion (approx. 2
strokes per second). Remove and discard the strip after ‘1’
on the display disappears.*
RECORD RESULT & RINSE CELL
The cursor will move across the display while the meter
prepares to measure the sample. Record the value displayed
for the respective parameter. This value is automatically stored
in its MENU and if using the eXact iDip®app, the result will
be saved in the app’s ‘RESULTS’. After testing, rinse cell
immediately and clean with brush.
6
7
Follow the steps to ‘SELECT CUSTOMER’ & ‘CONNECT DEVICE VIA BLUETOOTH’ before
proceeding (see page 12).
*For best accuracy, when testing outdoors in sunlight, place cap over cell cover
3

15
eXact®Strip Micro test procedure (SPECIAL NOTES)
1 Total Alkalinity — A. For water temperatures above 95°F (35°C), remove and discard the strip when
the timer displays “10”. B. If result is “HI” and a value is required, you will need to purchase eXact®Strip
Micro AL Range Extender (Part No. 486665) and visit us online at
sensafe.com/exact-micro-20-with-bluetooth/ for detailed instructions.
2Calcium Hardness — A. This test is accurate in water with Chloride < 2,000 ppm as NaCl. Chloride
levels from 12,000 to 24,000 ppm as NaCl give 10-15% error. For samples with Chloride levels greater
than 25,000 ppm as NaCl, contact ITS for a look-up table. B. For water temperatures above 95°F
(35°C), remove the strip when the timer displays “10”. C. Even if all pads are not fully immersed in water,
do not bend the strip. Make sure the strip touches the bottom of the CELL while dipping the strip.
3Chloride — If sample pH is high (>9), adjust pH to 5–6 using Vinegar.
4 Chlorine High Range — A. Use a 10 second dip time if water temperature is above 113°F (40°C).
B. INTERFERENCES: Oxidizers such as Chlorine Dioxide, Bromine, Iodine, Ozone, Bromamines, and
Permanganate will give false positive readings.
5Chromium (VI) — A. The strip is 8mm wide and needs to be angled in order to fit in the CELL.
B. This test has no interferences from Chromium (III).
6Total Hardness, HR & LR— A. Positive interferences are observed if the test sample contains Barium.
Interferences also observed if the test sample contains Copper, Lead, Cobalt, or Nickel. B. Below 90ppm
of Total Hardness HR, false positive results may occur. C. For Total Hardness HR, Total Alkalinity must
be in the range of 40-220ppm (as CaCO3). D. The pH of the sample for Total Hardness High Range
should be between 6.9 and 7.2. E. If the Total Alkalinity of the sample is greater than 220ppm, you will
need to purchase eXact®Strip Micro THH Conditioner (Part No. 486666) and visit us online at sensafe.
com/exact-micro-20-with-bluetooth/ for detailed instructions.
7 Hydrogen Peroxide —
If sample temperature is less than 42°F (6°C), allow sample to reach room
temperature before testing. Otherwise, you can press READ again to start an additional 20 second
countdown/100 second count-up and use this new result. The extra reaction time is needed in cold samples.
8 Nitrate — The CELL needs to be cleaned with brush and distilled water after each test. If any zinc dust
is adhering to the CELL wall, it will affect results.
9 Peracetic Acid — This test has no interferences from Hydrogen Peroxide.
10 pH — A. Requires water sample with a Total Alkalinity minimum of 20ppm. B. For water temperatures
above 95°F (35°C), remove and discard the strip when the timer displays “10”. C. Clean CELL with
brush prior to testing to remove any residual buffers that may adhere from DPD or other tests.
11 Phosphate — A. Clean CELL with 0.1N HCl, Distilled Vinegar (5%), or Muriatic Acid (diluted 1:40
with H2O) before testing. B. If running multiple tests in a row, using the same water sample, the CELL
does not have to be rinsed or cleaned with acid between each test. It is recommended that the CELL
be rinsed three times with the sample water. C. The calibration of the meter is based on a water
temperature between 15°C (59°F) and 31°C (88°F). If temperature is below 15°C (59°F), your final
Phosphate value may read low. This test can also be used for salt water testing.
Some test procedures require the combination of more than one test strip and/or liquid reagents
Please follow the step–by–step procedures as outlined in pages 18 – 27 to ensure the best accuracy.
For more tips on best accuracy, see page 28.
Any deviation from the outlined procedure, could result in inaccurate test results. Please take caution
to testing notes. If your required procedure is not listed in this manual or if you have any questions,
feel free to contact us at its@sensafe.com
16
Using eXact®reagent Standard liquid test procedure
Used for Cyanuric Acid (III)1, Fluoride2, Metals, and pH-BT
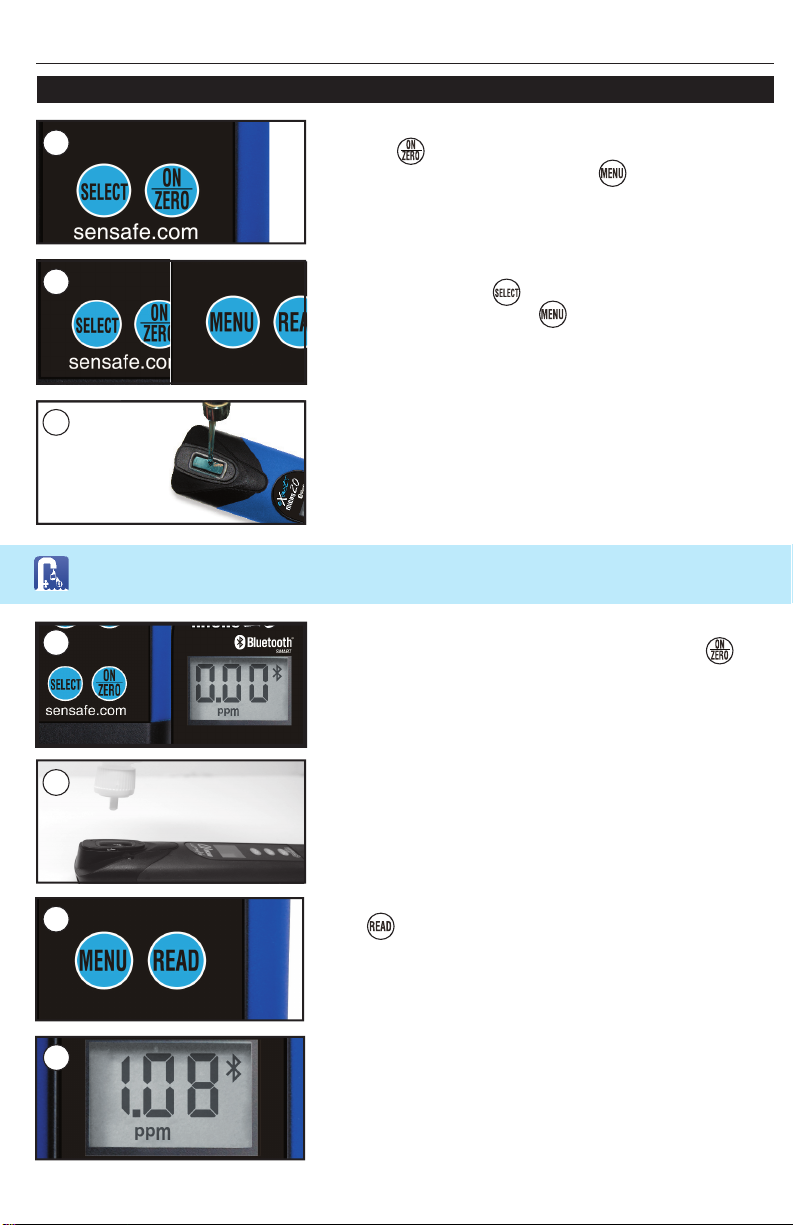
TURN METER ON
Press the button to power the meter on; the display will
show all annunciators, then the current selection, followed
by the last reading.
RINSE CELL AND FILL WITH SAMPLE
Rinse the CELL at least 3 times with the water sample you
will be testing (rinsing minimizes the potential for cross–
contamination from a previous test). Finally, fill the CELL to
capacity with the water sample.
ZERO METER*
Cover the CELL with the CELL COVER and press the
button. The cursor will move across the display followed by a
display reading of 0.00 PPM. Tilt the meter to discard about
0.2mL water in order to leave room for liquid reagent. Sample
is ready for testing.
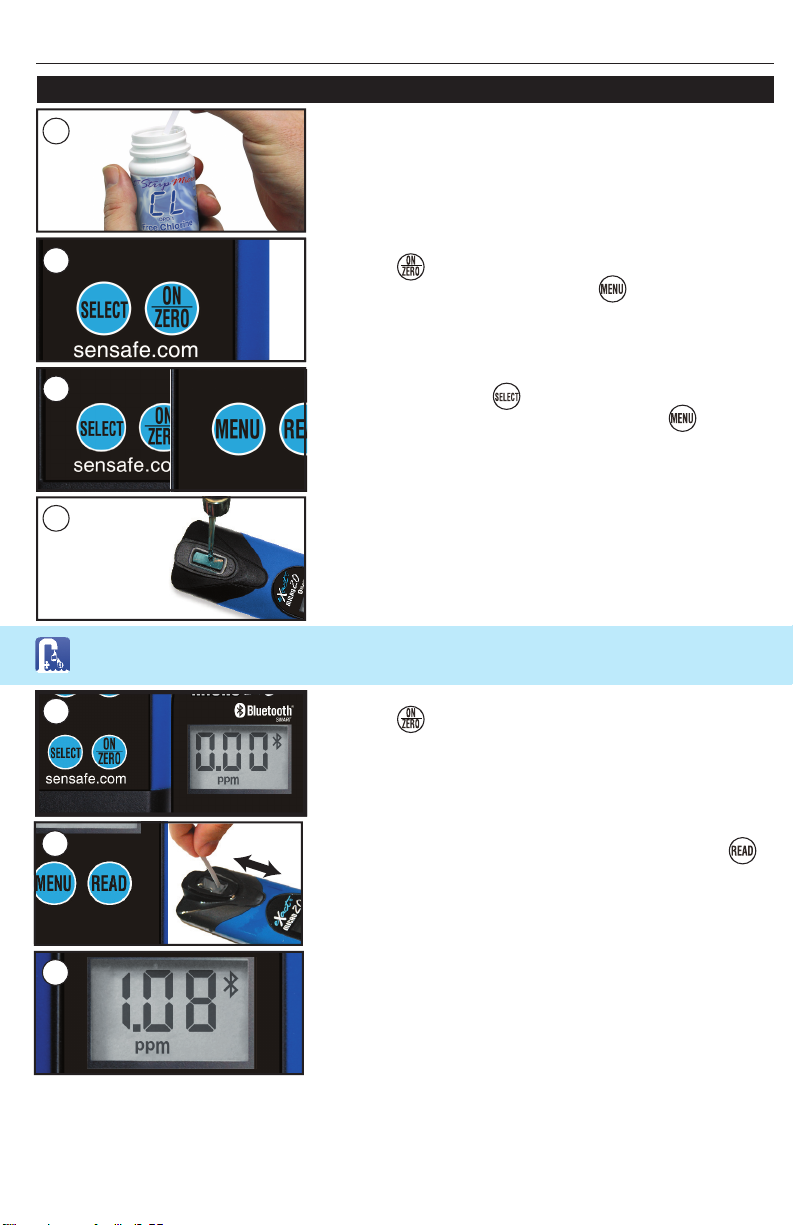
ADD DROPS
Remove the CELL COVER and, using the selected bottle of
reagent, add the required drops (see chart on pages 6–7) and
cover the CELL with the CELL COVER. Precaution: Ensure
that the bottle is straight when dispensing drops.
1
2SELECT GROUP AND MENU
Press and re–press the button to Select your group.
Then, press and re–press the button to select the test
parameter (see chart on page 6–7).
3
4
PRESS READ & MIX
Press and a 20 second countdown begins. During this
time, turn the meter upside down repetitively. When the timer
displays ‘1’, place the Micro 20 on a flat surface. Wait for
count–up time.
RECORD RESULT
The cursor will move across the display while the meter
prepares to measure the sample. Record the value displayed
for the respective parameter. This value is automatically stored
in its MENU and if using the eXact iDip®app, the result will
be saved in the app’s ‘RESULTS’. After testing, rinse cell
immediately and clean with brush.
6
7
5
Follow the steps to ‘SELECT CUSTOMER’ & ‘CONNECT DEVICE VIA BLUETOOTH’ before
proceeding (see page 12).
*For best accuracy, when testing outdoors in sunlight, place cap over cell cover
17
eXact®reagent liquid drops (SPECIAL NOTES)
Acrylic Calibration Stick
6
7
1Cyanuric Acid — Shake the bottle vigorously to mix before adding the drops to the sample
2Fluoride — The reagent contains acid, a stir bar may be used to mix the reagent.
Acrylic Calibration Stick (lot 22916) Records:
Date
Tested
Recorded
Value
Comments
The Acrylic Calibration Stick is a tool for verifying the calibration of your eXact
®
Micro 20 Smart
Photometer compared to its original factory settings. Run this test immediately upon receipt and
record value for future reference. Follow steps 2-5 on page 18 (do not use cap during ZERO). Then,
follow the remaining steps below.
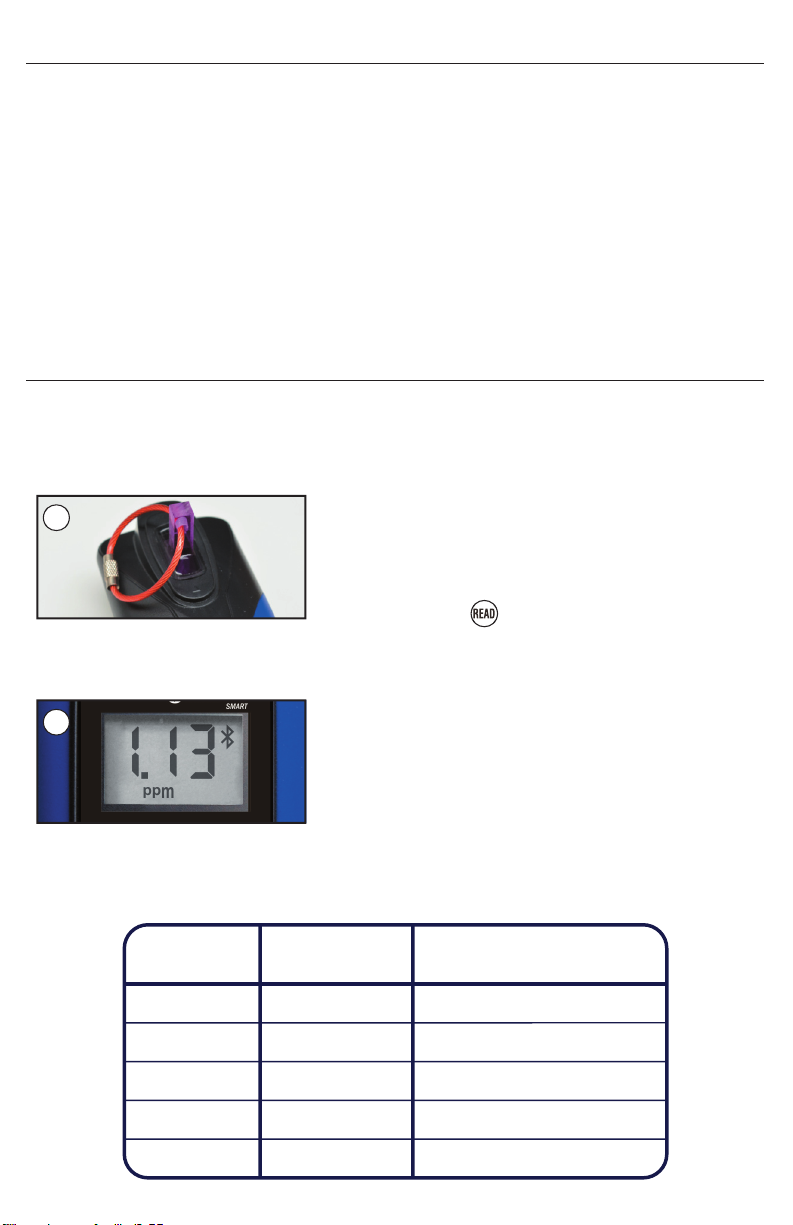
DIP STICK AND PRESS READ
Place the Acrylic Calibration Stick into the water sample in
the center of the CELL. Be sure the key is positioned upright
(vertical) and to the bottom of the CELL. Also, the hole in the
handle should face the top and bottom of the Micro 20 (see
image below). Press to initiate a 20-second countdown.
READ RESULT AND RECORD
Result is displayed on the eXact®Micro 20. Record value
on chart below. Expect future test results to be within 0.15
units from previous calibration. If variation is greater, please
re-check your ZERO procedure (steps 2-5) and be sure to use
clean water (deionized or distilled if necessary).
18
Free or Total Chlorine test procedure
TURN METER ON
Press the button to power the meter on; the display will
show all annunciators, then the current selection, followed
by the last reading.
2
3SELECT GROUP AND MENU
Press and re–press the button to Select your group
(Select 1, 3, or 6). Then, press and re–press the button
to select the CL test parameter.
5ZERO METER*
Press the button. The cursor will move across the display
followed by a display reading of 0.00 PPM. This indicates the
sample is ready for testing.
5
DPD–1 strip used for Free Chlorine detection, DPD–4 strip used for Total Chlorine detection
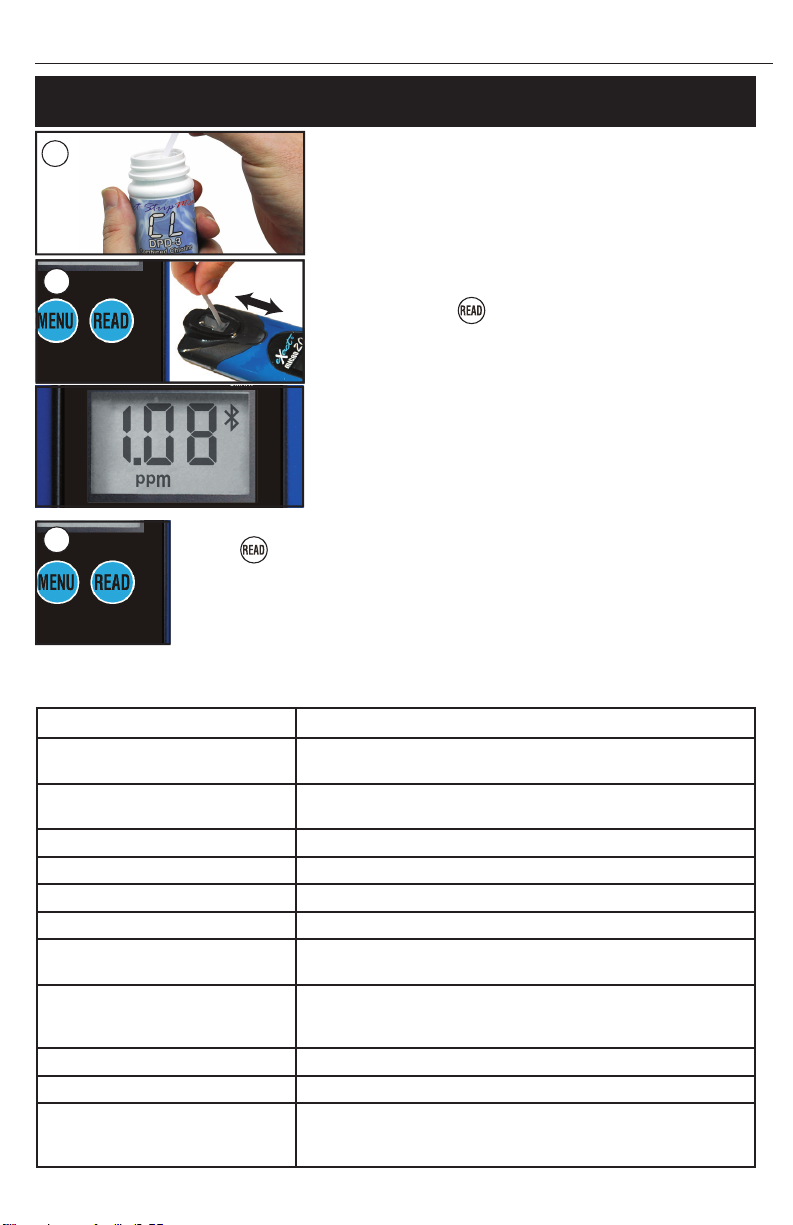
DIP STRIP & PRESS READ
Dip the required strip into the CELL, and immediately press
This will start a 20 second countdown timer. During this time,
move the strip in a gentle back and forth motion (approx. 2
strokes per second). Remove and discard the strip after ‘1’
on the display disappears.*
6
RECORD RESULT
The cursor will move across the display while the meter
prepares to measure the sample. Record the value displayed
for the respective parameter. This value is automatically stored
in the CL MENU and if using the eXact iDip®app, the result
will be saved in the app’s ‘RESULTS’. IMPORTANT: DO NOT
discard the sample from the Free Chlorine (DPD–1) test if you
are planning to run eXact®Strip Micro DPD–3 (Total Chlorine)
Procedure. Move directly to steps 8–10 on the next page,
otherwise immediately rinse the CELL and clean with brush.
7
Follow the steps to ‘SELECT CUSTOMER’ & ‘CONNECT DEVICE VIA BLUETOOTH’ before
proceeding (see page 12).
*For best accuracy, when testing outdoors in sunlight, place cap over cell cover
RINSE CELL AND FILL WITH SAMPLE
Rinse the CELL at least 3 times with the water sample you
will be testing (rinsing minimizes the potential for cross–
contamination from a previous test). Finally, fill the CELL to
capacity with the water sample.
4
REMOVE STRIP
Remove 1 eXact®Strip Micro CL (DPD–1), Part No. 486637
or eXact®Strip Micro CL (DPD–4), Part No. 486670 from
the bottle before beginning the test. Set the strip in a dry,
convenient place and recap the bottle immediately.
1
19
Combined Chlorine test procedure
REMOVE STRIP
Remove 1 eXact®Strip Micro CL (DPD–3), Part No. 486638
from the bottle before beginning the test. Set the strip in a dry,
convenient place and recap the bottle immediately.
8
This procedure is only valid when ran as a continuation of the eXact®Strip Micro
CL (DPD–1 Free Chlorine). Test procedure located on the previous page.
NOTE: Standard Method (4500–Cl G, procedure for total chlorine) requires the reading to be made after 2 minutes
from the time the KI is added. For compliance testing, you must time the 2 minutes and then make your measurement.
6DIP STRIP & PRESS READ
Dip the eXact®strip micro (DPD–3) into the CELL, and
immediately press . This will start a 20 second countdown
timer. During this time, move the strip in a gentle back and
forth motion (approx. 2 strokes per second). Remove and
discard the strip after ‘1’on the display disappears.
*
The
cursor will move across the display while the meter prepares
to measure the sample. Record the value displayed and this
value is automatically stored in the CL MENU, the result will
be saved in the app’s ‘RESULTS’.
(NOTE: The Iodide added with DPD–3 will, in the presence of
Combined Chlorine or Chloramines, convert into Iodine).
9
PRESS READ AGAIN
Press again and the meter will count down and display the next reading. If
this reading matches the previous result, then record this as the Total Chlorine
result. This value is automatically stored in the CL MENU. After testing is
completed, rinse CELL immediately. Record the highest value the meter
displayed as your Total Chlorine result. After testing, rinse cell immediately and
clean with brush.
10
*For best accuracy, when testing outdoors in sunlight, place cap over cell cover
Interfering Substance Interfering Levels and Treatments
Acidity
If sample has acidity above 150mg/L CaCO3 test may not develop
full color. Neutralize to pH 6.0 to 7.0 with 0.5N Sodium hydroxide.
Alkalinity
If sample has alkalinity above 200mg/L CaCO3 test may not
develop full color. Neutralize to pH 6.0 to 7.0 with 0.5N Sulfuric acid.
Bromine and Bromamines, Br2
Color similar to free chlorine reaction at all levels.
Chlorine Dioxide, ClO2
Color similar to free chlorine reaction at all levels.
Copper, Cu2+
Color development is reduced above 10 ppm (mg/L).
Iodine, I2
Color similar to free chlorine reaction at all levels.
Manganese, oxidized (Mn4+, Mn7+)
or Chromium, oxidized (Cr6+)
See AWWA procedure 4500-CL F, 1(d) for removal of interferences.
Monochloramines (NH2Cl)
(applies to DPD-1 only)
Monochloramine interferences are known to occur in free chlorine
DPD methods. This interference is dependent on temperature and
monochloramine concentration.
Ozone, O3
Color similar to free chlorine reaction at all levels.
Peroxides
Interference is possible.
pH
Typical pH samples of potable water with a pH of 6.0 to 9.0 are
OK. If outside this range adjust to pH 6.0 to 7.0 using acid
(0.5N Sulfuric acid) or base (0.5N Sodium hydroxide).
20
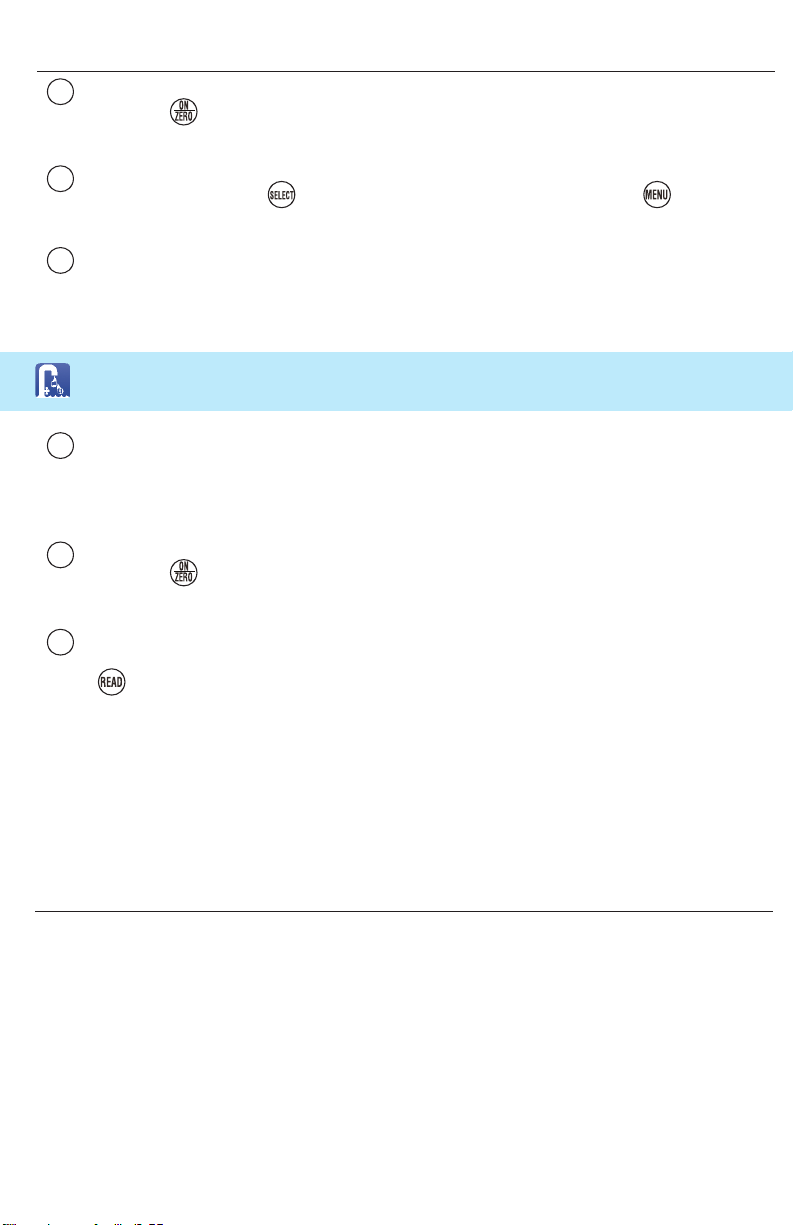
TURN METER ON
Press the button to power the meter on; the display will show annunciators, followed by
the current selection. It will then display the last reading.
RINSE & FILL CELL WITH SAMPLE
Rinse the CELL at least 3 times with the water sample you will be testing—rinsing minimizes
the potential for cross–contamination from a previous test. Finally, fill CELL to capacity with
the water sample. Tilt meter to discard about 0.2mL water to leave room for liquid reagent.
SELECT GROUP & MENU
Press and re–press the button to Select Group. Press and re–press the button to
select the test parameter (see chart on page 6–7).
ADD DROPS
Using the selected bottle of reagent, add the required drops (see chart on page 6–7) and
cover the CELL with the CELL COVER. Precaution: Ensure that the bottle is straight when
dispensing drops.
ZERO METER*
Press the button. The cursor will move across the display followed by 0.00 PPM. This will
indicate that the sample is ready for testing.
DIP STRIP & PRESS READ
Using the required strip (see chart on page 6–7), dip strip into the CELL, and immediately press
to initiate a 20 second countdown. Move the strip using a gentle back and forth motion
(approx. 2 strokes/sec). Remove and discard the strip after “1” on the display disappears.*
The meter will automatically start to count up. The count up time will vary for each parameter. At
the end, the cursor will move across the display while the meter prepares to measure the sample.
Record the value displayed for the respective parameter. This value is automatically stored in its
MENU and if using the eXact iDip
®
app, the result will be saved in the app’s ‘RESULTS’. After
testing, rinse CELL immediately and clean with the brush. After Sulfide testing: rinse CELL with
Distilled White Vinegar, 0.1N HCl, or Muriatic Acid and clean with brush.
1
2
3
4
5
6
Aluminum1, Ammonia2, Molybdate & Sulfide3test procedure
Aluminum, Ammonia & Sulfide (SPECIAL NOTES)
1Aluminum — A. First, clean the CELL with 0.1N HCl, Distilled Vinegar (5%), or Muriatic Acid (diluted
1:40 with H2O) before testing. B. If running multiple tests in a row, using the same water sample, the
CELL does not have to be rinsed or cleaned with acid between each test. It is recommended that the
CELL be rinsed 3 times with the sample water.
2Ammonia — The calibration of the meter is based on a water temperature between 14°C (57°F) and
28°C (82°F). If temperature is below 14°C (57°F), your final Ammonia value may read low.
3Sulfide — A. For results as Hydrogen Sulfide (H2S), multiply the resulting value by 1.06. B. The
calibration of the meter is based on the water sample temperature above 20°C (68°F). If the water
sample is below 20°C (68°F), the strip has to dip in the sample for an additional 10 seconds.
Follow the steps to ‘SELECT CUSTOMER’ & ‘CONNECT DEVICE VIA BLUETOOTH’ before
proceeding (see page 12).
*For best accuracy, when testing outdoors in sunlight, place cap over cell cover
Other manuals for eXact Micro 20
1
Table of contents
Other eXact Test Equipment manuals


