exaSound e12 DAC User manual

e12 Digital to Analogue Converter
DSD 256 Fs / 12.288 MHz
DXD 32bit / 352.8 kHz
PCM 32 bit / 384 kHz
Owner’s Man al (Mac OS X)
PLEASE READ BEFORE OPERATION
REV. 1.0.0 – 02/2015

Page | 2
Table of Contents
Safety Information ....................................................................................................... 4
Explanation of Graphical Symbols ............................................................................................................ 4
Important Safety Instr ctions ................................................................................................................... 4
Preca tions ............................................................................................................................................... 4
Welcome .......................................................................................................................... 7
Quick Start ...................................................................................................................... 8
Package Contents ...................................................................................................................................... 8
Proper Device Placement .......................................................................................................................... 8
Front Panel Indicators ............................................................................................................................... 8
Rear Panel Connectors .............................................................................................................................. 8
Driver Set p .............................................................................................................................................. 9
exaSo nd Men Icon ................................................................................................................................ 9
A dio-MIDI Set p ...................................................................................................................................... 9
Features ......................................................................................................................... 10
Mac OS X High-Performance Driver .................................................................................................... 10
Proprietary Mac ASIO Drivers ............................................................................................................. 10
Asynchrono s USB Mode .................................................................................................................... 10
Hardware Vol me Control and Vol me Bypass .................................................................................. 10
Connecting an Powering the e12 DAC............................................................... 11
Connecting the USB Inp t ....................................................................................................................... 11
Connecting the Line O tp ts .................................................................................................................. 11
Direct Connection to Analog e Power Amplifier .................................................................................... 11
Analog e Interconnect Recommendations ............................................................................................ 11
Connecting the Power Adapter............................................................................................................... 12
S rge Protectors ..................................................................................................................................... 12
Isolating the Cable TV Gro nd ................................................................................................................ 12
Setup of exaSoun e12 Driver an Dashboar for OS X ................................ 13
System Req irements ............................................................................................................................. 13

Page | 3
Software Installation Step-by-Step G ide ............................................................................................... 13
Using the e12 DAC ...................................................................................................... 16
Power On/Off .......................................................................................................................................... 17
Vol me Control ....................................................................................................................................... 17
Vol me Bypass ........................................................................................................................................ 17
Settings Men ......................................................................................................................................... 18
Using the exaSo nd ASIO Drivers for OS X ............................................................................................. 18
Step-By-Step Player Config ration Instr ctions ..................................................................................... 18
Specifications ............................................................................................................... 19
Limite Warranty ....................................................................................................... 21
Copyright © 2011-2015, exaSo nd A dio Design. All rights reserved.
Page | 4
Safety Information
Explanation of Graphical Symbols
The lightning flash with arrowhead symbol, within an eq ilateral triangle, is intended to
alert the ser to the presence of nins lated “dangero s voltage” within the prod ct’s
enclos re that may be of s fficient magnit de to constit te a risk of electric shock to
persons.
The exclamation point within an eq ilateral triangle is intended to alert the ser to the
presence of important operating and maintenance (servicing) instr ctions in the literat re
accompanying the Device.
Important Safety Instructions
1. Read these instr ctions.
2. Keep these instr ctions.
3. Heed all warnings.
4. Follow all instr ctions.
5. Do not se this apparat s near water.
6. Clean only with dry cloth.
7. Do not block any ventilation openings. Install in accordance with the man fact rer’s instr ctions.
8. Do not install near any heat so rces s ch as radiators, heat registers, stoves, or other apparat s
(incl ding amplifiers) that prod ce heat.
9. Do not defeat the safety p rpose of the polarized or gro nding-type pl g. A polarized pl g has two
blades with one wider than the other. A gro nding type pl g has two blades and a third gro nding
prong. The wide blade or the third prong is provided for yo r safety. If the provided pl g does not fit
into yo r o tlet, cons lt an electrician for replacement of the obsolete o tlet.
10. Protect the power cord from being walked on or pinched, partic larly at pl g, receptacle, and the
point where it exits from the apparat s.
11. Only se attachments/accessories specified by the man fact rer.
12. Refer all servicing to q alified service personnel. Servicing is req ired when the device has been
damaged in any way, s ch as power-s pply cord or pl g is damaged, liq id has been spilled or
objects have fallen into the device, the device has been exposed to rain or moist re, does not
operate normally, or has been dropped.
Precautions
• Before connecting the AC power adapter cord to the device, make s re the voltage designation of
the power adapter corresponds to the local electrical s pply. If yo are ns re of yo r power
s pply, contact yo r local power company. The acceptable power inp t range is AC ~ 100V-240V,
50/60Hz
• The device is still receiving power from the AC power so rce as long as it is connected to the wall
o tlet, even if the device itself has been t rned off.
Page | 5
• Unpl g the power adapter if yo are not going to se the device for an extended period of time.
Hold the power adapter when npl gging. Do not p ll on the cord.
• The power adapter is sed as the mechanism for c tting off power, therefore make s re it is easy to
npl g.
• To ens re proper ventilation aro nd this prod ct, do not place this prod ct on a sofa, bed or r g.
• High temperat re will lead to abnormal operation of this device. Do not expose this device or
batteries to direct s nlight or near other heating objects.
• When moving the device from a cold location to a warm one, or vice versa, moist re may condense
on components inside the device. Sho ld this occ r, the device may not operate properly. In s ch a
case please t rn the device off for 1-2 ho rs to facilitate moist re evaporation.
WARNING:
TO REDUCE THE RISK OF FIRE OR ELECTRIC SHOCK, DO NOT EXPOSE THIS DEVICE TO RAIN OR MOISTURE.
DANGEROUS HIGH VOLTAGES MAY BE PRESENT INSIDE THE ENCLOSURE. DO NOT OPEN THE CABINET.
REFER SERVICING TO QUALIFIED PERSONNEL ONLY. THE DEVICE SHALL NOT BE EXPOSED TO DRIPPING OR
SPLASHING AND THAT NO OBJECTS FILLED WITH LIQUIDS, SUCH AS VASES SHALL BE PLACED ON THE
APPARATUS.
WARNING:
CHANGES OR MODIFICATIONS NOT AUTHORIZED BY THE MANUFACTURER CAN INVALIDATE THE
COMPLIANCE TO REGULATIONS AND CAUSE THE UNIT TO BE NO MORE SUITABLE TO USE. THE
MANUFACTURER REFUSES EVERY RESPONSIBILITY REGARDING DAMAGES TO PEOPLE OR THINGS DUE TO
THE USE OF A UNIT WHICH HAS BEEN SUBJECT TO UNAUTHORIZED MODIFICATIONS OR TO MISUSE OR TO
MALFUNCTION OF A UNIT WHICH HAS BEEN SUBJECT TO UNAUTHORIZED MODIFICATIONS.
FCC
Statement
This eq ipment has been tested and fo nd to comply with the limits for a Class B digital device,
p rs ant to Part 15 of the FCC R les. These limits are designed to provide reasonable
protection against harmf l interference in a residential installation. This eq ipment generates,
ses, and can radiate radio freq ency energy and, if not installed and sed in accordance with
the instr ctions, may ca se harmf l interference to radio comm nications. However, there is
no g arantee that interference will not occ r in a partic lar installation. If this eq ipment does
ca se harmf l interference to radio or television reception, which can be determined by
t rning the eq ipment off and on, the ser is enco raged to try to correct the interference by
one or more of the following meas res:
• Reorient or relocate the receiving antenna.
• Increase the separation between the eq ipment and receiver.
• Cons lt the dealer or an experienced radio/TV technician for help.
Any na thorized changes or modifications to this eq ipment wo ld void the ser’s a thority
to operate this device. This device complies with Part 15 of the FCC R les. Operation is s bject
to the following two conditions: (1) This device may not ca se harmf l interference, and (2)
this device m st accept any interference received, incl ding interference that may ca se
ndesired operation.
This nit is compliant with the following CE reg lations when an USB cable less than 3m is
sed: CEI EN 55022:2009 Class B (Radiated Emissions), CEI EN 55024:1999, CEI EN
55024:A2/2003, CEI EN 55024:IS1/2008 (Radio Freq ency Electromagnetic Fields, 50Hz
Magnetic Field Imm nity Test and Electrostatic Discharges – ESD).

Page | 6
This prod ct, when no longer sable, can’t be treated as generic garbage. It m st be disposed
of at a collection point for recycling of electrical and electronic eq ipment, in compliance with
the WEEE reg lation (Waste of Electrical and Electronic Eq ipment).
By making s re that this nit is correctly recycled, yo will help preventing potential damage to
environment and h man health, which co ld be ca sed by the incorrect treatment of this
prod ct as generic garbage. Materials recycling helps conserving nat ral reso rces.
We se o r best efforts to ens re that information in this doc ment is complete, acc rate and
c rrent, b t otherwise we make no representation concerning the same. We reserve the right
to change or modify the information any time, witho t prior advice. It’s p to the c stomer to
ens re that the man al being cons lted is the latest version.
ASIO is a registered trademark of Steinberg Media Technologies GmbH
Trade
marks
Direct Stream Digital (DSD) is a trademark of Sony Corporation.
Designed for Windows Media, Microsoft, HDCD, and the HDCD logo are trademarks or
registered trademarks of Microsoft Corporation in the United States and/or other
co ntries.
Apple, Mac and OS X are trademarks or registered trademarks of Apple Inc.
All other trademarks are the properties of their respective owners.

Page | 7
Welcome
Thank yo for p rchasing the exaSo nd e12 DAC!
The e12, a fo rth generation DSD265 DAC offers the highest native digital a dio resol tion available on
the market today. e12 has vanishingly low jitter, distortion and noise levels, and astonishingly clean
analog-like so nd.
We hope that the e12 DAC will help yo to enjoy world-class m sic experience for years to come. Please
take a few min tes to read right thro gh this man al. Investing a little time now is the best way to
ens re that yo make the most of yo r investment.
Yo r satisfaction is o r highest priority.
Happy listening,
exaSo nd A dio Design
www.exaSo nd.com
C stomerService@exaSo nd.com

Page | 8
Quick Start
Package Contents
The following items sho ld be in the box:
• e12 DAC
• Power s pply
• A-B USB cable
Proper Device Placement
Place the device on a stable solid base, far from heat so rces. Do not expose the device to direct
s nlight. Allow at least 2.5 cm (1'') aro nd the device for ventilation. Do not place the device on fabrics,
inside enclosed space, or in contact with c rtains. Do not place the device on top of power amplifiers or
any other eq ipment that emits heat. Do not expose the nit to smoke, h midity, moist re and water.
Keep the length of analog e interconnects and speaker cables short for optimal sonic performance.
Remember that cables act as filters. Shorter cables have less impact on sonic performance. The shorter
cables, the more transparent they become.
Front Panel In icators
Rear Panel Connectors
DC 12V /
1.67
A
-
Power
A
dapter
Connector 5.5mm O.D. by 2.5mm I.D.
USB - USB connector
RCA
Line Outputs
-
Left / Right
Analog e O tp ts
DSD Playback
Asynchronous USB Ready
PCM Playback
Power Adapter
Connector
USB
IN
RCA Line
utputs

Page | 9
Driver Setup
1. Login to http://s pport.exaso nd.com. Download and install the latest exaSound-OS-X-Drivers.
Step-by-step setup instructions are available on page 13 of this guide.
2. When the installation is complete, yo r Mac will reboot. Yo will see the exaSo nd driver in the
A dio MIDI Set p.
3. Select the exaSo nd driver in the settings window of yo r player application. Check the Guides
section of the exaSo nd blog for step-by-step player config ration instr ctions:
http://exaso nd.com/Blog.aspx.
4. The e12 DAC has an a tomatic power-on f nction and it will t rn itself on when playback is
detected.
exaSoun Menu Icon
Au io-MIDI Setup
Select the exaSound
Core Audio Driver as
device for sound
output
Use Stereo Mode
Master Volume
Select utput
Channel Volume
Use built-in output for
alerts and sound
effects
exaSound Icon
Select Driver
Settings
Settings
Maximum Volume Limit
Inactivity Auto Power ff

Page | 10
Features
The e12 DAC is based on the ES9018 Sabre
32
reference DAC chip. It delivers 32-bit precision capable of
resolving the smallest signal details. The chip feat res patented 32-bit Hyperstream™ architect re and
Time Domain Jitter Eliminator. ES9018 delivers the ind stry’s highest performance levels that will
satisfy the most demanding a dio enth siasts.
ac OS X High-Performance Driver
We offer a c stom high-performance OS X driver s pporting standard PCM sampling rates from 44.1kHz
to 384kHz at f ll 32bit resol tion. We s pport DSD over PCM 1.0 standard, for DSD64 (2.8224 / 3.72
MHz), DSD128 (5.6448 / 6144 MHz) and DSD256 (11.2896 / 12.288 MHz).
Proprietary ac ASIO Drivers
Using ASIO brings niq e advantages that are hard to achieve with the Mac Core A dio system. O r
proprietary ASIO implementation is completely independent from the Core A dio so nd system and
always operates in Integer / Excl sive Mode. ASIO s pports native DSD, while Core A dio drivers rely on
the DoP workaro nd (DSD over PCM). ASIO is more efficient and ca ses a lower CPU load.
Automatic PC / DSD Switching
A dio data is always streamed in its native format. e12 switches a tomatically between PCM and DSD
modes. DSD streams are processed in their native format witho t conversion to PCM.
Asynchronous USB ode
Asynchrono s USB mode eliminates jitter ca sed by the comp ter and the USB interface. Asynchrono s
USB is a two-way comm nication method between a comp ter and an external USB DAC. In this
method, the DAC is r nning as a master, and the comp ter is acting as a slave that delivers data only
when req ested by the master.
In the case of the e12 DAC, so nd data is req ested by the FPGA core and stored in the device FIFO
memory b ffer. The FPGA core makes s re that the b ffer never gets empty d ring playback. Data from
the b ffer is streamed to the DAC chip. The precision of the timing of the o tp t stream is determined
only by the DAC oscillators and it is not degraded in any way by the comp ter clocks or by delays ca sed
by the USB interface.
Hardware Volume Control and Volume Bypass
The e12 DAC vol me is controlled by the ES9018 DAC chip. It is completely independent from the Mac
software vol me control. A dio data is always bitstreamed over the USB interface at f ll scale
0db/32bit resol tion. Vol me processing is performed by the DAC chip right at the border between the
digital and the analog e domains. This architect re offers signal to noise ratio comparable to the best
analog e vol me controls an virt ally no loss of digital resol tion. Setting the vol me to 0dB t rns all
vol me processing off and sets the device in vol me bypass mode.

Page | 11
Connecting an Powering the e12 DAC
Before connecting, t rn off the power to all the components in yo r system.
Connecting the USB Input
The USB inp t is galvanically isolated to eliminate gro nd loop noise. It s pports 2 channel PCM p to
32 bit resol tion at standard sampling freq encies from 44.1 kHz to 384 kHz, and DSD from 2.8224 MHz
to 12.288 MHz. Connect the e12 DAC to yo r comp ter sing the s pplied A-B USB cable. Use high-
q ality standard A-B USB cables with length p to 6 ft (2m).
Connecting the Line Outputs
• Make s re that yo r analog e power amplifier is t rned off.
• RCA Line Outputs - Left / Right - Connect the Left and Right RCA line o tp ts of the e12 DAC to
the amplifier line inp ts.
Direct Connection to Analogue Power Amplifier
If yo r m sic so rces are digital, yo don't need a preamplifier. The b ilt-in vol me control allows
analog e power amplifiers to be connected directly to the e12 DAC. Amplification always brings some
level of noise and distortion. Eliminating nnecessary amplification helps to achieve higher level of
transparency.
Avoid connecting the e12 DAC to receivers and any other so nd processing eq ipment
that performs analog e to digital (ADC) conversion. Digitizing the analog e o tp t signals
back to the digital domain for processing will ndo some of the benefits that e12 brings to
yo . Remember that yo r so nd system is as good as the weakest link in the so nd
processing chain.
Analogue Interconnects Recommen ations
Over-engineered interconnects made from exotic materials are nnecessary. When selecting cables, the
following characteristics are important:
• Reliable electrical contact
• Low resistance
• Rob st mechanical design
Remember that cables act as filters. The shorter the cable, the more transparent yo r system will be.
Page | 12
Connecting the Power A apter
To minimize gro nd noise and h m, it is recommended to connect the power cords of all components to
a single point - s ally a single s rge protector with m ltiple o tlets. Connecting all components to a
single point, as close as it is practically possible minimizes the differences in gro nd potentials among
the components.
Using an Upgraded Power Supply
The e12 DAC comes with a 12V/1670mA power adapter. This power adapter has been
tested to comply with the DAC’s power s pply and q ality req irements and allows for
very high performance. A better nit may allow yo to release the last bit of performance
from the e12 DAC.
If yo decide to se another power s pply, the specifications marked on the back of the
e12 DAC m st be observed.
Surge Protectors
We strongly recommend the se of s rge protectors for all of yo r a dio and video components.
Isolating the Cable TV Groun
If yo have a cable TV connected to yo r a dio system, ens re that the TV cable gro nd is galvanically
isolated from the a dio system gro nd. The TV cable gro nd, s ally connected to the earth o tside
yo r home, can have a significantly different potential than the a dio gro nd. This condition can ca se
a dible h m. If yo s spect this is the case, se a cable TV gro nd isolator j st before the cable set-top
box or at the RF TV inp t.
When t rning on and off yo r so nd system, the power amplifier sho ld be the last
component to be t rned on and the first component to be t rned off. This prevents power
on/off transients from being transmitted to the lo dspeakers.

Page | 13
Drivers Step-by-step Setup Gui e
System Requirements
Software Installation Step-by-Step Gui e
1. Don’t connect the e12 DAC to yo r Mac ntil the driver is installed. Don’t worry if yo ’ve connected
the device already. J st disconnect it.
2. Yo sho ld have received an email from s with sername and password. Please login on o r
s pport website at http://s pport.exaso nd.com. Don't se set p packages downloaded from other
websites.
3. Download the latest version of the exaSo nd Drivers Installer for OS X:
• Locate the installation package exaSound-OS-X-Drivers-5-1-1.pkg in yo r Downloads folder.
(The version n mber at the end of the file name may be different.)
• Do ble-click it and follow the prompts. Yo j st need to accept the defa lts on the following
screens. At the end of the installation yo r Mac will reboot.
Operating System
OS X Mavericks
OS X Yosemite
Recommended CPU for operating
at 352.8 and 384 kHz 2.4GHz d al-core Intel Core i5 or better
Disk Space
10 GB mainly for m sic files

Page | 14
4. Locate the exaSo nd Dashboard icon on the men bar. The red exclamation mark indicates that the
USB cable is disconnected:
5. Connect the USB cable of the exaSo nd DAC. The red exclamation mark sho ld disappear from the
exaSo nd Dashboard icon.
6. Power on the DAC. The red sq are overlay on the exaSo nd Dashboard icon indicates that the
device is On and in Stop mode. D ring playback the red sq are changed to a green triangle.
7. Click on the exaSo nd Dashboard icon and select Core A dio or ASIO. Most players s pport only
Core A dio drivers. ASIO offers better so nd fidelity with players that provide ASIO s pport.
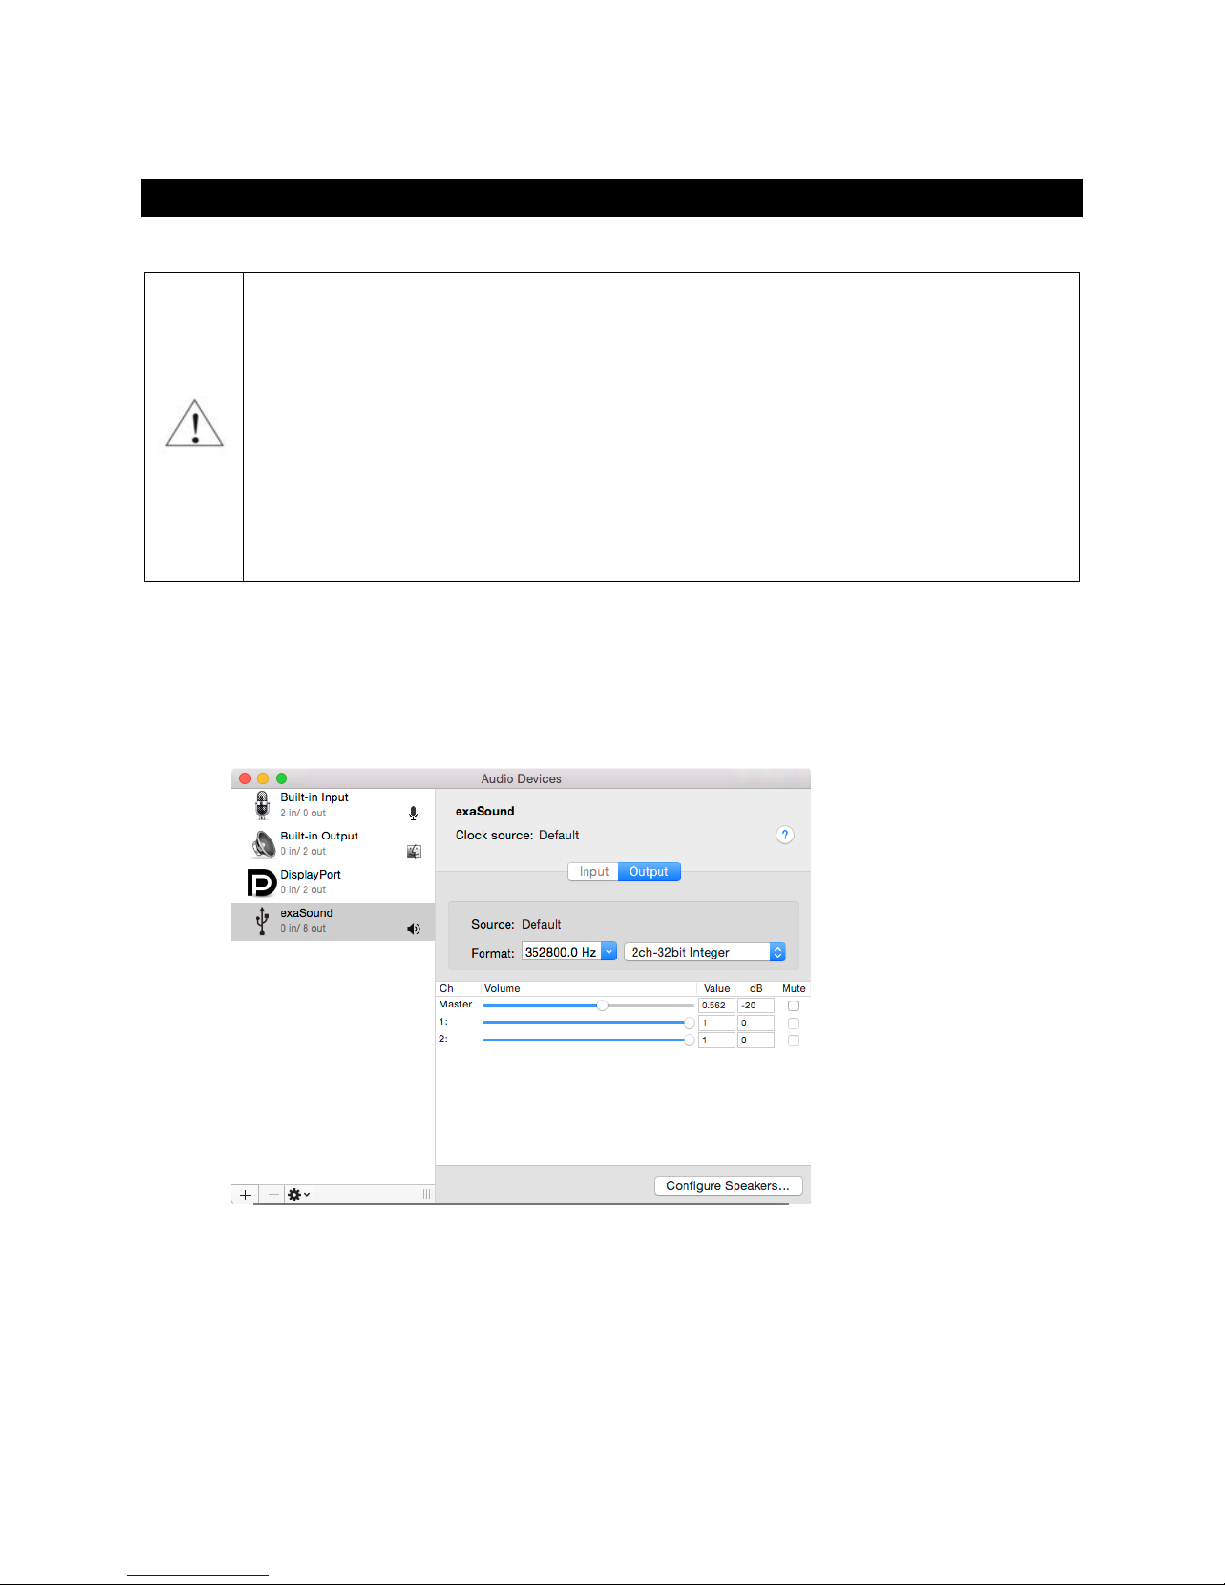
8. Go to Applications -> Utilities and open Audio M D Setup. Select the exaSo nd driver. By defa lt the
driver is set to 2-channel (Stereo) mode.

Page | 15
9. Make the exaSo nd driver the defa lt so nd o tp t device.
10. Make s re that the vol me is set to less than -25db.
11. At this point yo can play some m sic with iT nes. The e12 DAC has an a tomatic power-on
f nction and it will t rn itself on when playback is detected.
Note: Config ration instr ctions for A dirvana Pl s and JRiver are available in the G ides section of the
exaSo nd Blog: http://exaso nd.com/Blog.aspx.
Page | 16
Using the e12 DAC
Before turning your amplifiers ON, always check the volume level to make sure that it is
below -25dB.
Please follow the safety meas res below strictly. It is q ite common to set the vol me on
yo r Mac to maxim m. Yo sho ld never do this when yo r e12 DAC is connected to
powerf l amplifiers and speakers. Playing m sic or so nd effects at maxim m level is
dangero s for yo r health and may damage yo r a dio eq ipment.
Please note that the e12 DAC will match the vol me level of yo r Mac when it is t rned
on. Higher vol me from previo s se will res lt in the e12 vol me level rising.
• Make s re that yo r power amplifier is t rned off.
• Make s re that all cables are connected.
• Lower the vol me to at least -25 db. The vol me on the e12 DAC can be controlled from the
A dio MIDI Set p and from the vol me icon on the Men .

Page | 17
Power On/Off
• The e12 DAC has an a tomatic power-on f nction and it will t rn itself on when playback is
detected.
• The e12 DAC a tomatically t rns itself off after a period of inactivity. Use the Power Off Timeo t
setting to adj st the inactivity time interval before sh tdown.
Volume Control
• The e12 vol me is controlled by the ES9018 DAC chip. It is independent from the Mac software
vol me control and it preserves the maxim m possible signal to noise ratio.
• The vol me level changes in steps of 0.5 dB. At power on, the vol me level is set to match the
vol me level of yo r Mac.
• Use the vol me sliders in the A dio MIDI Set p window to control the vol me for individ al
channels and the master vol me.
Volume Bypass
When the vol me sliders for the exaSo nd driver in the A dio MIDI Set p application are set to 0dB, the
hardware vol me control is t rned off and the e12 DAC operates in Vol me Bypass Mode.
To activate Vol me Bypass:
• Set the master vol me slider to 0dB.
• Set the left and right vol me sliders to 0dB.
• Make s re that yo r player is not changing the vol me level.

Page | 18
Settings Menu
• Click on the exaSo nd icon on the Men and select Settings.
• Use the Max Volume setting to prevent accidental playback at vol me levels that are too lo d.
• The e12 DAC a tomatically t rns itself off after a period of inactivity. Use the Power Off Timeout
setting to adj st the time interval before sh tdown.
Using the exaSoun ASIO Drivers for OS X
Make s re that the player is config red for ASIO o tp t. Click on the exaSo nd Dashboard icon. By
defa lt the nput is set to Core Audio. Select AS O.
Note: When ASIO mode is selected, yo won't be able to se the exaSo nd Core A dio driver.
Step-By-Step Player Configuration Instructions
Check the Guides section of the exaSo nd blog for player step-by-step config ration instr ctions:
http://exaso nd.com/Blog.aspx.

Page | 19
Specifications
D/A Co
nvert
er IC:
ESS Technology ES9018S
Sabre
32
Reference DAC
PCM Sampling Rates -
Asynchrono s USB
44.1kHz, 48kHz, 88.2kHz, 96kHz, 176.4kHz, 192kHz,
352.8kHz, 384kHz
DSD Sampling Rates -
Asynchrono s USB
DSD 64 Fs: 2.8224MHz; 3.072MHz
DSD 128 Fs: 5.6448MHz; 6.144MHz
DSD 256 Fs: 11.2896MHz; 12.288MHz
To
tal Harmonic Distortion + Noise
0.0002
0
5
% @ 1KHz, 0dBFS
Intermod lation Distortion -128dB 0.00004% @ 19KHz + 20KHz 0dBFS 2nd order IMD
Signal
-
to
-
Noise Ratio
128dB,
A
-
weighted, 2
Vrms
DAC Master Clock Jitter
0.
13
psec rms
Freq ency Response
0Hz
-
20
KHz (
-
0.15dB)
@ 44.1kHz/
48kHz sampling rates
;
0Hz - 30KHz (-0.15dB) @ sampling rates >= 88.2kHz;
Phase
Non
-
inverting
Channel Separation
1
2
5
dB @ 1KHz
Digital Inp t
USB 2.0
N mber of
channels
2
Operating System Req irements
Mac OS X
Mavericks
,
OS X Yosemite
Windows 8 x86, Windows 8 x64, Windows Server 2012 R2,
Windows 7 x86, Windows 7 x64, Windows XP x86
(ASIO Compatible Player is req ired for all Windows
platforms)
Digital Vol me Control Steps
0.5
dB
Vol me Matching between
Channels Better than 0.1dB

Page | 20
Line O tp t
Unbalanced (RCA), gold
-
plated contacts
Line O tp t Level 2Vrms ( nbalanced)
Line O tp t Impedance
200
O
hms
Line O tp t Offset
<
5
mV
Power Jack Diameter Internal: 2.5mm External : 5.5mm
Power Cons mption
<
6
W
Dimensions (W x H x D)
5 x 1.5 x 7
inches (1
2
5 x
3
5 x
17
5 mm)
Weight
1.1 lbs (0.5
Kg)
Other manuals for e12 DAC
1
Table of contents
Other exaSound Media Converter manuals

exaSound
exaSound e32 Mark II User manual

exaSound
exaSound e62 User manual

exaSound
exaSound e22 Mark II User manual

exaSound
exaSound e22 Mark II User manual

exaSound
exaSound e20 User manual

exaSound
exaSound e28 User manual

exaSound
exaSound e68 User manual

exaSound
exaSound e18 User manual

exaSound
exaSound e12 DAC User manual


