exaSound e62 User manual

e62 Digital to Analogue Converter
Owner’s Manual
PLEASE READ BEFORE OPERATION
DSD 512/24.576 MHz PCM 32bit/384 kHz MQA 24 bit/384 kHz
REV. 1.4– 10/2020

Page | 2
Table of Contents
Welcome.......................................................................................................................... 4
Quick Start Guide.......................................................................................................... 5
Package Contents...................................................................................................................................... 5
Proper Device Placement.......................................................................................................................... 5
Front Panel Controls ................................................................................................................................. 5
Rear Panel Connectors.............................................................................................................................. 6
Infrared Remote Control........................................................................................................................... 6
Using the e62 DAC with exaSound Streamers and Music Servers............................................................ 7
Windows ASIO Driver Setup...................................................................................................................... 7
exaSound Dashboard (Windows).............................................................................................................. 8
Mac OS Driver Setup................................................................................................................................. 8
exaSound Menu Icon (Mac OS)................................................................................................................. 9
Audio-MIDI Setup (Mac OS)...................................................................................................................... 9
Features.........................................................................................................................10
Connecting and Powering the e62 DAC...............................................................12
Connecting the Digital Inputs ................................................................................................................. 12
Connecting the Line Outputs .................................................................................................................. 12
Trigger Output......................................................................................................................................... 12
Direct Connection to Analogue Power Amplifier....................................................................................12
Connecting the Power Supply.................................................................................................................13
Surge Protectors .....................................................................................................................................13
Isolating the Cable TV Ground ................................................................................................................13
Windows ASIO Drivers Step-by-step Setup Guide...........................................14
PC System Requirements........................................................................................................................14
Windows ASIO Driver Installation........................................................................................................... 14
Using the e62 DAC - Windows ................................................................................18
Using the Asynchronous USB Input - Windows ...................................................................................... 18
JRiver / JRemote Volume Synchronization Plug-in - Windows ............................................................... 19

Page | 3
Roon Volume Synchronization Plug-in - Windows ................................................................................. 19
Settings Menu - Windows....................................................................................................................... 19
Step-By-Step Player Configuration Instructions - Windows ................................................................... 20
Using Player Apps without ASIO Support ............................................................................................... 20
Mac OS Drivers Step-by-step Setup Guide..........................................................21
System Requirements .............................................................................................................................21
Software Installation...............................................................................................................................21
Step-By-Step Player Configuration Instructions - Mac OS ......................................................................23
Using the e62 DAC - Mac OS.....................................................................................24
Using the Asynchronous USB Input - Mac OS......................................................................................... 24
Settings Menu - Mac OS.......................................................................................................................... 25
Using the exaSound ASIO Drivers for Mac OS ........................................................................................ 26
Step-By-Step Player Configuration Instructions ..................................................................................... 26
Volume Control ...........................................................................................................27
Volume Bypass........................................................................................................................................28
Playing Music from SPDIF Sources .......................................................................29
Automatic Power On/Off .........................................................................................29
MQA (Master Quality Authenticated)..................................................................30
IR Remote Control Setup..........................................................................................31
Specifications...............................................................................................................32
Safety Information .....................................................................................................35
Explanation of Graphical Symbols ..........................................................................................................35
Important Safety Instructions ................................................................................................................. 35
Precautions ............................................................................................................................................. 35
Limited One Year Warranty....................................................................................38
Copyright © 2020, exaSound Audio Design. All rights reserved.

Page | 4
Welcome
Thank you for purchasing the exaSound e62 DAC!
The e62 DAC, a fifth generation exaSound device, brings native DSD512 support to our award winning
compact product line.
e62 features proprietary asynchronous USB streaming, ASIO and Core Audio drivers and FPGA core to
achieve 32bit, low-jitter, bit-perfect signal path.
e62 is a Roon Tested DAC. It has been profiled and tested by both Roon Labs and exaSound for
maximum compatibility and best user experience with Roon.
e62 includes MQA technology, which enables you to play back MQA audio files and streams, delivering
the sound of the original master recording.
e62 has vanishingly low jitter, distortion and noise levels, and astonishingly clean analog-like sound.
Seamless integration with exaSound streamers and music serves offers outstanding user experience and
reliability.
We hope that the e62 DAC will help you to enjoy world-class music experience for years to come. Please
take a few minutes to read right through this manual. Investing a little time now is the best way to
ensure that you make the most of your investment.
Your satisfaction is our highest priority.
Happy listening,
exaSound Audio Design
www.exaSound.com
Page | 5
Quick Start Guide
Package Contents
The following items should be in the box:
•e62 DAC
•Power supply (may be supplied separately)
•A-B USB cable
•IR Remote Control
Proper Device Placement
Place the device on a stable solid base, far from heat sources. Do not expose the device to direct
sunlight. Allow at least 2.5 cm (1'') around the device for ventilation. Do not place the device on fabrics,
inside enclosed space, or in contact with curtains. Do not place the device on top of power amplifiers or
any other equipment that emits heat. Do not expose the unit to smoke, humidity, moisture and water.
Do not stack exaSound devices one on top of the other.
Keep the length of analogue interconnects and speaker cables short for optimal sonic performance.
Remember that cables act as filters. Shorter cables have less impact on sonic performance. The shorter
the cables, the more transparent they become.
Before using the device, please check the safety instruction on Page 35.
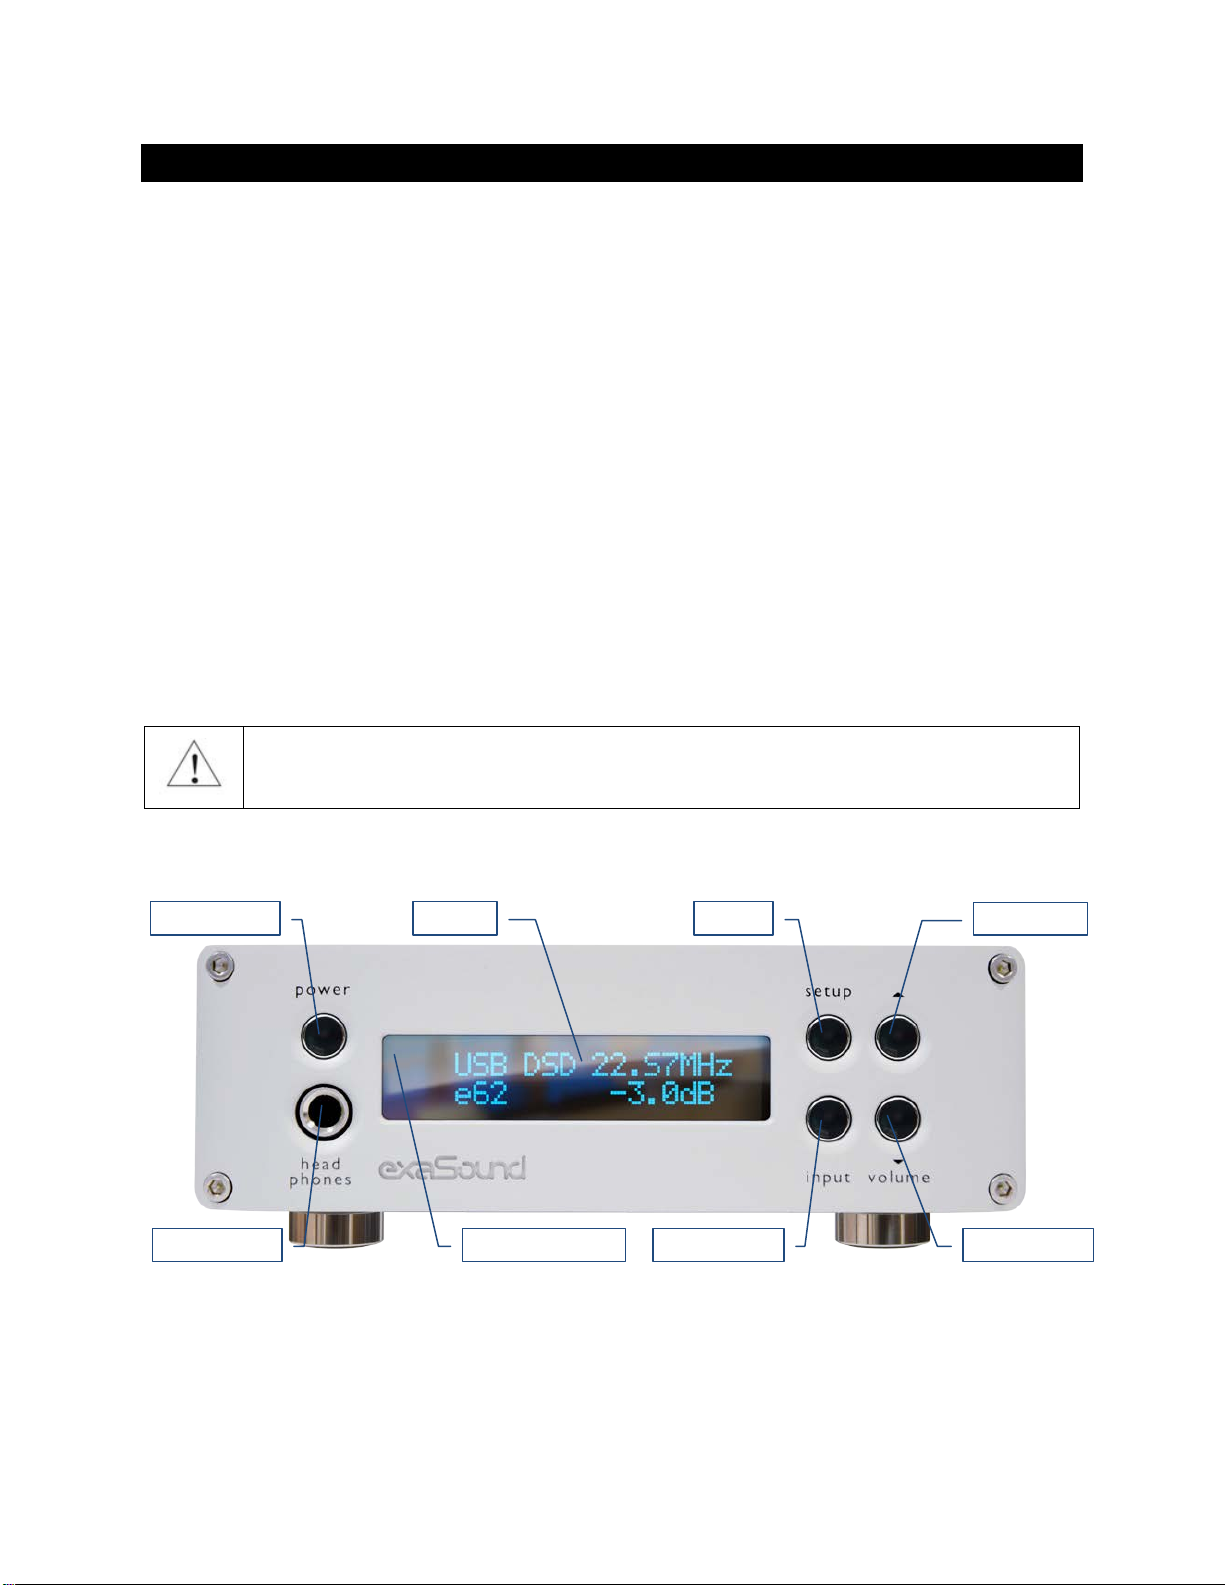
Front Panel Controls
Headphones accepts a standard 1/4-inch stereo single-ended phone plug. Use a suitable
adapter for headphones equipped with a different plug.
Volume Up
Setup
Volume Down
Input Selector
Power Button
Headphones
Display
IR Remote Sensor
Page | 6
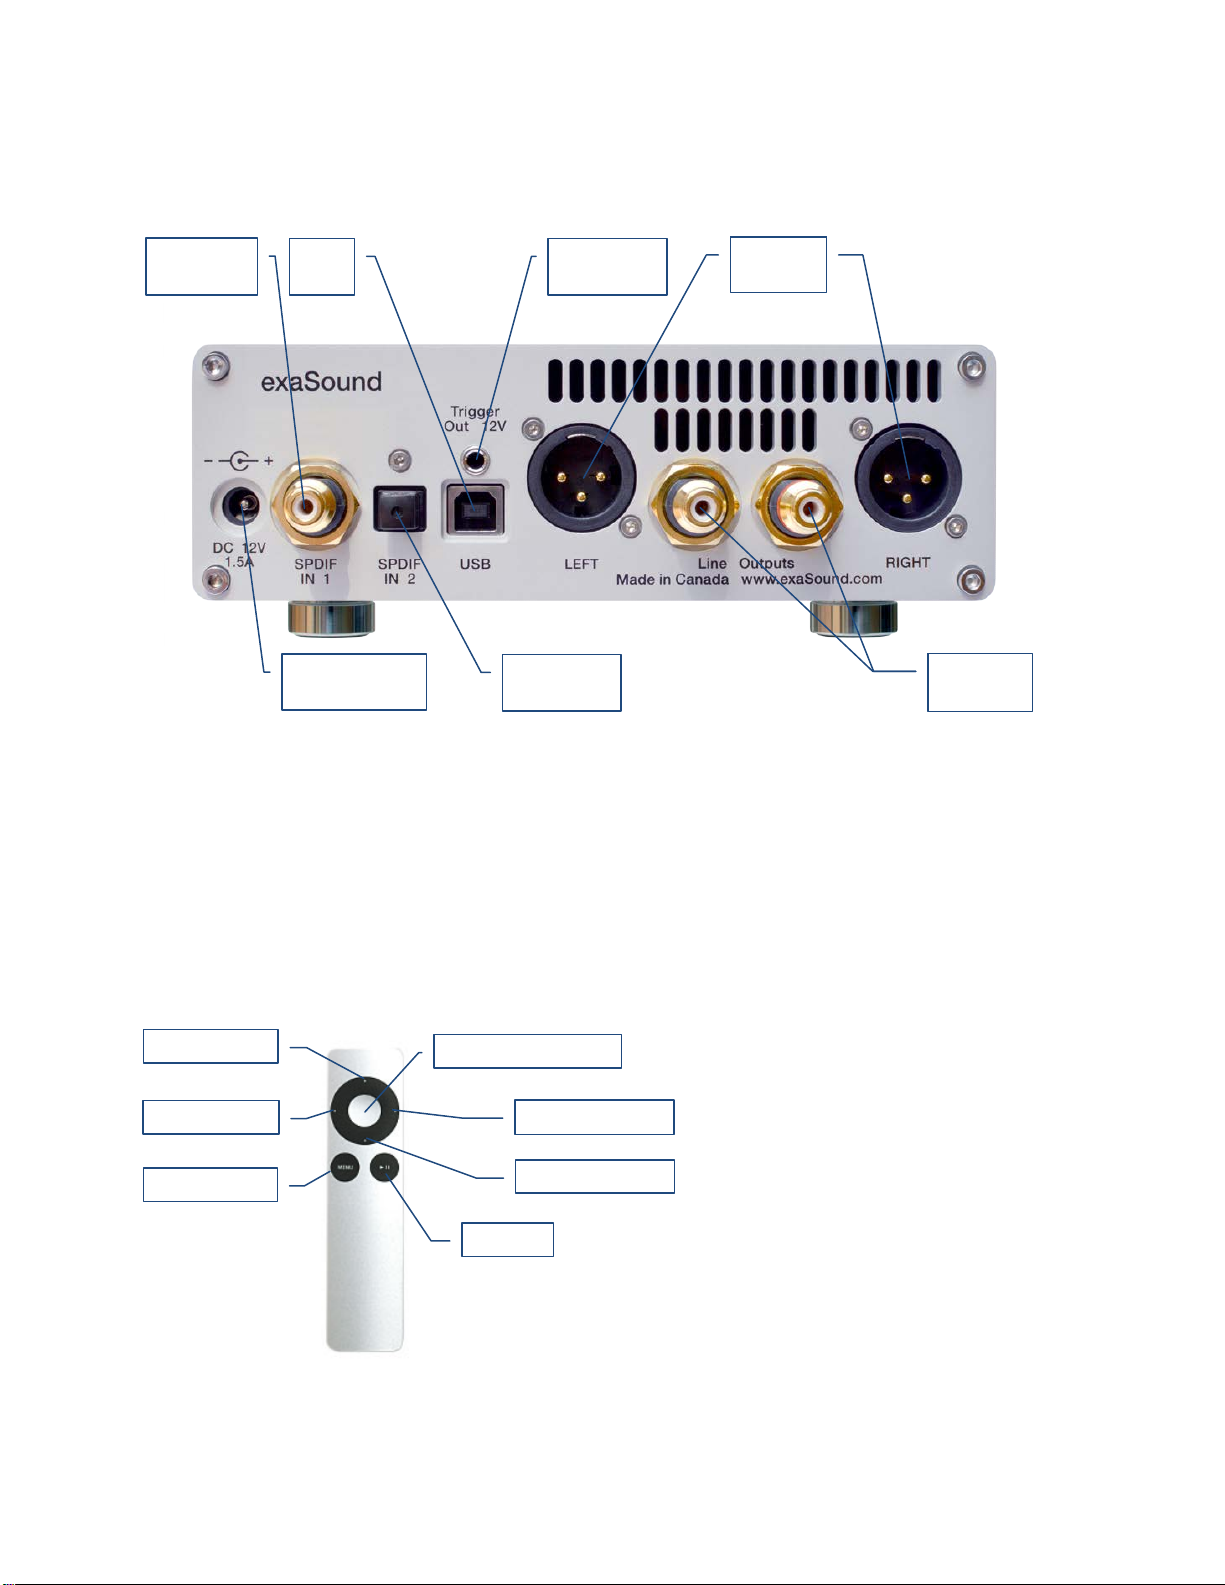
Rear Panel Connectors
SPDIF IN1 - Coaxial SPDIF Input
SPDIF IN2 - Optical TOSLINK Input
DC 12V / 1.5A - Power Adapter Connector
5.5mm 5. Outside / Inside Diameter
USB - USB Input
RCA Line Outputs -Left / Right
Analogue Outputs
XLR Line Outputs -Balanced
Left / Right Analogue Outputs
12V Trigger Output - use to activate trigger-
enabled equipment
Infrared Remote Control
XLR Line
Outputs
Optical
SPDIF IN 2
Coaxial
SPDIF IN 1
Power Adapter
Connector
USB
IN
RCA Line
Outputs
XLR Line
Outputs
12V Trigger
Output
Volume Up
Next Input
Volume Down
Previous Input
Mute
Power
Display Light On/Off
RCA Line
Outputs

Page | 7
Your unit is programmed to work with the supplied remote control.
The e62 DAC can be re-programmed to work with most infrared remote controls using Sony and NEC IR
protocols, for example the Sony RM-EZ4 Universal Remote, or Apple remote control.
See the IR Remote Control Setup section for instructions on how to change button assignments and how
to pair a different remote control with your e62 DAC.
Using the e62 DAC with exaSound Streamers and Music Servers
1. The DAC is ready for plug-and-play operation with exaSound streamers and music servers.
2. Connect the e62 DAC with your streamer or music server with the provided USB cable.
3. Follow the instructions for your exaSound streamers or music server.
Windows ASIO Driver Setup
1. Login to support.exasound.com. Download and unzip the latest exaSound Windows ASIO
Driver.
2. Run exaSound-N1-5-3-39-Setup.exe (or later version) and follow the prompts. ASIO drivers step-
by-step setup instructions are available in this guide.
3. Reboot your computer.
4. Setup your ASIO compatible player (Roon, J. River Media Center, HQPlayer etc.) to use the
exaSound ASIO driver. Check the Guides section of the exaSound blog for step-by-step player
configuration instructions: exasound.com/Blog.aspx.
5. Click on the exaSound Dashboard Icon next to the clock on the Windows System Tray and set
the master volume.
Page | 8
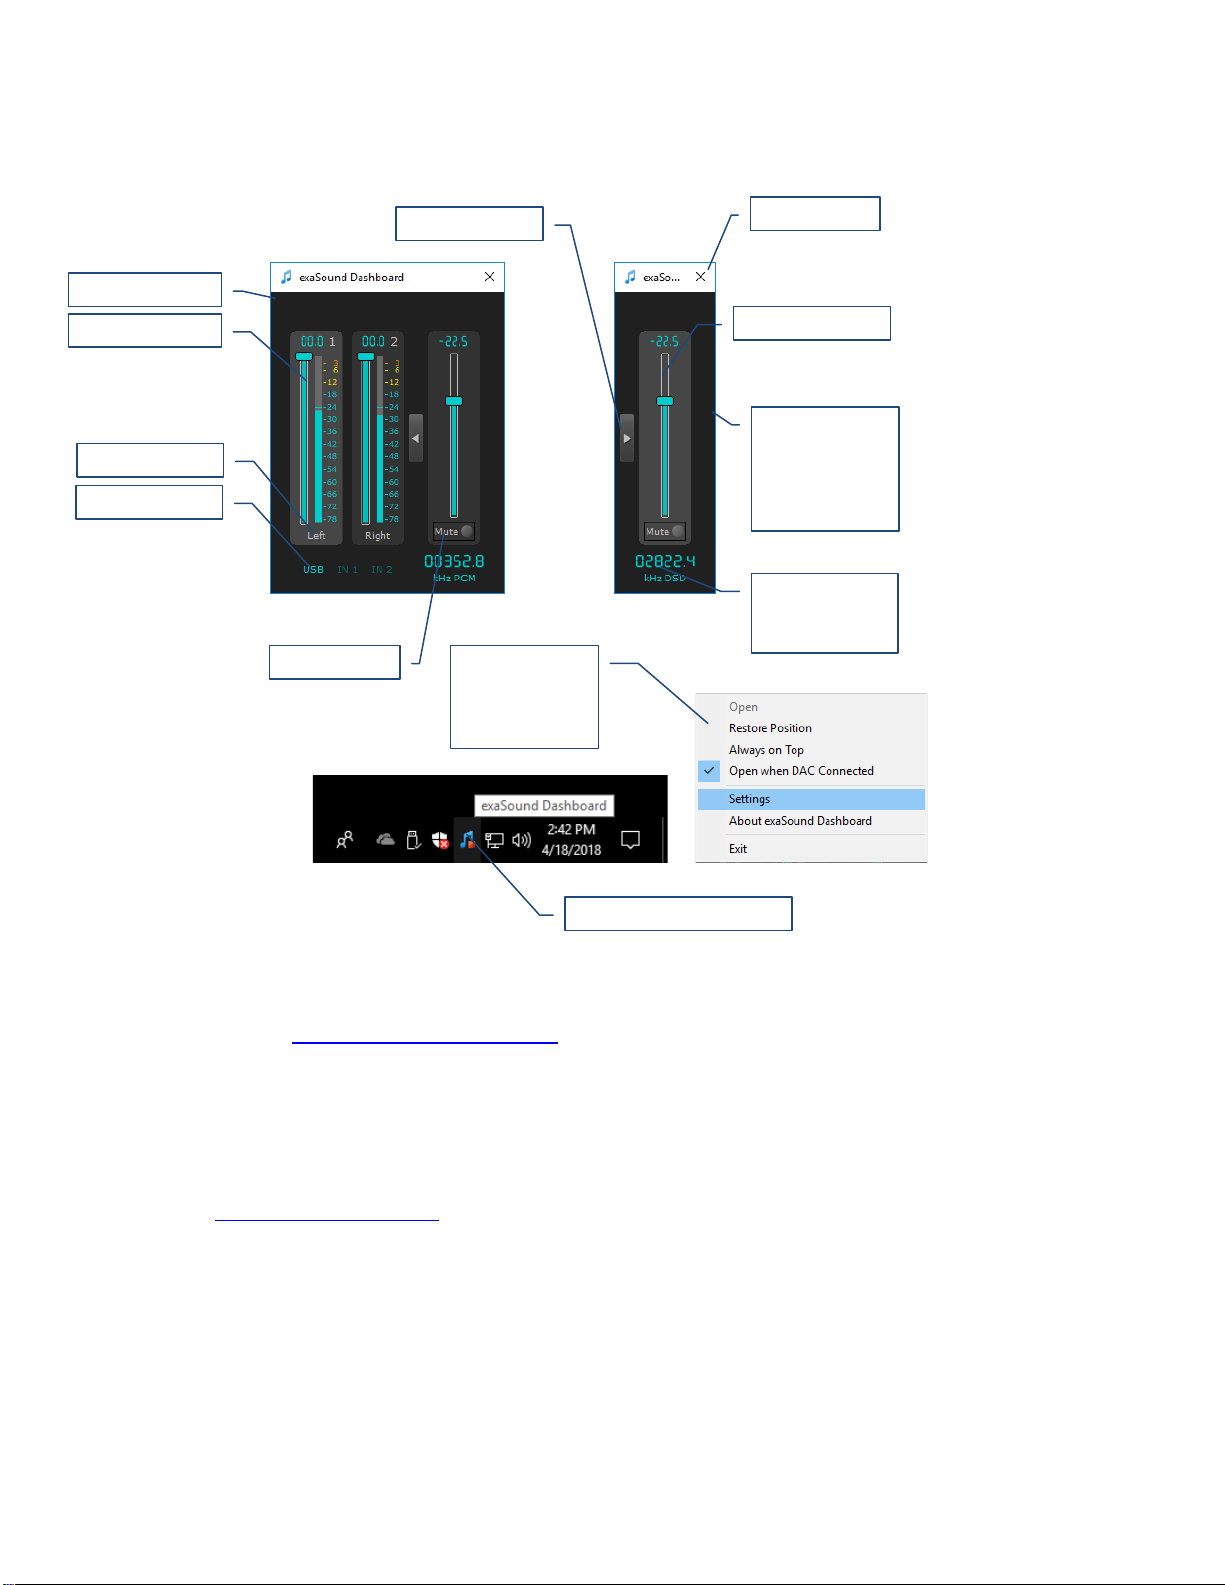
exaSound Dashboard (Windows)
Channel View Minimised View
System Tray
Mac OS Driver Setup
1. Login to http://support.exasound.com. Download and install the latest exaSound-OS-X-Drivers.
Step-by-step setup instructions are available in this guide.
2. When the installation is complete, your Mac will reboot. You will see the exaSound driver in the
Audio MIDI Setup.
3. Select the exaSound driver in the settings window of your player application. Check the Guides
section of the exaSound blog for step-by-step player configuration instructions:
exasound.com/Blog.aspx.
4. The e62 DAC has an automatic power-on function and it will turn itself on when playback is
started.
exaSound Dashboard Icon
Right-click the
Dashboard Icon
to display the
exaSound menu
Master Volume
Channel View
Channel Volume
Mute Button
Channel Labels
Stream Format
and Sampling
Rate
View Selector
Close Button
Input Selector
Right-click the
Dashboard
background
display the
exaSound menu

Page | 9
exaSound Menu Icon (Mac OS)
Audio-MIDI Setup (Mac OS)
Select the exaSound
Core Audio Driver as
device for sound
output
Select Stereo Mode
Master Volume
Select Output
Channel Volume
Use built-in output for
alerts and sound
effects
exaSound Icon
Select Driver Mode
Settings Window
Settings
Maximum Volume Limit
Inactivity Auto Power Off
Select Input: USB;
SP/DIF; Optical
Drive Mode Change
Notification

Page | 10
Features
The e62 DAC is based on the ES9028PRO reference DAC chip. It delivers 32-bit precision capable of
resolving the smallest signal details. The chip features patented 32-bit HyperStream technology.
ES9028PRO delivers the industry’s highest performance levels that will satisfy the most demanding
audio enthusiasts.
Windows ASIO Driver
Using ASIO brings unique advantages that are hard to achieve with other Windows driver technologies.
Mac OS High-Performance Driver
We offer a custom high-performance Mac OS driver supporting PCM sampling rates from 44.1kHz to
384kHz at 32bit resolution. We support DSD over PCM 1.0 standard at the following sampling rates:
DSD64 (2.8224/3.072 MHz), DSD128 (5.6448/6.144 MHz) and DSD256 (11.2896/12.288 MHz).
Proprietary Mac ASIO driver offers DSD512
ASIO brings unique capabilities to the MAC OS platform. exaSound's proprietary ASIO implementation is
completely independent from the Core Audio sound system and always operates in Integer / Exclusive
Mode. ASIO supports native DSD, while Core Audio drivers rely on the DoP workaround (DSD over PCM).
ASIO is more efficient and causes a lower CPU load.
At this time our proprietary ASIO drivers on Mac are supported only by Roon and HQplayer 3.
Automatic PCM / DSD / MQA Switching
Audio data is always streamed in its native format. e62 switches automatically between PCM, DSD and
MQA modes. DSD streams are processed in their native format without conversion to PCM.
Bit-perfect operation independent from the Windows volume control and mixer
The Windows volume control and mixer are optimized to provide wide compatibility and easiness of
use. These features come at the expense of sonic fidelity. The resulting output may not be bit-perfect or
bit-transparent.
Asynchronous USB mode eliminates jitter caused by the PC or the USB interface
Asynchronous USB is a two-way communication method between a computer and an external DAC.
e62 controls the rate at which audio data is transmitted over USB. Rather than being sent as a
continuous stream, as is the case with standard USB audio interfaces, the data is sent in packets. If a
streaming error is detected, the faulty packet is retransmitted. Packet retransmission for error
correction is possible because audio data is streamed at speed higher than the playback speed.
The incoming data is stored in a large memory buffer. The data is then clocked out of this buffer by the
e62 high-precision master clock. Re-clocking guarantees a very high accuracy and precision of data
timing. It completely eliminates jitter caused by computer timing errors and the USB data transport. An
added bonus to using packet based streaming over USB is the ability to send and receive control
information along with the audio data. This is how volume control instructions are exchanged between
the e62 DAC and the computer/streamer.

Page | 11
Hardware Volume Control and Volume Bypass
The e62 DAC volume is controlled by the ES9028PRO DAC chip. It is completely independent from the
Windows software volume control. Audio data is always bitstreamed over the USB interface at full scale
0db/32bit resolution. Volume processing is performed by the DAC chip right at the border between the
digital and the analogue domains. This architecture offers signal to noise ratio comparable to the best
analogue volume controls. Setting the volume to 0dB turns all volume processing off and sets the e62
DAC in volume bypass mode.
Volume Control Integration with JRiver for Windows / JRemote and Roon
The exaSound Volume Synchronization Plug-ins allow JRiver for Windows, the JRemote app and Roon to
access the hardware volume control built in all exaSound DACs.
On Mac OS the volume synchronization is implemented by the exaSound drivers and there is no need
for using plug-ins.
Roon Tested
e62 is a Roon Tested DAC. It has been profiled and tested by both Roon Labs and exaSound for
maximum compatibility. Roon recognizes exaSound devices and streams audio optimized for their
capabilities. Together, Roon and exaSound deliver the power, flexibility, and performance benefits of
digital audio, with the easiest setup and highest reliability available.
MQA (Master Quality Authenticated)
MQA is an award-winning British technology that delivers the sound of the original master recording.
The master MQA file is fully authenticated and is small enough to stream or download.
e62 DAC includes MQA technology, which enables you to play back MQA audio files and streams,
delivering the sound of the original master recording. Visit mqa.co.uk for more information.
MQA and the Sound Wave Device are registered trade marks of MQA Limited.© 2016

Page | 12
Connecting and Powering the e62 DAC
Before connecting, turn off the power to all the components in your system.
Connecting the Digital Inputs
All digital inputs are galvanically isolated to eliminate ground loop noise. The e62 DAC accepts three
digital inputs:
•USB - This is the recommended and most capable input. It supports PCM up to 32 bit/384 kHz,
MQA up to 24bit/384 kHz and DSD up to 24.576 MHz/DSD512.
Connect the e62 DAC to your computer, compatible streamer or audio server using the supplied
A-B USB cable. Most standard A-B USB cables with length up to 16 ft (5m) can be used.
•SPDIF IN1 - SPDIF Input, 75-ohm RCA. Supports 2 channels PCM up to 24 bit resolution at
standard sampling frequencies from 44.1 kHz to 192 kHz.
•SPDIF IN2 - SPDIF Input, TOSLINK, Optical. Supports 2 channels PCM up to 24 bit resolution at
standard sampling frequencies from 44.1 kHz to 96 kHz.
Connecting the Line Outputs
The e62 DAC offers two types of analogue line outputs - unbalanced (RCA) and balanced (XLR).
•Before making a connection make sure that your analogue power amplifier is powered down.
•RCA Line Outputs - Left / Right - Connect the Left and Right RCA line outputs of the e62 DAC to
the amplifier line inputs.
or
•XLR Line Outputs - Left / Right - Connect the Left and Right XLR line outputs of the e62 DAC to
the amplifier line inputs.
Trigger Output
When the e62 DAC is on, a 12 VDC signal is sent from the Trigger Output to control other devices. When
the e62 is placed in standby mode, the trigger signal is discontinued.
Direct Connection to Analogue Power Amplifier
If your music sources are digital, you don't need a preamplifier. The built-in volume control allows
analogue power amplifiers to be connected directly to the e62 DAC. Amplification always brings some
level of noise and distortion. Eliminating unnecessary amplification helps to achieve higher level of
transparency.

Page | 13
Avoid connecting the e62 DAC to receivers or any other sound processing equipment that
perform analogue to digital (ADC) conversion. Digitizing the analogue output signals back
to the digital domain will undo some of the benefits that e62 brings to you. Remember
that your sound system is as good as the weakest link in the sound processing chain.
Connecting the Power Supply
To minimize ground noise and hum, it is recommended to connect the power cords of all components to
a single point - usually a single surge protector with multiple outlets. Connecting all components to a
single point, as close as it is practically possible minimizes the differences in ground potentials between
the components.
Using a Third-Party Power Supply
The e62 DAC comes with a 12V/1670mA power supply. It has been tested to comply with
the DAC’s quality requirements and allows for very high performance.
If you decide to use another power supply, the specifications marked on the back of the
e62 DAC must be observed.
Surge Protectors
We strongly recommend the use of surge protectors for all of your audio and video components.
Isolating the Cable TV Ground
If you have a cable TV connected to your audio system, ensure that the TV cable ground is galvanically
isolated from the audio system ground. The TV cable ground, usually connected to the earth outside
your home, can have a significantly different potential than the audio ground. This condition can cause
audible hum. If you suspect this is the case, use a cable TV ground isolator just before the cable set-top
box or at the RF TV input.
When turning on and off your sound system, the power amplifier should be the last
component to be turned on and the first component to be turned off. This prevents power
on/off transients from being transmitted to the loudspeakers.
Page | 14
Windows ASIO Drivers Step-by-step Setup Guide
PC System Requirements
•Operating systems:
oWindows 10
oWindows 8
oWindows Server 2012 R2
oWindows 7, 32 or 64 bit
oWindows XP / 32 bit with the latest service packs installed
•USB 2.0 / USB 3.0 interface
•8 GB of RAM
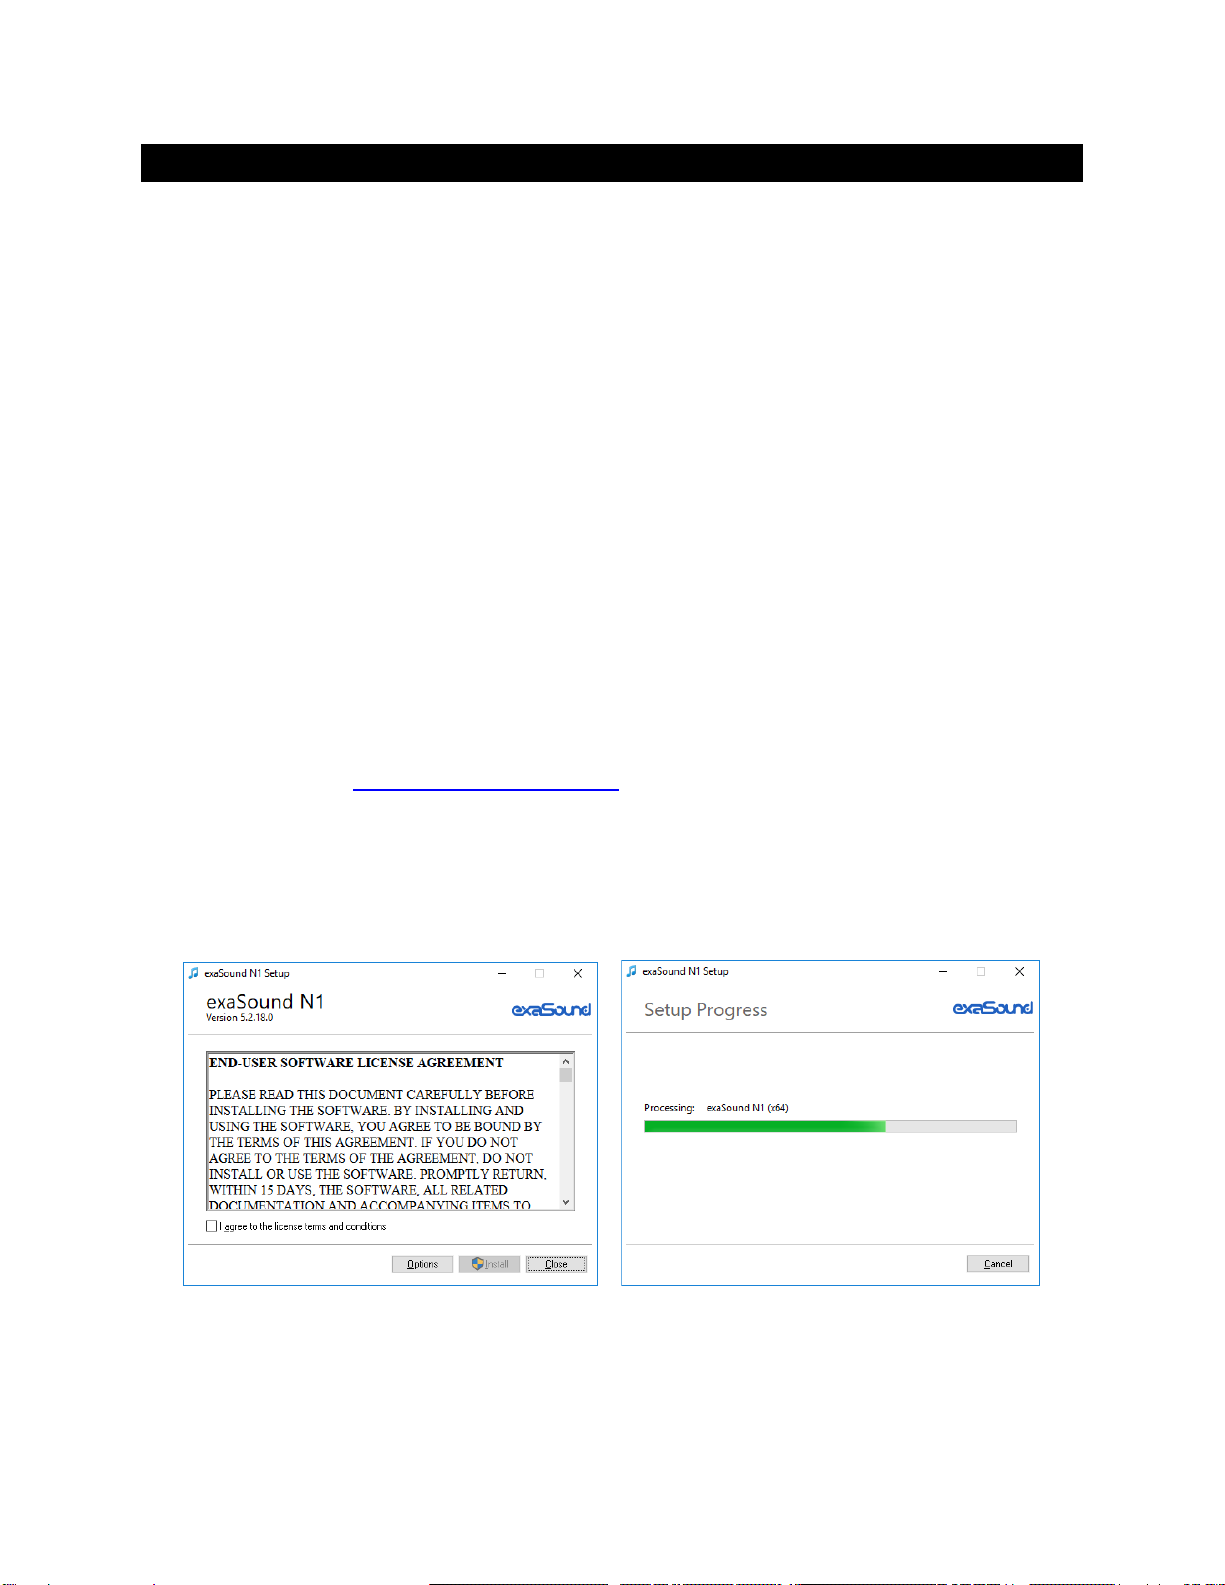
Windows ASIO Driver Installation
The first step required in the Windows setup process is to install the exaSound ASIO driver:
1. Don’t connect the e62 DAC to the PC until the driver is installed. Don’t worry if you’ve connected the
device already. Just disconnect it.
2. Download the latest driver.
You should have received an email from us with username and password. Please login to our
support website at http://support.exasound.com and download the latest version of the exaSound
Windows ASIO Driver. Don't use setup packages downloaded from other websites.
3. Unzip the installation package and double-click on exaSoundN1-5-3-39-Setup.exe. (The driver
version may be higher). Follow the instructions. In most cases you just need to accept the defaults
on the following screens.
Page | 15
4. Connect the USB cable between the e62 DAC and the computer.
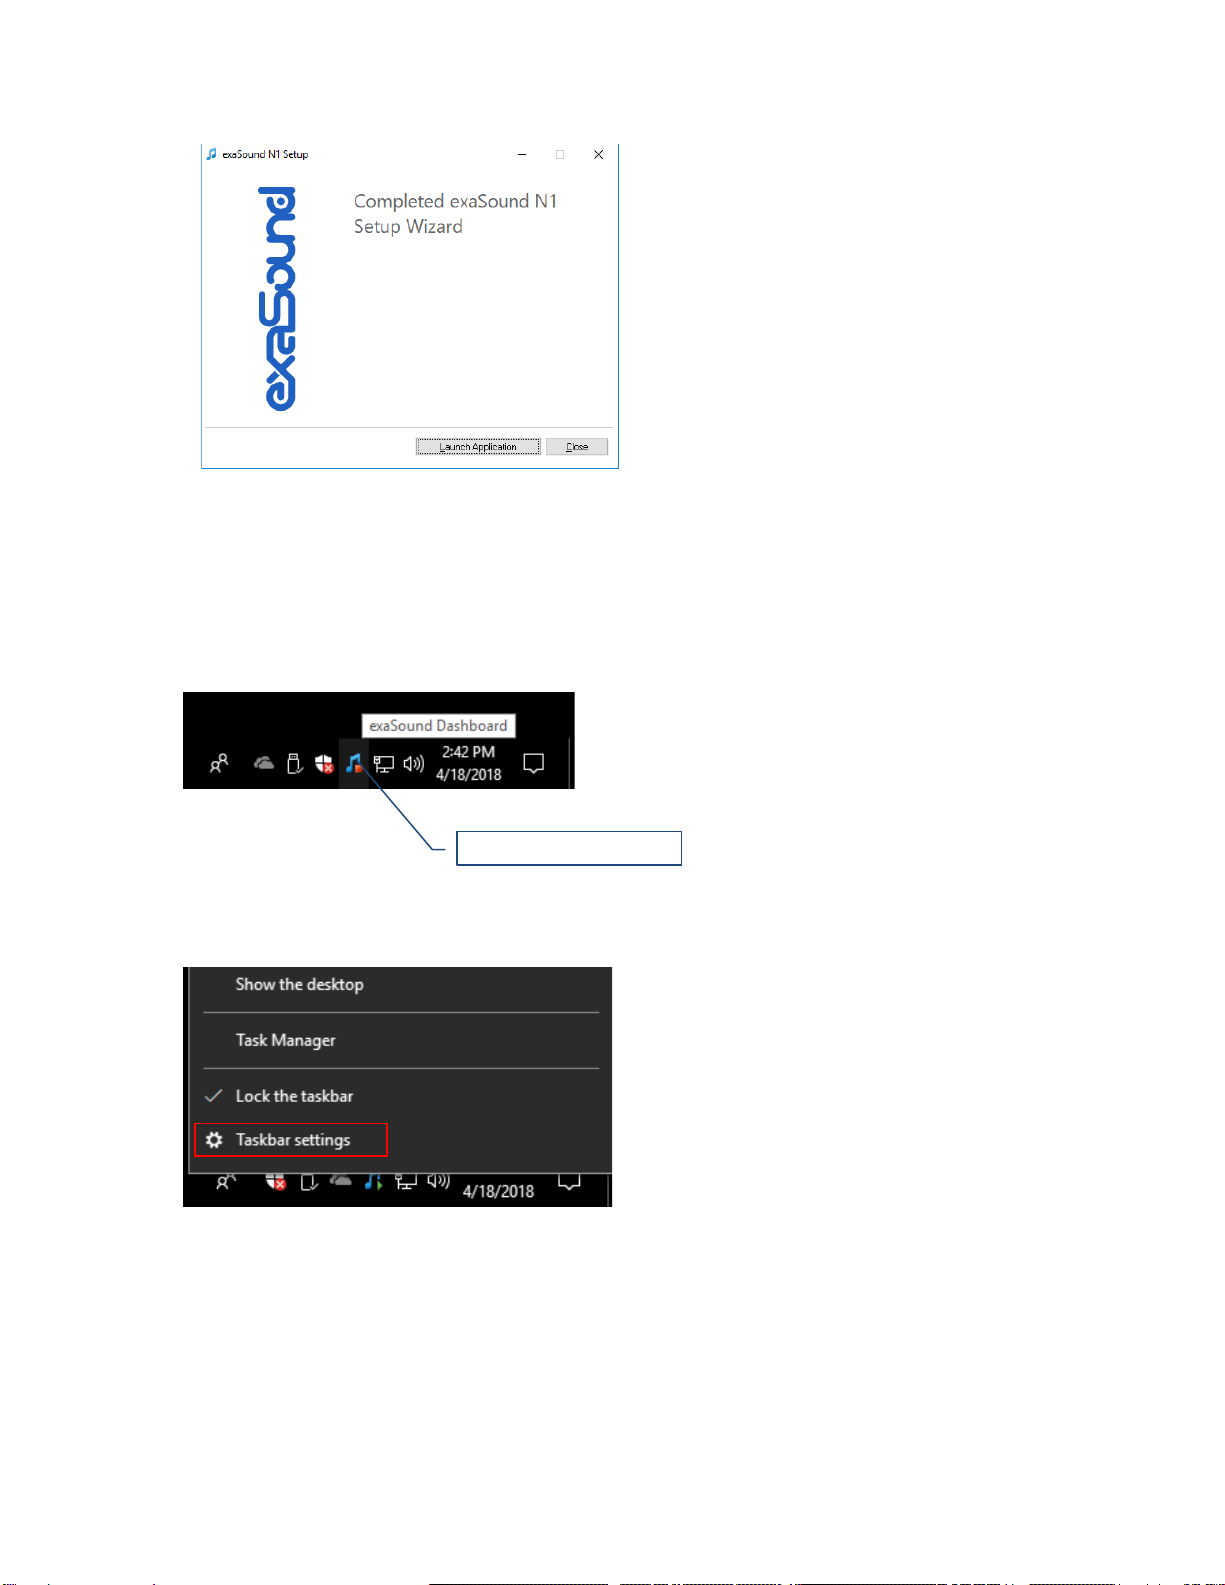
5. Upon completion of the Windows ASIO driver installation you will see the exaSound Dashboard Icon
in the System Tray area next to the clock.
6. If you don't see it, right-click on the clock and select Taskbar Settings from the menu.
exaSound Dashboard Icon
Page | 16
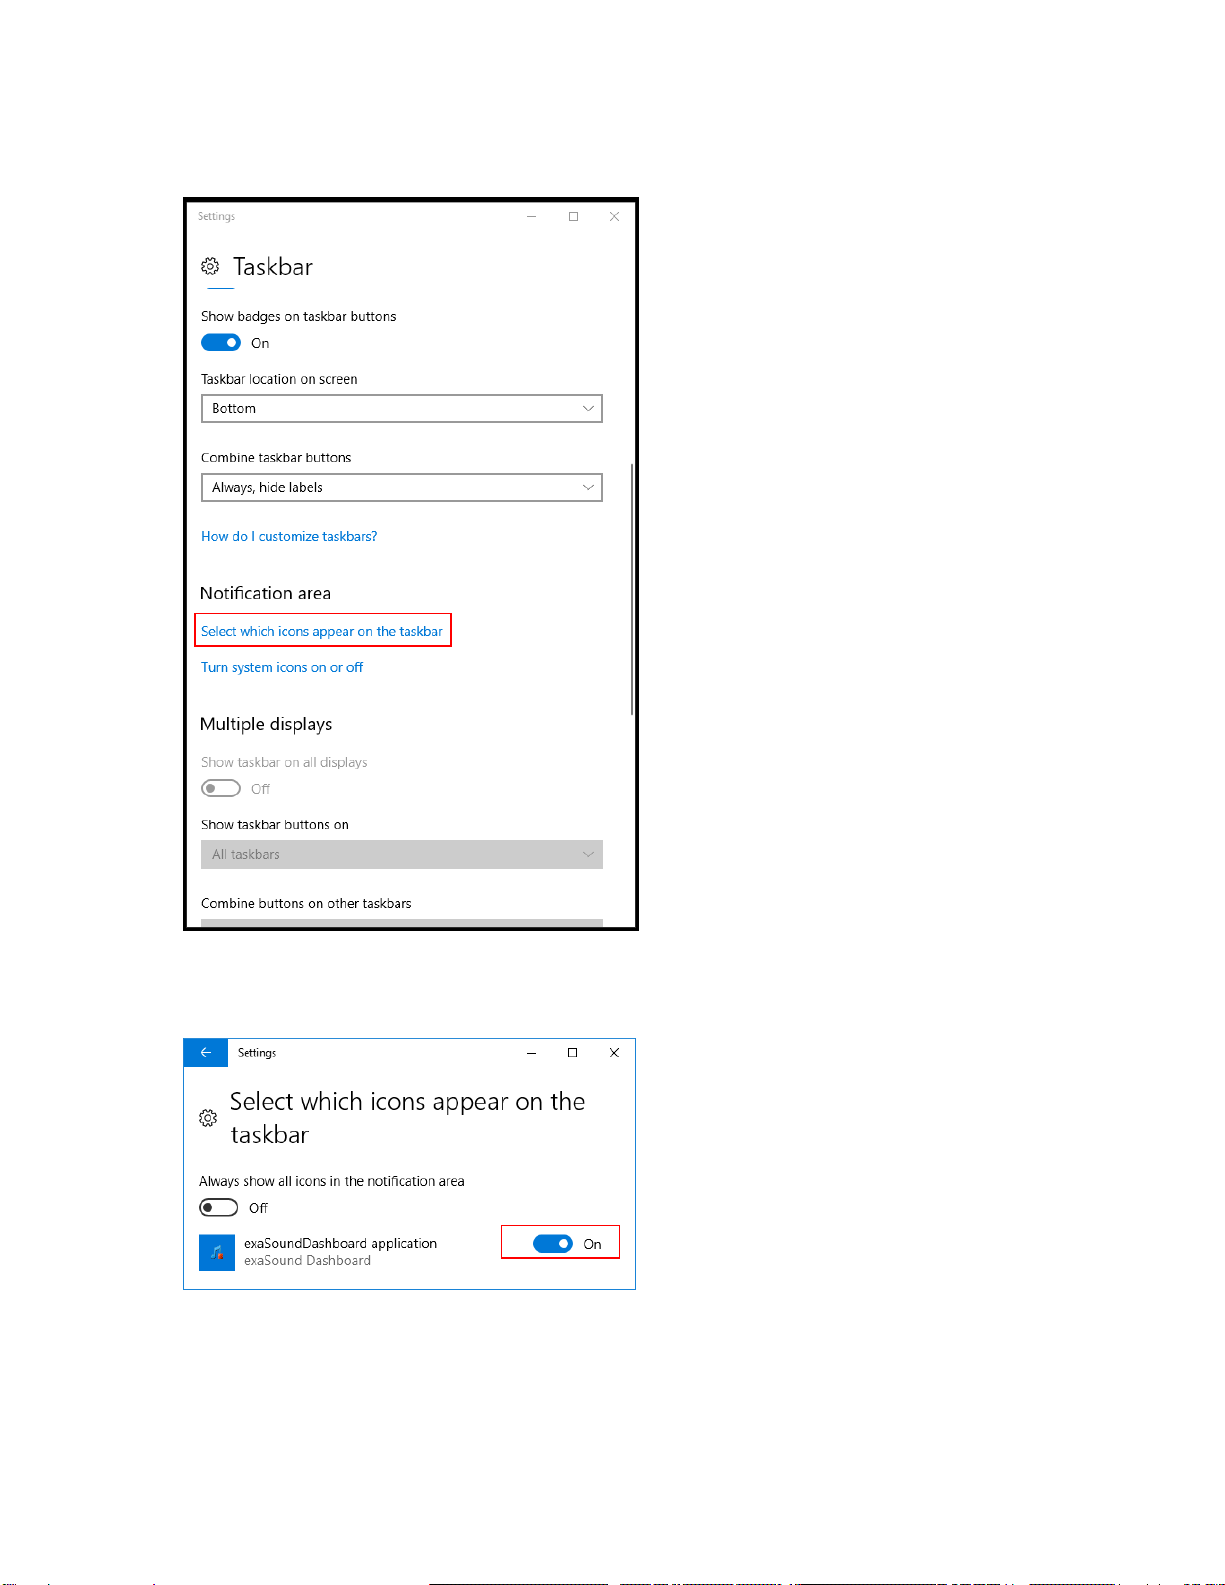
7. On the Taskbar Settings window click on Select Which Icons Appear on the Taskbar.
8. Scroll down to the exaSound e62 Dashboard icon and set the toggle to On.

Page | 17
9. You should be able to see the exaSound e62 Dashboard icons at all times. The Icon changes to
indicate playback, and displays an exclamation mark when the USB cable is disconnected:
exaSound Dashboard
Playback is stopped
Playback in progress
The USB cable is disconnected
10. Close all programs and reboot Windows. Some ASIO players may not recognise the driver if you omit
this step. If you don't restart Windows you may get an error message: "Hardware not present".

Page | 18
Using the e62 DAC - Windows
Using the Asynchronous USB Input - Windows
Before turning your amplifiers ON, always check the e62 DAC front panel to make sure
that the volume level is safe.
•The e62 DAC can be controlled from the front panel buttons, using an IR remote control or from
the computer screen.
•Make sure that all cables are connected. Turn on the unit using the Power button on the front
panel or the remote control. The front panel display will light up.
•Click on the exaSound e62 Dashboard Icon in the System Tray area next to the clock.
System Tray
•You will see the exaSound e62 Dashboard window.
Channel View Minimised View
•During playback the current sampling rate and stream format are displayed under the master
volume slider.
exaSound Dashboard Icon
Right-click the
Dashboard Icon
to display the
exaSound menu
Master Volume
Channel View
Channel Volume
Mute Button
Channel Labels
Stream Format
and Sampling
Rate
Input Selector
Right-click the
Dashboard
background
display the
exaSound menu

Page | 19
•You can customize the channel labels: Select a label with the mouse and edit the channel title.
Press Enter to save or Cancel to undo the change.
•Use the arrow button between the right channel and the master volume to toggle between
Channel View and Minimised View.
•Use the Xbutton in the top right corner to minimize the exaSound Dashboard window.
JRiver / JRemote Volume Synchronization Plug-in - Windows
The exaSound Volume Synchronization Plug-in allows JRiver for Windows and JRemote to access the
hardware volume control built in all exaSound DACs.
•Moving the JRemote or JRiver volume slider changes the master volume slider on the exaSound
Dashboard.
•Changing the master volume with the exaSound Dashboard adjusts the JRemote / JRiver volume
sliders.
Check the Guides section of the exaSound Blog for step-by-step configuration instructions for the
exaSound Volume Synchronization Plug-in: exasound.com/Blog.aspx
Roon Volume Synchronization Plug-in - Windows
Check the Guides section of the exaSound Blog for step-by-step configuration instructions for the Roon
Volume Synchronization Plug-in: exasound.com/Blog.aspx
Settings Menu - Windows
•Right-click on the exaSound icon on the system tray next to the clock. From the pop-up menu
select Settings. You can also display the menu by right-clicking on the background area of the
Dashboard.
•Use the Max Volume setting to prevent accidental playback at volume levels that are too loud.
•The e62 DAC automatically turns itself off after a period of inactivity. Use the Power Off Timeout
setting to adjust the time interval before shutdown.

Page | 20
Step-By-Step Player Configuration Instructions - Windows
ASIO-enabled player apps compatible with the e62 DAC include Roon, HQPlayer and JRiver Media
Center. Step by step configuration instructions are available in the Guides section of our blog:
exasound.com/Blog.aspx
Using Player Apps without ASIO Support
Player apps without ASIO support require the use of third-party WASAPI to ASIO bridge applications like
VB-Audio ASIO Bridge available as a free download from vb-audio.com/Cable/
JRiver Media Center offers with built-in WASAPI to ASIO bridge functionality.
Table of contents
Other exaSound Media Converter manuals

exaSound
exaSound e12 DAC User manual

exaSound
exaSound e32 Mark II User manual

exaSound
exaSound e22 Mark II User manual

exaSound
exaSound e68 User manual

exaSound
exaSound e20 User manual

exaSound
exaSound e12 DAC User manual

exaSound
exaSound e18 User manual

exaSound
exaSound e28 User manual

exaSound
exaSound e22 Mark II User manual
Popular Media Converter manuals by other brands


Pepperl+Fuchs
Pepperl+Fuchs KFD2-HLC-Ex1.D Series manual

Whelen Engineering Company
Whelen Engineering Company E-969 Installation & operating manual

Hengstler
Hengstler AX73 installation instructions

HRT
HRT VHD-HDMI user manual

Vanco
Vanco Evolution EV4K1014 quick start guide

Harvest Technology
Harvest Technology RIS NQER user manual