Excelsior Rockler User manual

Review full instructions prior to use for important safety information.
Always check Rockler.com to confirm that you are using the most recent version of instructions for your product.
Excelsior Mini Lathe Instructions
Effective December 2021

2BP1219
GENERAL SAFETY WARNINGS
This product is designed only for specific applications as defined in the instructions and should not be modified or used for any
manner not described in these instructions. Use only recommended accessories. Before using the Excelsior Mini Lathe: READ,
UNDERSTAND and FOLLOW ALL INSTRUCTIONS AND SAFETY WARNINGS. KEEP THESE INSTRUCTIONS READILY
AVAILABLE FOR FUTURE REFERENCE.
>Always confirm that you are using the most recent version of
the Instructions and safety warnings for your product (see the
Instructions link on the product page at Rockler.com).
>Before using another tool with this product, always read,
understand and follow the instructions and safety warnings
in the owner’s manual for that tool. If you do not have the
owner’s manual, obtain one from the tool’s manufacturer
before using it with this product.
>Before using any chemical with this product, always read,
understand and follow all safety warnings and guidelines in
the manufacturer’s Safety Data Sheet (SDS; formerly called
“MSDS”), especially regarding:
• How to safely use the chemical, including potential hazards
and recommended first aid measures;
• Personal safety equipment required to safely use the
chemical (e.g. gloves, eye protection, mask/respirator, etc.);
• Proper and safe handling, storage and disposal of
the chemical.
>Before using this product, review and verify that all tools to be
used with it have safety equipment installed and are in proper
working order as defined by the tool’s owner’s manual.
>Do not use this product until you have read and are
confident you understand:
• Product Specific Safety Warnings (pp. 3 - 4);
• Unboxing and Cleaning (p. 5);
• Electrical Connections and Grounding (p. 6);
• Getting Set Up (p. 6);
• Setting/Changing Spindle Speed (p. 7);
• Mounting a Workpiece Between
Centers (Spindle Turning) (p. 8);
• Mounting a Workpiece using the Faceplate (pp. 8 - 9);
• Maintenance (p. 9);
• Replacing the Drive Belt (pp. 9 - 10);
• Exploded View (p. 11);
• Parts List (p. 12).
>The user assumes all risk and responsibility for the proper and
safe use of this product and for ensuring product suitability for
the intended application.
>It is the sole responsibility of the purchaser of this product to
ensure that any anyone you allow to use this product reads
and complies with all instructions and safety precautions
outlined in this manual prior to use.
>Follow all standard shop safety practices, including:
• Keep children and bystanders away from the tool
operating area;
• Do NOT use power tools in explosive environments, or in
the presence of flammable liquids, fumes or dust;
• TURN OFF AND UNPLUG all power tools BEFORE
making any adjustments or changing accessories;
• Remain alert and use good judgment. Do not use this
product if you are in any way impaired by medications,
alcohol, drugs or fatigue;
• Keep your work area well lit and clean;
• Dress appropriately. Secure loose clothing, remove all
jewelry and tie up long hair before using this product;
• ALWAYS wear safety glasses, hearing protection
and respiratory protection that complies with
NIOSH/OSHA/ANSI safety standards;
• Use dust collection tools and dust face masks to
reduce exposure to dust;
• Use safety equipment such as featherboards, push
sticks and push blocks, etc., when appropriate;
• Maintain proper footing at all times and do not overreach;
• Do NOT force woodworking tools.
>These warnings and instructions do NOT represent the total
of all information available regarding tool safety, use and
technique. Always seek out opportunities to learn more
and improve your skills and knowledge.
Drilling, sawing, sanding or machining wood
products can expose you to wood dust, a substance known
to the State of California to cause cancer. Avoid inhaling
wood dust or use a dust mask or other safeguards for
personal protection. For more information go to
www.P65Warnings.ca.gov/wood.
Danger indicates a hazardous situation that, if not avoided, will result in death or serious injury.
Warning indicates a hazardous situation that, if not avoided, could result in death or serious injury.
Caution indicates a hazardous situation that, if not avoided, may result in minor or moderate injury
or property damage.
Notice indicates important or helpful information and/or user tips.

3
PRODUCT SPECIFIC SAFETY WARNINGS
Electrical/Grounding
>Connect only to a properly grounded outlet,
preferably a GFCI outlet. In the event of a malfunction
or breakdown, grounding provides a path of least
resistance for electric current to reduce the risk of electric
shock. This tool is equipped with an electric cord having an
equipment-grounding conductor and a grounding plug. The
plug must be plugged into a matching outlet that is properly
installed and grounded in accordance with all local
codes and ordinances.
>Do NOT modify the plug provided – if it will not fit the outlet,
have the proper outlet installed by a qualified electrician.
Do NOT use a three-prong-to-two-prong adapter.
>Improper connection of the equipment-grounding conductor
can result in a risk of electric shock. The conductor with
insulation having an outer surface that is green with
or without yellow stripes is the equipment-grounding
conductor. If repair or replacement of the electric
cord or plug is necessary, do NOT connect the
equipment-grounding conductor to a live terminal.
>Check with a qualified electrician or service personnel if
the grounding instructions are not completely understood,
or if in doubt as to whether the tool is properly grounded.
>Use only three-wire extension cords that have
three-prong grounding plugs and three-pole
receptacles that accept the tool’s plug. Do NOT
use a three-prong-to-two-prong adapter.
>Make sure the Main Power Switch is in the OFF position
before connecting the machine to the power source.
>Do NOT pull or carry by cord, use cord as a handle, close
a door on cord, or pull cord around sharp edges or corners.
Do NOT run heavy objects over cord. Keep cord away from
heated surfaces.
>Do NOT unplug by pulling on cord. To unplug, grasp
the plug, not the cord.
>Do NOT handle plug or appliance with wet hands.
>Repair or replace damaged or worn cord immediately.
>The use of extension cords is discouraged; try to position
the machine near the power source. If you must use an
extension cord, make sure that it is in good condition and
is heavy enough to carry the current your product will
draw. An undersized cord will cause a drop in line voltage
resulting in loss of power, overheating and fire. If you must
use an extension cord with this tool, use at least a 12-gauge
cord that’s no longer than 50'. Remember, the smaller the
gauge number, the heavier the cord.
Product Specific Safety Warnings continued on page 4
Safe Use
>Do NOT lift more than you are able. If the Excelsior Mini
Lathe feels too heavy for you to lift on you own, obtain the
help of another adult to lift the unit into position. Use proper
lifting techniques.
>Make sure that the bench or table holding the lathe is strong
enough to bear the weight and that it is solid and rigid. The
lathe is heavy, and serious injury could result if the support
were to fail.
>Keep tool guards in place and in working order.
>Remove adjusting keys and wrenches. Form a habit of
checking to see that keys and adjusting wrenches are
removed from the tool before turning it on.
>Keep your work area clean. Cluttered areas and benches
invite accidents.
>Don’t use in a dangerous environment. Don’t use power
tools in damp or wet locations or expose them to rain. Keep
work area well-lighted.
>Keep children and pets away. All visitors should be kept
safe distance from the work area.
>Make your work area kid-proof with padlocks or master
switches or by removing starter keys.
>Don’t force the tool. It will do the job better and more safely
at the rate for which it was designed.
>Use the right tool. Don’t force the tool or attachment to do a
job for which it was not designed.
>Wear proper apparel and contain long hair to avoid
entanglement. Do NOT wear loose clothing, gloves,
neckties, rings, bracelets, or other jewelry that might get
caught in moving parts. Nonslip footwear is recommended.
Wear protective hair covering to contain long hair.
>Always wear OSHA-approved safety glasses and a face
shield. Also use a dust mask if cutting operation is dusty.
Everyday glasses only have impact-resistant lenses; they
are NOT safety glasses.
>Make sure your workpiece is fully secured on the lathe
between centers, with a faceplate and screws of sufficient
length, or in four-jaw chuck with appropriate jaws. An
inadequately secured workpiece could come off the lathe
at high velocity, potentially causing serious injury.
>Don’t overreach. Always maintain proper footing and
balance.

4
>Maintain tools with care. Keep tools sharp and clean for
best and safest performance. Follow instructions for
lubricating and changing accessories.
>Disconnect the tool from the power source before servicing
or before changing accessories.
>Always turn off and unplug the lathe before adjusting the
belt to change the spindle speed.
>Always close and secure both the Side Belt Access Cover
and the Rear Belt Access Cover before turning on the lathe.
>Use recommended accessories. Consult the owner’s
manual for recommended accessories. The use of improper
accessories could create a risk of injury.
>Never stand on the tool. Serious injury could occur.
>Check damaged parts. Before further use of the tool, a
guard or other part that is damaged should be carefully
checked to determine that it will operate properly and
perform its intended function – check for alignment of
SAVE THESE INSTRUCTIONS
moving parts, binding of moving parts, breakage of parts,
mounting and any other conditions that could affect its
operation. A guard or other part that is damaged should
be properly repaired or replaced.
>Direction of feed. Feed work into a blade or cutter against
the direction of rotation of the blade or cutter only.
>Never leave tool running unattended. Turn the power off.
Don’t leave the tool until it comes to a complete stop.
>Check your workpiece for any splits, cracks or other
defects that could compromise the integrity of the wood
and possibly lead to the workpiece coming apart or coming
off the lathe. Do NOT turn blanks that have defects.
>Always use the lowest speed (rpm) when starting
a new workpiece.
>Maximum length: 173⁄4"
>Maximum diameter: 10"
PRODUCT SPECIFIC SAFETY WARNINGS CONTINUED

5
Unboxing and Cleaning
The Excelsior Mini Lathe comes assembled, except for the MT2
Live Center; MT2 Spur Center; quill handwheel handle and socket
screw. Also in the box will be a knockout bar and 3mm, 6mm and
8mm hex keys.
Check to make sure that you have all parts and that the product
is not damaged. If you find damage, contact Rockler Technical
packaging in case the product will need to be returned.
The unpainted surfaces of the lathe, such as the bed, have been
coated with grease to prevent corrosion during shipping. Use
a solvent-based cleaner or degreaser to remove this protective
coating, and then apply Boeshield T-9® Rust and Corrosion
Protection to the surface to prevent rust from developing. Always
follow the manufacturer’s instructions when using any cleaning or
lubricating product.
>Do NOT lift more than you are able. If the Excelsior Mini
Lathe feels too heavy for you to lift on you own, obtain
the help of another adult to lift the unit into position.
Use proper lifting techniques
>Make sure that the bench or table holding the lathe is
strong enough to bear the weight and that it is solid and
rigid. The lathe is heavy, and serious injury could result if
the support were to fail.
Headstock Headstock
Spindle M2 Spur
Center
6" Toolrest
M2 Live
Center
Toolrest
Lock Handle
Quill Lock
Handle Tailstock
Quill
Handwheel
(with Handle)
Tailstock
Lock Lever
(on back of
Tailstock)
Lathe
Bed
Power Switch and
Safety Pullout Key
Not shown but included in the box:
> 3" Faceplate > Knockout Bar
> 3mm Hex Key > 6mm Hex Key
> 8mm Hex Key > Spindle Washer
Toolrest
Banjo
Banjo Lock
Lever
Motor
Belt Tension
Lever Lock
Handle
Belt Tension
Lever
Side Belt
Access Cover
Rear Belt
Access Cover
(on back of
Headstock)
Headstock
Wheel

6
This appliance is for use on a nominal 120V circuit and has a
grounding attachment plug that looks like the plug illustrated in
Fig 1. Make sure that the tool is connected to an outlet having
the same configuration as the plug. Do NOT use an adapter with
this appliance.
Getting Set Up
1. With the lathe unplugged, fit the socket screw into the
Quill Handwheel Handle and use the appropriate Hex Key
to secure the handle to the Quill Handwheel.
2. Create a space for the lathe in your work area. Make
sure that the bench or table holding the lathe is level and
strong enough to bear the weight of the lathe, any tools, the
workpiece, and the forces exerted when the lathe is in use.
The bench or table must be solid and rigid. The lathe weighs
more than 80 lbs., and serious injury could result if the
support were to fail. Also keep in mind the height: For most
comfortable turning, the lathe should be set up at a height
so that the axis of turning is at about the level of your elbows.
Finally, make sure that you will have sufficient room in front
of and behind the lathe to maneuver your tools.
3. If your work surface isn’t uniform and level and the lathe
does not sit solidly on all four adjustable feet, turn the feet at
the appropriate corner(s) to eliminate any wobble and to level
the lathe. It is recommended to place a level on each axis of
the lathe bed to make certain the lathe is level.
4. Familiarize yourself with how to move and fully secure the
Tool Rest Banjo, the Tool Rest, and the Tailstock. Also
practice moving the quill by turning the Quill Handwheel.
It is very important when turning that these components be
positioned properly and fully secured; failure to do so could
result in serious injury to you as well as damage to the lathe,
your tools and your project.
Electrical Connections and Grounding
>Connect only to a properly grounded outlet only,
preferably a GFCI outlet. In the event of a malfunction
or breakdown, grounding provides a path of least
resistance for electric current to reduce the risk of
electric shock. This tool is equipped with an electric
cord having an equipment-grounding conductor and
a grounding plug. The plug must be plugged into a
matching outlet that is properly installed and grounded
in accordance with all local codes and ordinances.
>Do NOT modify the plug provided – if it will not
fit the outlet, have the proper outlet installed
by a qualified electrician. Do NOT use a
three-prong-to-two-prong adapter.
>Improper connection of the equipment-grounding
conductor can result in a risk of electric shock. The
conductor with insulation having an outer surface
that is green with or without yellow stripes is the
equipment-grounding conductor. If repair or replacement
of the electric cord or plug is necessary, do NOT connect
the equipment-grounding conductor to a live terminal.
>Check with a qualified electrician or service personnel
if the grounding instructions are not completely
understood, or if in doubt as to whether the
tool is properly grounded.
>Use only three-wire extension cords that have
three-prong grounding plugs and three-pole
receptacles that accept the tool’s plug.
Fig. 1
>Do NOT lift more than you are able. If the Excelsior Mini
Lathe feels too heavy for you to lift on you own, obtain
the help of another adult to lift the unit into position. Use
proper lifting techniques
>Make sure that the bench or table holding the lathe is
level and strong enough to bear the weight of the lathe,
any tools, the workpiece, and the forces exerted when the
lathe is in use. The bench or table must be solid and rigid.
The lathe weighs more than 80 lbs., and serious injury
could result if the support were to fail.
If desired, you can unscrew and remove
the rubber feet and secure the lathe to a level work surface
with 1/4" lag bolts and nuts or 1/4" lag screws (not included).
Grounding Plug
Cover of
grounded
outlet box

7
Setting/Changing Spindle Speed
The Excelsior Mini Lathe can be set at five different speeds: 760
rpm, 1,100 rpm, 1,600 rpm, 2,200 rpm. and 3,200 rpm. Fig. 2.
To set the lathe speed:
1. Loosen the top knobs on the Side Belt Access Cover and the
Rear Belt Access Cover. Rotate the access covers out of the
way so you can reach the Drive Belt. Tighten the knobs to
hold the access covers in the open position.
2. Loosen the Belt Tension Lever Lock Handle until you can
lift the Belt Tension Lever freely. This will allow you to
move the Drive Belt.
3. Continuing to lift the Belt Tension Lever as necessary, move
the Drive Belt to the appropriate set of pulleys for the speed
you want. Make sure that the belt is securely positioned on
complementary top and bottom pulleys. Do NOT position
the belt so that it is running at an angle. Fig. 2.
4. Lower the Belt Tension Lever until tension is restored to the
belt. (You should be able to deflect the belt inward about
1/2".) Spin the Headstock Wheel by hand to make sure
the drive belt doesn’t wander or drift.
5. Tighten the Belt Tension Lever Lock Handle.
6. Return the Side Belt Access Cover and the Rear Belt Access
Cover to the closed position and secure them in place.
7. Plug in and briefly turn on the lathe to verify that the speed
will be suitable for the size of object you are turning. (Speeds
for spindle turning are higher than speeds for bowl turning;
in general, the larger the diameter of the workpiece, the
slower the speed.)
Fig. 2 - Viewed from back of lathe
>Always turn off and unplug the lathe before adjusting
the belt to change the spindle speed.
>Always use the lowest speed (rpm) when starting
a new workpiece.
Always close and secure both the Side
Belt Access Cover and the Rear Belt Access Cover before
turning on the lathe.
760 RPM
1100 RPM
1600 RPM
2200 RPM
3200 RPM
Drive Pulley
(Top)
Belt
Motor Pulley
(Bottom)

8
Mounting a Workpiece Between
Centers (Spindle Turning)
When turning a workpiece with the grain running parallel to
the lathe bed (furniture legs are a good example) the workpiece
(often called a blank) typically is mounted between the lathe’s
Spur Center and Live Center. To mount a blank between centers:
1. Draw diagonal, corner-to-corner lines on both ends of the
blank to locate the center points.
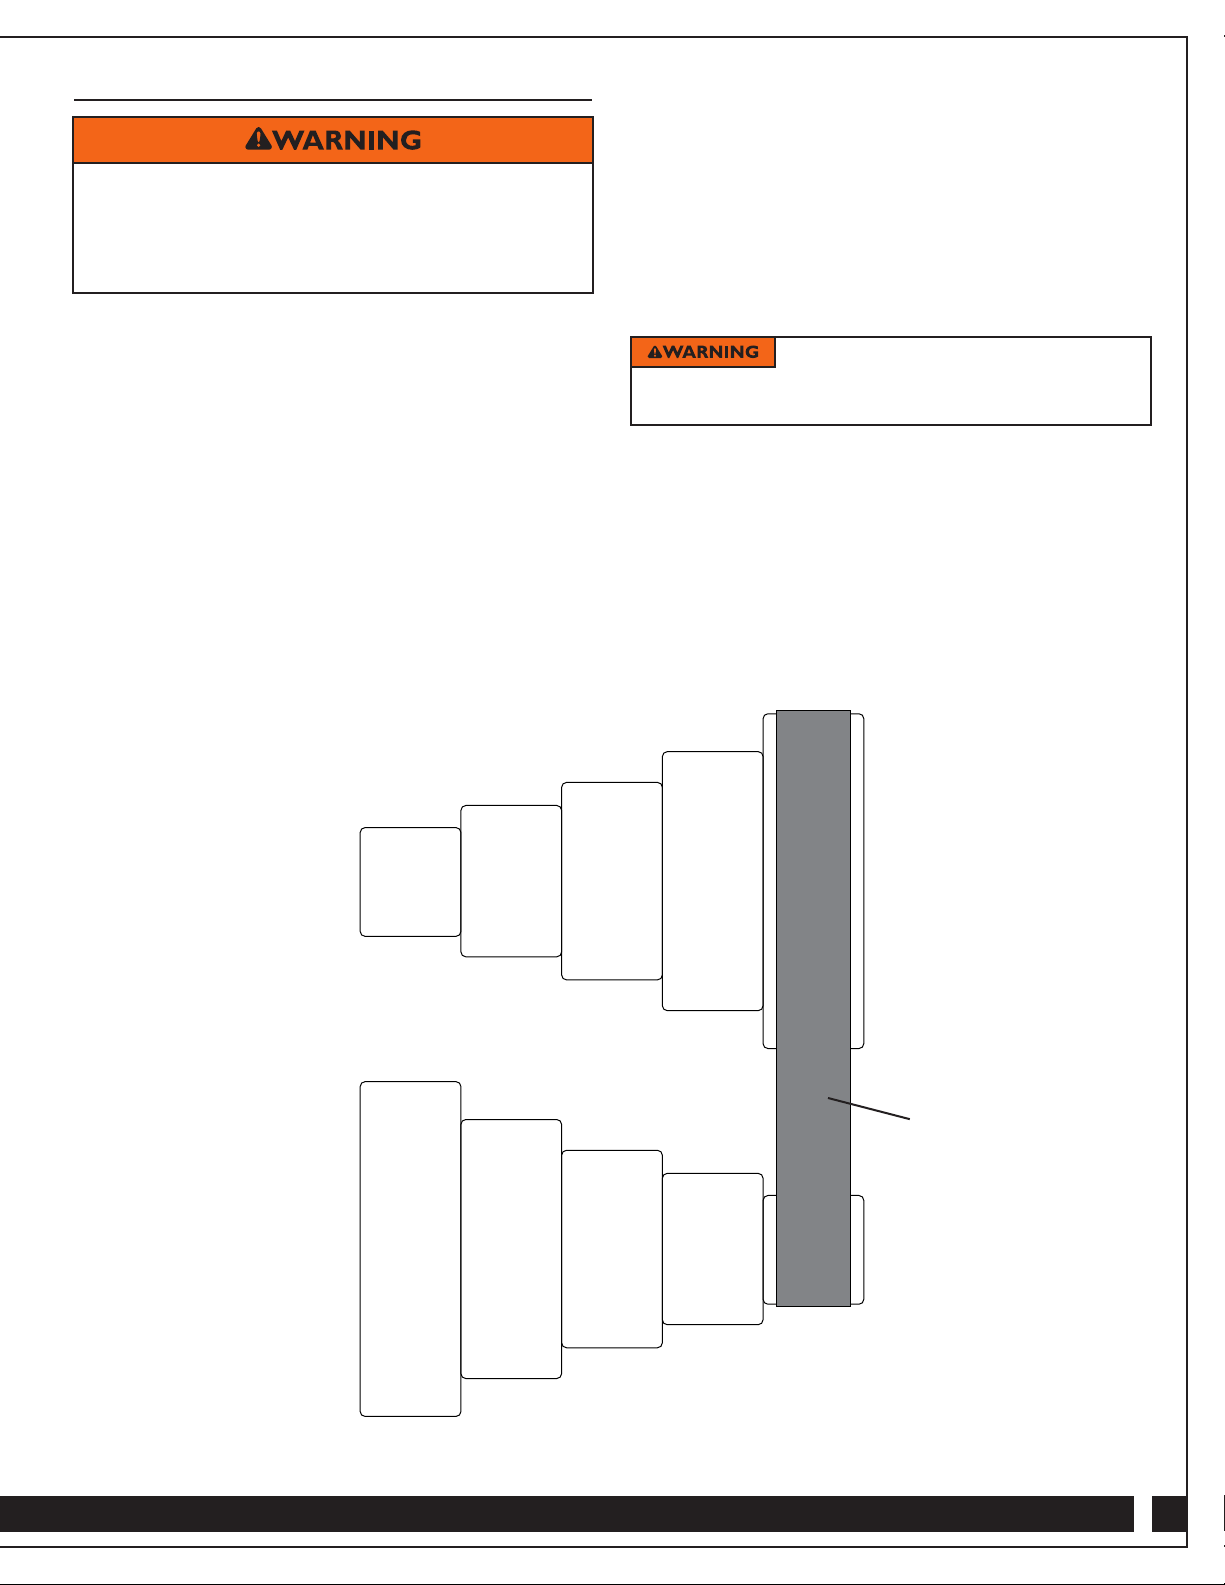
2. Carefully remove the Spur Center from the Headstock
Spindle, taking care not to injure your hand on the sharp
point and wings. If the Spur Center won’t come out when
you pull on it, use the Knockout Bar and, if necessary, a
dead-blow mallet to dislodge it. Don’t strike the end of the
Knockout Bar too hard, though, and be sure to catch
the Spur Center.
3. If the Faceplate is installed on the Headstock Spindle,
remove it by rotating counterclockwise.
4. Stand the blank on end and hold it securely or clamp it in
a vise. Position the Spur Center so that its center point is
at the intersection of the “X” you drew on the end of the
blank. Hold it straight and hit the end a couple of times with
a dead-blow mallet to seat the Spur Center at least 1/4" into
the blank. The Spur Center might come free from the blank,
but the impressions in the wood will make it easier to mount
the blank securely on the lathe. (If you are using an
especially hard wood, you might need to drill a 1/8"-diameter
by 3/16"-deep hole in the end of the blank after setting
the Spur Center.)
5. Reinstall the Spur Center in the Spindle and bring the blank
up to it, making sure to line up the impressions with the
wings on the Spur Center. Hold the blank parallel
to the Lathe Bed.
6. Release the Tailstock Lock Lever and slide the Tailstock until
the tip of the Live Center almost touches the blank. Press the
Tailstock Lock Lever to lock down the Tailstock.
7. Continuing to hold the blank, loosen the Quill Lock Handle.
Carefully turn the Quill Handwheel to advance the Live
Center, making sure to line up the tip with the center of
the “X” on the end of the blank. Once the tip of the Live
Center makes contact, continue tightening the Quill
Handwheel to make sure the blank is fully and securely
captured by both the Spur Center and Live Center. Tighten
the Quill Lock Handle to lock the quill in position.
8. Loosen the Banjo Lock Lever and the Tool Rest Lock
Handle. Slide the Tool Rest Banjo up to the workpiece,
leaving about 1/8" between the Tool Rest and the workpiece.
Spin the workpiece by hand to make sure no part of it will
contact the Tool Rest once the lathe is turned on. Lock the
Banjo Lock Lever.
9. Adjust the Tool Rest up or down to your preferred height
for the task and engage the Tool Rest Lock Handle. Typically,
the top edge of the rest will be just above the horizontal
centerline of the workpiece. Again, spin the workpiece by
hand to make sure no part of it will contact the Tool Rest.
Mounting a Workpiece using the Faceplate
When turning a workpiece with the grain running perpendicular
to the lathe bed (bowls and platters are good examples) the
workpiece (often called a blank) typically is mounted with screws
to the Faceplate or with a worm screw in a four-jaw chuck. To
mount a blank using the faceplate:
1. Prepare your blank for turning by making sure it is sized
to allow it to spin on the lathe without contacting the Lathe
Bed and does not exceed the recommended size limitations
of the lathe. Remove any corner edges with a band saw
or handsaw. Also make sure that the area where you will be
mounting the Faceplate is reasonably flat. If it’s not, you’ll
need to chisel out an area large enough to accommodate
the Faceplate.
2. Use a center finder or some other means to locate and mark
the center of your blank.
3. Center the Faceplate over the center mark on your blank and
mark the locations of ALL of the Faceplate’s screw holes
on the blank.
>Make sure your workpiece is fully secured on the lathe
between centers, with a faceplate and screws of sufficient
length, or in four-jaw chuck with appropriate jaws. An
inadequately secured workpiece could come off the
lathe at high velocity, potentially causing serious injury.
>Check your workpiece for any splits, cracks or other
defects that could compromise the integrity of the
wood and possibly lead to the workpiece coming
apart or coming off the lathe. Do NOT turn
blanks that have defects.
If the Tailstock Lock Lever won’t
release because it’s too tight or won’t secure the Tailstock
because it’s too loose, adjust the mounting nut on the
underside of the tailstock slightly to achieve the proper
clamping pressure.

9
4. Drill pilot holes of the appropriate diameter and depth for the
screws you will be using at all screw locations.
5. Firmly secure the Faceplate to the blank by driving screws
through all mounting holes in the Faceplate.
6. Fit the Spindle Washer onto the Headstock Spindle and then
thread the Faceplate with mounted blank onto the Spindle.
7. Release the Tailstock Lock Lever and slide the Tailstock until
the tip of the Live Center almost touches the blank. Press the
Tailstock Lock Lever to lock down the Tailstock.
8. Carefully turn the Quill Handwheel to advance the Live
Center. Once the tip of the Live Center makes contact,
continue tightening the Quill Handwheel to make sure
the Live Center is seated.
9. Loosen the Banjo Lock Lever and the Tool Rest Lock Handle.
Slide the Tool Rest Banjo into position, making sure that no
part of the workpiece will contact the Tool Rest once the lathe
is turned on. Lock the Banjo Lock Lever.
10. Adjust the Tool Rest up or down to your preferred height for
the task and engage the Tool Rest Lock Handle. Again, spin
the workpiece by hand to make sure no part of it will contact
the Tool Rest.
Maintenance
> Vacuum dust and debris from lathe regularly. Keep
Lathe Bed clean.
>If rust appears on cast iron Lathe Bed, carefully remove
with steel wool or other fine abrasive. Coat exposed iron
surface with Boeshield T-9®Rust and Corrosion Protection
to prevent rust from developing again.
>Before each use, check lathe components, including Drive Belt,
to ensure all are in proper working condition.
>Follow the manufacturer’s guidelines for proper use of any
rust prevention chemical. Dispose of any excess chemicals in
accordance with manufacturer’s instructions and as required
by law.
Replacing the Drive Belt
1. Loosen the Moving Knob (57), lift and swing the Side Belt
Access Cover (23) up under the Headstock Wheel (22) and
Tighten the Moving Knob to secure it there and provide
access to the Motor Pulley (29).
2. Follow the same process to swing the Rear Belt Access
Cover (20) up and secure it to obtain access to the
Drive Pulley (25).
3. Loosen the Belt Tension Lever Lock Handle (33) and lift the
Belt Tension Lever (31) to allow slack on the Drive Belt (26).
Fig. 3.
>Disconnect the tool from the power source before
servicing or before changing accessories.
>Always close and secure both the Side Belt Access
Cover and the Rear Belt Access Cover before turning
on the lathe.
Use steel pan-head or washer-head
screws to hold your blank to the Faceplate. The screws
need to be long enough to provide a strong bite on the
blank but shorter than the final depth of the recess you will
turn inside the bowl or platter. Typically, you want screws
at least 1" long.
Use the part numbers listed on the
Parts Diagram on pages 11 and 12 to identify parts
described in this section.
>Excelsior Mini Lathe Replacement Belt is available from
Rockler (29424, sold separately).
Use steel pan-head or washer-head
screws to hold your blank to the Faceplate. The screws
need to be long enough to provide a strong bite on the
blank but shorter than the final depth of the recess you will
turn inside the bowl or platter. Typically, you want screws
at least 1" long.
Fig. 3
31

10
4. Loosen the M6 x 10 Hex Socket Set Screw (28) on the
Headstock Wheel (22) and then rotate the Headstock
Wheel counterclockwise to remove it from the
Headstock Spindle (14). Fig. 4.
5. Using a rubber mallet, a wooden mallet or a metal hammer
with a wooden block against the end of the Headstock
Spindle (14), carefully drive it toward the center of the
Lathe Bed (1) until there’s enough of a gap between it and
the Headstock housing to remove the Drive Belt (26). You
also might need to loosen the Hex Socket Set Screw (24) on
the Drive Pulley (25) to allow the Headstock Spindle to shift
the necessary distance. Fig. 5.
6. Remove the Drive Belt (26) and fit the replacement onto
the Drive Pulley (25).
7. Taking care not to allow the replacement Drive Belt (26) to
fall off the Drive Pulley (25), use a rubber mallet, a wooden
mallet or a metal hammer with a wooden block against the
other end of the Headstock Spindle (14) to carefully drive
it back to its original position. If you needed to loosen the
Hex Socket Set Screw (24) on the Drive Pulley (25), make
sure the Drive Pully is returned to its original position, as
well, and tighten the Hex Socket Set Screw to secure it.
8. Visually check the Drive Pulley (25) and the Motor
Pulley (29) to make sure the pulleys are aligned vertically.
Vertical alignment of the Drive Pulley and Motor Pulley is
crucial for safe and proper operation of the lathe. If they’re
not aligned, loosen the Hex Socket Set Screw (24) and adjust
the position of the Drive Pulley (25) until they are.
9. Position the new Drive Belt (26) on the aligned Drive
Pulley (25) and the Motor Pulley (29) to deliver the desired
spindle speed. Make sure that the belt is securely positioned
on complementary top and bottom pulleys. Do NOT allow
the belt to run at an angle.
10. Lower the Belt Tension Lever (31) until tension is restored
to the Drive Belt (26). You should be able to deflect the belt
inward about 1/2". Spin the Headstock Wheel (22) by hand
to make sure the drive belt doesn’t wander or drift.
11. Tighten the Belt Tension Lever Lock Handle (33).
12. Return the Side Belt Access Cover (23) and the Rear Belt
Access Cover (20) to the closed position and secure
them in place.
13. Plug in and briefly turn on the lathe to verify that the
speed will be suitable for the size of object you are
turning. (Speeds for spindle turning are higher than
speeds for bowl turning; in general, the larger the
diameter of the workpiece, the slower the speed.)
Always close and secure both the Side
Belt Access Cover and the Rear Belt Access Cover before
turning on the lathe.
Check Rockler.com for updates. If you have further questions, please
contact our Technical Support Department at 1-800-260-9663
or support@rockler.com
Fig. 5
Fig. 4
22

11
28
22
2
27
27 20
49
57
58
21
17
15
14
13
12
34
40
64
36
35
34
37
41
11
10
9
8
54
6
5
53
1
42
56
4
55
3
2
43
44
46
47
51
27
39
38
49
30
52
49
31 52
33
32
45
50
46A
46B
7
16
48
49
48
18
19
23
24
25
28
29
26

12 Distributed by Rockler Companies, Inc.
4365 Willow Dr. Medina, MN 55340
33207
Rev 12/21
1-800-279-4441
www.rockler.com
PARTS LIST Quantity
1Lathe Bed 1
2Semicircle Head Screw 2
3Retaining Plate 1
4Quill Handwheel 1
5Tailstock 1
6Quill Lock Handle 1
7Tailstock Lock Lever 1
8Tail Axis 1
9Taper Rod 1
10 Bearing Ball 1
11 Cup Center 1
12 M2 Spur Center 1
13 Faceplate 1
14 Headstock Spindle 1
15 Bearing Ball 1
16 Retaining Ring 1
17 Retaining Ring 1
18 Bearing Ball 1
19 Headstock 1
20 Rear Belt Access Cover 1
21 Screw 3
22 Headstock Wheel 1
23 Side Belt Access Cover 1
24 Hex Socket Set Screw 1
25 Drive Pulley 1
26 Drive Belt 1
27 M8 x 25 Hex Socket Head Screw 5
28 M6 x 10 Hex Socket Set Screw 1
29 Motor Pulley 1
30 Hex Socket Head Screw 3
Quantity
31 Belt Tension Lever 1
32 Motor 1
33 Belt Tension Lever Lock Handle 1
34 Retaining Ring 12 2
35 Tool Rest 1
36 Tool Rest Banjo 1
37 Bolt 1
38 Lock Plate 1
39 Hex Nut 1
40 Banjo Lock Lever 1
41 Tool Rest Lock Handle 1
42 Bolt 1
43 Lock Plate 1
44 Hex Nut 1
45 Power Cord 1
46 Plate 2
46A Washer 2
46B Screw 2
47 Switch 1
48 Washer 4
49 Spring Washer 8
50 Rubber Washer 4
51 Switch Box 1
52 Washer 4
53 Retaining Ring 10 1
54 Tailstock Quill 1
55 Bolt 1
56 Handle 1
57 Moving Knob 2
58 Stationary Knob 2
Table of contents
Popular Industrial Equipment manuals by other brands

Anest Iwata
Anest Iwata PR-B5B instruction manual

morse
morse MORStak 289C Operator's manual

Idex
Idex FITZPATRICK D6B Operating instructions manual

Graco
Graco EcoQuip 300 Operation, repair, and parts

KAKA Industrial
KAKA Industrial 171003 Operation manual

SEW-Eurodrive
SEW-Eurodrive X Series Assembling and Operating Instructions