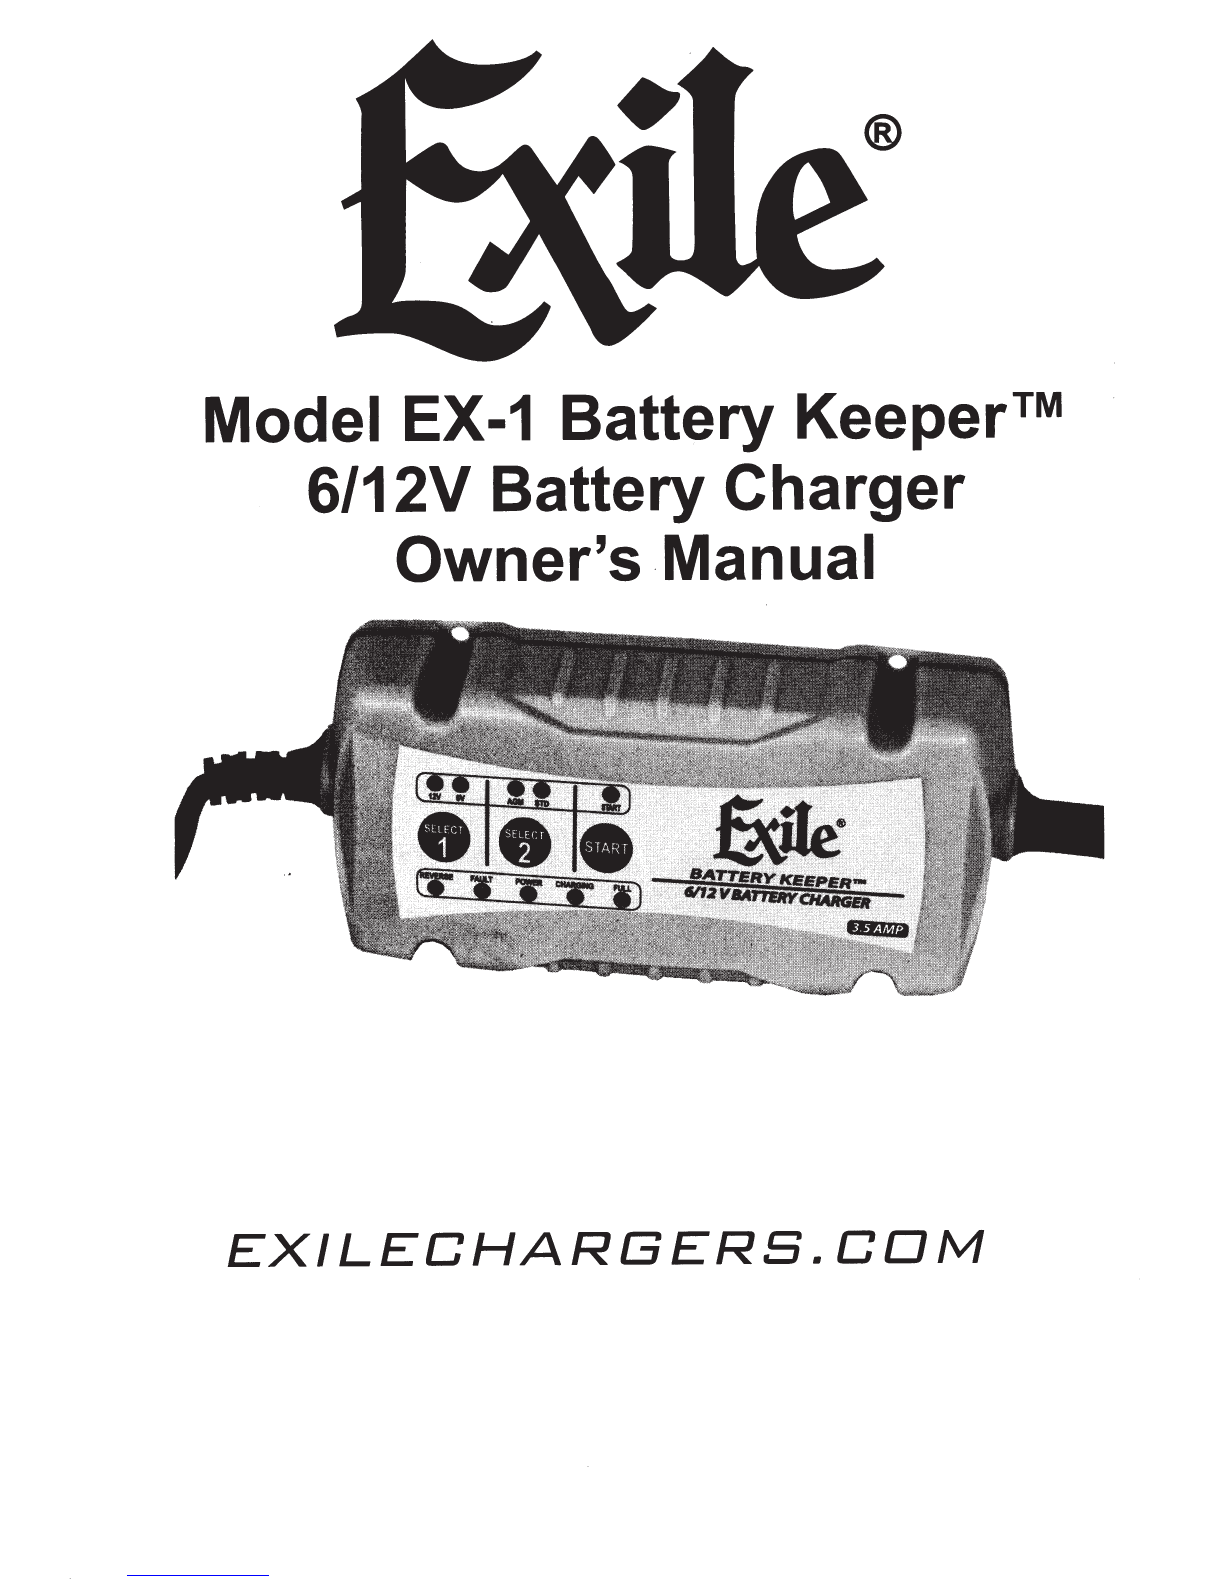
Exile EX-1 Battery Keeper User manual
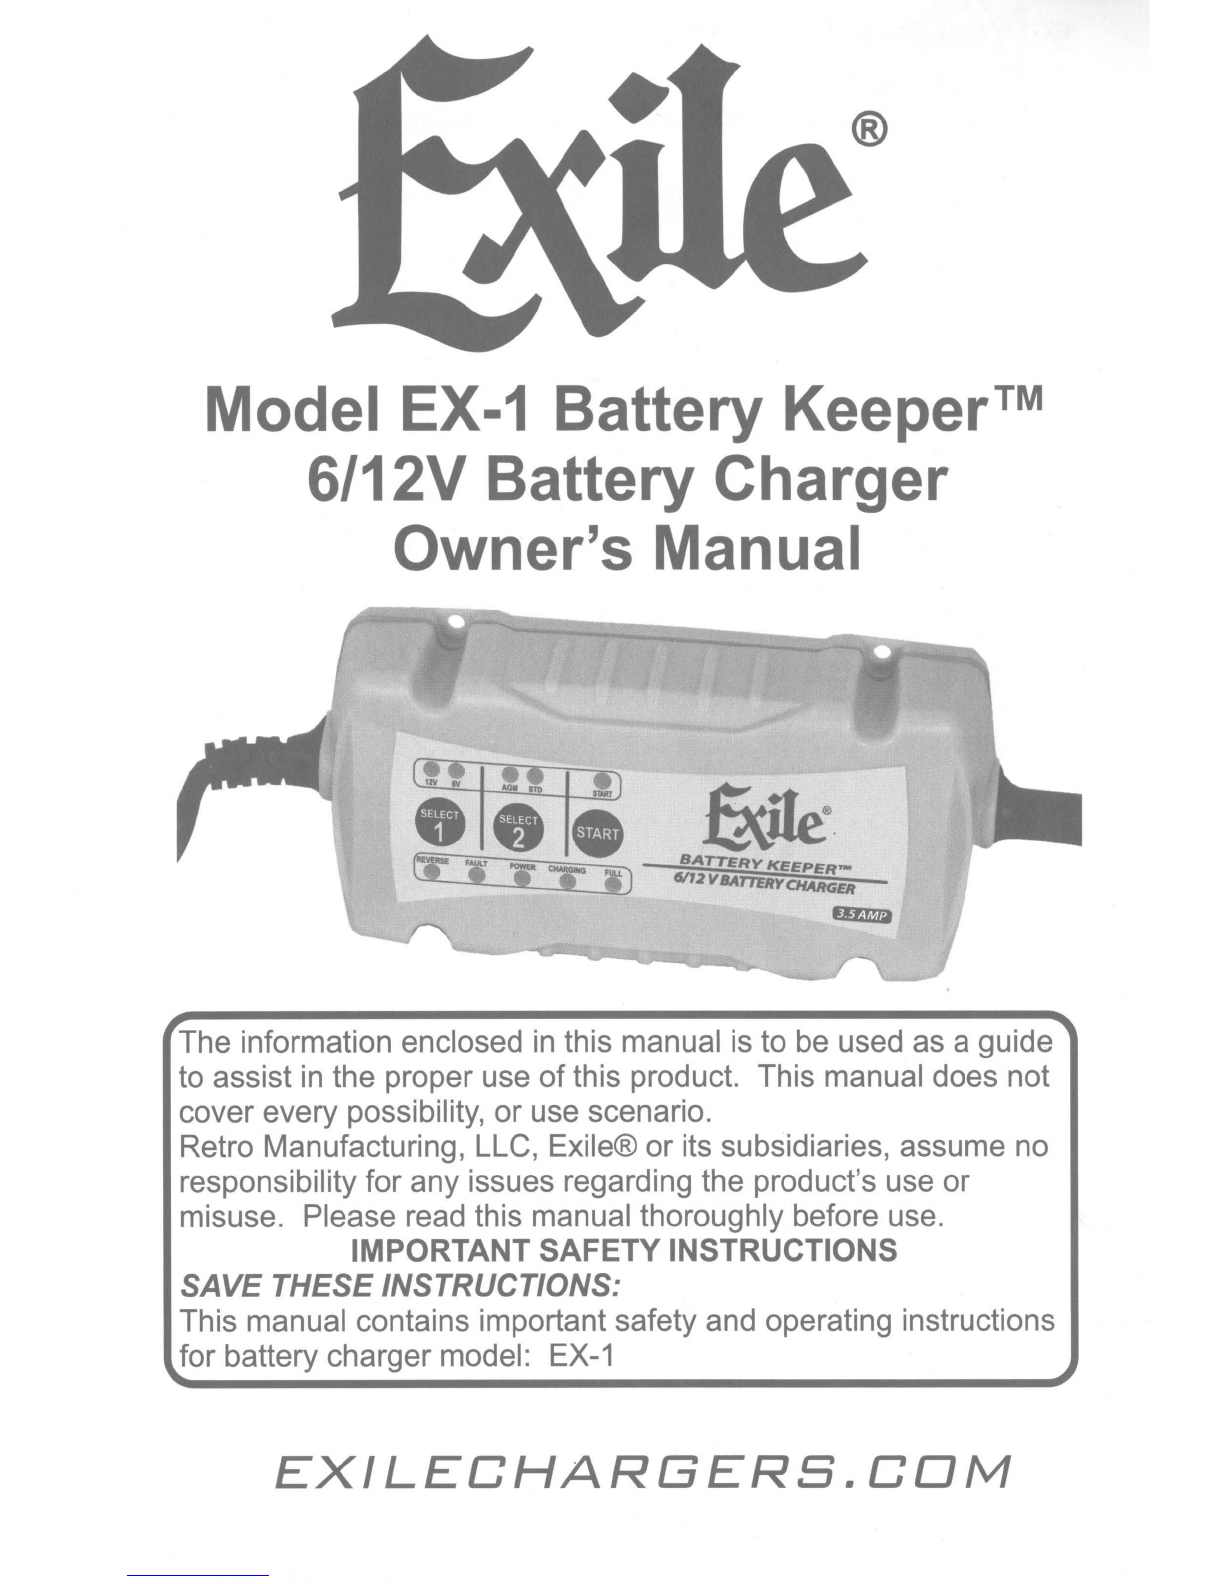
®
Model
EX-1
Battery Keeper™
6/12V Battery Charger
Owner's Manual
~
BATTERY
KEEPER-
tVr2
V8ATJBWCHARGij
fiDD
,..The
information enclosed in this manual is to be used as a guide
to assist in the proper use
of
this product. This manual does not
cover every possibility,
or
use scenario.
Retro Manufacturing, LLC, Exile® or its subsidiaries, assume no
responsibility for any issues regarding the product's use
or
misuse. Please read this manual thoroughly before use.
IMPORTANT
SAFETY
INSTRUCTIONS
SAVE THESE INSTRUCTIONS:
This manual contains important safety and operating instructions
for battery charger model: EX-1
EXILECHARGERS.
COM
EX-1
Battery
Charger
Owner's
Manual
Table
of
Contents
What's
in
the Box
........................................
2.
Welcome
...............................................
3.
Warnings and Precautions
................................
4.
Before
You
Charge Your Battery
...........................
8.
Connecting to the Battery. . . . . . . . . . . . . . . . . . . . . . . . . . . . . . . .
9.
Wiring Diagram
...........................................
1
0.
Wiring Diagram Overview
.................................
11.
Operating Instructions
...................................
12.
Troubleshooting
..........................................
14.
Warranty
...............................................
15.

EX-1
Battery
ChargerOwner's Manual
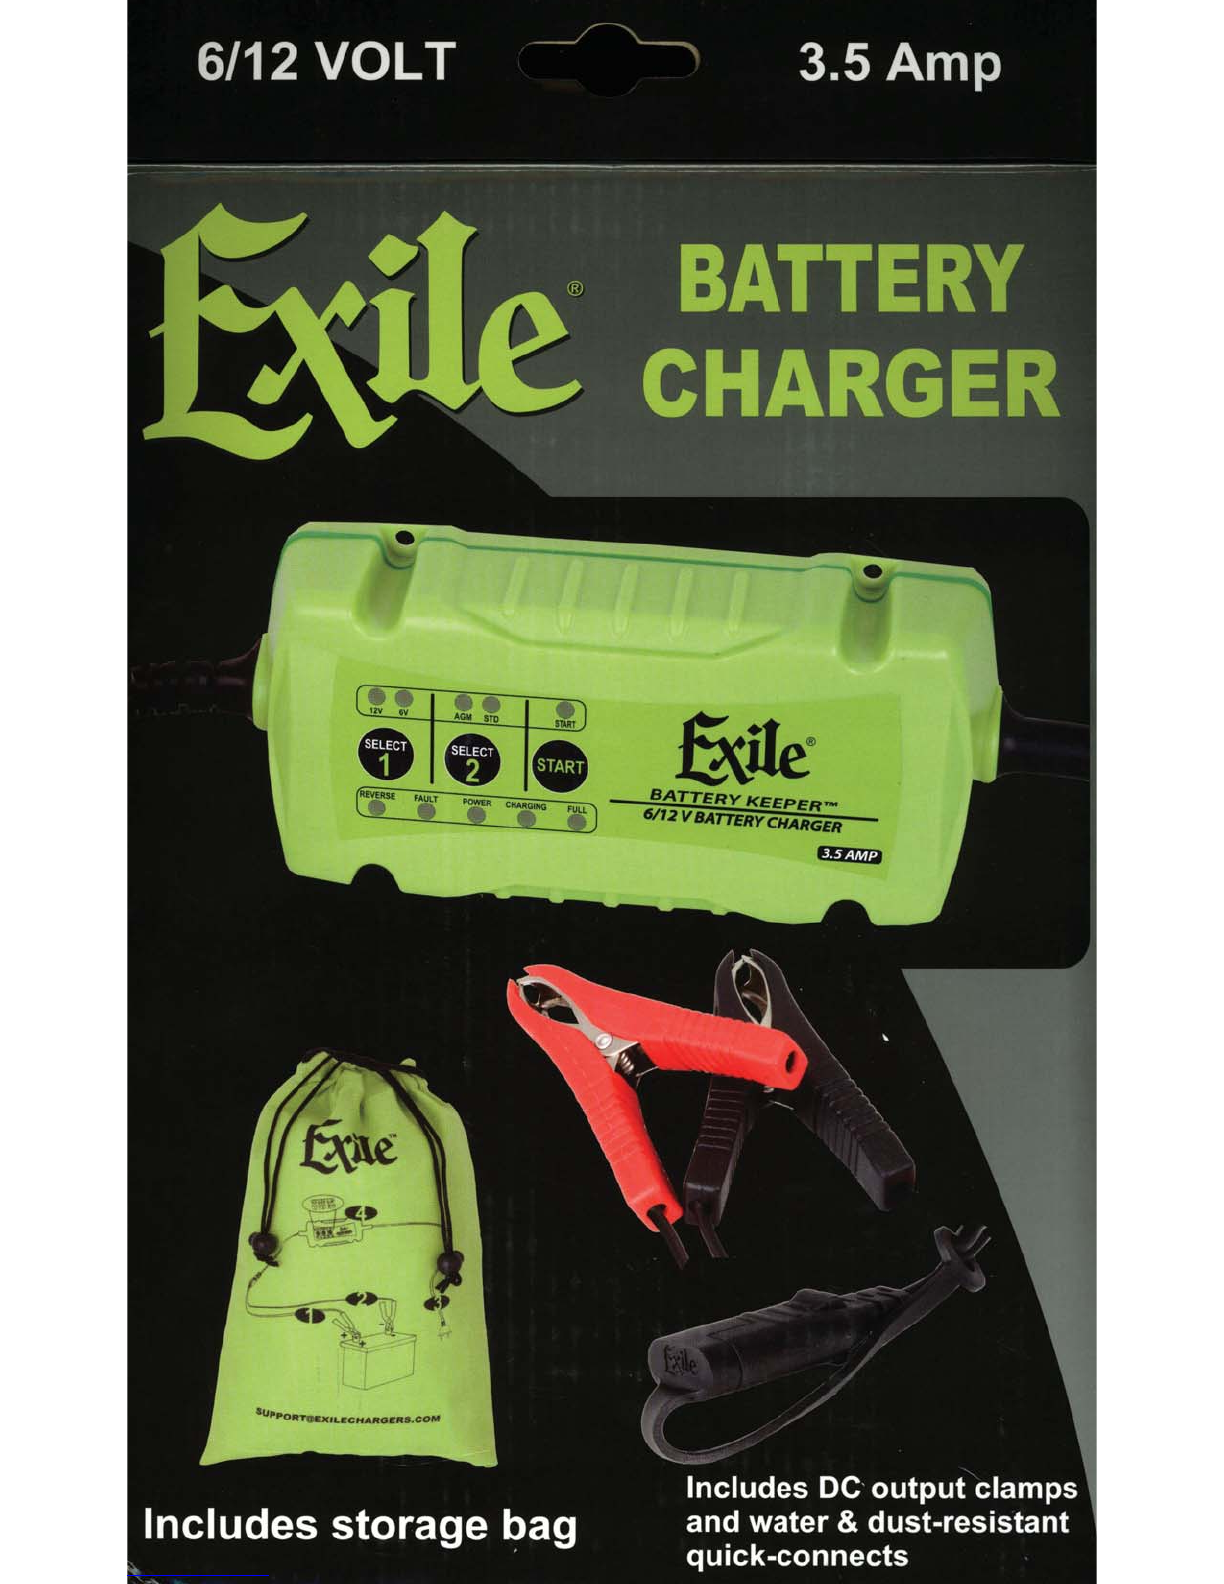
What's
in
the
Box
e1e1e
&ne
cr
"
't
:r
IJ
BATTERY
KEEPER-
3.5
AMP
6/12
Volt
EX-1
~attery
Charger
Red & Black battery clamps
w/
quick
connect
system
0-Ring
terminals
w/
quick
connect system
Charger storage bag

EX-1
Battery Charger Owner's Manual
Welcome
Thank you for your purchase. The Exile® 6/12 Volt Battery Charger
combines simplicity
of
operation with premium features not found on
otherbatterychargers.
General Features
• 4-stage charging
• Multiple battery compatible
• Battery
fault
protection
w/
audible alert
• Reverse
polarity
protection
w/
audible alert
• IP65 dust/water-resistant
• Maintains battery
without
over-charging
Notes
EX-1
Battery
Charger
Owner's
Manual
Warnings and Precautions
WARNING
Risk
of
SERIOUS INJURYORDEATH.
ELECTRICAL SHOCK, EXPLOSION, FIRE, AND EYE
INJURYHAZARDS.
PROTECTYOURSELF
AND
OTHERS.
Before use, READAND UNDERSTANDOwner's Manual.
Failureto read and understand this information could result
in
SERIOUSINJURY
or
DEATH.
DANGER
ELECTRICAL
SHOCK
HAZARD
1. This charger is an electrical device that can shock and
cause serious injury.
2.
Do
not
cut power cords.
3.
Do
not
submerge
in
water
or
get charger wet.
EXPLOSION HAZARD
4. Unmonitored, incompatible, or damaged batteries can
explode ifused with charger.
5.
Do
not
leavechargerunattended while
in
use.
6.
Do
not
attemptto charge damaged orfrozen batteries.
7.
Use charger only with batteries
of
recommended
voltage.
FIRE HAZARD
8.
The battery charger is an electrical device that emits
heatand can burn.
9.
Do
not
coverthe charger
10.
Do
not
smoke
or
use any other source of electrical
spark
or
fire when operating charger.
Keepthe chargerawayfrom combustible materials.

EX-1 Battery Charger Owner's Manual
Warnings and Precautions(Continued)
1!\
WARNING
1!\
EYE INJURY HAZARD
1. Batteries can explode and cause flying debris.
2. Battery acid can cause eye irritation.
3.
Wear eye protection when operating charger.
4. Avoid contact with eyes and wash hands after using
charger.
5.
In
case
of
eye contact, flush affected area with plenty
ofwater.
RISK OF EXPLOSIVE GASES
6.
Working
in
vicinity
of
a lead-acid battery
is
dangerous.
Batteries generate explosive gases during normal battery
operation. For this
reason-,
it
is
of
utmost importance that
you follow the instructions each time you use the charger.
7.
To·
reduce risk
of
battery explosion, follow these
instructions and those published by battery manufacturer
and manufacturer
of
any equipment intended to be used
in
vicinity
of
battery. Review cautionary markings
on
these products and on engine.
~CAUTION
~
1. Do not expose charger to rain or snow.
2.
Use
of
an attachment not recommended or sold by the
battery charger manufacturer may result
in
a risk
of
fire,
electric shock, or injury to persons.
3.
To
reduce risk
of
damage to electric plug and cord,
pull by plug rather than cord when disconnecting
charger.
4. Do not operate charger with damaged cord or plug -
replace the cord or plug immediately.
5. Do not operate charger if it has received a sharp blow,
been dropped, or otherwise damaged
in
any way; take it
to a qualified serviceman.
6.
Do
not disassemble charger; take it to a qualified
serviceman when service or repair is required. Incorrect
reassembly may result
in
a risk
of
electric shock or fire.
7.
To
reduce risk
of
electric shock, unplug charger from
outlet before attempting any maintenance or cleaning.
Turning off controls will not reduce this risk.

EX-1
Battery
Charger
Owner's
Manual
Warnings and Precautions (Continued)
IMPORTANT
DO NOT USE EXTENSION CORDS unless absolutely
necessary. Using
an
improper extension cord could result
in
a risk
of
fire and electric shock and may result
in
property damage, personal injury or death. If extension
cord must be used, make sure that:
1.) The pins
on
the extension cord plug have the same
number, size, and shape as those
of
the AC power cord
plug on the charger.
2.) The extension cord is properly wired and is
in
good
electrical condition.
3.) The wire size is as specified
in
the table below:
Length
of
cord in feet:
25
50
100
150
AWG size
of
cord:
18 18 16
14
USE THE FOLLOWING PRECAUTIONS WHEN YOU
WORK
NEAR LEAD-ACID BATTERIES:
1.
Consider having someone close enough by to come
to your aid when you work near a lead-acid battery.
2.
Remove personal metal items such as rings,
bracelets, necklaces, and watches when working with a
lead-acid battery. A lead-acid battery can produce a
short-circuit current high enough to weld a ring or the
like to metal, causing a severe burn.
3.
Use charger for charging a LEAD-ACID battery only. It
is
not
intended to supply power to a low voltage
electrical system other than
in
a starter-motor
application.
4. Do not use battery charger for charging dry-cell
batteries that are commonly used with home appliances.
These batteries may burst and cause injury to persons
and damage to property.
5.
NEVER charge a frozen battery.
EX-1 Battery Charger Owner's Manual
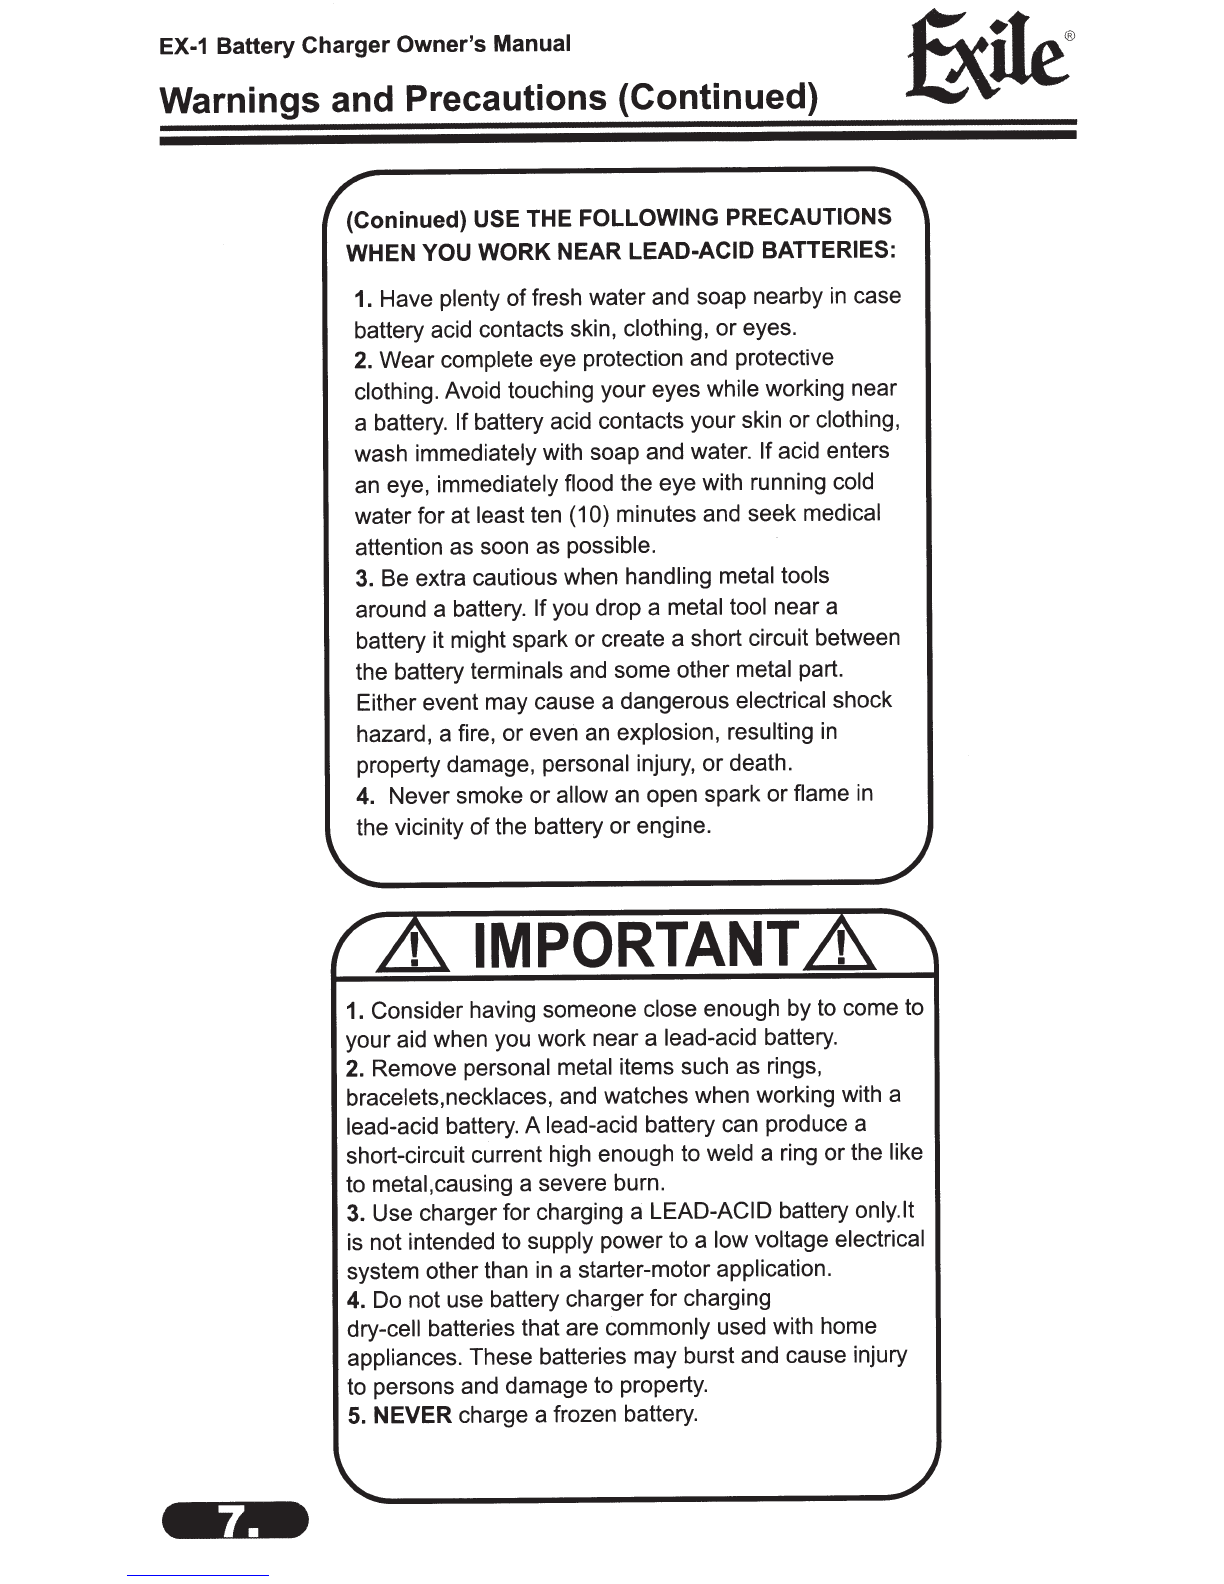
Warnings and Precautions {Continued)
(Coninued) USE THE FOLLOWING PRECAUTIONS
WHEN YOU
WORK
NEAR LEAD-ACID BATTERIES:
1.
Have plenty
of
fresh water and soap nearby
in
case
battery acid contacts skin, clothing, or eyes.
2.
Wear complete eye protection and protective
clothing. Avoid touching your eyes while working near
a battery. If battery acid contacts your skin or clothing,
wash immediately with soap and water. If acid enters
an eye, immediately flood the eye with running cold
water for at least ten
(1
0) minutes and seek medical
attention as soon as possible.
3.
Be extra cautious when handling metal tools
around a battery. Ifyou drop a metal tool near a
battery it might spark or create a short circuit between
the battery terminals and some other metal part.
Either event may cause a dangerous electrical shock
hazard, a fire, or even
an
explosion, resulting
in
property damage, personal injury, or death.
4.
Never smoke or allow an open spark or flame
in
the vicinity
of
the battery or engine.
IMPORTANT
1.
Consider having someone close enough by to come to
your aid when you work near a lead-acid battery.
2.
Remove personal metal items such as rings,
bracelets,necklaces, and watches when working with a
lead-acid battery. A lead-acid battery can produce a
short-circuit current high enough to weld a ring or the like
to metal,causing a severe burn.
3.
Use charger for charging a LEAD-ACID battery only.It
is not intended to supply power to a low voltage electrical
system other than
in
a starter-motor application.
4.
Do not use battery charger for charging
dry-cell batteries that are commonly used with home
appliances. These batteries may burst and cause injury
to persons and damage to property.
5.
NEVER
charge a frozen battery.
EX-1 Battery Charger Owner's Manual
Before You Charge Your Battery
PREPARING TO CHARGE THE BATTERY
1.
If it is necessary to remove battery from vehicle to charge, always remove the
grounded terminal from battery first.
Make sure all accessories
in
the vehicle are off, so as not to cause
an
arc.
2.
Be
sure the area around battery
is
well ventilated while battery
is
being charged.
3.
Clean battery terminals with a mixture of baking soda and hot water.
Be
careful to
keep corrosion from coming
in
contact with eyes.
4.
Study all battery manufacturer's specific precautions such
as
removing or not
removing cell caps while charging and recommended rates of charge.
5.
Determine voltage of battery by·referring to vehicle owner's manual and make sure
that output voltage.
6.
If the battery is not a sealed battery, add distilled water to each cell (if necessary)
until the battery acid solution reaches the level specified by battery manufacturer.
Do
not overfill. For a battery without cell caps, such
as
a valve regulated lead-acid battery
(VRLA), carefully follow the battery manufacturer's charging instructions.
7.
Before charging, carefully read the battery manufacturer's specific precautions and
recommended rates
of
charge.
8.
Determine the voltage of the battery by referring to the vehicle's owner's manual
and make sure that the charge mode is set at the correct voltage.
9.
Co~nect
and disconnect the
DC
output cables only after the battery charger is
placed
in
the STANDBY mode and the AC cord
is
removed from the electrical outlet.
NEVER allow the battery clamp or eyelet terminal connectors to touch each other.
BATTERY
CHARGER
PLACEMENT
1.
Locate the battery charger as far away from the battery
as
possible.
2.
Never place the battery charger directly above the battery; gases from battery will
corrode and damage battery charger.
3.
When reading electrolyte specific gravity or filing battery, never allow battery acid to
come
in
contact with the battery charger.
4.
Do
not operate the battery charger
in
a closed-in area or
an
area with restricted
ventilation.
5.
Do
not set a battery
on
top of battery charger.
BATTERY SPECS
The following recommendations should ONLY
be
considered
as
guidelines. Always refer
to the battery manufacturer's recommendations for battery charging. The
EX-1
is
suitable
for charging all types of 6V &12V lead-acid & gel cell batteries, including Wet (Flooded),
Gel,
MF
(Maintenance-Free) and AGM (Absorption Glass Mat) batteries. The
EX-1
is
suitable for charging batteries sized from 12-70Ah. The battery charger can also maintain
all battery sizes.
DC CONNECTION PRECAUTIONS
a) Connect and disconnect
de
output clips only after setting any charger switches to the
"off' position and remove ac cord from electric outlet. Never allow clips to touch each
other.
b)
Attach clips to battery and chassis as indicated
in
as follow t he content ofthe page 9 .

EX-1
Battery
Charger
Owner's
Manual
Connecting
to
the Battery
CONNECTING TO THE BATTERY
Before you connect to the battery, make sure that the AC power plug is not connected to
an
electrical outlet. DO NOT CONNECT THE BATTERY CHARGER AC POWER PLUG
TO THE ELECTRICAL OUTLET UNTILALL OTHER CONNECTIONS ARE MADE. Make
sure you have identified the correct polarity
of
the battery terminals
on
the battery. The
POSITIVE battery terminal is typically marked by these letters or symbol (POS,P,+). The
NEGATIVE battery terminal
is
typically marked by these letters or symbol (NEG,N,-).
FOLLOW
THESE STEPS WHEN BATTERY IS OUTSIDE VEHICLE. A SPARK
NEAR
THE BATTERY MAY CAUSE BATTERY EXPLOSION. TO REDUCE RISK OF A SPARK
NEAR
BATTERY:
1. Check polarity
of
battery posts. POSITIVE battery post usually has a larger diameter
than NEGATIVE post .
2.
Attach at least a 24-inch-long 6-gauge (AWG) insulated battery cable to NEGATIVE
battery post.
3.
Connect POSITIVE (RED) charger clip to POSITIVE post
of
battery.
4. Position yourself and free end
of
cable as far away from battery as possible -then
connect NEGATIVE (BLACK) charger clip to free end
of
cable.
5.
Do not face battery when making final connection.
6.
When disconnecting charger, always do so
in
reverse sequence
of
connecting
procedure and break first connection while as far away from batiery as practical.
7.
A marine (boat) battery must be removed and charged on shore.
To
charge it
on
board
requires equipment specially designed for marine use.
FOLLOW
THESE STEPS WHEN BATTERY IS INSTALLED
IN
VEHICLE. A SPARK
NEAR THE BATTERY MAY CAUSE BATTERY EXPLOSION. TO REDUCE RISK OF A
SPARK
NEAR
BATTERY:
1. Position AC and DC cords to reduce risk
of
damage by hood, door, or moving engine
part.
2. Stay clear
of
fan blades, belts, pulleys, and other parts that can cause injury to persons.
3.
Check polarity
of
battery posts. POSITIVE battery post usually has larger diameter than
NEGATIVE post.
4. Determine which post
of
battery is grounded (connected) to the chassis. If negative post
is grounded to chassis (as
in
most vehicles), see (5). Ifpositive post is grounded to the
chassis, see (6).
5.
For negative-grounded vehicle, connect POSITIVE (RED) clip from battery charger to
POSITIVE ungrounded post
of
battery. Connect NEGATIVE (BLACK) clip to vehicle
chassis or engine block away from battery. Do not connect clip to carburetor, fuel lines, or
sheet-metal body parts. Connect to a heavy gage metal part of the frame or engine block.
6.
For positive-grounded vehicle, connect NEGATIVE (BLACK) clip from battery charger
to NEGATIVE ungrounded post of battery. Connect POSITIVE (RED) clip to vehicle
chassis or engine block away from battery. Do not connect clip to carburetor, fuel lines, or
sheet-metal body parts. Connect to a heavy gage metal part of the frame or engine block.
7.
When disconnecting charger, turn switches to off, disconnect
ACcord,
remove clip from
vehicle chassis, and then remove clip from battery terminal.
8.
See operating instructions for length
of
charge information.
EX-1
Battery Charger Owner's Manual
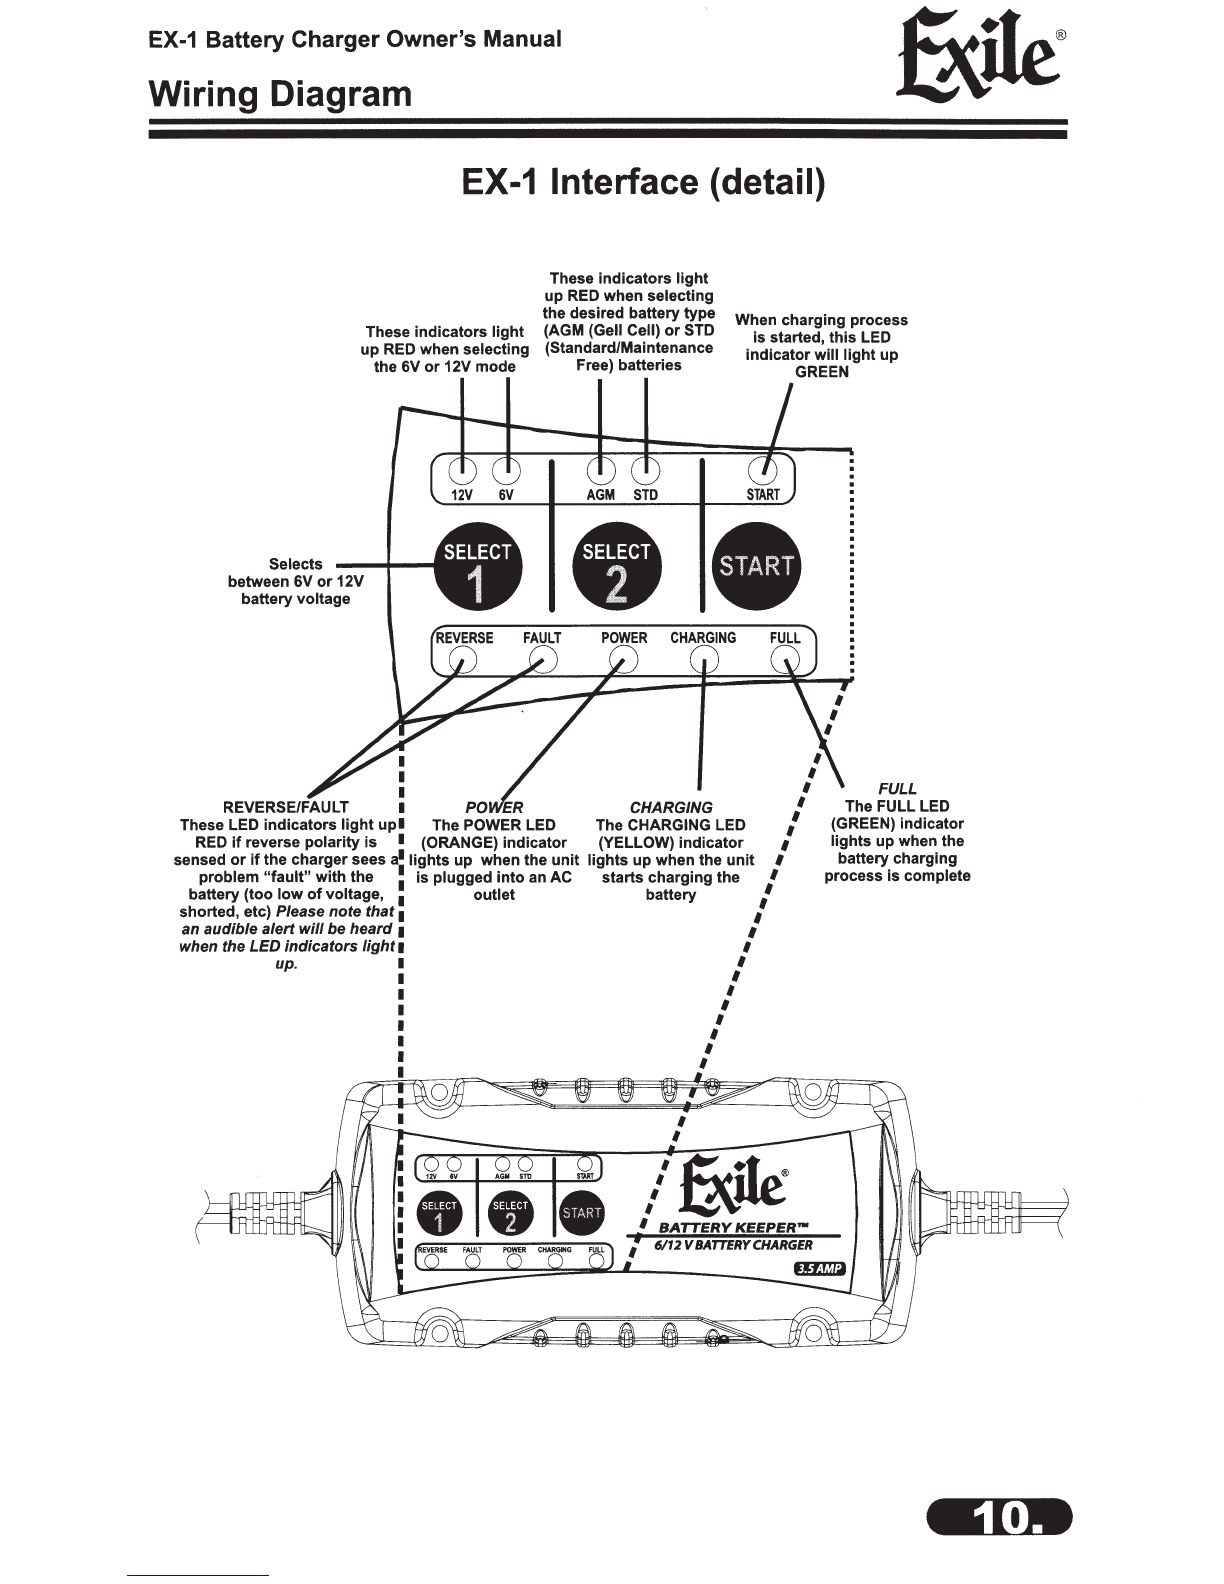
Wiring Diagram
EX-1
Interface (detail)
These indicators
light
up
RED
when selecting
the 6V
or
12V mode
These indicators
light
up
RED
when selecting
the desired battery type
(AGM (Gell Cell)
or
STD
(Standard/Maintenance
Free) batteries
When charging process
is
started,
this
LED
indicator
will
light
up
GREEN
Selects
between 6V
or
12V
battery voltage
I
I
I
REVE ULT I CHARGING
These LED indicators
light
upl
The POWER
LED
The CHARGING LED
RED
if
reverse polarity
is
I (ORANGE) indicator (YELLOW)
indicator
sensed
or
if
the charger sees
allights
up
when the
unit
lights
up
when the
unit
problem
"fault"
with the : is plugged
into
an AC starts charging the
battery (too
low
of
voltage, 1 outlet battery
I
I
I
I
I
I
I
I
I
I
I
I
shorted, etc) Please note
that
1
an audible
alert
will
be
heard
1
when the LED indicators
light
1
up. 1
I
I
I
I
I
I
I
I
I
I
I
I
I
I
I
I
I
FULL
The FULL LED
(GREEN) indicator
lights
up
when the
battery charging
process is complete

EX-1
Battery ChargerOwner's Manual
Wiring Diagram Overview
Quick
Connect
Plugs
Quick
Connect
Plugs
Included Red &
Black
Battery
Clamps,
perfect
for
temporary
charging
situations
Included
0-ring
battery
terminals,
perfect
for
permanent charging
situations
EX-1
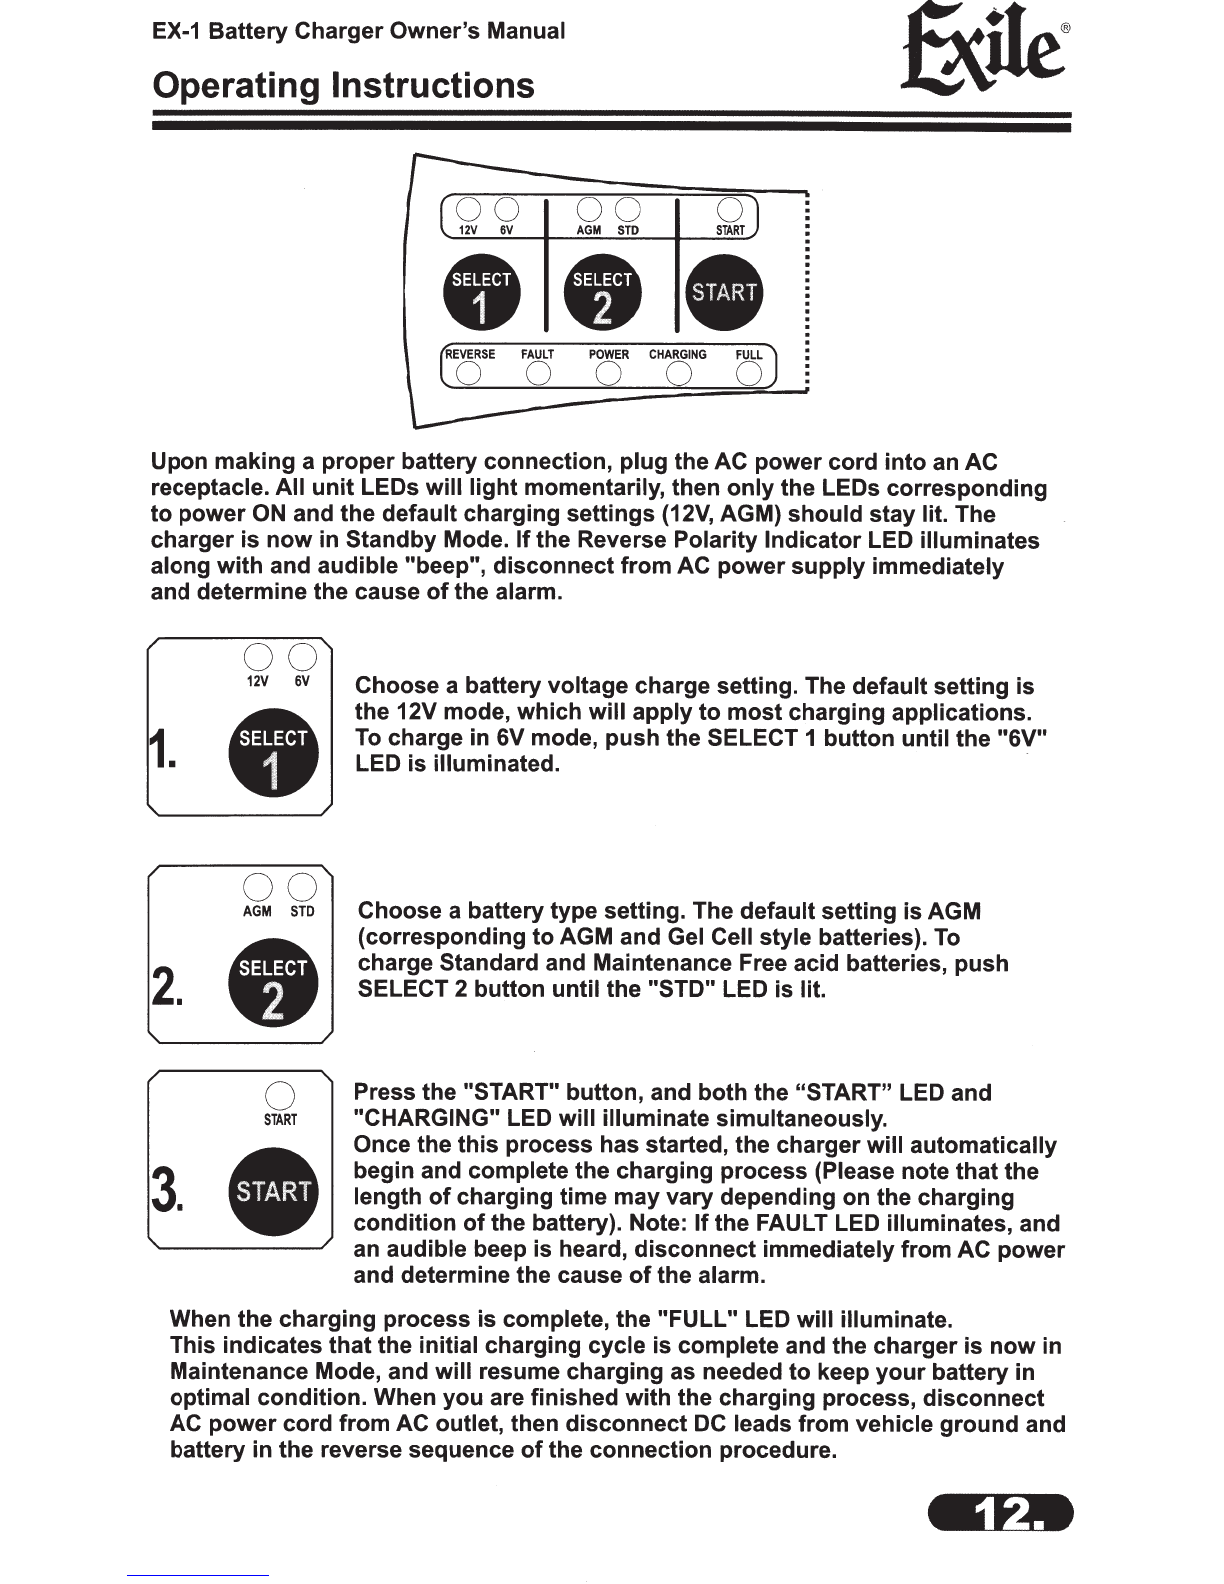
Battery Charger Owner's Manual
Operating
Instructions
00
00
0
12V
6V
AGM
STD
START
••
REVERSE
FAULT
POWER
CHARGING
FULL
0 0 0 0 0
Upon making a
proper
battery connection, plug the AC power cord
into
an AC
receptacle. All
unit
LEOs will
light
momentarily, then
only
the LEOs corresponding
to
power
ON
and the default charging settings
(12V,
AGM)
should
stay lit. The
charger is
now
in Standby Mode.
If
the Reverse Polarity Indicator LED illuminates
along
with
and audible "beep",
disconnect
from AC
power
supply
immediately
and determine the cause
of
the alarm.
00
12V
6V
1.
00
AGM
STD
2.
0
START
3.
Choose a battery voltage charge setting. The default setting is
the 12V mode,
which
will
apply
to
most
charging applications.
To
charge in 6V mode, push the SELECT 1 button until the
"6V"
LED is illuminated. -
Choose a battery type setting. The default setting is AGM
(corresponding
to
AGM and Gel Cell style batteries).
To
charge Standard and Maintenance Free acid batteries, push
SELECT 2 button until the "STD" LED is lit.
Press the "START" button, and both the "START" LED and
"CHARGING" LED will illuminate simultaneously.
Once the
this
process has started, the charger will automatically
begin and complete the charging process (Please note
that
the
length
of
charging time may vary depending on the charging
condition
of
the battery). Note:
If
the FAULT LED illuminates, and
an audible beep is heard,
disconnect
immediately
from
AC
power
and determine the cause
of
the alarm.
When the charging process is complete, the
"FULL"
LED will illuminate.
This indicates
that
the initial charging cycle is complete and the charger is
now
in
Maintenance Mode, and will resume charging as needed
to
keep
your
battery in
optimal condition. When you are finished with the charging process,
disconnect
AC
power
cord
from
AC outlet, then
disconnect
DC
leads
from
vehicle
ground
and
battery in the reverse sequence
of
the connection procedure.

EX-1
Battery Charger Owner's Manual
Operating
Instructions
(Continued)
EX-1
Charging Steps {detail)
The
Ex-1
battery charger features a 4 step charging process:
Step 1: Diagnostic Start Mode
Checks the battery voltage
to
make sure battery
connections
are
good
and the
battery is in a stable
condition
before beginning the charging process. Will
start
the
charging process
with
a gentle
"soft"
charge.
Step
2:
Primary Charge
Continues the Primary charging process, charges battery
to
90°/o
capacity.
Step
3:
Final Charge
Brings the charge level
to
1
00°/o.
Once
this
threshold
is
reached, the battery charger
will deliver small amounts
of
current
to
provide a safe, efficient charge and
limit
battery gassing.
Step
4:
Battery Maintain
Monitors the battery voltage
continuously
to
determine
if
a maintenance charge
should
be initiated.
If
the terminal voltage falls
below
approximately 6.4V {6V) and
12.8V {12V), the charger will start the Battery Maintain cycle until voltage reaches
approximately 7.2V {6V) and 14.4V {12V) and then
will
discontinue the charge cycle.
Maintain cycle
is
repeated indefinitely
to
keep the battery at full charge,
without
overcharging. Once connected and in
this
mode, the battery charger can be left
connected indefinitely.
Input Voltage AC:
Working Voltage AC:
Input
Current:
Efficiency:
Power:
Charging Voltage:
Charging Current:
Back Current Drain:
Charger Type:
Type
of
Batteries:
Battery Chemistries:
Battery Capacity:
Housing Protection:
Cooling:
Noise Level:
Dimensions {L x W x H):
Weight:
Approval:
120 VAC, 60Hz
110-130 VAC, 50-60Hz
1.2ARMS Max
82°/o
Approx.
68W Max
7.2V/14.4V
3500mA
<5mA
4 Step, FullyAutomatic, Switch-Mode
6V &12V Lead-Acid
Wet, Gel,
MF
&AGM
12-70Ah, Maintains
All
Battery Sizes
IP65
Natural Convection
<50
dB
6.5 x 2.9 x 1.83 Inches
.53
Kg/1.17
Pounds
UL
for
US
and Canada
EX-1 Battery Charger Owner's Manual
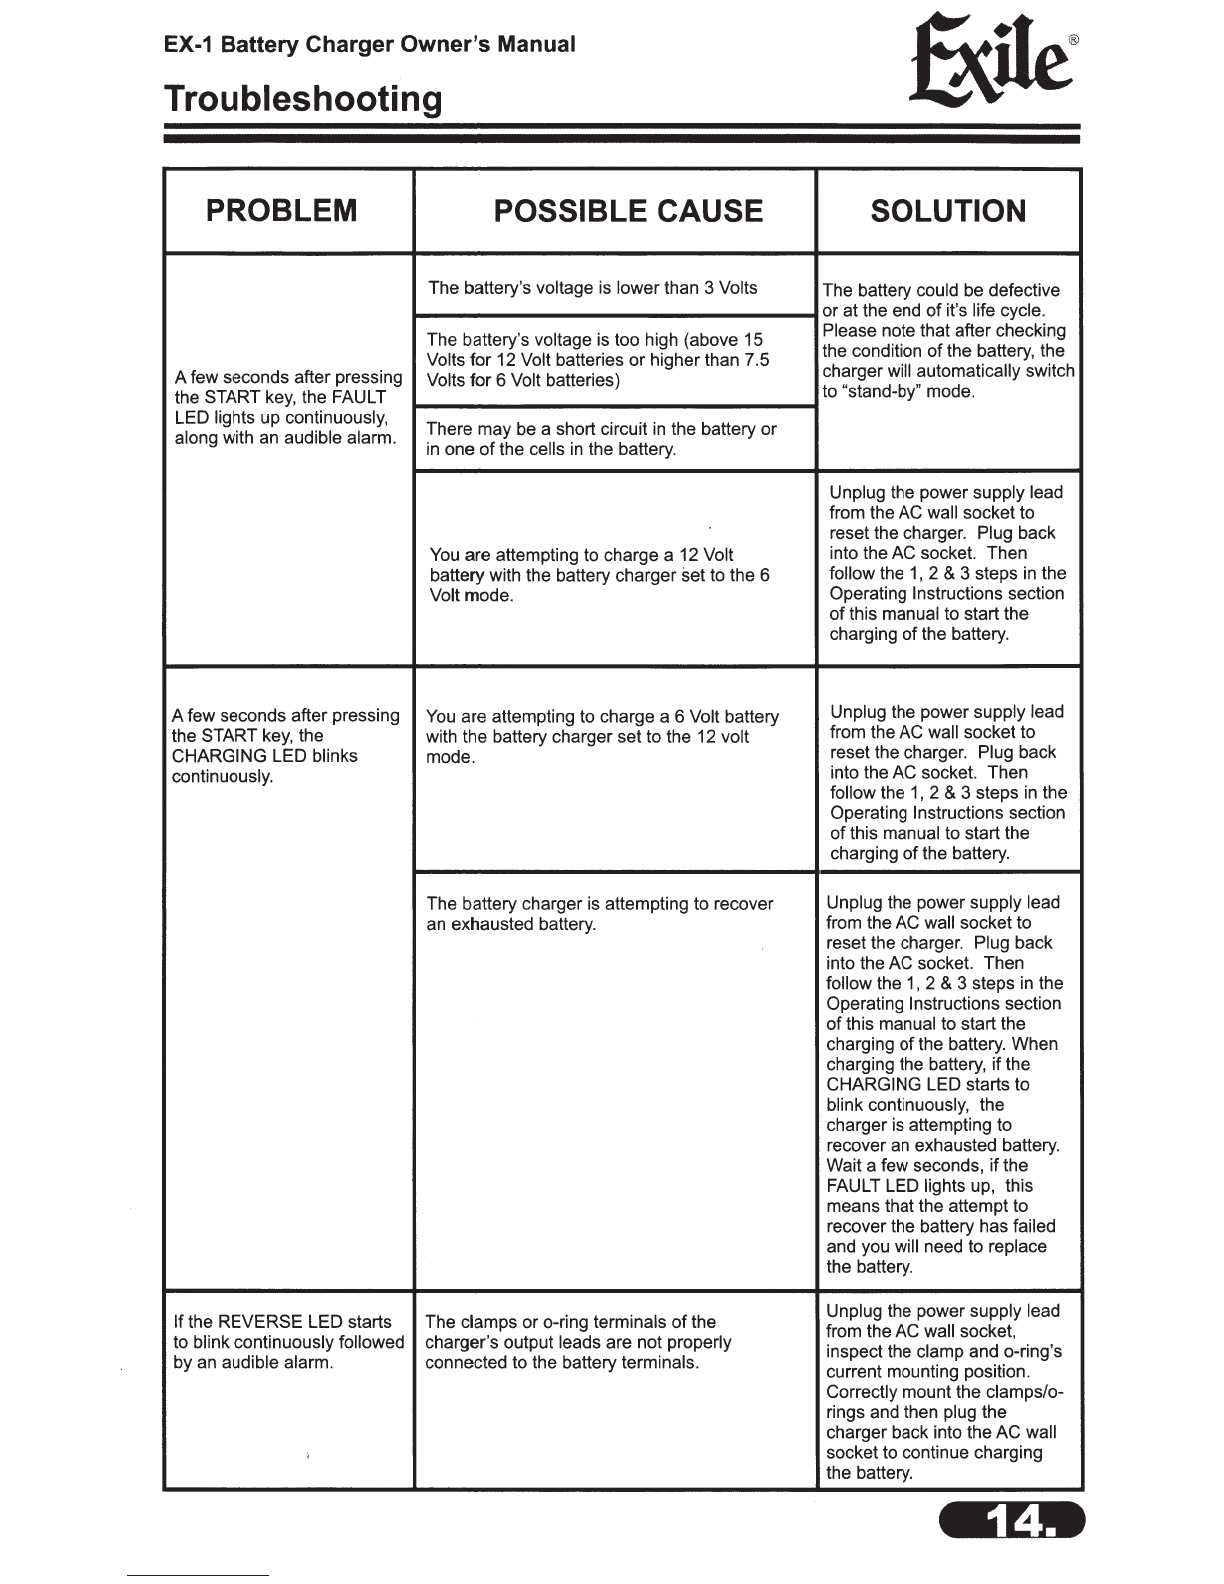
Troubleshooting
PROBLEM POSSIBLE CAUSE SOLUTION
The battery's voltage is lower than 3 Volts The battery could be defective
or at the end
of
it's life cycle.
The battery's voltage is too high (above 15 Please note that after checking
Volts for 12 Volt batteries
or
higher than 7.5 the condition
of
the battery, the
A few seconds after pressing Volts for 6 Volt batteries) charger will automatically switch
the START key, the FAULT to "stand-by" mode.
LED lights up continuously, There may be a short circuit
in
the battery
or
along with an audible alarm.
in
one
of
the cells
in
the battery.
Unplug the power supply lead
from the AC wall socket to
reset the charger. Plug back
You are attempting to charge a 12 Volt into the AC socket. Then
battery with the battery charger set to the 6 follow the
1,
2 &3 steps
in
the
Volt mode. Operating Instructions section
of
this manual to start the
charging
of
the battery.
A few seconds after pressing You are attempting to charge a 6 Volt battery Unplug the power supply lead
the START key, the with the battery charger set to the 12 volt from the AC wall socket to
CHARGING LED blinks mode. reset the charger. Plug back
continuously. into the AC socket. Then
follow the
1,
2 &3 steps
in
the
Operating Instructions section
of
this manual to start the
charging
of
the battery.
The battery charger is attempting to recover Unplug the power supply lead
an exhausted battery. from the AC wall socket to
reset the charger. Plug back
into the AC socket. Then
follow the
1,
2 & 3 steps
in
the
Operating Instructions section
of
this manual to start the
charging
of
the battery. When
charging the battery, if the
CHARGING LED starts to
blink continuously, the
charger is attempting to
recover an exhausted battery.
Wait a few seconds,
if
the
FAULT LED lights up, this
means that the attempt to
recover the battery has failed
and you will need to replace
the battery.
Ifthe REVERSE LED starts The clamps
or
o-ring terminals
of
the Unplug the power supply lead
to blink continuously followed charger's output leads are not properly from the AC wall socket,
by an audible alarm. connected to the battery terminals. inspect the clamp and a-ring's
current mounting position.
Correctly mount the clamps/a-
rings and then plug the
charger back into the AC wall
socket to continue charging
the battery.

EX-1
Battery Charger Owner's Manual
Warranty
If your product does not work properly because
of
defects
in
materials and workmanship
Exile
TM,
a division
of
Retro Manufacturing, LLC (collectively referred to as "the warrantor")
will, for the length
of
12 months (Parts
&
Labor), which starts with the date
of
original
purchase ("warranty period"), at its option either (a) repair your product with new or
refurbished parts, or (b) replace it with a new or refurbished product. The decision to repair
or replace will be made by the warrantor.
During the "Labor" warranty period, there will be no charge for labor. During the "Parts"
warranty period, there will
be
no charge for parts.
You
must mail
in
your product prepaid
during the warranty period. If batteries are included, they are not warranted. This warranty
only applies to products purchased and serviced
in
the United States, Alaska, Hawaii or
Puerto Rico. This warranty is extended only to the original purchaser
of
a new product
which was not sold "as is". A purchase receipt or other proof
of
the original purchase date
is required for warranty service.
To
handle a warranty issue,
contact
us
or
888-325-
1555 and
get
a Return
Authorization
number. All returns and warranty issues must
receive a Return Authorization (RA) number. Any product received without a RA number
will
be
refused.
LIMITED WARRANTY-LIMITS AND EXCLUSIONS
This warranty ONLY COVERS failures due to defects in materials and workmanship, and
DOES NOT COVER normal wear and tear or cosmetic damage. The·warranty ALSO
DOES NOT COVER damages which occurred during shipment, failures which are caused
by products not supplied by the warrantor, failures which result from accident, misuse,
abuse, neglect, bug infestation, mishandling, misapplication, alteration, faulty installation,
set-up adjustment, maladjustment
of
consumer control, improper maintenance, improper
antenna, inadequate signal reception or pickup, power line surge, improper voltage supply,
lightning, modification, commercial use (such as use
in
hotels, offices, restaurants, or
other business uses) or rental use
of
the product, or service by anyone other than the
technician from the factory service center or other authorized service centers, or damage
that is attributable to acts
of
God.
THERE ARE NO EXPRESS WARRANTIES EXCEPTAS LISTED UNDER "LIMITED
WARRANTY". THE WARRANTOR
IS
NOT LIABLE FOR INCIDENTAL OR
CONSEQUENTIAL DAMAGES RESULTING FROM THE USE OF THIS PRODUCT, OR
ARISING OUT OF ANY BREACH OF THIS WARRANTY. (As examples, this excludes
damages for lost time, cost
of
having someone remove or re-install
an
installed unit if
applicable, travel to and from the sevicer, and loss
of
media, data or other memory
contents. The items listed are not exclusive, but are for illustration only.) ALL EXPRESS
AND IMPLIED WARRANTIES, INCLUDING THE WARRANTY OF MERCHANTABILITY,
ARE LIMITED TO THE PERIOD OF THE LIMITED WARRANTY.
Some states do not allow the exclusion or limitation
of
incidental or consequential
damages,
or
limitatio'ns on how long an implied warranty lasts, so the exclusions may not
apply to you. This warranty gives you specific legal rights and you may also have other
rights which vary from state to state. If a problem with this product develops during or after
the warranty period, you may contact your dealer or service center.
®
Model
EX-1
Battery
KeeperTM
6/12V
Battery
Charger
Owner's
Manual
EXILEOHARGERS.
COM

••

' Exile™
is
a trademark
of
Cargador de batena Retro Manufacturing, LLC
Other manuals for EX-1 Battery Keeper
1
Other Exile Batteries Charger manuals


