Exor X5 User manual

X5 Quickstart Guide

X5 Quickstart Guide
©2020 EXOR International S.p.A. - Subject to change without notice
exorint.com 2
TABLE OF CONTENTS
1Introduction.................................................................................................................................4
2Security Features .......................................................................................................................5
3System Configuration Examples.............................................................................................6
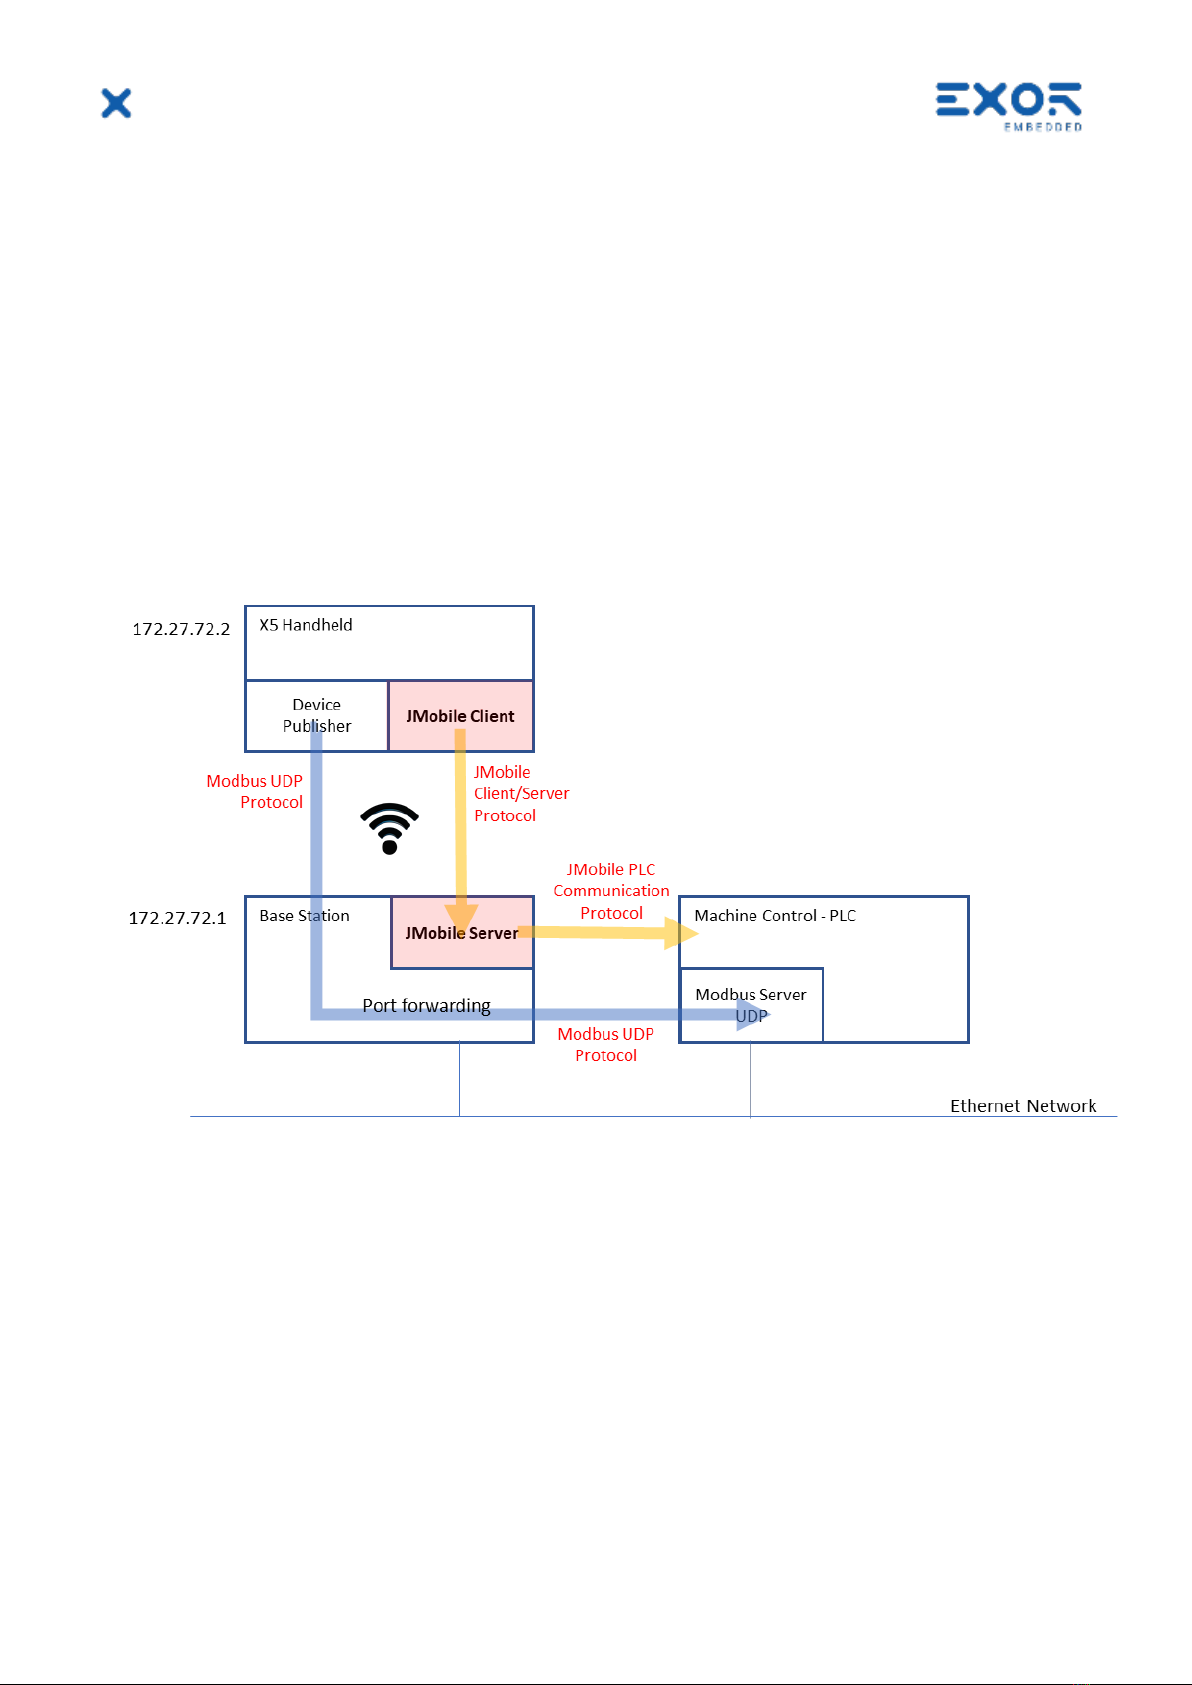
3.1 Client/Server Configuration (JMobile Client on Handheld).......................................6
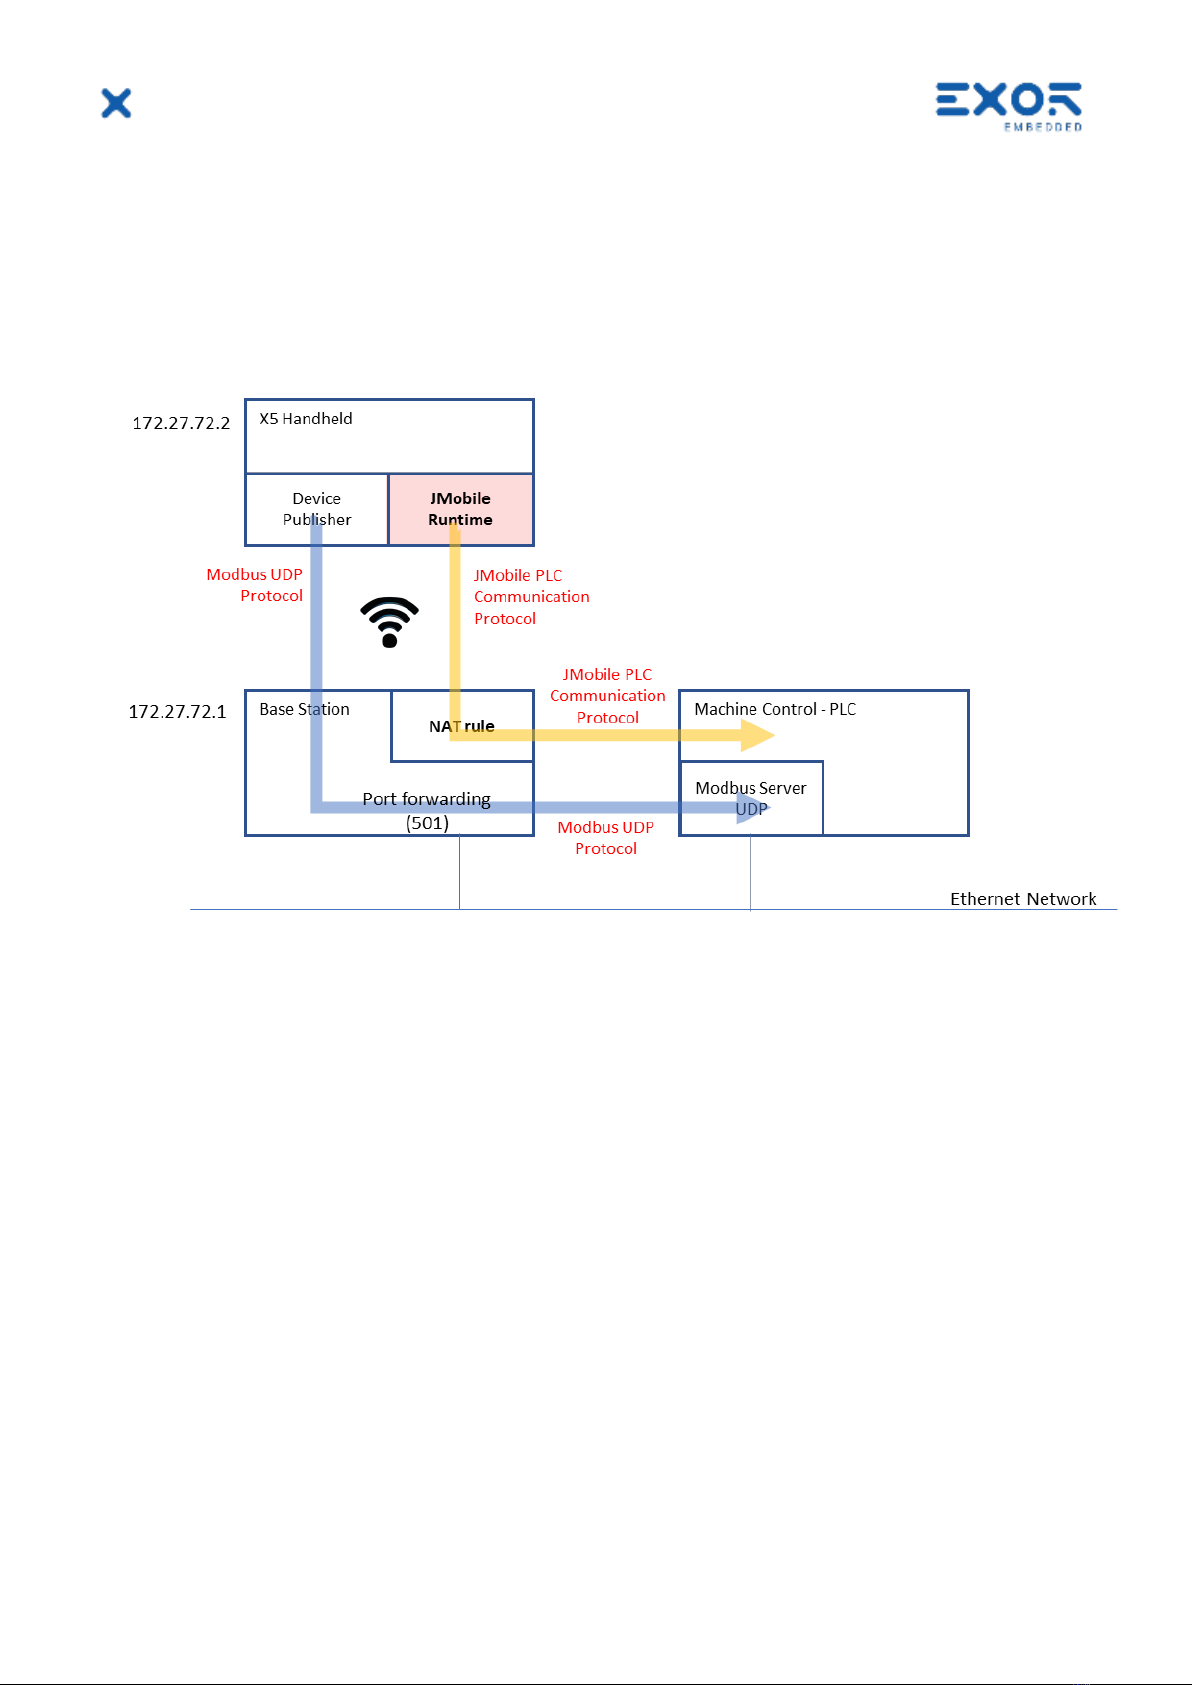
3.2 JMobile Runtime on Handheld.......................................................................................7
4Product Reference Information...............................................................................................8
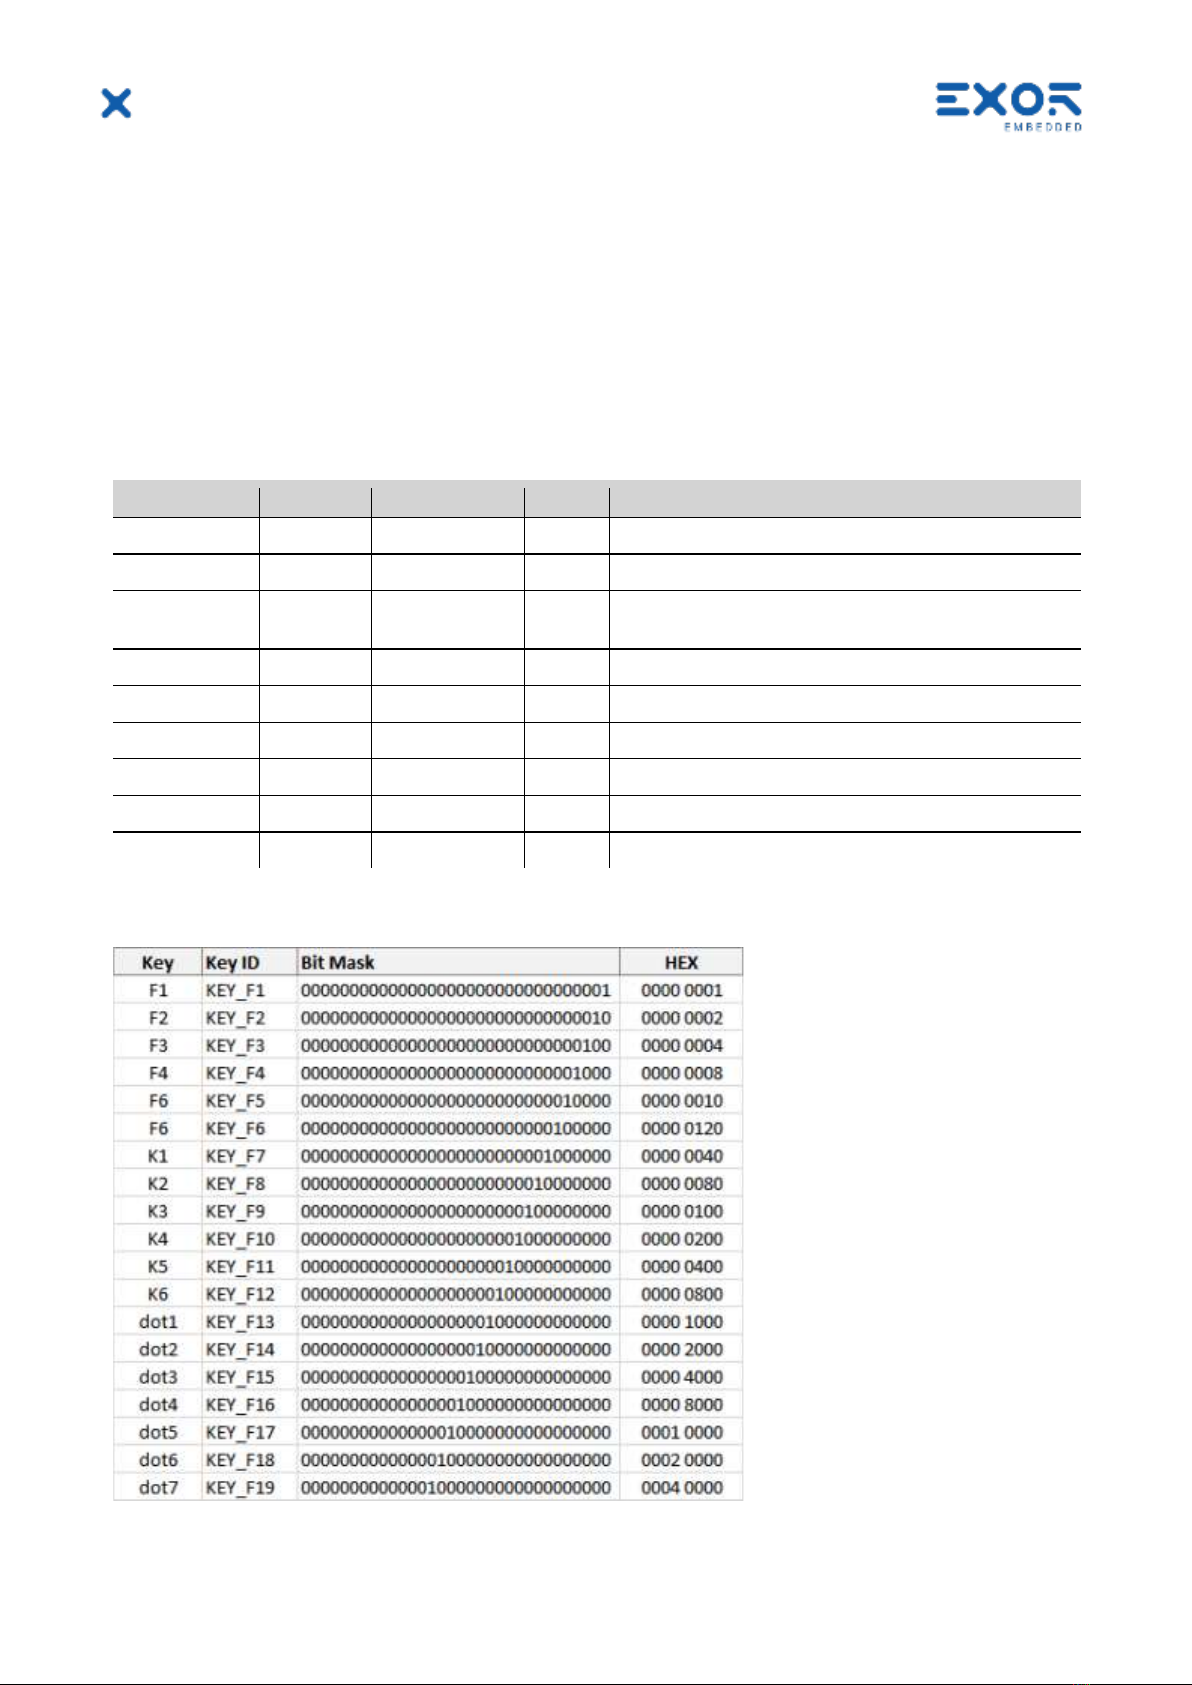
4.1 Keypad Shortcuts in X5 Handheld.................................................................................8
4.2 Pressing Multiple Keys in X5 Handheld ........................................................................8
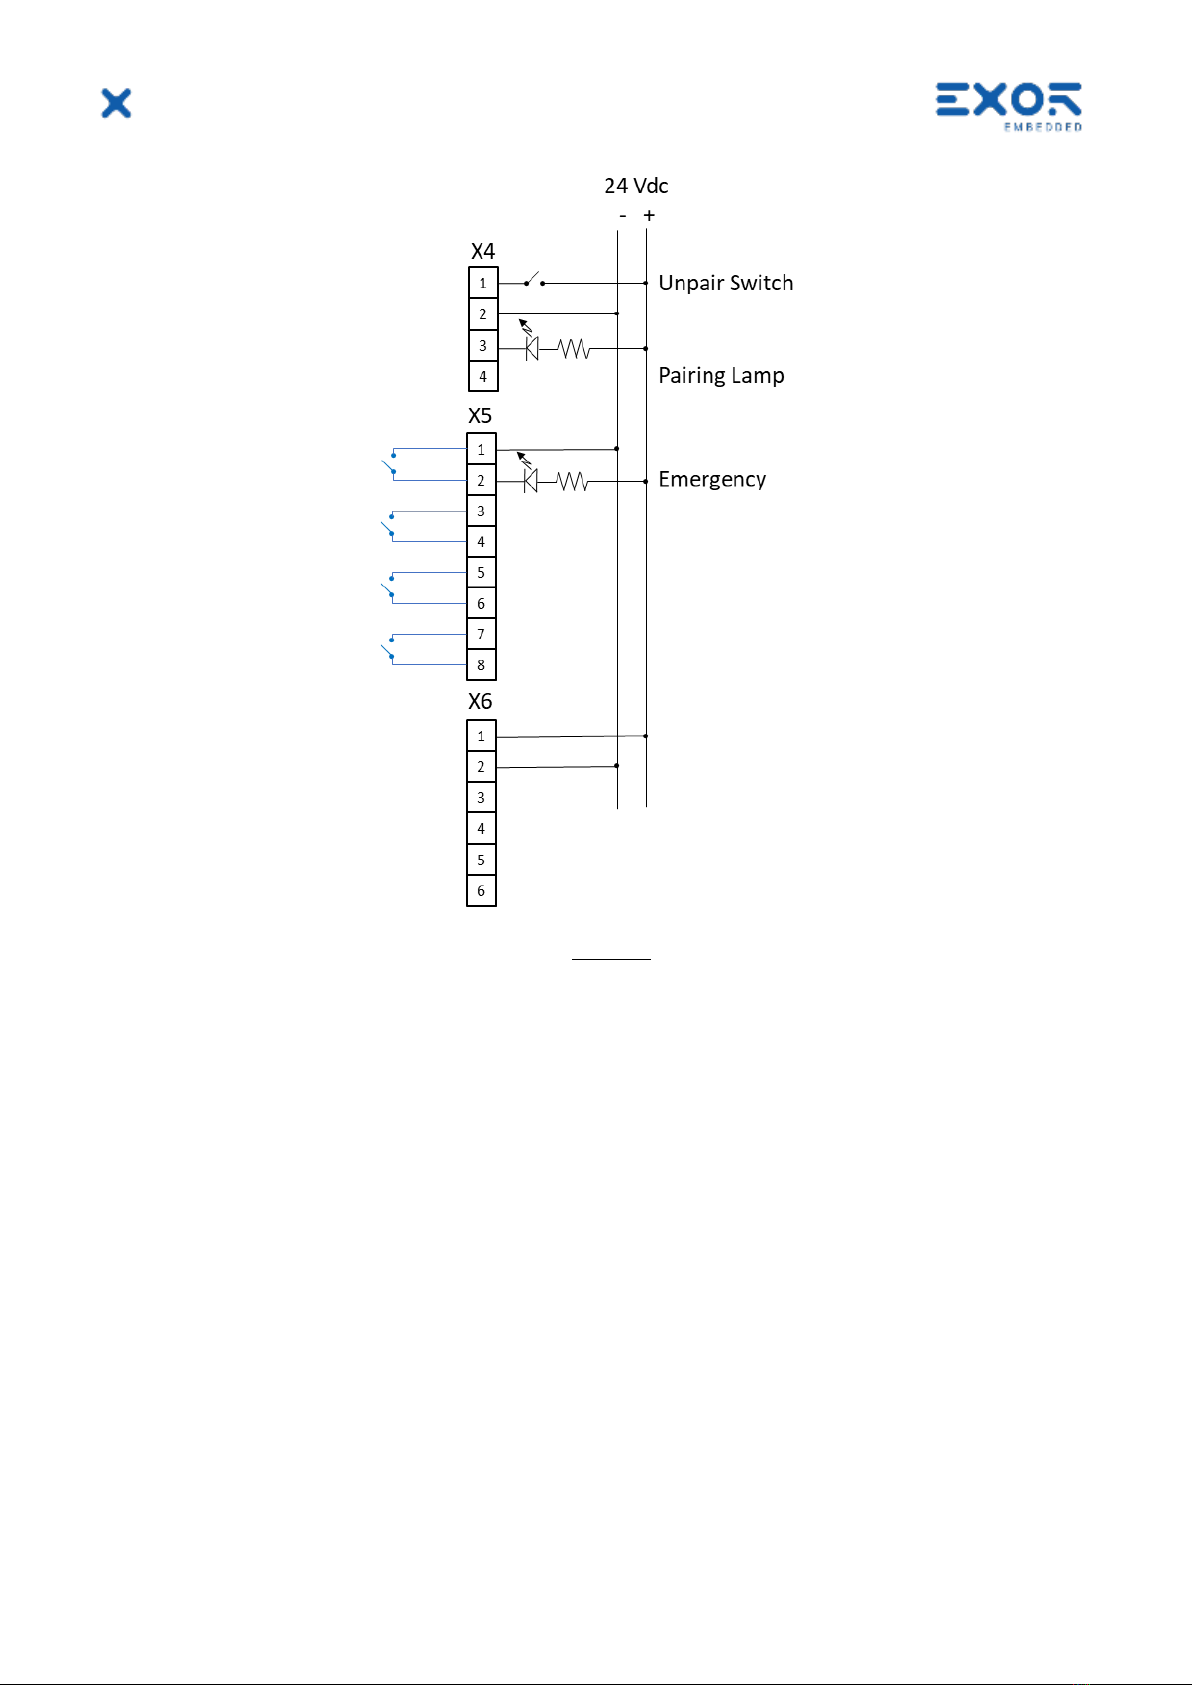
4.3 Simplified Wiring Diagram...............................................................................................8
5Device Publisher...................................................................................................................... 10
5.1 Redirect Device Publisher Information to the PLC/Controller............................... 11
5.2 Avoid Using a Full Modbus Server Stack for Device Publisher ............................. 12
6Quickstart Guide...................................................................................................................... 13
6.1 Base Station.................................................................................................................... 13
6.2 X5 Wireless Handheld................................................................................................... 15
7Further Steps with X5............................................................................................................. 17
7.1 Use VNC Client for Easier Access to BS and Handheld.......................................... 17
7.2 Connect Base Station to a Controller/PLC................................................................ 17
7.3 Quality of Pairing............................................................................................................ 17
7.4 Manually Flashing Pairing Lamp................................................................................. 18
7.5 Importing/Exporting UID Lists..................................................................................... 18
7.5.1 Exporting UID List ............................................................................................. 18
7.5.2 Importing UID List............................................................................................. 18

X5 Quickstart Guide
©2020 EXOR International S.p.A. - Subject to change without notice
exorint.com 3

X5 Quickstart Guide
©2020 EXOR International S.p.A. - Subject to change without notice
exorint.com 4
1Introduction
You will find in this document the minimal information required to set-up a working X5 sample
system.
These notes are not a replacement for the X5 User Manual and JMobile User Manual.
X5 is based on Linux BSP version 1.3.xxx.
Products based on BSP 1.3.xxx must be programmed with JMobile version 4.1.0.xxx or higher.
These products are NOT compatible with earlier versions of JMobile.

X5 Quickstart Guide
©2020 EXOR International S.p.A. - Subject to change without notice
exorint.com 5
2Security Features
This platform comes built-in security features.
The system now requires that you are logged-in to do any action with the BSP.
Products are configured at manufacturing time with two users:
admin
user
Each user has own password to validate the access.
At first power-up the system will require users to choose a new password replacing the default one.
The message you will see is:
Authentication/Users
Default password detected –please choose a more secure one. NOTE: system will reboot upon
completion.
At Exor we have established the following conventions for passwords in use internally purely for
testing purposes:
User: admin
Password: Exor123@
User: user
Password: Exor123@
If you are receiving a device that has been pre-programmed at Exor, these are the credentials we
have entered.
Access the system as “admin” whenever you need to change any property in System Settings.
Please note that without authenticating as a valid user you cannot even access System Settings or
Start-up in your X5 devices.
When entering passwords for the first time you will not be required to enter the old (default)
password.
You can change BSP passwords at later time; use the option “Authentication” in System Settings for
this. Remind that in this case you will have to enter the old password to be able to change to a new
one.

X5 Quickstart Guide
©2020 EXOR International S.p.A. - Subject to change without notice
exorint.com 6
3System Configuration Examples
3.1 Client/Server Configuration (JMobile Client on Handheld)
Benefits:
-complex PLC communication protocols are not using wireless band
-in case of configurations with multiple base stations and a single handheld, the handheld is
automatically loading the HMI program when connecting to the Base Station
-JMobile application running on Base Station can continue operation and data acquisition also
when the handheld is not connected
Weaknesses:
-depending on JMobile project complexity, Client/Server connection may take some time

X5 Quickstart Guide
©2020 EXOR International S.p.A. - Subject to change without notice
exorint.com 7
3.2 JMobile Runtime on Handheld
Benefits:
-Fast starting of JMobile application on handheld
Weaknesses:
-extra band load on wireless network. Performance to be evaluated
-PLC protocol requires routing. Performance to be evaluated.

X5 Quickstart Guide
©2020 EXOR International S.p.A. - Subject to change without notice
exorint.com 8
4Product Reference Information
4.1 Keypad Shortcuts in X5 Handheld
F2 and F5
Keep pressed for about 2 seconds
Switch on/Switch off handheld
K1 and K4
Start safety pairing application
4.2 Pressing Multiple Keys in X5 Handheld
Keypad handler in X5 handheld supports a maximum of 2 keys pressed at the same time.
If more than 2 keys are pressed at the same time, the handler will return a no-key pressed status.
Only available with BSP version 1.3.291 or higher
4.3 Simplified Wiring Diagram
Simple monitor board for test purposes.

X5 Quickstart Guide
©2020 EXOR International S.p.A. - Subject to change without notice
exorint.com 9
Note that 24 Vdc connection at connector X6 is required also when Selector outputs are not used.

X5 Quickstart Guide
©2020 EXOR International S.p.A. - Subject to change without notice
exorint.com 10
5Device Publisher
Device Publisher software application has been designed to ensure fast transfer of device data from
handheld directly to the PLC/controller connected to the Base Station. This is an important
requirement for applications where X5 is used for direct interaction with machines.
Device Publisher uses Modbus TCP protocol in UDP mode and operates as client.
Data transfer is bases on Modbus Function Code 16, Write multiple registers.
Addressing and register allocation is fixed.
Device Publisher send cyclically data packets with a cycle time of about 10 ms.
Register assignment:
Holding Register
Name
Data Type
Range
Description / Notes
400001
version
unsignedShort
1
The version number of this register schema
400002
counter
unsignedShort
-
Current packet count (diagnostic information)
400003
elapsed
uint64
-
Number of elapsed milliseconds since service was started
(Linux epoch timestamp)
400007
keys map
uint64
-
Binary map of keypad state
400011
wheel
unsignedShort
0..32767
Wheel counter
400012
pot 0
unsignedShort
0..255
Potentiometer
400013
pot 1
unsignedShort
0..255
Potentiometer
400014.0
battery
unsignedByte
0..100
Battery charge
400014.1
wifi signal
unsignedByte
0..100
Wi-Fi signal level
Byte order is big endian.
Bit assignment for “keys map” 400007

X5 Quickstart Guide
©2020 EXOR International S.p.A. - Subject to change without notice
exorint.com 11
5.1 Redirect Device Publisher Information to the PLC/Controller
You can automatically redirect the information produced by Device Publisher to the Controller/PLC
connected to the Base Station.
This will ensure the most efficient transfer of time-critical information directly from the handheld to
the Controller/PLC.
Please note that to do so the Controller/PLC must have a Modbus TCP server configured for
operating in UDP mode.
Addressing of Device Publisher information is given above.
Figure shows the diagram of the system you will be setting.
1
Connect to Base Station using a browser and open System Settings. Remind that you will be
asked to enter credentials.
2
Settings/Services
Open Router/NAT/Port forwarding
Define a Port forwarding rule associated the port used by the Modbus protocol of the Device
Publisher
Note that the “Device IP” address will have to be replaced with the actual IP address of the
controller you have connected to the Base Station
3
Note that Modbus in UDP mode is only sending out datagrams and does not expect response
from the server. The protocol in Device Publisher does not establish communication sessions
and does not provide error information, even in case the server is not present.

X5 Quickstart Guide
©2020 EXOR International S.p.A. - Subject to change without notice
exorint.com 12
5.2 Avoid Using a Full Modbus Server Stack for Device Publisher
Device Publisher is using Modbus TCP protocol in UDP mode to send X5 device information.
Port number 502, standard assignment to Modbus TCP and UDP, is used as default.
The software application uses only one data packet to send information using Modbus Function
Code 16, Write Multiple Registers. Dimensions of the Modbus packet are fixed. Data section is 28
bytes.
Modbus in UDP mode does not expect a response from the server receiving the data.
The format of the UDP packet in Device Publisher is shown in figure (produced with WireShark).
The payload of Device Publisher starts at byte with offset 49; see it highlighted in yellow in figure.
The byte sequence of the payload is:
Modbus Function Code
|10|
Start/End Address
|00|00|00|0e|
Byte Length
|1c|
Version
|00|01|
Counter
|8c|f9|
Elapsed
|08|fa|19|93|01|76|00|00|
Key map
|00|00|00|00|00|00|00|00|
Wheel
|7f|ff|
Pot 0
|00|00|
Pot 1
|00|20|
Wi-Fi level
|5a|
Battery charge level
|64|
X5 data area is highlighted in yellow. Values are shown as example.

X5 Quickstart Guide
©2020 EXOR International S.p.A. - Subject to change without notice
exorint.com 13
6Quickstart Guide
Objective of this guide is setting-up a simple working configuration for demonstration purposes.
Configuration is shown in figure.
Connect one LED indicator to the Pairing output in X4 of the base station. It will be required to
complete the safety pairing procedure between BS and X5 handheld.
Ethernet network IP addressing may obviously change based on available network metric.
6.1 Base Station
You must complete setup of Base Station first as you will be able to access handheld using Base
Station as the access point.
1
Find IP address assignment of Base Station eth1. This is a process common to all Exor
eXware7xx devices.
Switch on Base Station (BS).
Allow about one minute to complete boot phase.
Connect eth1 to network.
Find network address of eth1 using service in JMobile Studio Manage Target
Run> Manage Target> Board
The device may have been assigned an Auto-IP address or may have received an address
from a DHCP server.
2
Connect to device System Settings using a computer running a browser.
https://ipaddress/machine_config
System is protected by default.

X5 Quickstart Guide
©2020 EXOR International S.p.A. - Subject to change without notice
exorint.com 14
In case the product has been pre-programmed at Exor before leaving the factory, credentials
are:
user=admin
password=Exor123@
3
Settings/Localisation:
Enter
Country Code = Italy (or the country where you are)
4
Settings/Network:
Assign fixed IP address and mask to eth1
Enable Wi-Fi and Safety Network
Choose Wi-Fi channel
5
Settings/Services
Define a NAT rule to prepare direct access to the X5 handheld
Open Router/NAT/Port forwarding
Device IP is fixed. Source IP is the address assigned to BS in the network where it is attached.
Note that this corresponds to assigning a fixed IP address to X5 wireless handheld.

X5 Quickstart Guide
©2020 EXOR International S.p.A. - Subject to change without notice
exorint.com 15
Warning: make sure the value entered for “Source IP” is not the same as real IP address
assigned to the physical Ethernet port specified as “Source Interface”.
6
Settings/Services
Enable SSH Server with autostart
Enable VNC Server with autostart
7
Load a simple project file to BS using JM Studio.
The sample project should include:
System Variables protocol configured for Xbase device
Modbus TCP Server protocol configured in UDP mode (“use UDP/IP”)
Tags as needed
8
Connect a VNC client to BS to check operation of JMobile runtime with the project file you
have just loaded.
9
Connect a VNC client to the address of the handheld as defined at step 5.
6.2 X5 Wireless Handheld
You must have completed configuration described in previous chapter to proceed with handheld.
1
Switch on the handheld.
Wait for boot phase to complete.
When asked to start the pairing procedure, exit and return to startup menu.
2
Prepare an update package containing “JMobile Client” using JM Studio
Install this package to the handheld using a USB flash drive
Add the software to the device start-up list.
3
Install “Device Publisher” software application using a USB flash drive
Add the software to the device start-up list.
4
Start System Settings
Use touchscreen for operation.
System is protected by default.
In case the product has been pre-programmed at Exor before leaving the factory, credentials
are:
user=admin
password=Exor123@
4
Settings/Localisation:
Enter
Country Code = Italy (or the country where you are)
5
Settings/Network:
Enable Safety Wi-Fi

X5 Quickstart Guide
©2020 EXOR International S.p.A. - Subject to change without notice
exorint.com 16
6
Settings/Device Publisher
Enable Device Publisher.
Use default properties.
7
Connect to X5 Wireless device System Settings using a computer running a browser.
The IP address is the one defined with the NAT rule in BS settings
https://ipaddress/machine_config
System is protected by default. Credentials are
user=admin
password=Exor123@
8
Settings/Services
Enable SSH Server with autostart
Enable VNC Server with autostart
9
Start the Pairing application pressing the key combination K1-K4.
10
Select the device you want to pair with.
The first time you open the Pairing procedure the list of devices will appear empty.
Create one new entry in the pairing list pressing the button “Add” to start the process.
You will use the UID number printed on the BS module to identify the BS you want to connect.
The UID (Unique Identification) number can also be found in the System/Info page of System
Settings in Base Station.
11
Start the pairing procedure following the instructions appearing on screen.
Note that to proceed with this process you must have a lamp attached to the pairing output
of the BS (connector X4, pin 3).
At the successful completion of the pairing procedure, the lamp in the Emergency Stop
button will turn on. The E-Stop button will become “red”.
At this point the safety channel is active. Pressing the Enabling button or Emergency button
you will hear the relays switching in BS to match the status of safety devices in the handheld.

X5 Quickstart Guide
©2020 EXOR International S.p.A. - Subject to change without notice
exorint.com 17
7Further Steps with X5
7.1 Use VNC Client for Easier Access to BS and Handheld
The use of a VNC client running on your computer is suggested to improve your testing experience
with X5.
Using VNC you will have the possibility to access screen information in Base Station. Additionally, it
will make more convenient for you to access screen information in the X5 handheld.
To use VNC you must enable the VNC service in System Settings/Services.
Make sure you enable VNC service both in BS and in handheld.
To access information in the handheld you must have set the appropriate NAT rule in BS.
Any VNC client compatible with the standard will work.
RealVNC has been tested and proved to work fine.
7.2 Connect Base Station to a Controller/PLC
1
Using the sample JMobile project file created for the Quickstart step, add one additional
communication protocol dedicated to controller communication and create required tags.
2
Monitor communication activity using X5 handheld.
Additionally, you can directly checky operation of the Base Station connecting with VNC client.
7.3 Quality of Pairing
X5 Safety channel connects the Safety Module in X5 wireless handheld to the Safety Module in BS.
Pairing can be sustained only if the wireless connection guarantees a sufficient level of service.
An indication of the quality of the connection service is available in the screen of the pairing
application.
The indication has 5 levels, each associated to a different color. Desired level of optimal operation of
the system is the maximum (all 5 bars shown).
There are two factors that may adversely affect quality of connection regarding Safety channel:
-level of Wi-Fi signal; it depends on the distance between antenna of BS and wireless handheld
and on the presence/geometry of obstacles that may affect RF signal propagation
-level of occupation of the selected Wi-Fi channel due to the presence of other devices.
Only available with BSP version 1.3.291 or higher.

X5 Quickstart Guide
©2020 EXOR International S.p.A. - Subject to change without notice
exorint.com 18
7.4 Manually Flashing Pairing Lamp
In configurations including multiple systems controlled by X5, it may be useful for operators to easily
have an indication of what BS station is currently paired with a certain handheld.
This is the purpose of the “Flash” function available in the Pairing screen.
Pressing the Flash button results in the pairing lamp flashing with a cycle of about 3 Hz for a
duration of 4 seconds.
Only available with BSP version 1.3.291 or higher.
7.5 Importing/Exporting UID Lists
The UID List import/export function has the purpose of:
-simplify the creation of log UID lists
-backing-up the content of UID lists
-copying UID lists from one X5 wireless handheld to another.
Managing UID Lists require a USB Flash drive attached to one of the USB ports in the X5 Wireless
handheld.
Only available with BSP version 1.3.291 or higher
7.5.1 Exporting UID List
1
Create an empty file called “autoexec.sh” (file length 0 bytes) in the root of a USB Flash drive
2
Create an empty file called “x5bs.get” (file length 0 bytes) in the root of a USB Flash drive
3
Insert the Flash drive in one of the USB ports of X5 handheld
4
Cycle the power of X5 handheld
5
The file “x5bs.get” now contains the list of UID entries copied from X5 handheld.
Format of the list is comma-separated values.
Format of file:
UID, description,
UID, description,
…
7.5.2 Importing UID List
1
Create an empty file called “autoexec.sh” (file length 0 bytes) in the root of a USB Flash drive
2
Create an empty file called “x5bs.conf” (file length 0 bytes) in the root of a USB Flash drive
3
Insert the Flash drive in one of the USB ports of X5 handheld
4
Cycle the power of X5 handheld
5
The content of file “x5bs.conf” has been copied to the UID list in X5 handheld.
Format of the list is comma-separated values.
Note that if in the root of the USB Flash drive there is both a file “x5bs.conf” and a file “x5bs.get”, then
priority goes to the export procedure.
Other manuals for X5
1
Table of contents
Other Exor Laboratory Equipment manuals
Popular Laboratory Equipment manuals by other brands

VistaLab
VistaLab Ovation 9057-2009 Replacement

Thermo Scientific
Thermo Scientific Dionex UltiMate 3000 Series Standard Applications Guide

NuclearLab
NuclearLab DGC-II user manual

Thermo Scientific
Thermo Scientific ISQ EC operating manual

DEMA
DEMA 163-2DF-2 installation instructions

Grimm
Grimm ENVIRON CHECK 180 manual