S. 2-4
Eigenschaften und Spezikationen
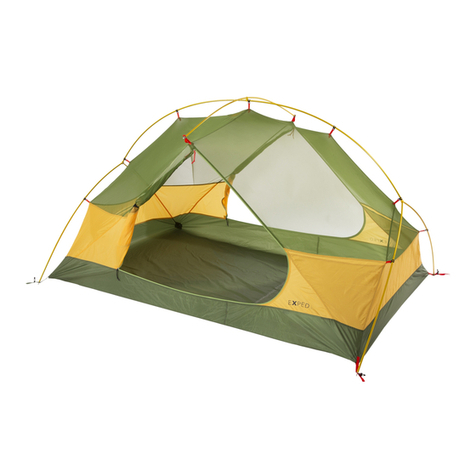
Viel Platz und Stauraum:
Zwei gleich grosse weit auf-zippbare Zugänge mit Stauraum
im Vorzelt bieten Platz für viel Gepäck. An der Innenzeltdecke
und in der Abside ist ein abnehmbares Hängenetz angebracht,
worauf stets griffbereit Lampe, Taschentuch usw. Platz nden.
In die Netztaschen neben den Türen lassen sich Buch, No-
tizblock und Brille stecken, selbst der Zwischenraum in den
Innentüren zwischen Stoff- und Moskitonetztür lässt sich als
Tasche nutzen.
Materialien vom Feinsten:
-Gestänge aus nahtlosem TH72M DAC Featherlite NSL Flug-
zeugalu in 9 mm und 10.25 mm Durchmesser; kälteresistente
Gummilitze;
- Aussenzelt: wasserdichtes, UV-resistentes PU-Ripstop Poly-
ester, abperlimprägniert und ammhemmend ausgerüstet;
- Doppelkappnähte: Nahtbandverschweisst für absolute Dichte
und zur Nahtverstärkung;
- Innenzelt: kondensabweisendes Ripstoppolyester;
- Boden: PU-beschichtetes Taffetanylon mit einer Wassersäule
von 10’000 mm.
Zubehör vom Feinsten:
- extrastabile breite V-Prol-Heringe für harte und weiche Böden;
- extraleichte schmale V-Prol-Heringe für harte Böden;
- rafnierte Abspanner, die sich ohne Aufknöpfen um einen
Baum herumführen lassen;
- ultraleichte aber extrastarke, vormontierte Dyneema-
Kernmantel-Leine (140 kg Bruchlast) mit Lichtreex-Faden
in praktischen Schnursäcken verpackt.
- smarter Kombipacksack für Gestänge und Zubehör; be-
quemer Roll-Packsack; nachtleuchtende, lichttreektierende
und farbkodierte Reissverschluss-Zupfer;
- bereits montiertes Gear Loft!
Optional erhältlich:
- Zeltunterlage
- Stoff-Anker für Schnee und Sand
- weitere Cord-Stuffsäcke, Schnüre, Heringe
Genialität der Einfachheit:
Die bewährten, auf das Wesentliche reduzierte Techniken wie
Klöppel/tent anchor und Ring, Stangenende und Bandschuh
dienen der einfachen Handhabung, einfachen Wartung und
der Leichtigkeit des Zeltes.
Features and Specications:
Spacious:
For access, ease and comfort each person has a personal
entrance with large doors and vestibule. The inner canopy is
tted with a gear loft and loops to suspend a lamp, laundry
or just about anything that ts. Two convenient pockets are
located near the doors to hold small items that should be
accessed quickly. Even the netting backed doors can double
as storage spaces.
Highest Quality Materials:
- Poles: TH72M DAC Featherlite NSL 9 mm and 10.25 mm
seamless aircraft aluminum tent poles with cold resistant
shock cords;
- Rainy fabric: Waterproof and UV-resistant PU-coated
ripstop polyester, DWR treated and ame retardant;
- Seams: factory taped, lap-felled seams for waterproof
performance and added strength;
- Canopy: DWR treated ripstop polyester fabric;
- Floor: PU-coated taffeta nylon (10,000 mm water column
rating), fully factory taped seams;
- Fabrics meet CPAI-84 guidelines for re retardency;
Ingenious Accessories:
- Sturdy ‘V’ pegs in two widths for hard packed and soft
ground;
- Exped‘s own cord line tensioners secure tent lines without
awkward knots;
- Super strong and lightweight Dyneema core guylines are
reective and pre-mounted and packed in Cord Stuffsacks;
- Combined packsack for poles and tent accessories;
- Reective, glow-in-the-dark zipper pulls will not snag and
are color coded for ease of use;
- premounted gear loft!
Optional accessories:
- Tent footprint,
- Snow and Sand anchors
- additional Cord Stuffsacks,
- additional V-Pegs
Simply ingeneous:
Reliable and simple technologies like ring and toggle/tent
anchor or webbing tent pole tension pockets make the tent
easy to handle, reduce weight and are eld maintainable.
p. 2-4
© Exped, for additional information visit www.exped.com
p. 3-4
© Exped, for additional information visit www.exped.com
© Exped, weitere Informationen und Tips siehe auf www.exped.com
© Exped, weitere Informationen und Tips siehe auf www.exped.com S. 3-4
Die Endstücke der
Stangen sind ab-
nehmbar, damit
die Gummilitze bei
starker Kälte verkür-
zt werden kann.
Moskitotüren am
Innenzelt und ge-
genüberliegende
Ventilationshauben
am Aussenzelt,
welches einseitig
nicht bis zum Boden
reicht und damit
den Kamineffekt
verstärkt, tragen zur
Reduktion der Kon-
denswasserbildung
bei.
Der Tent Anchor*
ermöglicht ein prob-
lemloses, einhändig-
es Ein- und Aushän-
gen des Innenzeltes.
* pat. pend.
Condensation is kept
to a minimum with
opposing doors and
vents. The tent fly
does not reach the
ground on the leeward
side to increase the
chimney effect and
further reduce con-
densation.
If the tent pole’s shock
cord gets slack, just
remove one pole end,
adjust the knot and
re-secure
The Tent Anchor*
permits simple one
handed removal and
remounting of the
canopy.
* pat. pend.
Tipps und Tricks:
- Vor jeder Tour prüfen, ob das Zelt vollständig und unbeschädigt ist. Stangen auf
Kerbrisse überprüfen. Zu Hause am besten im Halbdunkel üben, ob man das
Aufstellen beherrscht.
- Bei lockerem Boden, Sand und Schnee die Grabankertechnik anwenden: Heringe
quer vergraben und die Spannschnüre drumherumführen. Auch die Packsäcke
lassen sich so nutzen: mit Sand, Kieselsteine oder Schnee füllen und vergraben.
Aufbau:
1. Auslegen:
Ist der geeignete Zeltplatz gefunden, das Zelt beim Eingang mit einem Hering
sichern damit es bei Wind nicht davonsegelt.
2. Stangen:
Zuerst die beiden Bogenstangen und dann die Firststange in die farbmarkierten
Kanäle einschieben, in die Spannfüsse einstecken und nacheinander anzurren.
3. Abspannen:
Das Zelt beim zweiten Eingang packen und in die Länge ziehen, mit einem Her-
ing sichern. Weitere Heringe bei den Stangenenden einstecken, die seitlichen
Abspannschnüre die an den Stangenkanälen befestigt sind, sternförmig zum
Zeltzentrum ausrichten und abspannen. Bei bevorstehendem Sturm sind zusät-
zliche Heringe und Abspannleinen anzubringen.
Aufbau-Varianten:
1. nur Aussenzelt:
Stangen einschieben (siehe Punkt 2.), mit Heringen sichern, Apsiden spannen
und die Abspannschnüre ausrichten und abspannen. Eine optional erhältliche
Zeltunterlage eignet sich hervorragend als Bodenschutz.
2. nur Innenzelt:
Die beiden Bogenstangen durch die Elastikschlaufen schieben und in die
Schlaufenschuhe stecken. Nun noch die Stangenmitten an beiden Seiten mit
Schnur abspannnen.
Abbau:
1. Stangen herrausstossen:
Zuerst die Firststange dann die Bogenstangen lösen und diese herausstossen (nie
ziehen!). Die Stangen je in der Mitte packen und zusammenlegen. Die Stangen
reinigen bevor sie im Zeltzubehörsack verstaut werden.
2. Zelt einrollen:
Normalerweise bleiben Innen- und Aussenzelt zusammen. Das Zelt gegen Innen
längsseits bis auf Packsack-Breite einschlagen. Jetzt mit dem Zeltzubehörsack als
Gegenlager an einem Ende beginnend alles aufrollen und gleich in den Packsack
einschlagen.
- Für Pege und Reparatur siehe Anleitung im Zeltzubehörsack.
Setup:
1. Unpack:
Un-roll the tent y side up and secure with two pegs at the footend. In strong winds
open both door and rear vent to prevent ballooning and the tent from ying off.
2. Poles:
First feed the parallel poles and then the ridge pole gently into their corresponding
color coded pole sleeves until seated in the opposite sealed end. Then insert the
pole ends into the tension pocket and pull tight.
3. Tension:
Secure with pegs in the corners and vestibule. Tension the pre-mounted guy lines
forming a star pattern that radiates from the tent’s center. In high winds use ad-
ditional pegs and guylines found in the accessory bag.
Setup variations:
1. Rainy only setup:
Unhook the canopy and feed the poles into the sleeves, insert pole ends into the
tension pockets and pull tight. Secure corners and vestibules with pegs.
2. Canopy only setup:
Unhook the rainy and feed the tent poles through the elastic loops of the canopy.
Insert the pole ends into the webbing loops found in the canopy corners. Tension
the canopy by attaching a guyline each to the center of both poles and anchor with
2 pegs.
Teardown:
1. Stakes:
Remove all stakes and release the tension of the pole pockets.
2. Poles:
Push the poles out of their sleeves (never pull). Fold the poles from the center out.
Clean and dry the poles before stowing them in the accessory bag.
3. Pack:
Canopy and rainy may remain hooked together. Spread out the tent, fold the ves-
tibules inward then fold the long sides of the tent in thirds so the width corresponds
the packsack size. Place the full accessory bag at one end of the folded tent as
a rolling aid and roll tightly into the packsack.
- For maintenance and repair consult the manual in the accessory bag.
Tips and Tricks:
- Before heading out on a trip, check that no parts are missing, make necessary re-
pairs and replace any damaged parts. Check the poles for burs or ssures. Practice
setup in the dark wearing gloves.
- In soft terrain, like sand or snow: tie the guylines to the center of the stakes and bury
them square into the ground. Or attach guylines to stuff sacks lled with pebbles,
dirt or snow. Consider Exped Sand and Snow Anchors.

