EzyFast 6414-272 User manual

Instruction Manual
Sew into Seam of Carry Bag: OUTSIDE OF BAG / AND GAZEBO CANOPY
SKU: 6414-272
14'X10' EZYFAST ANTIPOOLING SHELTER

page 1 of 6
PLEASE READ
THIS IS A SHADE STRUCTURE, NOT A PERMANENT STRUCTURE.
GAZEBO MUST BE PACKED DOWN WHEN NOT IN USE.
THISGAZEBO SHOULD NOT BELEFT UNATTENDED IN HEAVY RAIN.
DO NOT USE
DURING SEVERE
WEATHER
CONDITIONS.
CARE AND MAINTENANCE:
•HAND WASH CANOPY WITH A MILD SOLUTION OF SOAP AND
WATER. RINSE THOROUGHLY, AND DRY COMPLETELY. DO NOT USE
BLEACH OR SOLVENTS.
•TO CLEAN THE FRAME, SIMPLY WIPE DOWN WITH A DAMP CLOTH.
•GENTLY TIGHTEN BOLTS AND NUTS IF FRAME COMES LOOSE.
•THE GAZEBO IS DESIGNED AS A TEMPORARY SUN SHELTER, NOT
A PERMANENT STRUCTURE. DO NOT LEAVE UP FOR EXTENDED
PERIODS AND DO NOT LEAVE THE GAZEBO UNATTENDED.
TAKE DOWN THE GAZEBO AND STORE AWAY AFTER USE.
•ENSURE YOU READ THE USER MANUAL AND FAMILIARISE
YOURSELF WITH THE PRODUCT BEFORE USE.
MODEL: AO-G20 PRODUCT CODE: 62475/62476 V.1
KEEP AWAY FROM
HEAT SOURCES AND
OPEN FLAMES.
DO NOT USE IN WINDY
CONDITIONS.
CARE AND MAINTENANCE:
•HAND WASH CANOPY WITH A MILD SOLUTION OF SOAP AND
WATER. RINSE THOROUGHLY, AND DRY COMPLETELY. DO NOT USE
BLEACH OR SOLVENTS.
•TO CLEAN THE FRAME, SIMPLY WIPE DOWN WITH A DAMP CLOTH.
•GENTLY TIGHTEN BOLTS AND NUTS IF FRAME COMES LOOSE.
•THE GAZEBO IS DESIGNED AS A TEMPORARY SUN SHELTER, NOT
A PERMANENT STRUCTURE. DO NOT LEAVE UP FOR EXTENDED
PERIODS AND DO NOT LEAVE THE GAZEBO UNATTENDED.
TAKE DOWN THE GAZEBO AND STORE AWAY AFTER USE.
•ENSURE YOU READ THE USER MANUAL AND FAMILIARISE
YOURSELF WITH THE PRODUCT BEFORE USE.
MODEL: AO-G20 PRODUCT CODE: 62475/62476 V.1
KEEP AWAY FROM
HEAT SOURCES AND
OPEN FLAMES.
SECURE THE FRAME
WITH PEGS.
110mm
80mm
DO NOT USE DURING
SEVERE WEATHER
CONDITIONS.
CARE AND MAINTENANCE
Extra weight down at legs is highly recommended.
Do not use in extreme weather conditions. Do not use in lightning storms.
Do not use in very windy weather. Do not over use in rainy weather.
Take down the gazebo before extreme weather events.
Be cautious when handling the frame. Avoid pinching hands or fingers in
any moving parts as frame opens and closes.
The gazebo is designed for temporary use, not a permanent structure.
Do not leave up for extended periods and do not leave the gazebo
unattended. Take down the gazebo and store away after use.
Keep children away from the set-up area.
Avoid twisting the frame during set up. Raise legs evenly. The frame
tubes may break if you twist the frame too much.
Wash frame and canopy with a mild solution of soap and water, rinse
thoroughly. Dry completely. Do not use bleach or solvents.
Inspect frame periodically to ensure all bolts and nuts are tight.
Always return the gazebo to storage bag after use. Suggest taking the
canopy off the frame for separate storage in the bag. Be sure the
canopy is completely dry before storing it.
There could be some minor leaking or dripping from the seams,
recommend using seam-sealer spray, available at most hardware
stores or on-line stores.
THIS SHELTER MUST BE SECURED WITH GUY ROPES AND PEGS
ONCE SET UP AT ALL TIMES.
THIS MAY PROVIDE SUPPORT DURING A SUDDEN GUST OF WIND.
IGNORING THIS WARNING MAY CAUSE THE SHELTER TO BE
BLOWN AWAY AND CAUSE SERIOUS DAMAGE AND INJURY.
AT ALL
TIMES!
110mm
80mm
SECURE THE FRAME
WITH PEGS ADD EXTRA
WEIGHT TO LEGS
IF NEEDED.
YOU MUST SECURE
ALL GUY ROPES.
SECURE
KEEP ALL FLAME AND HEAT SOURCES AWAY FROM THIS TENT
FABRIC. This Tent is Made With Fabric That Meets CPAl-84 Specification
For Flame Resistance. lt is Not Fireproof. The Fabric Will Burn lf
Left ln Continuous Contact With Any Flame Source. The application
of any foreign substance to the tent fabric may render the flame-resistant
properties ineffective.
WARNING:

page 2 of 6
Utility Hook for small hanging object only.
Common Mistakes and Misuses to Avoid
Mistake 1. Incorrect setup
Ensure you are following our assembly instructions when setting up a gazebo. Set up without reading the
instruction manual can cause unnecessary damage to the gazebo and increase unnecessary wear and tear.
Mistake 2. Using Gazebos without being properly anchored
This is the single biggest mistake inexperienced users can make. A sudden wind can cause serious
damage. Gazebos must be secured to a fixed structure in any circumstances to provide additional stability by
using pegs and guy ropes. This is essential to avoid wind damage. Further support can be achieved by using
leg weights, like sandbags and steel leg weights.
Mistake 3. Using a gazebo in extreme weather conditions
The gazebo is designed as a temporary sun shelter. It works for normal weather conditions for a period of time.
Do not recommend using in rainy and windy days. Strictly avoid use in extreme weather conditions. The power
of nature is incredible.
Mistake 4. Your gazebo is left up overnight or left attended
Gazebo shall be not left outside overnight. Weather change constantly and largely unpredictable. Unexpected
rain, sudden strong wind, or temperature changes may cause serious damage to your gazebo. Nature is full
of surprise.
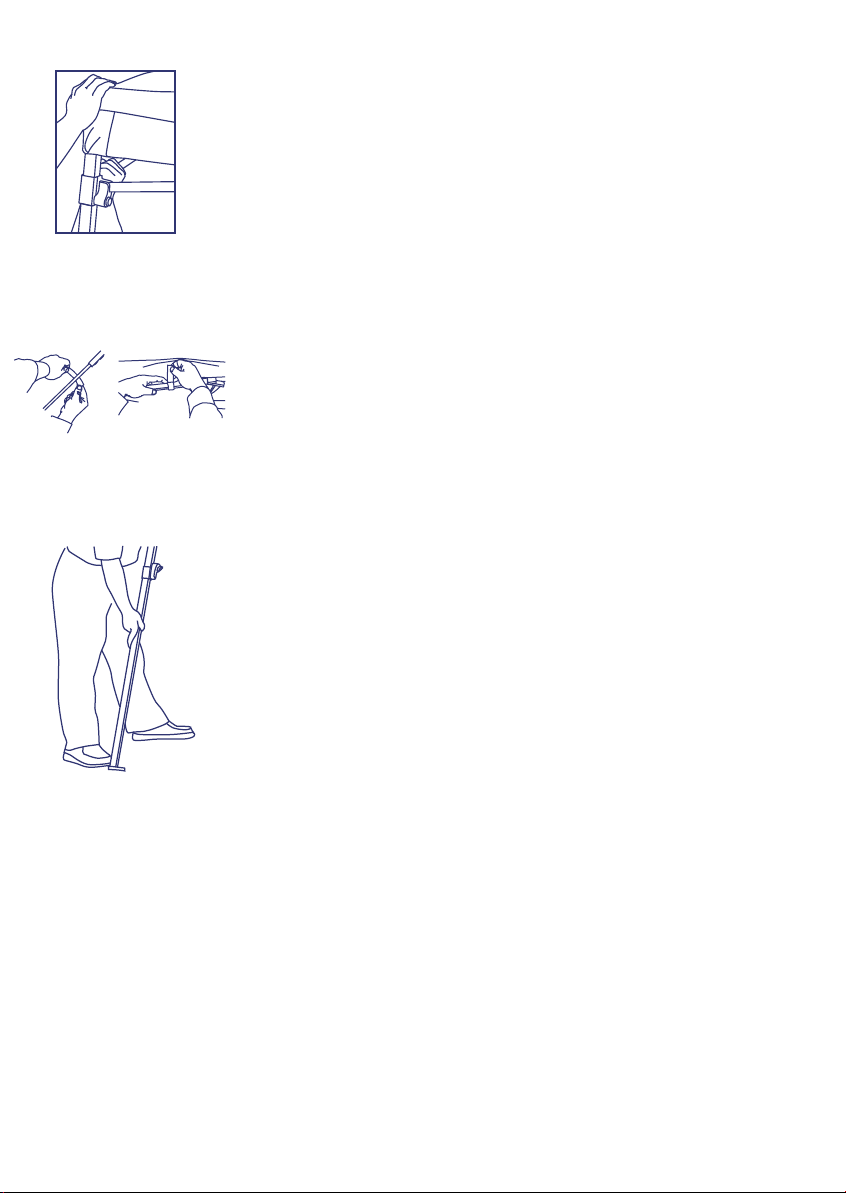
Mistake 5. Forcefully take the canopy top away without undoing the Velcro ties
This may cause tears at the points that Velcro ties are sewn. Velcro ties and loops are used to secure the
canopy top to the frame after setting up. They must be untied before take-down.
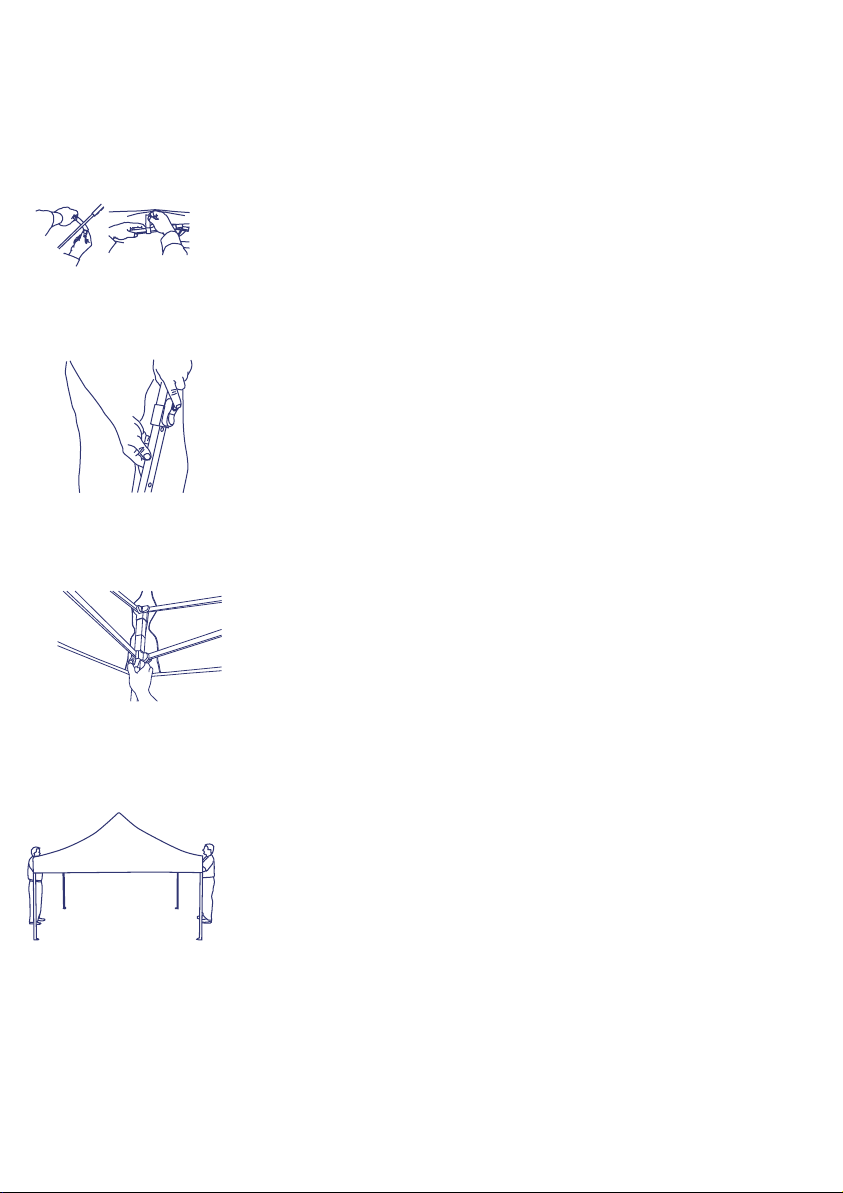
Mistake 6. The canopy is left on the frame when it’s folding down
Unnecessary wear and tear will increase if the canopy was left on the frame when it’s folded down. The moving
truss tubes may catch the fabric and cut it during the closing, causing tears. This wrongful operation will weaken
or tear your canopy.
Mistake 7. Retract the dirty telescoping legs
While used on the beach or other wet and dirty ground, the sands or dirt may get into the telescoping tubes
and cause them to get stuck if not removed and cleaned before retracting. Always make sure the legs are cleaned
and free from sand and dirt before retracting.
Mistake 8. Repack a wet or damp gazebo after using
Repack a wet or damp gazebo after using can cause mildew. Take your gazebo down when it is completely
dry, then fold the cover neatly and store it back in the bag.
Mistake 9. Ignore the effect of damaged parts
Damaged parts on your gazebo can cause further damage. Check the gazebos framework for a damaged roof,
brackets, bent truss bars, and loose or missing bolts, and replace/tighten as necessary.
Mistake 10. Excess water or use chlorine-containing cleaning chemicals to wash the gazebo
It is a good idea to give our gazebos a regular clean to prevent the build-up of dirt and the formation of mold.
Using a hose is a good way to get rid of dirt from the canopy. In some circumstances, excess and unattended
water on the frame can cause the materials to rust. The proper way to clean your gazebo(both cover and frame)
is to use cold water and a soft cloth together with a mild soap such as bleach-free dish-washing detergent or mild
soap. We recommend you apply some silicone spray to the joints from time to time to keep them in good working
order.
Reminders for Canopy Users
NEVER forcefully setup or takedown. NEVER twist the frame. NEVER assume there is no wind. NEVER
leave your shelter unattended. NEVER use it in prolonged raining situations.
CAUTION sudden wind can blow shelter over and cause damage. CAUTION forceful operation can damage
or destroy the frame. CAUTION any unattended shelter can cause serious injury and or damage.
ALWAYS anchor or weight down. ALWAYS take down in wind greater than 15mph. ALWAYS take down in
a lightning storm. ALWAYS refer to the instruction manual.

page 3 of 6
SET-UP INSTRUCTIONS
IMPORTANT: DO NOT USE EXCESSIVE FORCE DURING ANY PART
OF SET-UP
Stand frame upright.Starting at the
corners, with partner standing on the
opposite side, grasp the two outer
legs, slightly lift the frame off the
ground and step backward, stopping
at full arms’ length.
Place the fabric canopy over the top
frame. Use the Velcro pads to secure
each corner of the canopy to the
frame under the plastic leg caps.
Each partner should then grasp the
bottom of the middle frame section
(cross beams)where it forms diamond.
Lift slightly and slowly walk backward
until the frame is fully extended. Be
careful not to pinch your finger and
not pull backward too hard as this
may result in the bending of cross
beams.
1.
2.
3.
Tips: the frame need to be expand to the
maximum. you may walk inside the canopy
and push up the frame. In case heavy, you
may fully open and lock the frame first and
put on the canopy top after.

page 4 of 6
Engage the slider at each corner by pushing
up the slider with one hand while holding
down the top of the leg with the other hand
until it locks in to place. Repeat this for the
rest of corners.
Lift two adjacent outer legs and pull out
inner legs gently until spring loaded snap
button pops in position. Repeat on the
other two legs. The gazebo has three
height levels. To adjust, lift the leg up,
carefully depress the push button at
knuckle and slowly pull out the inner leg
till the snap button pops in next position.
Repeat on the other legs. Be careful do
not overpull the leg.
6.
4.
5. To secure the fabric top to the frame,
please wrap the hook and loop straps
around roof tubes and cross beams.
Tips: the frame need to be expand to the
maximum. you may walk inside the canopy
and push up the frame. In case heavy, you
may fully open and lock the frame first and
put on the canopy top after.

page 5 of 6
Peg down the gazebo by driving the 4
small pegs through one of the holes on
the base of each foot. This will keep the
legs from moving sideways in mild weather
conditions.
Tie up one end of each guy rope to the
triangular shaped rope holder located on
the outside fabric corners. Pull the guy rope
out from the corner of the gazebo towards
the ground at a 45 degree angle. Hammer
one of the larger pegs in to the ground and
secure the guy rope firmly to it. Make sure
the guy ropes have adequate tension.
THE GAZEBO MUST BE SECURED TO THE
GROUND WITH ANCHORS AND GUY ROPES!
7.
8.
Warning:Utility Hook for small hanging object only.
Do not hang any object heavier than 5 lbs.
Check the hook every time before use.
Do not use if it comes loose!

page 6 of 6
IMPORTANT: PRINT SPECS
NUMBER OF COLOURS TO PRINT
DO NOT ALTER ARTWORK/DIELINE
3
MAGENTA YELLOW BLACK
DIELINE
110mm
IMPORTANT: PRINT SPECS
NUMBER OF COLOURS TO PRINT
DO NOT ALTER ARTWORK/DIELINE
3
MAGENTA YELLOW BLACK
DIELINE
PACK-DOWN INSTRUCTIONS
IMPORTANT: DO NOT USE EXCESSIVE FORCE DURING TAKING-DOWN.
PLEASE REMOVE ANCHORS AND GUY ROPES BEFORE TAKING DOWN.
Release push button on each leg and
shorten the frame to its original height prior
to extending the legs during set-up.
2.
4.
3.
Undo the hook and loop straps of the
fabric top from around the roof tubes
and cross beams. Failure to do so may
tear the fabric during take-down.
Remove spikes or weighted anchors.
Release sliders at all four corners
depressing the push button and gently
pushing the corners down slightly.
Make sure all four corners unlocked
before proceed next step!
1.
Remove the canopy and pack nicely.
With partner on the opposite side, grasp
the middle section of the frame and lift
up slightly.

CONSUMER WARNING LABEL - (QTY X 2)
Sew into Seam of Carry Bag: OUTSIDE OF BAG / AND GAZEBO CANOPY
62475_62476_Central Locking Gazebo_LB1
CONSUMER WARNING LABEL - (QTY X 2)
Sew into Seam of Carry Bag: OUTSIDE OF BAG / AND GAZEBO CANOPY
62475_62476_Central Locking Gazebo_LB1
Walk forward slowly allowing the
frame to fold inward and close.
Be careful not to pinch fingers or
hands as you close the frame.
Completely close the frame.
Wheel your gazebo to your desired
storage area.
8.
7.
6.
5.
Stand the closed frame on the ground,
and pull the storage bag top down over
the frame. Carefully lay down the stor-
age bag, then flip the bottom on and zip
the storage bag completely shut. Please
do not drop the frame during the pro-
cess to avoid damage to the frame. Be
sure the gazebo is completely dry
before storage.
SKU: 6414-272 Code : 17JS00090801
Email: [email protected]
Home Hardware Stores Limited
34 Henry Street West, St. Jacobs, Ontario,
Canada N0B 2N0
Table of contents
Other EzyFast Tent manuals