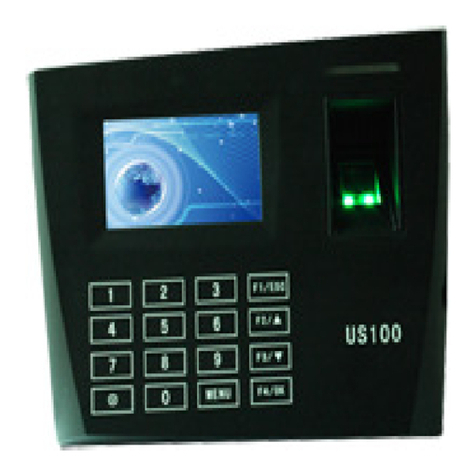
Explore Scientific Easy Time Clock US100CR Manual

Biometric Fingerprint Reader and
Proximity Card Reader
Setup Instructions
Customer Service 405-314-2436
_________________________________________________________________________________
Page 1of 6
Easy Time Clock
Customer Service 405-314-2436
©2003 - 2012 Easy Time Clock, All Rights Reserved
Welcome to the Easy Time Clock US100CR Proximity Card Reader quick easy setup instructions.
Before using, please read this manual carefully to a oid unnecessary damages!
Please don’t place the product in the place with strong light, because the strong light may significantly
affect the scanning, and thus cause the erification fail.
Don’t place the terminal in an area where the temperature exceeds 104F or 040C. US100C proper working
temperature range is 104F or 040C. If the temperature of the machine gets too hot, the de ice will be
affected easily, such as, the slower reaction speed and the reduced passing rate. If mounted outdoors,
place the unit in a shaded well entilated area and/or use cooling equipment to keep the area
temperature controlled.
There are se en easy steps to configure your terminal. 15 minutes approx time.
STEP 1
Setup US100CR – Install unit on wall with Ethernet connection according to instructions
1) Power on the system will boot up and the reader will then search for your network.
a. Starting Network will display a plane black box.
b. Searching for server will display a green letter “I” in the black box. I
c. Connecte to server will display a green box in the upper right corner.
Look for the Easy Time Clock logo
display to easily see the black box.
The reader will use DHCP to find
your network.
STEP 2
Downloa Your Employee Names From your Easy Time Clock account
1) Login as A min into your Easy Time Clock account
2) Go to Main Menu | Employee Setup | Fingerprint an ID Car Clock Downloa page.

Biometric Fingerprint Reader and
Proximity Card Reader
Setup Instructions
Customer Service 405-314-2436
_________________________________________________________________________________
Page 2of 6
Easy Time Clock
Customer Service 405-314-2436
©2003 - 2012 Easy Time Clock, All Rights Reserved
NOTE: If the Employee # is missing, go to the Employee Maintenance | Payroll Setup page and enter the
Employee’s identification number in the column and sa e changes. The download looks for an Employee ID
number to identify the employee’s name. You can enter the employees ID number listed in your payroll software
or if you do not ha e a payroll software that has assigned employee id numbers, just number create your own ID
numbering system, like 1,2,3 etc. Maximum number of digits is 5 numbers not starting with zero.
4) Type in the assigned Car ID Number listed on the proximity card.
5) Check the box to select the employees to download to the US100C and click the Downloa button
(Request Processed)
**To see the downloaded employee list in the clock go to
M/OK – User Mng – M/OK - */> - Manage – M/OK
Search Employee List by ID number
a. On the Manage screen with the long list of employees,
press OK.
b. You will see a list of functions with Search User on top.
c. Select Search User and press OK again and you will see
the search screen.
d. Enter the employee number and press OK and the
employee will be highlighted.

_________________________________________________________________________________
Easy Time Clock
Customer Service 405-314-2436
STEP 4
Test the Car
1) Test clocking in with the card by placing the card in front of the sensor area.
Employee can now clock in and out using just the fingerprint without a password.
the system will show the name of the employee and the clock in or out time displayed.
2) Look at the Detailed Report in Easy Time Clock to see the clock in.
Now your employees are rea y to use the US100C
STEP 5 – IMPORTANT!!
Setup Fingerprint/ID Rea er A ministrator
Limit the Manage functions (the
M/OK
can enter the
Manage area. To limit this, set one or more people to be Administrators.
1) Press M/OK
to enter the Main Menus
2) Press M/OK to enter
1.UserMng
3) Arrow to the right to
Manager
4) Arrow down to select the
ID.No
added to help with this) and press
5) Arrow down to E it
and press
6) Arrow down to Purview
and Arrow to the right
7) Arrow down to OK
and Press
8) You will see a lock
next to the user to show that they are now an
☺
Important:
1)
means this employee is the administrator.
2) means
password has been enrolled
Note: If the screen says "
A min Affirm 1
finger printer reader has been set to require an administrator to access the
management features. The number shown with Admin Affirm is the numb
with administrator access. To enter the management features simply use the
Biometric Fingerprint Reader and
Proximity Card Reader
Setup
Instructions
Customer Service 405-
314
_________________________________________________________________________________
©2003 - 2012
Easy T
1) Test clocking in with the card by placing the card in front of the sensor area.
Employee can now clock in and out using just the fingerprint without a password.
the system will show the name of the employee and the clock in or out time displayed.
2) Look at the Detailed Report in Easy Time Clock to see the clock in.
Now your employees are rea y to use the US100C
-ID
to clock in an out.
Setup Fingerprint/ID Rea er A ministrator
:
M/OK
button) to require a fingerprint or password. By default, anyone
Manage area. To limit this, set one or more people to be Administrators.
to enter the Main Menus
1.UserMng
Manager
and press OK
ID.No
to set as administrator (during the download, the ID.NO of 9999 was
added to help with this) and press
M/OK to open the next menu
and press
M/OK
and Arrow to the right
to change from User to
A min
and Press
M/OK to Save
next to the user to show that they are now an
A min
means this employee is the administrator.
password has been enrolled
A min Affirm 1
" and shows a picture of a padlock
, the
finger printer reader has been set to require an administrator to access the
management features. The number shown with Admin Affirm is the numb
er of users
with administrator access. To enter the management features simply use the
Biometric Fingerprint Reader and
Proximity Card Reader
Instructions
314
-2436
_________________________________________________________________________________
Page 3of 6
Time Clock, All Rights Reserved
Employee can now clock in and out using just the fingerprint without a password.
When print is accepted
the system will show the name of the employee and the clock in or out time displayed.
to clock in an out.
button) to require a fingerprint or password. By default, anyone
Manage area. To limit this, set one or more people to be Administrators.
to set as administrator (during the download, the ID.NO of 9999 was
A min
, the
finger printer reader has been set to require an administrator to access the
er of users
with administrator access. To enter the management features simply use the

Biometric Fingerprint Reader and
Proximity Card Reader
Setup Instructions
Customer Service 405-314-2436
_________________________________________________________________________________
Page 4of 6
Easy Time Clock
Customer Service 405-314-2436
©2003 - 2012 Easy Time Clock, All Rights Reserved
administrator’s finger print. If the administrator is no longer a ailable or was ne er set, contact us for help
resetting the administrator requirement.
STEP 6 --OPTIONAL --
Enroll Passwor
1) At the US100C, go into User Management and Manage
2) Highlight each name, Press M/OK, press to select ,
press M/OK (Press to mo e up and down.)
3) Press select Enroll PW (Password) button, press M/OK
4) Input Password: Type in 8 digit password. (All numbers not starting with zero.)
5) Press select to mo e cursor to the next PW field and type the password again to “Affirm” password,
press M/OK to sa e,
6) Press Esc popup to sa e PW, select M/OK for Yes.
7) Go to back to the employee list.
8) Press to mo e the cursor or selection. Follow the same instructions for all of the employees.
Change Passwor
:
1) At the US100C, go into User Management and Manage
2) Highlight each name, Press M/OK, press to select , press M/OK
(Press to mo e up and down.)
3) Press select Change PWD (Password) button, press M/OK
4) Input Passwor : Type in 8 digit password. (All numbers not starting with zero.)
5) Press select to mo e cursor to the next PW field and type the password again to “Affirm” password,
press M/OK to sa e,
6) Press Esc popup to sa e PW, select M/OK for Yes.
7) Go to back to the employee list.
8) Press to mo e the cursor or selection.
Follow the same instructions for all of the employees.
T9 Input

Biometric Fingerprint Reader and
Proximity Card Reader
Setup Instructions
Customer Service 405-314-2436
_________________________________________________________________________________
Page 5of 6
Easy Time Clock
Customer Service 405-314-2436
©2003 - 2012 Easy Time Clock, All Rights Reserved
T9 means “Text on 9 keys.” It is commonly used on cell phones. The US100C uses a combination of keys to enter
uppercase, lowercase, and symbols.
Here is an overview:
1) Arrow to get to the name text field, press the right arrow */ and you will see a gray bar at the
bottom of the screen with the word [English] .
2) To get a letter, press the number key with the letter you want on it and you will see a second line with
numbers followed by upper and lower case letters. Press the number to the left of the letter you want.
3) To get symbols, press the right arrow a second time and you will see the second row with numbers
followed by symbols. To see more symbols, arrow down. You can select a symbol by pressing the
number key or you can go back to Letters by pressing the right arrow again.
4) To remo e letters, press the / for backspace to remo e the letters.
5) Back to Numbers, press ESC button to get back to the numbers.
Here are the setups to enter a wor that starts with a capital A:
1) Press the right arrow */ and you will see a gray bar with the word [English] on the bottom of the
screen.
2) Press the number 2 and you will see a second line with numbers followed by upper and lower case
letters A through C.
3) Press the number 3 to get the uppercase A.

Biometric Fingerprint Reader and
Proximity Card Reader
Setup Instructions
Customer Service 405-314-2436
_________________________________________________________________________________
Page 6of 6
Easy Time Clock
Customer Service 405-314-2436
©2003 - 2012 Easy Time Clock, All Rights Reserved
Cleaning Gui elines
From time to time, the surface of optical sensor lens, the keypad and LCD display screen will need to be cleaned to
keep your reader in top performance. The optical sensor lens in the unit is delicate and requires special cleaning
instructions so to not scratch or damage the lens. Please follow the cleaning guidelines to protect your unit from
getting damaged.
LCD Display Screen
Optical Sensor Lens
Keypad
Cleaning the Keypa an LCD Display Screen
Turn off the unit before cleaning.
To clean the keypad and LCD display screen, moisten a soft non-scratch cloth with water or some other mild “all
purpose” cleaning spray to clean, like multipurpose spray and wipe or 409 cleaner. It is recommended to dilute the
cleaning solution with water. Do not spray or apply water directly on the reader. Test a small section of the
keypad to make sure the cleaner will not remo e the lettering from the keypad.
Lightly wipe the keypad and LCD screen with a damp cloth and air dry. Be sure the keypad and LCD screen is dry
before turning on the reader. DO NOT put the reader under running water or immerse in water when cleaning.
Cleaning the Optical Sensor Lens
A oid scratching the lens by following the instructions below.
Turn off the unit before cleaning the optical lens.
1. If dusty or gritty, first blow air on surface of the lens to clear off any loose particles.
2. It is recommended to first apply any scotch or adhesi e tape to clean the surface of lens.
Warning: don’t use water and the other cleaning agents for cleaning, which may damage the lens.
3. Use an optical lens cleaning product that is a ailable at most office supply stores and computer supply
stores. Use an optical lens cloth or wipes to gently wipe the lens to clean and air dry. Be careful not to scratch
the lens when wiping the lens. If you see lint on the lens, lightly blow air on the lens after the sensor is dry.
Do Not Use Cotton or Alcohol Wipes.
Table of contents
Other Explore Scientific Card Reader manuals
Popular Card Reader manuals by other brands

Advanced Card
Advanced Card ACR100I Reference manual

SCM Microsystems
SCM Microsystems @MAXX prime Reference manual

Vanderbilt
Vanderbilt VR4 S-MF Series Installation and mounting instructions

Rosslare
Rosslare DR-12C user manual

Vertiv
Vertiv CYBEX SCMDR0001 Quick installation guide

Panasonic
Panasonic LP-ABR11 Setup and operation manual