manuals.online logo
Brands
  1. Home
  2. •
  3. Brands
  4. •
  5. EXPOL
  6. •
  7. Greenhouse Kit
  8. •
  9. EXPOL ATLAS User manual

EXPOL ATLAS User manual

MANUAL ATLAS
2
Dear customer!
Thank you for buying “Garant Triumph sectional Modular Arc”greenhouse which was developed
specifically for backyards and garden patches and features a simple and reliable design. Zinc-coated frame
sections are resistant to harsh weather conditions. Strong and flexible polycarbonate guarantees reliable
side wind protection and appropriate microclimate for your crops.
We wish you to enjoy using the greenhouse for a long time and hope that our greenhouse will completely
satisfy your expectations.
SAFETY REQUIREMENTS DURING OPERATION
Read the manual carefully before installing the greenhouse. It will save your time and prevent damaging
the frame during installation. It is recommended to first mount the frame elements without tightening the
bolted connections, so that any possible errors can be easily corrected. After the complete frame is mounted,
make sure to tighten the bolted connections.
A piece of ground for the greenhouse placement should be flat and without significant ground level
differences. Do not mount the greenhouse closer than 2 meters from other constructions, buildings, and
fences. Do not apply mechanical stress to the greenhouse frame. Do not change yourself the construction
design.
Depending on the climatic conditions and the greenhouse location, the customer on his own must
estimate the expected snow load and install supports or remove the show from the frame as necessary. In
case that the greenhouse is to be mounted in a windy location, provide rigid frame fixation to the ground
using materials at hand, such as metallic rods, bars, etc.
WARRANTY
Warranty period for the greenhouse frame is 1 year from the purchase date. The warranty covers any
manufacturing and material defects. The warranty does not cover damages caused by corrosion of the
construction elements.
The warranty is terminated in the following cases:
- failure to comply with the installation manual;
- non-compliance with the product operation requirements;
- using the product for purposes other than intended;
- occurrence of force majeure (natural calamity);
- absence of the product certificate with seller's note.
The warranty does not cover cellular polycarbonate.
The manufacturer takes responsibility for:
- completeness of the supplied set;
- the product assemblability.
INSTALLATION MANUAL
1. PRODUCT DESCRIPTION
The “Garant Triumph sectional Modular Arc”greenhouses are made of zinc-coated shaped pipe. The
load-carrying arc-shape greenhouse elements are 40×20 mm in the cross-section. For the greenhouse
cladding, cellular polycarbonate sheets are used (not included in the set and are to be purchased separately).
The “Garant Triumph sectional Modular Arc”greenhouses are designed to create ideal conditions for
cultivating vegetables, seedlings, flowers and berry plants on your backyard or garden patch. Greenhouse
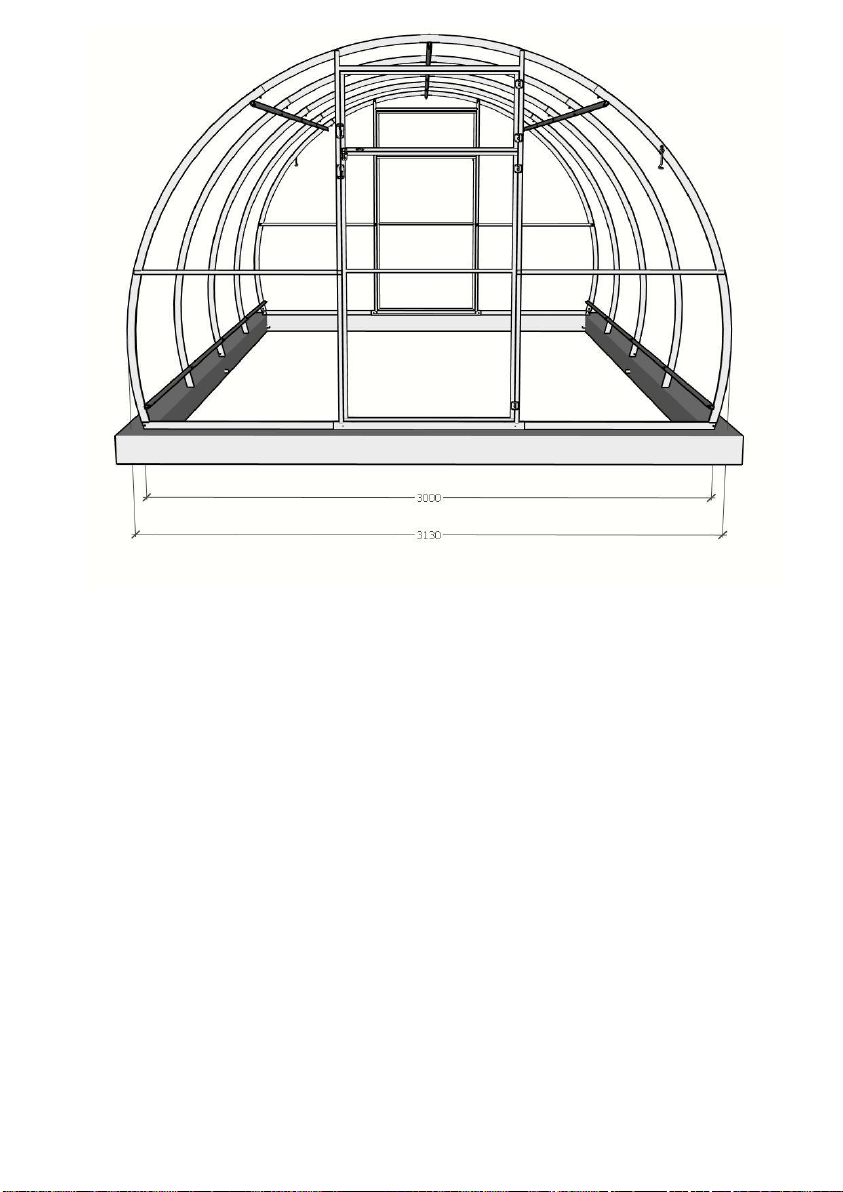
height is 2 m, base (ground) width is 3 m and the maximum arc width is 3.15 m.
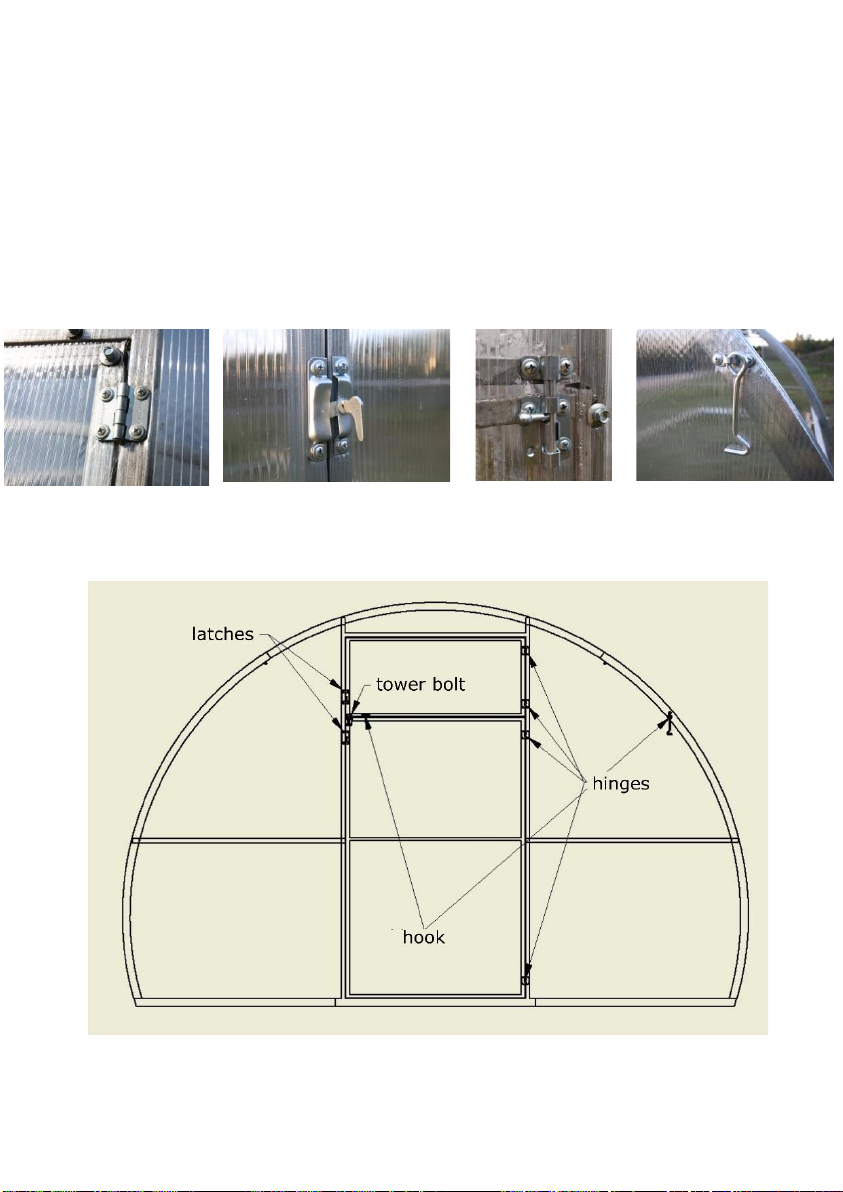
For convenience during transportation, the greenhouse end-walls and arcs are designed modular.
Each end-wall is equipped with a door and a vent for the greenhouse ventilation. It is not required to
remove the greenhouse cladding during winter.
2. PRODUCT SUPPLY SCOPE
Table 1 –Scope of supply for the greenhouse with 1 m spacing
3
Table 2 –Scope of supply for the greenhouse with 0.67 m spacing
4. PRODUCT ASSEMBLY SEQUENCE
Step 1. End-wall assembly
The first step is to assemble the frame end-walls. The end-walls are assembled by inserting the pipes of
the smaller cross-section into the pipes of a larger cross-section (when assembling the arcs), and by
connecting the end-wall sections with each other through the holes in the corresponding elements.
When assembling an end-side arc, its parts are fastened to each other using the М6×50 bolts with washers
and nuts via one of the two drilled holes. The second hole is used for mounting the frame crossbars during
Part
No.
Part name
Quantity per one
greenhouse, pcs.
4 m
6 m
8 m
10 m
12 m
1
End-walls with a door and a vent
2
2
2
2
2
2
Arcs
3
5
7
9
11
3
End crossbar (without connecting bends)
5
5
5
5
5
4
Crossbar (with connecting bend on one end)
5
10
15
20
25
5
Latches (for doors and vents)
4
4
4
4
4
6
Tower bolt (for connection doors and vents)
2
2
2
2
2
7
Hinges (for doors and vents)
8
8
8
8
8
8
Bolts М6×65 (or М6×70) mm with a washer and a nut (for interconnecting arcs
and cross beams)
25
35
45
55
65
9
Bolts М6×50 mm with a washer and a nut (for arc assembly)
10
14
18
22
26
10
Screws 5.5×19 (or 5.5×25) mm (for attaching polycarbonate sheets)
122
138
154
170
186
11
Screws 4.2×16 mm (for interconnecting the end-wall parts, for attaching
latches, hinges, hooks, and anchors to the greenhouse frame)
96
98
100
102
104
12
Hooks (for fixing the vent and the door in an open position)
2
2
2
2
2
13
Anchors (for anchoring the greenhouse to the ground)
6
8
10
12
14
14
Cellular polycarbonate sheets 2100×6000 mm
(not included in the set and are to be purchased separately)
3
4
5
6
7
Part
No.
Part name
Quantity per one greenhouse, pcs.
4 m
6 m
8 m
10 m
12 m
1
End-walls with a door and a vent
2
2
2
2
2
2
Arcs
5
8
11
14
17
3
End crossbar (without connecting bends)
5
5
5
5
5
4
Crossbar (with connecting bend on one end)
5
10
15
20
25
5
Latches (for doors and vents)
4
4
4
4
4
6
Tower bolt (for connection doors and vents)
2
2
2
2
2
7
Hinges (for doors and vents)
8
8
8
8
8
8
Bolts М6×65 (or М6×70) mm with a washer and a nut (for
interconnecting arcs and crossbars)
35
50
65
80
95
9
Bolts М6×50 mm with a washer and a nut (for arc assembly)
14
20
26
32
38
9
Screws 5.5×19 (or 5.5×25) mm (for attaching polycarbonate sheets)
138
162
186
210
234
10
Screws 4.2×16 mm (for interconnecting the end-wall parts, for
attaching latches, hinges, hooks, and anchors to the greenhouse
frame)
96
98
100
102
104
11
Hooks (for fixing the vent and the door in an open position)
2
2
2
2
2
12
Anchors (for anchoring the greenhouse to the ground)
6
8
10
12
14
13
Cellular polycarbonate sheets 2100×6000 mm
(not included in the set and are to be purchased separately)
3
4
5
6
7
4
later frame assembly steps. The nut and the washer are mounted from the inner greenhouse side (under the
arc). A wrench size 10 is required for the installation. Other elements are fastened to each other using screws
with pressure pads on the inner side of the greenhouse and using roof screws on the outer side of the
greenhouse (for attaching polycarbonate sheets). The locations and amount of the screws are shown in
Figures 1 and 2.
Attention! When assembling the end-walls, make sure that the punched holes are located on the same
side for all elements. The punched holes on the elements are used for subsequent attaching of the
polycarbonate sheets which are to be mounted on one side of each end-wall.
Figure 1 –Greenhouse frame end-wall assembly schematic (view from the inside of the greenhouse)
5
Figure 2 –Types of element connections for the greenhouse frame end-walls (view from the inside
of the greenhouse)
6
Step 2. Covering of end-walls using the cellular polycarbonate sheets
Before attaching polycarbonate to the frame end-walls, familiarize yourself with the general rules
for mounting cellular polycarbonate sheets.
General rules for mounting cellular polycarbonate sheets
Cellular polycarbonate sheets are attached to the frame using the roof screws with a rubberized
washer. The locations for the screws used to fix the cellular polycarbonate sheets are labelled with
punched holes on the frame elements. Considering the thermal expansion, the holes in the polycarbonate
should be made larger by 2 mm than the screw diameter. The screws should not be overtightened, so that
there is a small gap allowing some free movement.
Cellular polycarbonate which has an ultraviolet protection coating, must be mounted with this
coating facing outside (towards the sun). Therefore, always confirm the location of the coated side during
purchase and follow the corresponding labels on the cellular polycarbonate sheets or on the package.
The cellular polycarbonate sheets must be cut using a special utility knife or using a jigsaw with
blades for metal with small teeth.
After finishing mounting the cellular polycarbonate sheets, immediately remove the protection film
from the sheet surfaces (if present).
To avoid ingress of moisture, dust, and insects into the polycarbonate channels (cells), it is
recommended to cover them by installing face sections (not included in the set and are to be purchased
separately).
First, install the polycarbonate sheets on the greenhouse end-walls. One standard polycarbonate
sheet (6х2,1 m) is enough to cover two greenhouse end-walls. For convenience, the end-walls are covered
separately, before assembling the complete greenhouse frame. To do that, place the assembled end-wall
on a flat horizontal surface, insert the door and the vent into the door opening, place the polycarbonate
sheet on top as shown in Figure 3, and fix it using the roof screws with rubberized washers. Please note
that the sheet must be attached to both the end-wall, and to the door and the vent. After that, cut the
polycarbonate sheet along the end-wall edge.
Mount the polycarbonate sheet on the remaining end-wall part in the same way (Figure 3). Cut the
sheet along the end-wall edge.
Figure 3 –Cutting plan of the cellular polycarbonate sheet (6×2.1 m) for covering greenhouse frame
end-walls
Attention! Check carefully the size of the remaining polycarbonate on every cutting step to avoid
its shortage!
7
After fixing the polycarbonate sheets, mount the hinges, latches, tower bolts, and hooks on the door and
the vent (Figure 4) using screws with a pressure pad (Figure 5). The latches are used to fix the doors and vents
in the closed position. The tower bolt is used for connecting the door and the vent into a single unit, which can
be easily opened or closed (for example to conveniently enter the greenhouse). The hook is used to fix the vent
or the combined door /ventunit in the open position. All the hardware should be mounted on top ofpolycarbonate
sheets. After installing the hardware, make cuts along the door opening perimeter and between the door and the
vent.
Attention! The cuts along the door opening and between the door and the vent can bemade only after
fixing the polycarbonate sheets to the end-walls and installing the hardware on top of them. It is absolutely
forbidden to fix to the door and vent and cut polycarbonate sheets separately from the side-walls –after
subsequent mounting of the door and the vent, there will be openings between the door / vent sheets and the
end-wall sheets, which will cancel the greenhouse effect .
a) hinges
b) latches
c) tower bolts
d) hooks
Figure 4 –Mounting configuration for the hinges, the latches, the tower bolts and the hook
Figure 5 –Placement of the hinges, the latches, the tower bolts, and the hook on the frame end-wall
Step 3. Frame assembly
8
Before assembling the frame, its end-walls must already be covered with the polycarbonate sheets. The
end-walls and the intermediate arcs are connected to each other with 5 rows of the connecting elements
(crossbars) using bolts, washers, and nuts through the drilled holes. A wrench size 10 is required for the
installation.
The crossbars are mounted under the arcs from the inner side of the greenhouse, with the nut being
screwed onto the bolt from the inner side too (Figure 6).
The cross bars are connected by attaching the end crossbars to the crossbars with connecting bends on
one end (Figure 6).
Figure 6 –The mutual arrangement of the arcs and the crossbars during assembly
Figure 7 - The mutual arrangement of the arcs and crossbars of the greenhouse frame (side view)
Step 4. Covering the frame with the cellular polycarbonate
End-walls
Arcs
Connecting crossbar
End crossbar
9
The polycarbonate sheets are to be mounted after the frame assembly is completed. First mount the side
sheets, then the middle ones; it is required that the sheets are oriented in such a way that the bending direction
follows the cell direction (Figure 6). Mount the sheets so that they overrun the end arcs (end-wall arcs) by at
least 5 cm. The polycarbonate sheets are installed so that they overlap with each other along the long side.
Carefully align the sheets and fix them with the screws, first along the bottom edge, and then along the
arcs according to the drilled holes.
Attention! Do not forget to remove the packing tape from the both sides of the sheets!
Step 5. Greenhouse installation
Before installation start, carefully level the greenhouse installation area. Insert the anchors into the arcs
(into every second arc for the greenhouse with 1 m spacing, and into every third arc for the greenhouse with 0.67
m spacing) and the end-walls from both sides (Figure 8).
Attention! Make sure to fix the anchors to the arc with the screws with a pressure pad.
Make the ground recesses for the anchors which are deep enough to completely accommodate the
anchors. Install the assembled greenhouse so that the bottom crossbar rows are levelled with the ground, and the
legs and polycarbonate sheet edges are buried in the ground. Then fill the anchor recesses with ground and firm
it. As an option, it is possible to use a wooden frame or a concrete foundation for the greenhouse installation.
Figure 8 –Anchor installation
Attention! The greenhouse has a high windage area. Do not leave an assembled greenhouse not
anchored to the ground.
Attention! The “Garant Triumph sectional Modular arc”greenhouse has a specific shape, which has
to be taken into account during foundation laying (Figure 9).
Anchors
10
Figure 9 –Foundation sizing
Due to continuous refinement of the “Garant Triumph sectional Modular Arc”greenhouse design, the
manufacturer reserves the right to change the design without prior notice.
The product is intended for private use, and not for public (commercial) use.
Purchase data: _______________________ Seller:_____________________
Foundation

Popular Greenhouse Kit manuals by other brands

Outdoor living today Garden In A Box Assembly manual

Outdoor living today

Outdoor living today Garden In A Box Assembly manual

Palram Mythos 6x14 TwinWall Glazing Assembly instructions

Palram

Palram Mythos 6x14 TwinWall Glazing Assembly instructions

Growhouse Lean To 6 x 8 Erection and Glazing Instructions

Growhouse

Growhouse Lean To 6 x 8 Erection and Glazing Instructions

Juliana Oase Assembly instruction

Juliana

Juliana Oase Assembly instruction

Botanica E manual

Botanica

Botanica E manual

AeroGarden 507140-0000 AD Planting & growing guide

AeroGarden

AeroGarden 507140-0000 AD Planting & growing guide

Palram Applications Grand Gardener Prestige 8x8 instructions

Palram Applications

Palram Applications Grand Gardener Prestige 8x8 instructions

Flower House StarterHouse manual

Flower House

Flower House StarterHouse manual

Vitavia VM0041-F 5900 Assembly instructions

Vitavia

Vitavia VM0041-F 5900 Assembly instructions

Palram CANOPIA AMERICANA 12x12 / 3.7x3.7 How to assemble

Palram

Palram CANOPIA AMERICANA 12x12 / 3.7x3.7 How to assemble

LAMS Melissa manual

LAMS

LAMS Melissa manual

Juliana Oase Assembly instruction

Juliana

Juliana Oase Assembly instruction

ZipGrow MICROGREENS STATION Assembly guide

ZipGrow

ZipGrow MICROGREENS STATION Assembly guide

Velcom CAMELLIA R Technical manual

Velcom

Velcom CAMELLIA R Technical manual

ClearSpan 104903 Assembly instructions

ClearSpan

ClearSpan 104903 Assembly instructions

Dancover STRONG 3x4 m manual

Dancover

Dancover STRONG 3x4 m manual

Wilko 462571 Assembly instructions

Wilko

Wilko 462571 Assembly instructions

RVM CAMELLIA Technical manual

RVM

RVM CAMELLIA Technical manual

manuals.online logo
manuals.online logoBrands
  • About & Mission
  • Contact us
  • Privacy Policy
  • Terms and Conditions

Copyright 2025 Manuals.Online. All Rights Reserved.