Beachten Sie bitte die folgenden Installationshinweise.
1. Installieren Sie den EX-60315 mit dem DIN-Rail Kit auf eine Tragschiene oder mit der
Wandmontagehalterung an die Wand.
2. Schließen Sie den Stromanschluss des optional erhältlichen Netzteils an den Terminal
Block an und schalten Sie das Netzteil ein.
3. Nach dem Einschalten des Geräts leuchtet die PWR-Anzeige. Wenn die Anzeige nicht
leuchtet, überprüfen Sie den korrekten Anschluss an die Stromversorgung.
4. Verbinden Sie Ihren Router mit dem RJ45-Eingang des PoE-Injectors.
5. Schließen Sie nun Ihr PoE-PD-Gerät an den PoE Anschluss an.
6. Wenn alle Kabel korrekt angeschlossen sind, leuchten die Anzeigen entsprechend dem
Portstatus der LEDs (Seite 2).
234
HARDWARE INSTALLATION
ANSCHLÜSSE & LED'S
Das DIN-Rail Kit ist mit zwei Schrau-
ben an der Rückseite vormontiert Zur Montage der Wandhalterung wird
das DIN-Rail-Kit durch den Montage-
bügel ersetzt
LAYOUT
Manual
Vers. 1.1 / 30.10.23
EX-60315
ACHTUNG!
Bitte auf die richtige Polarität achten!
Netzteil nie eingeschaltet mit dem Terminal Block verbinden!
Schweiz:
EXSYS Vertriebs GmbH
Dübendorfstrasse 17
8602 Wangen
www.exsys.ch
Deutschland:
EXSYS Vertriebs GmbH
Industriestrasse 8
61449 Steinbach
www.exsys.de
Status LEDs:
LED Name Farbe LED Funktion
Power Grün An: Stromversorgung an
Aus: keine Stromversorgung
PoE
Grün An: PoE ist aktiv
Blinken: Power Device (PD) erkannt
Aus: Kein (PD) Gerät angeschlossen
The Gigabit Ethernet PoE Injector EX-60315 in a robust metal housing allows end devices such
as IP telephones, IP cameras, WLAN access points, etc. to be powered via the network cable. It
supports the PoE standards IEEE 802.3af (PoE), IEEE 802.3at (PoE+) and IEEE 802.3bt
(PoE++) and enables a maximum power output of up to 90W at the PoE port. Power is supp-
lied via the +12~48V terminal block using an optional external power supply. The EX-60315
guarantees secure data transmission and excellent performance of up to 1000Mbps. The
rugged metal housing and extended operating temperature range of -40°C to 80°C make it
suitable for a wide range of applications, even in harsh environments. Supplied with a pre-
assembled DIN rack kit and wall mounting bracket.
DESCRIPTION & TECNICAL INFORMATION
Compatibility: Gigabit Ethernet 10/100/1000Base-T
PoE: IEEE 802.3af/at/bt (PoE++)
PoE (PSE): type 1 = 15.4W / type 2 = 34.2W /
type 3 = 60.0W / type 3 = 90.0W
Operating System: All operating systems
Connectors: 2x RJ45-Port, 1x Terminal Block 12~48VDC
Extent of Delivery: EX-60315, DIN-Rail Kit, Wall Mounting Bracket, Manual
Certificates:
RJ45 Anschluss:
Zur Reinigung des Gerätes verwenden Sie bitte ausschließlich ein trockenes nicht faserndes
Tuch und entfernen Sie die Verschmutzung mit leichtem Druck. Im Bereich der Anschlüsse bitte
darauf achten, dass keine Fasern des Tuchs in der Buchse hinterlassen werden. Verwenden
Sie bitte zu Reinigung in keinem Fall ein feuchtes oder nasses Tuch!
REINIGUNG
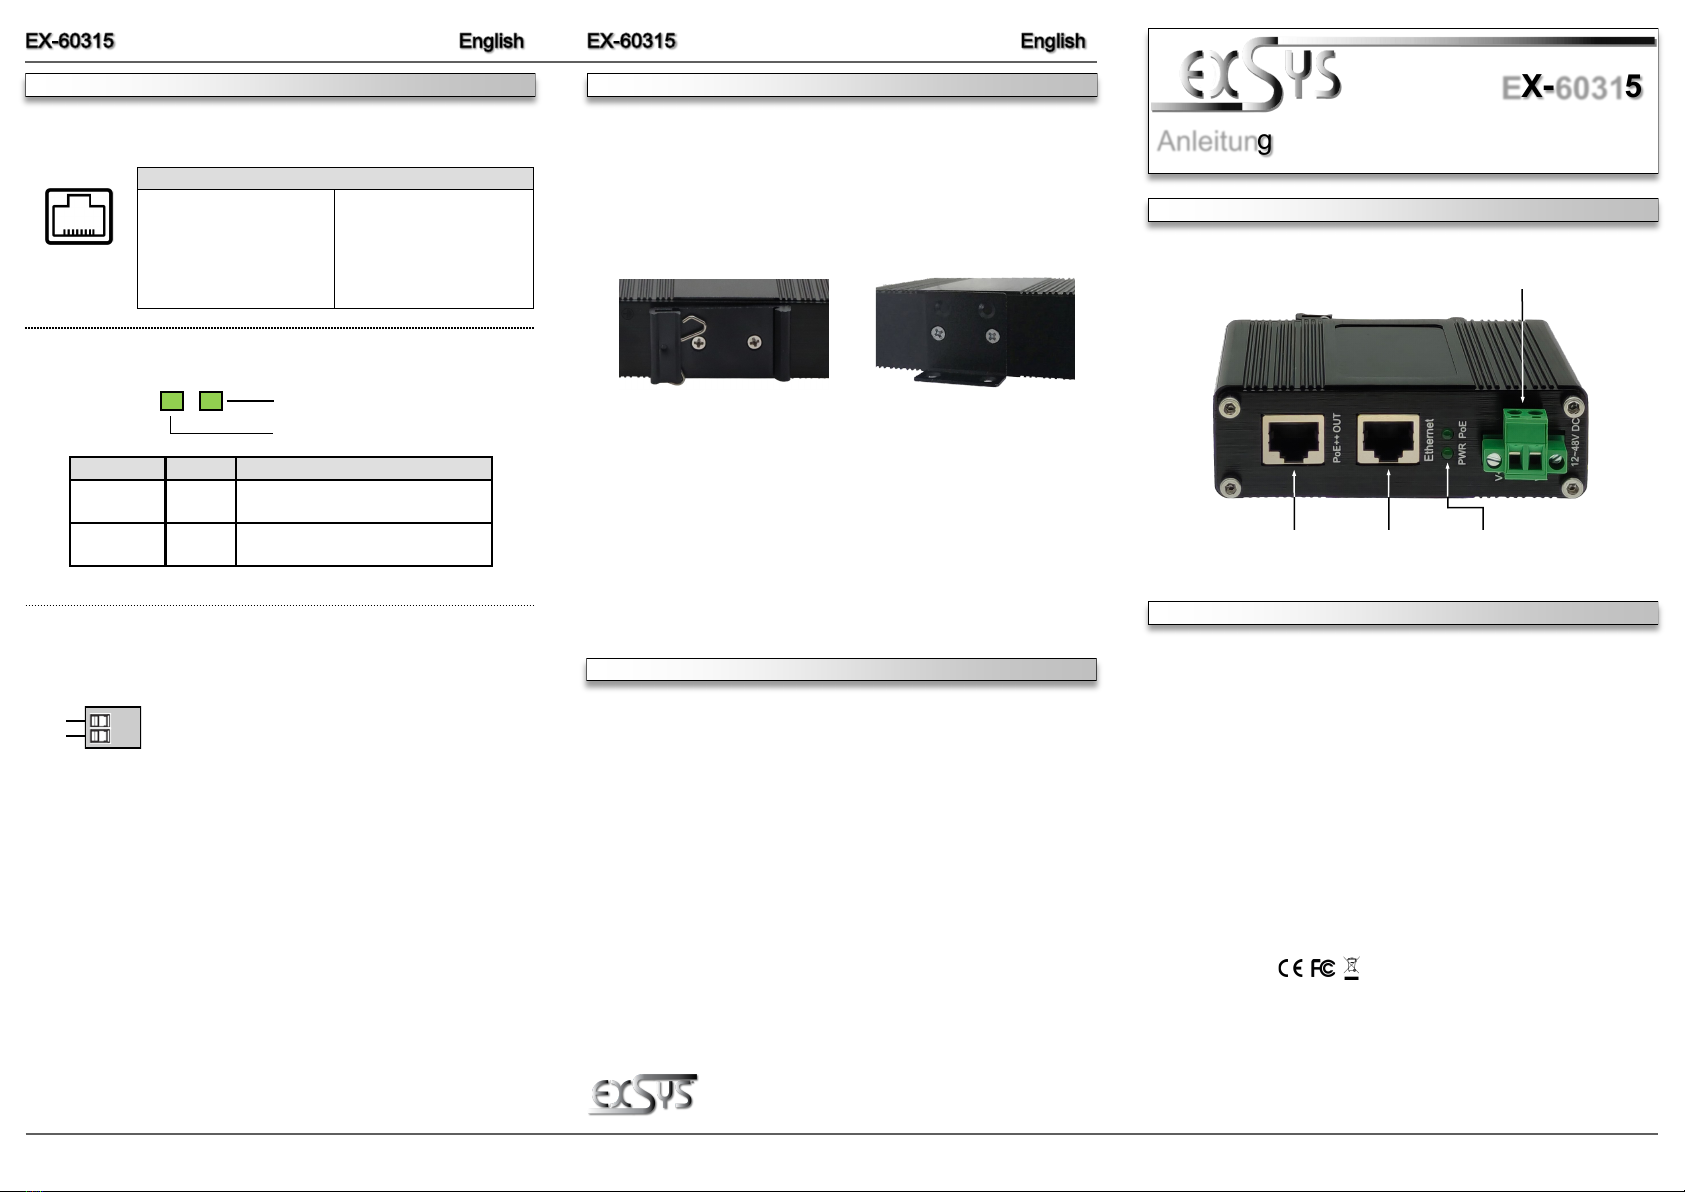
Power LED
PoE LED
12V bis 48V T-Block:
V+
V-
Status LEDsRJ45-Uplink
(Data)
RJ45-Downlink
(PoE/Data)
12-48V T-Block for optional
Power Supply
RJ45 Port
Pin Signal PoE Pin Signal PoE
Mode A Mode B Mode A Mode B
1BI_DA+ VCC+ 5BI_DC- VCC+
2BI_DA- VCC+ 6BI_DB- VCC-
3BI_DB+ VCC- 7BI_DD+ VCC-
4BI_DC+ VCC+ 8BI_DD- VCC-
Power over Ethernet IEEE802.3af/at/bt (PoE++ / 4PPoE)
87654321