Exsys EX-1316HMV User manual

Anleitung
Vers. 1.0 / 08.12.17
Manual
EX-1316HMV
USB 2.0 zu 16x RS-232 Ports
im Metallgeh use
USB 2.0 to 16x RS-232 Ports
Metal Case

2
EX-1316HMV
1. Beschreibung······················································································ 3
2. Lieferumfang ······················································································ 3
3. Aufbau, Anschlüsse, LED‘s & Jumper Einstellungen ·································4-6
3.1 Aufbau······································································································ 4
3.2 Anschlüsse······························································································4-5
3.3 LED‘s ······································································································· 5
3.4 Jumper Einstellungen ················································································5-6
4. Hardware Installation············································································ 6
5. Treiber Installation ··············································································· 7
6. Reinigung ·························································································· 8
7. Technische Daten················································································ 8
1. Description ························································································· 9
2. Extent of Delivery ················································································ 9
3. Layout, Connections, LED’s & Jumper Settings···································· 10-12
3.1 Layout ·····································································································10
3.2 Connections ························································································ 10-11
3.3 LED‘s ······································································································11
3.4 Jumper Settings ··················································································· 11-12
4. Hardware Installation···········································································12
5. Driver Installation················································································13
6. Cleaning ···························································································14
7. Technical Information ··········································································14
Inhaltsverzeichnis
Index
© Copyright 2017 by EXSYS Vertriebs GmbH. All Rights Reserved
3
EX-1316HMV Deutsch
Die EX-1316HMV ist ein Modul zur Umsetzung von USB auf sechzehn RS-232 Schnitt-
stellen mit FIFO 16C550 Port für den Anschluss von High Speed Seriellen RS-232 Peri-
pherie Ger ten (z.B. Modem, Plotter usw.). Die EX-1316HMV ist mit einem USB 2.0 A-
Stecker zum Anschluss an den PC und sechzehn RS-232 seriellen 9 Pin Stecker aus-
gestattet. Das USB Modul ist Hot Plug & Play f hig. Die EX-1316HMV unterstützt POS
(Power over System). Es besteht die Möglichkeit, +5V oder +12V Spannung auf den
Pin 9 der sechzehn 9 Pin Stecker zu legen. Die +5V oder +12V Spannung ist abh ngig
welches Netzteil angeschlossen ist.
Merkmale:
• Kompatibel zu USB 1.1, 2.0, 3.0 & 3.1
• Bis zu 921.6KBaud
• Windows 9.x/ ME/ 2000/ XP/ Vista/ 7/ 8.x/ 10/ Server 20xx/ Linux/ MAC
• Zerti iziert ür
Bevor Sie den EX-1316HMV an Ihren PC anschließen, überprüfen Sie bitte zuerst den
Inhalt der Lieferung:
• EX-1316HMV
• Netzteil 12V/3A
• USB 2.0 Kabel (EX-K1542V)
• 19“ Rack Befestigungs-Kit
• DIN-RAIL Kit
• Treiber CD
• Anleitung
1. Beschreibung
2. Lie erum ang
© Copyright 2017 by EXSYS Vertriebs GmbH. All Rights Reserved

4
Deutsch EX-1316HMV
3.1 Au bau
3.2 Anschlüsse
3. Au bau, Anschlüsse, LED‘s & Jumper Einstellungen
1x USB 2.0
Upstream B-Buchse
Betriebs LED
+7V-24V T-Block:
+7V - 24V GND (Ground)
ACHTUNG!!!
Schließen Sie niemals Strom an Ground an,
dadurch kann Ihre Hardware zerstört werden!!!
© Copyright 2017 by EXSYS Vertriebs GmbH. All Rights Reserved
12V DC Anschluss für
beiliegendes Netzteil
+12V Buchse:
Achtung!!!
Nur zur Verwendung mit im
Lie erum ang enthaltenem Netzteil!
+
-
7-24V T-Block für optionales
externes Netzteil
S1-S16: 16x 9 Pin Seriell RS-232 Stecker
Status LED
für jeden Port

5
EX-1316HMV Deutsch
3. Au bau, Anschlüsse, LED‘s & Jumper Einstellungen
3.2 Anschlüsse
© Copyright 2017 by EXSYS Vertriebs GmbH. All Rights Reserved
3.3 LED‘s
Status LED‘s:
LED Status LED Funktion
Aus Kein Datenverkehr
Blinken Daten werden gesendet oder empfangen
9 Pin Stecker Seriell RS-232
Pin Signal Pin Signal
1DCD 6DSR
2RXD 7RTS
3TXD 8CTS
4DTR 9RI
5GND
DB 9M: Verdrahtung RS-232:
DB9 (EX-1316HMV) RS-232 (Endgerät)
1DCD 1DCD
2RXD 2RXD
3TXD 3TXD
4DTR 4DTR
5GND 5GND
6DSR 6DSR
7RTS 7RTS
8CTS 8CTS
USB 2.0 B-Buchse:
USB 2.0 B-Buchse
Pin Signal Pin Signal
1VCC 3DATA+
2DATA- 4GND
3.4 Jumper Einstellungen
Mit der EX-1316HMV haben Sie die Möglichkeit +5V oder +12V auf Pin 9 der Seriellen
RS-232 Stecker S1 bis S16 zu konfigurieren:
Achtung! Nur konfigurieren wenn für das Peripherieger t wirklich +5Volt oder +12Volt
benötigt wird. Für normale Anwendung den Jumper nicht ver ndern, da sonst Ihre Ge-
r te besch digt werden!

6
Deutsch EX-1316HMV
© Copyright 2017 by EXSYS Vertriebs GmbH. All Rights Reserved
4. Hardware Installation
Beachten Sie bitte die folgenden Installationshinweise. Da es große Unterschiede zwi-
schen PC‘s gibt, können wir Ihnen nur eine generelle Anleitung zum Anschluss der EX-
1250V geben. Bei Unklarheiten halten Sie sich bitte an die Bedienungsanleitung Ihres
Computersystems.
1. Falls Sie die EX-1316HMV auf einer Tr gerschiene installieren wollen, befolgen Sie
als erstes den Punkt 5 bevor Sie mit Punkt 2 fortfahren.
2. Verbinden Sie nun das mitgelieferte USB Kabel mit der USB B-Buchse der EX-
1316HMV.
3. Schließen Sie jetzt den Stromanschluss des mitgelieferten Netzteils an den DC An-
schluss des Hubs an oder verbinden Sie das optionale Netzteil mit dem Terminal
Block des Hubs und stecken Sie den Netzstecker des Netzteils in eine Steckdose.
4. Verbinden Sie nun das andere Ende (A-Stecker) des mitgelieferten USB Kabels mit
der A-Buchse an Ihrem PC.
5. Installation der EX-1250V auf einer Tr gerschiene.
3. Au bau, Anschlüsse, LED‘s & Jumper Einstellungen
3.4 Jumper Einstellungen
PWR
DIS
S1
Öffnen Sie hierfür das Geh use indem Sie die vier seitlichen Schrauben lösen. Es sind
jetzt die 16 Jumper (S1-S16) erkennbar mit denen die Spannung auf Pin 9 der sech-
zehn Stecker gesetzt werden kann. Hierzu müssen Sie die gewünschten Jumper von
der Position DIS auf PWR umsetzen (siehe nachfolgende Abbildung).
S2 S3 S4 S5 S6 S7 S8 S9 S10 S11 S12 S13
S14 S15 S16

7
EX-1316HMV Deutsch
© Copyright 2017 by EXSYS Vertriebs GmbH. All Rights Reserved
Windows
Nach Abschluss der Hardwareinstallation erkennt das Betriebssystem automatisch den
Adapter und installiert diesen! Falls die Treiber nicht automatisch installiert werden soll-
ten, legen Sie nun die Treiber CD in Ihr CD-ROM Laufwerk (z.B. Laufwerk D:) ein und
öffnen Sie den Ordner „USB_to_IO/FTDI“. Nun w hlen Sie den Ordner Ihres Betriebs-
systems aus und installieren Sie die Treiber (siehe Abbildung). Folgen Sie den Installa-
tionsanweisungen und schließen Sie die Installation ab. Wichtig! Starten Sie Ihren PC
nach der Installation neu.
ÜBERPRÜFEN DES INSTALLIERTEN TREIBER
Öffnen Sie den >Geräte-Manager<. Jetzt müssten Sie unter „Anschlüsse (COM &
LPT)“ und unter „USB-Controller“ folgenden Eintrag sehen:
Sind diese oder hnliche Eintr ge vorhanden, ist die EX-1316HMV richtig installiert.
5. Treiber Installation

8
Deutsch EX-1316HMV
6. Reinigung
Zur Reinigung des Ger tes verwenden Sie bitte ausschließlich ein trockenes nicht fa-
serndes Tuch und entfernen Sie die Verschmutzung mit leichtem Druck. Im Bereich der
Anschlüsse bitte darauf Achten, dass keine Fasern des Tuchs in der Buchse hinterlas-
sen werden. Verwenden Sie bitte zu Reinigung in keinem Fall ein euchtes oder
nasses Tuch!
7. Technische Daten
Chip-Set: FTDI
Datentrans er-Rate: 300Baud bis 921.6KBaud
Anschlüsse: 16x 9 Pin Seriell RS-232 Stecker, 1x USB 2.0 B-Buchse
1x Terminal Block 7-24V, 1x 12V DC Anschluss
Hardwaresystem: USB 2.0
Betriebssystem: Windows 9.x/ ME/ 2000/ XP/ Vista/ 7/ 8.x/ 10/ Server 20xx/
Linux/ MAC
Betriebstemperatur: 0° bis 55° Celsius
Lagertemperatur: -40° bis 75° Celsius
Rel. Lu t euchtigkeit: 5% bis 95%
Stromversorgung: +7 bis +24 Volt & +12 Volt
Abmessung: 336,00 x 68,00 x 43,00 mm
Gewicht: 1000g
© Copyright 2017 by EXSYS Vertriebs GmbH. All Rights Reserved
9
EX-1316HMV English
The EX-1316HMVS are plug & play high-speed USB 2.0 to Serial module for USB 2.0
ports with up to sixteen RS-232 9 pin connector. The EX-1316HMV provides one USB
2.0 A-Plug for connect to PC and sixteen 9 Pin serial RS-232 connector. The USB to
Serial module design utilizes the Chip-Set FTDI with 16C550 UART. It is not possible to
change the address or IRQ settings manually, they will be obtained automatically by the
operating system. The USB module support Hot Plug and Play. The EX-1316HMV sup-
ports POS (Power over System). It is possible to connect +5V or +12V voltage on pin 9
of the sixteen 9 pin connectors. The +5V or +12V voltage depends on which power sup-
ply is connected.
Features:
• Compatible for USB 1.1, 2.0, 3.0 & 3.1
• Up to 921.6KBaud
• Windows 9.x/ ME/ 2000/ XP/ Vista/ 7/ 8.x/ 10/ Server 20xx/ Linux/ MAC
• Certi icate or
Before you connect the EX-1316HMV to your PC, you should first check the contents of
the delivery:
• EX-1316HMV
• Power Supply 12V/3A
• USB 2.0 Cable (EX-K1542V)
• 19-inch Rack Mounting Bracket
• DIN-RAIL Kit
• Driver CD
• Manual
1. Description
2. Extent o Delivery
© Copyright 2017 by EXSYS Vertriebs GmbH. All Rights Reserved
10
English EX-1316HMV
© Copyright 2017 by EXSYS Vertriebs GmbH. All Rights Reserved

3.1 Layout
3.2 Connections
3. Layout, Connections, LED’s & Jumper Settings
1x USB 2.0
Upstream B-Port
Power LED
+7V-24V T-Block:
+7V - 24V GND (Ground)
ATTENTION!!
Never connect power to GND, it will destroy
your Hardware!!!
+12V Buchse:
Attention!!!
Use only with the included power supply!
+
-
S1-S16: 16x 9 Pin Serial RS-232 Connector
Status LED
for each Port
12V DC Connector for
included Power Supply
7-24V T-Block for optional
external Power Supply

11
EX-1316HMV English
© Copyright 2017 by EXSYS Vertriebs GmbH. All Rights Reserved
3. Layout, Connections, LED’s & Jumper Settings
3.2 Connections
3.3 LED‘s
Status LED‘s:
LED Status LED Function
Off No Data Traffic
Flash Data is send or received
9 Pin Connector Serial RS-232
Pin Signal Pin Signal
1DCD 6DSR
2RXD 7RTS
3TXD 8CTS
4DTR 9RI
5GND
DB 9M: Cable Wiring RS-232:
USB 2.0 B-Port:
USB 2.0 B-Port
Pin Signal Pin Signal
1VCC 3DATA+
2DATA- 4GND
3.4 Jumper Settings
With the EX-1316HMV you have the option +5V or +12V to configure to pin 9 from all
connector S1 to S16:
Attention! Only change if you really need +5Volt or +12Volt for the peripheral device.
For normal use, don‘t change the jumper or your hardware can be damaged.
DB9 (EX-1316HMV) RS-232 (Device)
1DCD 1DCD
2RXD 2RXD
3TXD 3TXD
4DTR 4DTR
5GND 5GND
6DSR 6DSR
7RTS 7RTS
8CTS 8CTS

12
English EX-1316HMV
© Copyright 2017 by EXSYS Vertriebs GmbH. All Rights Reserved
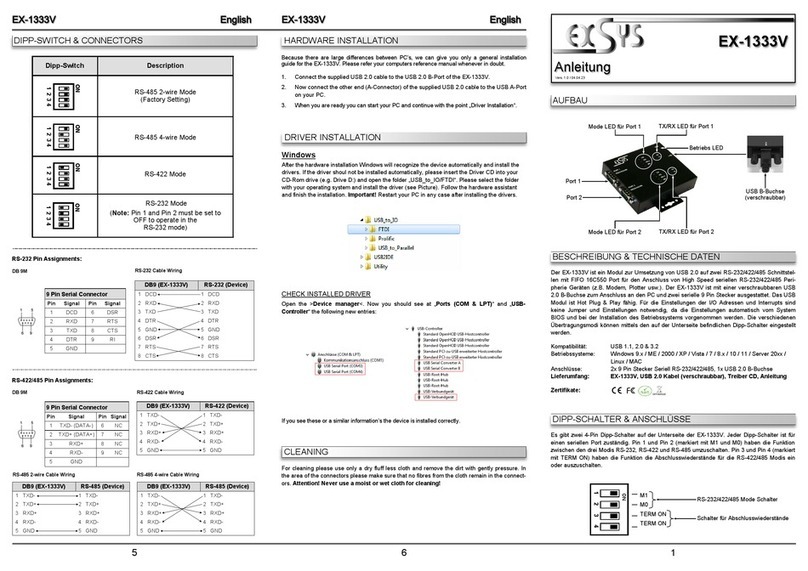
4. Hardware Installation
Because there are large differences between PC’s, we can give you only a general in-
stallation guide. Please refer your computer’s reference manual whenever in doubt.
1. If you want to install the EX-1316HMV on a DIN-RAIL, then please go ahead with
the step 5, before proceeding to step 2.
2. Now connect the included USB cable to the USB B-Port of the EX-1316HMV.
3. Connect the included power supply to the DC connector at the EX-1316HMV or
connect the optional power supply into the terminal block at the EX-1316HMV.
4. Now connect the other end from the USB cable (A-Plug) to the A-Port at your PC.
5. Assemble the EX-1316HMV on the DIN-RAIL.
3. Layout, Connections, LED’s & Jumper Settings
3.4 Jumper Settings
PWR
DIS
S1
Open the case with the four screws on both sides. There are now 16 jumper (S1-S16)
recognizable. With the jumpers you can set the voltage to pin 9 of the sixteen connect-
ors. For this you need set the jumper from DIS to PWR (see following picture).
S2 S3 S4 S5 S6 S7 S8 S9 S10 S11 S12 S13
S14 S15 S16

13
EX-1316HMV English
© Copyright 2017 by EXSYS Vertriebs GmbH. All Rights Reserved
Windows
After the hardware installation Windows will recognize the device automatically and
install the drivers. If the driver shoul not be installed automatically, please insert the
Driver CD into your CD-Rom drive (e.g. Drive D:) and open the folder „USB_to_IO/
FTDI“. Please select the folder with your operating system and install the driver (see
Picture). Follow the hardware assistant and finish the installation. Important! Restart
your PC in any case after installing the drivers.
CHECK INSTALLED DRIVER
Open the >Device manager<. Now you should see at „Ports (COM & LPT)“ and „USB-
Controller“ the following new entry:
If you see this or a similar information the device is installed correctly.
5. Driver Installation

14
English EX-1316HMV
Chip-Set: FTDI
Data Trans er Rate: 300Baud bis 921.6KBaud
Connectors: 16x 9 Pin Serial RS-232 Connector, 1x USB 2.0 B-Port
1x Terminal Block 7-24V, 1x 12V DC Connector
Hardware System: USB 2.0
Operating System: Windows 9.x/ ME/ 2000/ XP/ Vista/ 7/ 8.x/ 10/ Server 20xx/
Linux/ MAC
Operating Temperature: 32°F to 131°Fahrenheit
Storage Temperature: -40°F to 167°Fahrenheit
Rel. Humidity: 5% to 95%
Power: +7 bis +24 Volt & +12 Volt
Size: 336,00 x 68,00 x 43,00 mm
Weight: 1000g
© Copyright 2017 by EXSYS Vertriebs GmbH. All Rights Reserved
6. Cleaning
For cleaning please use only a dry fluff less cloth and remove the dirt with gently pres-
sure. In the area of the connectors please make sure that no fibres from the cloth re-
main in the connectors. Attention! Never use a moist or wet cloth or cleaning!
7. Technical In ormation


Table of contents
Languages:
Other Exsys Media Converter manuals

Exsys
Exsys EX-1334HM User manual

Exsys
Exsys EX-1309-T User manual

Exsys
Exsys EX-1333VIS User manual

Exsys
Exsys EX-1311-2 User manual

Exsys
Exsys EX-1309-9 User manual

Exsys
Exsys EX-6300SM User manual

Exsys
Exsys EX-60340 Manual

Exsys
Exsys EX-1348HMV User manual

Exsys
Exsys EX-3605 User manual

Exsys
Exsys EX-6300MM User manual