EZ-ACCESS SUITCASE Top Lip Extension User manual

10264 REV 10-29-2020
Patented.
LIFETIME WARRANTY. Please register at www.ezaccess.com/warranty-satisfaction.
© EZ-ACCESS®, a division of Homecare Products, Inc. All rights reserved.
All text and images contained in this document are proprietary and may not be shared, modified,
distributed, reproduced, or reused without the express written permission of EZ-ACCESS.
Instructions
SUITCASE®Top Lip Extension

Page | 2
PACKAGE CONTENTS
QTY
DESCRIPTION
IMAGE*
2
EZ-ACCESS® SUITCASE® TOP LIP EXTENSION
2
NUT HEX .25"-20 NYLON INSERT LOCKNUT ZINC PLATED
STEEL
2
BOLT CARRIAGE SQUARE NECK .25-20 x .75 ZINC PLATED
STEEL
2
WASHER - FLAT 1/4 ID X 5/8 OD ZINC PLATED STEEL
1
HOOK & LOOP SELF-CINCHING STRAP
1
INSTRUCTIONS
* IMAGES NOT SHOWN TO ACTUAL SIZE

Page | 3
SYMBOLS AND WARNINGS
The WARNING symbol indicates a potentially hazardous condition/situation. The warnings throughout this
document, and on your equipment, if any, are for the protection of people and property. Failure to abide by
warnings will result in a waiver of all liabilities, loss of your warranty, and could result in equipment damage
and or failure, property damage, risk of serious bodily injury, and or death to operators, riders, and those
nearby. The symbol may appear in various colors and in conjunction with other symbols.
The NOTE symbol indicates important information. Failure to obey all notes could result in improper operation,
less-than-optimum equipment performance, and at the sole discretion of the equipment manufacturer, may
void your warranty. The symbol may appear in various colors and in conjunction with other symbols.
INTRODUCTION
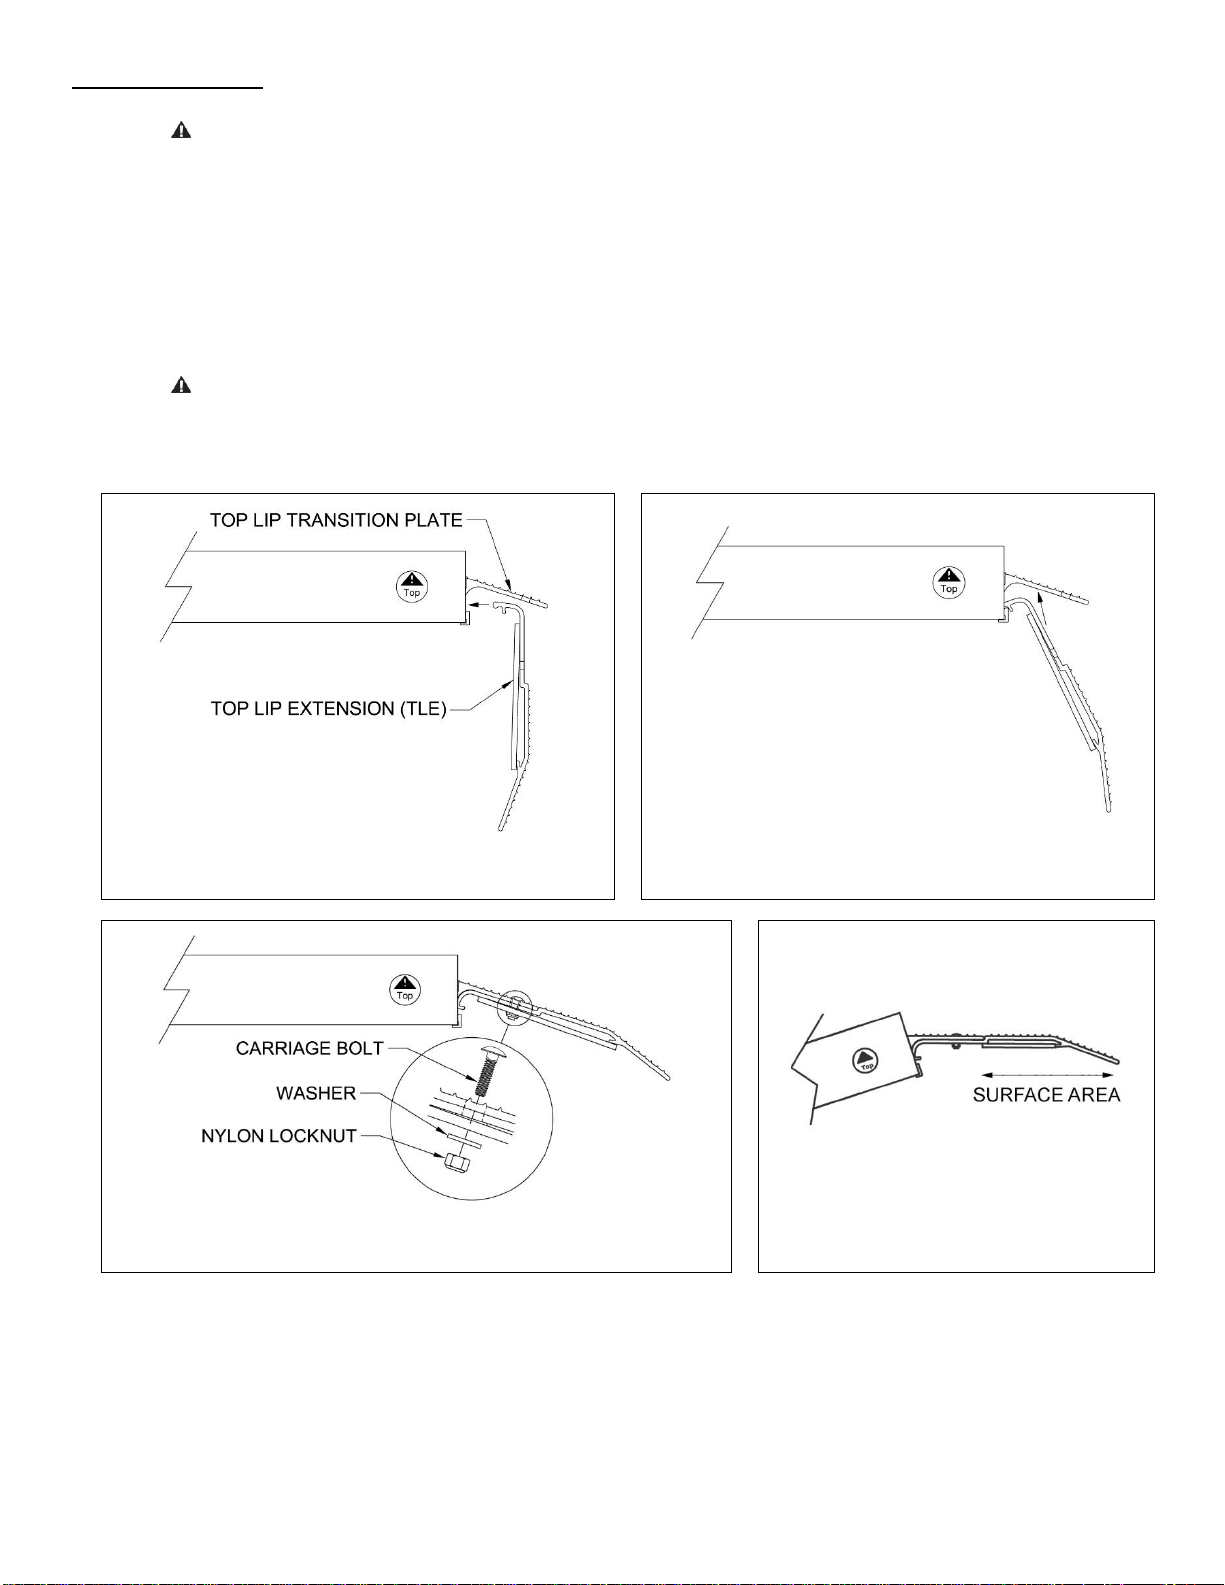
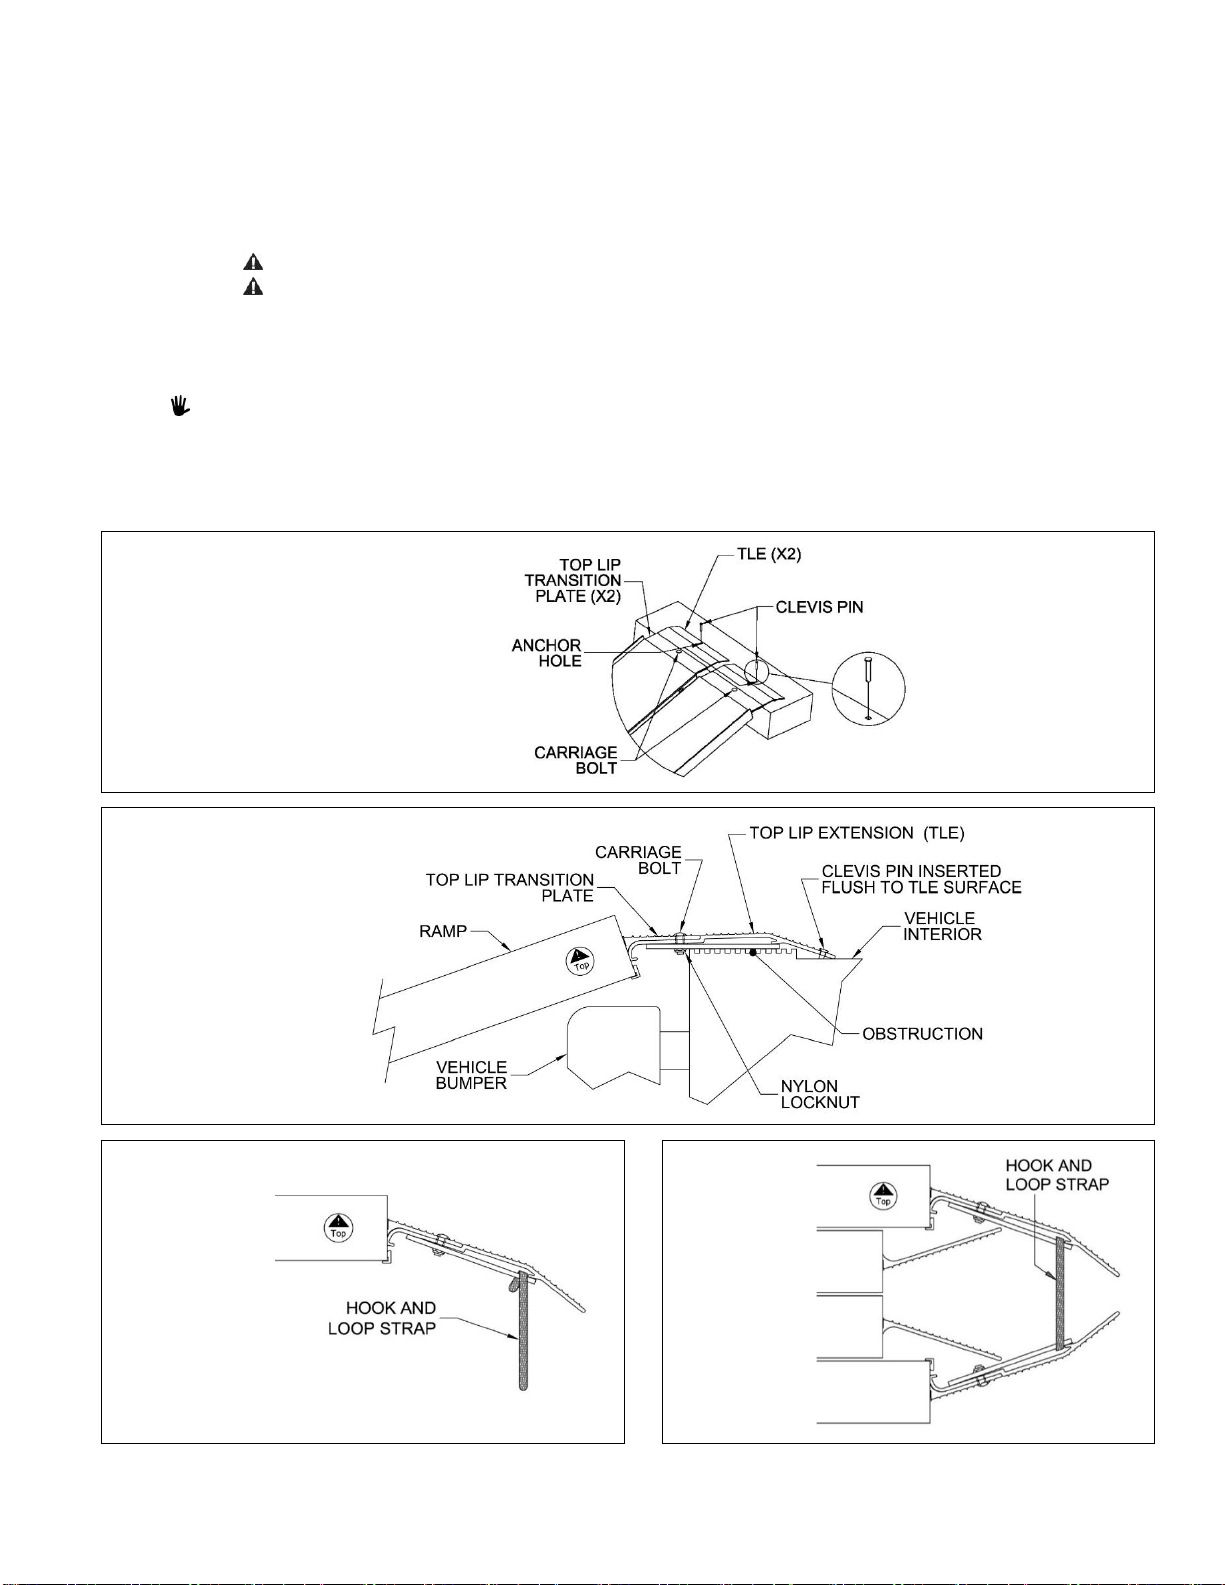
1. If the ramp’s top lip transition plates are not long enough to fully overlap a secure, unobstructed, level
landing, a SUITCASE® Top Lip Extension (‘TLE’) is an available option that increases the standard 3” reach
of the top lip transition plates to 9”, in many cases, allowing the ramp to clear an obstruction to create a
smooth transition. Visit www.ezaccess.com or call 1-800-451-1903 for more information.
Use of the TLE reduces overall ramp weight capacity to 500 lbs.; never exceed weight capacity.
If a secure, unobstructed, level landing cannot be attained, do not use the TLE or ramp.
2. The TLE must be used in pairs and is designed only for use with an appropriate EZ-ACCESS® SUITCASE®
Singlefold, Singlefold AS, Trifold® AS, or OEM equivalent ramp. If you have questions concerning
compatibility, please call 1-800-451-1903. Before use, read the ramp’s instruction manual in its entirety
and follow all instructions before and during use.
WARNINGS!
Maximum weight capacity is 500 lbs. (use of the TLE reduces overall ramp weight capacity to 500 lbs.); never
exceed weight capacity.
Prior to assembly and use, read and follow all instructions, warnings, and labels. Following all instructions and
obeying all warnings before and during use is necessary for safe operation. For additional information or to
obtain replacement copies of instructions or labels, call 1-800-451-1903.
For wheelchairs and scooters only; not for commercial use.
Before using the TLE with ramp, refer to your mobility equipment's owner guide for acceptable ramp usage,
including proper slope/incline, chair direction, etc.; never exceed its recommendations.
Only use the TLE with ramp with a qualified helper and always use a lap belt.
Before each use, check the TLE and ramp for worn, loose, or damaged parts. If you find any of these conditions,
do not use the TLE or ramp. Contact your dealer for service or repairs. Failure to do so may cause injury.
Do not use the TLE with ramp if TLE and or ramp are damaged or unstable.
Do not tamper with, attempt to repair, or modify any portion of the TLE with ramp.
Ensure that the landing the TLE will be placed on is substantial and of sound construction.
Ensure that each TLE fully overlaps a secure, unobstructed, level landing enough to safely install clevis pins or
other anchoring hardware and rests firmly against the landing prior to use. If a secure, unobstructed, level
landing cannot be attained, do not use the TLE or ramp.
Ensure that the TLE with ramp is securely anchored before each use.
Do not use the TLE with ramp unless the carriage bolts, washers, and nylon locknuts are secure.
The TLE or ramp surfaces may become slippery in wet conditions; use caution if surfaces are wet as traction may
be reduced.
Do not use if TLE or ramp surfaces are covered with ice, snow, dirt, leaves, or other debris. Remove all
accumulations and sweep surfaces clean before use.
The TLE must be used in pairs and is designed only for use with an appropriate EZ-ACCESS® SUITCASE®
Singlefold, Singlefold AS, Trifold® AS, or OEM equivalent ramp. If you have questions concerning compatibility,
please call 1-800-451-1903.
Improper use of product could result in serious injury.

Page | 4
CARE AND MAINTENANCE
1. Before each use, check the TLE and ramp for worn, loose, or damaged parts. If you find any of these
conditions, do not use the TLE or ramp.
Do not tamper with, attempt to repair, or modify any portion of the TLE with ramp.
2. Keep the TLE and ramp surfaces clear of ice, snow, dirt, leaves, and other debris. For ice and or snow, remove
all accumulations and sweep surfaces clean before use. For dirt, leaves, and other debris, sweep the surfaces
or wash with a soft bristle brush and non-alkaline detergent; rinse well.
The TLE and ramp surfaces may be slippery in wet conditions; use caution if surfaces are wet as traction
may be reduced.
3. Store the TLE in a cool, dry place when not in use.
GETTING STARTED
1. Read this instruction manual in its entirety before use and follow all instructions before and during use.
2. Before using the TLE and ramp, refer to your mobility equipment's owner guide for acceptable ramp usage,
including proper slope/incline, chair direction, etc.; never exceed its recommendations.
3. Before each use, check the TLE and ramp for worn, loose, or damaged parts. If you find any of these
conditions, do not use the TLE or ramp.
4. Confirm that all package contents are present. Open the shipping box and inspect for damaged or missing
parts. If damaged or missing parts are noted, do not use the TLE.

Page | 5
SET UP AND USE
1. Ensure that you have received two each TLE.
The TLE must be used in pairs and is designed only for use with an appropriate EZ-ACCESS®
SUITCASE® Singlefold, Singlefold AS, Trifold® AS, or OEM equivalent ramp. If you have questions
concerning compatibility, please call 1-800-451-1903.
2. Open the ramp (refer to SUITCASE® or OEM equivalent ramp instructions) and insert one TLE under a top lip
transition plate as shown (FIG. 1).
3. Rotate the TLE upward (FIG. 2). Ensure that the TLE is firmly seated in the top lip transition plate and that
the square hole in the top lip transition plate is aligned with the hole in the TLE.
4. Install a carriage bolt through the square hole in the top lip transition plate and through the TLE, then secure
with a washer and nylon locknut on the underside of the TLE (FIG. 3). Tighten securely.
5. Repeat previous steps for attachment of the second TLE to the remaining top lip transition plate.
Do not use the TLE with ramp unless the carriage bolts, washers, and nylon locknuts are secure.
6. Ensure that the surface area of each TLE fully overlaps a secure, unobstructed, level landing enough to safely
install clevis pins (provided with your ramp) or other anchoring hardware and rests firmly against the landing
(FIG. 4).
FIG. 1
FIG. 2
FIG. 3
FIG. 4

Page | 6
7. Securely anchor the TLE with ramp to the upper landing (FIG. 5).
a. TEMPORARILY: To attach temporarily using the provided clevis pins, position the TLE with ramp
securely and use the hole in each TLE as a template to drill corresponding 1/4” holes into the landing
(ensure drilled holes are deep enough to fully seat each clevis pin). Fully insert a clevis pin (FIG. 6)
through the pre-drilled hole in each TLE and into the corresponding drilled holes in the landing.
b. SEMI-PERMANENTLY: To attach semi-permanently using non-provided hardware, position the TLE
with ramp securely and use the hole in each TLE as a template to identify anchor locations. Install
non-provided hardware flush with the surface of TLE and ensure that it does not create a hazard.
Ensure that the TLE with ramp is securely anchored before each use.
When using non-provided hardware, follow hardware manufacturer’s installation instructions,
ensuring that hardware is of sufficient type and size to prevent TLE with ramp slippage or undo
movement.
8. Before use, refer to the overview of the TLE with ramp (FIG. 6) to ensure proper application.
9. For stowage and transportation, connect each TLE together by fastening the provided hook and loop strap.
Applies only when using the TLE on an EZ-ACCESS® SUITCASE® Trifold® AS or OEM equivalent ramp.
a. Fold the ramp into its carrying position (refer to ramp instructions).
b. Loop one end of the self-cinching strap over the flat bar.
c. Pull the strap down, enough to fold the tip of the strap back onto itself (FIG. 7); press firmly to adhere.
d. Repeat for the other end of the strap, inserted through the second TLE (FIG. 8).
FIG. 5
FIG. 6
FIG. 7
FIG. 8
Table of contents
Popular Automobile Accessories manuals by other brands

Directed
Directed Xpresskit DBALL2 installation guide

Metra Electronics
Metra Electronics 99-8711 installation instructions

Directed
Directed Xpresskit DBALL2 installation guide

Gatorback Mudflaps
Gatorback Mudflaps GCR31F Mounting Diagram & Instructions

Arkon
Arkon GN083 installation instructions

Setma
Setma E01PO28005 Installation