EZ Breathe A-400 User manual

Installation Guide
Copyright 2015, EZ Breathe®, LLC
Model A-400

You are installing the most innovative ventilation system on the market.
EZ Breathe®is designed not only to lower humidity levels, but also
to reduce moldy, musty odors and indoor pollutants. This ventilation
appliance installed in the lowest level of your home/building is
engineered to expel moisture-laden air that stagnated due to poor air
circulation and to provide ventilation in lower levels, basements,
crawlspaces as well as any other areas in need of air circulation.
The EZ Breathe®unit’s quiet, powerful fan draws the moist polluted
air through the bottom vents and then expels it outside through a 6"
duct. The humidistat control continuously monitors the humidity of
the air flowing out. When the humidity level of this air drops to the
desired level (at a set point below 50%), the EZ Breathe®unit will
shut off, and then come back on again when humidity levels increase.
The EZ Breathe®will draw on the most readily available air and
works most effectively when that air is from your upstairs and your
upstairs air is dry. Your upstairs air is driest when you condition it with
your furnace or air conditioner. Allowing your EZ Breathe®to draw
air from an unconditioned source, (i.e. open windows or open doors)
may lead to increased humidity. The humidity content of the
replacement air that is being drawn down to your EZB unit will directly
impact its performance, causing spikes in relative humidity and moisture
content.
WELCOME
1

Before installing your EZ Breathe®ventilation unit, make sure that you
have the right model and accessories. Make sure that the total length
of the unit is taller than your foundation wall.
The following items should be included in the box. If parts are
missing, contact tevenS Levine at 626-2399 (203)
zOwners Manual z(4) #8 x 1 ¼” Truss
Quadrex Screws
z10 Year Warranty Card z(1) 6" Pipe
z6” Flex Exhaust Vent z(6) Screws #8 x 2”
z(2) Cable Tie z(6) Screws #8 x ½”
z(8) ¼” x 1 ¼” Plastic Anchors z(1) EZ Breathe Unit
Supplies needed:
Electrical reciprocal saw or 6" diameter hole saw.
Note: a 6 ¼” hole saw may be used if a 6" saw is not available
zElectric Drill – ¼” concrete drill bit or 6" core bit assembly
zNo. 2 Screwdriver
zMeasuring Tape
zDuct Tape
zHammer
zTin Snips
z1 tube of clear silicone caulking
zLevel
WHAT’S INSIDE
2

3
Base Dimensions: Service area/unit: 7000 sq. ft.
Height: 10 inches (25.40 cm) Air flow: 138 CFM’s
Width: 21 inches (53.34 cm) Noise level: 42 db
Depth: 6 inches (15.24 cm) Amperage: 0.27 amps
Weight: 9.25 lbs. (4.2 kg) Voltage: 110 volts
Tube axle fan, 1 phase
Chute Dimensions: Energy consumption: 31 watts
Height: Extends up ETL Control # 3176995
To 87" tall (220.98 cm)
Width: 12 inches (30.48 cm)
Depth: 2.5 inches (6.35 cm)
(For Taller Applications)
Extension Chute
Extends up to
102" (259.08 cm)
TECHNICAL DATA
Model #A-400
Top Cone
b
a

1. LOCATION SELECTION
4
zThe installation must be performed in the basement or lowest, wettest,
coldest level of your home/building. Please find an outside wall to
accommodate a 6" exit hole to the exterior of the house where no electrical
wires or pipes are present. Note: The distance between the back of the EZ
Breathe®unit and the exterior wall should not be more than 12 feet. All rigid 6"
piping is required for this application with a metal elbow.
zMake sure the unit is NOT placed directly below the main support
beam so as not to weaken the foundation integrity.
zThe minimum distance to any combustion appliance (furnace, hot
water heater, gas dryer, etc.) must be 8 to 10 feet.
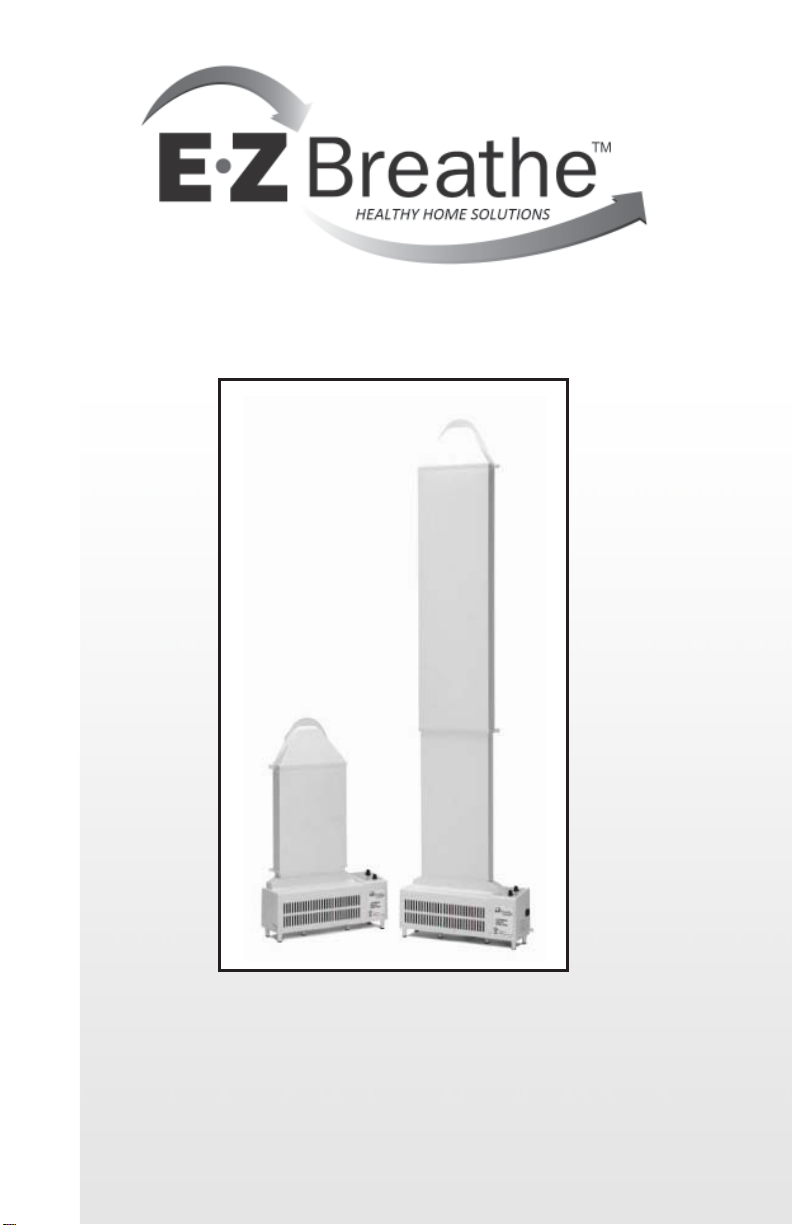
zThe EZ Breathe®appliance is designed to pull cool, damp air from the
lowest level, basement, or crawlspace and expel it outside.
zMaximize the distance between the unit and your replacement air
source. In many cases this might be a stairwell or opening to the upper
level.
zEnsure the air from the upper level of the home/building can reach the
unit in the basement/lower level. The EZ Breathe®ventilation unit will
not serve its purpose if the air cannot flow freely between the two levels
through a stairwell or by other means. An 80 sq. in. communication hole
between the two levels is needed if your basement is fully isolated from
the top level. Air communication can be achieved by: (1) 8" x 10" floor
grill, (2) cut 1 1/2" off the basement/lower level door, (3) install a louvered
door, (4) simply leave your door(s) open, (5) passive wall vent leading to
stairwell. Ensure that the air all over the basement/lower level can
reach the EZ Breathe®unit.
zKeep doors open between rooms to allow for proper air circulation or
install vents in the basement/lower level between rooms.
zDo not leave furniture or boxes too close to the wall as they may restrict
airflow and trap mold.

2. DRILL THE DUCT HOLE
3. PUTTING IT TOGETHER
CONSIDER LOCATION OF OUTSIDE VENT: not below deck or
outside seating area. This hole is needed to pass a duct through to the
outside. Make sure that the hole location is above ground level. Do
not line up the hole with a stud, electrical wires or pipe. The exhaust hole
is usually located between the floor joist of the basement/lower level ceiling.
1. From the inside, drill a pilot hole approximately ¼” at the center of
the proposed hole.
Note: You may have to make inside and outside measurements to ensure accurate
duct hole location.
2. Outside the home/building, find your pilot hole. Using a hole saw
and the pilot hole as a guide, drill a 6" hole through the exterior of the
house/building. On wood or sided installations, reverse the direction
of the saw for the beginning of the cut. This will ensure a clean hole
with no rough edges.
Unique foundation materials (i.e. poured concrete, cinder black, brick)
require a core bit assembly.
EZ Breathe®Model A-400 is telescopic.
Slide the telescoping chute over the base unit bottom chute (b) narrow
section attaches directly to base. This units base should
be resting on the floor. Install 4 screws (white), two in
each side to secure the chutes to the base unit motor.
5
fig. 1.2
b
a
m
m

4. ATTACH FLEX, PIPE & VENT
6
5. SECURE OUTSIDE VENT
6. FASTEN UNIT TO THE WALL
From the inside, slide the beaded end of the pipe through the 6" outside
hole so that it sticks out a couple of inches. Once this is done slide the
flex onto the pipe. Stretch the flex and cut the excess off; if this is not
done the efficiency of the unit will diminish drastically. Now that the flex
is tight, it can be attached to the beaded pipe with the tie wrap. We
recommend wrapping this seam where the pipe and flex meet with duct
tape to ensure an airtight seal. Then from the outside, attached the vent to
the 6" beaded pipe with screws provided. Hold the pipe from the inside
to ensure that the screws go through the galvanized rather that bend it.
Avoid pushing against flaps. Flex should not be kinked in any way.
Insert four 2" screws to secure the vent. Make sure the vent is not twisted
by inserting the screws too tight, and that the flaps are working properly.
Apply clear silicone caulking to act as a weather seal.
Mark where the holes for securing the unit are to be drilled (2 on the
chute, and 2 on the unit itself). Move the unit to the side and drill ¼”
pilot holes where you marked. Use a level to make sure the holes are
even. Insert the enclosed anchors into the holes, and slide the unit back
into place. Insert the screws through the unit’s holes into the anchors
and secure it to the wall. If attaching to paneling or drywall, screw
directly to the surface.
Insert plugs into any unused holes to give the EZ Breathe®unit a more
finished look.

7. S ET H U M I D I STAT
7
8. SET SPEED CONTROL
PLUGGING IT IN
This component continuously monitors the humidity level of the air
being expelled through the EZ Breathe®unit. You can set this control
to maintain the desirable level of humidity in your home/building.
For best results…
Set the humidistat between 35% to 40%.
Please note… even thought the ideal setting is 35%, this level of humidity,
due to environmental conditions, may not be obtainable even with an
EZ Breathe®. Consequently, the EZ Breathe®will run continuously.
The unit has been designed to perform under these conditions.
The rate at which you expel the damp air outside is adjustable with the
help of this control. When the humidity level is lower than the setting
on the humidistat, the appliance will turn off. In the cooler months,
you can set the fan on low and the humidistat to its lowest setting. This
very low speed will prevent a cold draft from entering your hours/building
while still allowing some ventilation for the removal of indoor pollutants.
For best results…
In the summer, set the speed control to MED-HIGH
In the winter, set the speed control to MED-LOW
Your EZ Breathe®unit can be plugged into any 110V electrical outlet.
If the cord is not long enough to reach your nearest outlet, an extension
cord may be used since the unit only draws approximately .34 amps
(the equivalent of a 40W light bulb).

DROP CEILINGS - “L” PIECE
8
1. With removable panels:
a. Move a panel to see where pilot hole in face plate will be drilled.
Drill pilot hole.
b. Drill exhaust hole same directions as above.
c. Take screws out of top piece (top chute) and insert “L” piece. Attach
it with 4 white screws.
d. Reattach the top piece to the other side of the ”L” piece. The 6"
vent will be facing up, toward the ceiling when unit is in place.
e. Cut a 6" hole in the drop ceiling panel and put it back in place.
f. Slide the unit up to the hole and push through until it’s flush, while
an assistant is pulling it through (from outside) the exhaust hole.
g. Finish the same as for normal installation.
h. Or snip the steel frame of the drop ceiling away, cut the drop
ceiling panel to a tight fit and reinstall panel.
2. With non-removal panels, drywall, etc.
a. Use a stud finder or tap with a hammer to find floor joists, and
make sure they are not in the way.
b. Cut a 6" hole in the drywall and push duct up the same way as
described above.
c. Make an accurate measurement from the inside and outside, to
determine where the exhaust hole is to be, then drill a pilot hole from
the inside, with the drill. Note: This may require a longer bit, or
angle drill.
d. Redrill the pilot hole from the outside, to make sure it is level.
Drill exhaust hole and finish per normal installation.
e. Or drill a 6" hole below the ceiling in the wall (be sure this hole
will be above grade)
Note: if conduit or pipes are on the wall, you may need to finish out the wall with
a 2" x 4" or 1" x 4" strips.

9
FINISHED WALL - Z PIECE
For Finished Basements
The “Z” Piece is used to move the base of the EZ Breathe®unit away
from the wall. Because the chute is 14" wide and 2" deep it can be
placed between studs and finished over, making the finished space more
usable and improve the appearance of the installation.
Install the “Z” Piece onto the base with 2 screws on each end, then lift
the telescoping chute and place it over the top end of the Z Piece.
Installation of the “Z” piece can be performed at the time of unit
installation or added later when the space is being finished.
PLEASE REMEMBER!
zDo NOT store anything within a radius of 3 to 4 feet around the base of
the EZ Breathe®ventilation unit. These articles will interfere with the
circulation at floor level.
zMake sure that the air from the entire home/building can reach the
EZ Breathe®ventilation unit.
zKeep doors to rooms open, or undercut doors by 1 1/2", or install a
louvered door, or install vent grills in lower wall or at bottom doors,
minimum 80 sq. in.
The only maintenance needed is a periodic vacuuming of dust
accumulation at the intake grills located at the bottom front of the EZ
Breathe®unit.
MAINTENANCE

EZB-IG Rev. 7-1-15
Other EZ Breathe Fan manuals