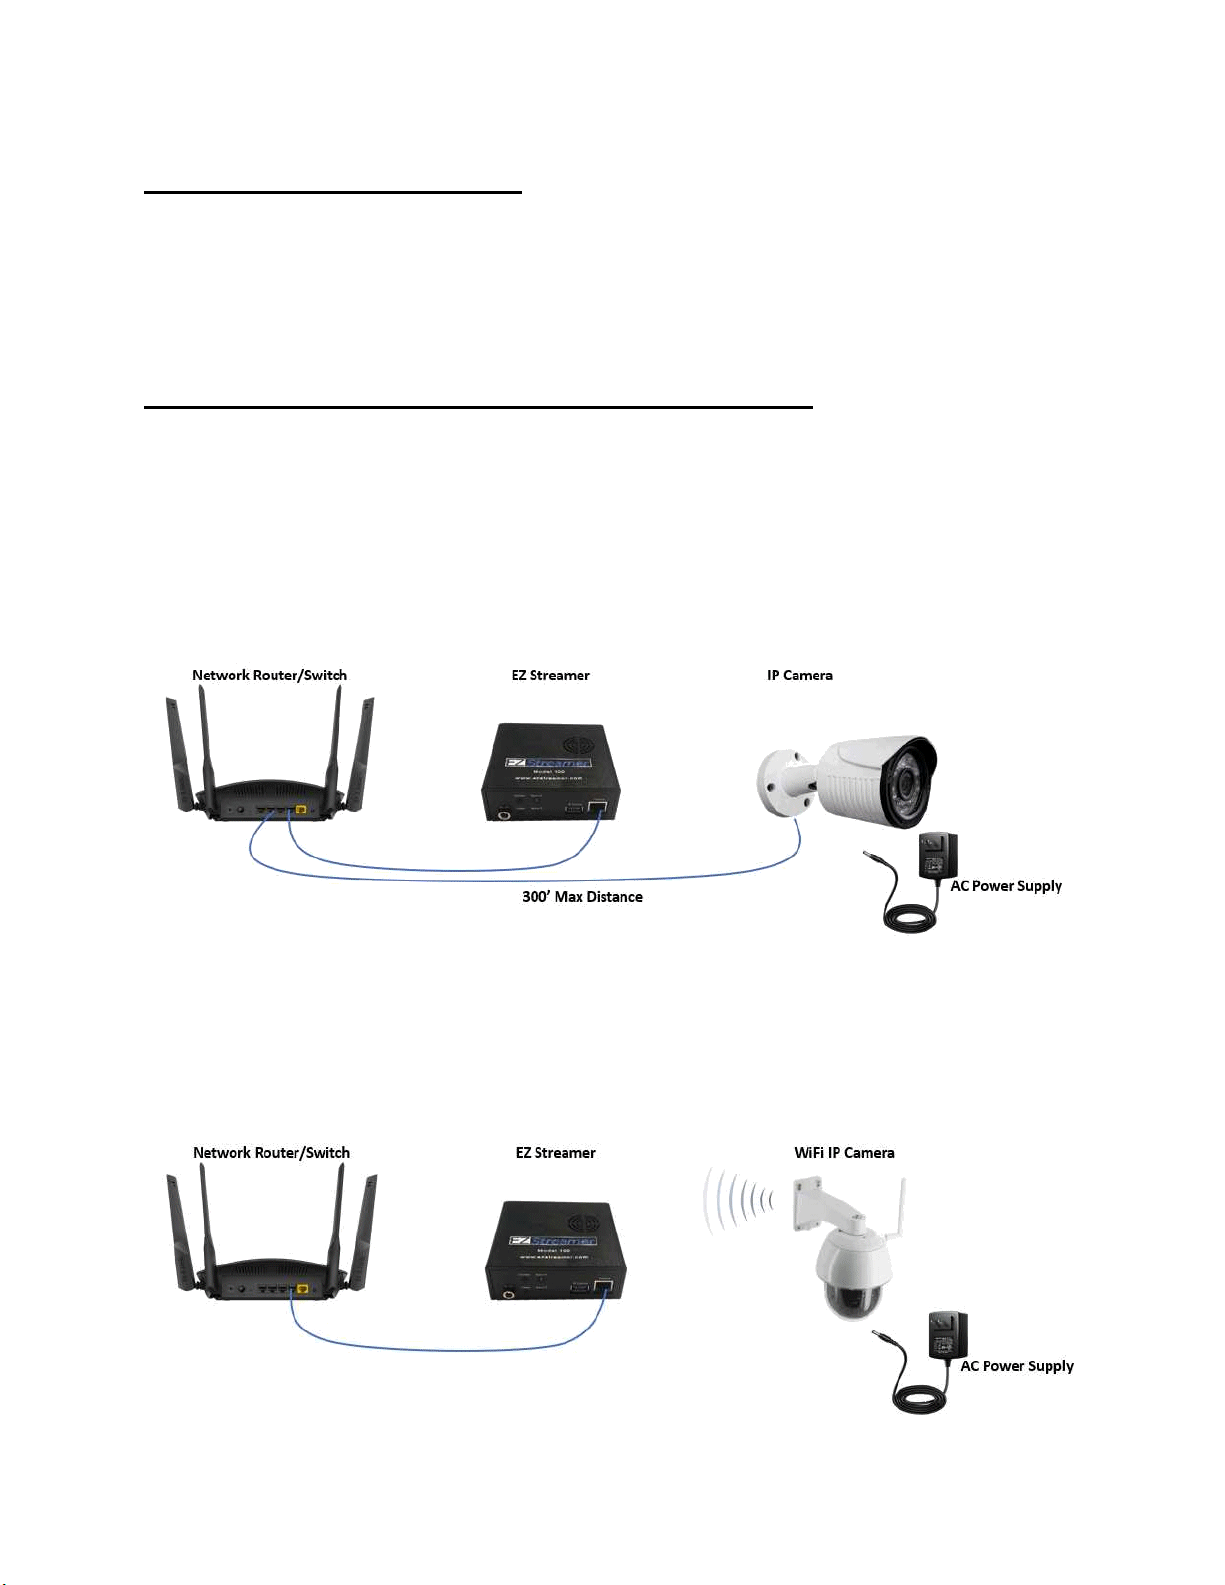
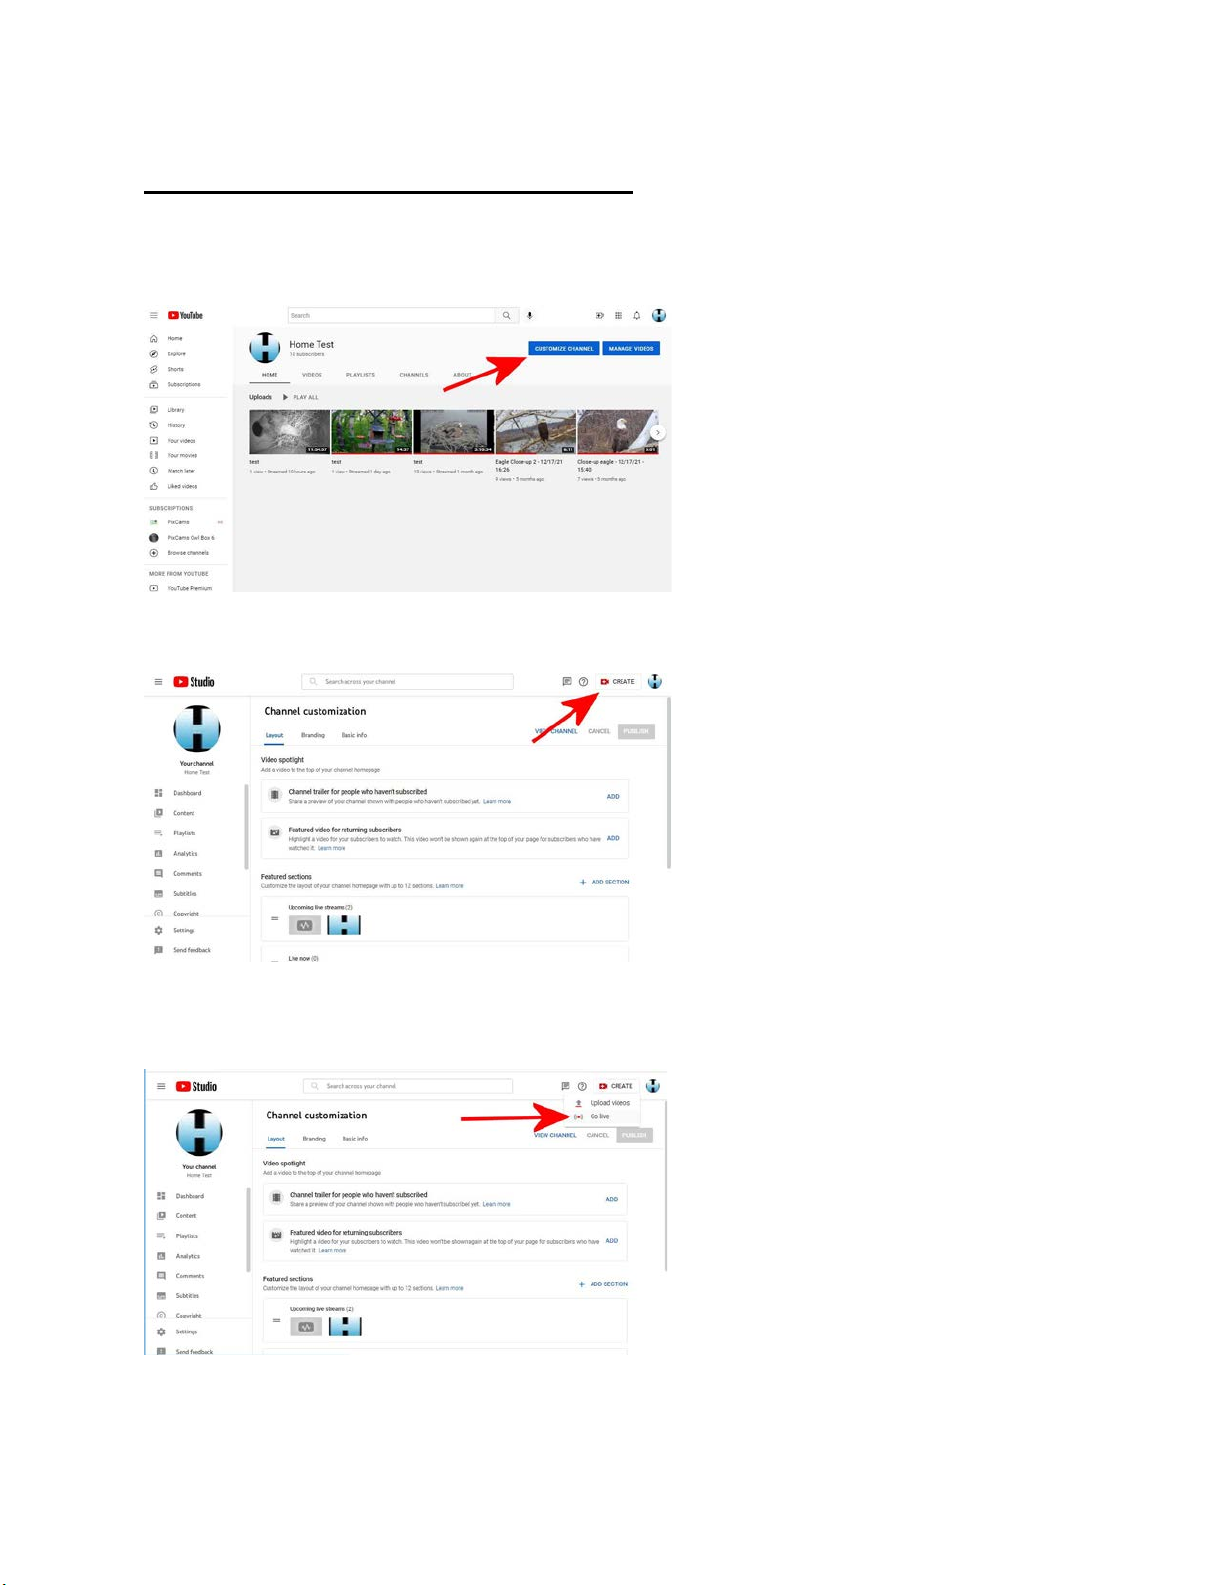
EZ Streamer EZ-100 User manual

Overview
EZ Streamer Model 100 dedicated RTSP live streaming encoder. Connect any IP camera with H.264
compression and supports RTSP protocol (Real-Time Messaging Protocol). Stream to any streaming
player service supporting RTMP (Real-Time Messaging Protocol) such as YouTube, Facebook Live, and
Twitch.
The EZ Streamer can encode up to four IP cameras at once live streaming up to Quad HD 1440P
resolution and/or simulcast your live event simultaneously to four different platforms. Easily set up and
change the settings on your EZ Streamer through our ez-streamer.com Cloud Portal. Modify the IP
camera RTSP link address and RTPM server settings.
Specifications
What’s Included
1. EZ Streamer Model 100 Encoder
2. 3.0A USB-C power supply
3. 1’ Ethernet Cable

Compatible Cameras
The EZ Streamer Model 100 is compatible with IP Cameras (Internet Protocol Cameras) that support
H.264 encoding and include the Real-Time Streaming Protocol (RTSP). IP cameras use either Ethernet
cables or a Wi-Fi connection to connect to your local network. From there, the signal will be encoded by
the EZ Streamer encoder to your live streaming service.
EZ Streamer Network Configurations
Basic Wired Live Streaming Camera System
This is one of the most basic set ups using the EZ Streamer and a security/IP Camera to live stream your
webcam to YouTube and/or Facebook Live. Simply connect the EZ Streamer to your router or a network
switch on your network. Next, run an outdoor rated CAT6 Ethernet cable from your router or switch to
the IP camera. You will also need to power the IP camera using this configuration. The Ethernet cable
can’t be any longer than 300′. Once the systems are wired configure your EZ Streamer on the EZ
Streamer portal and you’re live.
Basic WiFi Live Streaming Camera System
This is second most basic set up’s using the EZ Streamer and a WiFi security/IP Camera to live stream
your webcam to YouTube and/or Facebook Live. First, connect the EZ Streamer to your WiFi router or
network switch. Next, install our WiFi IP camera within wireless range of your WiFi router and plug the
AC power outlet into your camera. Once the systems is wired configure your EZ Streamer on the EZ
Streamer portal and you’re live.

PoE (Power over Ethernet) Wired Live Streaming Camera System
This configuration is the same as Configuration 1 other than now we are installing a PoE (Power over
Ethernet) AI switch. The PoE switch will eliminate the need for the camera power supply. This simplifies
the install since the camera will be powered using the Ethernet cable. Note, your IP camera must be a
PoE type IP camera. The “AI” PoE switch will extend the maximum length of the Ethernet cable from
300′ out to 820′.
Multiple PoE Wired Live Streaming Camera System
This configuration is exactly like Configuration 3 only it demonstrates the expandability of the set up.
Since the EZ Streamer can support encoding up to 4 cameras at once to YouTube or Facebook Live you
can install three more cameras to the system as the configuration diagram shows.

Register Your EZ Streamer Model 100 System
When you receive your EZ Streamer unit you will have to register the system on the EZ Streamer cloud.
Got to this link: https://www.ez-streamer.com/myezstreamerweb/admin/login
Enter the UDI number from the EZ Streamer unit and press the “Register New User” button. If you
already have an account, you do not need to do that again.
Log into the EZ-Streamer.com Portal
The EZ Streamer Cloud Portal is a web-based device management system for the EZ Streamer encoder.
This can be accessed from any browser to modify the EZ Streamer settings, monitor the health of the
live streams, add/modify IP camera links, and set your RTMP live streaming player service.
Dashboard
The dashboard displays a quick overview of the activated EZ Streamer encoders and what streams are
running on each individual encoder. Streams running will have a green colored camera icon and streams
not running will have a red colored camera icon. The EZ Streamer cloud will check all streams every
minute for stream health and update the dashboard automatically.

Device Configure
When configuring the EZ Streamer encoder you can set up an unique name for the encoder under the
"General" tab.
Stream Configure
The "Stream" tab is where the live streaming encoder setting are set.
The RTSP Link box is where you enter the RTSP IP Camera link. The format of the RTSP link is typically
provided by the IP Camera manufacturer. You can also visit https://www.ispyconnect.com/cameras for
help finding the RTSP link of your IP camera.
The RTMP Link and Stream Key settings are provided by the RTMP streaming service you are encoding
the live steam to.
Stream Health
The EZ Streamer cloud will monitor each stream of the EZ Stream encoder once a minute and record the
live stream frame rate and bit rate and update the Historical Data graph. The Historical Data graph will
display the last 48 hours of stream heath.

Live Streaming to YouTube
First, go to your YouTube channel. If you do not have a YouTube account, you will need to create one
first. After you log into your YouTube channel press the “CUSTOMIZE CHANNEL” button.
Next, press the “CREATE” button.
Select the “Go Live” option

Next, press the “SCHEDULE STREAM” button
Enter the Stream Details of the Title and Description, once complete press the “NEXT” button.
Enter the Stream Customization details and press the “NEXT” button when complete.

Enter the Visibility details and press the “DONE” key when complete.
Select the “Stream Key”
Create a new stream key and enter the title and description, then press the “CREATE” button.

Once complete you need to copy the “Stream Key” and “Stream URL” and past those into your EZ
Streamer Stream Portal.
Go to the EZ Streamer Portal and select the “Stream 1” tab. Enter the RTSP LINK of your IP camera, enter
the YouTube Stream URL into the “URL (RTMP Link) box, and enter your YouTube Stream key into the
“Stream Key” box, then select “YouTube” from the Service drop down menu. When complete press
“Save Stream 1 Configuration”.
Once you hit the Save Configuration button go back to your YouTube page. You should see the live
stream. Press the “GO LIVE” button.

You’re Streaming!
Live Streaming to Facebook LIVE
Go to your Facebook page. If you do not have a Facebook account, you will need to create one. Press the
“LIVE” button from the Create box on your dashboard.

In the Go Live box press the “Select” button.
Select the “Streaming Software” button.
Copy the “Stream Key” and “Stream URL”, and set the Persistent stream key option if you want to keep
the stream key for future streams without having to set up the Facebook Live Stream option.

Go to the EZ Streamer Portal and select the “Stream 2” tab. Enter the RTSP LINK of your IP camera, enter
the Facebook Stream URL into the “URL (RTMP Link) box, and enter your Facebook Stream key into the
“Stream Key” box, then select “Facebook” from the Service drop down menu. When complete press
“Save Stream 2 Configuration”.
Table of contents