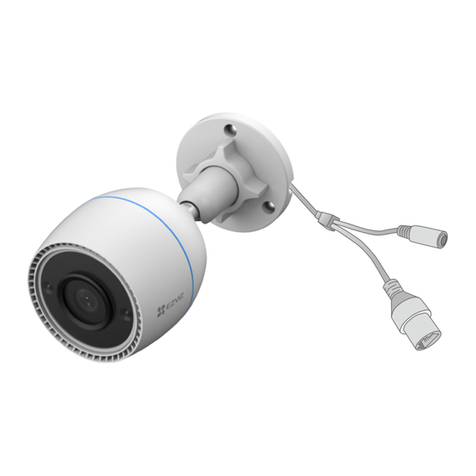
Ezviz C3N User manual

Scan the QR code with the EZVIZ App
to add the device to your account.
Please keep it for further reference.


COPYRIGHT © Hangzhou EZVIZ Software Co., Ltd.. ALL RIGHTS RESERVED.
Any and all information, including, among others, wordings, pictures, graphs are the
properties of Hangzhou EZVIZ Software Co., Ltd. (hereinafter referred to as “EZVIZ”).
This user manual (hereinafter referred to as “the Manual”) cannot be reproduced,
changed, translated, or distributed, partially or wholly, by any means, without the
prior written permission of EZVIZ. Unless otherwise stipulated, EZVIZ does not make
any warranties, guarantees or representations, express or implied, regarding to the
Manual.
About this Manual
The Manual includes instructions for using and managing the product. Pictures,
charts, images and all other information hereinafter are for description and
explanation only. The information contained in the Manual is subject to change,
without notice, due to rmware updates or other reasons. Please nd the latest
version in the ™ website (http://www.ezvizlife.com).
Revision Record
New release – January, 2019
Trademarks Acknowledgement
™, ™, and other EZVIZ’s trademarks and logos are the properties of
EZVIZ in various jurisdictions. Other trademarks and logos mentioned below are the
properties of their respective owners.
Legal Disclaimer
TO THE MAXIMUM EXTENT PERMITTED BY APPLICABLE LAW, THE PRODUCT
DESCRIBED, WITH ITS HARDWARE, SOFTWARE AND FIRMWARE, IS PROVIDED
“AS IS”, WITH ALL FAULTS AND ERRORS, AND EZVIZ MAKES NO WARRANTIES,
EXPRESS OR IMPLIED, INCLUDING WITHOUT LIMITATION, MERCHANTABILITY,
SATISFACTORY QUALITY, FITNESS FOR A PARTICULAR PURPOSE, AND NON-
INFRINGEMENT OF THIRD PARTY. IN NO EVENT WILL EZVIZ, ITS DIRECTORS,
OFFICERS, EMPLOYEES, OR AGENTS BE LIABLE TO YOU FOR ANY SPECIAL,
CONSEQUENTIAL, INCIDENTAL, OR INDIRECT DAMAGES, INCLUDING, AMONG
OTHERS, DAMAGES FOR LOSS OF BUSINESS PROFITS, BUSINESS INTERRUPTION,
OR LOSS OF DATA OR DOCUMENTATION, IN CONNECTION WITH THE USE OF THIS
PRODUCT, EVEN IF EZVIZ HAS BEEN ADVISED OF THE POSSIBILITY OF SUCH
DAMAGES.
TO THE MAXIMUM EXTENT PERMITTED BY APPLICABLE LAW, IN NO EVENT SHALL
EZVIZ’S TOTAL LIABILITY FOR ALL DAMAGES EXCEED THE ORIGINAL PURCHASE
PRICE OF THE PRODUCT.
EZVIZ DOES NOT UNDERTAKE ANY LIABILITY FOR PERSONAL INJURY OR
PROPERTY DAMAGE AS THE RESULT OF PRODUCT INTERRUPTION OR SERVICE
TERMINATION CAUSED BY: A) IMPROPER INSTALLATION OR USAGE OTHER THAN
AS REQUESTED; B) THE PROTECTION OF NATIONAL OR PUBLIC INTERESTS;
C) FORCE MAJEURE; D) YOURSELF OR THE THIRD PARTY, INCLUDING WITHOUT
LIMITATION, USING ANY THIRD PARTY’S PRODUCTS, SOFTWARE, APPLICATIONS,
AND AMONG OTHERS.
REGARDING TO THE PRODUCT WITH INTERNET ACCESS, THE USE OF
PRODUCT SHALL BE WHOLLY AT YOUR OWN RISKS. EZVIZ SHALL NOT TAKE
ANY RESPONSIBILITES FOR ABNORMAL OPERATION, PRIVACY LEAKAGE OR
OTHER DAMAGES RESULTING FROM CYBER ATTACK, HACKER ATTACK, VIRUS
INSPECTION, OR OTHER INTERNET SECURITY RISKS; HOWEVER, EZVIZ WILL
PROVIDE TIMELY TECHNICAL SUPPORT IF REQUIRED. SURVEILLANCE LAWS AND
DATA PROTECTION LAWS VARY BY JURISDICTION. PLEASE CHECK ALL RELEVANT
LAWS IN YOUR JURISDICTION BEFORE USING THIS PRODUCT IN ORDER TO
ENSURE THAT YOUR USE CONFORMS TO THE APPLICABLE LAW. EZVIZ SHALL
NOT BE LIABLE IN THE EVENT THAT THIS PRODUCT IS USED WITH ILLEGITIMATE
PURPOSES.
IN THE EVENT OF ANY CONFLICTS BETWEEN THE ABOVE AND THE APPLICABLE
LAW, THE LATTER PREVAILS.
Regulatory Information
FCC Information
This device complies with Part 15 of the FCC Rules. Operation is subject to the
following two conditions:
(1) This device may not cause harmful interference, and
(2) This device must accept any interference received, including interference that
may cause undesired operation.
Note: This product has been tested and found to comply with the limits for a Class
B digital device, pursuant to Part 15 of the FCC Rules. These limits are designed
to provide reasonable protection against harmful interference in a residential
installation. This product generates, uses, and can radiate radio frequency energy
and, if not installed and used in accordance with the instructions, may cause
harmful interference to radio communications. However, there is no guarantee that
interference will not occur in a particular installation. If this product does cause
harmful interference to radio or television reception, which can be determined
by turning the equipment off and on, the user is encouraged to try to correct the
interference by one or more of the following measures:
—Reorient or relocate the receiving antenna.
—Increase the separation between the equipment and receiver.
—Connect the equipment into an outlet on a circuit different from that to which the
receiver is connected.
—Consult the dealer or an experienced radio/TV technician for help.
Please take attention that changes or modication not expressly approved by the
party responsible for compliance could void the user’s authority to operate the
equipment.
This equipment should be installed and operated with a minimum distance 20cm
between the radiator and your body.
This device complies with Industry Canada licence-exempt RSS standard(s).
Operation is subject to the following two conditions:
(1) this device may not cause interference, and
(2) this device must accept any interference, including interference that may cause
undesired operation of the device.
Under Industry Canada regulations, this radio transmitter may only operate using
an antenna of a type and maximum (or lesser) gain approved for the transmitter by
Industry Canada. To reduce potential radio interference to other users, the antenna

type and its gain should be so chosen that the equivalent isotropically radiated
power (e.i.r.p.) is not more than that necessary for successful communication.
EU Conformity Statement
This product and - if applicable - the supplied accessories too are
marked with "CE" and comply therefore with the applicable harmonized
European standards listed under the Radio Equipment Directive
2014/53/EU, the EMC Directive 2014/30/EU, the RoHS Directive
2011/65/EU.
2012/19/EU (WEEE directive): Products marked with this symbol
cannot be disposed of as unsorted municipal waste in the European
Union. For proper recycling, return this product to your local supplier
upon the purchase of equivalent new equipment, or dispose of
it at designated collection points. For more information see:
www.recyclethis.info.
2006/66/EC and its amendment 2013/56/EU (battery directive):
This product contains a battery that cannot be disposed of as
unsorted municipal waste in the European Union. See the product
documentation for specic battery information. The battery is marked
with this symbol, which may include lettering to indicate cadmium (Cd),
lead (Pb), or mercury (Hg). For proper recycling, return the battery to
your supplier or to a designated collection point. For more information
see: www.recyclethis.info.
EC DECLARATION OF CONFORMITY
Hereby, Hangzhou EZVIZ Software Co., Ltd. declares that the radio equipment type
[CS-C3N, CS-C3W, CS-C3Wi, CS-C3WN, CS-C3C, CS-C3HC, CS-C3HN, CS-C3HW, CS-
C3HWi] is in compliance with Directive 2014/53/EU.
The full text of the EC DECLARATION OF CONFORMITY is available at the following
web link:
http://www.ezvizlife.com/declaration-of-conformity.
Safety Instruction
CAUTION: RISK OF EXPLOSION IF BATTERY IS REPLACED BY AN INCORRECT TYPE.
DISPOSE OF USED BATTERIES ACCORDING TO THE INSTRUCTIONS.
BATTERY IS NOT USER REPLACEABLE.
Due to the product shape and dimension, the name and address of the importer/
manufacturer are printed on the package.
Customer Service
For more information, please visit www.ezvizlife.com.
Need help? Please visit “www.ezvizlife.com/inter/page/contact-us” for our local
contact details.

1
Package Contents
or
Wi-Fi Camera PoE Camera
Drill Template Screw Kit Waterproof Kit
Power Adapter Quick Start Guide
• The camera appearance is subject to the actual model you have
purchased.
• Power adapter is not included with the PoE camera model.

2
Basics
Wi-Fi Camera
Micro SD Card Slot
(Behind the cover)
Reset Button
MIC
Ethernet Port
Power Port
Antenna
LED Indicator
Lens
Spotlight
IR Light
Name Description
LED Indicator • Solid Red: Camera starting up.
• Slow-ashing Red: Wi-Fi connection failed.
• Fast-ashing Red: Camera exception (e.g. Micro SD
card error).
• Solid Blue: Video being viewed in the EZVIZ app.
• Slow-ashing Blue: Camera running properly.
• Fast-ashing Blue: Camera ready for Wi-Fi connection.

3
Basics
PoE (Power over Ethernet) Camera
Micro SD Card Slot
(Behind the cover)
Reset Button
MIC
PoE Port
Power Port
LED Indicator
Lens
Spotlight
IR Light
Name Description
LED Indicator • Solid Red: Camera starting up.
• Slow-ashing Red: Network connection failed.
• Fast-ashing Red: Camera exception (e.g. Micro SD
card error).
• Solid Blue: Video being viewed in the EZVIZ app.
• Slow-ashing Blue: Camera running properly.

4
Get the EZVIZ App
1. Connect your mobile phone to Wi-Fi using your 2.4GHz network.
2. Search for “EZVIZ” in App Store or Google PlayTM.
3. Download and install the EZVIZ app.
4. Launch the app, and register an EZVIZ user account.
Setup
Follow the steps to set your camera:
1. Power on your camera.
2. Log in to your EZVIZ app user account.
3. Connect your camera to the Internet.
4. Add your camera to your EZVIZ account.
How to Set Your Wi-Fi Camera?
1 Power-on
Steps:
1. Connect the power adapter cable to the camera's power port.
2. Plug the power adapter into an electrical outlet.
Power Outlet
Power Adapter
The LED turning fast-ashing blue indicates that the camera is powered
on and ready for network conguration.

5
2 Connect to the Internet
• Wireless Connection: Connect the camera to Wi-Fi. Refer to Option 1.
• Wired Connection: Connect the camera to a router. Refer to Option 2.
Option 1: Use the EZVIZ app to congure Wi-Fi.
Steps:
1. Log in to your account using the EZVIZ app.
2. On the Home screen, tap “+” on the upper-right corner to go to the
Scan QR Code interface.
3. Scan the QR code on the Quick Start Guide cover or on the body of
the camera.
4. Follow the EZVIZ app wizard to nish Wi-Fi conguration.
Please choose to connect your camera to the Wi-Fi to which your
mobile phone has connected.
Hold the reset button for 5s to restart and set all parameters to
default.
Hold the reset button for 5s in any of the following cases:
• The camera fails to connect to your Wi-Fi network.
• You want to change to another Wi-Fi network.

6
Option 2: Connect your Wi-Fi camera to a router.
Steps:
1. Connect the camera to the LAN port of your router with the
Ethernet cable.
Ethernet Cable
The LED turning slow-ashing blue indicates that the camera is
connected to the Internet.
2. Log in to your account using the EZVIZ app.
3. On the Home screen, tap “+” on the upper-right corner to go to the
Scan QR Code interface.
4. Scan the QR code on the Quick Start Guide cover or on the body of
the camera.
5. Follow the wizard to add the camera to the EZVIZ app.

7
How to Set Your PoE Camera?
Option 1: Connect your PoE camera to a PoE Switch/NVR.
Steps:
1. Connect the Ethernet cable to the PoE port of your camera.
2. Connect the other end of the Ethernet cable to the PoE port of your
PoE switch or NVR.
3. Connect the LAN port of your PoE switch or NVR to the LAN port of
a router via the Ethernat cable.
Router
For PoE Port For LAN Port
For LAN Port
PoE Switch/NVR
• The LED turning slow-ashing blue indicates that the camera is
connected to the Internet.
• The PoE switch, NVR and Ethernet cable are not included in the
package.
4. Log in to your account using the EZVIZ app.
5. On the Home screen, tap “+” on the upper-right corner to go to the
Scan QR Code interface.
6. Scan the QR code on the Quick Start Guide cover or on the body of
the camera.
7. Follow the wizard to add the camera to the EZVIZ app.

8
Option 2: Connect your PoE camera to a router.
Steps:
1. Connect the power adapter cable (sold separately) to the camera's
power port.
2. Plug the power adapter into an electrical outlet.
3. Connect the Ethernet cable to the PoE port of your camera.
4. Connect the other end of the Ethernet cable to the LAN port of a
router.
Router
Power Adapter
DC12V 1A
Ethernet Cable
• The LED turning slow-ashing blue indicates that the camera is
connected to the Internet.
• The Ethernet cable is not included in the package.
5. Log in to your account using the EZVIZ app.
6. On the Home screen, tap “+” on the upper-right corner to go to the
Scan QR Code interface.
7. Scan the QR code on the Quick Start Guide cover or on the body of
the camera.
8. Follow the wizard to add the camera to the EZVIZ app.

9
Installation (Optional)
1 Install the Micro SD Card (Optional)
1. Remove the cover on the camera.
2. Insert the micro SD card (sold separately) into the card slot as
shown in the gure below.
3. Place the cover back on.
After installing the micro SD card, you should initialize the card in
the EZVIZ app before using it.
This Side Up
4. In the EZVIZ app, tap the Storage Status in the Device Settings
interface to check the SD card status.
5. If the memory card status displays as Uninitialized, tap to initialize it.
The status will then change to Normal and it can store videos.

10
2 Install the Camera
The camera can be mounted on the wall or ceiling. Here we take wall
mounting as an example.
• Recommended installation height: 3m (10ft).
• Make sure the wall/ceiling is strong enough to withstand three
times the weight of the camera.
• Avoid positioning the camera in an area that gets a lot of light
shining directly into the camera lens.
- Place the drill template onto the surface you have chosen to mount
the camera.
- (For cement wall/ceiling only) Drill screw holes according to the
template, and insert three anchors.
- Use three metal screws to x the camera according to the template.
Drill Template
Anchor Metal Screw
1
2 3
Please tear up the drill template after installing the base if needed.

11
3 Adjust the Surveillance Angle
- Loosen the adjusting knob.
- Adjust the surveillance angle for a best view of your camera.
- Tighten the adjusting knob.
Adjusting Knob
0-90°
0-360°
Make sure the micro SD card slot is facing downward.
For detailed information, please visit www.ezvizlife.com.

12
패키지 구성품
또는
Wi-Fi 카메라 PoE 카메라
드릴 템플릿 나사 세트 방수 키트
전원 어댑터 빠른 시작 가이드
• 카메라 외관은 구매한 실제 모델에 따라 다를 수있습니다.
• PoE 카메라 모델에는 전원 어댑터가 포함되어 있지 않습니다.

13
기본 사항
Wi-Fi 카메라
Micro SD 카드 슬롯
(커버 뒤)
초기화 버튼
마이크
이더넷 포트
전원 포트
안테나
LED 표시등
렌즈
조명등
IR 조명
명칭 설명
LED 표시등 • 빨간색 켜짐: 카메라가 시작 중입니다.
• 빨간색으로 천천히 깜박임: Wi-Fi 연결에 실패했습니다.
• 빨간색으로 빠르게 깜박임: 카메라 비정상 (예: 마이크로 SD
카드 오류).
• 파란색 켜짐: EZVIZ 앱에서 비디오를 재생합니다.
• 파란색으로 천천히 깜박임: 카메라가 올바르게 작동 중입니다.
• 파란색으로 빠르게 깜박임: 카메라에 Wi-Fi를연결할 준비가
되었습니다.

14
기본 사항
PoE (Power over Ethernet) 카메라
Micro SD 카드 슬롯
(커버 뒤)
초기화 버튼
마이크
PoE 포트
전원 포트
LED 표시등
렌즈
조명등
IR 조명
명칭 설명
LED 표시등 • 빨간색 켜짐: 카메라가 시작 중입니다.
• 빨간색으로 천천히 깜박임: 네트워크 연결에 실패했습니다.
• 빨간색으로 빠르게 깜박임: 카메라 비정 상(예: 마이크로 SD
카드 오류).
• 파란색 켜짐: EZVIZ 앱에서 비디오를 재생합니다.
• 파란색으로 천천히 깜박임: 카메라가 올바르게 작동 중입니다.

15
EZVIZ 앱설치
1. 2.4GHz 네트워크를 사용해 모바일 폰을 Wi-Fi 에연결합니다.
2. App Store 또는 Google PlayTM 에서 “EZVIZ”를검색합니다.
3. EZVIZ 앱을 다운로드해 설치합니다.
4. 앱을 실행하여 EZVIZ 사용자 계정을 등록합니다.
설정
다음 절차에 따라 카메라를 설정합니다.
1. 카메라 전원을 켭니다.
2. EZVIZ 앱사용자 계정에 로그인합니다.
3. 카메라를 인터넷에 연결합니다.
4. 카메라를 EZVIZ 계정에 추가합니다.
Wi-Fi 카메라 설정은 어떻게 하나요?
1전원 켜기
단계:
1. 전원 어댑터 케이블을 카메라 전원 포트에 연결합니다.
2. 전원 어댑터 플러그를 전기 콘센트에 꽂습니다.
전원 콘센트
전원 어댑터
LED 가파란색으로 빠르게 깜박이면 카메라 전원이 켜져 있고 네트워크 구성이
준비되었음을 나타냅니다.
Other manuals for C3N
3
Table of contents
Languages:
Other Ezviz Security Camera manuals

Ezviz
Ezviz C1C User manual

Ezviz
Ezviz C6T User manual

Ezviz
Ezviz CSC3N1H2 User manual

Ezviz
Ezviz Mini 360 Plus User manual

Ezviz
Ezviz Mini Plus User manual

Ezviz
Ezviz Mini O User manual

Ezviz
Ezviz Husky Air User manual

Ezviz
Ezviz CSW2H4MP User manual

Ezviz
Ezviz CS-CV248 User manual

Ezviz
Ezviz CS-T2-A User manual

Ezviz
Ezviz C6CN User manual

Ezviz
Ezviz C6TC User manual

Ezviz
Ezviz CS-C4S-51FR User manual

Ezviz
Ezviz Husky Air User manual

Ezviz
Ezviz C8PF User manual

Ezviz
Ezviz EB8 4G User manual

Ezviz
Ezviz DP2 User manual

Ezviz
Ezviz Bullet Cloud Camera User manual

Ezviz
Ezviz Mini 360 Plus User manual

Ezviz
Ezviz C6W User manual