Fagor AD - 21 W User manual

SERVICEMANUAL
**********
2013
UNDERCOUNTERGLASSWASHER
UNDERCOUNTER
GLASSWASHER
Models:AD–21W

ForCustomerService:Call1‐866‐GOFAGOR–www.fagorcommercial.com| P.II
Contents
SPECIFICATIONS...................................................................................................................................................3
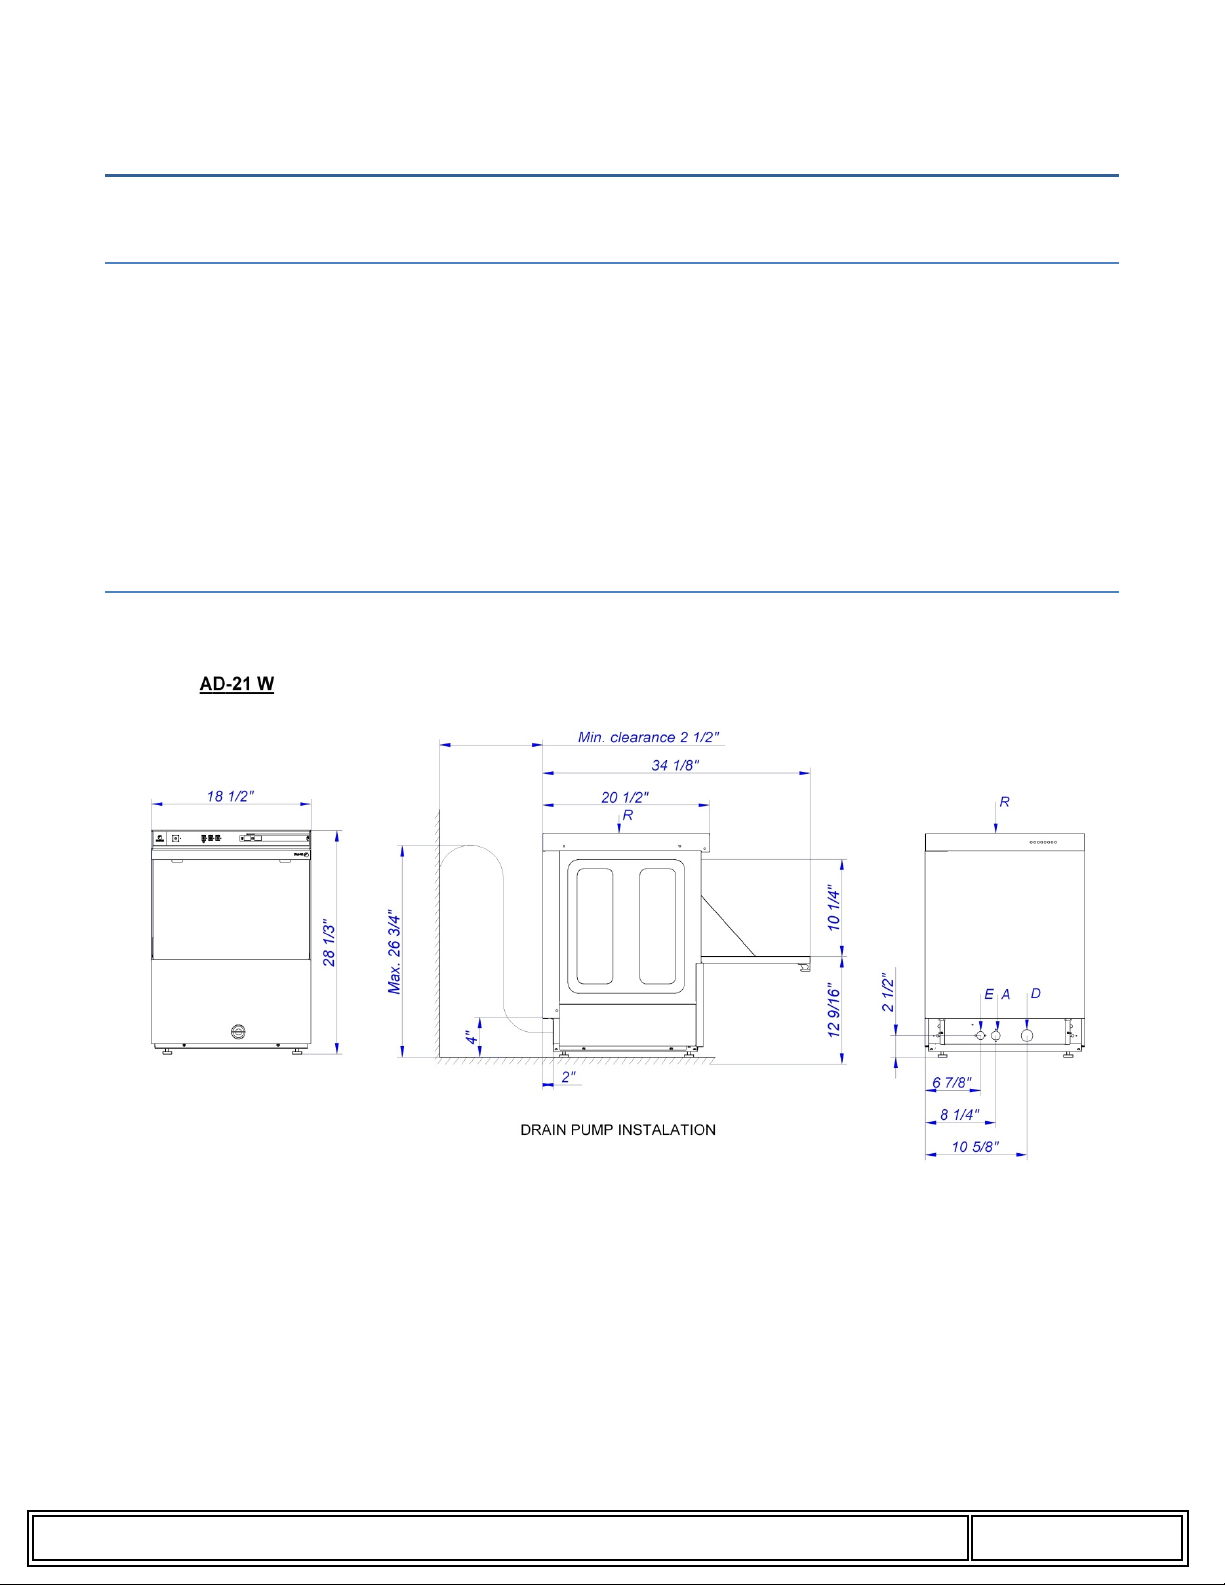
AD–21W........................................................................................................................................................3
INSTALLATION......................................................................................................................................................4
VISUALINSPECTION.........................................................................................................................................4
INSTALLATIONDIAGRAMS...............................................................................................................................4
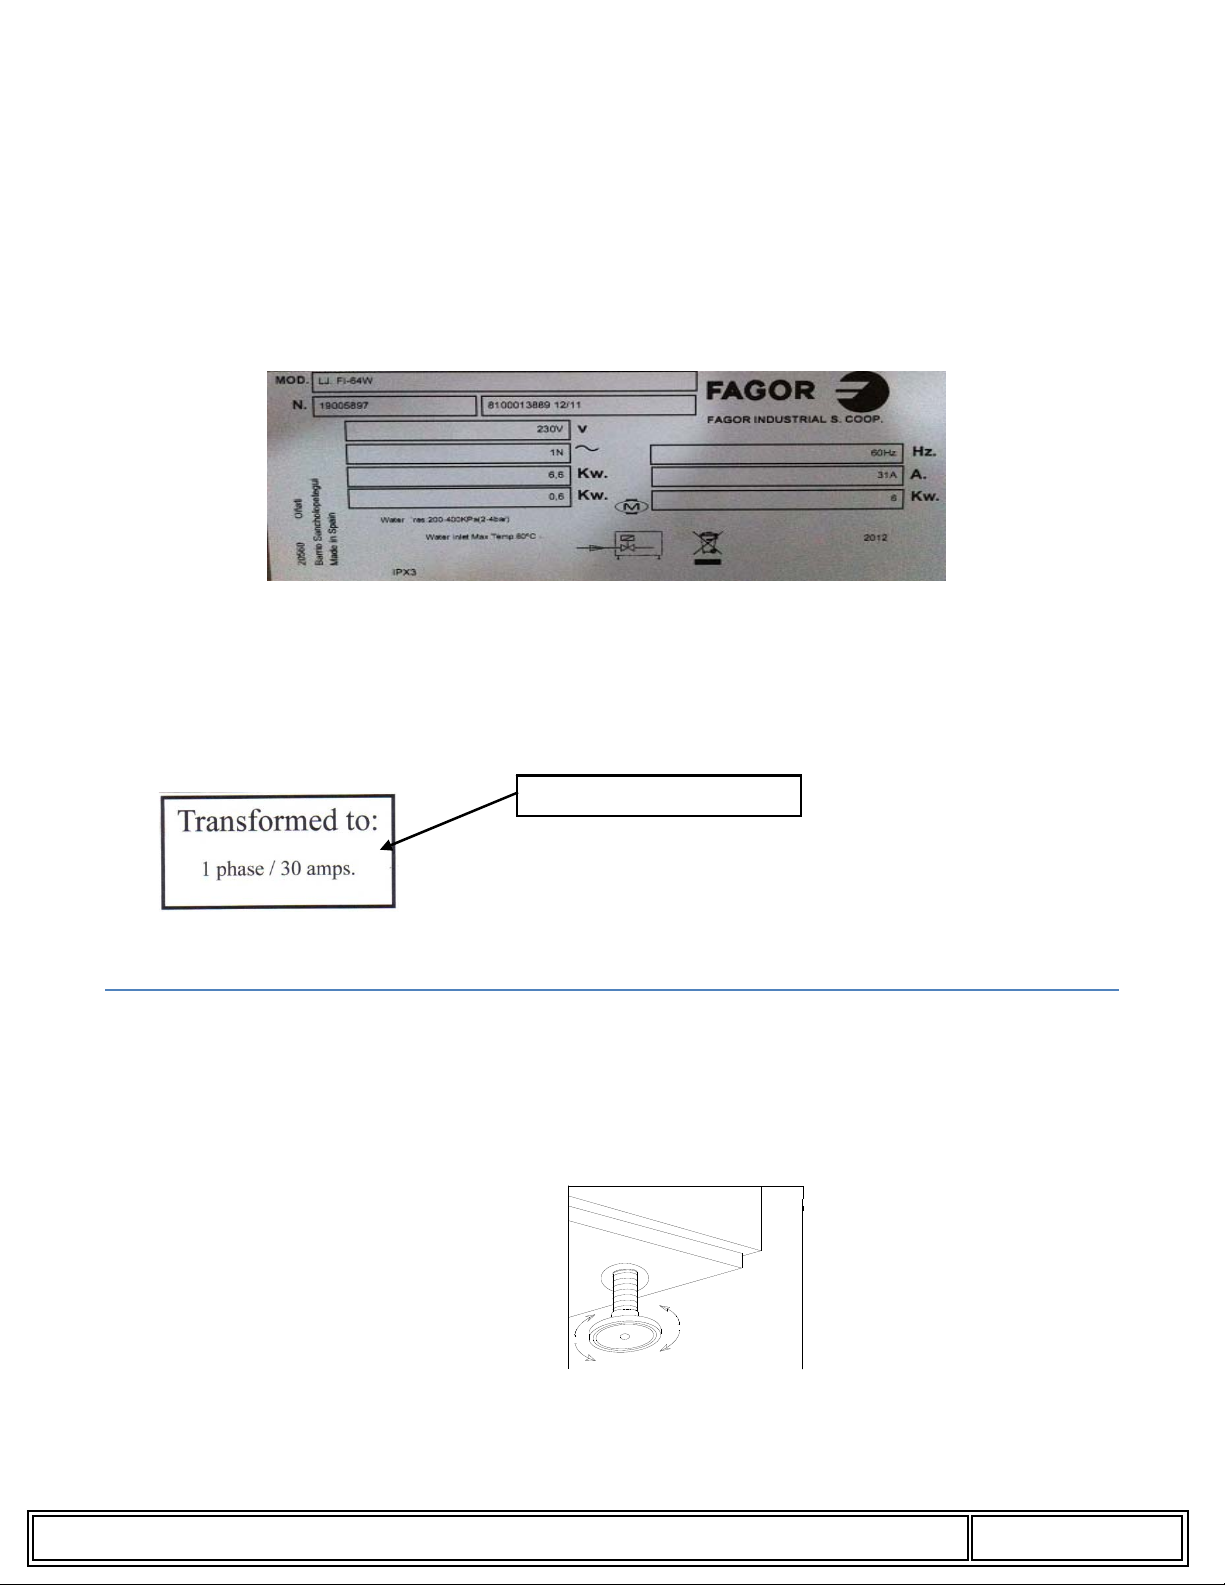
POSITIONING...................................................................................................................................................5
WATERINSTALLATION.........................................................................................................................................6
REQUESTEDQUALITYOFTHEWATER.............................................................................................................7
WATERDRAINAGEINSTALLATION.......................................................................................................................7
ELECTRICALCONNECTION...................................................................................................................................8
INSTALLATIONCHECKLIST....................................................................................................................................9
OPERATION..........................................................................................................................................................9
TURNINGTHEMACHINEON.........................................................................................................................10
PREPARINGTHEMACHINE...........................................................................................................................10
WASHING......................................................................................................................................................10
COOLRINSE.......................................................................................................................................................11
DRAININGANDCLEANING................................................................................................................................11
DETERGENTCONTROL......................................................................................................................................12
PREPARINGTHEWARE......................................................................................................................................13
DELIMING......................................................................................................................................................13
TROUBLESHOOTING..........................................................................................................................................14
DIAGNOSTICS................................................................................................................................................17
ELECTRICALDIAGRAM......................................................................................................................................18
WIRINGSCHEMATIC..........................................................................................................................................19
RECOMMENDEDSPAREPARTS.........................................................................................................................20
LIMITEDWARRANTY.........................................................................................................................................21

ForCustomerService:Call1‐866‐GOFAGOR–www.fagorcommercial.com| P.3
SPECIFICATIONS
AD–21W
PERFORMANCE/CAPACITIES
CapacitiesHeatingElements
Racksperhr.:22Electricwashtankheater:2.8Kw
Tank:4gal./15.4liters Electricboosterheater:2.8Kw
WaterConsumption/RequirementsOperatingCycles
Gallonsperhr.(Max.use):20gal./75litersWashtime(Seconds):3settings(70/100/160)
Gallonspercycles:.64gal./2.4litersDwell(Seconds):5
Inlettemperature:140ºF Rinsetime(Seconds):15
Flowrinsepressure:20‐25psiTotalTime(Seconds):3settings(60/90/180)
WashPumpMotorDimensions/Shipping
Motor(hp):1/3HPWidth:20”/508mm
Depth:241/2”/622mm
Temperatures Height:341/2”/876mm
Wash:150ºF/66ºC Maxclearancefordishware:10½”/267mm
Rinse:180ºF/82ºC Rack:16”x16”/400mmx400mm
Shippingweight:105lbs./47.5kg
Shippingvolume(cu.ft.):10
TECHNICALSPECIFICATIONS
TotalPowerConsumption BoilerPowerConsumption
VoltsAmpsPower(KW) VoltsAmpsPower(KW)
208/60/113.12.7 208/60/1122.5
220/60/114.93.2 220/60/112.72.8
240/60/115.03.6 240/60/113.753.3
PumpPowerConsumption
VoltsAmpsPower(KW)
208/60/11.100.5
220/60/11.180.6
240/60/11.250.7

ForCustomerService:Call1‐866‐GOFAGOR–www.fagorcommercial.com| P.4
INSTALLATION
VISUALINSPECTION
Beforeinstallingtheunit,checkthepackageandmachinefordamage.Allmachineshavebeentested,
inspectedandpackedatthefactoryandisexpectedtoarrivetoyouinnew,undamagedcondition.Visually
inspecttheexteriorofthepackage.Anydamageshouldbenotedandreportedtothedeliveringcarrier
immediately.Ifdamaged,openandinspectthecontentswiththecarrier.
Intheeventthattheexteriorisnotdamaged,yetuponopeningthereisconcealeddamagetothe
equipment,pleasenotifythecarrier.Notificationshouldbemadeverballyaswellasinwrittenform.Requestan
inspectionbytheshippingcompanyofthedamagedequipment.Also,contactthedealerthroughwhichyou
purchasedtheunit.
INSTALLATIONDIAGRAMS
A=Waterinlet
D=Drainhose
E=ElectricalCable
R=TerminalBlock

ForCustomerService:Call1‐866‐GOFAGOR–www.fagorcommercial.com| P.5
DATAPLATE
Thedataplateinlocatedononesideofthemachine.Undernocircumstancesshouldthedataplatebe
removedfromtheunit.Thedataplateisessentialtoidentifytheparticularfeaturesofyourmachineand
isofgreatbenefittoinstallers,operatorsandmaintenancepersonnel.Itisrecommendedthat,intheevent
thedataplateisremoved,youcopydowntheessentialinformationinthismanualforreferencebefore
installation.
Anytransformationsorchangesmadeonthemachinesduringinstallationshouldbereflectedonthedata
plateorusingalabelasbelow:
POSITIONING
Levelingandadjustingtheheightoftheapplianceisdonebyturningthelevelingstandstothedesireheight.
Ensurethattheunitislevelbeforemakinganyconnections(Fig.2).
Fig.2
Totalloadatindicated
AD21W

ForCustomerService:Call1‐866‐GOFAGOR–www.fagorcommercial.com| P.6
WATERINSTALLATION
Waterinstallationiscarriedoutasshowninfigures3and4.Thehotwaterlinetothedishwashermust
provide20psiofwaterpressure.Thehotwaterheatershouldbesettodeliver140F(notlowerthan120°F)
watertemperaturetothedishwasherforbestresults.Use¾”coppertubinginletline.
CAUTION:Donotconfusestaticpressurewithflowpressure.Staticpressureisthelinepressureina“no
flow”condition(allvalvesandservicesareclosed).Flowpressureisthepressureinthefilllinewhenthe
solenoidvalveisopenedduringthecycle
THEDISPLAYOFTHEPRESSUREGAUGESHALLBECLEARLYVISIBLEOFTHEOPERATOROFTHEMACHINE.THE
GAUGESHALLHAVEINCREMENTSOF1psi(7kpa)ORSMALLERANDSHALLBEACCURATETO±2psi(±14kpa)IN
THE20psi(103‐172kpa)RANGES.IFTHEGAUGEISLOCATEDUPSTREAMOFTHECONTROLVALVE,ITSHALLBE
MOUNTEDINANACCESSIBLEVALVEWITHA¼INIRONPIPESIZECONNECTION.
Ifthewaterpressureislessthan20psi(1.4kg/cm2),installationofawaterpumpisrequiredasshowninFig.
4.Inareaswherethepressurefluctuatesorisgreaterthantherecommendedpressure,itissuggestedthata
waterpressureregulatorbeinstalled.
S=Gatevalve
F=Filter
H=Hose
E=Fillvalve
M=Pressuregauge
R=¾”Co
pp
er
S=Stopcock
F=Filter
H=Hose
E=Electrovalve
B=Electropump
M=Manometer
R=¾”Co
pp
er

ForCustomerService:Call1‐866‐GOFAGOR–www.fagorcommercial.com| P.7
REQUESTEDQUALITYOFTHEWATER
‐Hardness:5‐10ºF
‐Conductivity200‐2000µS
‐pH6.5–7.5
‐Chloride’sconcentration<150mg/litre
‐Chlorine0.2‐0.5mg/litre
‐Impurities<0,08mm
Itisnecessarytoremoveallforeigndebrisfromthewaterlinethatmaypotentiallygettrappedinthevalves
orcauseanobstruction,priortoconnectingtothemachine.
Useonlythesuppliedhoses(3/4”Femalehoseconnector)atthewaterconnections.Failuretodosomay
resultindamagetothesolenoidvalvethreadsandleaking.Tightenbyhand.Connectthebentsideofthehose
tothemachine.Adaptorsuppliedfor¾”femalegardenhoseconnection.
FORHARDWATERSUPPLIESWITHAHARDNESSOFOVER2GRAINSOR10ºFANDPHBEYONDTHERANGE
OF7.0–8.5,AWATERCONDITIONERMUSTBEINSTALLED.
Slowlyturnonthewatersupplytothemachineaftertheincomingfilllineandthedrainlinehavebeen
installed.Checkforanyleaksandrepairasrequired.Allleaksmustberepairedpriortoplacingthemachinein
operation.
WATERDRAINAGEINSTALLATION
AttachthedrainhoseasshowninFig.5.Itisrecommendedtoaffixasiphonpipetopreventodors.All
pipingfromthemachinetothedrainmustbeaminimum1‐1/2”I.P.S.Thereshouldalsobeanairgapbetween
themachinedrainlineandthedrain.Fornaturaloverflowefficiencyusefloordrain.
Fig.5
23/8"
D=Drainhose
C=Draincollector
A=AirGap
F=ScrapBasket

ForCustomerService:Call1‐866‐GOFAGOR–www.fagorcommercial.com| P.8
ELECTRICALCONNECTION
Toaccesstotheelectricalconnectionblock(R)(Fig.1),removethetopcover(T)(Fig.1)andtherearpanel
(P)(Fig.1).Connectthewiresasshowninfigure6.Insertthepowercordthroughthecordholder(E)(Fig.1)
andmakesuretoleaveenoughcabletoremovetheelectricalpanelfromthefrontforservice.Tightenthe
connections.
Leavefree39”(1000mm)ofpowercordfromthereartofacilitatecleaningofthelocationoftheglass‐
washer.
Installacircuitbreakeraccordingtorequiredconsumptionguidelines(Page1)anddataplate.
Themachinemustbegrounded.
Fig.6
WARNING:ElectricalShockHazard
Itisthepersonalresponsibilityandobligationofthecustomertocontactaqualifiedelectriciantoassure
thattheelectricalinstallationisadequateandisinconformancewiththeNationalElectricalCode,ANSI/NFPA
70–latesteditionandalllocalcodesandordinance.
BLACK CAP – Red
Wire
BROWN CAP – Red
Wire
BLUE CAP – Red
Wire
BLUE CAP - Red Wire
Neutral
Line
Yellow/
Green
Ground
Terminal Block
(
208-220-240V
G

ForCustomerService:Call1‐866‐GOFAGOR–www.fagorcommercial.com| P.9
INSTALLATIONCHECKLIST
OPERATION
CHECKOFFTHEFOLLOWINGITEMSASTHEYARECOMPLETEDBEFOREPROCEEDINGTOOPERATEORSERVICETHE
DISHWASHER.
Hasthedishwasherbeenproperlyleveled?
Hastheservicevoltagebeencheckedtoensurethatitmeetsthe
requirementslistedonthedishwasherspecifications(Page2)?
CircuitBreakersize______Voltage______Phase_______ExistingorNewelectricalinstall_______
Hasthedishwasherbeenproperlygrounded?
Aretheelectricalconnectionsandplumbingpipestighteningtopropertorquelevels?
Hasbeeninstalledwiththesuppliedwaterhose?Ifnot,Specifyspecsofthewaterhoseinstall
Thread_____Size______Brand______
Flushwatersupplylinebeforeopeningwatervalve
Isthewatervalveopen?
Istheincomingwatersupplyat20‐25psi?
Verifywaterhose,drainhoseandchemicalhosesarenotkinked?
Isthehotwatersupplyattheoptimumtemperature(140ºF)?Ifnot,listwatertemperature_______ °F
Isthewaterhardness≤2.0gpg/34.2ppmandPHlevel7‐8.5ph?
Hasthedrainplumbingbeeninstalledaccordingtotheinstructionsinthismanual?
Heightofthedrainhose______Airgapsize_______
Wasthedraininstalledtoagarbagedisposal?Ifyes,hasbeeninstalledabackflowsafetyincasethegarbagedisposalfail?
____Damagestoadrainpumpduetoafailureofagarbagedisposalwillnotbecoveredunderwarranty
IstheoverflowtubewiththeO‐ringfittedinitspositioninsidethetank
Isthedetergentforcommercialdishwashers?
Haveyouadjustedtheamountofdetergent/rinsegoingtothemachine?____Adjustmentsondetergent/rinsepumparenot
coverunderwarranty.Pleaserefertopage18forinstructions.
InordertovalidateyourwarrantythischecklistmustbereturntoFagoralongwiththeproductregistrationcard.
MODELNO.__________________________
SERIALNO.___________________________
INSTALLATIONDATE___________________
SERVICEREP.NAME___________________
PHONENº___________________________
Registrationcanbecompletedbymail,phone,andfaxoronthe
websitewww.fagorcommercial.com
Fax:3057790173
13105NW47Ave.OpaLocka,FL33054

ForCustomerService:Call1‐866‐GOFAGOR–www.fagorcommercial.com| P.10
TURNINGTHEMACHINEON
Pressandholdthepowerbutton(1)forfiveseconds.LED#2willlitupandthemachinewillstartfillingup
withwater.
PREPARINGTHEMACHINE
Afterthemachinehasfilleditwillstartheatinguptherinsetankandthewashtank.Themachineisreadyto
washwhenthethermometer(9)indicates180ºF(83˚C)andthethermometer(10)160ºF(71˚C).
Itistheuser’sresponsibilitytowaituntiltheminimumtemperaturesaredisplayedbeforeputtingthemachine
towash.
WASHING
NOTE:AllmodelsarefittedwithThermo‐stop.Thetemperatureoftheincomingwatershouldbehigher
than120°F/50ºC.(Idealtemp.140°F/60ºC)Ifitislower,themachine'scapacitymaybeaffectedandyoumay
haveextendedcycles.
Thereare3washingcyclesformodelsdescribedbefore:P1(3),P2(5)andP3(7)of60,90and180seconds
respectively.(Fig.7).LED’snumbers4,6and8indicatethatthemachineisworking;dependingonselected
programme,oneorotherledwillswitchon.
Ifyoustartyourdishwasherpriortoyourboosterheater(9)reachingaminimumof180ºF
(83ºC),YOUWILLHAVEANEXTENDEDWASHCYCLE!
Fig.7
AD‐21W
2357
46810
9
1

ForCustomerService:Call1‐866‐GOFAGOR–www.fagorcommercial.com| P.11
COOLRINSE
Coolrinseprovidesyourmachinewithwaterthatisbelowthetemperatureoftheglassesinsidethe
machine.Thiswillcooldownthecontentsofyourrackinordertofacilitatetheremovaloftherackfromtheunit
afterthecycleiscompleted.Foracoolrinse,pressandholdthebuttonP3(7)(fig.7)COOLRINSEwillbeONas
longastheoperatorholdP3button.
DRAININGANDCLEANING
DrainingmustoccurEVERYDAYandifinahighapplication;itshouldbedrainedaftereachmealrush!
DrainingtheMachine
OpenthedoorandremovetheFrontRightS/SFilter,leavedooropen.(Fig.8)
Removetheoverflowtubebyinsertingafingerintothetopofthetube.(Fig.9)
DONOTREMOVESCRAPBASKET!DONOTLOOSEO’RINGFROMOVERFLOWTUBE!
PressandholdthebuttonP1(3)for5seconds(Fig.9).Thelednumber4willilluminateduring
operation
Waituntiltheled(3)turnsoff.(3minutes20seconds)
Takeoutscrapbasketforcleaningbytwistingtotheleft.(Fig.10)
Replacescrapbasket,lockintopositionbytwistingtotherightandreplaceoverflowtubewith
O‐ring.
ReplaceS/Sfilterbackintoposition.(Fig.8)
Presspowerswitch(1)toturnunitOFF
Fig.7
AD‐21W
12357
46 8 10
9

ForCustomerService:Call1‐866‐GOFAGOR–www.fagorcommercial.com| P.12
Toavoidtheriskofdamagefromoxidizationorcorrosionfromchemicals,keepallsteelsurfacescleanand
dry.Itisadvisabletochangethetankwater,bynewfilling,atleastevery40‐50washesortwiceaday.
DETERGENTCONTROL
UseONLYCommercialGrade,HighTemperature,LowSudsLiquidDetergent.Fagordoesn’trecommendany
specificbrandnameofchemicals.Contactyourlocalchemicaldistributorforquestionsconcerningyour
chemicalneeds.
AllmachinescomeequippedwithaninternalDetergentandRinsedispenser.
Takethetubelocatedinthebackoryourmachinemarked“Detergent”andplaceinsidedetergent
container.
Takethetubewithabluestripemarkandplaceinsiderinsecontainer.
Tubesarecleartoprovideyouavisiblemeansthatchemicalsarebeingdispensed.
IfdesiredyoucancontroltheamountofChemicalbeingdispensedbyopeningthebottomfrontpanelofthe
machine.Locatethedetergentdispenser(Fig.9)andregulateaccordingtotheflowchart(Fig.9a).Forthe
Rinse,turnthebuttoncounterclockwisetogetmorerinseaideandclockwiseforless.Verifyallconnectionsto
thedispenserarehandtightentopreventanyleaks.
Controlandmaintainthelevelofdetergentandrinseaidofthetanks.Keepchemicaltubingandfilters
submerged.
Oº 220º
1
2
345
6
7
Fig.9a
Gal./h.
10
20.06
30.20
40.40
50.53
60.66
70.80
DETERGENTPUMP
DETERGENTADJUSTMENT
RINSEPUMP
RINSEPUMPADJUSTMENT
Fig.9

ForCustomerService:Call1‐866‐GOFAGOR–www.fagorcommercial.com| P.13
Warning!
IfyourequiretheinstallationofanNONFAGORDetergentandRinsepump,aformMUSTbefilloutpriorto
installationbyyourinstaller.FailuretodosowillvoidyourWarranty.Thisformcanbelocatedinsideyour
dishwasher.Iflost,pleasecontactFagortogetacopy.
Note:Thedetergentpumpandrinsedispensingpumpwillonlyworkduringtheprocessoffillandrinse.
PREPARINGTHEWARE
Pre‐scrapandrinseallrackspriortoplacingtheminthedishwashertoremovelargefoodparticles
(pre‐scrap)fromtheware.
Washglasswarefirst
Puttraysinthebaskets,makingsureisinitsseparaterack(Fig.12).
Putplatesinthebaskets,makingsureeachisinitsseparaterack(Fig.11).
Putglassesinupsidedown.
Putcutleryinthecutlerybasketshandlesdown.Mixspoonswithknivesandforks.(Fig.10)
Putthespecialcutlerybasketsinthebasebaskets.
Fig.10
Fig.11
DELIMING
Inordertomaintaindishwasheratoptimumconditions,itisrequestedtoremovelimeandcorrosion
depositsonafrequentbasis.Ade‐limingsolutionshouldbeavailablefromyourchemicalsupplier.Readand
followallinstructionsonthelabelofthede‐limingsolution.Operations:
Fillthemachine.Addthecorrectamountofde‐limingsolutionsasrecommendedbythede‐limingsolution
manufacturer.Thewatercapacityofthetankcanbeverifiedonthespecificationsheetofthismanual
Removedetergentandrinsingtubesfromcontainerssonochemicalsgotothemachine
Runthemachinefortherecommendedperiodoftime.Asmanycyclesasneeded.Turnoffthemachineand
openthedoor.Whenclean,drainandre‐fillthemachineandRunmachinefor3‐4cyclestoremovede‐
limingsolution
Drainthemachine.

ForCustomerService:Call1‐866‐GOFAGOR–www.fagorcommercial.com| P.14
TROUBLESHOOTING
SYMPTOM POSSIBLE CAUSE ACTION
Dishwasher will NOT FILL
after the door is closed.
Power “ON” light (L1) is not
illuminated.
Service breaker tripped Reset. If the breaker trips again, contact an electrician to
verify amps or possible short.
Machine not connected to
power source. Verify the unit is connected to a hot (live) feed. Verify
voltage and proper phasing.
Faulty Circuit Board Make sure power is being supplied to the board. Check
for loose wiring harness connections. Check circuit board
fuse. Check voltage between R (brown) and N (blue). If
208V-240V found, replace circuit board.
Dishwasher will NOT FILL
or reach the appropriate
water level after the door is
closed. Power “ON” light (L1)
is illuminated.
No water to machine Verify hose is not blocked or kinked, water valve is open
and pressure > 20 psi.
Machine not level Level machine. Legs are height adjustable.
Overflow tube not attached
or broken / missing O-ring. Check condition of overflow tube. Make sure O-ring is in
good working condition and in place.
Faulty door switch Verify the wiring at the switch for loose connections; if
no loose connections are present, replace the switch (Ip)
or the door relay (Cp)
Faulty fill pressure switch
(P1) Verify voltage at terminal 2 (brown) and GND. If no
voltage, P1 is possible stuck.
Faulty rinse/fill valve (V) Verify the wiring and proper voltage at valve; if correct
replace fill valve.
Dishwasher will NOT RUN
after the door is closed.
Power “ON” light (L1) is
illuminated and the unit has
completed the filling and
heating cycle.
Faulty fill pressure switch
(P1) Verify it changes position of the switch; on terminal 1 to
2 (fill), and 1 to 3 (heating) If not replace it.
Faulty Power/Start button
(St) Verify good connection between digital start buttons and
circuit board. If disconnected, reconnect and verify.
Verify circuit board fuse is If connected and still not
working, replace Adhesive Trim.
Faulty Circuit board
Make sure power is being supplied to the board. Check
for loose wiring harness connections. Check circuit board
fuse. Check voltage between R (brown) and N (blue). If
208V-240V found, replace circuit board.
Faulty wash pump (MBL) Rotate the pump from the shaft flat head slot counter-
clock wise to verify free rotation. Verify that the wash
pump is getting power. If so, replace the pump.
Faulty start buttons Verify good connection between digital start buttons and
circuit board. If disconnected, reconnect and verify.
Verify circuit board fuse is If connected and still not
working, replace Adhesive Trim.
Rinsing temperature gauge
is lower than 180ºF. Wait until sanitized rinsing temperature reached a min.of
180ºF. Check out your incoming water temperature.
Recommended incoming water temperature is 140°F

ForCustomerService:Call1‐866‐GOFAGOR–www.fagorcommercial.com| P.15
SYMPTOM POSSIBLE CAUSE ACTION
Dishwasher RUNS
continuously in the wash
cycle or not rinsing.
Faulty Circuit Board Make sure power is being supplied to the board. Check
for loose wiring harness connections. Check circuit board
fuse. Check voltage between R (brown) and N (blue). If
208V-240V found, replace circuit board.
Dishwasher RUNS
continuously in the wash
cycle or not rinsing.
Faulty Circuit Board Make sure power is being supplied to the board. Check for
loose wiring harness connections. Check circuit board
fuse. Check voltage between R (brown) and N (blue). If
208V-240V found, replace circuit board.
Faulty Operating t-stat
(Tc)/Faulty Circuit Board Verify rinse gauge temperature is above 180°F. If above,
replace circuit board. If rinse temperature <180°F replace
Tc thermostat and/or boiler element and heater relay. If
A4 is displayed, reconnect temperature sensor. If A5 is
displayed, replace temperature sensor.
Faulty rinse/fill valve (V) Verify the wiring and correct voltage at valve; if correct
replace fill valve.
No water to machine. Verify hose is not blocked or kinked. Verify the inlet water
pressure is at a min of 20 psi and max 25 psi.
Clogged or obstructed
rinse arms Remove and clean rinse arms/nozzles.
Dishwasher FILLS slowly
and/or rinse is weak.
Poor water pressure Verify the inlet water pressure is at a min of 20 psi and
max 25 psi.
Hose strainer is clogged Check strainer or any filters installed.
Bad rinse/ fill valve (V)
Valve can be clogged
causing poor flow.
Disconnect hose from fill valve and check filter screen
inside for debris. Replace rinse/fill valve as needed.
Temperature gauge in
front panel is defective. Check temperature with a calibrated thermometer at the
corresponding temperature sensor location. Replace
temperature gauge as needed.
Dishwasher RUNS.
RINSE WATER NOT
REACHING MINIMUM
TEMPERATURE OF 180°F
Misadjusted/faulty
thermostat (Tc) Verify rinse temperature probe sensor is properly inserted
inside probe well. Replace Tc thermostat and/or boiler
element and heater relay. If A4 is displayed, reconnect
temperature sensor. If A5 is displayed, replace
temperature sensor.
Faulty high limit stat (Tl) Reset thermostat by depressing red button. Replace if
necessary. Make sure heater relay (Cc) is working
properly (not stuck in or out) and Tc thermostat is cutting
off below 195°F
Faulty heater relay (Cc) Verify voltage at heater relay coil (A1, A2), solenoid
closes when receiving voltage. If not, replace heater relay
(Cc).
Faulty Boiler element (Rc)
Ohm out element check for continuity; if open, replace
heater (Rc).

ForCustomerService:Call1‐866‐GOFAGOR–www.fagorcommercial.com| P.16
SYMPTOM POSSIBLE CAUSE ACTION
Dishwasher RUNS.
WASH WATER NOT
REACHING REQUIRED
TEMPERATURE OF 150°F
Low incoming water
temperature supplied to the
Dishwasher
Check out that incoming water temperature is at least
120°F and pressure is at least 20 psi. Optimal incoming
water temperature is 140°F and optimal incoming water
pressure is 25 psi.
Faulty thermostat (Tc) Verify that there is power on violet (vi) coming from Tc
to Tt (only applies after Tc has been satisfied or >
180°F). If A4 is displayed, reconnect temperature
sensor. If A5 is displayed, replace temperature sensor.
Misadjusted/faulty
thermostat (Tt) Verify voltage to t-stat. If voltage has been verified ok,
check tank heater relay Ct
Tank heater relay (Ct)
faulty. Verify voltage at heater relay coil (A1, A2), solenoid
closes when receiving voltage. If not, replace heater
relay (Ct)
Tank heater (Rt) faulty Ohm out (between 10-12 Ohms) element check for
continuity; if open, replace heater (Rt).
Dishwasher Washes and
Rinses but Does NOT DRAIN
or overflows.
Door is closed Open the door and push the drain button for 3 sec.
Overflow tube not
removed. Open the door and remove the Front Right S/S Filter and
remove the overflow tube by inserting a finger through
the hole on top of the overflow tube and pull upward.
Drain pump (BD) clogged. Open drain pump cover and remove debris. (Lower front
panel; unscrew white removable cover, rotate counter-
clock wise
Drain hose kinked Make sure the drain hose is not kinked and flush out any
debris that may have been accumulated.
Faulty Drain pump (BD) Verify voltage to drain pump; if receiving voltage,
replace Drain pump (BD).
Faulty safety pressure
switch (P2), Overflow. Verify that the black rubber pressure tube is not kinked
or damaged (air leak). If so, replace black rubber
pressure tube. If not kinked or damaged, replace
pressure switch P2.
Machine temperatures or
pressure may not be to
specification.
Wait until sanitized rinsing temperature reached a min.of
180ºF. Check out your incoming water temperature.
Recommended incoming water temperature is 140°F and
incoming water pressure is 20-25 psi.
None or too little
detergent being used. Make sure detergent to dish ratio is fallowed to
manufacturer specification. Make sure that the detergent
and rinse pumps have been adjusted and primed
(priming only applies to the rinse pump). Check for kinks
along the chemical lines. Make sure that the chemical
line brass filters are completely submerged below the
chemical level.
Dishes are not coming
out clean enough.
Improper loading or
overloading Read chapter on proper loading of dishwasher. Refer to
page 15 of this manual.
Washing and or rinsing
arms jammed or dirty. Check that arms rotate properly by spinning them
manually and that rinsing and washing nozzles are not
blocked or dirty. Clean if necessary
Clogged drain Remove obstruction from the pump and/or make sure
the drain hose is not kinked and flush out any debris that
may have been accumulated.
Machine not level Level machine by adjusting the unit’s legs accordingly.
Refer to page 6 of this manual
WATER OVERFLOW
FROM BOTTOM OF THE
DOOR
Excessive inlet pressure Install pressure reducing valve. Ensure flow is 20-25 psi.
EXCESS FOAM coming out
of the door.
Use ONLY commercial grade, low suds, liquid detergent
for commercial appliances. Adjust the amount of
chemicals being dispensed to the unit. Refer to page 14
of this manual.
Low water pressure, rinse
aid container is empty, air in
the pump and/or lines.
Verify that the min. incoming water pressure is 20 psi.
Verify that there is enough rinse aid left in the container.
Make sure that the rinse agent chemical lines are primed
and free of kinks.
Rinse agent not being
dispensed Detergent tubes not
placed properly inside
container/improper
adjustment
Verify detergent tubes are secured inside container
Adjust chemicals to proper levels

DIAGNOSTICS
.
ON/OFFLEDFLASHING:ErrorsorFaultsarenotifiedbyflashesoftheON/OFFLED.Theflashesstayonfor
halfsecond,followedby2secondsoff.
On On Off OnOn Off
1Flash(OPENDOOR):Thisisindicatedbyaoneflashandapause.Thiscontinuesaslongasthedooris
openandtheselectedcycleisunfinished.
2Flashes(TANKFILLERROR):Thisisindicatedbyatwoflashesandapause.Thiscontinueswhilethewater
inthetankdoesnotreachthecorrectlevelinthespecifiedtime.
3Flashes(TANKDRAINAGEERROR):Thisisindicatedbyathreeflashesandapause.Thiscontinueswhile
thedrainagepumpdoesnotdrainthewaterinthetanktothecorrectlevelinthespecifiedtime.
4Flashes(BOILERHEATINGERROR):Thisisindicatedbyafourflashesandapause.Thiscontinueswhilethe
waterintheboilerdoesnotreachthecorrecttemperatureinthespecifiedtime.
5Flashes(TANKHEATINGERROR):Thisisindicatedbyafiveflashesandapause.Thiscontinueswhilethe
waterinthetankdoesnotreachthecorrecttemperatureinthespecifiedtime.
TEMPERATUREPROBEERROR:Thedisplaymayshowdifferentalarmsforthetemperatureprobes.Thealarm
isshown
o
n
thecorrespondingdisplay
(
boilertemperature
d
is
p
l
a
yor
t
a
n
k
temperaturedisplay)
.
A
4 :
“T
e
m
p
e
r
a
t
ur
e
probe
open”
alarm:
A
5:
“T
e
m
p
e
r
a
t
ur
e
probe
short-circuit”
alarm:
Exampleofa2flashesERROR(TankWaterFillError)

ForCustomerService:Call1‐866‐GOFAGOR–www.fagorcommercial.com| P.18
ELECTRICALDIAGRAM

ForCustomerService:Call1‐866‐GOFAGOR–www.fagorcommercial.com| P.19
WIRINGSCHEMATIC

RECOMMENDEDSPAREPARTS
PartnumberDescription
P255001Waterfillvalve(dual)
R223005Tankheatingelement2000W.
Z203009Doorswitch
Z203062Doorrelay
Z268004TemperatureProbe
Z213007 Contactor
Z203062RELE230V.16A50‐60HZ
Z393005Boilerthermostat
Z400709Washingnozzle
Z400711Washingnozzlebracket
Z401001Pumpmotor60Hz.
Z421711Boilerheatingelement2800W.
Z433011Pressureswitch
Z393005Tankthermostat
Z223501Drainpump
V8171006MFCapacitor
Z231106AntiReturnValve
12045206RinsePump
Z213073ElectronicBoard
Z448401000MEMBRANESWITCHADHES.AD‐21W
Z448405000STICKERMODELAD‐21W
R723015000Fuse10Amps
Table of contents
Other Fagor Dishwasher manuals

Fagor
Fagor 3LVF-638IT User manual

Fagor
Fagor LVF63ITB User manual

Fagor
Fagor FI - 48 W Parts list manual

Fagor
Fagor CO-500 User manual

Fagor
Fagor 3LVF-435 User manual

Fagor
Fagor W Series User manual

Fagor
Fagor LFA-65 Parts list manual

Fagor
Fagor LF-453IT User manual

Fagor
Fagor 3LVF-623 User manual

Fagor
Fagor IO-DWS-1497 User manual

Fagor
Fagor FI - 48 W User manual

Fagor
Fagor Dishwasher User manual

Fagor
Fagor 3LVF-635 User manual

Fagor
Fagor HDWF-CL User manual

Fagor
Fagor 3LVF-423.1 User manual

Fagor
Fagor EVO CONCEPT CO-502 Setup guide

Fagor
Fagor AD-21BDD User manual

Fagor
Fagor LF-020S Service manual

Fagor
Fagor 3LVF-624IT User manual

Fagor
Fagor AD-48W User manual