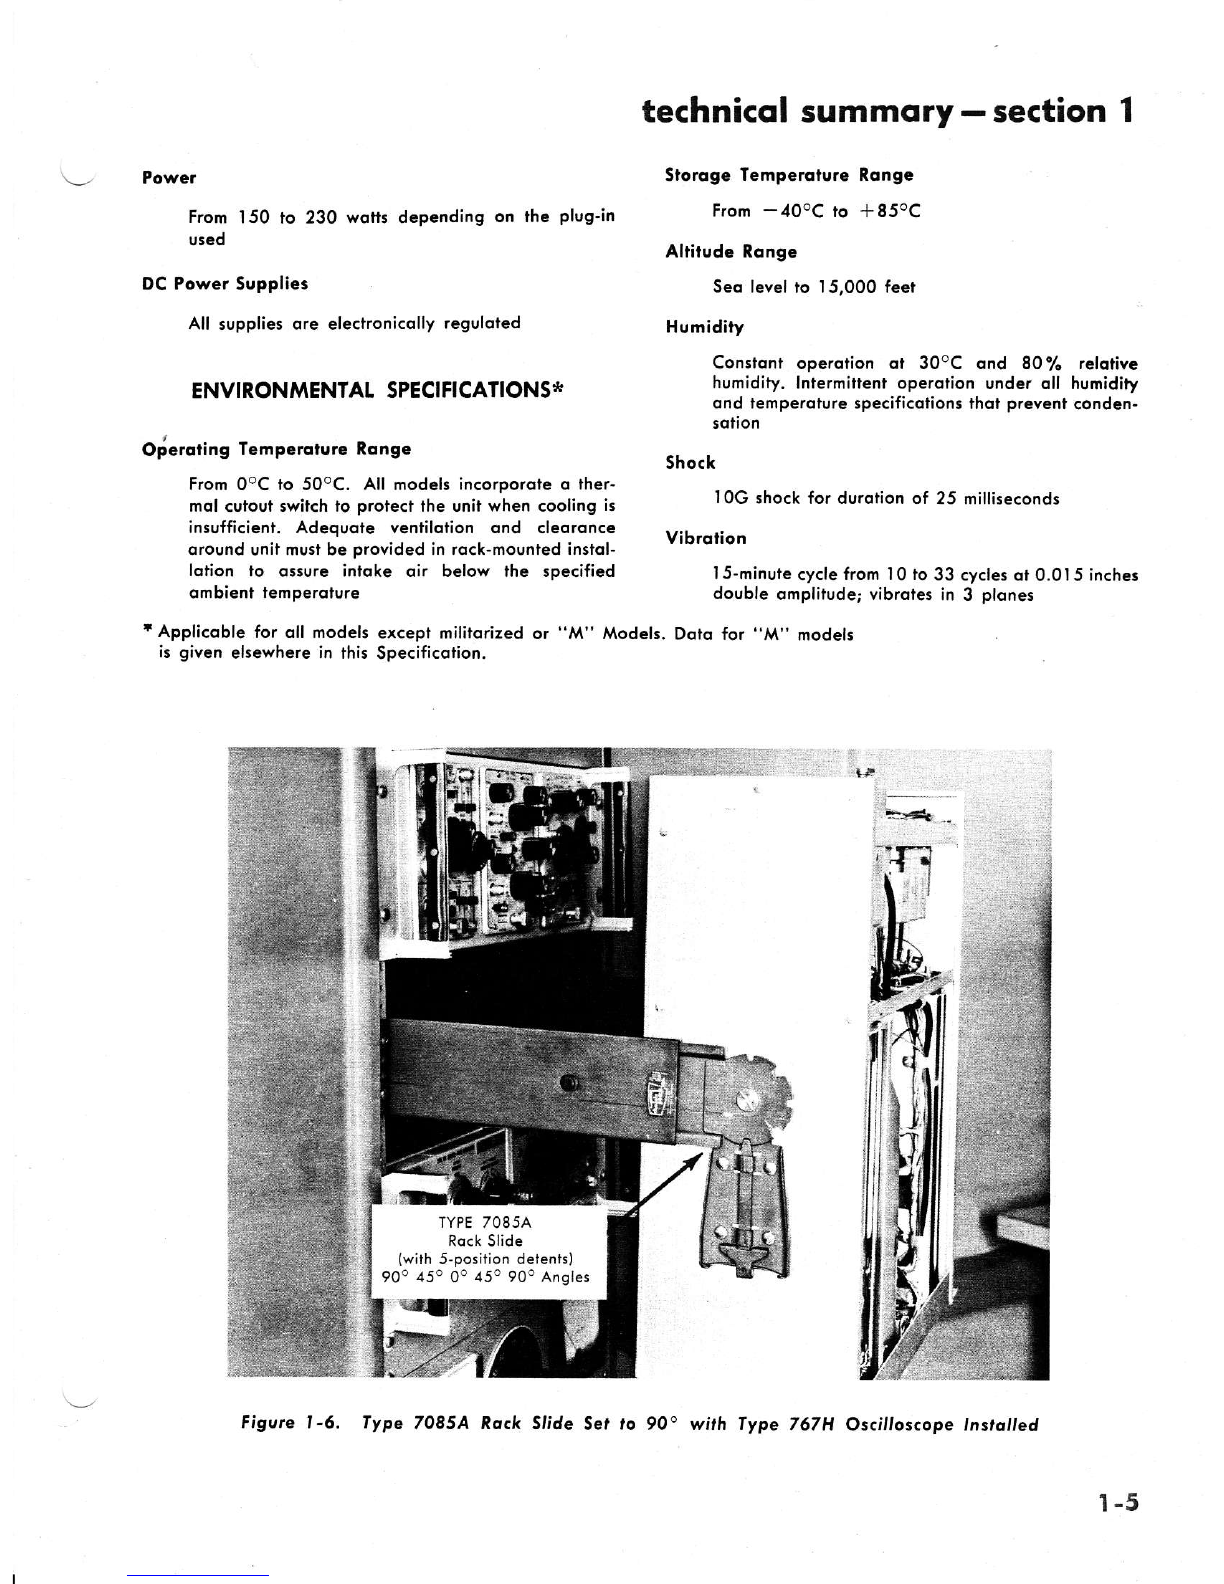
Fairchild 766H SERIES User manual

UP
766H SERtES OSCTILOSCOPE
lnstruciion Monuol
Seriol No.
FAIFICHILE'
INSTRUMENTATION
5o soMEiSET PTACE, CtlFtON, N. J. Or0t5
@ 1965 Foirchild Comero ond lndrument Corp. Monuol No. 6704 5893

Section Title
I. TECHNICAT SU'IAIYIARY
l-l Introduction
l-2 Features
2. OPENATINGINSTRUCTIONS
Introduction
Preliminary Information
Power Requiremenm
3. CIRCUIT DESCRIPIION
Introduction
CRT Circuit .....
l-3 List of Recommended Accessories ............
l-4 Technical Sur4mary (Specifications) ...
l-5 Type 765MH Technical Data ........................
List
List of Recommended Vendors
rrruslRAiloNs
Title
Fairchild Type 766H Transistorized
Oscilloocope
Type 765H Portascope
Page
6-l
6-5
6-7
Page
3-l
3-l
3-1
J'J
c-J
2-l
2-2
2-3
2-4
2-5
2-6
3-l
3-l
5-J
3-4
2-t
2-l
2-l
r.3
l-3
r-7
4-t
4-1
4.1
4-l
1-0
r-2
Operating Instructions -----,- --- .......... 2-l
Beam Brightening Switch ........ ...... ................. 24
Operator's Maintenance Inlormation ... 2-4
Type 765 Portascope with Complerc
Carrying Case ....................... ........-...........
Type 766H Bench Model
t4
l-5
l-6
t-2
1-2
t-2
l-5
Circuit Description for Low Voltage
Regulated Supplies
Type 70854 Rack Slide Set to g0o
with Type 767H Oscilloscope
Installed
l-7 Typ€ 767H Oscilloscope Showing
Clearance Dimension for lnsta]lla-
4. PERFONMANCE ASSURANCE TEST
4-l Maintenance Check to Assure
Pertormance .............
Introduction
Removal and
Normal Sweep Unblanking
Fast Single Sweep Unblanking
and Type
Moundng
vDe 767H
Type 767H Oscilloscope Showing
Clearance Dirr.ension for Insta'ila-
tion of Type 7085A Rack Slides
(Standard Insrallarion)
Type 765MH
Type 766H Solid
Front-Panel FaFacilities
State Oscilloscope,
Type 766H Over-all System Func-
Diagram
vpe 766F
tional Block Diagram
Rear View Showing Transistors
and cRT
Rear View Showing Fuses, Switch
and Diodes
l-8
t-9
2-1
2-3
3-l
E-2
5-7 Installation Instructions
5-8 Installation Insructions
l-6
1-6
t-7
Checking the Power Supply ............ . ....
Check Ripple of Low-Vbltige Type 766H Calibrator Display .... . ... 2-3
SinEle Sweeo Unblankino Vs '
Supplies ...............
Calibrator Check Single Sweep Unblanking Vs
Sweep Speed
ype 766H Ser
Checking CRT Geometry Adjusrment... 4-2 Type 766H Series *200V and *100V
Regulators, Functional Block
5. iIAINTENANCE AND RECATIBRAIION Diagram
ype 766F
Type ?66H Series *50V and -50V
Regulators, Functional Block
4-3
4-4
4-5
5-l Introduction -.................. E-l
5-2 Removal and Replacement of parts.....5-l
5-3 Cathode-Ray TuBe Replacement ............ b-Z
5.4 Servicing Hints ...... .. ................ ... ...... .. b-2
5-5 Trouble Shooring the Power Suppty .... 5-3
5-6 Trouble Shootin"g rhe CRT Ciidit .. 5-B
5-7 Test Equipment Required for
Service Adiustments .........._ ............ b-+
5-8 Adlusting th6 Low-Voltage power
Supplies.. ...................... b-4
5-9 High-Voltage Adiusrment ......... ........ b-4
5-10 CRT Adjustmen6 ..... . b4
5-ll Serring Main Frame Capaciry for
LV and HV Series Ohty ..... . ....... f-tO
5.12 Type 7062 CRT Terminaiion
_ - . - Nerwork (HF Series Only) . ....... ... S_10
5.13 Supplemenr ior Type 766EI Mod I02
Oscilloscope ......" . ... . 5-13
3-2
8-2
5-l
5-l
5-2
0-c
5-4 Top View o[ Chassis Showing Test
Points. Transistors and
Adjustments .............. 5-7
5-5 Right Oblique View Showing X & y
Peaking Trimmers . . ... - .. . ......... 5-8
5-6 Left Oblique View Showing
5-6 L* Oblique View Showing
Transistors, Swirch and Adjustment... E-9
5.11
5-12
5-9^ Type^7062 I-nterconnecring Diagram .... 5-13
5-10 Test Serup for Peaking Aljusti.rent 5.14
TABLE OF CONTENTS
Page
l-l
l-1
Section Title
6. PARTS tI5I5 AND SCHEiAAIICS
6.4 Electrical Parts
68 Spare Parts List
Figure
1-l
t-2
1-3
Type 767H Rack Modei
tion of Type 7l
and Tvoe 7078
70E5A Rack Slides
Kit for Flush

section 1 -technicol summory
t
r0cus
C}
ASIG
I-O
Figute l -l - Foitchild fype 766H frcnsistorixed Oscilloscope

sEcTtoN r
TECHNICAT SUfiTiAARY
l.t INIRODUCIION (Figurcr l-2 io l-51
The Fairchild Types 765, 766, and 767 Family of
Oscilloscopes are available in three basic form factors:
bench, rack, and portable models. The Portable
Models are identified by the TyP€ 765 numerical
Series; the Bench Models by the Type 766 numerical
Series, and the Rack-mounted Models by the Type 767
numerical Series.
In addition, there are alphabetical suffixes appended
to the numerical series to identify special electronic
circuits. The suffix H denotes the high-voltage oscillo-
scope with an accelerating potential of l3 Kv. The low
voltage option is 5 Kv and these series oscilloscopes are
identified by the absence of the H alphabetical suffix.
The suffix H/F denotes the high-voltage high-fre-
quency model. These models are provided with the
Type 7062 CRT Termination Network to enable them
to accommodate the Type 79-024 DC to 100 Mc
Plug.in Amplifier. The suffix M denotes the militarized
model. Further details Ior all of the models are listed
in the Specifications.
Since the electrical circuits are identical in all
models except for minor difierences, discussion will be
confined to the Type 766H Series Oscilloscope. All ref-
erences to the Type 766H Series will be equally appli-
cable to the other models unless otherwise indicated.
To simplify discussion, the Type 766H Series Oscil-
loscope may be categorized into three basic Series:
(l) Low-voltage, (2) High-voltage, and (3) High
Frequency.
l. The following models comprise the low-voltage
Series:
Type 765, 765M, 766, 766M,767, and 767M
2. The following models comprise the high-voltage
Series:
Type 765H, 765MH,
767MH
3. The following models
quency Series:'
766H, 766MH, 767H,
comprise the high-fre-
Type 765H/F, 765MH/F, 766rI/F, 766MH/F,
767H/F, A 767MIJ/F
rNore.' These oscilloscopes are electrically identical
to the high.voltage series except for the addition of the
high-frequency CRT Termination Network.
Separate manuals are provided for each of the plug-
in units. If desired, these manuals may be inserted into
the same binder supplied with your Indicator unit,
I.2. FEATURES
The Fairchild Type 766H Family of Oscilloscopes
consists of an Indicator Unit and any two of a number
of available plug-in modttles. The Indicator Unit con-
tains the power supplies, a cathode-ray tube with asso
ciated circuitry, and an internal amplitude calibrator.
The plug-in modules take the place of the vertical
and horizontal deflection systems of a conventional
oscilloscope, and their outputs are connected directly
to the deflection plates of the cathode-ray tube.
All plug-ins in the Type 74-00 and 76-00 Series may
be used universally in the oscilloecope. The plug-in
rnodules may be selected to give a degree and type of
performance demanded of them by the particular ap-
plication for which they are to be used.
. l3 Kv accelerating potential (low-voltage option:
5 Kv)
o Quatity display area of 6 cm by l0 cm
o Three basic Main Frames available; Portable
(Type 765), Bench (Type 766) and Rack-
mounted (Type 767)
o Silicon solid state circuitry
o Dual Plug-in capability (DC to 100 Mc) with all
High Frequency or H/F Models
o Z-axis input provided on all bench and rack-
mounted models
o Illuminated internal graticule optionally avail-
able
o Silicon transistors and fully regulated electronic
power supplies, assure maximum drift stability
and long-term reliability
t -l

section I -technicol summory
..- PHOTOGRAPHS OT BENCH, RACK AND PORTABTE MODEI.S
Figwe l -3- fype 765 Porros(ope
Wilh Complele Corrying Cose
Figure I -5.
fype 767H Rock Model
Figure l -4.
Itpe 766H Bench Model
Figwe I -2. fype 765H Portos(ope
rif-or -i
c}
fi;
@
- ),-
I
l:"
c,l , J 4:J:
/,-A)
t-2

\- t -3. tlST OF RECOIyI^'IENOED ACCESSOTIE
Typr or
Pqrt Numbcr Dcrcription
AITENUATOR PROBES
(10:l tcrminoied in BNC type conncclorl
12?0 10M. l0 pf;4-ft cqblc
1298 l0M. 14 pf; 8-ft coblc
1299 l0M, 12 pf;6-ft coblc
799$ l0M. 7 pf; 4-ft coblc
7999r l0M, 9 pf;9-ft cqblc
t For use wiih lypc 79-O2A Dsol Trocc DC to IOO M€
Amplificr.' COTOR FITTERS
,t800 5861 Amber for P7 screen
4800 5862 Blue for Pl I or PZ screen
,1800 5863 Grecn for P2 ond P3l screen
4800 610l Nsutrql, Girculqrly polorized
4501 0,152 Anliporollox scole
SCOPE TRAVETERS & RACK STIDE
Top Troy: 103/a inches x 22th inches;
26 Yr inches from floor
Top Troy: 17.1 inches x 22th inchcs;
32th inches from floor
Slidc drowcr (for rqck-mounted uniil
TERMINAI. ADAPTERS
Mqle BNC type €onnecfor to Type C
femqle odqpter, UG.635/U
Scope binding poit lo BNC qdqptc.
vrEwtNG AccEssoRrES
Viewing Hood mode of moldcd rubbcr
Round lighi shield tq rcduce glorc ond
reflection; does not hovc q molded ey.-
piece
Portoblc Models
765-
|Vt'
17!q"
23'
rvP.
276C
128 5A
4290
Terminol Adopters
1287 Risht ongle; UG-306A/U
UG-636/U C mqle io BNC femqle
UG-1090/U 8NC to plug tip {bononol
1296
orv
'|
2
I
2
2
2
7020
7030
7085
7081
7080
276C
7035
l8 lbs
9lbs
37 lbs
Ecnci Models
766-
t3le"
eTq"
2oYe"
27 lbs
37 lbs
Rqck.Mounted Modclt
767-
19'
20"*
27 lbs
37 lbs
technicql summqry-section 1
1285A
150/1sOA,
153/1s3A
L291
PHYS]CAI. CHANACTERISTICS
Height
widrh
Depth
Weight
Corrying Cosc
Shipping Weight
Note: A minimum of 2" clearoncc murl be mqinlqined tor the rqck-mounted model
to qssure odequqte cooling, Do not iubiec, ,he unit lo lhc hot exhouri qir o,
odiqcent cquipment.
r Sehind ponel. With mouniing brockeh reversed: t 8 r/a inches
CRI IERMINATION NETWORK
7062 CRT Terminotion Network Kit lo trqnt.
form rhe H modcls to H/F models. Ihis
neh.rork i5 stqndqrd equipment wiih ihc
High-Frequency Moin Frome Oscillo-
scopes (Typer 765Hlt, 765MHlf,
766t HlF, 766Hlt, 767Hlt qnd
767 MH/?l
l -4. TECHNICAL SUMIIIARY (Spccificolionsl
The electrical characteristics of the Type 766 Low
Voltage, High Voltage, and High-Frequency Series
Oscilloscopes are listed in the Performance Specifica-
tion which follows.
TERMINATING RESISTOR
50-ohm, 5-wott, Typc C connector
CAATERAS
Oscillorcope-Record Cqmcrqs with ruit-
oblc qccessorier
CABIE ASSEMBI.Y
Extension cqble for remgic opcrotion of
lhe plug-in from the oscilloscopc
OPERATIONAT ACCESSORY KIT
Complatc lil coniqinr:
D...rlptlon
Viewing Hood
50.ohm Terminqtion
Probc
l-3

section I -technicol summory
Type
For lyp. 766 Low-Voltcae Series
1765, 765M, 766, 766M, 767 & 767M1
FZ65O-O-P3l single beom, electroslotic focus qnd
deflection cothode-roy tubc ir normolly supplied;
5000 volts occelerqting poteniiol
For lype755 High-Voltoge Serie:
1765H, 765MH, 766H, 766MH, 767H & 767MHl
F7660-0-P3l single beom, electro3tqtic focus ond
deflection coihodc-rqy tube is normolly supplied;
13,000 volts occeleroling potentiol
Fot lype 766 High-Frequcncy Series
765H/t, 76sl/.Hlt, 766Hlt, 766MH/F, 767H/F,
& 767MHlFl
F767O-O-P3\ sinqle beom, electrostotic focus qnd
deflection cothode-roy tube is normolly supplied;
13,000 voli5 ocqeleroting poteniiql
Optionol Phosphor:
P7 phosphor for long persistence low frequency or
trqnrient obseryqtion; Pl I pho!phor for photo-
grophic use; ond P2 phosphor for combinotion yi5uol
ond photogrophic use. All other phosphors qvoiloble
on speciol order
Aluminizolion
All tubca qre qluminized for moximum light outpul
ond to preycnl screen chorge distortigns
Bezel
Lighi-tight bezel provides firm mount for on oscillo-
lcope cqneaq ond permits reqdy interchonge of
filters qnd scoles
Grqlicule
Engrqved edge-lii groticule hoving 6 cm by l0 cm
groduotion: ond oppropriote color filter over foce of
tube. Scole illuminotion control vories light leycl from
zero to intensity odequote for photogrophic record-
ing. CRT internol no-porollox groticule is optionolly
ovoiloble; white scole moy be edge lit for photo-
grophic recording
CRT Direci lnput
l. X Axis, l0 to 15 volts/cm (oll CRT seriesf
2q. Y Axis: 5.2 to 7.2 volls/cm (F7650"0-p- ond
F7660-0-P- CRT onty)
2b. Y Axis: 2t/t to 3Yz vohsfcn IF767O-0-P-
CRI onlyl
l-4
SPECIFICATIONS
CATHODE.RAY TUBE DAIA Z Axi: (Bench ond Rqck-mountcd Models onlyl
Negotivc pulse to grid of CRT blonks trqce. 25 volts
ore required inlo on impedoncc of opproximqtely
I mcgohm coupled vio 0.01 pf cqpociio. to dim
trqce
CRT Beqm Controls
lNTENSlry, FOCUS, qnd ASTIG conirols qre pro-
vided on the Mqin Frome for controlling the CRT
beqm
Beom Brightening
A switch lqbeled NORMAT/SINGLE is provided on
lhe Type 766 High-Volloge ond High.Frequency
Series chqssir. Beom brightening con be occom-
plished by beom goling (normol operotion) or by
cqthode gqting {for photogrophing single-shot high-
5peed lronsienti)
VOTTAGE CATIBRATOR
Amplitude
Col lV, peqk-to-peok 3quore wove signol ovoiloble
ot pin iock on front ponel o{ Moin Frome 1t2,5%
moximum, t I % nominoll; fqst rise qnd fqll iime
permits qdiurtment of qflenuolor probe
Accurocy
Nominolly tl./o, olwoys within i2.5%
Frequency
locked io power-line frequency. This woveform moy
be used to colibrote ihe time oxis wherever the
power"line frequency is o controlled siqndqrd
Acces: to Plug-lns
The some l.volt colibrotor woveform is supplied to
eoch plug.in. The omplifier plug-ins will be pro-
vided wiih o suitoble qrrqngement for cqlibrotion of
oll qctive circuitry. The colibrotor wqyeform will
normolly be inseried into the input stoge by meons
of the VOITS/D|V swirch
POWER REQUIREMENTS
line Voltoga
From 105 io 125 volts or from 210 io 250 voltr dt
60-cycle line
Line Frequency
Operoiion from 48 through 1000 cycles; line voltqge
excursion is reduced ol exlremes of frequency ronge
ond where power line disiortion exceeds 5%

Power
From '150 to 230 wqtts depending on the plug-in
used
DC Power Supplie:
All supplies ore electronicolly reguloted
ENVIRONMENTAT SPECIFICATIONS*
O/eroring Temperqlure Ronge
From ooC to 50oC. All models incorporqle o ther-
mql cutout swilch lo prolect the unit when coolinE is
insufficient. Adequote venliloiion ond cleoronce
qround unil musi be provided in rock-mounted in3tol-
lotion to ossure intoke oir below ihe specified
qmbieni iempe.oture
r Applicoble for oll models except militorized or "M" Models. Doto for "iA" models
is given elsewhere in thir Specificotion.
technicol summory-section 1
Storqge Temperoture Ronge
From -400c ro + 850c
Altitude Ronge
Seo level io 15,000 feei
Humidity
Constont operoiion at 30oC ond 80/6 relolive
humidity, Inlermittenf operotion under oll humidity
ond lemperolure specificoiionr lhol prevenl condcn-
sotion
Shoc k
l0G shock {or durotion of 25 milliseconds
Vibrqtion
l5-minute cycle from l0 to 33 cycles ot 0.015 inche:
double omplilude; vibroies in 3 plones
Figvre l-6. Type 7085A Rock Slide 5e, ,o 90" with Type 767H Oscilloscope Instolled
l-5

section I - technicol summory
:t
a'
Figure l-7. Type 767H Oscilloscope Showing Cleoron<e Dimension lor lnstollotion ol
lype 7O85A Rock Slides ond fype 7078 Kit lor Flush Mounting
22"
Figute l-8. lype 767H Oscilloscope ShowinE Cleoroace Dimeasion for
lnstollorion ol fype 7OB5A Rock Slides (standotd lnstdlldtion)
i-:!
H
t-6

technicol summory - section I
I.5. TYPE 765IAH TECHNICAT DATA
Figure I -9. Iype 765MH
Humidi8 - CoDstant operation at 40'C and 95Eo relati\e
humidity. Intermittent operarioo utrder all humidity tem-
perature specificatioos which preveos coodeosatioo. Meets
MIL standard 2028 method 106A except freeziog. No
cotrdeqsatioo permitted when operathg.
Shock -
2O G shock foi duratioo of 5 ms
15 G shock for duration of 1l ms
l0 C shock for duration of 25 ms
(4 shocks in each plane for a total of 12 shocks.)
Vibration - ls-miDute cycle from l0 to 3000 cycles at
0.010 ioches double amplitude (peak-ro-peak). Vibrated
in 3 planes, ls-minutes itr each plaoe (2 G limir) with a
S-minute scao cycle, ls-miqute cycle from IO to 3000
cycles al 0.025 ioches double amplitude (peak-to-peak).
Vibrated in 3 planes, l5-minutes in each plaue (5 c-limit)
with a 3Gsecond scan cycle. Four web guides are provided
tor mounting the fiberglas case.
Transit- Uoit will meet Natiooal Safe Transit Specifica-
tions when factory packaged. Vibration for ooe hour at
1.2 G 3o-inch drops on corners. edges aorl flat surfaces.
Height-
widrh -
20.9 cm
45-0 cm
58.4 cm
81,i"
t'7.%"
Depth - (with cover) 23"
AAILITARIZED PORTASCOPE@
I Meetr ruggedized militory specificolions I Operqtion from line power frequencies of 48-IOOO cycles
I Low power conrsmplion I Operotion from -30o io t6OoC I Semiconductor circuitry
I Light weighi- extremely porioble I RFI shielding I Federql Stock Number 6625-O'6-llls
I Eqch unit is vibrotion tesled I Certificqtion of complionce supplied with eoch system
The 765MH is a militarized, rugged, portable oscilloscope.
The uoit is housed in a sturdy flberglas case. A conve ent
carrying handle permits easy transport through narrow
aisles, hatchways or any confined area. A fiberglas cover
is provided with facilities for mounting accessories.
This basic indicator houses the CRT, power supplies,
aod has two cayities iDto which various X and Y plug-ius
may be ioserted. All electrical specifications are ideotical to
the 765H Series-
Heater Strips - A 200-watt thermostatically cooEolled
staodby heater is incorporated for low temperature opera-
tioo. 200 watts of additiooal standby power are required
below 0oC,
Weisha -The weight of this uoit iDcludiEg plug-ios is
less thao 35 pouods. Maio frame weight is under 27
pounds. Case aDd covers are constructed of rugged 6ber-
glas material. An RFI metallic coatitrg is sprayed ioside
the case.
Temperature Range (in all positions) -
Storage -40'C to *85"C
Operating -30"C to *50"C (without fan)
-30"c to +60'c (with fan)
(modification 103)
Operational Attitude -
Operational to 15,000 feet
Non-operating to 5O,OOO feet Weight -
Net - 27 pounds ShippiDg - 37 pounds
1-7

I 2.I. INTRODUCTION
This section of the Instruction Nlanual describes the
operadon of the Indicator Unit with the Plug-in
modules inserted. Operation oI the Indicator Unit
with the plug-in modules inserted is the same as that
of a conventional oscilloscope with corresponding ver-
tical and horizontal deflection systems. Full operating
instructions for each of the plug-in modules are con-
tained in the manual which accompanies it.
2.2. PREI.IMINARY INFORiAATION
. The Type 766HlF Oscilloscope is a general purpose,
wide band laboratory instrument with dc to 100 Mc
capabilities. The dual cavities of the instrument will
accept any of the present Types 74-00, 76-00, and 79-00
Series Plug.ins, thus determining the oscilloscope's ulti-
mate performance. The Type 766H/F Oscilloscope is
in essence a Type 766H Series unit which has been
provided with the Type 7062 CRT Termination Net-
work to accommodate the Type 79-024 100 NIc Dual
Trace Ampli6er Plug-in. For the militarized or "M"
models, a 200-watt thermostatically-controlled standby
heater is incorporated for low temperature operation.
The low-voltage power supply provides regulated
and unregulated voltages for application throughout
the instrument. The cathode-ray tube circuitry pro-
vides the necessary controls and adjustments for pre-
senting a sharp display of the desired intensity for
displaying the signals applied to the deflection plates
by the plug-in modules.
The voltage calibrator yields a l-volt, peak-to-peak
Iast rise and fall time square wave signal for use in
normalizing the gain of the plug-in amplifier modules
and for setting the timing of the time base plug-in
module wherever the power-line frequency is a con-
trolled standard.
2.3. POWER REQUIREMENIS
The line transformer in this oscilloscope can be set
for either I l5-volt or 230-volt operation; a plate on the
rear of the instrument specifies the voltage for which
your instrument is set. If the instrument is set for
115-volt operation, it will operate properly at any line
voltage between 105 and 125 volts. Il ir is set for 230-
\? volt operation, it will operate properly at any line
voltage between 210 and 250 volts. Line voltages be"
yond the limit specified may cause the power supplies
to go out of regulation. Powerline voltage excursiori
will be more limited over the permissible power-line
frequency range of 48 to 1000 cycles. Harmonic distor-
tion should not exceed 5%.
If desired, this instrument can be converted from
I l5-volt operation to 230-volt operation, or vice versa,
by merely setting the I l5Vl230V Selector switch to the
desired voltage.
Although primarily designed to operate at a line
frequency between 50 and 60 cycles, this instrumenr
cau be operated at any line frequency from 48 cycles to
1000 cycles. However, slightly higher line voltages are
required ar rhe higher frequencies.
2.4. OPERATING INSTRUCTIONS
(Figures 2-I qnd 2-2)
Any of the plug-in modules may be inserted in
either of the cavities in the front of the instrument.
The module on the right, controls the horizontal de-
flection of the beam, and the module on the left, con-
rols the vertical deflection of the beam. Thus, it is
possible to change from a horizontal time sweep to a
vertical time sweep merely by changing the position of
a time-base module. However, there is no provision for
coupling an unblanking pulse from the left-hand
module to the cathode-ray tube, so when a vertical
sweep is used, the trace is not blanked between sweeps.
X-Y operation is obtained by using amplifier modules
in both oscilloscope cavities. (The right.hand cavity is
often referred ro in rhe plug-in manuals as the
"X-Axis" cavity; the left-hand cavity is referred to as
the "Y-Axis" cavity.) The procedure for making the
adjustment on each plug-in is described in its indi-
vidual manual.
The following illusrrations are designdd to aid the
operator in becoming familiar with the oscilloscope.
Figure 2-1. Type 766H Solid State Oscilloscope,
Front-Panel Facilities
Figure 2-2. Type 766H Calibrator Display
We know that you are anxious to get acquainted
with your new instrunent. To aid you in this en-
deavor, you may set up the instrument using the
built-in calibrator signal to demonstrate the efiects of
the various controls on the display.
Intensity modulation of the CRT beam is possible
through the Z INPUT connector at the rear of the
oscilloscope.
sEciloN 2
OPERATING INSTRUCTIONS
2-l

action 2 - operoting instructions
INTENSITY
Co.nol: vo.ier no..
SCALE II.LUM
Control with il.h: dimBer
.onkol voaca icole illu inq'
tion; tttoch€d sit.h tuh3
PAITERN ?OSITIONING
.Joyslick <onkol: permitt po-
sirioning the dirploy in both
the horizonlol o.d vorti.ol
directionr for r.gLhotion of
the potte.n wiih tie grcli.ul.
a
*
a#
rocus
Co.tol. provid6' o. odilst-
dble voltog. for .othod.ioy
tub. fo.ui srid t6 oPlinit.
ASTIG
Cont.ol: provide5 on odiurt-
obl. voltos€ Ior cothod.-roy
tub. to optifrit. tPol rhoPa
OIL,4YIIII SMEP r
-a .t:t. a- / a'
Ita
BEA/I{ ROTATE
Con(.&ic a<r€wddvlr.d'
hol, vori6 th. field rtrength
whi.h rhe CRT b6om i.ter
. thur .oFp..totios for lha
corlh'3 mqgnelic off..t or
cepl! cou3ing it ,o rotot.,
--
"2
Figvte 2-1. fype 766H Solid Stote Oscilloscope, Front Ponel Fociliries

operoting instructions - section 2
T6 obtoin lh. colibror,or disploy, ,er the conhots erodty o! .hown ond p€rlorn
ihe numbered rrcpr i, 3.q!.n<c.
Use the ron. Fro<.dur. wh.n diffi<ulty i5 .rp.ri.nced wh.n obroinins o di!.
pldy. Thi. willeliml.ot 'cockpir" troobl* due ro ni3otignoenr of controtr.
Set ASIIG, FOCUS, & lN.
TENSITY (onrroh ro ce.-
5 mSEC
Sei ,wnch6 ,o: +. AC, A
TINE
fleodiGt INTENSITY, TOCUS ond
ASTIG .onirols for d shqrp por.
|eh, Reqdiu,, 6 ,o cenrer th.
Set POSITION conhol. ro
, EEry 765H
e
*
e
o{t-lYlc s[EP -
-. ,tr .-/ ,
A\. :,ifi[
Rotore inn€l l.ob tvARt
ABIE) fllly clockeke
-
Set inner tnob (TRIGGERI t6
NORM S.t to aUTO
Set olter knob t/vtODEl ro CH 1
Figure 2-2. lype 766H Colibrotot Disploy
2-3

section 2 - operoting instructions
.- To remove a plug-in from the Main Frame, siurply
unscrew the knurled thumbscrew at center bottom of
unit and pull it free of the Main Frame. The plug-in
unit is provided with a power-line interlock jumper on
its cernector, hence all power is automatically discon-
nected whenever a plug-in is removed.
When you change a module from one cavity of the
Indicator Unit to the other, you trust adjust the gain
oI the plug-in unit to allow for the difierence in ver-
tical and horizontal sensitivity of rhe cathode-ray tube.
This is accomplished by means of the GAIN ADJ or
SWP CAL front-panel screwdriver controls on the
plug-in modules and permits normalization of the
plug-ins to any NIain Frame.
The Type 76'00 Series plug-ins have a GAIN CAL
range in the order of 3 to I so that in general they can
be calibrated to the scale urarkings in either the Y or X
cavity.
All Type 74-00 Series Amplifier plug-ins can be cali-
brated to the scale markings in either the Y or X
cavity.
The Type 74-00 Series Sweep plug,ins have a cali-
bration range of approximately L25% to adjr.rst for
variations in X sensitivity of individual Main Frames.
When inserted in the Y cavity, these plug-ins can only
be calibrated to twice their nonnal sweep rate.
2-5. BEAM BRIGHTENING FACILITY (Figure 2-3)
A back-of-panel slide switch labeled BEANI
BRIGHTENING is provided on all oI the high-
voltage and the high-frequency Nlain Frame models
so that both NORIVIAL (beam gate blanking) and
FAST SINGLE SWEEP ONLY (grid-cathode blank-
ing) are available. See Figure 5-6 for location of
switch.
Beam brightening is normally accomplished by ap-
plying the unblanking pulse to the CRT beam gating
Figwe 2-3. Single Sweep Unblonking vs Sweep Speed
2-4
plares. To rerord high-speed rransienm, it is necessary
to unblank or brighten the CRT beam with an AC
coupled negative gate applied to the cathode of the
CRT. Cathode drive lor beam brightening is desirable
when high writing rates are required to assure maxi-
trurn beam current with minimum spot size.
Basically, the beam brightening feature should not
be used except on fast sweeps, because in the single
shot rnode, the brightening gate is ac coupled to the
cathode of the CRT. This means that if slow sweep
speeds are used, full scan unblanking may not be
available since the brightening gate will be differen-
tiated by the capacitive-resistive coupling network,
Figure ?-3 shows the efiect of the AC coupled beam
brightening pulse. The Time Base unit was set up for
single sweep and for sweep rates of 50 ,g,sec, Z0 4,sec,
l0 g.sec, and 5 4,sec respectively. Judging from Figure
2-3, it may be seen that the beam brightening is only
eflective at very fast sweep speeds. This effect oflers
no real disadvantage since the purpose of the Single
Shot mode is to photograph fasr transients. By setting
the BEAM BRIGHTENING switch to NORMAL,
the r.rnit may be operated as a standard oscilloscope.
2.6. OPERATOR'5 MAINTENANCE INFORMATION
Frequently, many oscilloscope ailments may be dis-
covered through an erroneous display on the screen or
by the conspicuous absence of a display. The informa-
tion in the paragraphs to follow will pin-point this
information according to the syluptoms presented to
the operator.
o. A Nqked Screen
If the operator is not able to obtain a trace or spot
on the screen lor either beat-n after substituting other
plug-ins known to be operating properly, the trouble
is confined to the Indicator or N,lain Frame Unit.
Refer to Section 5 of this rnanual for diagnostic and
remedial proceclures.
b. lnsufficient Deflection
II the horizontal or vertical deflection signal cannot
be set to the proper value with the front-panel screw-
driver controls GAIN ADJ or SWP CAL on rhe plug.
ins, then check the output of the low-voltagrc regulated
supplies at Test Points TPl00l, TPtl0l, TPt20l, and
TPl301 located on the N'Iain Frame. The high-voltage
Test Point is TP200l also located on the Nlain Franre
chassis. If these voltages check out alright, the trouble
tnay reside in one oI the plug-ins. If there is insuffi-
cient vertical deflection, it is in rhe left-hand module;
if there is insuficient horizontal deflection, it is in rhe
right-haucl rnodule. Reler to the appropriare plug-in
trtotlule Instmction Nlanual lbr ftrrther infonuatio[.

c. lmproper Sw..p Timing
A front.panel screwdriver control, SWP CAL, is pro-
vided on the Time Base Plug-in to permit normaliza-
tion of this module to any main frame. If this control
does not have sufficient range, then check the output
of the regulated supplies at the Test Points previously
mentioned. II these voltages are normal, then check
out the Time Base Plug-in.
d, lmpropar friggcring
If external and line triggering modes are satisfac.
tory, but the intemal triggering mode is not, then the
trouble may reside in the trigger take-off circuit of the
opersting instructions-section 2
Y Plug-in amplifrer that the operator is using. How-
ever, if improper tiggering cannot be obtainid from
any of the triggering sources, the trouble probably
resides in the Time Base Plug-in itself. Refer to the
Time Base Plugin Instruction Manual for more in-
format ion-
e. Woveform Distortion
If the display under observation is distorted, but
there is no other manifestation of rouble such as
insufficient deflection, improper sweep rate etc., then
the problem is confined to the plug-in which is ampli
fying the distorted signal. Check that the PATTERN
POSITIONING conrol is properly adjusted.
2-5

sEcTloN 3
CIRCUIT DESCRIPTION
3.I. INTRODUCTION
This section of the Instruction Manual contains the
circuit description of the Main Frame or Indicator
Unit alone. The circuit description will be keyed to
the Functional Block Diagrams, Figures 3-l and 3-2.
Emphasis is placed on the interrelation of circuits
rather than on detail o{ operation. It is also recom-
mended that the schematics at the rear of this manual
be referred to in following the circuit description.
3-2, CIRCUII DESCRIPIION FOR tOW VOTTAGE
REGUTAIED SUPPIIES (Figures 3-l qnd 3-2)
q. Power Trqnsformer
Low voltage and heater power for this instrument is
provided by power translormer Tl00l. The primary is
wound with two equal ll5-volt windings that can be
switched either in parallel for I l5-volt operation, or in
series for 230-volt operation vii the I l5V/230V Se-
lector switch S100. The secondaries contain four sepa-
rate windings which provide power to the regulated
supplies and two separate heater windings.
b, Regulored Supplies
Four regulated and two unregulated supplies are
provided with output as shown in Figures 3-l and 3-2,
Functional Block Diagrams of the Power Supply. All
of the regulated supplies are of the constant-output
voltage series-passing type.
The basic reference for all of the regulated supplies
is established by the frxed drop across zener diode
CRl304. This constant drop or relerence voltage is
applied to the base of Q1302 which is one o{ the in-
puts to difierential amplifier Ql30l and Q1302. The
other input to the amplifier is connected across a
divider consisting of R1302 through R1305 which
samples a portion of the -50V regulated output.
A portion of this sample voltage is tapped by the
-50V AD.l potentiometer R1303, and is applied to the
base of Ql30l. Potentibmeter R 1303 is adjusted so that
the output is precisely -50 volts. The minus 50-volt
output is also the voltage relerence source for the other
low-voltage regulated supplies. Thus, voltage adjust-
nlents are always made in the sequence starting with
the -50-volt supply and ending with the +200-volt
supply.
Since the operadon of the low-voltage regulated sup-
plies is similar, only the *50-volt supply is described.
CRl201 and CRl202 are connected in a conventional
full-wave rectifrer circuit. The rectifted output is ca-
pacitively filtered by Cl20l shunted by resistor RI202
and applied to the voltage regulator.
Operation of the regulator is as follows: assume the
output voltage tends to decrease. This will lower the
base voltage of the error detector dc amplifier Ql20l,
and raise the base voltage of emitter follower driver
Q1202.
The increase in voltage at the emitter of Q1202 is
applied to the base of the series-passing transistor
Q1203. The resultant increase in voltage at the emitter
of the pass transistor is such as to return the output
voltage to its proper value.
c. Voltoge Colibrqtor
The power-line lrequency voltage from Tt00l is
applied to the base o{ rhe voltage calibrator Ql05l
through limiting resisror R1051. Negative and positive
voltage excursions will drive the fansistor into and
out oI conduction at the line-frequency rate. The re-
sulting square wave is applied to a voltage divider
consisting of R1053 and R1054. The attenuated cali-
brator output of one volt peak.to-peak is coupled to
the amplifier plug.in when the VOLTS/DIV switch is
set to CAL. The plus 100-volt supply and the satura-
tion voltage of the transistor will determine rhe peak-
to-peak voltage excursion of the calibrator waveform.
3-3. CRT CtRCUrr
q. CRT Beqm Control Circuils
The INTENSITY conrol R2016, part of the nega-
tive high-voltage divider is used to vary the cathode-
ray tube grid voltage to adjust the beam current. The
FOCUS control R2014 is provided to vary the voltage
at the focusing anode to set the second cross-over point
right at the screen of the cathode-ray tube. The
ASTIGmatism control R2022F is provided to vary the
voltage at the asti$matism anodes to focus the spot in
both axes simultaneously. The PATTERN CORRec-
tion service adjustment is set to vary the field the
cathode-ray beam encounters as it emerges from the
deflection system to control the linearity at the ex-
tremes of deflection.
The BEAM ROTATE front-panel screwdriver con-
trol R2022 is provided to vary the current through coil
L2001 around the neck of the CRT. The current
varies the field strength which the CRT beam inter,
cepts causing it to rotate. This lunction is used to
compensate for the earth's magnetic effect on trace
alignment.
b. High Vohoge Power Supply
Accelerating voltages lor the cathode-ray tube are
obtained by rectifying a 30-Kc high voltage produced
3-l

section 3 - circuit description
Froov i€ouiii;dl
rlrJrrr-;sr- l
I uprraer I
Figurc 3-1. lype 766H j200Y and +100y Regulororu, Functionol Block Diogrcm
I;sovEG,Jrrrdl
fstrr.Ei]l!-Eiliid
I A{PLIFIEi I
Figwe 3-2. lype 766H !50V ond -50V Regulolors, Functionol Elock Diogrom
3-2

by ransistor oscillator Q2002. This tmnsisfor is con-
nected as a Class C oscillator with the primary of
ffansformer T2001 tuned by the strayed capacitance
and the reflected secondary impedance.
The output of the oscillator is stepped up by T2001
and applied via a conventional solid state tripler net.
work consisting of CR2050 through CR2052 to the
post-deflection accelerator of the cathode-ray tube.
The negative high-voltage supply is derived from a
tap on the secondary winding ol transformer T2001
which is connected to a half-wave rectifler CR200l.
The rectiEed output of -1440 volts is capacitively
filtered by C2008, C2009, and C20l t and provides the
n€cessary operating potentials fbr the proper intensity
and focusing of the cathode-ray tube.
Regulation of the high voltage negative supply is
accourplished by sampling a porrion of the rectified
output and applying a correction signal back through
the HV regulator Q2000 to Q2002 to the base of the
HV oscillator Q2003. This action changes the ampli-
tude of oscillation of Q2003 and T2001 in such a
manner as to restore the high voltage output to its
preset level. Potentiometer R2009R, HV ADJ, is pro-
vided to preset the output of the high'voltage supply
to its proper level.
3.4. NORMAI. SWEEP UNBTANKING
The cathode-ray tube used in this oscilloscope has
two additional beam deflection plates which cut ofi the
electron beam independently of the control grid. In
beam gate blanking, the electron beam is always
turned on and passes through an aperture in the
circuit description - section 3
center of a blanking shield. Behind this shield is a set
of deflection plates, one of which is connected to a
nxed +50 volt source, while the second deflection
plate is connected to the unblanking gate from the
X Plug-in. When the time base is sweeping, both beam
gate deflection plates are at the same potential and the
electron beam passes through the aperture in the
blanking shield. When the sweep ends and the un-
blanking gate voltage increases, the beam is deflected
behind the blanking plate and the screen is dark.
Beam control pulses (trace brightening and retrace
blanking pulses) can easily be dc coupled since these
beam deflection plates are electrically close to ground.
Hence, the display is visible only during the forward
sweep interval and is blanked during the retrace and
lockout interval.
3.5. FASI SINGLE SWEEP UNBTANKINS
A back-of-panel slide switch is provided on the high-
voltage and high-frequency Main Frame models so
that both NORMAL (beam gate blanking) and
SINGLE SHOT (grid-cathode blanking) are avail-
able. Cathode drive for beam brightening is desirable
when high writing rates are required to assure maxi-
mum beam current with minimum spot size.
When it is desired to record high"speed, single-shot
uansients, the back-of-panel Beam Brightening switch
is set to FAST SINGLE SWEEP ONLY, This tech-
nique completely turns ofi the electron beam eliminat-
ing the possibility of film fogging and loss of infor-
mation when the lens is open for an extended period.
3-3

SECTION 4
PERFORffTANCE ASSURANCE TEST
4.I. 'I/IAINTENANCE CHECK TO ASSURE
PERFORIYIANCE
The tests described in the paragraphs to follow
should be performed by Instrument Test Departments
and Ma.intenance Laboratories to certify proper per-
formance of this insrument. These tests are divided
into sections for simplification and to assist those test
groups where complete checking is not mandatory, or
where all test equipment is not available. Refer to
Secdon 5, paragraph 5-7, lor list of test equipment
required.
NOTE
If this oscilloscope is checked by a Receiving
Inspectiou laboratory, the tests outlined below
are recommended to certify performance. This
instrument has been thoroughly tested and aged
at the factory. Nevertheless, rough shipment,
extreme environments, or long idle periods may
necessitate mi[or adjustments of the controls.
Hence, it is suggested that the certilying engineer
ffy the recommended adjustments not only lor
recentering the controls, but also to ascertain
their range and to familiarize himself with this
precision insftument. If, after performing all the
tests outlined in the paragraphs to follow, the
inshument will not perform to specification, the
assistance of the local Fairchild Field Engineering
representative should be requested,
4.2. CHECKING IHE POWER SUPPLY
l. Check the line fuse (s) Fl0l for proper value:
3 amperes; an additional line fuse is provided in the
"M" models: F150, 2 amperes.
2. Check Iuses of the regulated supplies for proper
yalue:Reguloted Fuse
Supply Symbol Roting
3. Examine the instrument for charred or mechani-
cally damaged components. Correct all defects.
4. Apply power to tJre instrument through a variable
\.-, voltage source (Variag or an equivalent). Set the line
- voltage to ll5 volts. (Double this value for 230-volt
operation.)
5. Set up the oscilloscope to obtain six cycles of the
calibrator signal.
6. Allow 20 minutes Ior warmup before making any
adjustments.
7. Lower the line voltage to I05 volts (210 volts for
230-volt operation) . The disptay should remain stable
and must not be erratic. If instabitity is noted before
the lower limit o{ the line voltage is reached, check
operation of the low-voltage regulated power supplies
as outlined in Section 5 of this lnstruction Manual.
Nor€. Always check the regulated voltages starting
with the -50-volt supply and ending with the +200-
volt supply,
8. Raise the line voltage to 125 volts (250 volts for
230-volt operation) . The display should remain stable
and must not be erratic. Il instability is noted before
this upper limit of line voltage is reached, check opera-
tion of the low.voltage power supplies.
9. Reset the line voltage to 115 volts (230 volts for
230-volt operation).
4.3. CHECK RIPPTE OF IOW-VOIIAGE SUPPTIEs
l. Use a Type 704 Test Oscilloscope with a Type
4290 Probe.
2. Ground all chassis to power-line ground.
3. Set the oscilloscope for ac coupled input and set
Y sensitivity to 5 mv/cm.
4. Use AUTO triggering with line sync and set
SWEEP RATE switch to 5 mS/CM.
5. Measure the amount of 120-cycle ripple at the
output of each power supply as listed below. (For line
frequencies other thau 60 cycles, the ripple will be
twice the line frequency.)
Reguloted
Sspply Ripple Voltqge Test Point
-50 volts l0 millivolis p-p mox TPl3ol
*50 volts 20 millivolts p-p mox TPI2oI
+ 100 volrs 30 millivolts p-p mox TPI l0l
+ 200 volt5 65 millivolts p-p mqx TPI 001
4.4. CATIBRATOR CHECK
o. Woveshope Check
l. Adjust the Type 704 Oscilloscope for a sensitivity
of 20 mv/cm and connect the Y INPUT to rhe CAL
pin jack on the front panel of the Main Frame via the
Type 4290 Attenuator Probe.
2. Observe a I volt (5 cm) peak-to-peak, 60-cycle
square wave; rise time to be less than 20 g,sec. Tilt and
ringing should be less than 5/o (50 mv or 2.5 mm) .
-50 volts
*50 volts
+ 100 Yolts
*200 volts
I ompere
1.5 omperes
I ompere
0.5 ompere
Fl30
tt 20
Flr0
tl02
4-l

section 4 - performonce ossuronce test
\--, b. Amplirudc Accurocy (Optionol Tcstl
Nole: This check is not required on every oscillo
scope.
l. Precisely calibrate the Type 704 Oscilloscope with
the Ballantine Model 420 Calibrator. The oscilloscope
is set up with the Type 4290 Probe at a sensitivity of
20 mvlcm.
2. Set the Ballantine Calibrator lor a frequency of
I Kc at an output of I volt peak.
3. Adjust oscilloscope for 5-centimeter vertical bar.
4. Transfer the Probe from the Ballantine Calibra-
tor to the I volt pin jack. Note Calibrator amplitude
to be 4.9 to 5.1 cm (l volt -+2%). Avoid errors by
using the anti-parallax scale,
4.5. €HECXING CRT GEOIAETRY AOJUSTIIAENT
Set Y VOLTS/DIV switches to CAL and SWEEP
RATE switches to 5 mS/DIV. Note the steady square
wave patterns on the screen for each beam. The dis-
play should fall within a 6 cm x l0 cm and a 5.75 cm x
9.75 cm frame. Refer to the paragraph entitled "CRT
Adjustmenb," in Section 5 of this Insruction Manual
for further details.
4-2