Fakir UMOR User manual

Instruction Manual
Kullan›m K›lavuzu
Dehumidifier
UMOR
Nem alma cihazı


03
Girifl
Uzun yıllar sorunsuz çalıflması için tasarlanan ve üretilen
Fakir Umor Nem Alma Cihazını satın almıfl oldu¤unuz
için teflekkür ederiz.
Benzer ürünleri kullanmaya alıflık olabilirsiniz, ancak
kullanma kılavuzunu okumak için lütfen zaman ayırınız.
Bu kılavuz satın almıfl oldu¤unuz üründen en iyi
performansı almanız için hazırlanmıfltır.
Cihazın di¤er su tankı tabanında bulunmaktadır.
Tabandaki su tankı yerinden çıkartılamaz ve
doldu¤unda biriktirdi¤i nemi üst kısımdaki
çıkartılabilir su tankına aktarmaktadır.
D‹KKAT!
•
•
•
Güvenlik Önemlidir
Kendi güvenli¤iniz ve di¤erlerinin güvenli¤i için ürünü
çalıfltırmadan önce kullanma kılavuzunu okuyunuz. Bu
kılavuzu ilerideki kullanımlar için güvenli bir yerde
saklayınız. Umor nem alma cihazı çift tanklı yeni konsept
ev tipi kullanım için tasarlanmıfl bir cihazdır.
Üst kısma yerlefltirilmifl olan su tankı kolay kullanım ve
boflaltma sa¤lar. Üst su tankı taflıma sapı ile birlikte
cihazın kolay bir flekilde taflınmasını sa¤lar.
‹lk kullanım sırasında tabandaki su tankı dolaca¤ı için
üst kısımdaki su tankına su gelmesi biraz zaman alabilir.
Umor otomatik nem alma cihazı ev kullanımı için
tasarlanmıfltır. 30°C sıcaklık ve %80 ba¤ıl nem’e kadar
olan ortamlarda çalıflabilir.
Nem seviyesi çamaflır makinesi, kurutma makinesi, fırın
v.b. makinelere göre oda büyüklü¤üne göre
de¤iflmektedir.
Mutfaklarda nem oranı genellikle %60-70 gibi yüksek
oranlarda olur. Merkezi ısıtmalı odalarda (oturma odası,
yatak odası) nem oranları genellikle %35-50 olarak
daha düflüktür.
So¤uk binalarda nem seviyesi daha düflük olaca¤ı için,
cihaz daha az nem biriktirecektir.
Güvenlik Uyarıları:
Elektrikli bir cihaz kullanılırken, afla¤ıdaki önlemler her
zaman alınmalıdır. Yangın, elektrik çarpması ve kiflisel
yaralanmaları engellemek için;
Cihazın üzerinde yazan voltaj ile flebeke voltajının uyumlu
oldu¤undan emin olunuz.
Cihaz düflürülmüfl veya gözle görünür herhangi bir
arızası var ise, su sızdırıyorsa veya anormal olarak
çalflıyorsa kesinlikle kullanılmamalıdır.
Cihaz üzerinde kullanıcının yapabilece¤i herhangi bir
bakım yoktur. Bu yüzden cihazın herhangi bir parçasını
sökmeye çalıflmayınız. Herhangi bir arıza durumunda
tamir için Fakir Yetkili Servisi’ne gönderiniz.
1- Cihazın düz ve sa¤lam bir
zemin üzerine yerlefltirildi¤inden
emin olunuz.
• E¤er yerlefltirildi¤i zemin düz
de¤il ise, cihaz kayıp devrilebilir.
2- Cihazın hava girifl ve
çıkıfllarının önünü tıkamayınız.
• Cihaz, hava girifl ve çıkıflları
tıkanmayacak flekilde çalıflmalıdır.
3- Cihazın hava girifl ve çıkıfllarına
herhangi bir cisim sokmayınız.
• Cihazın hava girifl ve çıkıfllarına
girecek herhangi bir cisim, elektrik
çarpmasına ve kiflisel
yaralanmalara neden olabilir.
4. Cihaza su tutmayınız.
• Bu durum cihazda
onarılamayacak arızalara ve
elektrik çarpmasına neden olur.
5. Cihazı radyatör ve di¤er ısıtıcı
cihazların yakınına
yerlefltirmeyiniz.
• Aynı zamanda cihazı do¤rudan
günefl altında çalıfltırmayınız.
6. Cihazı banyoda veya dufl
yanında kullanmayınız.
7. Cihazın fiflini ıslak ellerle prize
takmayınız.
8. Cihazın devrilmesi durumunda,
cihazı hemen fiflten çekiniz.
• Fifli prizden ıslak eller ile
çekmeyiniz.
• Ürünü tekrar kullanmadan önce
iyice kontrol ediniz. E¤er herhangi
bir problem oldu¤unu
düflünüyorsanız hemen Fakir Yetkili
Servisi’ne baflvurunuz.
9. Cihazı baflka bir yere taflımadan
önce hem alt hem de üst su
tanklarını boflaltınız.
• Bu flekilde yere veya elektrikli
parçalara herhangi bir
su sızmasını engellemifl olursunuz.

04
20
350
Gaz fiarjı 170 gr
14.2 kg
72.4x24x39 cm
Taflıma ve Boflaltma tutma sapı
10 yılKullanım ömrü

Kullanım
Nem alma cihazının faydaları:
1. Kıyafetler ve deri ürünler
üzerindeki nemi azaltır.
• Nem alma cihazını
çalıfltırmadan önce gardırop
içindeki askıları çıkartınız.
2.Tavan, duvar ve camlardaki
nemi azaltır.
• Cihazın kullanımı sırasında
en iyi performansı alabilmek
için pencere ve camları
açmaktan kaçınınız.
3. Kitaplık ve dolapların nemini
azaltır.
• Nem alıcının etkin
çalıflabilmesi için dolap
kapaklarını açın ve cihazı
dolabın önüne yerlefltiriniz.
Cihazı ilk paketinden çıkardıktan sonra,
çalıfltırmadan önce en az 2 saat bekleyiniz.
D‹KKAT!
Daha sonra
Nem oranını %30’a ayarlamak için
“ON/OFF” dü¤mesine 1 kere basınız.
Nem oranını %35’e ayarlamak için
“ON/OFF” dü¤mesine 2 kere basınız.
Nem oranını %40’a ayarlamak için
“ON/OFF” dü¤mesine 3 kere basınız.
Nem oranını %45’e ayarlamak için
“ON/OFF” dü¤mesine 4 kere basınız.
Nem oranını %50’ye ayarlamak için
“ON/OFF” dü¤mesine 5 kere basınız.
Nem oranını %55’e ayarlamak için
“ON/OFF” dü¤mesine 6 kere basınız.
Nem oranını %60’a ayarlamak için
“ON/OFF” dü¤mesine 7 kere basınız.
Nem oranını %65’e ayarlamak için
“ON/OFF” dü¤mesine 8 kere basınız.
Nem oranını %70’e ayarlamak için
“ON/OFF” dü¤mesine 9 kere basınız.
Nem oranını %75’e ayarlamak için
“ON/OFF” dü¤mesine 10 kere basınız.
Nem oranını %80’e ayarlamak için
“ON/OFF” dü¤mesine 11 kere basınız.
• Cihaz, istenilen nem seviyesine ulafltı¤ında
otomatik olarak kapanacaktır.
• Cihaz, oda içindeki nem seviyesi istenilen
seviyenin üzerine çıktı¤ında otomatik olarak
tekrar çalıflmaya bafllayacaktır.
• Cihaz nem alma sırasında kapatılırsa, cihazı
tekrar çalıfltırmak için 3 dakika bekleyiniz.
• E¤er cihaz çalıflmaz ise, üst su tankının düzgün
yerlefltirildi¤inden ve fiflin prize takılı oldu¤undan
emin olunuz.
• Üst su tankı doldu¤unda, kırmızı ıflık yanacaktır.
Bu durumda afla¤ıda belirtildi¤i gibi su tankını
boflaltınız.
Nem alma cihazı optimal olarak 15 ˚C - 35 ˚C
arasında çalıflmak üzere tasarlanmıfltır. Cihazın 15
˚C altında kullanılması durumunda havadaki nemin
düflmesi ile birlikte, cihazın toplayaca¤ı nem de
azalacaktır. Bu durum sonucu cihazın su tanklarında
su toplanmayabilir.
b. Nem alma cihazının kapatılması
• Nem alma cihazını kapatmak için “ON/OFF”
dü¤mesine birkaç saniye basılı tutunuz.
• Cihazı uzun sure kullanmayacaksanız, fiflten
çekiniz ve tabandaki tankın içindeki suyu afla¤ıdaki
talimatlara göre boflaltınız.
c. Su tankının dolması ve boflaltılması
• Su tankı doldu¤u zaman kırmızı ıflık yanacak ve
cihaz otomatik olarak kapanacaktır. Cihazın tekrar
çalıflabilmesi için, üst su tankı boflaltılmalı ve yeniden
takılmalıdır.
• Afla¤ıdaki talimatlara göre üst su tankını boflaltınız.
05
a. Nem Alma Cihazının çalıfltırılması
• Üst su tankının tam olarak yerine oturdu¤undan emin
olunuz.
• Cihazı, üzerinde yazan voltaj ile uyumlu bir prize takınız
ve “ON/OFF” dü¤mesine basarak cihazı çalıfltırınız.
Oda sıcaklı¤ı ve ba¤ıl nem miktarı dijital ekranda
gözükecektir. ‹lk açılıflta görülecek olan ayar %0 ba¤ıl
nemdir. Bu aynı zamanda sürekli nem alma içindir.

a) Kilit dü¤mesini kaydırarak geri
çekiniz. Geri çekili konumda iken,
tutama¤ı kendi ekseni etrafında
çeviriniz. Bu flekilde su tankı
çıkartılabilir konuma gelmifl olur.
Su tankını yukarı do¤ru çekerek,
çıkartınız. Su tankını lavaboya
getiriniz ve boflaltınız.
b) Bofl su tankını yerine
yerlefltirmeden önce, tutama¤ı
geriye do¤ru çeviriniz. Tutma sapı
böylece tekrar kilitli konuma gelir. Kilit anahtarı
otomatik olarak yerine geçecektir.
c) Su tankını yerine yerlefltirdi¤inizde çıkıntılar ile
yuvaların tam olarak oturdu¤undan emin olunuz. Su
tankı sadece 1 flekilde yerlefltirilebilir.
06
d. Sürekli Çalıflma / Taban tankını boflaltma
1) Cihazın fiflten çekildi¤inden emin olunuz.
2) Su çıkıflının ucundaki plastik parçayı çıkartınız.
Plastik parça çıkartıldı¤ında su akmaya
bafllayacaktır.
D‹KKAT!
3) Sürekli çalıflma için uygun
bir hortumu tahliye borusuna
ba¤layınız. Di¤er ucunu da
uygun bir yere ba¤layınız. Bu
flekilde nem alma cihazını sürekli
çalıfltırabilirsiniz.
4) Sürekli çalıflma sırasında su
tankı dolu uyarısı
çalıflmayacaktır.
Cihazı saklamadan ya da yerini de¤ifltirmeden
önce taban su tankını boflaltınız.
D‹KKAT!
e. Defrost modu
Cihazı oda sıcaklı¤ı 15 ˚C’nin altına düfltü¤ünde
kullanırsanız, cihazın içindeki parçalar üzerinde buz
oluflacak ve bu durum cihazın performansını
etkileyecektir. Bu durum olufltu¤unda periyodik olarak,
cihaz otomatik olarak defrost moduna geçecektir ve
sarı ıflık yanmaya bafllayacaktır.
Bakım ve Temizlik
Herhangi bir temizlik ya da bakım yapmadan önce,
mutlaka cihazın kapatıldı¤ından ve fiflinin prizden
çekildi¤inden emin olunuz. Temizlik haricinde cihaz
üzerinde kullanıcının yapabilece¤i herhangi bir bakım
bulunmamaktadır. Herhangi bir arıza ya da
problem durumunda Fakir Yetkili Servisi’ne
baflvurunuz.
a. Filtrenin temizlenmesi
• Filtreyi çıkartmak için hava girifl kasasını el ile
sökünüz.
• Filtre üzerindeki iki çıkıntıyı bulunuz ve bu
noktalardan filtreyi afla¤ıya çekerek çıkartınız.
• Elektrikli süpürge ile ya da so¤uk suda yıkayarak
filtreyi temizleyiniz.
• Filtrenin tam olarak kurumasından sonra filtreyi
yerine takınız.
b. Cihazın dıflının temizlenmesi
• Cihazın kasasının hiçbir aflındırıcı veya solvent ile
temizlemeyiniz.
• Cihazın kasasına su tutmayınız.
• Sadece hafif nemli bir bez ile temizleyiniz.

07

08
Introduction
Thank you for purchasing Umor Dehumidifier which has
been designed and manufactured to give you many
years of trouble-free service.
You may already be familiar with using a similar product,
but do please take time to read these instructions – they
have been written to ensure you get the very best from
your purchase.
The base of the dehumidifier contains the primary
water tank. The primary tank is not removable
and will fill with water before automatically
siphoning to the top water tank.
Safety is Important
To ensure your safety and the safety of others, please
ensure you read the Safety Instructions before you operate
this product. Keep this information in a safe place for
future reference.
Therefore when the dehumidifier is first operated, or the
primary tank is drained down, the top water tank may
take some time to fill. The Umor dehumidifier is suitable
for use in most domestic applications where high room
temperature of 30°C and 80% Relative humidity.
Humidity levels can vary considerably and are dependent
upon the size of the room and any sources of humidity
in the room, such as washing machines, tumble dryers,
cookers…etc.. Typically in kitchens humidity levels may
be as high as 60-70%RH. Centrally heated rooms such
as living and dinning rooms may be as low as 35-
50%RH. A cold building will not typically have a high
humidity level and so the unit will have a reduced water
extraction rate.
Safety Instructions
When using an electric appliance, basic precautions
should always be followed, including the following:
To reduce the risk of fire, electric shock, or
injury:
3. Do not attempt to open the cabinet or dismantle any
parts from the appliance, there is no serviceable part
inside. If there is any damges, please apply to authorized
Fakir Services.
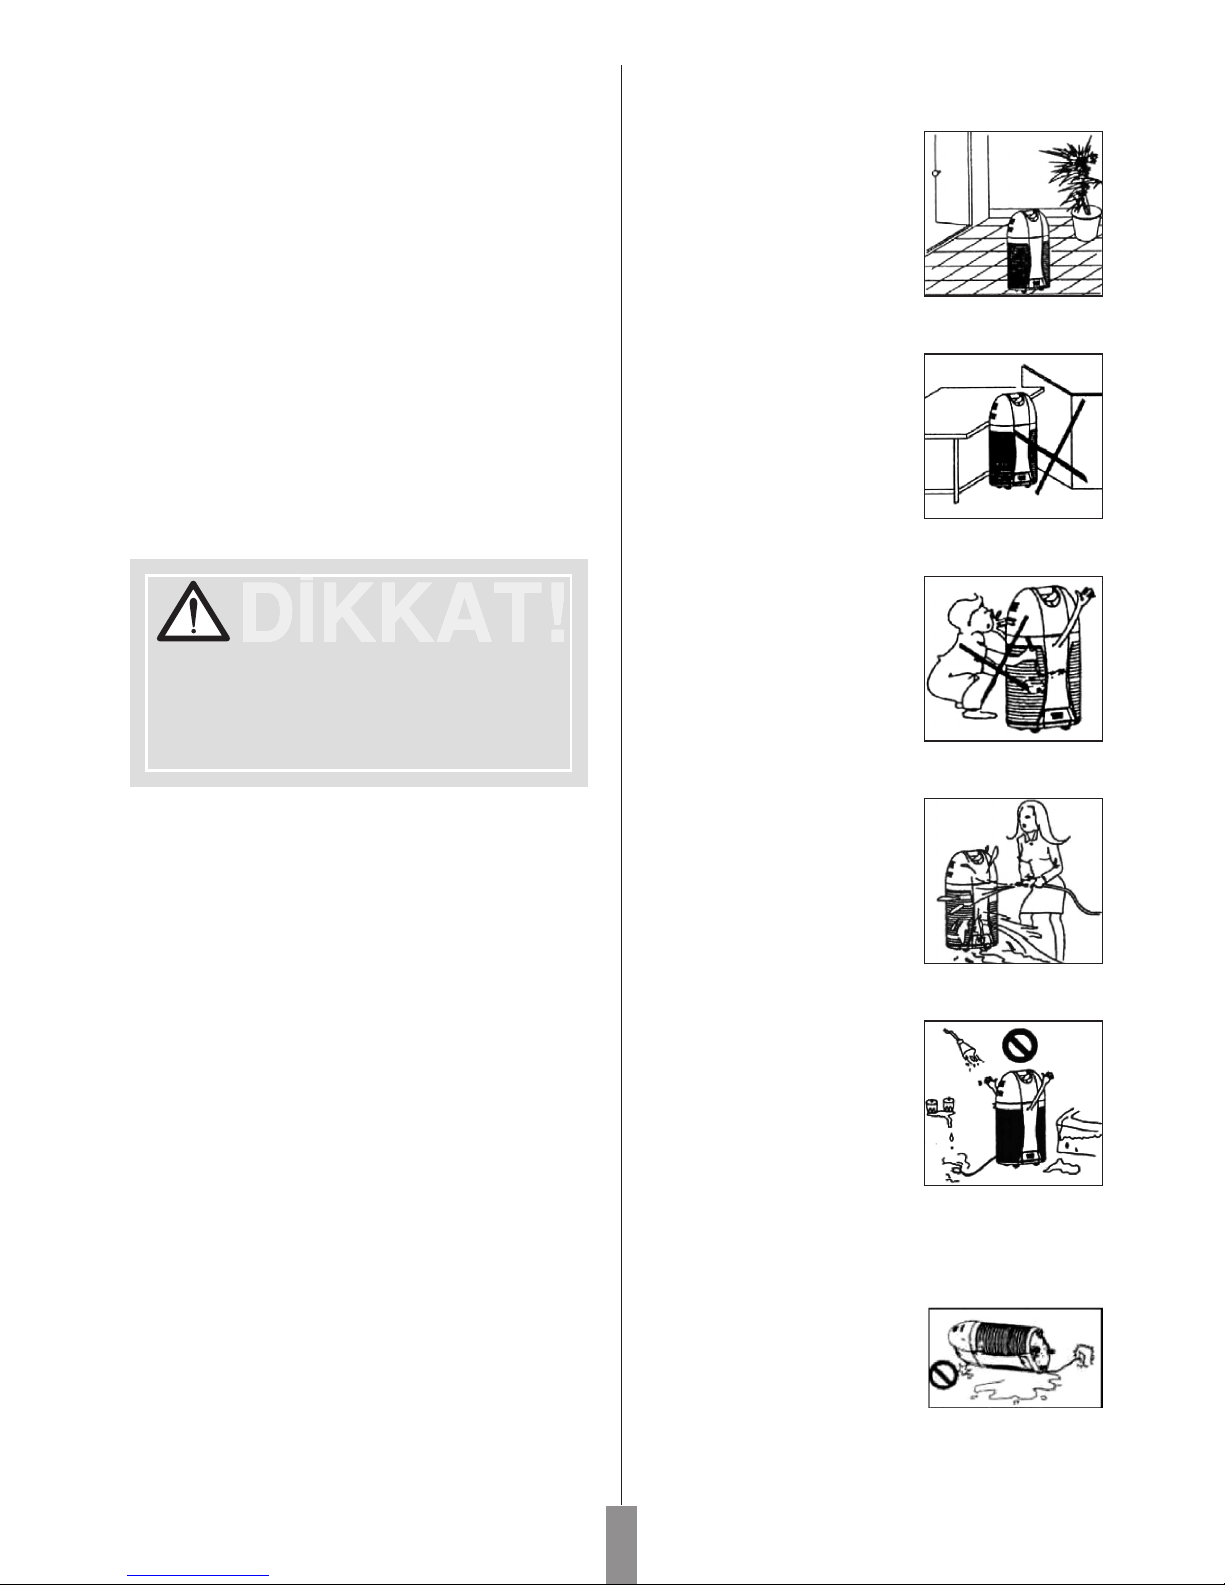
1. Ensure that the unit is placed
on a stable and flat floor surface.
• If the floor surface is not even
there is a risk that the unit may
be unstable and topple over.
Also excessive unit vibration and
noise may be result.
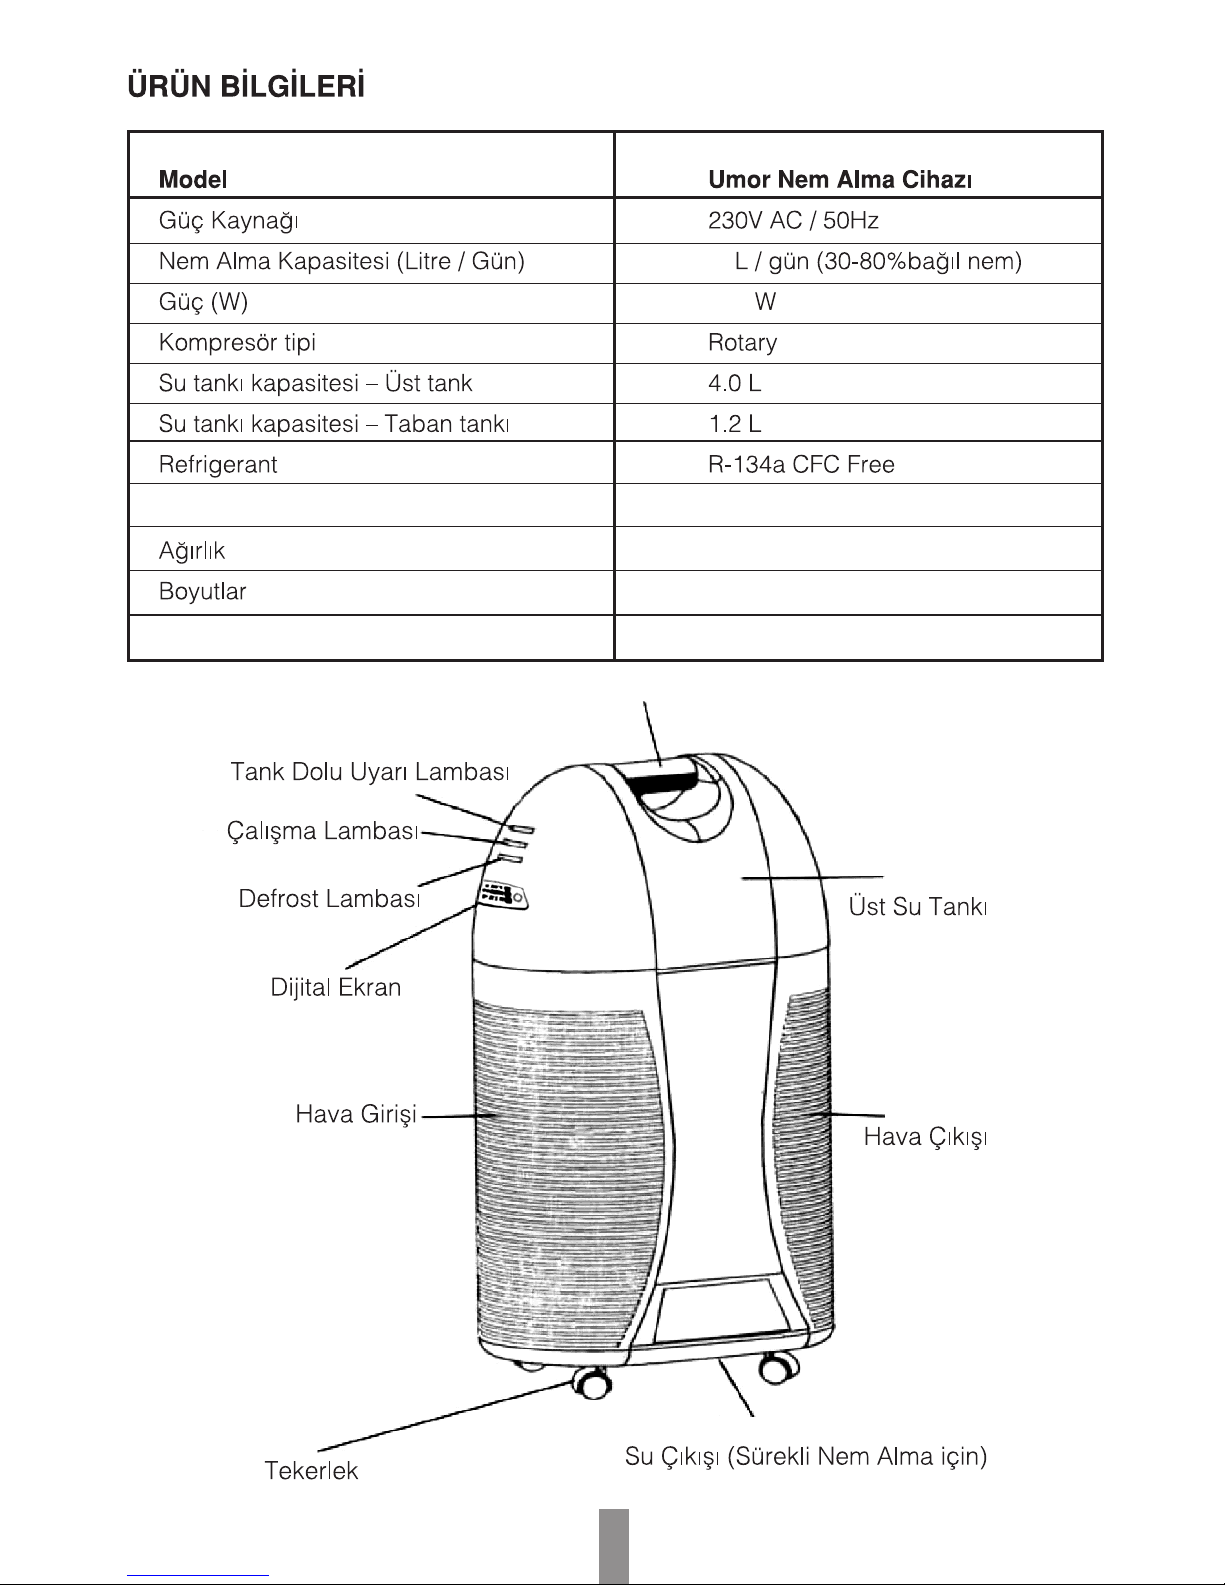
2. Do not block or restrict airflow
around unit.
• The unit must be positioned in
use so that the air inlet and
exhaust grilles are not clocked
or restricted in anyway.
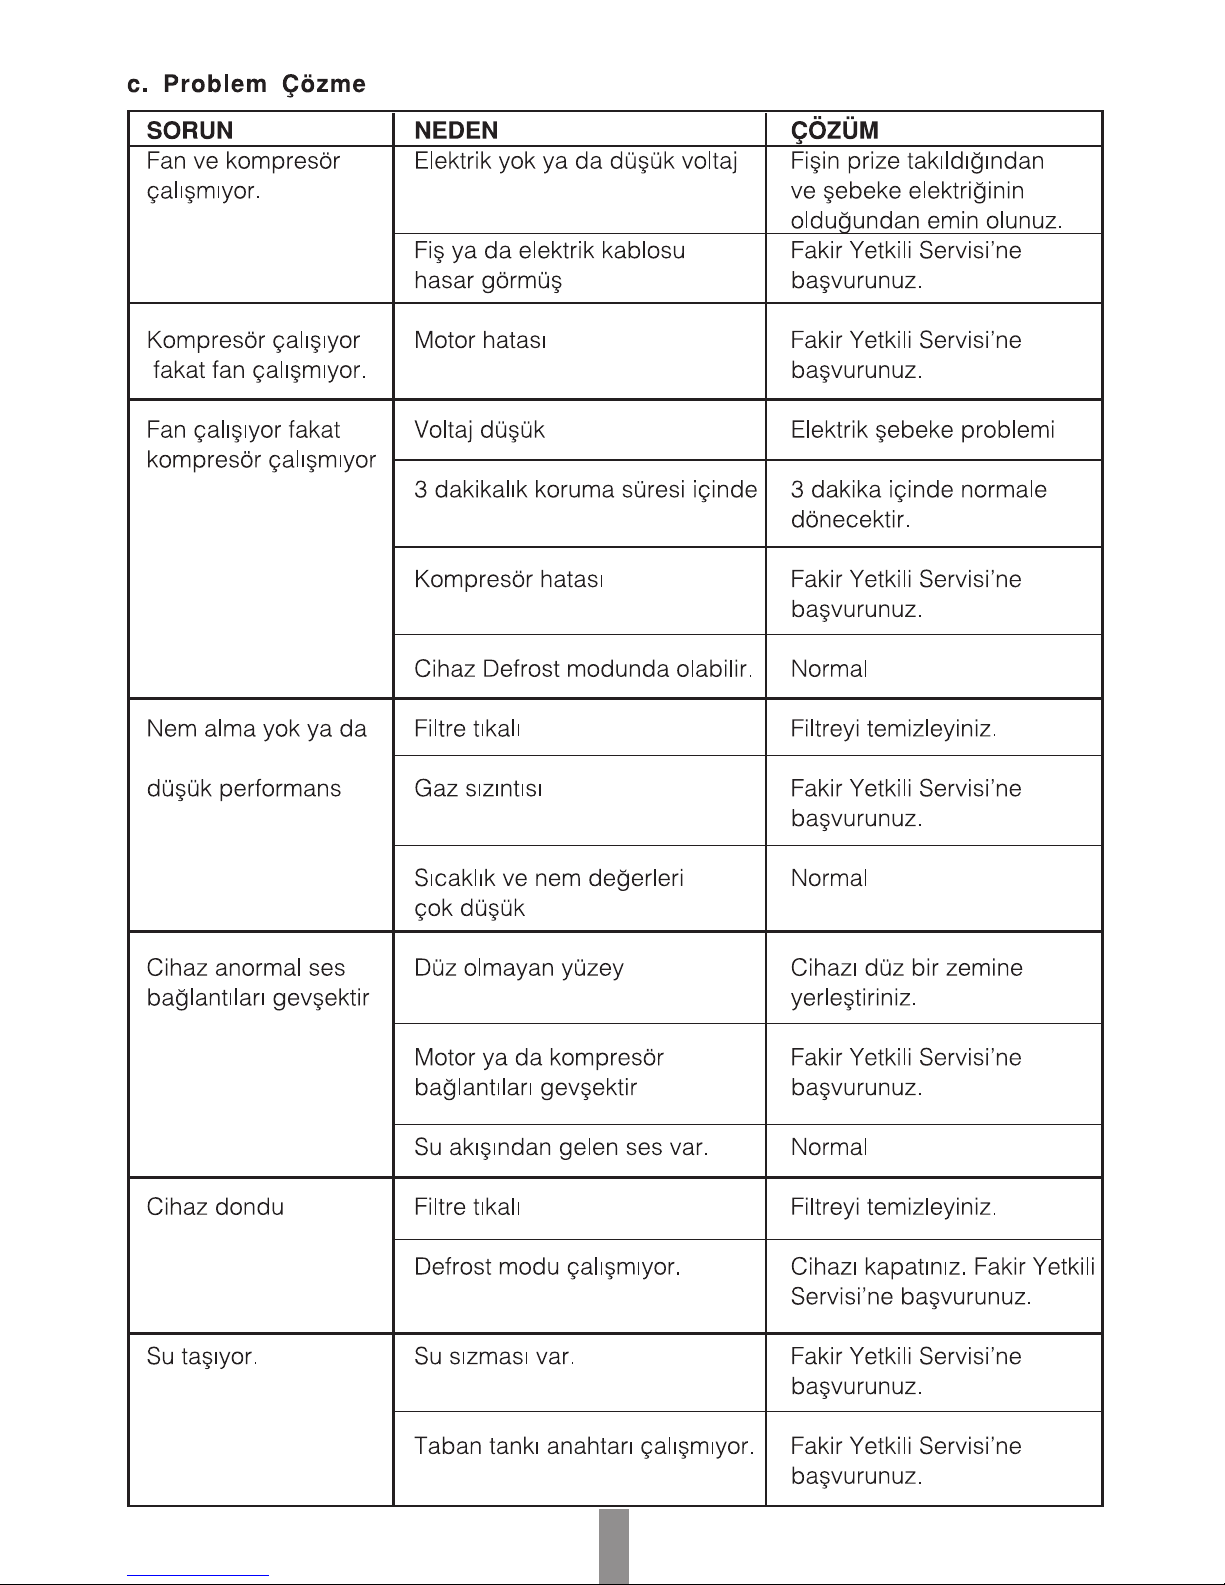
3. Do not push any object in
the unit air inlet and exhaust
grilles.
• Any inserted object may
contact hazardous internal live
electrical parts.
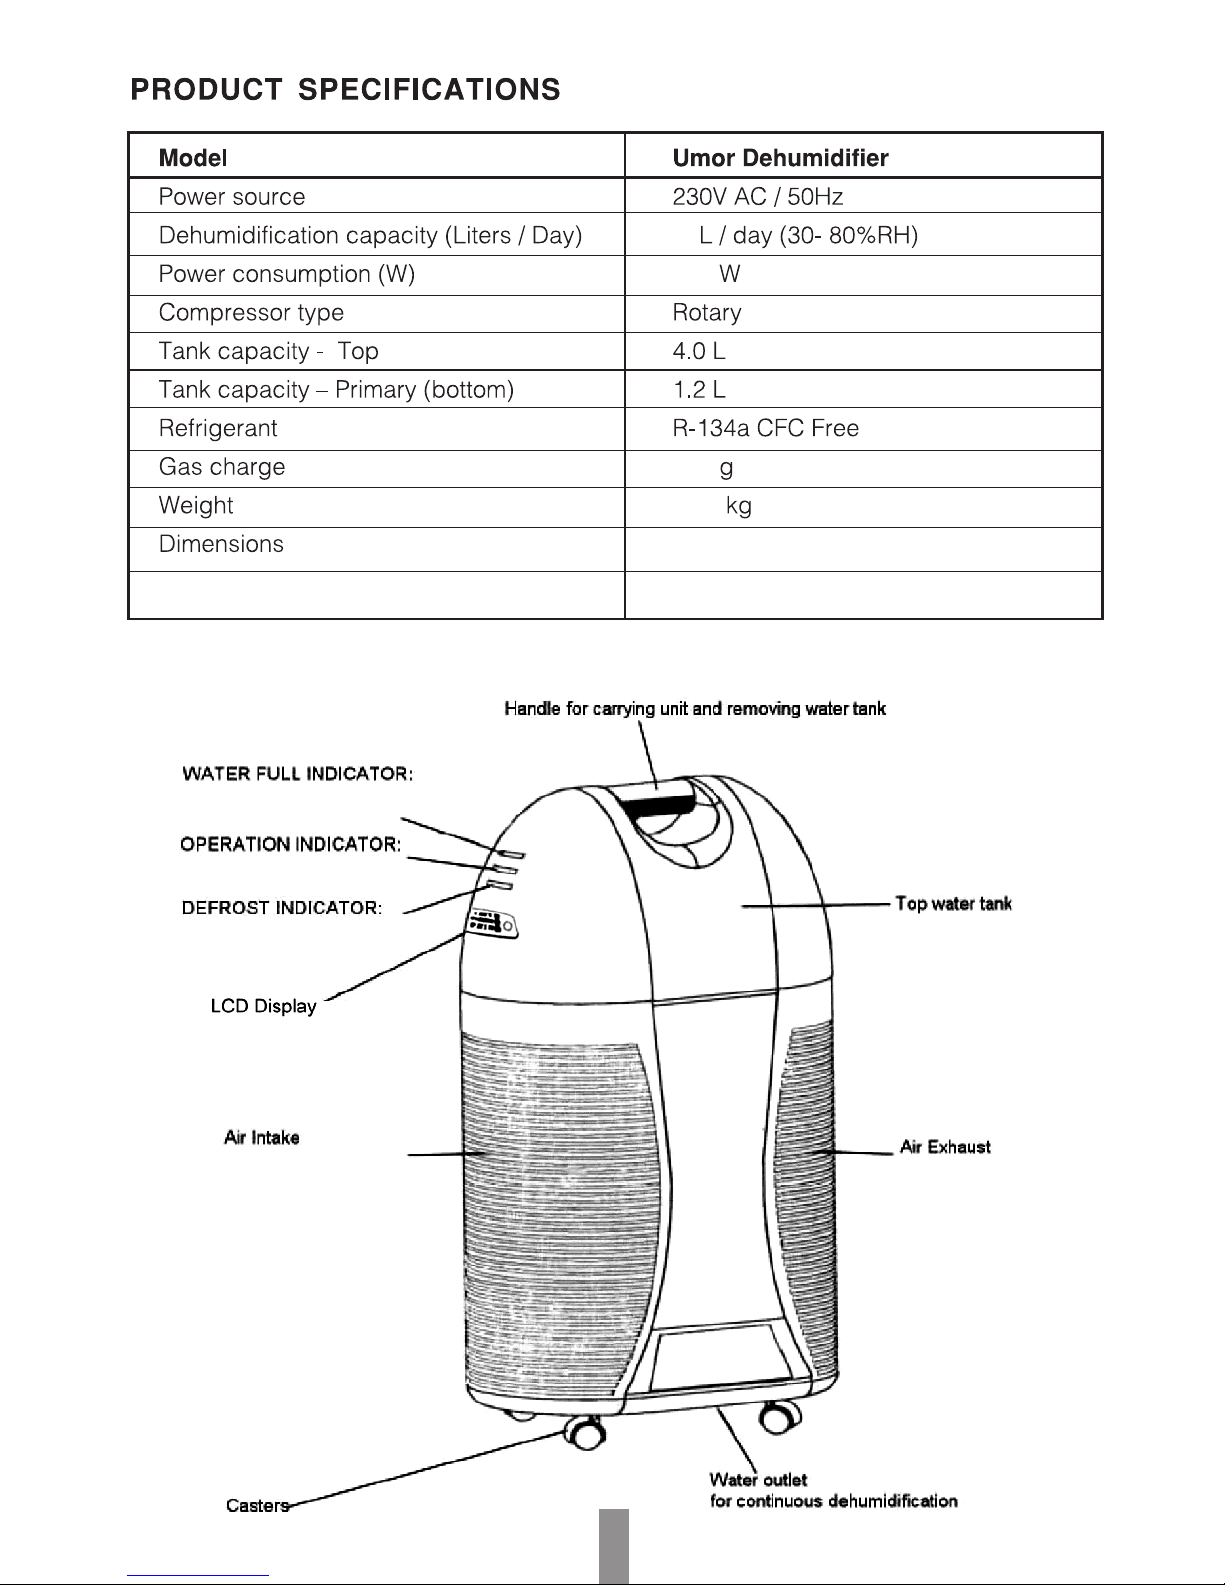
4. Do not spray water on unit.
• This may cause irreparable
damage to the unit and the
risk of electric shock.
5. Do not place unit near
radiators or heating
appliances.
• Also do not operate the unit
in the direct sunlight.
6. Do not use the unit in the
bathroom or shower
room.
7. Do not plug unit into a power
socket with wet
hands.
8. If the unit eve tips or falls
over, unplug the power
cord immediately.
• Do not remove plug with wet
hands.
• The unit must be thoroughly
checked by a qualified
engineer before being used
again.
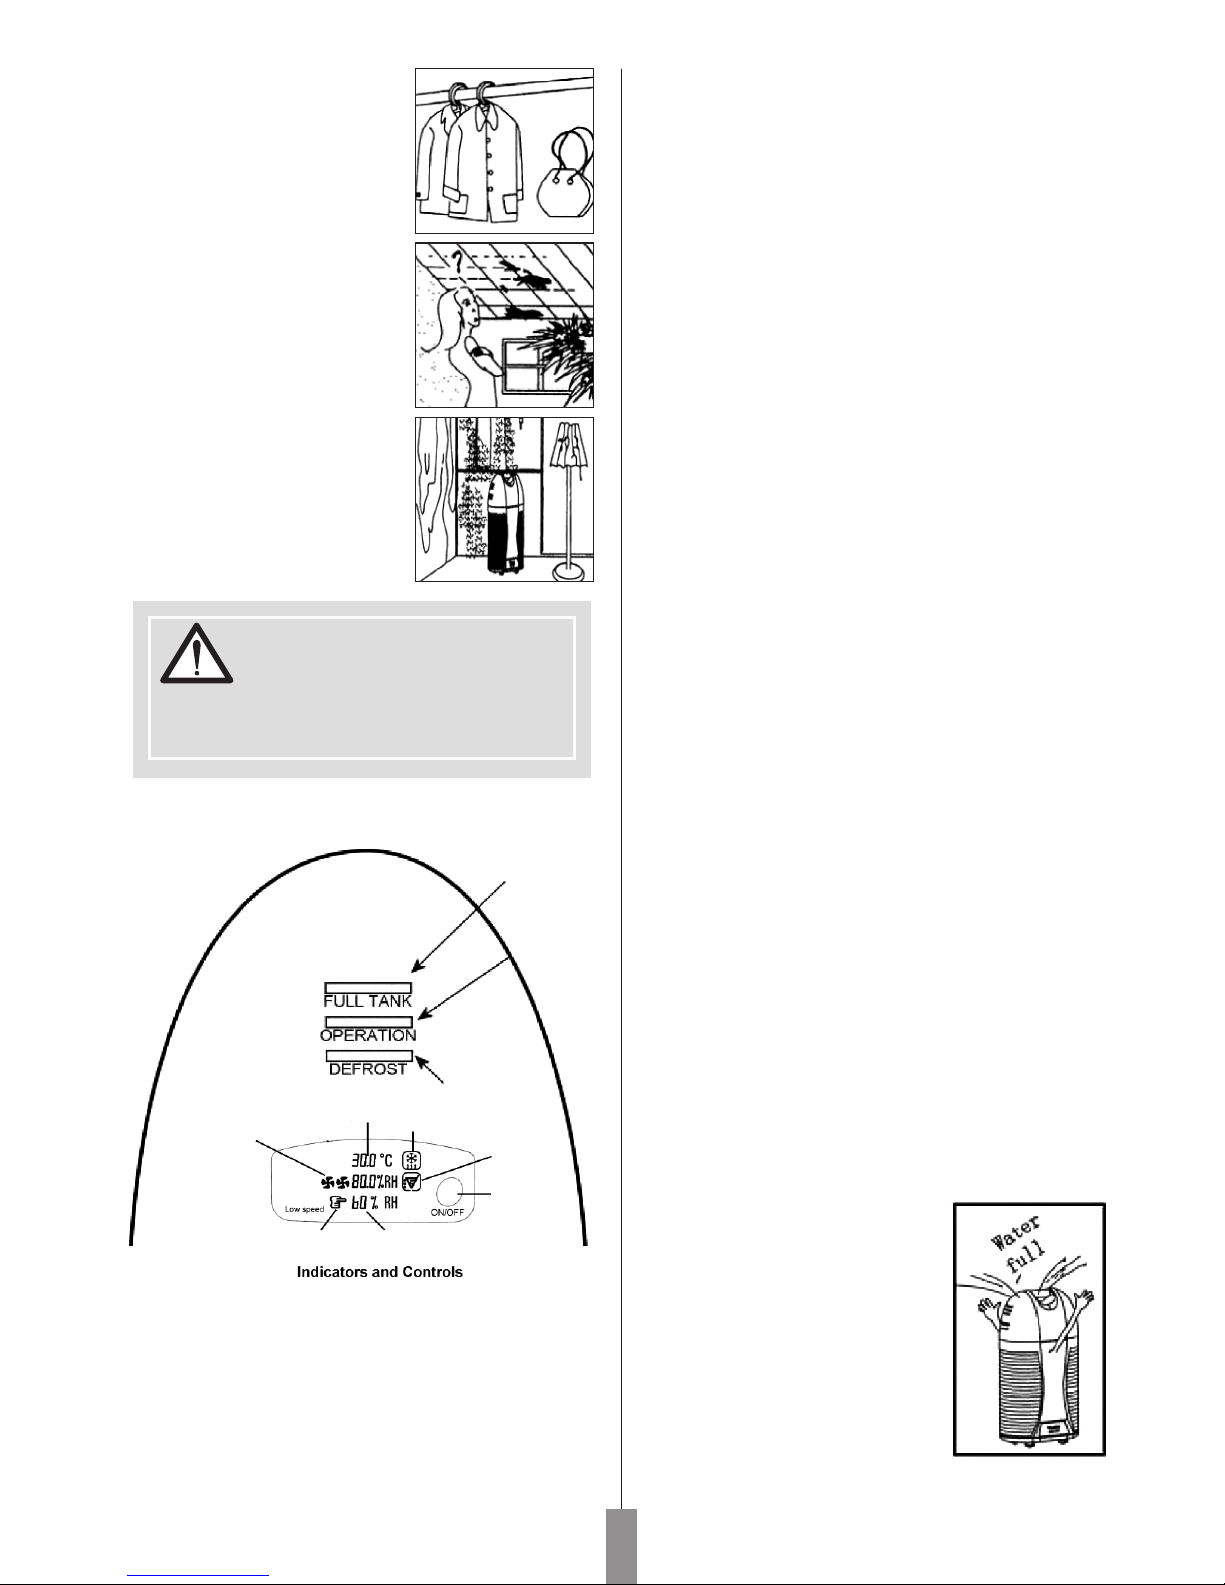
9. Empty both top and primary
tanks before moving unit.
• This will ensure that any water
will not flood on to the floor
and also prevent water
contacting any internal live parts
in the unit.
Umor dual tank dehumidifier is a new concept in home
mobile dehumidification. The unique top mounted water
tank design allows for convenient and easy emptying of
the dehumidifier. The top mounted water tank also
incorporates a carrying handle for transporting the
dehumidifier.
1. Check the mains voltage stated on the rating plate
corresponds to the local electricity supply.
2. The unit is not to be used if it has been dropped,if
there are visible signs of damage or if it is leaking.
CAUTION!
CAUTION!

09
20
350
170
14.2
72.4x24x39 cm
10 yearsUsage life

Benefits of Dehumidifier
1. Reduces effects of mould
growth on clothes and leather
goods.
• Pull out drawers of the
wardrobe before turning the
dehumidifier ON.
2. Reduces formation of
condensation on ceilings, walls
and windows.
• Refrain from opening
windows and doors to obtain
best performance from the unit.
3. Reduces the dampness from
bookshelves and cupboards.
• Open the door and put the
dehumidifier in front of the
cupboard for it to operate
effectively.
NOTE!
After unpacking the unit please allow at least 2
hours before switching on.
NOTE!
10
Then:
Press “ON/OFF” once: The required air
humidity is set to 30%.
Press “ON/OFF” twice: The required air
humidity is set to 35%.
Press “ON/OFF” three times: The required
air humidity is set to 40%.
Press “ON/OFF” four times: The required
air humidity is set to 45%.
Press “ON/OFF” five times: The required
air humidity is set to 50%.
Press “ON/OFF” six times: The required air
humidity is set to 55%.
Press “ON/OFF” seven times: The required
air humidity is set to 60%.
Press “ON/OFF” eight times: The required
air humidity is set to 65%.
Press “ON/OFF” nine times: The required
air humidity is set to 70%.
Press “ON/OFF” ten times: The required
air humidity is set to 75%.
Press “ON/OFF” eleven times: The required
air humidity is set to 80%.
Then repeat the process above.
• The unit will turn itself off when the moisture in the
air reaches the set position on the Humidistat control.
• The unit will automatically turn itself on when the
moisture in the air rises above the setting on the
Humidistat control.
• If the unit is turned off during its operation, please
leave for 3 minutes before being turned on again.
• If the unit does not operate, check the top tank is
correctly located in the unit and that the power socket
is switched on.
• When the top water tank is full and the RED
indicator lights empty the top tank as described in
point 3. The dehumidifier is designed to provide an
optimum operating performance above 15° and up
to 35°. When used below 15° the rate of water
extraction will typically be reduced. This may lead
to little or no water being collected in the unit’s water
tanks.
b. Turning the
dehumidifier OFF
• To turn the unit off, press and
hold down the “ON/OFF” button
for a few seconds.
• If the unit is not to be used for
a long period, unplug unit from
power supply and drain the
primary tank as described in
point 4.
Usage
a. Turning the dehumidifier ON.
• Ensure that the top water tank is properly located.
• Connect the unit to a suitable power supply socket and
switch on using the “ON/OFF” button.
The current room temperature and air humidity are
shown in the electronics display. The
required air humidity is set to 00%. This is also the setting
for continued dehumidification.
High speed
Temperature
Humidity setting Humidity setting value
Moda
Power switch
Water
tank full
Indicator Lights
when tank is full
Indicator Lights
when unit is in defrost
mode (automatic)
Indicator Lights
when unit is on

11
d. Continuous operation/Draining primary
water tank
e) Ensure that unit
unplugged from
power supply.
f) Remove the rubber plug
from the water outlet located
at the rear base of
the unit. (Note: When
rubber plug is removed water
may drain!)
g) For continuous operation
connect a suitable drainpipe
to the water outlet. The unit
can now be operated
continuously.
h) During continuous
operation, the “WATER
FULL” indicator is off.
NOTE!
The primary water tank must be emptied before
transporting or storing the unit.
NOTE!
e. Defrost mode
• When operating the unit at low room temperature
(less than 15°C), the surface on the evaporator will
accumulate ice and reduce the dehumidifier
efficiency. Periodically when this happens, the unit
will go into automatic defrost mode. In defrost mode
the Yellow indicator will light.
5. Maintenance and Cleaning
Before carrying out any maintenance or cleaning
the unit, make sure that the power to the unit is
turned off and the power cord is removed from the
power socket. Apart from cleaning the filter there
are no other user serviceable parts contained in
the unit.
a. Cleaning the filter
• Manually remove air intake case molding to expose
filter assembly.
• Locate the two tabs at the top of the filter assembly,
pull down and withdraw filter assembly.
• Use a vacuum cleaner or wash in cool water to
clean filter.
• Allow to dry thoroughly before replacing filter
assembly in the unit.
b. External cleaning of unit
• Do not clean unit with any abrasive cleaning agents
or solvents.
• Do not apply any water directly to the unit for
cleaning.
• Only use a soft clean cloth for all cleaning purposes.
a) Slide the lock switch to the RELEASE
position and ROTATE handle in the direction
of arrow to UNLOCK position.
Tank is now in UNLOCK position. Pull the
tank up and empty contents.
b) Before placing empty tank back onto the
unit, ROTATE handle back to LOCK
position. The lock switch will automatically
snap into LOCK position.
c) Place tank back on the dehumidifier insuring
that LOCATION RIBS are inline with
LOCATION SLOTS. Note that tank can only
be placed on the dehumidifier in on
orientation.
c. Water Full and top tank removal
• When the water tank is full the red indicator will
light and the unit will automatically stop operating.
The top water tank must be emptied and reinstalled
before the dehumidifier will operate.
• Please observe the following steps when emptying
the top water tank.

12

13

14

15

Youlong Industrial Co. Ltd.
11 F No:79, YongjıRoad Taipei/Taiwan
Table of contents
Languages:
Other Fakir Dehumidifier manuals