Fakir RCT109 Cyclonic User manual

RCT 109 Cyclonic
Rechargeable Cleaner - Instruction Manual
fiarjl› El Süpürgesi - Kullanma K›lavuzu


Uzun y›llar sorunsuz çal›flmas› için
tasarlanan ve üretilen bu ürünü sat›n
ald›¤›n›z için teflekkür ederiz.
Benzer ürünleri kullanmaya al›fl›k
olabilirsiniz, ancak kullanma k›lavuzunu
okumak için lütfen zaman ay›r›n›z, bu
k›lavuz sat›n alm›fl oldu¤unuz üründen
en iyi performans› alman›z için
haz›rlanm›flt›r.
Güvenlik Önemlidir
• Kendi güvenli¤iniz ve di¤erlerinin
güvenli¤i için ürünü çal›flt›rmadan önce
kullanma k›lavuzunu okuyunuz.
• Bu k›lavuzu ilerideki kullan›mlar için
güvenli bir yerde saklay›n›z.
GÜVENL‹K B‹LG‹LER‹
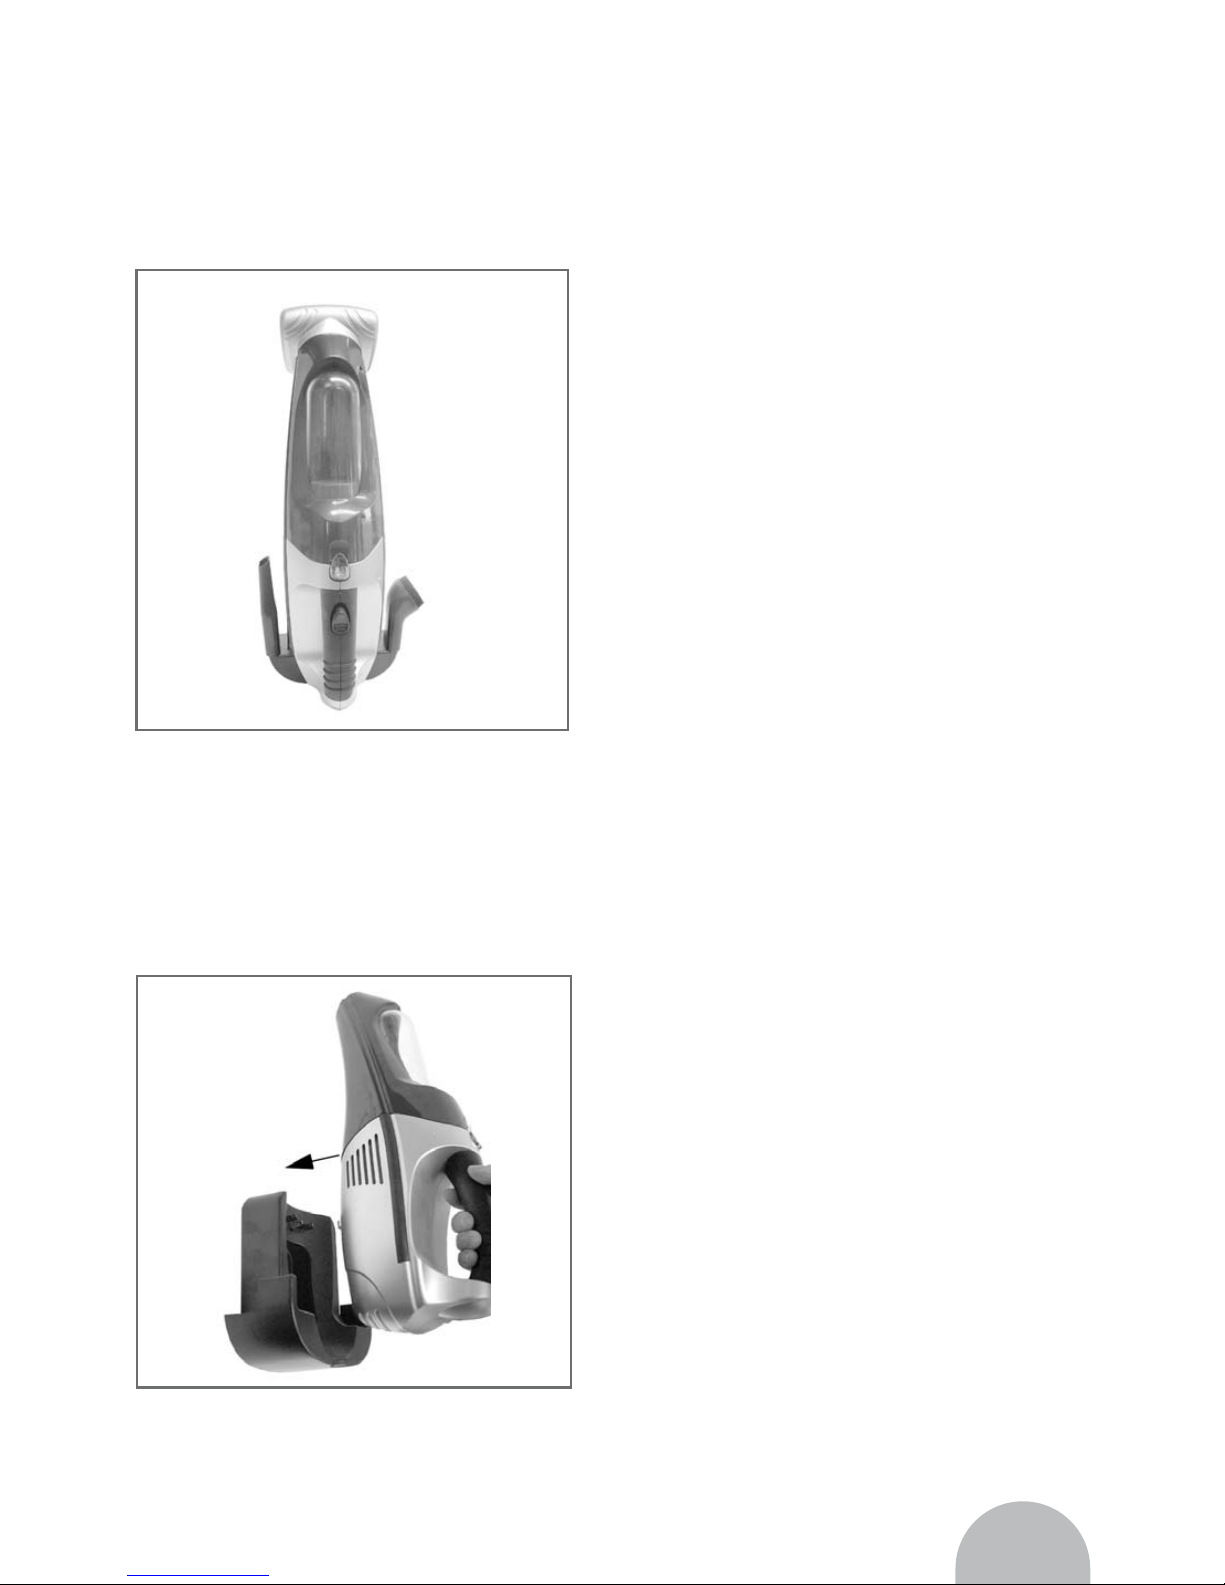
Süpürgenin kullan›lmas›
• Kullanmadan önce, süpürgeyi ve flarj
aletini varsa hatal› parçalar› kontrol
ediniz. Parçalar›n k›r›klar›n›, dü¤melerin
hasarlar› vs. cihaz›n çal›flmas›n›
engelleyici herhangi bir durum olup
olmad›¤›n› kontrol ediniz.
• E¤er süpürgenin herhangi bir parças›
hasarl› ya da hatal› ise cihaz›
kullanmay›n›z.
• Hasarl› ya da hatal› parçalar Fakir Yetkili
Servis’i taraf›ndan tamir edilir ya da
de¤ifltirilir.
• fiarjl› süpürgeyi s›v›lar için kullanmay›n›z
ve suya dald›rmay›n›z.
• Motoru yüzünüzden ve gözlerinizden uzak
bir seviyede tutunuz.
• fiarjl› süpürgeyi yan›c› veya tehlikeli s›v›lar
için kullanmay›n›z.
• fiarjl› süpürgeyi yanan sigara, kibrit veya
s›cak kül gibi s›cak veya yanan cisimleri
almak için kullanmay›n›z.
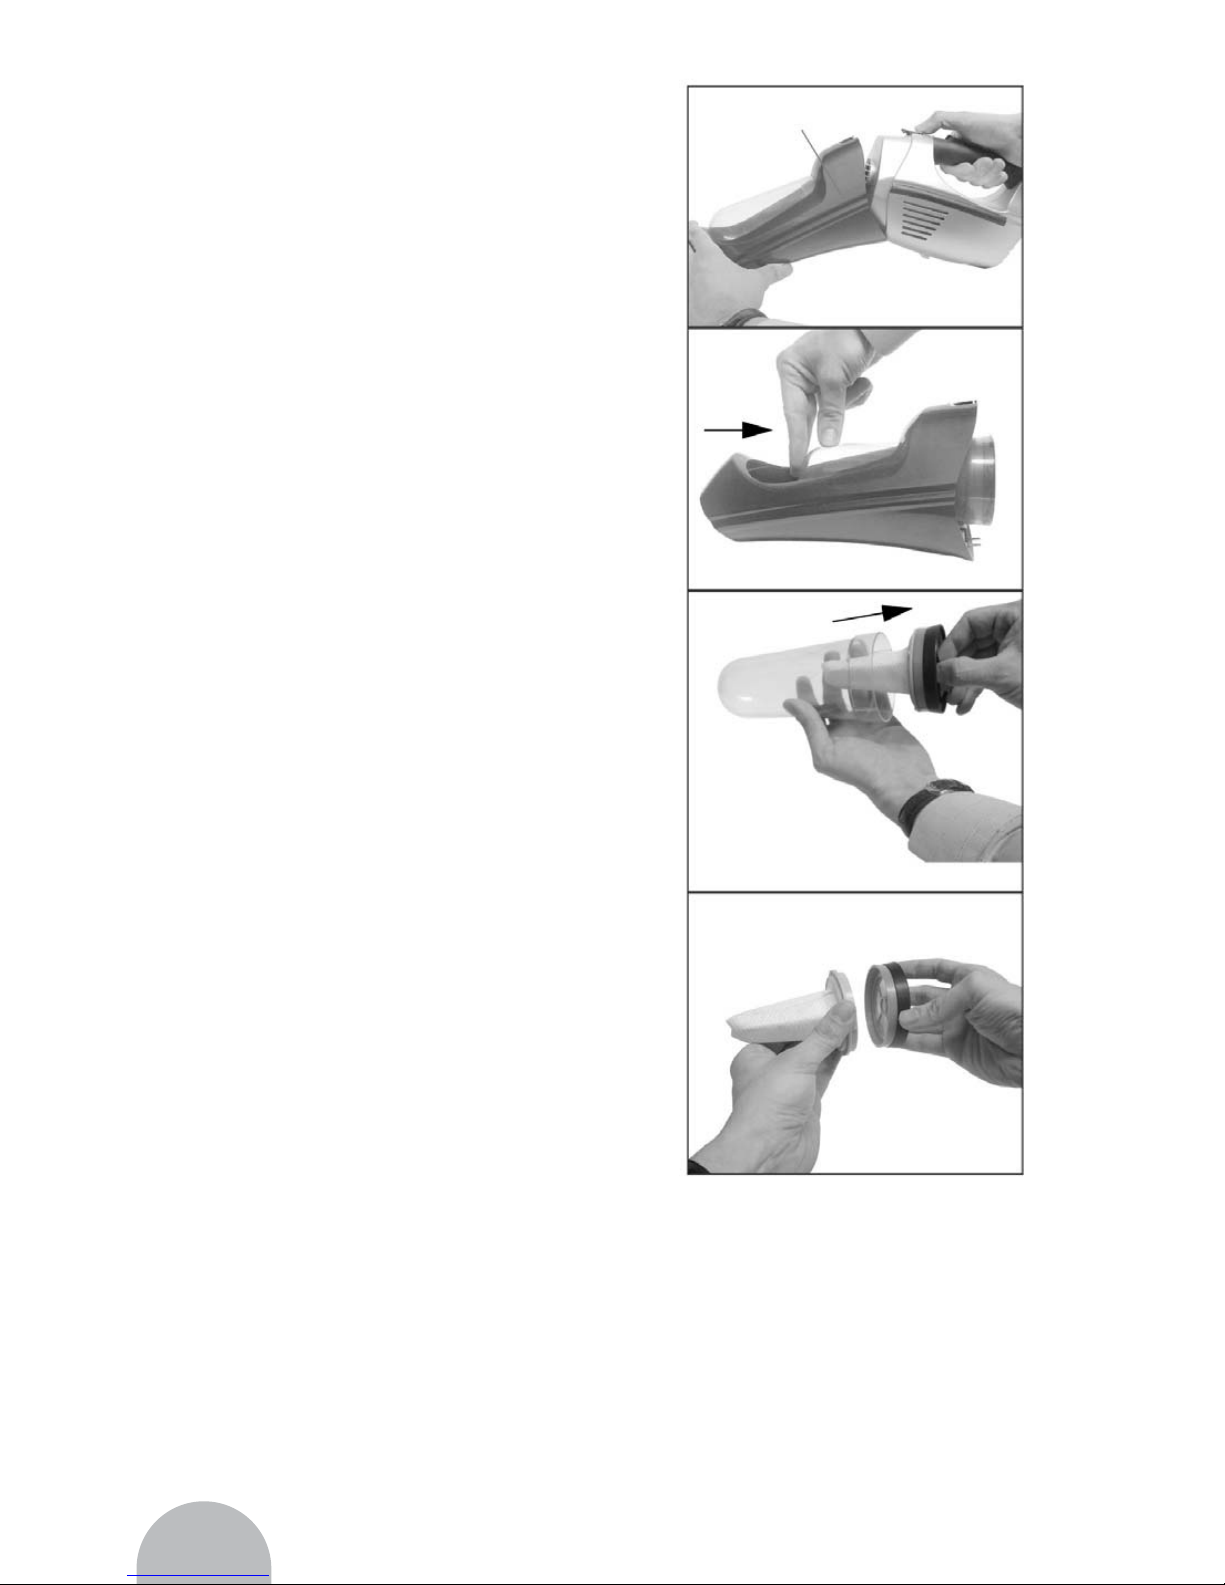
• fiarjl› süpürgeyi haznesi ve filtresi
tak›lmadan kullanmay›n›z.
• fiarjl› süpürgeyi kullan›rken çocuklar› ve
evcil hayvanlar› güvenli bir mesafede
tutunuz.
• fiarjl› Süpürge sadece hafif, kuru,
kapal› alan kullan›m› için tasarlanm›flt›r.
Herhangi bir aksesuar veya ek parça ile
tavsiye edilenin d›fl›ndaki kullan›m flekli
kiflisel yaralanma riski içerir.
• fiarjl› süpürgeyi kullanmad›¤›n›z
zamanlarda kuru, çocuklar›n
ulaflamayaca¤›, uygun bir yerde
saklay›n›z.
fiarj Adaptörü
• fiarj adaptörünü baflka cihazlarda
kullanmay›n›z.
• Süpürgeyi baflka hiçbir flarj aleti ya da
adaptörü ile flarj etmeyiniz.
• Sadece cihaz ile birlikte verilen flarj
adaptörünü kullan›n›z.
• Cihaz›n temizlenmesi veya bak›m›
ifllemlerine bafllamadan önce flarj
adaptörünü fiflten çekiniz.
• fiarj adaptörünü açmay›n›z, açmaya
çal›flmay›n›z.
• fiarj adaptörünü fiflten çekmek için
adaptörün kablosunu kullanmay›n›z.
• fiarj adaptörünü ›s›, ya¤ ve keskin
yüzeylerden uzak tutunuz.
Hava alma
• E¤er cihaz›n hava alma veya so¤utma
delikleri t›kal› ise cihaz› kullanmay›n›z.
• So¤utma ve hava alma deliklerini saç,
3

tüy, iplik, toz vb. hava ak›fl›n›
engelleyebilecek maddelerden
koruyunuz.
Batarya
• Bataryay› ya da batarya yuvas›n› açmaya
çal›flmay›n›z.
• Bataryay› suya dald›rmay›n›z.
• Bataryay› atefle atmay›n›z.
• Bataryan›n yok edilmesi s›ras›nda,
kullanma k›lavuzunun Çevre Korumas›
bölümündeki maddeler takip edilmelidir.
ELEKTR‹K GÜVENL‹⁄‹
UYARI! :
fiarj adaptörünü fifle takmadan önce
mutlaka elektrik güvenli¤ini dikkatlice
okuyunuz. Kullanmad›¤›n›zda flarj
adaptörünü fifle tak›l› b›rakmay›n›z.
• Bu flarjl› süpürge sadece kapal› alanlarda
kullan›lan bir flarj adaptörü ile kullan›l›r.
• Adaptörü fifle takmadan önce, flebeke
voltaj›n›n cihaz›n›z ile uyumlu olup
olmad›¤›n› kontrol ediniz.
• fiarj adaptörü kapal› bir ünitedir.
Adaptörde kullan›c› taraf›ndan
ayarlanacak herhangi bir k›s›m olmad›¤›
gibi adaptöre ayar yap›lmas› da gerekli
de¤ildir.
UYARI! :
fiarj adaptörünü açmaya çal›flmay›n›z.
• E¤er flarj adaptörü fifliniz ile uyumlu de¤il,
hatal›, hasarl› ya da bataryay› flarj edemez
durumda ise de¤ifltirilmeli ve uygun bir
yol ile imha edilmelidir. Bu ifllem için Fakir
Yetkili Servisi’ne baflvurunuz.
• fiarj adaptörü 220V-240V 50Hz flebeke
voltaj› ile çal›flacak flekilde tasarlanm›flt›r.
Adaptörün baflka özellikteki flebekeye
ba¤lanmas› adaptöre zarar verebilir.
• Süpürgenin veya adaptörün ya¤mur ya
da neme maruz kalmas›n› engelleyiniz.
• Düzenli olarak flarj adaptörünün ve
kablosunu hasarlara karfl› kontrol ediniz.
E¤er bir hasar ya da hata oluflursa
adaptörü kullanmay›n›z. Fakir Yetkili
Servisi’ne baflvurunuz.
Bu sembol flarj adaptörünün S›n›f II
cihaz› oldu¤unu ve topraklamaya ihtiyac›
olmad›¤›n› gösterir.
Ürün Özellikleri
Model Numaras› RCT 109 CYCLONIC
fiarj voltaj› 220V-240V AC 50 Hz
Batarya voltaj› 10.8 volt
fiarj süresi 24 saat
Ek Parçalar
Motorlu dönen f›rça kafas›
Plastik tutma sap›
Y›kanabilir toz filtresi
Kutu ‹çindekiler
fiarjl› süpürge
Duvara monte flarj ünitesi
fiarj adaptörü
Dönen f›rça kafas›
Kenar-köfle aparat›
Mobilya f›rças›
4

5
Parça Bilgileri
a. Toz haznesi
b. Filtre (Toz haznesinin içinde)
c. Toz haznesi açma dü¤mesi
d. Açma/Kapama dü¤mesi
e. Tutma sap›
f. Motor/pil yuvas›
g. Duvara monte flarj ünitesi
h. Kenar-köfle aparat›
i. Mobilya f›rças›
j. Motorlu dönen f›rça kafas›
k. fiarj lambas›

Bu cihaz direk olarak cihaz›n ucuna
ba¤lanabilen 3 aksesuar ile birlikte
gelmektedir.
Kenar-Köfle Aparat›
Kenar- Köfle aparat› ulaflmas› zor yerlerde
kullan›l›r. Aparat› direk olarak cihaz›n
ucuna takabilirsiniz
Mobilya F›rças›
Mobilya f›rças›n› direk olarak cihaz›n
ucuna takabilirsiniz
Motorlu Dönen F›rça Kafas›
Motorlu dönen f›rça kafas› k›sa tüylü hal›
ve kilimler için tasarlanm›flt›r. Uzun tüylü
hal›lar için kullan›lmamal›d›r. Bu f›rça
özellikle hayvan tüyü toplamada iyidir.
Duvara Monte fiarj Ünitesinin
Kurulmas›
Duvara monte flarj ünitesinin kurulmas›
Süpürgenin düzgün flekilde flarj olabilmesi
için flarj ünitesinin duvara monte edilmesi
tavsiye edilir.
1. Elektrik prizine yak›n, kapal› bir alanda,
çocuklar›n ulaflamayaca¤› bir yer
belirleyiniz.
2. fiarj ünitesini do¤rudan günefl alt›nda
kalacak bir yerde ya da s›cak bir kayna¤›n
yak›n›na (ocak, f›r›n vb.) kurmay›n›z.
3. Seçti¤iniz yerde duvar içinde baflka kablo
ya da boru olmad›¤›ndan emin olunuz.
4. Adaptörün ucunu flarj cihaz›n›n arka
taraf›na getirin ve uygun pozisyondayken
çevirerek tak›n.
5. Monte vidalar›n›n yerini duvarda
belirleyiniz ve uygun 2 tane delik aç›n›z.
6. fiarj adaptörünün kablosunun ünite
üzerindeki deli¤e girdi¤inden emin olunuz.
Kablodaki fazlal›k flarj ünitesinin arka
taraf›nda toplanabilir.
7. fiarj ünitesinin vidalar›n› s›k›n›z.
8. fiarjl› süpürge kullan›lmad›¤›nda flarj
ünitesine yerlefltirilmelidir, bu sayede her
zaman kullan›ma haz›r olur.
6
Kenar- Köfle
Aparat›
Mobilya
F›rças›
Motorlu Dönen F›rça
Kafas›
Aparat
Adaptör Fifli
Monte
Delikleri

SAKLAMA
Aksesuarlar›n ve turbo f›rçan›n flekilde
gösterildi¤i gibi yerlefltirilmesini öneririz,
bu sayede kaybolmalar› ve bozulmalar›
engellenir.
fiARJLI SÜPÜRGEN‹N KULLANIMI
Pilin fiarj Edilmesi
Not: Kullanmadan önce maksimum
performans için batarya 24 saat flarj
edilmelidir.
1. fiarj›n fiflini prize tak›n (220 – 240V 50HZ)
2. Süpürgeyi flarj ünitesine uygun bir flekilde
koyunuz. Süpürgenin flarj soketinin flarj
ünitesi üzerindeki pimler ile temas
etti¤inizden emin olunuz.fiarj lambas›
(LED) yanarak flarj iflleminin bafllad›¤›n›
gösterecektir.
NOT: fiarj esnas›nda ürün kapal›
olmal›d›r.
3. E¤er iki haftadan fazla kullan›lmaya-
caksa adaptör prizden ç›kart›lmal›d›r.
AÇMA - KAPAMA
fiarjl› süpürgeyi açmak için tutma
sap›ndaki açma - kapama dü¤mesini
kullan›n›z.
NOT:
E¤er flarjl› süpürgenin vakum gücü
zay›fsa veya azalm›flsa flarjl›
süpürgenizi yeniden flarj edilmeye
ihtiyac› vard›r.
MOTORLU DÖNEN FIRÇASININ
KULLANIMI
UYARI:
Motorlu f›rça kafas›na, dönerken
dokunmay›n›z, kiflisel yaralanmalar
neden olabilir.
1. Dönen f›rça kafas›n› takabilmek için
süpürgeyi flarj ünitesinden ç›kar›n›z.
2. Cihaz›n kapal› oldu¤undan emin olunuz.
3. F›rça kafas›n› sertçe hava girifl kanal›na
‹tiniz. F›rça kafas› üzerindeki 2 pimin
süpürgeye tam ve düzgün flekilde
oturdu¤undan emin olunuz.
4. Ç›karmak için f›rça kafas›n› hava
girifllerinden sertçe çekiniz.
Dönen f›rça kafas› k›sa tüylü hal›lar›n
7

temizli¤inde kullan›l›r. Uzun tüylü
hal›lar›n temizli¤inde kullan›lmamal›d›r.
NOT:
Pamuk, saç vb. maddelerin süpürül-
mesinde, dönme miline tak›lmalar› f›rça
kafas›n›n t›kanmas›na neden olur.
Bu durum oluflursa, f›rça kafas›n›
ç›kart›n›z ve tak›lan parçalar› dönme
milinden sökünüz.
Toz Haznesinin Temizlenmesi ve
Filtre
Süpürgenin çal›flma performans› toz
haznesinin ve filtrenin durumuna ba¤l›d›r.
Toz haznesi düzenli olarak boflalt›lmal›
ve temizlenmelidir. Filtre düzenli olarak
s›cak ve sabunlu su ile y›kanmal› ve iyice
durulanmal›d›r.
1. Ünitenin kapal› oldu¤undan emin olun.
2. Toz haznesini boflaltmak ve filtreyi
ç›karmak için, toz haznesi açma
dü¤mesine bas›n›z.
3. Toz haznesini resimde gösterildi¤i
flekilde motorun oldu¤u k›s›mdan çekiniz.
4. Filtreyi toz haznesinden ç›kar›n›z.
5. Hazneyi boflalt›p temizleyiniz.
6. Filtreyi s›cak ve sabunlu suda y›kay›n›z.
Tekrar takmadan önce kurumaya
b›rak›n›z. Kurutma makinesi gibi s›cak
kaynaklarda kurutmay›n›z.
7. Her zaman filtreyi tak›p toz haznesine
do¤ru flekilde oturttuktan sonra süpürgeyi
çal›flt›r›n›z.
8
Açma
Dü¤mesi

9
Thank you for purchasing this product
which has been designed and
manufactured to give you many years of
trouble free service.
You may already be familiar with using
a similar product, but do please take time
to read these instructions - they have
been written to ensure you get the very
best from your purchase.
Safety is Important
Keep this information in a safe place for
future reference.
To ensure your safety and the safety of
others, please ensure you read the Safety
Instructions before you operate this
vacuum cleaner.
SAFETY INSTRUCTIONS
Using the Vacuum Cleaner
• Before use, inspect the cleaner and the
charger for damage or defective parts.
Check for breakage of parts, damage to
switches and any other condition that
may affect its operation.
• Do not use the cleaner if any part is
damaged or defective.
• Have any damaged or defective parts
repaired or replaced by an authorized
repair agent.
• Do not vacuum wet surfaces, pick up wet
objects or use in wet conditions.
• Do not place the nozzle or unit near the
eyes or ears whilst operating.
• Do not use to vacuum flammable or
corrosive liquids.
• Do not use any charger other than the
one provided.
• Does not use the vacuum cleaner to pick-
up burning objects as this is a fire risk!
• Do not pick up hot objects such as coal
and ash.
• Do not operate the cleaner without the
container and filters installed.
• This cleaner has been designed for light,
dry, indoor use only.
• The use of any accessory or attachment
or the performance of any operation with
this appliance other than those
recommended in this User Guide may
present a risk of personal injury.
• When not in use the cleaner should be
stored in a dry, secure location out of the
reach of children.
The Charging Adaptor
• Do not use the charging adaptor on any
other appliance.
• Do not charge this vacuum cleaner
with any other charger or charging
adaptor.
• Use only the charging adaptor supplied
with this appliance.
• Unplug the charging adaptor from the
mains supply before starting any cleaning
or maintenance procedures.
• Do not attempt to open the charging
adaptor.
• Do not pull the charging adaptor lead to
disconnect the charging adaptor from
the mains supply.
• Keep the charging adaptor lead away
from heat, oil and sharp edges.
Air Intake
• Do not use the cleaner if the air intake or
the cooling vents are blocked.
• Keep the cooling vents and air intake

10
free of hair, lint, dust and any other items
that may block or restrict the air flow.
The Battery
• Do not attempt to open the battery or
battery compartment.
• Do not expose the battery to water.
• Do not incinerate the battery.
• When disposing of the battery, follow the
instructions given in the Environmental
Protection section of this User Guide.
ELECTRICAL SAFETY
Warning
READ THESE ELECTRICAL SAFETY
INSTRUCTIONS CAREFULLY BEFORE
CONNECTING THE CHARGING
ADAPTOR TO THE MAINS SUPPLY.
DO NOT LEAVE YOUR CHARGING
ADAPTOR CONNECTED TO THE
MAINS SUPPLY WHEN NOT IN USE.
• This vacuum cleaner is supplied with a
charging adaptor which has been
designed for indoor use only.
• Before plugging the charging adaptor
into the mains supply, make sure that the
voltage of your electricity supply is the
same as that indicated on the rating plate
on the charging adaptor.
• The charging adaptor is a sealed unit.
There are no user serviceable parts inside
and it does not require any electrical
adjustments.
Warning
DO NOT ATTEMPT TO OPEN THE
CHARGING ADAPTOR.
• If the charging adaptor is not suitable for
your socket, becomes damaged, or fails
to charge your battery, it must be
replaced and disposed of in a safe and
environmentally protective way. Always
refer to qualified personnel.
• This charging adaptor is designed to
operate on 220-240VAC 50Hz supply
only. Connecting it to any other power
sources may damage the unit.
• Do not allow the cleaner, or the charging
adaptor to be exposed to rain or moisture.
• Regularly inspect the charging adaptor
and the lead for damage. Do not use it
if faults or damage are found. Refer to
qualified service personnel.
This symbol indicates that this
charging adaptor is a Class II appliance
and does not require an earth connection.
Model Number
• RCT109 Cyclonic
Charger Input Voltage
• 220-240V AV 50 HZ
Battery Voltage
• 10.8 Volts
• 24hr charging time
Features
• Wall mounting recharging base
(inc screws and rawl plugs)
• Charging adaptor
• Crevice tool
• Small brush
• Motorized rotating brush head

11
Specification
a- Dust Container
b- Filter (Inside dust container)
c- Release Button
d- On / Off Switch
e- Handle
f- Motor/Battery Housing
g- Charging Stand
h- Crevice Tool
›- Small Brush
j- Motorized Brush
k- Led

ACCESSORIES
This unit comes with 3 accessories which
are fitted by directly inserting them into
the nozzle.
Crevice Tool
The Crevice tool can be used to clean
hard to reach places. Fit the crevice tool
directly into the nozzle.
Brush Attachment
The Brush attachment can be fitted
directly into the nozzle.
Motorized Brush
The motorized brush is designed for
cleaning short pile carpets and rugs. It
should not be used for cleaning long pile
carpets. This attachment is especially
good at picking up pet hairs.
INSTALLING THE WALL
MOUNTED CHARGING BASE
It is recommended that the charging
base should be mounted on a wall to
provide a convenient storage and
charging point for the cleaner.
1. Find a suitable indoor wall location near
a mains power socket but out of the reach
of children.
2. Do not mount the charging base in direct
sunlight or close to a heating source.
3. Make sure that there are no hidden
electrical wires or pipes in the chosen
location.
4. Insert the adaptor plug through the rear
of the charging base and twist to lock
into position.
5. Mark the location of the mounting holes
and drill two suitable holes, insert the
rawl plugs supplied into the holes.
6. Make sure that the charging plug is
correctly located and that the adaptor
lead is threaded through the slot in the
charging base. Excess lead can be
stored at the rear of the charging base.
7. Screw the charging base to the wall,
using the screws provided.
8. The cleaner should be stored in the
charging base. This will ensure that the
battery remains fully charged and the
cleaner always ready for use.
12
Crevice tool
Motorised brush
Brush attachment
Nozzle
Adaptor plug
Mounting
holes

STORAGE
We recommend that the accessories are
stored as shown to prevent them getting
lost or damaged. The turbo brush
attached to the vacuum cleaner and the
accessories place onto the charger as
shown.
CHARGING
NOTE:
Before using the vacuum cleaner it is
recommended that you charge for a
full 24 hours to ensure maximum
performance.
• Plug the charging stand into a mains
outlet socket (220-240V ~ 50HZ).
• To charge the unit, slide the vacuum
cleaner into the charging stand. The
charging LED indicator will light up to
indicate charging is in progress.
NOTE:
The On/Off switch must be in the off
position for charging.
• You may leave this unit on charge
permanently thereby ensuring that the
unit is always ready to use. If the unit is
not to be used for at least two weeks,
disconnect the charger from the mains
outlet.
Switching On/Off
To switch the vacuum cleaner on, push
the ON/OFF switch located above the
handle forwards.
NOTE:
If you find that the suction power of
the vacuum cleaner becomes weak or
stops, you may need to charge the
vacuum cleaner again.
Using Your Vacuum Cleaner
Using the pet patrol rotating turbo brush
WARNING!
DO NOT TOUCH THE MOTORISED
BRUSH HEAD WHILE IT IS ROTATING
AS THIS COULD CAUSE PERSONAL
INJURY.
13

• To connect the rotating turbo brush,
remove the cleaner from the wall
mounting charging base.
• Ensure that the cleaner is switched Off.
• Push the brush head firmly into the nozzle.
Ensure that the two pins on the turbo
brush head are correctly located in the
two sockets either side of the nozzle.
• To remove the brush head pull it firmly
out of the air intake. The rotating brush
head is designed for cleaning short pile
carpets and rugs. It should not be used
for cleaning long pile carpets.
NOTE:
Picking up cotton, hair and other
threads may clog the brush head by
twisting around the brush head
spindle. If this happens remove the
brush head from the cleaner and
remove the hair from the brush to
maintain pick-up performance.
Emptying the Dust Container
To empty and clean the unit, carry out
the following procedure.
1. Ensure the unit is switched off.
2. Press and hold the release button.
3. Remove the dust container by pressing
the release button and tilting the container
holder away from the motor housing.
4. Push the container out of the unit as
shown.
5. Pull out the filter from the unit and empty
the container into a rubbish bin.
6. Wash and dry the inside of the dust
container.
7. Take the filter apart by twisting the front
section slightly anticlockwise. Tap the
two halves gently to remove any dust
which has accumulated. If it is very dirty,
carefully brush the filters with a small
brush.
8. Replace the filters and refit the dust
container making sure it is the correct
way up and it 'clips' into position.
14
Release
button
Table of contents
Languages:
Other Fakir Vacuum Cleaner manuals

Fakir
Fakir STARKY PRO User manual

Fakir
Fakir Red Vac User manual

Fakir
Fakir Prestige 2000 User manual

Fakir
Fakir CLYDE User manual

Fakir
Fakir prestige TS 700 User manual

Fakir
Fakir S 250 User manual

Fakir
Fakir Nilco Premium 1107 User manual

Fakir
Fakir AS 1072 T User manual

Fakir
Fakir IC 1009 User manual

Fakir
Fakir INOVAX User manual

Fakir
Fakir clarris User manual

Fakir
Fakir Clyde BL 181 User manual

Fakir
Fakir E-240 User manual

Fakir
Fakir MRC 36 User manual

Fakir
Fakir PRESTIGE 2000 OKO User manual

Fakir
Fakir premium Starky HSA 700 User manual

Fakir
Fakir RANGE User manual

Fakir
Fakir Trendline User manual

Fakir
Fakir prestige AS 1111 All in One User manual

Fakir
Fakir RCT 108 User manual