Famous Trails MD1023 User manual

1580 N. Harmony Cr. Anaheim, CA. 92807
Phone: (714) 701-9671 Fax: (714) 701-9672 Toll Free: (877)
97-SCOPE www.famoustrails.com
MD1023 Metal Detector
OWNER’S MANUAL

Thank you for choosing FAMOUS TRAILS!
Before you return your product to the store
CONTACT US FIRST!
We can help if you needANY assistance!
¾Log onto www.famoustrails.com
¾Get answers to your questions, email our
technicians, and more!
¾Call 1-877-97-SCOPE, to speak to a Famous
Trails representative!
(Monday – Friday 8:00am to 4:00pm, PST)
Para asistencia, contactenos por telefono o Internet.

Quick Start Guide MD1023
1. Make sure power is Off.
2. Assemble the unit and install two 9v batteries (not
included).
3. Turn the SENS knob clockwise to power the unit.
4. Remove any metal objects away from the detector.
Remove any jewelry.
5. Set mode to ALL METAL.
6. Set SENS to midrange (5).
7. You are now ready to start searching.
Note: Please review the instruction manual. This will help in
becoming familiar with the different tones and features. We
also recommend testing your unit a few times to facilitate it’s
use.

Guía Rápida MD1023 Del Comienzo
1. Cerciórese de que la energía esté apagada.
2. Monte la unidad y instale dos baterías 9volt
3. Dé vuelta a la perilla de SENS a la derecha para accionar
la unidad.
4. Quite cualquier objeto del metal lejos del detector. Quite
cualquier joyería.
5. Fije el modo a TODO EL METAL.
6. Fije SENS al alcance medio (5).
7. Usted esta listo para comenzar a buscar.
Nota: Repase por favor el manual de instrucción. Esto ayudará
en llegar a ser familiar con los diversos tonos y características.
También recomendamos el probar de su unidad algunas veces
le facilitarla el uso.

CONTENTS
Assembling the Detector----------------------------------------------------------
Installing Batteries------------------------------------------------------------------
Controls and Functions-----------------------------------------------------------
Operating Instructions-------------------------------------------------------------
Treasure Hunter’s Code of Ethics----------------------------------------------
Care and Maintenance------------------------------------------------------------

With your MD1023 metal detector, you can hunt for coins, relics, jewelry,
gold, and silver just about anywhere. The detector is versatile and easy to
use. This unit has an auto ground balance used in Disc and All Metal
Modes.
FEATURES:
zView Meter- Quite useful in a noisy area, where it is difficult to hear
or distinguish tones.
zHeadphone Jack (Headphones not included)-Connect stereo
headphones and operate without trouble.
zWaterproof Searchcoil- Use the detector under shallow water.
zAdjustable Stem- Adjust the detector’s length for comfortable use.
zArm Support- Carry and operate your detector comfortably.
zPower-Your metal detector requires two 9-volt alkaline batteries (not
supplied). The built in insolating circuit helps avoid wrong battery
connection and prolong the battery life.
ASSEMBLING THE DETECTOR
Assembling your detector is easy and requires no special tools. Just
follow these steps:
1. Insert the latch on the liner into the assembly hole on the bottom of the
control box. Then slightly push the control box in the direction of IN on
the handle to fix the latch in place. Tighten the fixing screw properly.

7
2. Unscrew the knobs on the searchcoil, then remove the knobs and the
connector. Insert the stem and align the holes on the searchcoil
bracket and the stem. Push the connector through the holes, then
replace and tighten the knobs.
3. Wind the searchcoil cable around the stem and insert its plug into the
relevant jack.
Caution: The searchcoil’s plug fits into the jack only one way. Do not
force the plug or you could damage it. Don’t pull the cable if you want
to pull out the plug from the jack.
4. Rotate the stem’s lock nut clockwise to loosen it.
5. Stand and stretch your arm, holding the metal detector to make the
searchcoil above the ground for about 1 to 5 cm. Rotate the stem’s lock
nut counterclockwise to tighten it.
Caution: Don’t pull the aluminum stem totally out. Be aware of there is
a plastic ring, whose smaller rim should be upward when being
assembled.
INSTALLING BATTERIES
1. Check the power switch on the front panel to make sure it is in the
“OFF” position.
control box
fixing screw
latch assembly hole
liner

8
2. Slide the left battery cover off in the direction of the arrow.
3. Place a 9V battery into the battery compartment matching the polarity
symbols (+ and -) marked inside and reinstall the left battery cover.
4. Slide the right battery cover off in the direction of the arrow.
5. Place a 9V battery into the battery compartment matching the polarity
symbols (+ and -) marked inside and reinstall the right battery cover.
Caution:
zThe two sides covers cannot be interchanged. The sign on the cover
must match the sign inside the compartment, B1 to B1 and B2 to B2.
zIf you don’t plan to use the unit for a week or more, remove the
batteries. Batteries can leak chemicals that can destroy electronic
parts.
Warning:
zDispose old batteries promptly and properly. Never bury or burn
them.
USING HEADPHONES (not included)
1.Insert the stereo headphones’ 3.5mm plug into the PHONE jack.
2.The unit does not have volume control. It’s better to use stereo
headphone with volume control. Set the volume to desired level.
Listening Safely
zTo protect your hearing, set the volume to the lowest setting before
you begin listening, adjust the volume to a comfortable level.
zDo not listen at extremely high volume levels. Extended high volume
listening can lead to permanent hearing loss.
zDo not wear headphones while operating your detector near

9
high-traffic areas. Pay attention to traffic safety.
Controls and Functions
1. SENS- Sensitivity control also used as power switch.
Rotate clockwise (away from OFF) to turn on the power. When you
rotate the SENS from 0 to 10, the sensitivity is gradually increased. In
general use, you can set the SENS to a higher position. But in
mineralized area, or area with electrical interference, it’s better to
lower the SENS.
2. MODE SWITCH
zDISC- The mode DISC/TONE can facilitate in your search and
discriminate the target type based on a long or short tone for
different metal target.
zALL METAL- Search for all kinds of metal objects without
discrimination.
zTONE- Works with DISC/TONE. Discriminates metals with two
different tones (high or low).
3. TARGET- To pinpoint the target. Press this button to lower the
sensitivity automatically and to locate the target.
4. LOW BAT- When indicator lights, user has to replace the battery.
1
2
3 4
5
6
7

10
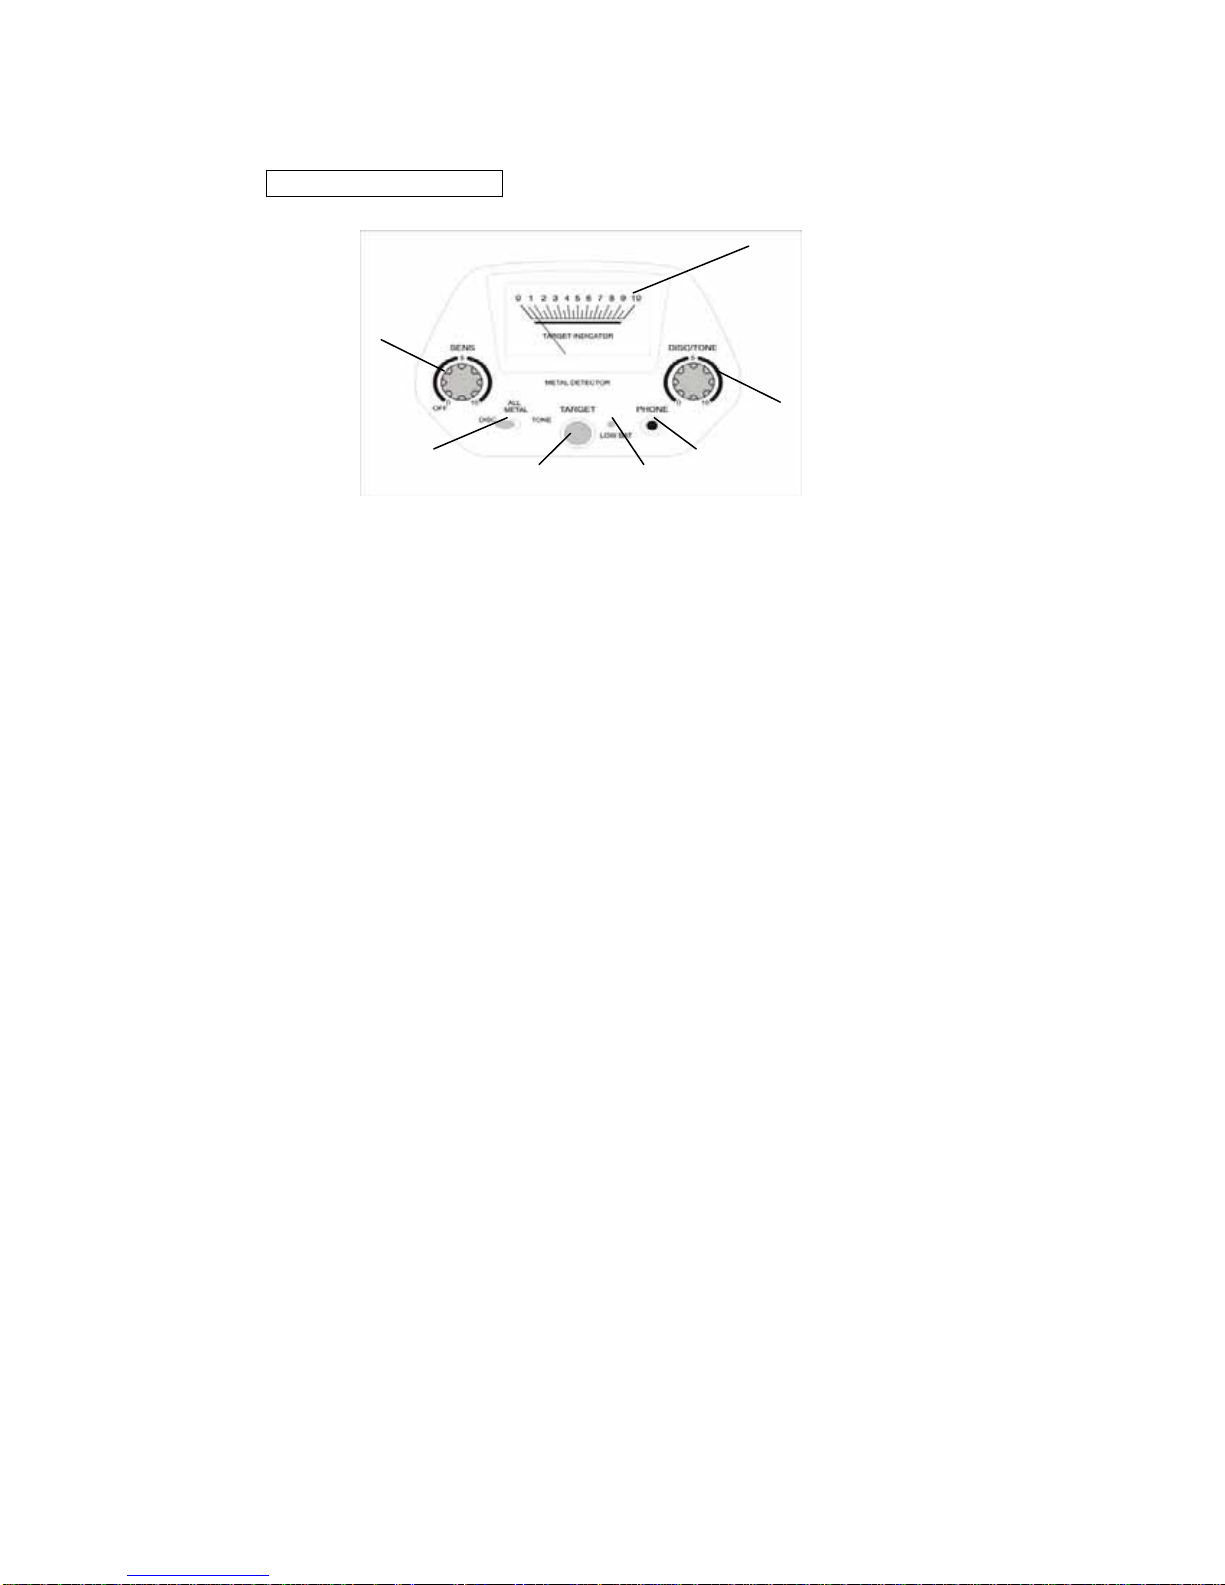
5. HEADPHONE Jack- Insert the stereo headphones’ 3.5mm(1/8”) plug
into the headphone jack.
6. DISC/TONE- Associated with mode switch. When mode switch is in
DISC mode, you can rotate the control clockwise from 0 to 10 to
discriminate between metals. Unit discriminates the metal type with
different tones, you may hear a long tone, short tone or there may be
no tone. In TONE mode, unit discriminates the metal type with high or
low tones.
7. VIEW METER-The pointer will swing to the right as the unit has made
a detection.
Operation Instructions
DISC, TONE and ALL METAL are motion modes. You have to move the
searchcoil to find your target. While TARGET is a non-motion mode.
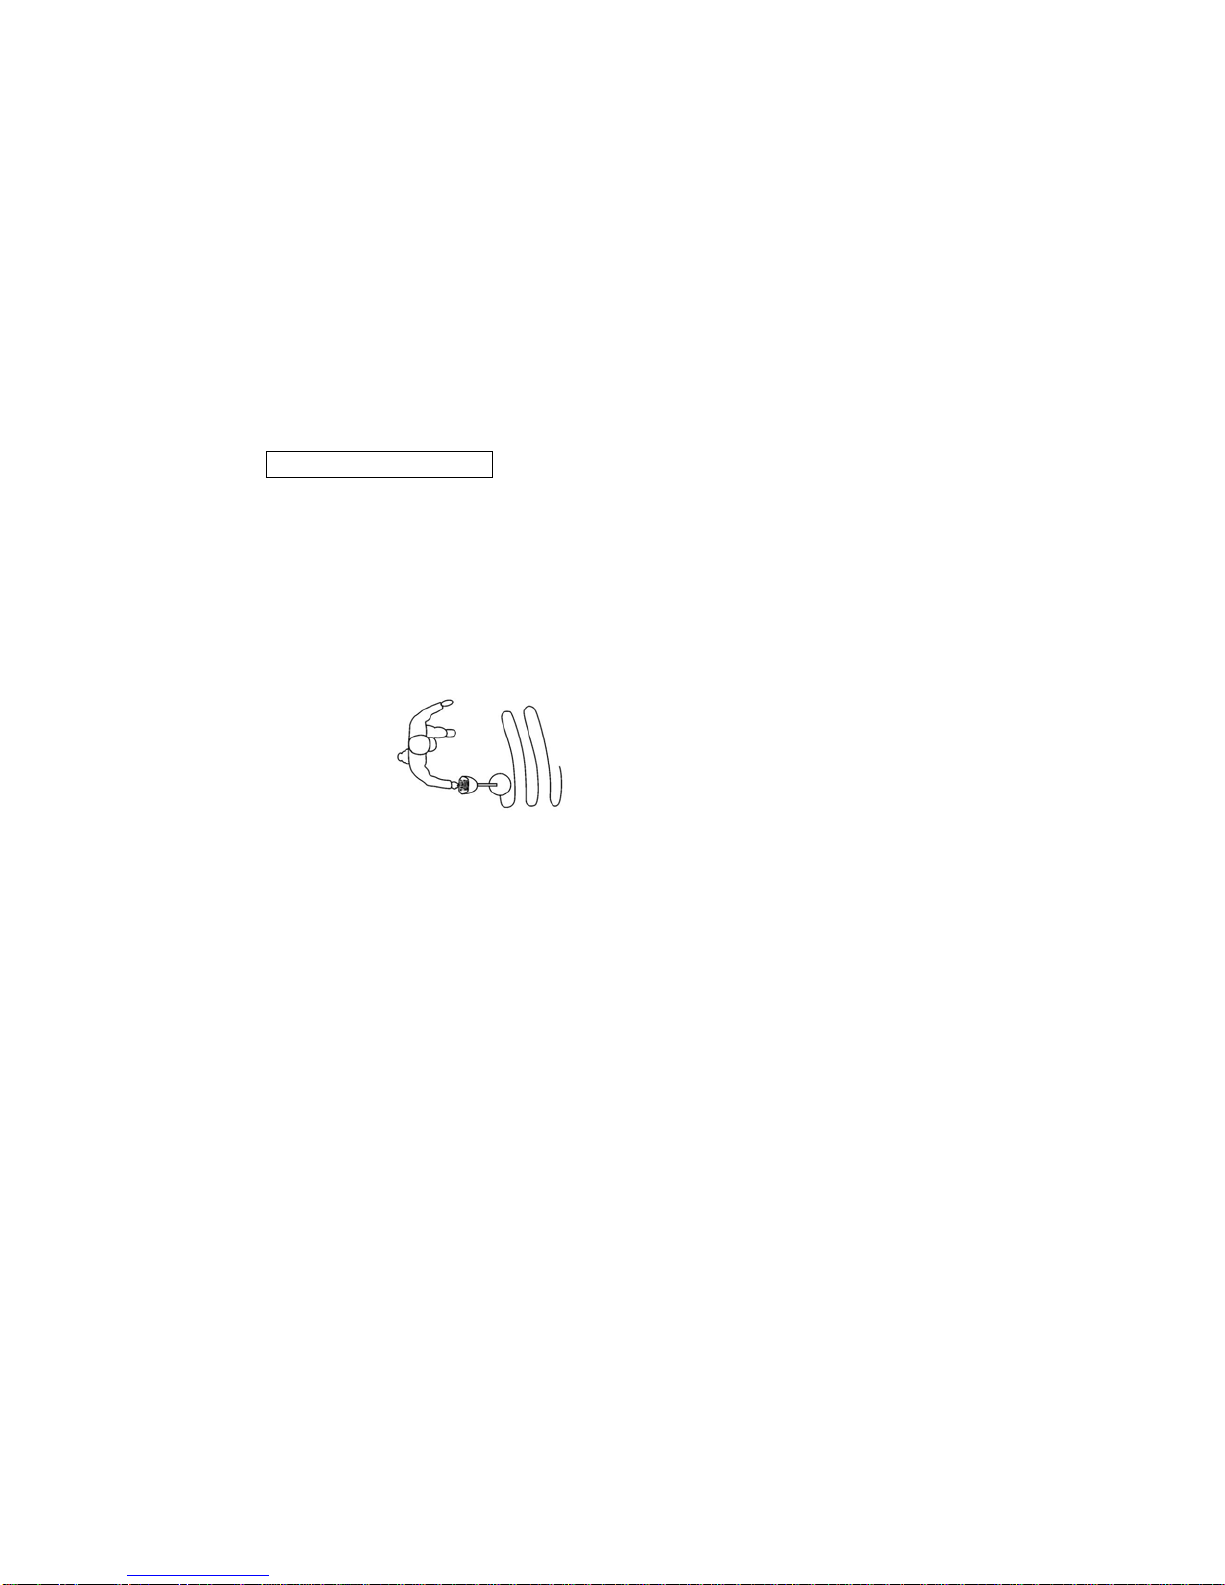
When searching, set operation mode to ALL METAL and SENS to 5.
Sweep your searchcoil as following picture, move the searchcoil right and
left in an arc line. It is better to keep the distance from searchcoil to the
ground about 1 – 5cm (closer to the earth for smaller target).
If there is a sound of “du-du” during moving, it indicates that there is a
metal object in the target area. In this case, you can use TARGET to
pin-point the object. Set mode switch to DISC or TONE to determine
which type of metal you have detected. The followings are the four
operation modes in detail.
4 OPERATING MODES:

11
ALL METAL- Used to search for all kinds of metal objects. Used in
general searching. In this mode, the unit will respond with a “di-di” tone to
all metal. This mode cannot discriminate metal type.
DISCRIMINATION (DISC) - This mode can help you to search and
discriminate the target type, based on different tones (short, long or
silence) for different metal targets. Set the DISC mode switch to “0”.
Slowly rotate the control clockwise to high position to reject more objects
you don’t want.
When DISC/TONE is set to 0, unit will respond to any metal object with a
long tone. As the controller is rotated clockwise, the unit will sound a short
tone, or even be silent to ferrous metal objects. This means the ferrous
metal is rejected. Rotate the control further clockwise. Nickel, zinc, and
copper will be rejected. When the control is set to 10, most metal objects
are rejected, except silver. The unit will respond with “du” tone to silver.
TONE- Based on DISC/TONE control, the unit can discriminate the metal
type with high or low tone. A rejected object sounds a low tone, which is
different from DISC mode. When DISC/TONE is set to 0, it sounds a high
tone to any metal. As it is rotated to high position (clockwise), it sounds a
low tone to ferrous metal such as nickel, zinc, or copper, and sounds a
high tone to silver. To get better tone identification, we recommend you try
testing your unit a few times.
TARGET- Used in ALL METAL mode to pinpoint the target accurately at a
lower sensitivity. When detect metal object, you can press TARGET to
pinpoint the object. Hold the searchcoil 50cm or more away from the
ground. Press and hold down the TARGET button. Sweep the searchcoil
over the search area and release the button when you hear a “di” sound.
After about 1-2 seconds, hold down the red button again, the “di” sound
disappears. Sweep the searchcoil closer to the ground and you’ll hear the
sound again. Repeat the above steps until you locate the object.
Notes:

12
1. If there is interference from similar metal detectors in your searching
area, please lower the sensitivity.
2. If there is interference from electrical cable, TV, radio, or other
electrical devices in your searching area, again, lower the sensitivity.
3. When searching in highly mineralized area, the unit will sound even if
there’s no metal. In this case, you can lower the sensitivity and set
discrimination to high a position as well as increase the height
between the searchcoil and the ground until the false signal
disappears. To find the proper position of DISC/TONE knob, you
must place a metal object in highly mineralized earth or wet sand (for
testing) before setting it.
4. When searching in trash area, it’s better to set the “DISC” to scale 5,
so that the unit can reject most of invaluable metals such as nails
and small iron.
5. Move all metal digging tools when searching.
6. Sensitivity level is generally in contradiction with that of the
discrimination. The higher the sensitivity level is, the worse
discrimination will be. You can lower the sensitivity to have better
discrimination.
7. You can move the searchcoil horizontally and vertically and make a
cross at the sound point. The center of the cross if the location of the
target.
Treasure Hunter’s Code of Ethics
All treasure hunters might be judged by the example you set. Here are a
few basic rules you should follow while using your detector.
zAlways get permission before searching any site.
zRespect the rights and property of others.
zObserve all national, state, and local laws while treasure hunting.
zNever destroy historical or archaeological treasures. If you are not
sure about an object you have found, contact a museum or historical

13
society in your area.
zLeave the land and vegetation as it was. Fill in any holes you dig.
zUse your detector only in safe areas.
zDispose of any junk you find, only in approved areas. Do not leave it
for the next treasure hunter to find.
CARE AND MAINTENANCE
Your MD1023 metal detector is an example of our superior design and
craftsmanship. The following suggestions will help you care for your
metal detector so you can enjoy it for years.
Handle the detector gently and carefully. Dropping it can
damage circuit boards, cases, and can cause the
detectortomalfunction.
Use the detector only in normal temperature
environments. Extreme temperatures can shorten the life of
electronic devices and/or damage the cases of the detector.
Keep the detector away from dust and dirt, which can cause
premature wear of parts.
Wipe the detector with a damp cloth occasionally to keep
it looking new. Do not use harsh chemicals, cleaning
solvents, or strong detergents to clean the detector.
DO NOT RETURN YOUR METAL DETECTOR TO THE STORE. FOR
QUESTIONS, OR TECHNICAL SUPPORT CONTACT OUR
TECHNICAL DEPT AT 1-877-97 SCOPE.

14
Table of contents
Other Famous Trails Metal Detector manuals