nalanda MD027 User manual

MD027 Metal Detector
Owner’s Manual

The detector is a metal detector with both motion and non-motion modes. In the
motion mode, it has higher sensitivity, and it has dierent colors of LED to indicate
metal types, helping the operator to nd lost coins, gold/silver jewels, and other metal
objects. In the non-motion mode, the operator can move the search coil slowly. The
detector has good waterproof function, it is suitable for detection underwater, so
operators can enjoy the pleasure of exploration under water.
Read this manual carefully before using. Most importantly, review the Quick-Start
TABLE OF CONTENTS
Specication
Assembly
Battery
Panel and LCD
Controller
Quick-start
Field Skills
Caution
Maintain
TROUBLESHOOTING GUIDE
Specication
Operation frequency: About 2.4KHZ
Operation mode: Motion-ALL-METAL, DISC,Non-motion
Target display: Red / green / blue LED indicates three kinds of metals
Low, medium, high sound indicates three kinds of metals
Discrimination adjustment: Yes
Sensitivity adjustment: Yes
Search coil: 210mm or 250mm
Earphone: Piezoelectric
Arm length adjustment: 100cm-120cm
Weight: About 2kg
Work environment: Land, seaside, river, sea
Waterproof: The depth of water is not more than 40 meters
Power supply: 1x9V alkaline battery(battery not supplied)
2
L0ck Nu t

Assembly
1. Take out the aluminium stem and search coil from the packing box(see Fig.1).
2. Unscrew the lock knob on the search coil,and take o the bolt.Attach the lower
stem to the search coil, and lock it(see Fig.2). Note: the rubber gasket should be
placed properly.
3
Fig.1
Fig.2

3. Take out the upper stem, the middle stem and the control box from the packing
box.Press the silver button on the upper stem,and insert it into the middle stem.
Let
the silver button align with the two holes of the middle stem. (see Fig.3)
4. Loosen the two triangular fastening screws at the bottom of the control box,
install
the control box on the stem, and lock it. (see Fig.4)
5. Install the bracket arm on the upper stem.The bracket arm has three positions,
loosen the triangle fastening knob under the bracket arm, let the bracket arm
separate up from down.Take o the bracket arm, place it in a certain position, and
then tighten the triangle fastening knob(see Fig.5).
4
Fig.3
Fig.4
Fig.5

6. Relax the Lock Nut on the middle stem. According to need, the operator can
adjust
the length of the aluminum rod, by aligning the silver button on the lower stem
into
a group of holes on the middle stem. Wrap the cable around the aluminium stem,
tighten moderately, so that the cable does not shake (see Fig.6). Tighten the lock
nut.
Battery
A 9V 6F22 battery is used to power the detector.
1. Set the “SENS” switch at the position of “OFF”.
2. Unscrew the battery cover in the direction of the arrow. Push a 9v 6F22 battery
into
the battery cap, according to the battery polarity symbols. Note: the battery cap
attachment should be placed above, push into the battery box. (see Figure.7)
Install the battery cover. A waterproof rubber washer is installed on the battery
cover, the battery cover should be tightened by hand. If it is detected underwater, a
key is needed to tighten it.(see Figure.8)
5
Fig.6
Fig.7
Fig.8

Note: If not used for a long time, please remove the battery. In case the leakage of
the battery will destroy the detector. Depending on the battery capacity, a 9V
alkaline battery can be used for more than 20 hours.
Panel and controller
Panel(see Figure.9)
1. POWER-SENS knob
The power switch also acts as sensitivity adjustment. Turn counter-clockwise to OFF,
to turn o the power supply, turn clockwise to turn on the power supply, and turn
up the sensitivity.
2.MODE-DISC knob
The MODE switch also acts as DISC adjustment.
Turn counterclockwise to NON-M, the detector is in non-motion mode. Move the
search coil slowly when in detecting, but it can’t discriminate the metal category.
Turn clockwise to enter motion mode, scan with the search coil, it can discriminate
the metal category. The default mode is the ALL METAL mode, the detector will
respond to all kinds of metals. Rotate the MODE-DISC knob, you can adjust discrimi-
nation type, it will reject the metal type according to gold conductivity from low to
high.
LED and earphone
The operation state and detection result of the detector is indicated by colors of the
LED and earphone. See the table below:
6
Fig.9

Quick-start
Prepare for three kinds of metal samples
Iron nail
Pull-Tab
25¢silver coin
Lay the detector
Put the detector on a wooden or plastic table, and let the search coil stretch out of
the table above 30cm, Keep it away from walls, ceilings and oors, turn o all kinds
of electrical appliances that cause electromagnetic interference, remove watches
and rings from hands. (see Figure 10).
7
LED and sound indication table
Color LED Sound State
Green light ashes at
interval
Sound short DU tone at
interval
MOTION works normally.
Red light ashes
quickly
Long low tone In the MOTION mode, it
nds ferrous metal.
Green light ashes
quickly
Long medium tone In the MOTION mode, it nds
medium conductivity metal
such as nickel, tin (5¢,
pull-tab, etc).
Blue light ashes
quickly
Long high tone In the MOTION mode, it nds
high conductivity metal,
such as copper, silver.
Blue light ashes at
interval
Sound short Du tone at
interval
It gets into NON-MOTION
mode.
Blue light ashes
frequency conversion
Frequency conversion tone In the NON-MOTION mode, it
nds metal.
Red light ashes
slowly
Sound short Du tone at
interval
Indicate the operation is
abnormal, and the voltage is
low.
Fig.10

8
1. Turn On
Rotate the “SENS”knob clockwise to turn on the detector, rotate the “MODE-DISC”
clockwise to the position of DISC. The green light ashes twice , the speaker sound
“dudu”tone. Then the green light ashing and the “Du” tone sound occasionally, the
detector is ready to detect now. Set the “SENS”at the middle position.
2. ALL METAL Mode Test
Set the “MODE-DISC”knob at A-M position. Sweep the three samples above the
search coil 8-10cm respectively, the unit will all respond, the LED will ash with red,
green and blue light respectively, and the speaker will sound low, middle and high
tone (see Figure 11). It is indicated that the detector responds to all kinds of metals.
3. Discrimination function test
Set the "SENS" and "DISC" knobs to the middle position. Sweep the three metal
samples about 8-10cm above the search coil respectively (the sample should be
swept out of the edge of the search coil). When sweeping the pull-tab and the 25¢
coin, the detector responds, the LED gives out green or blue light, the speaker
sounds middle or high tone. When sweeping the iron nail, the detector has no
response. The iron nail is rejected.
Set the "SENS" knob to the middle position, and set the "DISC" knob to the maxi-
mum position of clockwise direction. Sweep the three metal samples about 8-10cm
above the search coil respectively. When sweeping the 25¢coin, the detector
responds, the LED gives out blue light, the speaker sounds high tone. When sweep-
ing the pull-tab and the iron nail, the detector has no response. The pull-tab and the
iron nail are rejected.
4. Sensitivity adjustment function test
Sweep the 25¢coin above the search coil at dierent heights, meanwhile adjust the
sensitivity knob from low to high, the maximum height that the detector detected
will also get larger.
5. NON-MOTION mode test
Rotate the “MODE-DISC” knob to the maximum position counter clockwise, the
Fig.11

9
balance, the detector gives out blue light and sound DU tone at interval, the detec-
tor enters the NON-MOTION mode. The operator can move the search coil slowly to
detect. Note that in the NON-MOTION mode, the detector does not have the ability
to identify metal categories.
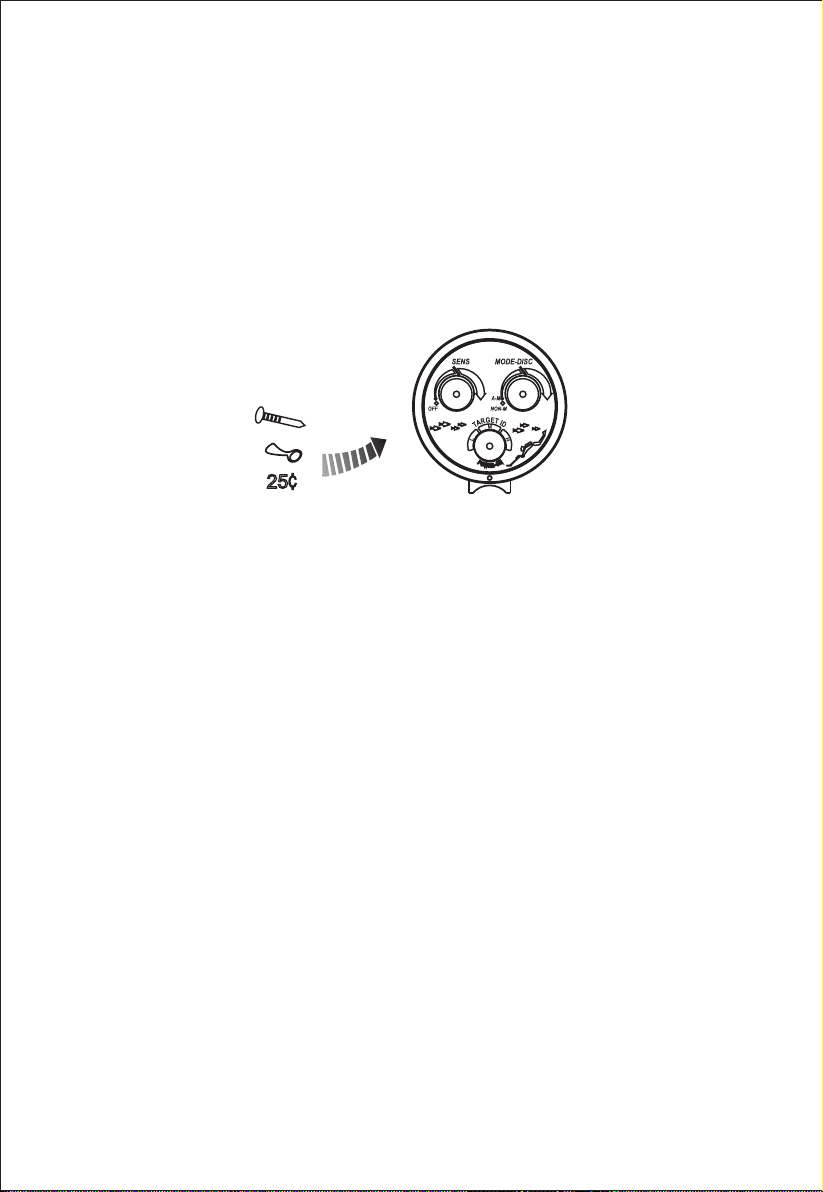
Let the 25¢coin approach the search coil slowly, the detector sounds frequency
conversion tone, and the blue light ashes faster. Until the metal sample is very close
to the central of the search coil, the speaker will sound long tone, and the blue light
will be lighted all the time, entering the saturation. Keep the metal sample immov-
able, switch the MODE-DISC knob once, and the detector balance once, the detector
will resume give out blue light and sound DU tone at interval. Now, you can contin-
ue to detect.
Through learning, you have learned the operation of the detector preliminary. In the
eld, because of the inuence of the soil, sea sand, ore and the electromagnetic eld,
especially under the water, the sensitivity and the discrimination position of the
detector will all change. Repeated test, accumulate experience, to master the
technique of detection gradually, and then realize the happiness of the exploration.
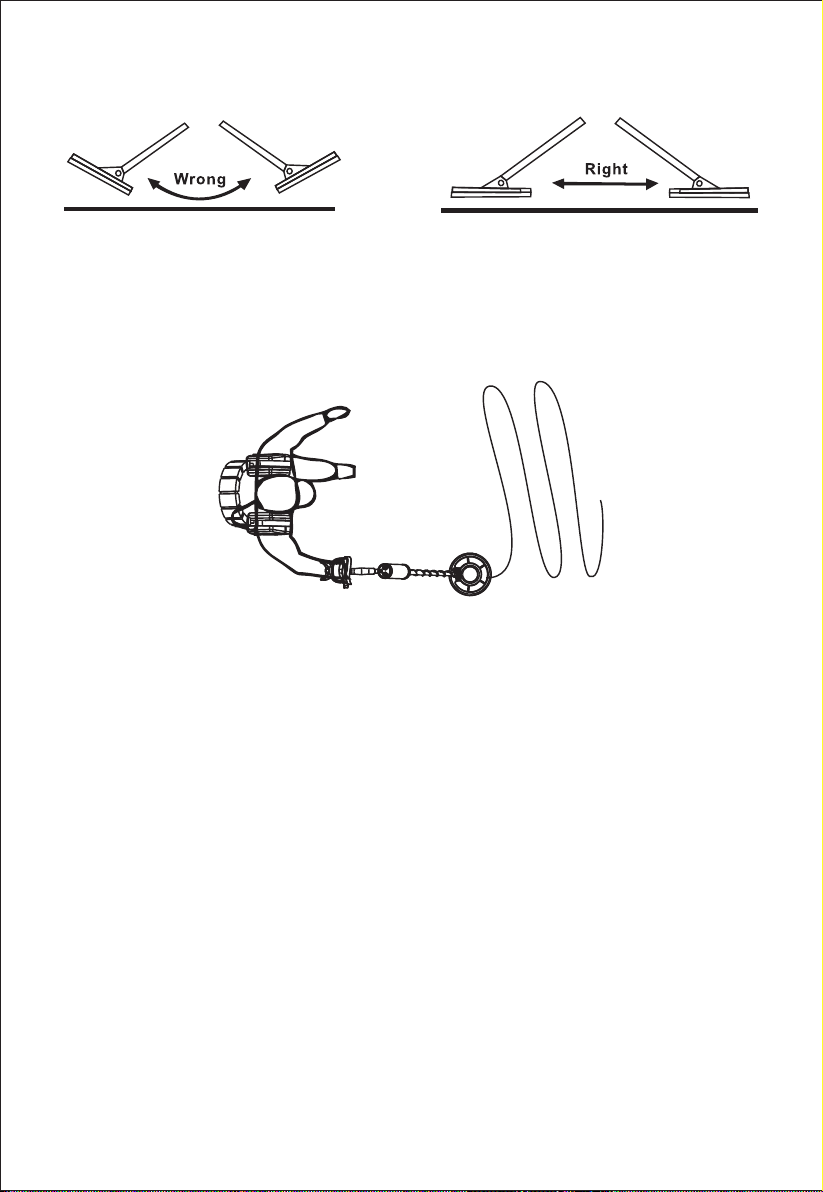
Field Skills
Metal detector is used outdoors. There are too many metals indoors, and all kinds of
electrical equipment that will bring interference signals. So it is not t for using the
detector indoors.
Field detection is more complicated, the composition of the regional soil, the
component, size, shape and the oxidation degree of the underground metals will all
aect the detection results. This chapter is only the general step of the eld detec-
tion. It’s necessary for the operator to practice again and again and accumulate
experience, so as to achieve good results.
When using it in mineralized soil, sea, city dump or other place has strong interfer-
ence, it will give a deviate result in discrimination mode. In this case, it is recom-
mended to bring some samples, such as iron nails, pull-tabs, coins, and silver coins
we said above to have a test. Bury these samples in the soil of the detection area, try
to detect and record the DISC location is detected, then make a comparison to the
place where you actually bury the metals. In this way, it will improve the accuracy of
the target's category and its place.

1. Move the search coil
When moving, you should move the search coil in a steady speed, not unsteadily.
Let the search coil be parallel with about 1/2 inch from the surface, not to swing it
like a pendulum to move it up and down from the ground(See Fig.12,13).
NON-MOTION mode
In water or on the uneven ground, it is dicult to move the search coil quickly.
You can choose the NON-MOTION mode, move the search coil slowly to detect. In
the areas where electromagnetic interference is relatively strong, the NON-MOTION
mode can also be selected. The detector gives out blue light and sound Du tone
occasionally, which means the NON-MOTION mode works normally. If it is found that
the detector doesn’t give out blue light and sound Du ton internally in the NON-MO-
TION mode, it means that there is metal, strong mineralizer or conductive soil
around the search coil. You can switch the MOTION-DISC button one or two times, to
reduce the interference.
Note: If the unit has no interval blue light and “DU” tone in NON-MOTION mode, you
can reduce the interference by switching the MOTION-DISC button one or two times.
10
Fig.12
Fig.13

CAUTION
1. In heavy trac area, please do not wear earphone, in case an accident.
2. Keep away from the region where may bury the electrical line, cable line or
pipeline, in particular, the pipes that are full of ammable gases and liquids. Do
not
detect in the military area where may bury bombs or gas explosives.
3. When excavating the target, use the reasonable method, don’t destroy the
vegetation. After the excavation, the ground surface should be restored. A sand
bucket can be used to get objects in the water.
4. If there are 2 detectors in your detection area, they shouldn't be very close to
each
other, which will cause mutual distress. In this case, you should reduce sensitivity
or keep 2 detectors away from each other for more than 10 meters.
Maintenance
The metal detector is specially designed as a waterproof detector. The following
suggestions will help you maintain the metal detector for long time use.
1. Do not open the front and back cover of the control box. The control box adopts
special waterproong measures. Do not open it with any special tools, as it will
aect its waterproof function seriously.
2. Don't open the earphone. The waterproof measures of the earphone are installed
in
the buzzer, after using in water. It is normal if there is water in the headphone
box,
and it will not aect its waterproof performance. As long as the earphones are
erected, the water will get out.
3. Do not cut the sheath of the cable, otherwise, it will aect the waterproof
performance.
4. After using at the seaside, rinse with water and dry it with a dry towel. It is
forbidden to use hand sanitizers or detergents to clean detectors.
5. When not in used, stored it in a dry place.
11

TROUBLESHOOTING GUIDE
SYMPTOM SOLUTION
No power, no boot sound. 1.Be sure that the batteries are installed
correctly.
2.Replace the batteries.
Sound a successive“DU”“DU”
tone
1.Make sure that there is no other metal
detector operating around.
Sound an irregular tone. 1.Don’t use it indoors, because there is many
metals there.
2.Make sure whether there is electromagnetic
interference sources, such as power
lines,cables, electronic fences and so on.
Keep away from these areas, or try to reduce
the sensitivity.
3.Change a place to scan, in order to deter-
mine
whether you can get a more stable signal.
4.The target burying deeper, try to increase
the
sensitivity or speed up the speed of
scanning
the search coil, in order to get a more stable
signal.
5.Maybe more than one metal targets buried
there.
The battery case is taken in water. 1.The battery cover is too loose.
2.Add a little silicone grease on the rubber
washer, or replace the attachment rubber
washer.
12
Other nalanda Metal Detector manuals