F&U PA-91 User manual

PA-91/PA-120
INSTRUCTION FOR USE
MOBILE AIR CONDITIONER
VERY IMPORTANT
Do not install and use your portable air conditioner unit
before carefully reading this instruction guide.
Please retain this manual brochure for product warranty and
future reference
CAUTION
1." DO NOT BLOCK VENTILATION "! Please make sure the inlet and outlet
ventilation is not blocked at all times.
2. Operate this unit on a horizontal surface to avoid water leakage.
3. Do not operate this unit in an explosive or corrosive atmosphere.
4. Operate this unit in an ambient of 32or less.
5. The unit should not be operated in heating function an indoor ambient temperature
above 7℃or lower23℃. Clean air filter periodically to enjoy the most efficient cooling.
7. When the unit is shut off, please wait at least 3.5 minutes before restarting
this is to prevent the compressor from being damaged.
8. This unit needs at least 7 Amps of electricity to have its compressor operational.
To avoid the household electricity block out, please do not use any extension
cord for this unit.
9. This unit is for indoor cooling, heating and dehumidifying.
10. When boot-strap, the fan will operate but the compressor will start up after
thecoolingalarmflashesforthreeminutes
●In heating function, the heating alarm will flash for 3.5 minutes
before the compressor and fan start up.

11. When the supply cord is damaged, it must be replaced by the manufacturer,
its service agent or similarly qualified persons in order to avoid hazard.
12、The batteries must be removed from the appliance before it is scrapped and that
they are disposed of safely.
13. The air-conditioner can be connected only to a supply with system impedance no
more than 0.219Ω.In case necessary, please consult your supply authority for system
impedance information.
14.The devices should be installed at minimum distant of 50CM from the wall or
other obstacle.
15.This appliance is not intended for use by persons (including children) with
reduced physical, sensory or mental capabilities, or lack of experience and
knowledge, unless they have been given supervision or instruction concerning use
of the appliance by a person responsible for their safety. Children should be
supervised to ensure that they do not play with the appliance.
CONGRATULATIONS ON YOUR
SELECTION OF A QUALITY
PORTABLE AIR CONDITIONER
Your Air Conditioner has been designed and manufactured to the
highest standards of modern engineering.
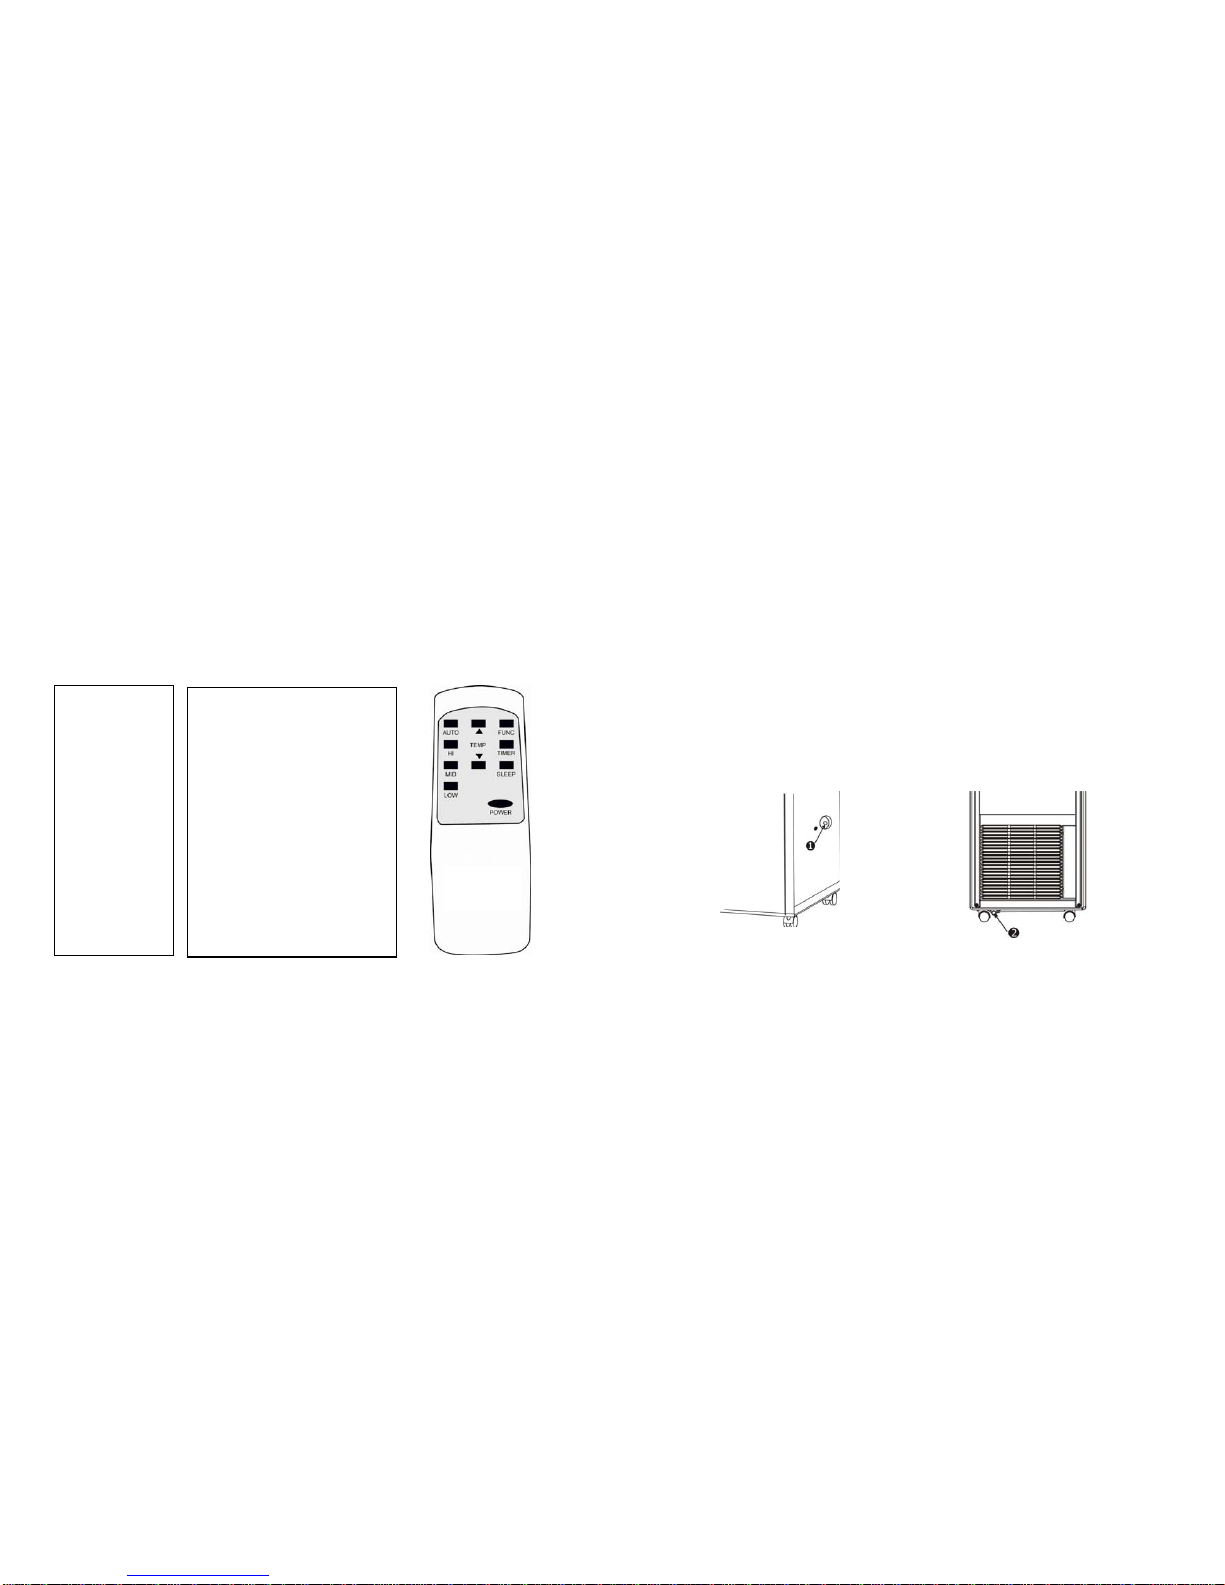
Its many features not only include remote control
Operation that lets you control all functions with easy and
convenience.
- Moves easily from room to room on easy glide castors
- No installation required-just plug into any household
power outlet
- Refrigerated air system design cools instantly whenever
you want it
- Dehumidified filtered air cycle for improved breathing
conditions due to powerful dehumidification
process
-If remote control function is not required, your one touch
electronic pad provides easy to identify manual operation
-24 hour programmable timer that can be used with either the
air conditioning or dehumidification setting
-Unique sleep control function
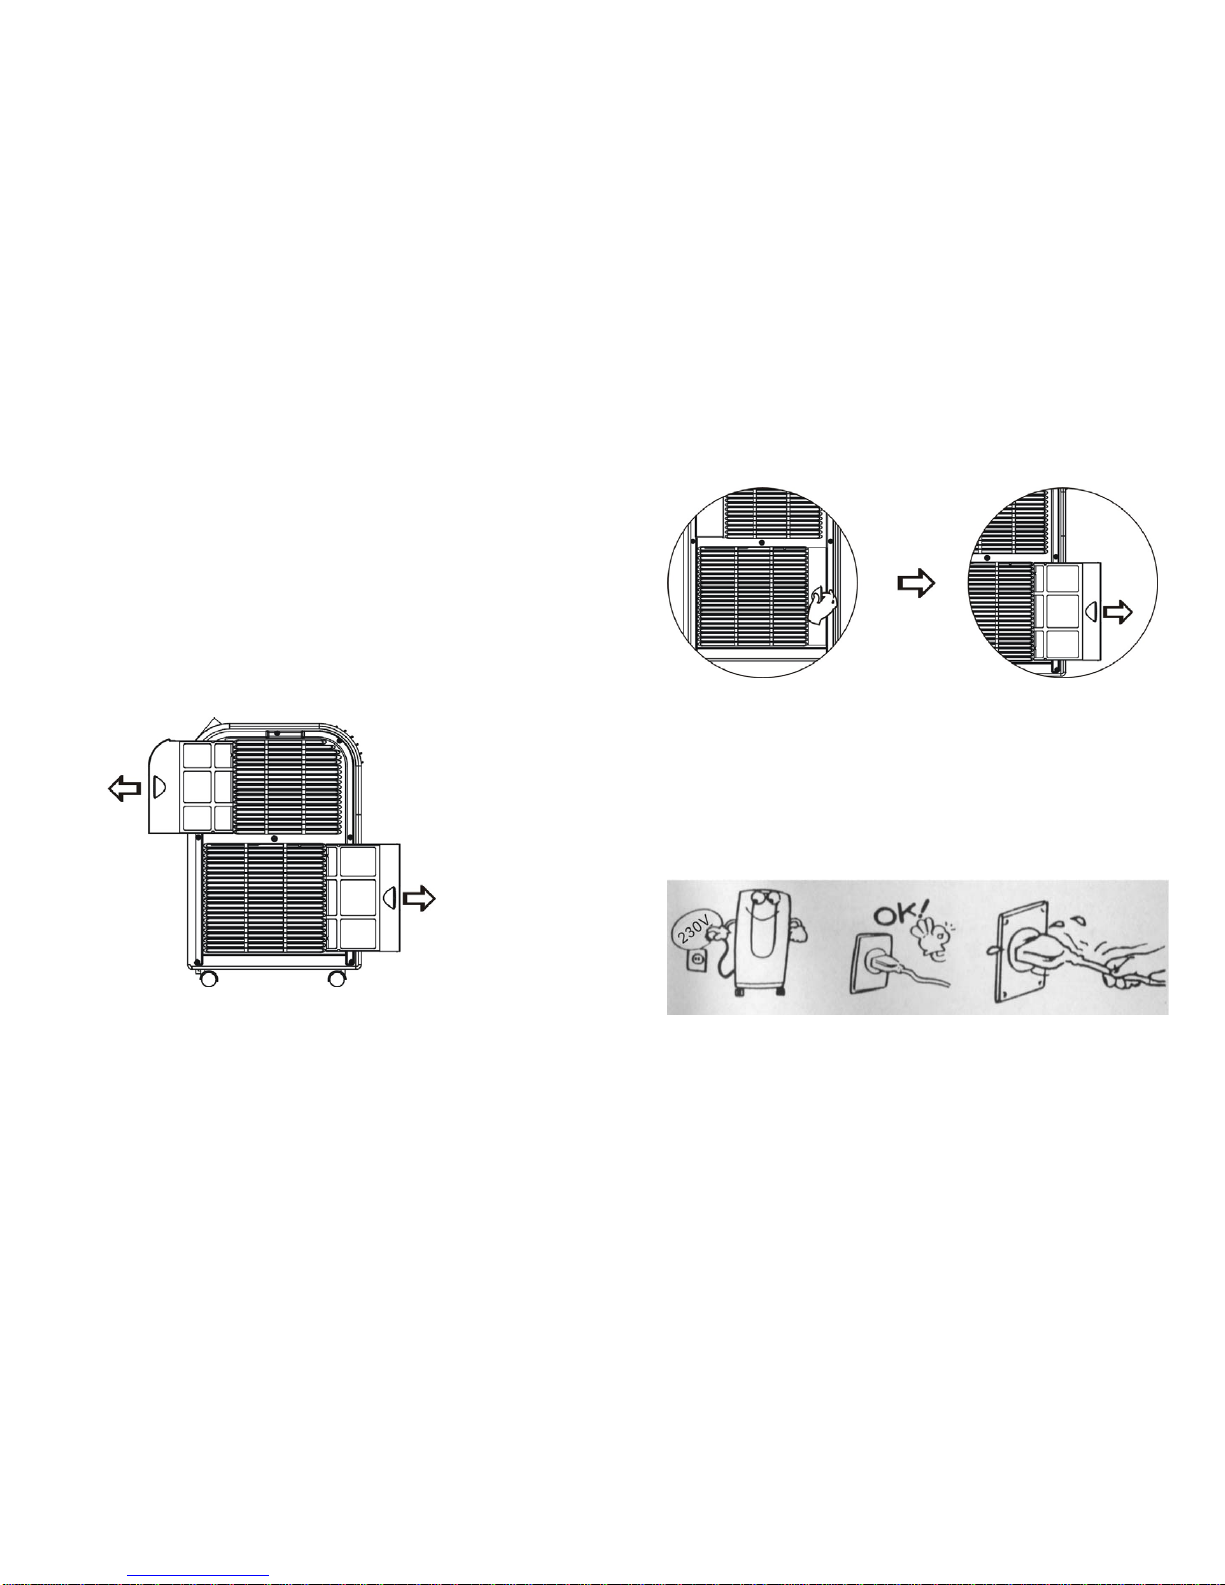
-220~240 Volt 50Hz operation
-1.6 meter cord with plug

UNPACKING INSTRUCTIONS
1. Place the unit in the correct upright position before unpacking.
2. Cut the two packing straps.
3. Slide the carton in an upwards motion and it will release from the base.
4. Grip the carry handles located on either side of the unit and carefully lift until it slides
out of the foam base.
5. Disconnect the tie-in inside the exhaust tube and take out
the exhaust tube
6. Install the exhaust tube on the unit before operating the unit.
CONTENTS
1 / Air control unit
2 / 1-remote control unit
NAME OF THE PARTS
1. Control panel
2. Remote receiver
3. Adjustable air vent
4. Joint tube
5. Exhaust tube
6. Up drain pipe
7. Cool inlet
8. Cool Air filter
9. Hot inlet
10. Hot air filter
11. Drain pipe
CONTROL PANEL & DESCRIPTION
OF FUNCTION

1.POWER KEY Press to turn unit "ON" or "OFF".
2. FUNCTION Press this key to select refrigeration, heat or dehumidification. or
cooling.
3. TEMPERATURE REGULATION KEY (UP)
During cooling function:This key raises the preset temperature by 1℃each time it is
pressed to a maximum of 30℃。
During heating function:This key raises the preset temperature by 1℃each time it is
pressed to a maximum of 25℃
4. TEMPERATURE REGULATION KEY (DOWN)
During cooling function:This key lowers the preset temperature by 1℃each time it is
pressed to a minimum of 17℃.
During heating function:This key lowers the preset temperature by 1℃each time it is
pressed to a minimum of 15℃.
5. L.E.D. DISPLAY
Indicates the temperature or the time setting. After any time set the display will return to the
preset temperature automatically.
6. SPEED Press to select either LOW, MEDIUM, HIGH or AUTO fan speed.
If"AUTO"isselected(During cooling function),”HIGH” or "MEDIUM" or
“LOW" will be selected automatically according to the difference between
setting temperature and room temperature.
Note: In heating function and dehumidifying function, the wind-speed setting is inefficacy because
the unit has setted hi
g
h-s
p
eed
(
heatin
g)
and low-s
p
eed
(
dehumidif
y
in
g)
.
7. PROGRAMMABLE TIMER
Programmable timer ON/OFF key.
TIMER-ON: The timer-on is used to turn on the unit automatically after the set time is over.
1. Press the "TIMER" key at stand-by status to set the time desired.
2. Once the set hour has come to an end, the unit will turn on automatically.
3. Press the "POWER" key before time out, the setting time will be canceled and the unit will
turn on.
TIMER-OFF: The timer-off is used to turn off the unit automatically after the setting time is
over.
1). Press the "TIMER" key at stand-by status to set the time desired.
2). Once the set hour has come to an end, the unit will turn off automatically.
3). Press the "POWER" key before the time out, the setting time will be canceled and the
unit will turn off.
8.SLEEP CONTROL FUNCTION
When setting the "sleep comfort" mode please ensure that you then set the number of
hours required and press the timer button till those hours are indicated on the L.E.D
display. After setting the hours the L.E.D. display will automatically return to the current
pre-set temperature. To increase this setting "up" press button indicating and for each
press, the temperature will be increased by 2℃. Likewise to set for a lower temperature
press button indicating and for each press the temperature will be decreased by 2℃
During the course of this cycle, to ensure maximum sleep comfort. the micro-processor
memory will raise the pre-set temperature 1℃each half hour to a maximum of 4℃over
two hours and then maintain that temperature for the balance of the time set.
The portable air conditioner is fitted with a 3 minute compressor delay protection circuit
which simply means that the compressor requires 3.5 minutes to start. From either being
switched on, or when changing from “dehumidify” to any air conditioning cycle chosen.

9. ALARM
When the water tank is full,"E4" will be displayed on the display panel. To resume
operation, please remove the rubber cap of the drain hose to drain out the water firstly.
After finishing draining the water out, please restart the unit and then the unit can
operate normally.
REMOTE CONTROL FUNCTION
1. POWER
2. FUNC
3. TIMER
4. AUTO
5. HI
6. MID
7. LOW
8. SLEEP
9. TEMP.
Stop/Start switch
Function “MODE” selector
Hourly programming
Automatic fan speed
High fan speed
Medium fan speed
Low fan speed
Night operation selector
Temperature selector
NOTICE
This unit can evaporate the condensation and flow out through
the exhaust hose automatically.
1. When the unit is in the cooling or heating function, it does not need to install the
drain hose. Please make sure that the rubber cap is locked on drain hose, when the
unit is running.
2. When operating heating function, in order to improve the heating effect or prevent
low temperature(lower than 17℃), water full phenomenon will happen . And then we
suggest to pull out the “②”rubber cap.
3. When operating dehumidifying function。
“①” rubber cap on drain hose should be pulled out and install a proper drain hose.
●Please remove the air exhaust hose, connect a drain hose to the drain hole and lead
the water to the outside in order to let the dehumidifying capacity more strong.
MAINTENANCE
PLEASE DISCONNECT THE POWER CORD BEFORE CLEANING.

AIR FILTER
The air filter located on the left hand side of the unit can be removed,
simply by pulling the frame in an upward motion.
CONDENSER/EVAPORATOR
Use a brush attachment with a vacuum cleaner.
CABINET
Wipe with a damp cloth and polish with a soft cloth.
To remove the air filter, please follows the arrow direction and push the
filter lightly, and then take out the filter for cleaning.
POWER SUPPLY
(1) Confirm the correct power.
(2) Insert the plug into the outlet firmly. In case of dangerous leak,
prevent the AC cord from scarring.
(3) Don’t pull power wire by force because it will cause damage to power
wire.

PLACE FOR USE
(1) Because the machine expels hot air, please don’t operate in a
narrow place.
(2) In case of dangerous leak, don’t work the machine in a humid place.
(3) Don’t place the machine in a sunlit corner otherwise the colors soon
fade out of the machine.
HELPFUL HINTS
The unit is fitted with a special thermal cut off device.
Please ensure the unit is not placed against objects which will
obstruct air intake e.g. furniture or curtains as this will affect it's
performance dramatically.
Do not place the unit in direct sunlight, as this may cause the unit
to overheat and turn off.
EXHAUST TUBE INSTALL
1. Circumrotate the wind pipe according to the direction as the arrowhead ①indicates
and then the wind pipe can be took out from the unit.
2. Circumrotate the wind pipe according to the direction as the arrowhead ② indicates
and then make it connect with the unit.
How to enjoy heating function?
When operating heating function:
1.Disassemble the subassembly of outlet and the subassembly of exhaust pipe as
arrow direction Fig.01 and then exchange the two subassemblies to install. The
finished illustration is as Fig.03.

SPECIFICATION
(CE) N 842/2006:
R134A is a kind of fluorinated greenhouse gases covered by
the Kyoto Protocol.
Its total global warming potential (GWP) is 1300
MODEL
POWER SOURCE
RATING POWER(EN60035)
COOLING
HEATING
COOLING CAPACITY
HEATING CAPACITY
MOISTURE REMOVED
AMBIENT
REFRIGERANT
DIMENSION(MM)
PA-91
220~240V/50Hz AC
1100W
950W
2600W
3000W
50liters /day
30°C RH80%
R410A
330Wx486Dx740H
PA-120
220~240V/50Hz AC
1480W
1300W
3500W
3500W
60liters /day
30°C RH80%
R410A
330Wx486Dx740H
NOTICE ABOUT RECYCLING
Your product is designed and manufactured with high quality
materials and components which can be recycled and reused.
This symbol means that electrical and electronic equipment, at
their end-of-life, should be disposed of separately from your household
waste. Please dispose of this equipment at your local community waste
collection/ recycling centre.
In the European Union there are separate collection systems for used electrical
and electronic products. Please help us to conserve the environment we live in!
DECLARATION OF CONFORMITY
This product complies with the requirements of the directives
EMC-Directive: 2004 / 108 / EC
Low Voltage Directive: 2006 / 95 / EC
declare that the PA-91 and PA-120
are in compliance with the following norms:
EN 55014-1:2006
EN 55014-2/Α1:2001
EN 61000-3-2:2006
EN 61000-3-3/A2 :2005
EN 61000-3-11:2000
EN 61000-6-3:2007
EN 60335-2-40/A1 :2004
EN 60335-1/A2 :2006
EN 50366/A1 :2006
EXCLUSIVE IMPORTER IN GREECE:
Amiridis – Savvidis S.A.
33, Vas. Olgas avenue
P.O. 54641, Thessaloniki, Greece
Tel: +30 2310 850107, +30 2310 850108, Fax: +30 2310 867835
45, Akti Posidonos street
P.O. 18344, Moschato, Athens, Greece
Tel: +30 210 9402064, Fax: +30 210 9402137
This manual suits for next models
1
Table of contents
Other F&U Air Conditioner manuals