manuals.online logo
Brands
  1. Home
  2. •
  3. Brands
  4. •
  5. Fantasea
  6. •
  7. Camera Accessories
  8. •
  9. Fantasea Nano Flash User manual

Fantasea Nano Flash User manual


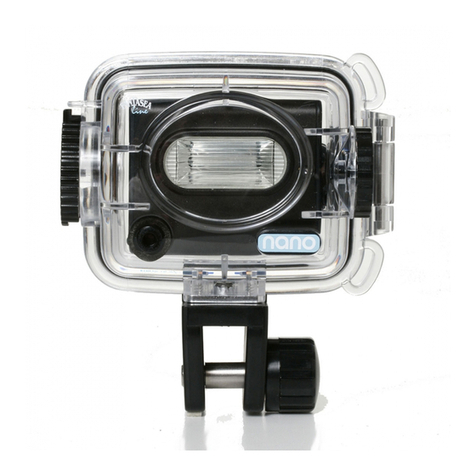
Fantasea Nano Flash Instruction Manual 26110120
Fantasea Nano Flash
(Cat. No. 6115)
Instruction Manual

Fantasea Nano Flash Instruction Manual 26110120
1. Introduction
The Nano Flash is a universal underwater slave flash especially designed for compact digital
housings. It triggers in sync with the camera built-in flash and was designed to significantly
improve the colors in underwater photographs, as well as to retrieve the light absorbed by
water. The Nano Flash is recommended at all depths, during daylight and night dives. It also
enhances images by allowing for diverse creative lighting opportunities, while reducing the
amount of backscatter in the images and preventing the shadowing effect caused by the
camera internal flash, especially when accessory lenses are mounted on the housing lens
port.
2. Nano Flash Specifications
Compatible with all compact digital
cameras
Guide number 12 (Air: ISO 100 x 1 meter)
Uses 2 x AAA batteries
Depth rated to 60 meters / 200 feet
3 pre-flash modes
3 power output settings
Made of Polycarbonate and stainless
steel
Dimensions: 47 x 97.5 x 104.5 mm /
1.9 x 3.8 x 4.1 inch (DxWxH)
Weight: 200g (7.0 oz)
3. Identification of Nano Flash Parts
5
Nano Flash
Nano Flash Housing
Diffuser Holder
Spare O-Ring Seal
Silicone Grease
3 x Flash Diffusers
Nano Adaptor Kit

Fantasea Nano Flash Instruction Manual 26110120
Nano Flash Controls & Features
Nano Flash Housing Controls & Features
4. Instructions For Use
a. Test the Watertight Seal of the Nano Flash Housing
Prior to installing the Nano Flash inside the Nano Flash Housing, test the housing
in a shallow water pool in order to verify that it is perfectly watertight sealed.
Make sure no bubbles escape from it and that no water enters the housing.
Flash Bulb
Flash Slave Sensor
Pre-Flash Mode Control
Power Output
Control
Power Switch
Battery
Compartment
Ready Light
Pre-Flash
Mode Dial
Y-S Connector
Dial Lock
Power
Output
Control
O-Ring Seal

Fantasea Nano Flash Instruction Manual 26110120
b. Open the Nano Flash Housing
i. Release the security lock by gently pulling it out (image #1).
ii.Rotate the Dial Lock clockwise till it reaches an angle of 45 degrees (image
#2).
iii.Open the rear cover and take the Nano Flash out of the housing.
c. Install Batteries Inside the Nano Flash
i. Make sure that the Pre-
ii.Open the Nano Flash battery compartment by gently sliding the lid outwards
and then lifting it.
iii.Install 2 new AAA batteries according to the + and marks found underneath
the battery compartment lid.
- Do not mix new and old or different types of batteries, as this may lead to an
over-discharge of the weaker battery, resulting with gassing or leaking of fluid
from the battery.
- P
rechargeable batteries.
iv.Close the battery compartment lid by gently pushing it down and then
inwards. Make sure that once you stop applying pressure on the battery
compartment lid, it remains closed.
v. Turn on the flash by turning the Pre-
properly installed, the Ready Light at the back of the flash should turn on after
a few seconds.
vi.When the Ready Light is on, the flash can be tested by turning the Pre-Flash

vii. Important Notice: Do not allow any drops of water to enter the battery
compartment when installing or removing batteries.
Image #1
Image #2

Fantasea Nano Flash Instruction Manual 26110120
d. Install the Nano Flash Inside the Housing
i. Make sure that the both the Pre-Flash Mode Dial on the Nano Flash Housing
and the Pre-Flash Mode Control on the Nano Flash are 
position.
ii.
iii.Insert the Nano Flash carefully into the front door of the housing, making
sure it seats fully.
iv.Prior to closing the Nano Flash Housing, the O-ring, positioned at the back
door, should be visually inspected. If there is any debris present, including
dirt, sand, dust, hair, grease or other matter, it must be cleaned to ensure a
proper watertight seal. Cleaning the O-ring is a simple matter of wiping it
with a damp, soft cloth to remove the foreign matter. Be careful the cloth
you use does not leave any of its own material behind, as this can also affect
the effectiveness of the seal.
v. It is recommended to apply a slight layer of silicone on the O-ring. Use the O-
ring Remover in order to remove the O-ring from its groove and make sure it
ut. Please
note that the amount of lubrication required on the O-ring is only enough to
allow it to slip into place without friction, so it does not twist or become
dislodged. More grease is not necessarily better, and in some cases might
interfere with the watertight seal of the Nano Flash Housing.
vi.When replacing the O-ring seal, place it back into the same groove you have
taken it out of. Be sure it is completely positioned in the channel for a proper
seal.
vii. Close the back door of the housing. Make sure you close it completely.
viii. Rotate the Dial Lock counterclockwise until
the Security Lock is pointed upwards. Lock
the Dial Lock by pushing the Security Lock in
(image #3).
e. Select the Proper Pre-Flash Program for Your
Camera
i. Please note that watching the Nano Flash
fire does not mean it triggers on the right
timing. If it is not synchronized with your
camera, this will usually result with
underexposed images.
Image #3

Fantasea Nano Flash Instruction Manual 26110120
What are Pre-Flashes?
Pre-flashes are one or more flashes given out to assist in the focusing and
exposure setting of the camera before the actual picture-taking primary flash
is fired. It is important to set the Nano Flash to the correct pre-flash setting so
it fires in sync with the primary flash of the camera.
The Nano Flash features 3 different pre-flash settings (image #4):
1 For cameras with no pre-flash
2 For cameras with 1 pre-flash
3 For cameras with 2 pre-flashes
ii.In order to properly synchronize the Nano Flash with your camera, you should
determine which pre-flash program on the Nano Flash is the most suitable
with your camera internal flash. In order to do so, please follow the
instructions below:
1. Place your digital camera in front of the Nano Flash within a distance of
approximately 1 meter, so they are facing each other.
2. Set your camera built-in flash to ON.
3. Turn the Nano Flash on by setting the Pre-
picture with your camera. Do the same when the Pre-Flash Mode Dial is set

4. Compare the 3 images taken in the 3 different pre-flash modes. The most
overexposed image indicates the correct Nano Flash pre-flash mode for
your camera.
5. Turn off the Nano Flash by setting the Pre-
f. Test the Watertight Seal of the Nano Flash
After closing the Nano Flash, always test it in a shallow water pool prior to diving
with it, in order to verify that it is perfectly watertight sealed. Make sure no
bubbles escape from it and that no water enters the housing.
Image #4:
3 pre-flash programs

Fantasea Nano Flash Instruction Manual 26110120
g. Mount the Nano Flash on an Arm
i. Remove the screw from the Y-S Connector at the bottom of the Nano Flash
Housing by unscrewing it all the way out.
ii.Position the Nano Flash on top of the arm so that the Y-S Mount on top of the
arm is aligned with the Y-S Connector at the bottom of the Nano Flash (image
#5).
iii.Install the screw all the way through the Nano Flash and arm. Tighten it
enough to keep the Nano Flash within a fixed position (image #6).
h. Attaching a Nano Fiber Optic Cable to the Nano Flash (optional)
Although the Nano Flash features a slave sensor and is capable of synchronizing
with the camera internal flash without using any cables in most diving conditions,
a fiber optic cable ensures the best synchronization between the camera internal
flash and the Nano Flash at all angles and within various diving conditions,
especially when photographing in shallow clear water with bright ambient light.
i. The fiber optic cable consists of
two ends: One is attached to a
white plastic fitting (flat white
plastic at the end of the cable
with Allen screw inside), and
the other is loose (image #7).
Insert the exposed end of the
fiber optic cable (the end
without the fitting) into the
small hole of the black Nano Adaptor unit, starting from the end that features
a screw and pushing it towards the end that features an O-ring, until the fiber
optic cable reaches the end of the adaptor.
ii.Use the tool included in the Nano Adaptor Kit in order to tighten the screw
on the adaptor (image #8 on the following page). Tighten it enough to
Image #5
Image #6
Image #7

Fantasea Nano Flash Instruction Manual 26110120
stabilize the fiber optic cable inside the adaptor, but don't tighten it too
strongly. Tightening the screw too much might damage the fiber optic cable.
iii.Install the black and clear plastic diffuser cover on the Nano Flash Housing.
iv.Insert the Nano Adaptor inside the lower right grommet (the one with the
wider hole) of the black diffuser cover, so that the adaptor screw doesn't get
in its way. Insert it all the way to the end, and do not use force once you
encounter any resistance (image #9).
v. If attaching the Fiber Optic Cable to
a Fantasea FP7000 Housing or any
other housing that features a
dedicated fiber optic cable
attachment configuration (image
#10), please refer the housing
instruction manual for specific
instructions regarding attaching the
fiber optic cable to the camera housing. If attaching the Fiber Optic Cable to
any other standard camera housing, please follow the instructions below.
vi.The other end of the fiber optic cable attaches outside of the camera housing
- opposite the camera internal flash - by using both sides of the Velcro strip
included in the kit. The white plastic fitting normally comes with the Velcro
tape attached and therefore you are only required to apply the other side of
the Velcro strip on the housing to receive it (images #11 and #12 on the
following page). If your housing features a built-in flash diffuser, the Velcro
strip should be attached beneath it, directly to the housing. If possible, place
the Velcro strip between the built in flash diffuser and the housing,
positioned opposite the internal flash of the camera.
Image #8
Image #9
Image #10

Fantasea Nano Flash Instruction Manual 26110120
vii. It is preferable to totally block out the internal flash of the camera after
attaching the camera side of the cable by applying black electrical tape over
the fiber optic connector attached to the housing case. This effectively
achieves two things: it diminishes the effects of backscatter, as well as
eliminates any shadowing effect caused by lens accessories mounted on the
housing lens port. Removing the built-in flash diffuser will have no affect on
lighting.
viii. In some cases, after using the fiber optic cable frequently or for a long period,
you might encounter a decrease in performance. You can easily solve this
problem by cutting 1 cm/0.3 inch off the fiber optic cable ends, using a sharp
tool and performing a very straight angled cut. This allows you to remove any
worn ends and to expose a new portion of the cable.
i. Taking Photographs with the Nano Flash
i. Turn the Nano Flash on by setting the Pre-Flash Mode Dial to the pre-flash
program found most compatible with your camera (section e).
ii.Position the flash in a way that it is pointed at your subject. Also, if a fiber
make sure that nothing blocks the
slave sensor, so the Nano Flash can synchronize with your camera internal
flash.
iii.Set your camera built-
iv.Take a photograph by pushing the shutter-release button of the camera. The
camera built-in flash fires and triggers the Nano Flash as well. Always take
photographs with the Ready Light fully lit up.
v. Adjust the output of the Nano Flash by turning the Power Output Control to
achieve the desired exposure in your photograph.
vi.Removable Flash Diffusers: It is highly recommended to install a diffuser
when shooting wide angle or extreme macro images. In wide angle
photography, the diffuser can be used in order to spread the light more evenly
and in a way that it covers a greater angle. In macro photography, the diffuser
Image #11
Image #12


Fantasea Nano Flash Instruction Manual 26110120
can be used to absorb part of the light when
the flash is too powerful, even when set to the
lowest output. In order to install any of the
flash diffusers, first install the Diffuser Holder
on the flash housing by simply clicking it in.
Then slide any of the diffusers through the slot
found at the top of the Diffuser Holder (image
#13). It is recommended to secure both the
Diffuser Holder and the flash diffusers to the
flash by secure strings.
vii. When the Nano Flash is not in use, it is best to
turn it off in order to prevent exhaustion of the
batteries.
j. Care & Maintenance
The Nano Flash requires only a minimum amount of care for reliable
performance. The following tips will enable you to get the best results.
i. Submerge the flash in fresh water for about 20 minutes after every dive in
order to dissolve the salt water crystals from around the controls and
openings of the flash. Manipulate each of the movable controls to assist the
removal of salt particles from these tight areas.
ii.Allow the flash to dry thoroughly before packing it away for the day or for
the trip home. You may use a soft towel or cloth to dry the flash. Be sure
there is no grease or other debris on the towel.
iii.Visually check the condition of the O-ring before every dive. If it is dirty,
clean it with fresh water and dry it with a soft cloth as described above. If it
is damaged in any way, such as cut or perforated, replace it immediately.
iv.It is recommended to slightly lubricate the O-ring periodically. It's important
to note that the amount of lubrication required on the O-ring is only enough
to allow it to slip into place without friction, so it does not twist or become
dislodged. More grease is not necessarily better, and in some cases might
interfere with the watertight seal of the flash.
v. Do not drop the flash on hard surfaces. It is not a shock absorber, and could
crack, affecting its watertight integrity. It could also cause damage to the
electronic components inside.
vi.When travelling, remove batteries, leave back the door loose or
unassembled and pack the unit in a protected fashion in a padded case or
bag.
vii. Never dive with the Nano Flash to a depth greater than 60 meters/200 feet.
viii. Never store the flash or housing in high temperatures (above 60C/140F
degrees).
Image #13

Fantasea Nano Flash Instruction Manual 26110120
ix.Never use petroleum, alcohol, benzene and paint thinner to clean the flash,
housing or O-ring.
Fantasea Products Consumer Limited Warranty
         
materials and workmanship under reasonable use for a period of ONE (1) YEAR,
(two years, where required by law as determined by the origin of the authorized
dealer). This warranty is effective from the date of retail purchase from Fantasea
or an authorized Fantasea dealer, by the original end-
     
product defect arises and a valid claim is received within the Warranty Period, at
its option, Fantasea, or its authorized service facilities will either (1) repair the
product defect at no charge, (2) exchange the product with a product that is new
or which has been manufactured from new or serviceable used parts and is at
least functionally equivalent to the original product. The warranty will not extend
beyond the original warranty period.
Your Fantasea Product should be registered within 30 days of purchase. You
must keep the proof of purchase which indicates the date on which the purchase
was made; as you may be required to show proof of purchase if you need
warranty service. The following conditions apply: 1. This warranty extends to the
original purchaser only. It is not assignable or transferable. 2. The warranty does
not cover damage resulting from misuse, abuse, negligence, or accidents. Proper
maintenance of the Product is the responsibility of the owner. 3. The warranty
does not cover damage directly or indirectly resulting from the use of
unauthorized replacement parts or service performed by unauthorized facilities.
4. This warranty does not cover any damage to any other product used in
conjunction with the Fantasea product, including cameras and lenses, and
resulting from any defect in the product materials or workmanship. 5. The cost of
sending the product back to Fantasea or its authorized service facilities is the
responsibility of the customer. 6. The warranty does not cover any incidental
damages resulting from any defects in the product. This expressly includes any
         
optional use of the product. The conditions of this warranty are expressly in lieu
of all other expressed warranties, including the payment of consequential or
incidental damages for the breach of any warranty. Please register your product
on line at this URL: http://www.fantasea.com/registration.
www.fantasea.com/contactase contact us atFor further information, ple
www.fantasea.comor visit our website

Other manuals for Nano Flash

1

Other Fantasea Camera Accessories manuals
Fantasea FRX100 VA User manual

Fantasea

Fantasea FRX100 VA User manual

Fantasea Cool flash nano User manual

Fantasea

Fantasea Cool flash nano User manual

Fantasea BlueRay Sport User manual

Fantasea

Fantasea BlueRay Sport User manual

Fantasea EyeGrabber FP7000 User manual

Fantasea

Fantasea EyeGrabber FP7000 User manual

Fantasea Line FP7000 Housing User manual

Fantasea

Fantasea Line FP7000 Housing User manual

Fantasea FP-1 User manual

Fantasea

Fantasea FP-1 User manual

Fantasea Remora Flash User manual

Fantasea

Fantasea Remora Flash User manual

Fantasea CP-6 User manual

Fantasea

Fantasea CP-6 User manual

Fantasea BigEye User manual

Fantasea

Fantasea BigEye User manual

Fantasea FP-5000 User manual

Fantasea

Fantasea FP-5000 User manual

Fantasea CP-7 User manual

Fantasea

Fantasea CP-7 User manual

Fantasea CP-3 Guide

Fantasea

Fantasea CP-3 Guide

Fantasea FS-6 User manual

Fantasea

Fantasea FS-6 User manual

Fantasea Line FP7000 Housing Installation guide
Fantasea

Fantasea Line FP7000 Housing Installation guide

Fantasea FE 330 User manual

Fantasea

Fantasea FE 330 User manual

Fantasea Nano LED Pro Set User manual

Fantasea

Fantasea Nano LED Pro Set User manual

Fantasea CP-4 Pro Guide

Fantasea

Fantasea CP-4 Pro Guide

Fantasea FS200 User manual

Fantasea

Fantasea FS200 User manual

Fantasea FD-70 User manual

Fantasea

Fantasea FD-70 User manual

Fantasea FD-50N User manual

Fantasea

Fantasea FD-50N User manual

Fantasea 15355 User manual

Fantasea

Fantasea 15355 User manual

Fantasea FL-15 User manual

Fantasea

Fantasea FL-15 User manual

Fantasea Nano Premium User manual

Fantasea

Fantasea Nano Premium User manual

Fantasea FS 1 User manual

Fantasea

Fantasea FS 1 User manual

Popular Camera Accessories manuals by other brands

Godox GM55 instruction manual

Godox

Godox GM55 instruction manual

Chesapeake & Midlantic BMT-70A10 installation manual

Chesapeake & Midlantic

Chesapeake & Midlantic BMT-70A10 installation manual

Visceral Psyche Films Leeming LUT Pro manual

Visceral Psyche Films

Visceral Psyche Films Leeming LUT Pro manual

Sony HDVF-C35W Maintenance manual

Sony

Sony HDVF-C35W Maintenance manual

Ozito Power X Change PXBP-200U Original instructions

Ozito

Ozito Power X Change PXBP-200U Original instructions

Samsung SHP-3701H installation manual

Samsung

Samsung SHP-3701H installation manual

DÖRR Live View instruction manual

DÖRR

DÖRR Live View instruction manual

Multiblitz MAGNOLUX 1200 Instuctions for use

Multiblitz

Multiblitz MAGNOLUX 1200 Instuctions for use

Titan TTB804CHR manual

Titan

Titan TTB804CHR manual

Tamron ADAPTALL-2 owner's manual

Tamron

Tamron ADAPTALL-2 owner's manual

Camtree Hunt CH-DSM-FS700 instruction manual

Camtree Hunt

Camtree Hunt CH-DSM-FS700 instruction manual

LevelOne BOH-1000 Quick installation guide

LevelOne

LevelOne BOH-1000 Quick installation guide

Camtree CH-BMUM-SK instruction manual

Camtree

Camtree CH-BMUM-SK instruction manual

PROAIM VI-CYRS-01 Assembly manual

PROAIM

PROAIM VI-CYRS-01 Assembly manual

Panasonic WV7225 - PANA TILT operating instructions

Panasonic

Panasonic WV7225 - PANA TILT operating instructions

Zeiss Conquest Gavia Instructions for use

Zeiss

Zeiss Conquest Gavia Instructions for use

Philips CR2025 brochure

Philips

Philips CR2025 brochure

Sony DXF-51 Service manual

Sony

Sony DXF-51 Service manual

manuals.online logo
manuals.online logoBrands
  • About & Mission
  • Contact us
  • Privacy Policy
  • Terms and Conditions

Copyright 2025 Manuals.Online. All Rights Reserved.