FAR FCNEX17SF User manual

Built-In Oven
Four Encastrable Électrique
60 cm
Electrical
USER MANUAL GB
FRMANUEL DE L'UTILISATEUR
FAR
FCNEX17SF

2
Dear Customer,
Thank you for relying on this product.
We aim to allow you to optimally and efciently use this
environment-friendly product produced in our modern facilities under
precise conditions with respect to sense of quality in total.
We advise you to read these operating manual thoroughly before using
the oven and keep it permanently so that the features of the built-in oven
you have purchased will stay the same as the rst day for a long time.
NOTE:
This Operating Manual is prepared for multiple models. Your appliance
may not feature some functions specied in the manual.
The product images are schematic.
This product has been produced in modern environment-friendly
facilities without adversely affecting nature.
Products marked with (*) are optional.
Regarding the instructions for installation and electric connection
appliance, thanks to refer to the below paragraph of the manual.
Regarding the instructions for cleaning surfaces in contact with food,
thanks to refer to the below paragraph of the manual.
Regarding the information of the method for replacing illuminating
lamps, thanks to refer to the below paragraph of the manual.
"Complies with AEEE Regulation"
GB

3
CONTENTS
Important Warnings 4
Introducing The Appliance 8
Technical Specications 9
Installation Of Appliance 9
Important Warnings 15
Control Panel 16
Program Types 18
Cooking Recommendations 19
Cooking Table 19
Using The Oven 20
Replacing Oven Lamp 21
Cleaning Oven Glass 21
Cleaning And Mounting Oven Door 22
Maintenance And Cleaning 23
Steam Cleaning 23
Accessories 24
Troubleshooting 24
Environmentally-Friendly Disposal 25
Package Information 25
GB

4
IMPORTANT WARNINGS
1. WARNING: To avoid electric shock, ensure that the
appliance circuit is open before changing the lamp.
2. WARNING: All supply circuit connections must be
disconnected before accessing terminals.
3. WARNING: The appliance and its accessible parts
become hot during use. Care shoud be taken to avoid
touching heating elements. Children less than 8 years of
age shall be kept away unless continiously supervised.)
4. WARNING: Fire hazard; do not store materials on
cooking surface.
5. WARNING: If the surface is cracked, open the
appliance circuit to avoid risk of electric shock.
6. WARNING: The appliance and its accessible parts
become hot during use. Care shoud be taken to avoid
touching heating elements. Children less than 8 years of
age shall be kept away unless continiously supervised
7. Setting conditions of this appliance are specied
on the label.(Or on the data plate)
8. Accessible parts might be hot during use of grill.
Small children should be kept away.
9. WARNING: Appliance is intended for cooking only.
It should not be used for other purposes like heating a
room.
GB

5
10. There are additional protective tools avoiding
contact with oven doors.This part must be attached
when it's likely that there are children around.
11. Do not use steam cleaners to clean the appliance.
12. NEVER try to put out the re with water. Only
shut down the appliance circuit and then cover the
ame with a cover or a re blanket.
13. Hard and abrasive cleaners or hard metal scrapers
should not be used to clean the oven glass door, as
these can scratch the surface and cause breaking.
14. Ensure that door is fully closed after food is
placed.
15. Children under 8 years of age should be kept
away, if they cannot be monitored continuously.
16. Touching the heating elements should be avoided.
17. The appliance hasn't been designed for
operation with an external time or a separate remote
control system.
18.This device has been designed for domestic use.
19. Make sure that children at and under 8 can't reach
appliance and appliance cable.
20. Keep curtains, tissue paper or combustible
(inammable) materials away from appliance before
starting to use it. Do not place inammable or
combustible materials in or on the appliance.
GB

6
21. During use the appliance becomes hot. Care
should be taken to avoid touching heating elements
inside the oven.
22. WARNING: The appliance and its accessible
parts become hot during use. Care should be taken
to avoid touching heating elements. Children less
than 8 years of age shall be kept away unless con-
tinuously supervised. This appliance can be used by
children aged from 8 years and above and persons
with reduced physical, sensory or mental capabilities
or lack of experience and knowledge if they have been
given supervision or instruction concerning use of the
appliance in a safe way and understand the hazards
involved. Children shall not play with the appliance.
Cleaning and user maintenance shall not be made
by children without supervision.)
23. Do not use harsh abrasive cleaners or sharp
metal scrapers to clean the oven door glass since they
can scratch the surface, which may result in shattering
of the glass.
24. WARNING: Ensure that the appliance is switched
off before replacing the lamp to avoid the possibility
of electric shock.

7
25. If the supply cord is damaged, it must be replaced
by the manufacturer, its service agent or similarly
qualied persons in order to avoid a hazard.
26. This appliance is intended to be used in household
and similar applications such as:- staff kitchen areas
in shops, ofces and other working environments;
farm houses;- by clients in hotels, motels and other
residential type environments;- bed and breakfast
type environments.

8
INTRODUCING THE APPLIANCE
1.Control Panel
2.Roast Chicken Skewer
3.In Tray Wire Grill
4.Standard Tray
5.Oven door
7. Lamp
1
2
3
4
5
7
GB

9
TECHNICAL SPECIFICATIONS
SPECIFICATIONS 60 cm Built-In Oven
Lamp Power 15-25W
Thermostat 40-240 / Max °C
Lower Heater 1200W
Upper Heater 1000W
Turbo Heater 1800W
Grill Heater Small Grill 1000W Big Grill 2000W
Supply Voltage 220V-240V / AC 50Hz
Technical specications can be changed without prior notice to improve
product quality.
The values provided with the appliance or its accompanying documents
are laboratory readings in accordance with the respective standards.
These values may differ depending on the use and ambient conditions.
Figures in this guide are schematic and may not be exactly match your
product.
INSTALLATION OF APPLIANCE
Ensure that electrical installation is suitable for operationalising the
appliance. If not, call an electrician and plumber to make necessary
arrangements. Manufacturing rm can't be hold responsible for damages
to arise due to operations by unauthorized people and product warranty
becomes void.
WARNING: It is customer's responsibility to prepare the location the
product shall be placed on and also have power utility prepared.
WARNING: The rules about electrical local standards must be adhered to
during product installation.
WARNING: Check for any damage on the product before installing it.
Do not have product installed if it's damaged. Damaged products pose
danger for your safety.
GB

10
Important Warnings for Installation:
Cooling fan shall take extra steam out
and prevent outer surfaces of appliance
from overheating during operation of
oven. This is a necessary condition for
better appliance operation and better
cooking.
Cooling fan shall continue operation
after cooking is nished. Fan shall
automatically stop after cooling is
completed.
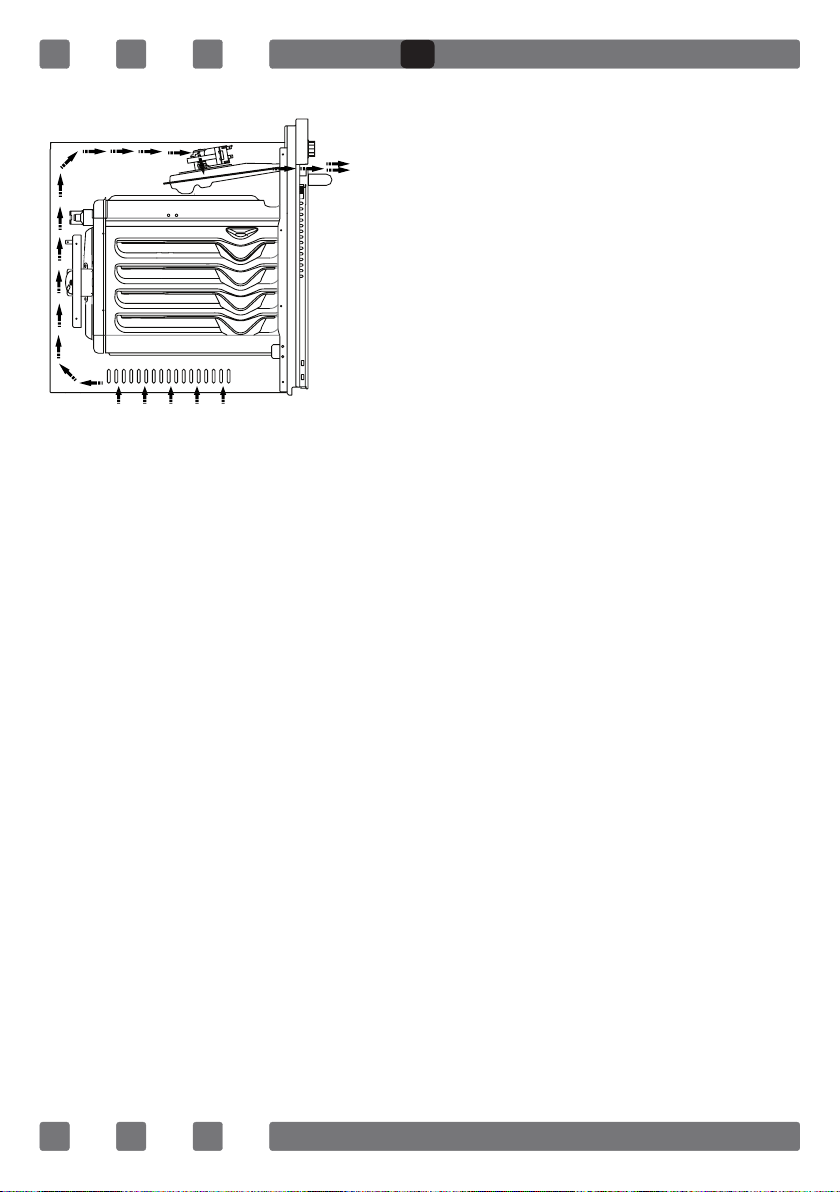
A clearance must be left behind the enclosure where you'll place the
appliance for efcient and good operation. This clearance shouldn't be
ignored as it's required for ventilation system of the appliance to operate.
Right Place For Installation
Product has been designed to be mounted to worktops procured from
market. A safe distance must be left between the product and kitchen
walls or furniture. See the drawing provided on the next page for proper
distances. (values in mm).
• Used surfaces, synthetic laminates and adhesives must be heat
resistant. (minimum 100°C).
• Kitchen cupboards must be level with product and secured.
• If there is a drawer below the oven, a rack must be placed between
oven and drawer.
WARNING: Do not install the product next to refrigerators or coolers. The
heat emitted by the product increases the energy consumption of cooling
devices.
WARNING: Do not use door and/or handle to carry or move the product.
Figure 1
GB

11
60 cm Built-In Oven Installation and Mounting
Place of use for product must be located before starting installation.
Product mustn't be installed in places which are under the effect of
strong air ow.
Carry the product with minimum two people. Do not drag the product
so that oor isn't damaged.
Remove all transportation materials inside and outside the product.
Remove all materials and documents in the product.
Installation Under Counter
Cabin must match the dimensions provided in Figure 2.
A clearance must be provided at the rear part of the cabin as indicated
in the gure so that necessary ventilation can be achieved.
After mounting, the clearance between lower and upper part of
the counter is indicated in Figure 5 with "A". It's for ventilation and
shouldn't be covered.
Installation In An Elevated Cabinet
Cabin must match the dimensions provided in Figure 4.
The clearances with the dimensions indicated in the gure must be
provided at the rear part of cabin, upper and lower sections so that
necessary ventilation can be achieved.
Installation Requirements
Product dimensions are provided in the Figure 3.
Furniture surfaces for mounting and mounting materials to be used
must have a minimum temperature resistance of 100 °C.
Mounting cabin must be secured and its floor must be plane for
product not to tilt over.
Cabin floor must have a minimum strength that would handle a load of
60 kg.
Placing and Securing the Oven
Place the oven into the cabin with two or more people.
Ensure that oven's frame and front edge of the furniture match
uniformly.
GB

12
Supply cord mustn't be under the oven, squeeze in between oven and
furniture or bend.
Fix the oven to the furniture by using the screws provided with the
product. Screws must be mounted as shown in Figure 5 by passing
them through plastics attached to frame of the product. Screws mustn't
be overtightened. Otherwise, screw sockets might be worn.
Check that oven doesn't move after mounting. If oven isn't mounted in
accordance with instructions, there is a risk of tilt over during operation.
Electrical Connection
Mounting place of the product must have appropriate electrical
installation.
Network voltage must be compatible with the values provided on type
label of product.
Product connection must be made in accordance with local and
national electrical requirements.
Before starting the mounting disconnect network power. Do not
connect the product to network until its mounting is completed.
Mounting
Figure 2
GB

13
560**
560
600
35
500
30 30
555
545
595
595
565
22
Figure 3
GB

14
590
550
560
35 500
30 30
Figure 4
GB

15
IMPORTANT WARNINGS
Electrical Connection and Safety
This oven must be installed and connected to its place correctly
according to manufacturer instructions and by an authorized service.
Appliance must be installed in an oven enclosure providing high
ventilation.
Electrical connections of the appliance must be made only via sockets
having earth system furnished in compliance with rules. Contact an
authorized electrician if there is no socket complying with the earthed
system at where appliance will be placed. Manufacturing company is by
no means responsible for damage resulting from connection of
non-earthed sockets to appliance.
Plug of your oven must be earthed; ensure that socket for the plug
is earthed. Plug must be located in a place that can be accessed after
installation.
A
Figure 5
GB

16
Your oven has been manufactured as 220V-240V / AC 50Hz power
supply compliant and requires a 16 Amp fuse. If your power network
is different that these indicated values, refer to an electrician or your
authorized service.
When you need to replace the electrical fuse, please ensure that
electrical connection is made as follows:
• Phase (to live terminal) brown cable
• Blue cable to neutral terminal
• Yellow-green cable to earth terminal
Oven disconnecting switches must be in an accessible place for nal
user while oven is in its place.
Power supply cable (plug in cable) mustn't touch hot parts of the appliance.
If supply cord (plug in cable) is damaged, this cord must be replaced
by the importer or its service agent or an equally competent personnel to
prevent a hazardous situation.
CONTROL PANEL
Adjustment can be made only when button is popped for models with
pop-up button.
Make sure that button is popped by pressing on the
button as shown in the gure at left side.
Digital Panel Visual
Mechanical Panel Visual
Figure 6 *
GB

17
You can make necessary adjustments by turning
right or left when button is popped enough.
Thermostat Button: Helps to set cooking temperature
of the food to be cooked in the oven. You can set
the desired temperature by turning the button after
placing the food into the oven. Check cooking table
related to cooking temperatures of different foods.
*Mechanical Timer Button: Helps to set time for the
food to be cooked in the oven. Timer de-energizes
the heaters when set time expires and warns you
by ringing. See cooking table for cooking times.
Program Button: Helps to set with which heaters the
food placed in oven will be cooked. Heater program
types in this button and their functions are stated
below. Every model might not have all heater types
and thus program types of these heaters.
Figure 7*
Figure 8
Figure 9
Figure 10
GB

18
PROGRAM TYPES
Heating program types in your appliance and important explanations
of them are provided below for you can cook different foods appealing to
your taste.
Lower heating element: Select this program towards end of cooking time
if lower part of the food cooked will be roasted.
Upper heating element: Used for post heating or roasting very little pieces
of foods.
Lower and upper heating elements: A program that can be used for
cooking foods like cake, pizza, biscuit and cookie.
Lower heating element and fan: Use mostly for cooking foods like fruit
cake.
Lower and upper heating element and fan: The program suitable for cook-
ing foods like cakes, dried cakes, lasagne. Suitable for cooking meat
dishes, as well.
Grill: Grill cooker is used for grilling meat like foods such as steak,
sausage and sh. While grilling, tray should be placed in the lower rack
and water must be placed in it.
Turbo heater and fan: Suitable for baking and roasting. Keep heat setting
lower than "Lower and Upper Heater" program since heat is conveyed
immediately via air ow.
Grill and fan: Suitable for cooking meat type foods. Do not forget to place
a cooking tray in a lower rack inside the oven and a little water in it while
grilling.
Lower and Upper Heating
Elements Fan
Lower Heating Element and Fan Turbo Heater and Fan
Grill and Roast Chicken Lower-Upper Heating Element
and Fan
Upper Heating Element and Fan Grill and Fan
Multifunctional Cooking Grill
Lower Heating Element Upper Heating Element
Small Grill and Fan Steam Cleaning
GB

19
Multi Functional Cooking: Suitable for baking and roasting. Lower and
upper heaters operate as well as quick transmission of heat via air ow.
Suitable for cooking requiring single tray and intense heat.
COOKING RECOMMENDATIONS
You can nd in the following table the information of food types which
we tested and identied their cooking values in our labs. Cooking times
can vary depending on the network voltage, quality of material to be
cooked, quantity and temperature. Dishes to cook by using these values
might not appeal to your taste. You can set various values for obtaining
different tastes and results appealing to your taste by making tests.
WARNING: Oven must be preheated for 7-10 minutes before placing
the food in it.
COOKING TABLE
Food Cooking
Function
Cooking
Temperature (°C)
Cooking
Rack
Cooking
Time (min.)
Cake Static / Static+Fan 170-180 2-3 35-45
Small Cake Static / Turbo+Fan 170-180 2 25-30
Pie Static / Static+Fan 180-200 2 35-45
Pastry Static 180-190 2 20-25
Cookie Static 170-180 2 20-25
Apple Pie Static / Turbo+Fan 180-190 1 50-70
Sponge cake Static 200/150* 2 20-25
Pizza Static Fan 180-200 3 20-30
Lasagne Static 180-200 2-3 25-40
Meringue Static 100 2 50
Grilled Chicken** Grill+Fan 200-220 3 25-35
Grilled Fish** Grill+Fan 200-220 3 25-35
Calf Steak** Grill+Fan Max 4 15-20
Grilled Meatball** Grill+Fan Max 4 20-25
* Do not preheat. First half of cooking time is recommended to be at
200°C de while the other half at 150°C.
** Food must be turned after half of the cooking time.
GB

20
USING THE OVEN
Initial Use of Oven
Here are the things you must do at rst use of your oven after making
its necessary connections as per instructions:
1. Remove labels or accessories attached inside the oven. If any, take
out the protective folio on front side of the appliance.
2. Remove dust and package residues by wiping inside of the oven with
a damp cloth. Inside of oven must be empty. Plug the cable of appliance
into the electrical socket.
3. Set the thermostat button to the highest temperature (240 Max. °C)
and run the oven for 30 minutes with its door closed. Meanwhile a
slight smoke and smell might occur and that's a normal situation.
4. Wipe inside of the oven with a slightly warm water with detergent
after it becomes cold and then dry with a clean cloth. Now you can use
your oven.
Normal Use of Oven
1. Adjust thermostat button and temperature at which you want to
cook the food to start cooking.
2. You can set cooking time to any desired time by using the button at
models with mechanical timer. Timer will de-energize heaters when time
expired and provide warning beep as ringing.
3. Timer turns the heaters off and provides audible signal when cooking
time expires in line with the information entered in the models with
digital timer.
4. Cooling system of the appliance will continue to operate after
cooking is completed. Do not cut the power of appliance in this
situation which is required for appliance to cool down. System will shut
down after cooling is completed.
GB
Table of contents
Languages:
Other FAR Oven manuals