Sincronizzazione-Synchronisation-Synchronisation-Synchronisierung -Sincronización
•Premere il tasto (13)per due secondi e rilasciarlo.
La sincronizzazione è avvenuta quando l’indicatore
luminoso (11) è acceso con luce ssa. Ripetere per
disattivare la sincronizzazione.
•Press button (13) and hold for two seconds, then
release. Synchronisation is complete when signal light
(11) remains lit permanently.
Repeat to deactivate synchronisation.
•Appuyer sur la touche (13) pendant deux
secondes et la relâcher. La synchronisation est
eective lorsque l’indicateur lumineux (11) est
allumé sans clignoter. Répéter pour désactiver la
synchronisation.
•Betätigen Sie die Taste (13) für zwei Sekunden und
lassen Sie sie los. Die Synchronisierung ist erfolgt,
wenn die Leuchtanzeige (11) dauerhaft leuchtet.
Wiederholen Sie den Vorgang, um die Synchronisie-
rung zu deaktivieren.
•Presionar el botón (13) durante dos segundos
y soltarlo. El encendido con luz ja del indicador
luminoso (11) indica que se ha obtenido la sincro-
nización. Repetir para desactivar la sincronización.
Cambiamentocodice-Code editing-Changementdecode
Ändern des Codes-Cambiodecódigo
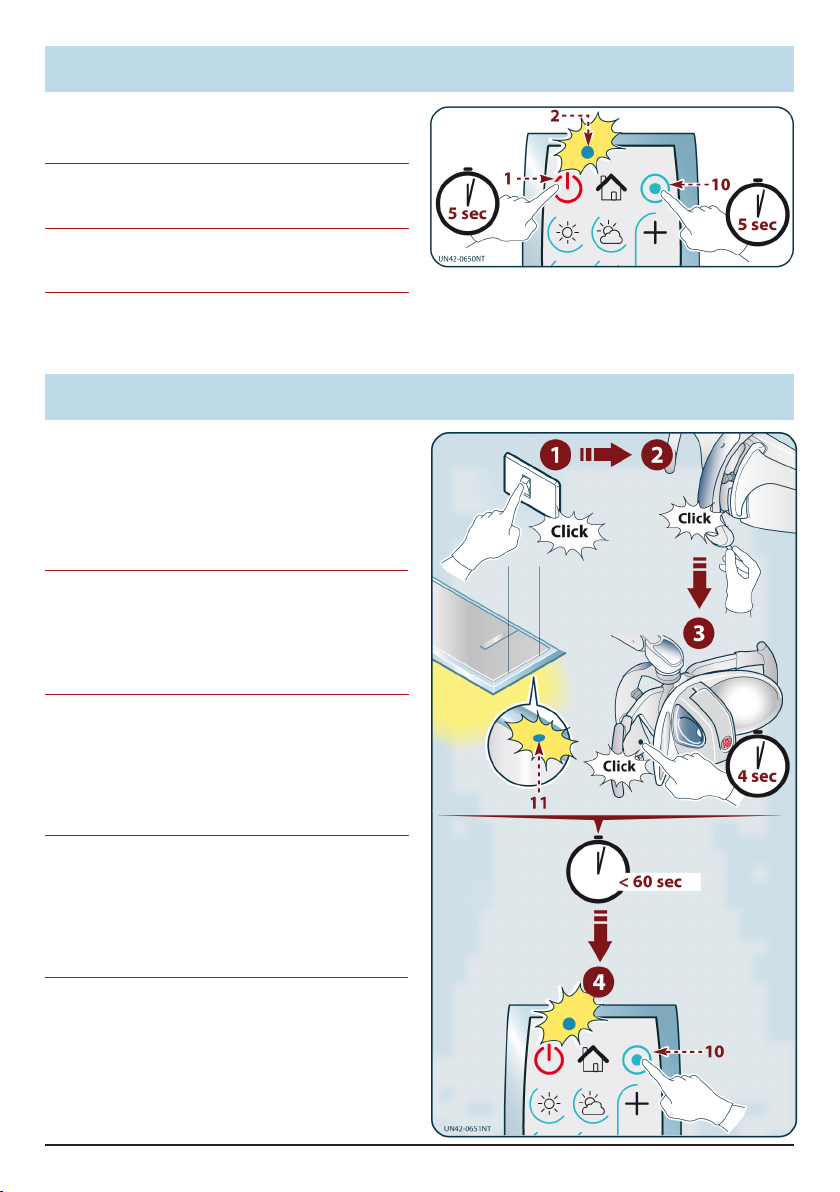
•Spegnere e accendere la lampada con l’interrut-
tore (12). Entro 60 secondi dall’accensione della
lampada premere e tenere premuti i tasti (3 -7)per
5secondi. Rilasciare i tasti quando l’indicatore lumi-
noso (11) è acceso con luce ssa.
Premere il tasto (10); la luce del led (11) lampeggia
più volte e si spegne.
Il nuovo codice è stato acquisito.
• Using switch (12), turn the lamp o and then on
again. Within 60 seconds of the lamp turning on, press
buttons (3- 7) and hold for 5seconds. Release the but-
tons when signal light (11) remains lit permanently.
Press button (10); LED (11) will ash several times and
then turn o.
The new code has been acquired.
•Éteindre et allumer le la lampe avec l’interrupteur
(12). 60 secondes après l’allumage de la lampe
enfoncer les touches (3- 7) enfoncées pendant 5
secondes. Relâcher les touches lorsque l’indicateur
lumineux (11) est allumé sans clignoter.
Appuyer sur la touche (10); la lumière de la DEL (11)
clignote plusieurs fois et s’éteint.
Le nouveau code a été saisi.
• Schalten Sie die Leuchte mit dem Schalter (12) aus
und ein. Halten Sie innerhalb von 60 Sekunden nach
dem Einschalten der Leuchte die Tasten (3- 7) für 5Se-
kunden gedrückt. Lassen Sie die Tasten los, wenn die
Leuchtanzeige (11) dauerhaft leuchtet.
Betätigen Sie die Taste (10); das Licht der Led (11)
blinkt mehrmals und verlischt.
Der neue Code wurde erfasst.
•Apagar y encender la lámpara mediante el inte-
rruptor (12). Dentro de los 60 segundos sucesivos
al encendido de la lámpara, presionar y mantener
presionados los botones (3- 7) durante 5segundos.
Soltar estos botones cuando el indicador luminoso
(11) queda encendido con luz ja.
Presionar el botón (10); la luz del led (11) parpadea
varias veces y se apaga. El nuevo código ha sido ad-
quirido.