Fatar STUDIO 900 User manual

S T U D IO 1100
S T U D IO 1100
STUDIO 900
Pag.
"
"
"
"
"
2
2
3
3
4
5
CARATTERISTICHE
CONNESSIONI
STANDARDSETUP
PROGRAMMAZIONE
ELABORAZIONIMIDI
MIDICONTROL NUMBER
Page
"
"
"
"
"
"
"
20
20
21
21
21
22
23
24
TECHNICALDATA
CONNECTIONS
PROGRAMCHANGE
BANKCHANGE
CONTROL#COMMANDS
TOPPANEL
OPERATION
MIDICONTROL NUMBER
Pag.
"
"
"
"
"
"
"
44
45
46
47
48
50
51
52
TECHNISCHEDATEN
HINWEISE
VERKABELUNG
BEDIENUNG
MIDI-KANAL
PROGRAMMWECHSEL
CONTROLLER
TRANSPONIERUNG
INDEX
ENGLISH DEUTSCHITALIANO
Pag.
"
"
"
"
"
"
"
"
"
"
"
"
"
CARATTERISTICHE
CONNESSIONI
PROGRAMMAZIONE:
PERCAMBIARE PRESET
LEZONE
PROGRAMMAZIONE
DIUNA ZONA
KEYRANGE
RCVCHAN
PROGRAMCHANGE
BANKSELECT
CHANNEL- CANAL MIDI
WHEELS- RUOTE DI
MODULAZIONE
VOLUME
VELOCITY- DINAMICA
AFTERTOUCH
Page
"
"
"
"
"
"
"
"
"
"
"
"
"
"
"
26
27
28
29
29
30
31
32
32
33
33
33
34
34
35
35
6
7
8
8
9
9
9
10
10
10
10
11
11
11
QUICKREFERENCE
DEMOSTRATIONPRESET
SPECIFICATION
BASICINFORMATION
BACKPANEL CONNECTIONS
MIDISYSTEM
CONFIGURATION
ZONES
OPERATION
PERFORMMODE
EDITMODE
ZONEFUNCTIONS
LOWKEY; HIGH KEY
PROGRAM
VOLUME
TRANSPOSE
CHANNEL
Pag.
"
"
"
"
"
"
"
"
"
"
"
"
"
"
54
55
56
56
56
57
57
57
58
58
58
58
59
59
59
TECHNISCHEDATEN:
VERBINDUNGEN
PROGRAMMIERUNG
PRESETÄNDERUNG
DIEZONEN
PROGRAMMIERUNG
DERZONEN
KEYRANGEODER
ZONENVERLÄNGERUNG
RCVCHAN
PROGRAMMCHANGE
BANKSELECT
CHANNEL-MIDIKANAL
WHEELS-MODULATIONSRÄDER
LAUTSTÄRKE
VELOCITY-DINAMIK
AFTERTOUCH
STUDIO 1100
Pag.
"
"
"
"
16
16
17
17
17
DATITECNICI
CONNESSIONI
POSIZIONEDELLE OTTAVE
CANALEMIDI
CAMBIOPRESET
PROGRAMMAZIONE:
Page
"
"
"
"
"
"
40
40
41
41
41
42
42
FEATURES
CONNECTIONS
TURN-ONDEFAULTS
OPERATING INSTRUCTIONS
BINARYLED DISPLAY
OCTAVEASSIGNMENT
CHANNELASSIGNMENT
PROGRAMASSIGNMENT
Pag.
"
"
"
"
60
60
61
61
61
DIETECHNISCHEN DATEN
ANSCHLÜSSE
1.0OKTAVLAGE
2.0MIDI-KANAL
3.0WEITERSCHALTENDER
KLANGFARBEN
DIE PROGRAMMIERUNG:
MIDI PEDALBOARD MP-1
STUDIO 900
STUDIO 1100
MIDI PEDALBOARD MP-1
ITALIANO
Pag.
"
"
"
"
"
"
"
"
12
12
12
12
12
13
13
13
14
TRANSPOSE
CSL-CURSORECSL/DATA
PEDAL
MOVIMENTIALL’INTERNO
DELL’AMBIENTEEDIT
SAVE/LOADDATA
Istruzioniper il salvataggio
Istruzioniper il caricodati
RESETGENERALE
PRESETINITILIALIZATION
LISTADEI CONTROLLI MIDI
Page
"
"
"
"
"
"
"
"
"
35
36
36
37
37
38
38
38
39
VELOCITY
CSL(CONTROL SLIDER)
WHEELS
AFTERTOUCH
PEDAL
MISCHELLANEOUS
FUNCTIONS
RECEIVECHANNEL
PROGRAMSAVE AND LOAD
PRESETINITIALIZATION
Pag.
"
"
"
"
"
"
"
60
60
60
60
62
62
62
PEDAL
VORGÄNGE IN DER
UMGEBUNG
SAVE/LOADDATA
ANWEISUNGENZUR
SPEICHERUNG
SPEICHERUNGDER AKTIVEN
SONENBEIM AUFRUFEN DER
PRESETS
KONTROLLNUMMER
KONTROLLFUNKTIONEN
STUDIO 1100
ENGLISH DEUTSCHITALIANO
7
6STUDIO1100 STUDIO 1100
LaMASTERKEYBOARDSTUDIO1100sipresentacon
-Tastieradinamicaa88tastipesati
-Aftertouch
-32presets
-10switchesdicui4perabilitarelezoneditastiera,
2percambiarebancodipresetse4percambiarepreset
-2slidersdicuiunoperilmainvolumeel'altroassegnabile
-1displaya3cifre
-2wheelsperpitchemodulation
-2midioutparalleli
-1midiin
-1ingressojackperpedalesustain
-1ingressojackperpedalevolume
-1interruttoredialimentazione
-1ingressodialimentazioneDC
-11deitastineridellaMastersonousatiperfunzionispeciali
BenvenutinelmondodelleMASTERKEYBOARDFATAR.
LaMASTERKEYBOARDSTUDIO1100èunMIDICONTROLLERcompleto,versatile
ediveloceutilizzo;ottimosiaperusolivecheperlavorodistudio.
CARATTERISTICHE
STUDIO 1100
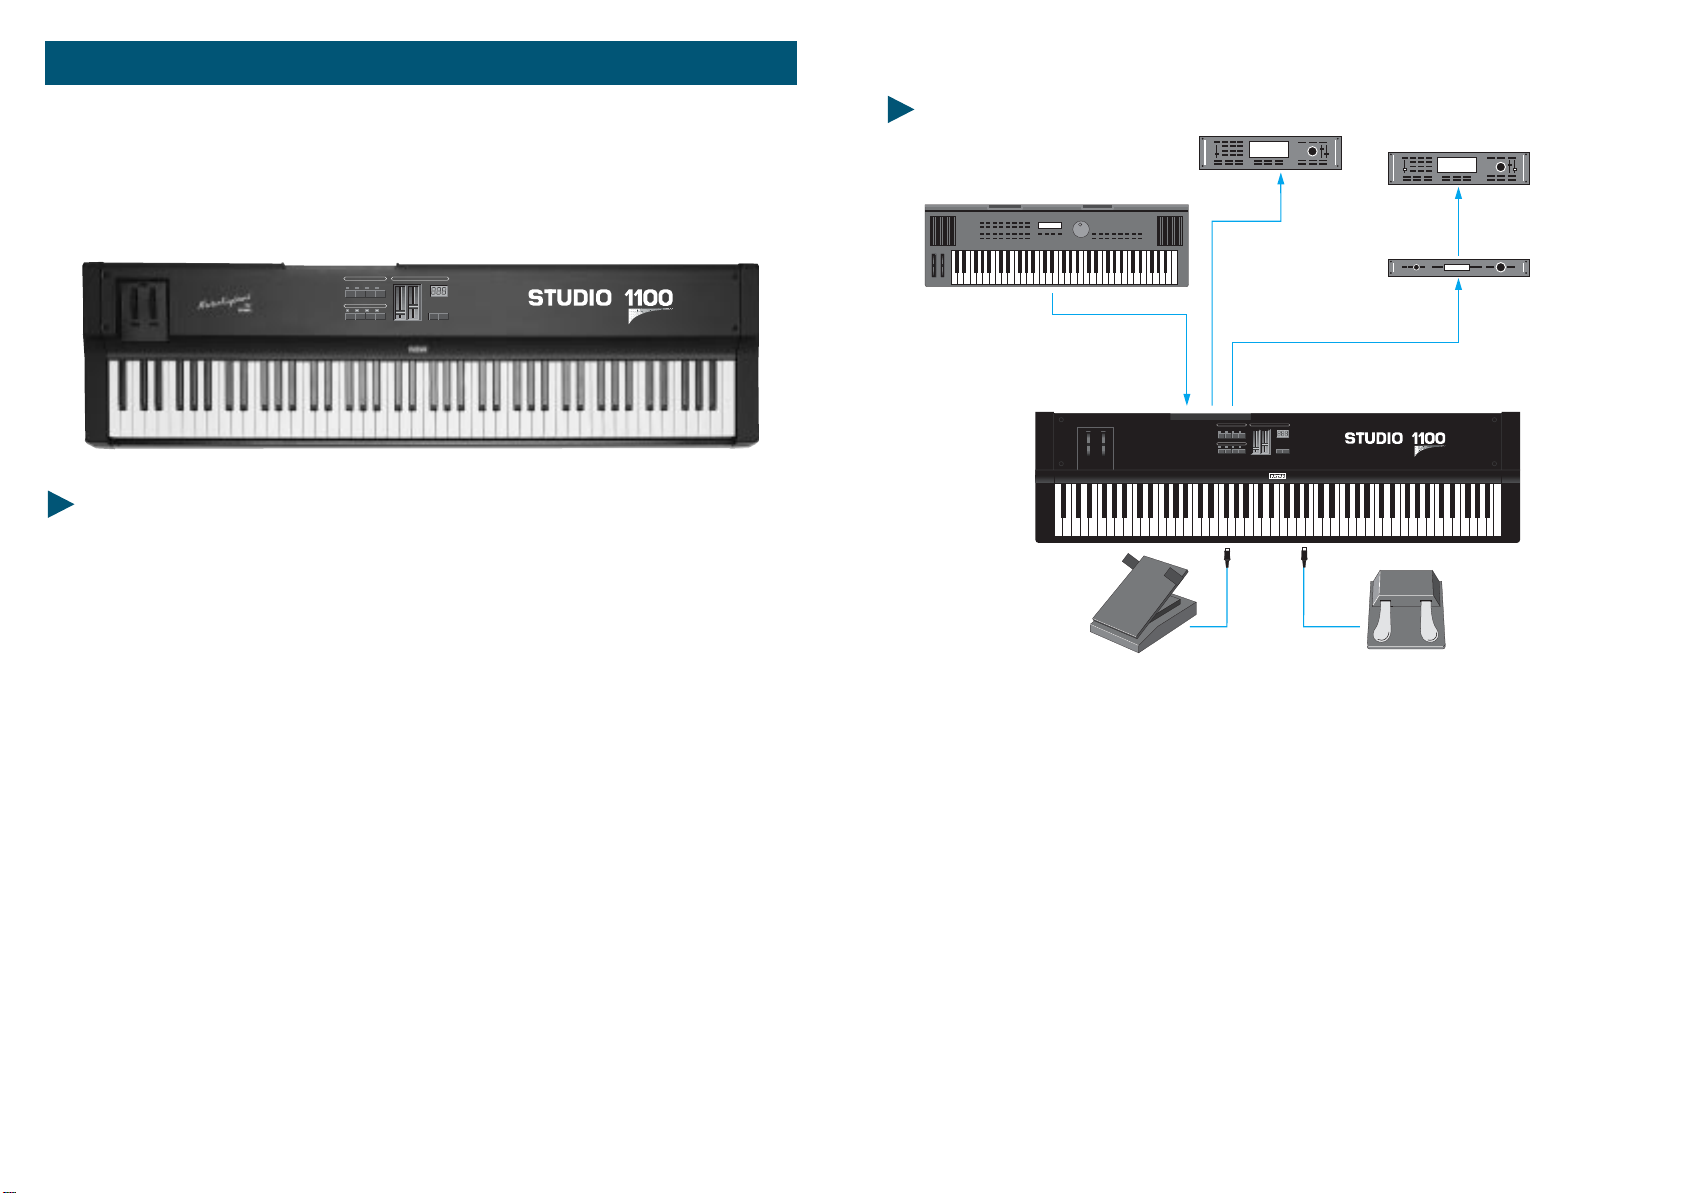
CONNESSIONI
1) Collegare l'adattatore di tensione alla presa elettrica di rete (verificando che la
tensione dell'adattatore corrisponda alla tensione di linea). Collegare il cavo di
uscita dell'adattore all'ingresso di alimentazione della MASTERKEYBOARD
(STUDIO 1100 accetta come alimentazione 9V DC con polarità positiva (+) al
centroenecessitadiunacorrenteminimadi200mA).
2)Collegareil/icavimidialvostrooaivostriexpandersoaltridispositiviMIDI.
3) Attivare la MASTERKEYBOARD STUDIO 1100 premendo il pulsante POWER e si
predisporrànelPRESET<11>.
4) Se si ha la necessità di controllare il sustain e il volume, collegare agli appositi
jack, per il sustain un pedale con il contatto normalmente aperto (es.: VFP1/10),
perilvolumeunpedaledicontrollolineareconjackstereo(es.:VP26).
1243
1243
LOWKEY
HIGHKEY
RCVCHAN
PROGRAM
CHANNEL
WHEELS
VOLUME
VELOCITY
AFTERTCH
TRANSPOSE
CSL
PEDAL
PERFORM / EDITPRESET / FUNCTION
ZONES
CSL/ DATA MASTER VOL PRESET/ VALUE
PRESET/ ZONE
LOAD SAVE
1243
1243
LOWKEY
HIGHKEY
RCVCHAN
PROGRAM
CHANNEL
WHEELS
VOLUME
VELOCITY
AFTERTCH
TRANSPOSE
CSL
PEDAL
PERFORM/ EDITPRESET/ FUNCTION
ZONES
CSL/ DATA MASTER VOL PRESET/ VALUE
PRESET/ ZONE
LOAD SAVE
MIDI IN
MIDI OUTPUTS
OUT
IN
IN
IN
Sound Module 2
Sound Module 3
Sound Module1
THRU
Sustain
Footswitch
Control pedal
Keyboard
Pitch A
9
8STUDIO1100 STUDIO 1100
PROGRAMMAZIONE DELLA STUDIO 1100
PER CAMBIARE PRESET
Con i due tastini con frecce sotto il display si incrementa o si decrementa il banco
di presets (STUDIO 1100 ha la possibilità di storare 32 presets suddivisi in 8 banchi
da 4), quindi una volta fissato il banco desiderato, premere uno dei 4 switch sotto
la scritta <PRESET>. Se nel display leggiamo 11 significa che siamo nel preset 1 del
banco1.
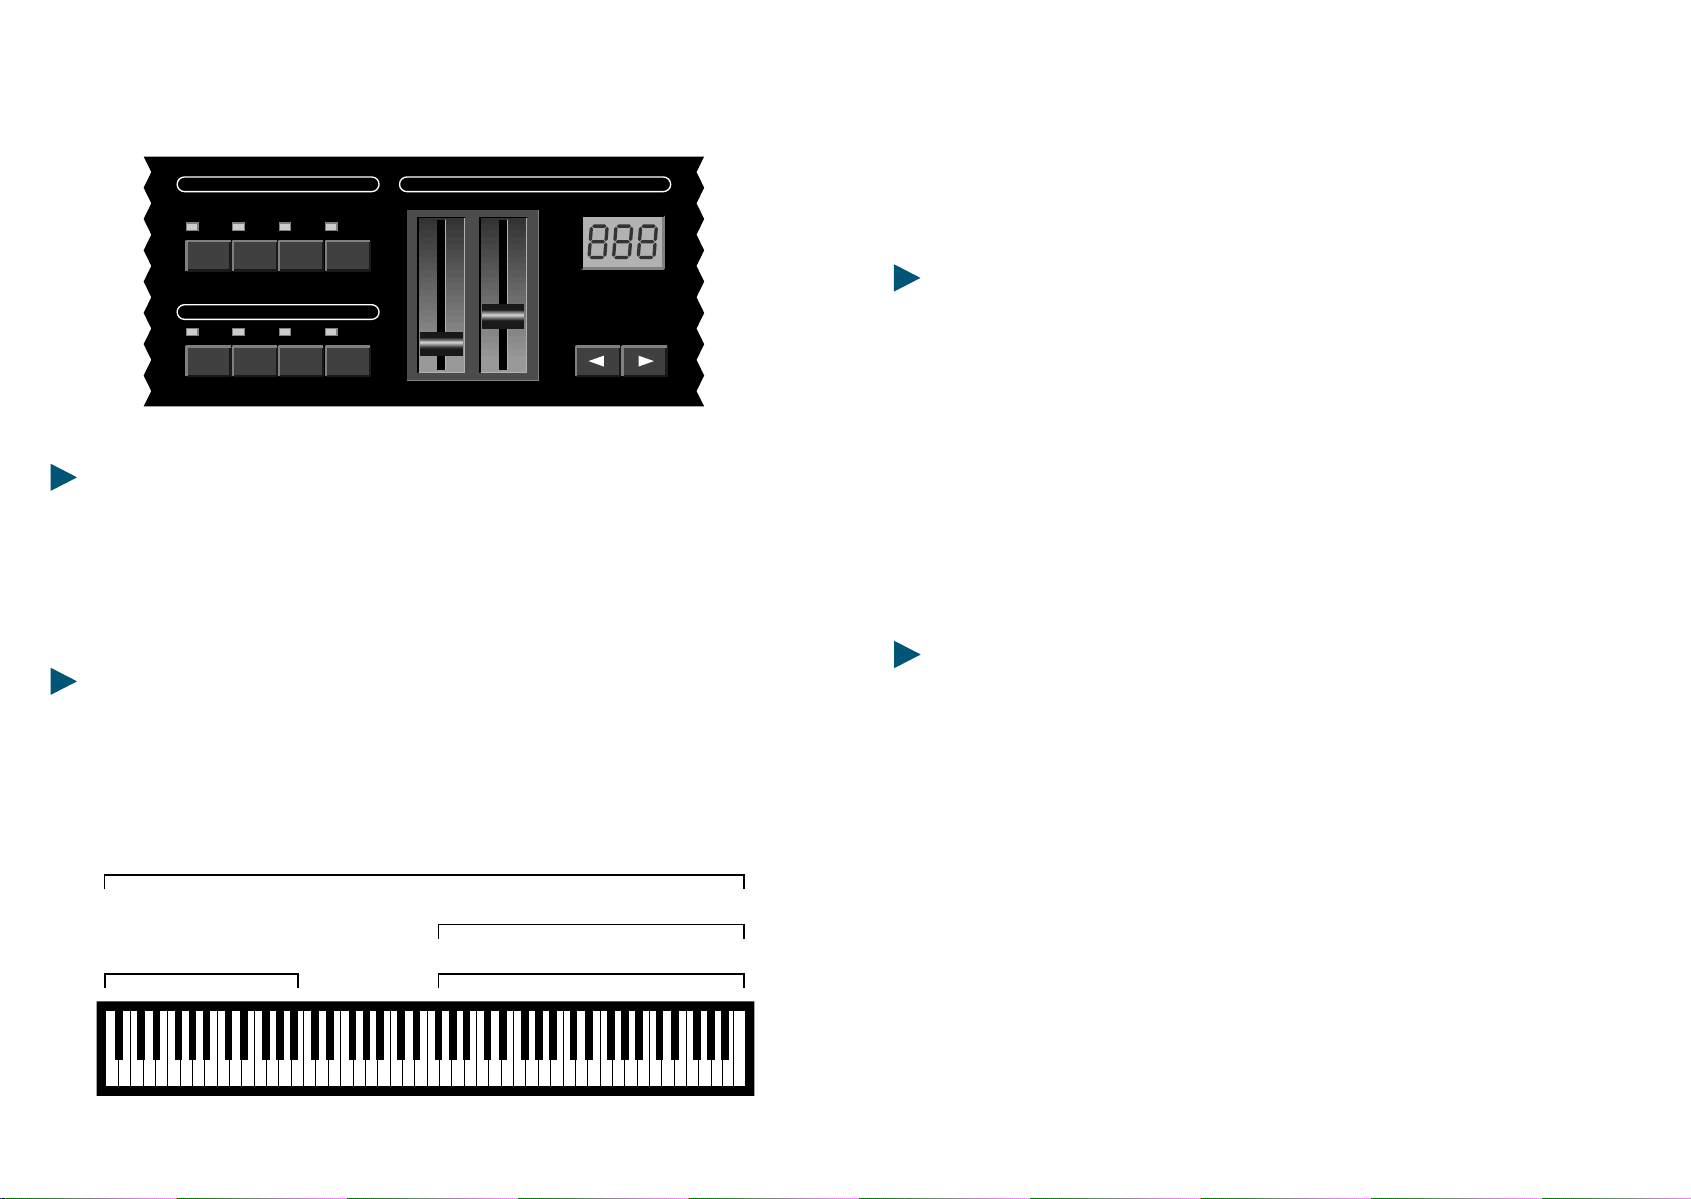
LE ZONE
All'interno di ogni singolo preset (o patch) è possibile creare da 1 a 4 zone di
tastiera per splits o sovrapposizioni. Ogni zona può essere programmata per avere
tuttiicontrolliMIDIdicuil'utenteavràbisogno.
Per abilitare o disabilitare ogni zona premere lo switch contrassegnato da 1 a 4
sottolascritta<ZONES>.
PROGRAMMAZIONE DI UNA ZONA
Le istruzioni che seguono riguardano la procedura di edit di una zona, con tutte le
possibilità software che possiede la macchina, ricordando che all'interno di un
preset è possibile combinare fino a 4 zone. È chiaro poi che l'utente programmerà
laSTUDIO1100secondoleproprieesigenze.
KEY RANGE o ESTENSIONE DI ZONA
Tenere premuto lo switch della zona che si vuole creare - premere il tastino
funzione n. 1 (in alto a sinistra) - rilasciare entrambi gli switches - ora il led relativo
alla zona lampeggia, e il display visualizza il numero di tasto più grave - a questo
punto ci sono 2 modi per definire il tasto di inizio e il tasto di fine zona = posso
suonare direttamente sulla tastiera la nota più grave e la nota più acuta ed
automaticamente il key range sarà settato e la modalità <EDIT> terminerà non
lampeggiano più il led della zona interessata; oppure tramite lo slider <CSL/DATA>
fisserò il numero di tasto più grave e premendo una seconda volta lo switch
funzione n. 1 il display visualizza il tasto più acuto ed agendo sullo slider
<CSL/DATA> fisserò il numero del tasto più acuto; per uscire dall'ambiente <EDIT>
èsufficientepremereloswitchdellazona.
RCV CHAN - CANALE MIDI IN RICEZIONE
STUDIO 2001 è provvista di un MIDI INPUT, quindi accetterà dati in arrivo da
dispositiviesternieverranoriportatiinuscitasulleMIDIOUT(MIDIMERGE).
Persettare il canale MIDI in ricezione tenere premuto loswitch della zona, premere
poi lo switch funzione n. 1 per tre volte e il display indicherà il numero di canale in
ricezione = muovendo lo slider <CSL/DATA> si deciderà il numero desiderato = se
si visualizza un trattino orizzontale <-> la STUDIO 1100 funzionerà da MIDI
MERGE bypassando qualsiasi informazione di qualsiasi canale MIDI, se ad esempio
visualizzo il numero 1 tutti i dati saranno bypassati ma i messaggi di program
change del canale MIDI 1 provenienti da dispositivi esterni saranno interpretati
come program change che cambieranno i preset della STUDIO 1100. Premere lo
switchdellazonaperusciredall'ambiente<EDIT>.
Bass (Zone 2, channel 4) Flute (Zone 4, channel 12)
Strings (Zone 3, channel 8)
Piano (Zone 1, channel 5)
1243
1243
LOW KEY
HIGH KEY
RCV CHAN
PROGRAM
CHANNEL
WHEELS
VOLUME
VELOCITY
AFTERTCH
TRANSPOSE
CSL
PEDAL
PERFORM / EDITPRESET / FUNCTION
ZONES
CSL / DATA MASTER VOL PRESET / VALUE
PRESET / ZONE
LOAD SAVE
Other manuals for STUDIO 900
1
This manual suits for next models
2
Table of contents
Languages:
Other Fatar Recording Equipment manuals


