FatShark DOMINATOR User manual

WARNING: DO NOT leave the headset exposed to direct sunlight. Sunlight will magnify through
the optics and burn holes in the OLED color filter. Damage from sunlight will not be covered under
warranty. Keep goggles in protective case when not in use.
WARNING: Always operate this product in a safe and responsible manner and observe local laws.
WARNING: The Dominator by Fat Shark is not a toy. This product contains small parts and is
intended to be operated by adults. Not for children under 14 years old.
Dominator Digital Headset User Manual
Rev. 270622(DDMMYY)
THIS HEADSET INCLUDES ANTENNAS AND BATTERY REQUIRED, NOT INCLUDED
1#1125 Dominator Headset
1 Carrying Case
1Head Strap
1 XT-60 Battery Adapter
1Lens Cleaning Cloth
25.8GHz RP-SMA Directional or Omni Antenna
25.8GHz RP-SMA Omni Antenna
1Headset Battery

2Fat Shark DOMINATOR
TABLE OF CONTENTS
Diagrams ...............................................................................................................................................................3
Button controls.....................................................................................................................................................4
Linking ...................................................................................................................................................................4
Standby Mode ......................................................................................................................................................5
Signal strength and channel selection ...........................................................................................................5
Share options .......................................................................................................................................................5
Video transmitter options...................................................................................................................................6
Camera options....................................................................................................................................................6
Display settings....................................................................................................................................................6
Recording options................................................................................................................................................7
Buzzer options......................................................................................................................................................7
Playback options..................................................................................................................................................7
Firmware information ..........................................................................................................................................8
Restore factory settings......................................................................................................................................8
Betaflight Setup....................................................................................................................................................9
Canvas Mode (Betaflight) ...................................................................................................................................9
OSD Setup (Betaflight)........................................................................................................................................9
Troubleshooting ..................................................................................................................................................11
DOMINATOR HEADSET SPECIFICATIONS
DISPLAYS:
Dual Full HD 1080p OLED displays
FIELD OF VIEW (FOV):
46°
HEADSET ADJUSTMENTS:
Inter-Pupillary Distance (IPD): 57–70mm
Adjustable Focus Range: +2 to -6 diopter
HEADSET INTERFACE
• 2 top buttons (enter, record start/stop)
• 5 way switch (menu navigation)
• 1 bind button (recessed - insert tool to press)
• 1 power button (mechanical press on/ press off)
HEADSET OUTPUT:
USB-C (HDMI)
INPUT POWER:
5.5mm Barrel Connector, 7–21V Center Pin Positive
SD CARD SLOT
Micro sized SD card reader for recording video and firmware updates
ANTIFOG FAN
Slide vent for control
ANTENNAS (REQUIRED, NOT INCLUDED)
4 RP-SMA (top for omni antennas, front for omni or directional antennas)
OPERATING FREQUENCIES:
5.725–5.850GHz
WEIGHT:
315 g
OPERATING TEMPERATURE:
32°–104°F (0°–40°C)
COMPATIBLE VIDEO TRANSMITTER PROTOCOL:
Avatar HD

3Fat Shark DOMINATOR
Bottom View
Rear View
Top View
Front View
RP-SMA CONNECTORS
FOR OMNI ANTENNAS
RP-SMA CONNECTORS
FOR DIRECTIONAL OR
OMNI ANTENNAS
ANTI-FOG FAN CONTROL
POWER BUTTON
USB-C
IPD AND FOCUS
MICRO SD CARD SLOT
VIDEO DISPLAYS
Each eye adjustment can be controlled separately.
Slide to adjust IPD (The spacing between your
eyes). Twist to adjust focus.
DIAGRAMS

4Fat Shark DOMINATOR
Linking is the process of pairing the video goggles with the video transmitter. You will need to complete the linking process in order for the goggles to receive
video from the transmitter. You can link multiple transmitters to the same set of goggles.
1. Power ON the goggles. Wait for the goggles to display the main standby screen.
2. Power ON the video transmitter. Wait for the LED to blink green.
3. Press the link button on the video transmitter, the LED on the video transmitter turns red.
4. Use a tool to press the link button on the goggles; they will beep to indicate link mode.
5. When linking is complete, the goggles will stop beeping and the LED on the transmitter will turn green.
LINKING
• The transmitter will not send a video signal unless the goggle it is linked to is turned on.
• The transmitter will power up and transmit on the channel selected at the goggle.
• By default, the Public Channel will be selected. This channel should not be used for flying your drone and should only be used
to select a channel for operation.
• The system may prevent you from selecting channels currently in use by other pilots.
• Once you have selected a channel, the goggle and transmitter will go to your selected channel on future power ups.
• If your previously selected channel is occupied by another pilot while your system is not powered up, the system may default
back to Public Channel and prompt you to pick a dierent channel.
Right-hand view
BUTTON CONTROLS
After linking the video transmitter will operate under these conditions
RECORD
BACK
5-WAY SWITCH
LINK
POWER INPUT
Press the 5-way switch in the center,
or up/down/left/right for dierent
functions from the button.
Button Input Action
Back Short press Back one level Escape
Record Short press Start/stop video recording
5-Way Switch
Press center Enter Pause/play
Press up Menu up
Press down Menu down
Press left Menu left
Press right Menu right
5-WAY SWITCH
5Fat Shark DOMINATOR
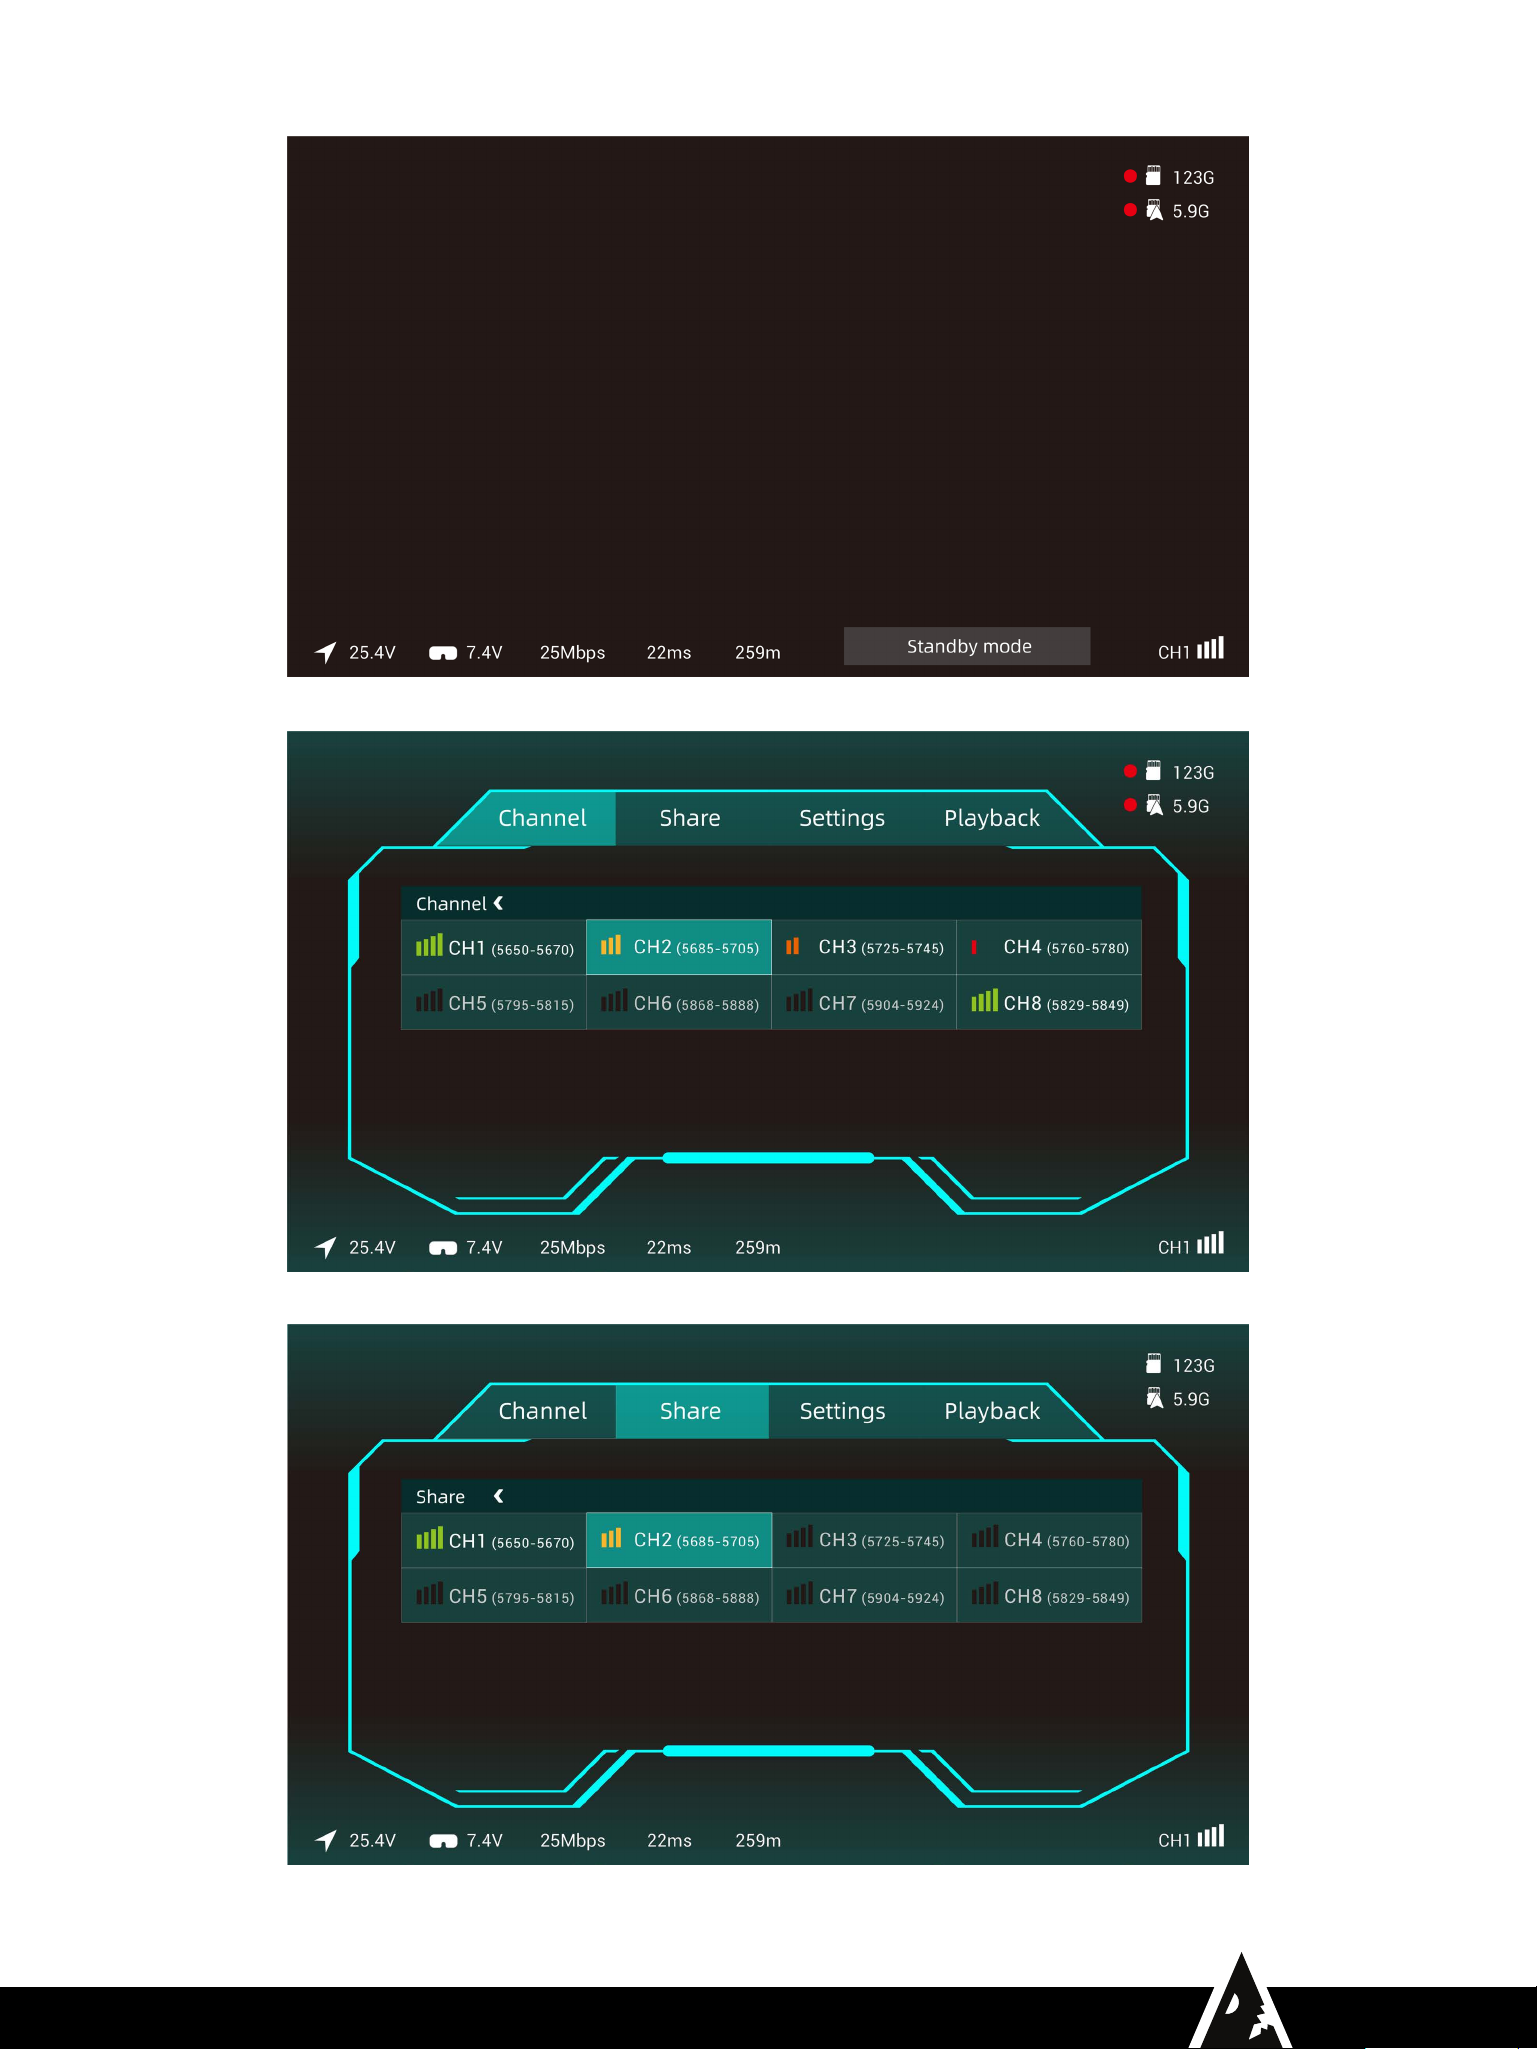
SIGNAL STRENGTH AND CHANNEL SELECTION
STANDBY MODE
SHARE OPTIONS

6Fat Shark DOMINATOR
CAMERA OPTIONS
VIDEO TRANSMITTER OPTIONS
DISPLAY SETTINGS
Camera, Transmit Power,
Frame Rate, and
Low Battery tabs have
sub menus available.
Select the tab to open the
sub menu.

7Fat Shark DOMINATOR
RECORDING OPTIONS
PLAYBACK OPTIONS
BUZZER OPTIONS

8Fat Shark DOMINATOR
FIRMWARE INFORMATION
RESTORE FACTORY SETTINGS

9Fat Shark DOMINATOR
OSD SETUP (BETAFLIGHT)
1. Connect the Flight Controller to Betaflight 4.x (MultiWii API version 1.41) or above
2. Select “Ports”
3. Select UART port that is connected with VTX, and set baud rate to 115200.
4. Save
CANVAS MODE (BETAFLIGHT)
Currently only Betaflight supports msp_displayport. Do not attempt to perform this CLI update on INAV. Please make sure that the FC firmware version is the latest version
of BetaFlight. The current (2021/03/12) is version 4.2.8. For a better experience, please wait for the release of version 4.3.0.
1. Connect VTX UART to FC’s serial port, such as UART3.
2. In the Ports interface, turn on the MSP function corresponding to the Identifier (UART3), the baud rate is 115200, Save and Reboot.
3. After opening the CLI, make the following settings:
A. Set osd_device to msp:
set osd_displayport_device = MSP
B. Specify the serial port of msp_displayport as 2 (the number in this place should be the serial port number minus 1):
set displayport_msp_serial = 2
C. Save and exit:
save
The setup is complete.
5. Select Configuration
6. Open OSD
7. Save
BETAFLIGHT SETUP
10Fat Shark DOMINATOR
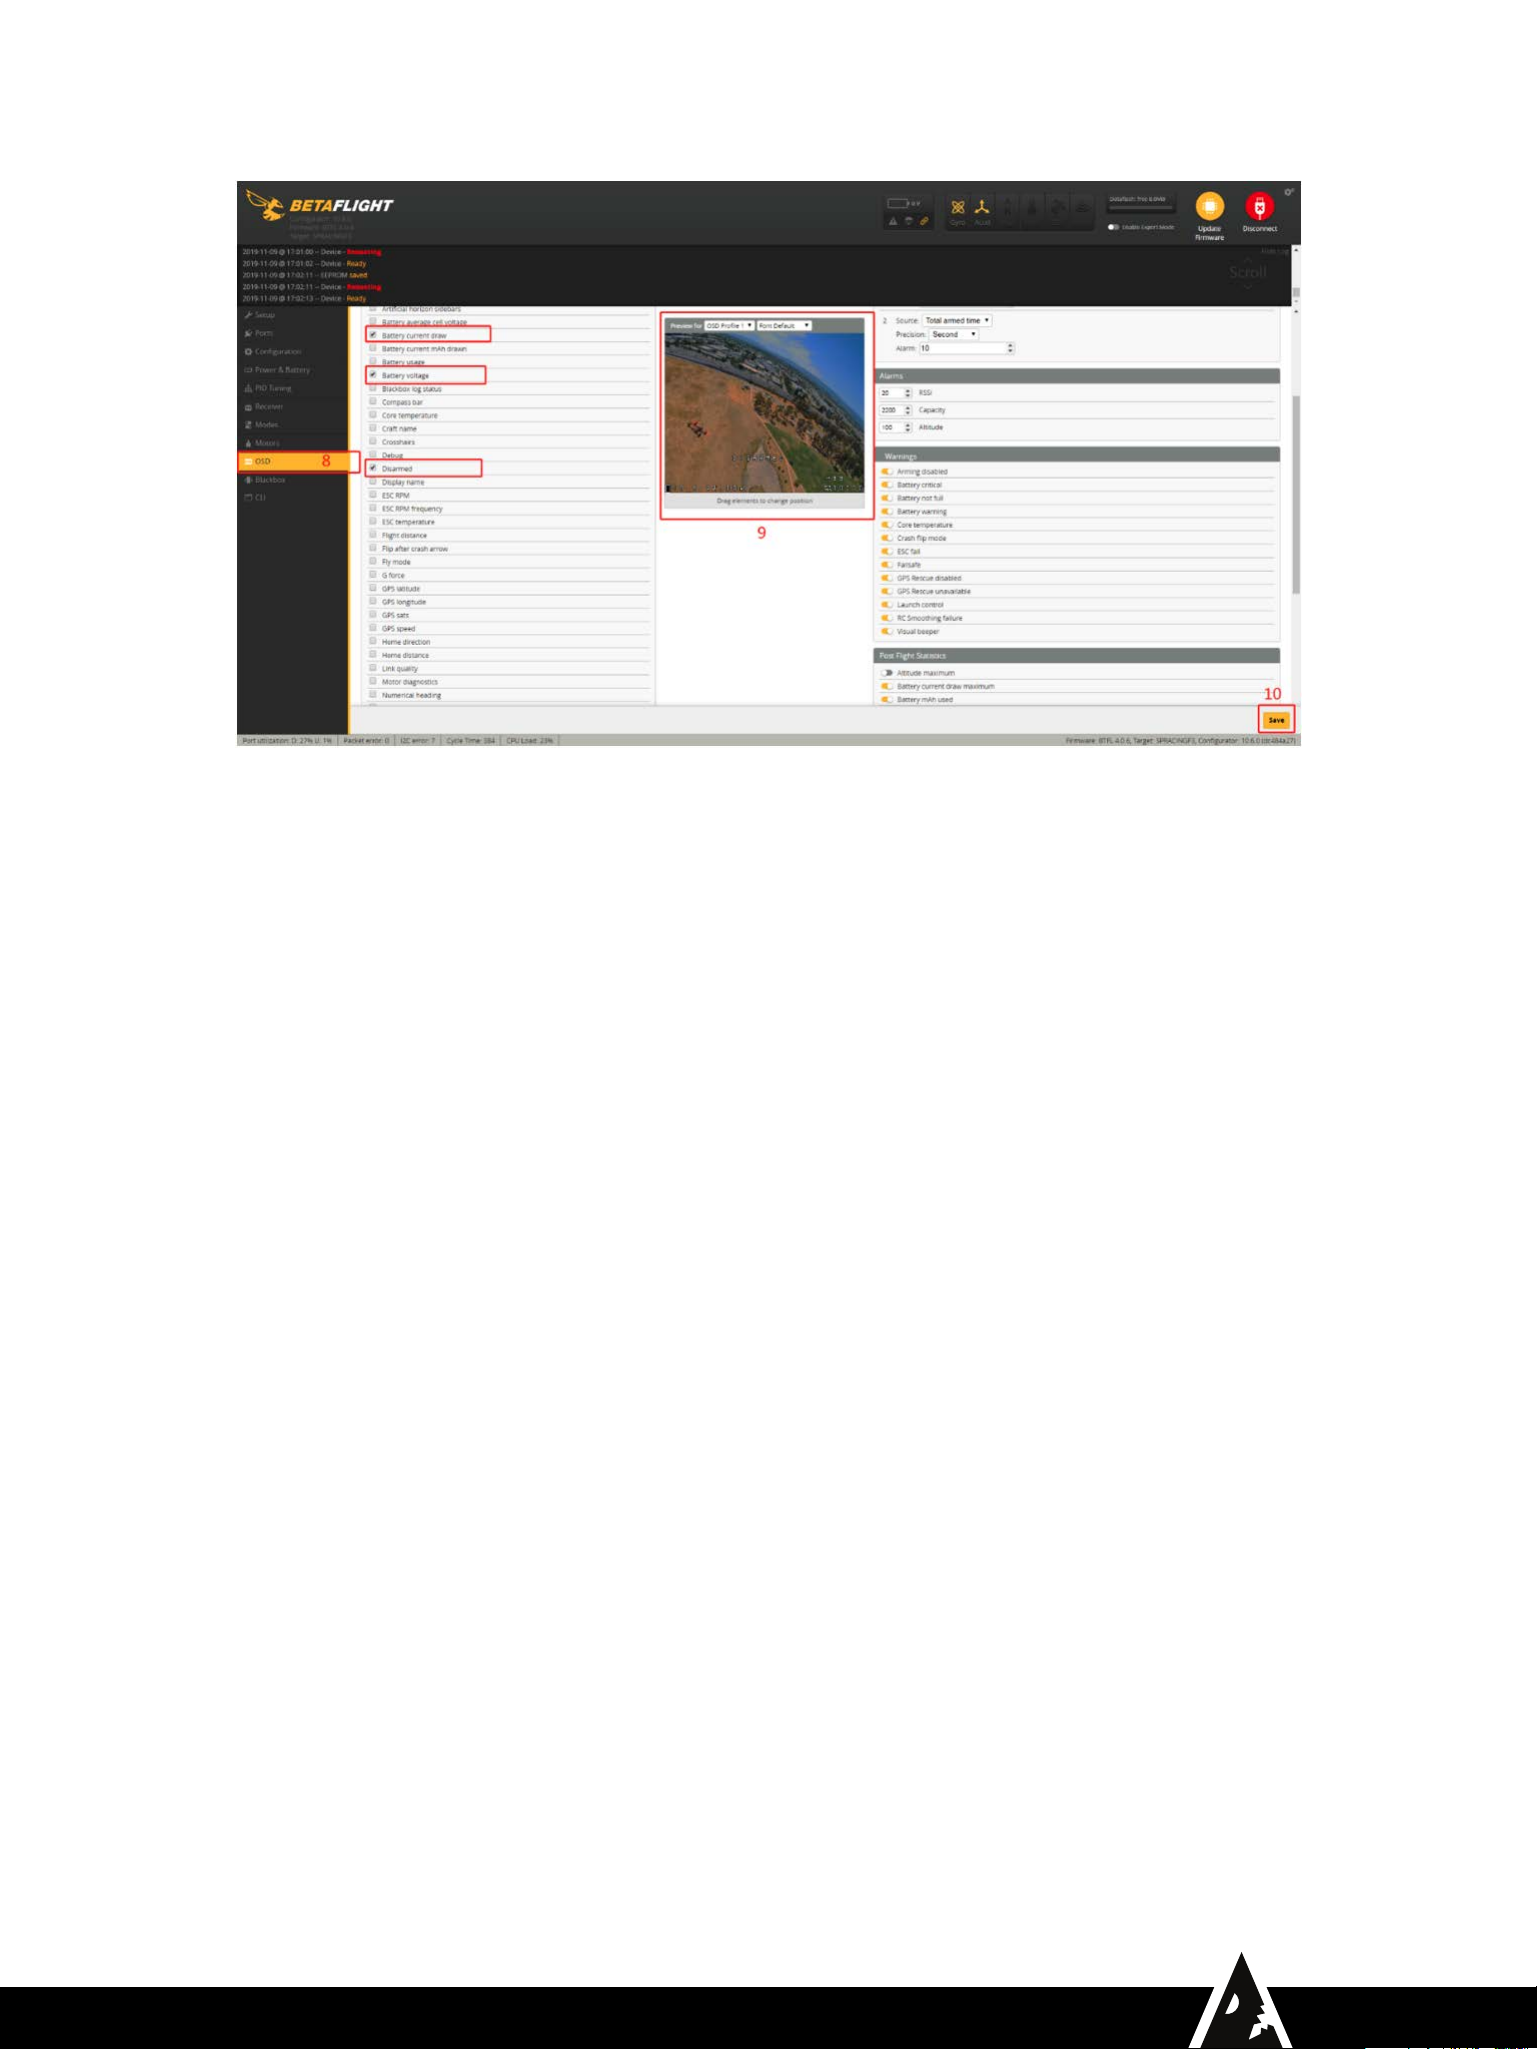
8. Select “OSD”
9. Select any combination of OSD functions, and drag them to desired positions shown on the simulated OSD.
10. Save

11Fat Shark DOMINATOR
TROUBLESHOOTING
Problem Possible Problem Possible Solution
Video recording not
working
SD card not set to correct format Reformat the SD card using the goggles
Less than 200MB available on the SD card Replace the card or clear o some space on the card and try again
Not a solid video signal Focus on reception first
Poor reception
RC antennas too close to video antennas Maintain maximum separation between RC antennas and video antennas
Shadowing of VTX antenna Try a dierent VTX antenna with a longer coaxial section to get the active element
further from carbon fiber or metal parts
VTX antenna connection loose
Ensure the VTX antenna and any adapters in use are secured and solidly
connected. If the antenna becomes disconnected during operation it will degrade
performance and may cause permanent damage to the VTX.
VTX has entered overheat protection mode
Disconnect power and allow the video transmitter to cool, then reconnect power
and try again.
Improve airflow to the video transmitter RF board in your installation.
In unconventional installations with poor ventilation, consider adding a cooling fan
to improve air flow.
Loose antenna connection on video transmitter Make sure antenna connector is seated securely
Interference from other source of RF Move goggle away from possible sources or RF interference such as wifi routers,
high power transformers, etc
White dead areas appear
on screen Damage from sunlight
Keep the goggles from being exposed to direct sunlight on the optics to prevent
further damage. Contact service for a repair quote. Damage from sunlight is not
covered under warranty.
Dominator Digital Headset User Manual Rev. 270622(DDMMYY)
For more product information, please visit: www.FatShark.com
All Rights Reserved
TECHNICAL SUPPORT
NOTE: Support should be attempted in the following order. Initial inquiries to Fat Shark support will expect you to have exhausted the online and retailer resources:
1. Research Fat Shark helpdocs which can be found at http://fatshark.helpscoutdocs.com/ under FatShark Troubleshooting.
2. Contact your retailer for support.
3. Email Fat Shark support. [email protected]
Warranty
The system can be exchanged for a new unit within 7 days for any manufacturing defects if returned in new condition. The video headset will be warrantied for repair for 2 years if
there are no signs of excessive use. Buyer will be responsible for shipping costs. If beyond the warranty period, Fat Shark will provide repair services.
Other manuals for DOMINATOR
1
Table of contents
Other FatShark Headset manuals


