Favero ASSIOMA UNO User manual

1. User Manual 1EN
Manuale d’uso 17 IT
Technische Informationen 33 DE
Art. 772-01 ASSIOMA UNO cycle power meter
Art. 772-02 ASSIOMA DUO cycle power meter
0259-0902A _Rev10


1
FAVERO Electronics - 0259-0902 Assioma user manual _Rev10 - EN-IT-DE
ENGLISH
ENGLISH -USER MANUAL
Contents
1. Versions
Assioma UNO left pedal with power sensor,
right pedal without power sensor
Art.
772-01
Assioma DUO Left and right pedals with power sensor Art.
772-02
1. Versions 1
2. Package content 2
3. Product description 2
4. Warnings 3
5. Quick start 3
6. Switching on Assioma 3
7. Activating Assioma 3
8. Fixing the pedals to the crank-arms 4
9. Cleat xing, shoe position check and cleat release force adjustment 5
10. Bike computer conguration 7
11. Manual zero offset 8
12. Using Assioma for the rst time on road or rollers 9
13. Battery charge 9
14. Transforming Assioma UNO into Assioma DUO 11
15. Removing the pedals 11
16. Reinstalling the pedals (on another bicycle) 11
17. Compatible bike computers 11
18. LEDs behavior 12
19. Inspection and maintenance 12
20. Spare parts 12
21. Product troubleshooting 13
22. Copyright 14
23. Warranty 14
24. Technical features 14
25. Exploded view of the components 16
2FAVERO Electronics - 0259-0902 Assioma user manual _Rev10 - EN-IT-DE
ENGLISH
2. Package content
• Assioma pair of pedals with sensor (1 sensor for Assioma UNO, 2 sensors for Assioma DUO).
• 1 battery charger with EU, US, UK, AU plug adaptors ( IEC Types C, A, G ,I ).
• 2 m USB/micro USB cable (1 cable for Assioma UNO,2 cables for Assioma DUO).
• Magnetic charging connector (1 connector for Assioma UNO,2 connectors for Assioma DUO).
• 2 red cleats (6° oat), 1 8 mm hexagonal wrench, 4 washers.
• User manual, Safety instructions, Warranty information.
3. Product description
Assioma is a pedal for racing bicycles with a quick clip system, provided with power
sensor to measure the force applied to the pedal during pedal stroke.
This pedal includes the function of cadence meter and can calculate the power of a
single leg in real time, sending it to the bike computer.
It is provided with a 50 hour rechargeable battery and is designed to guarantee many
years of use. Therefore, there are no openings with gaskets for the replacement of the
battery.
Assioma is fully sealed (IP67) thanks to its case without openings and all its internal
components are immersed in a special lling resin.
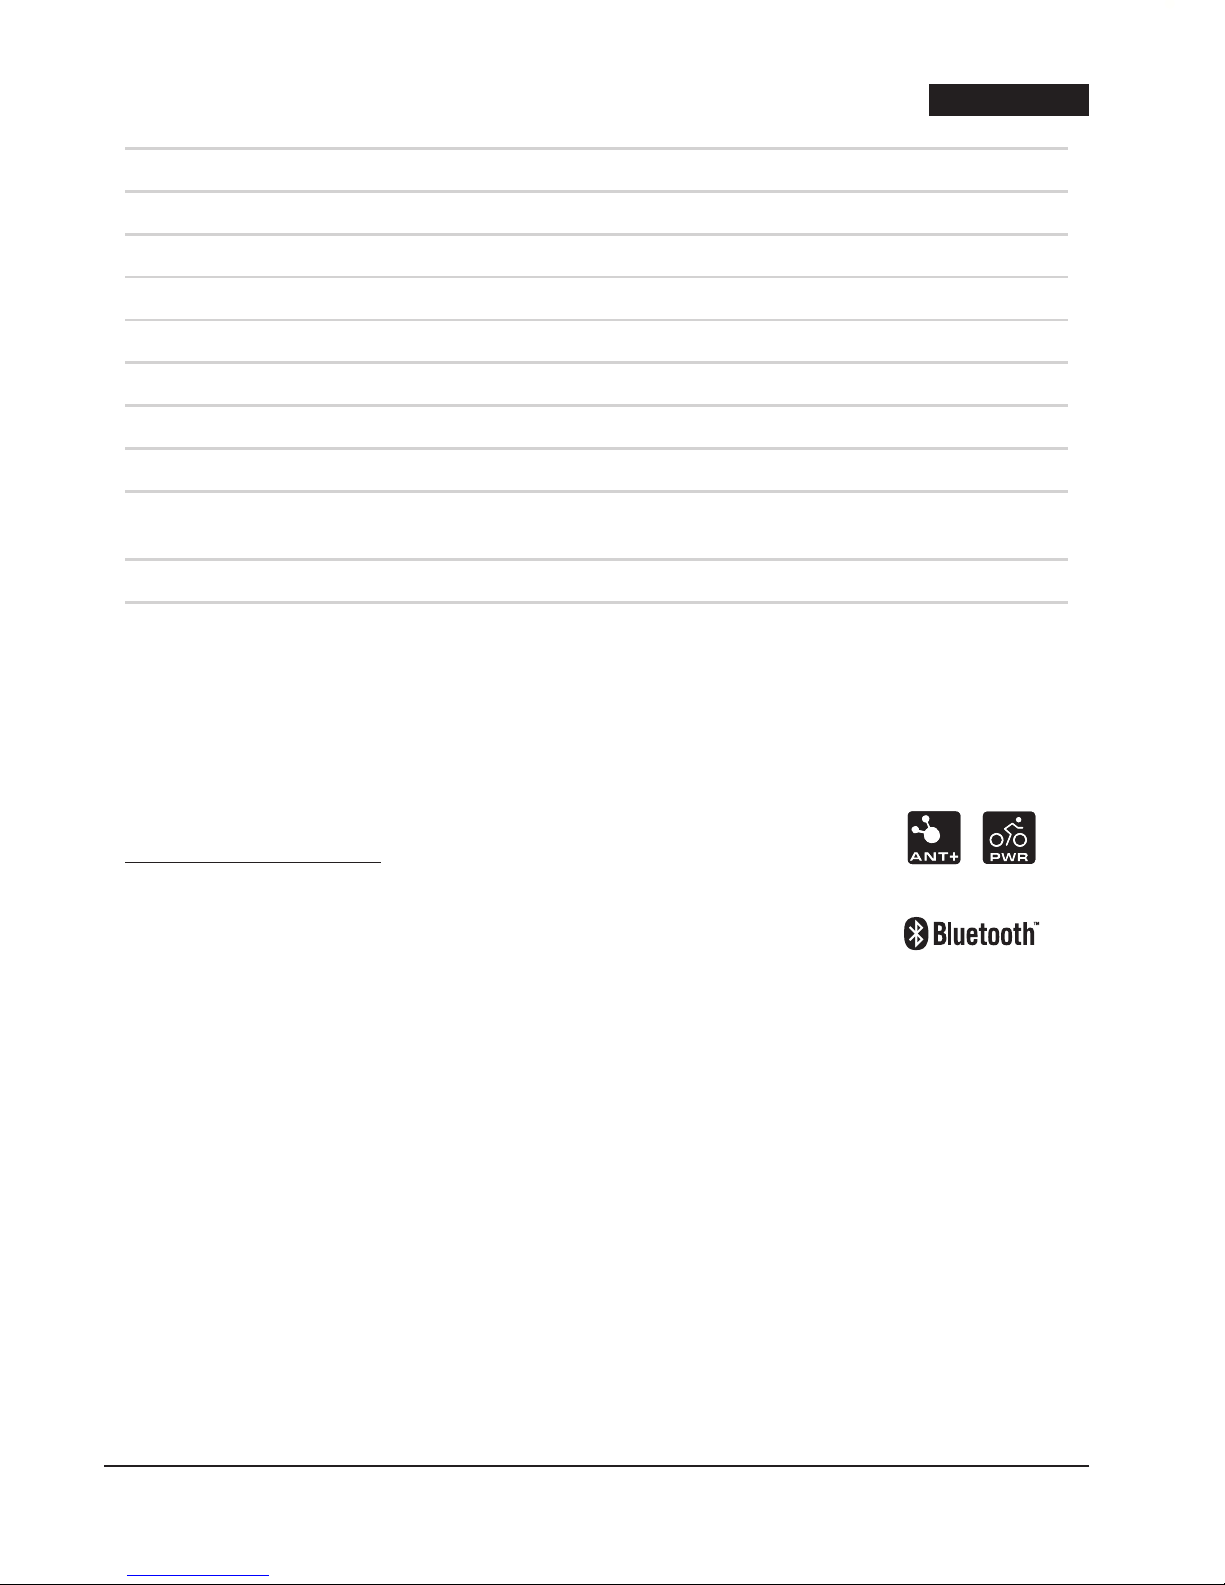
For radio communication, Assioma is compatible with the ANT+ standard and
Bluetooth v4.0 standard, or later version. The use of Bluetooth v4.0 in
smartphones started in 2011 - 2012.
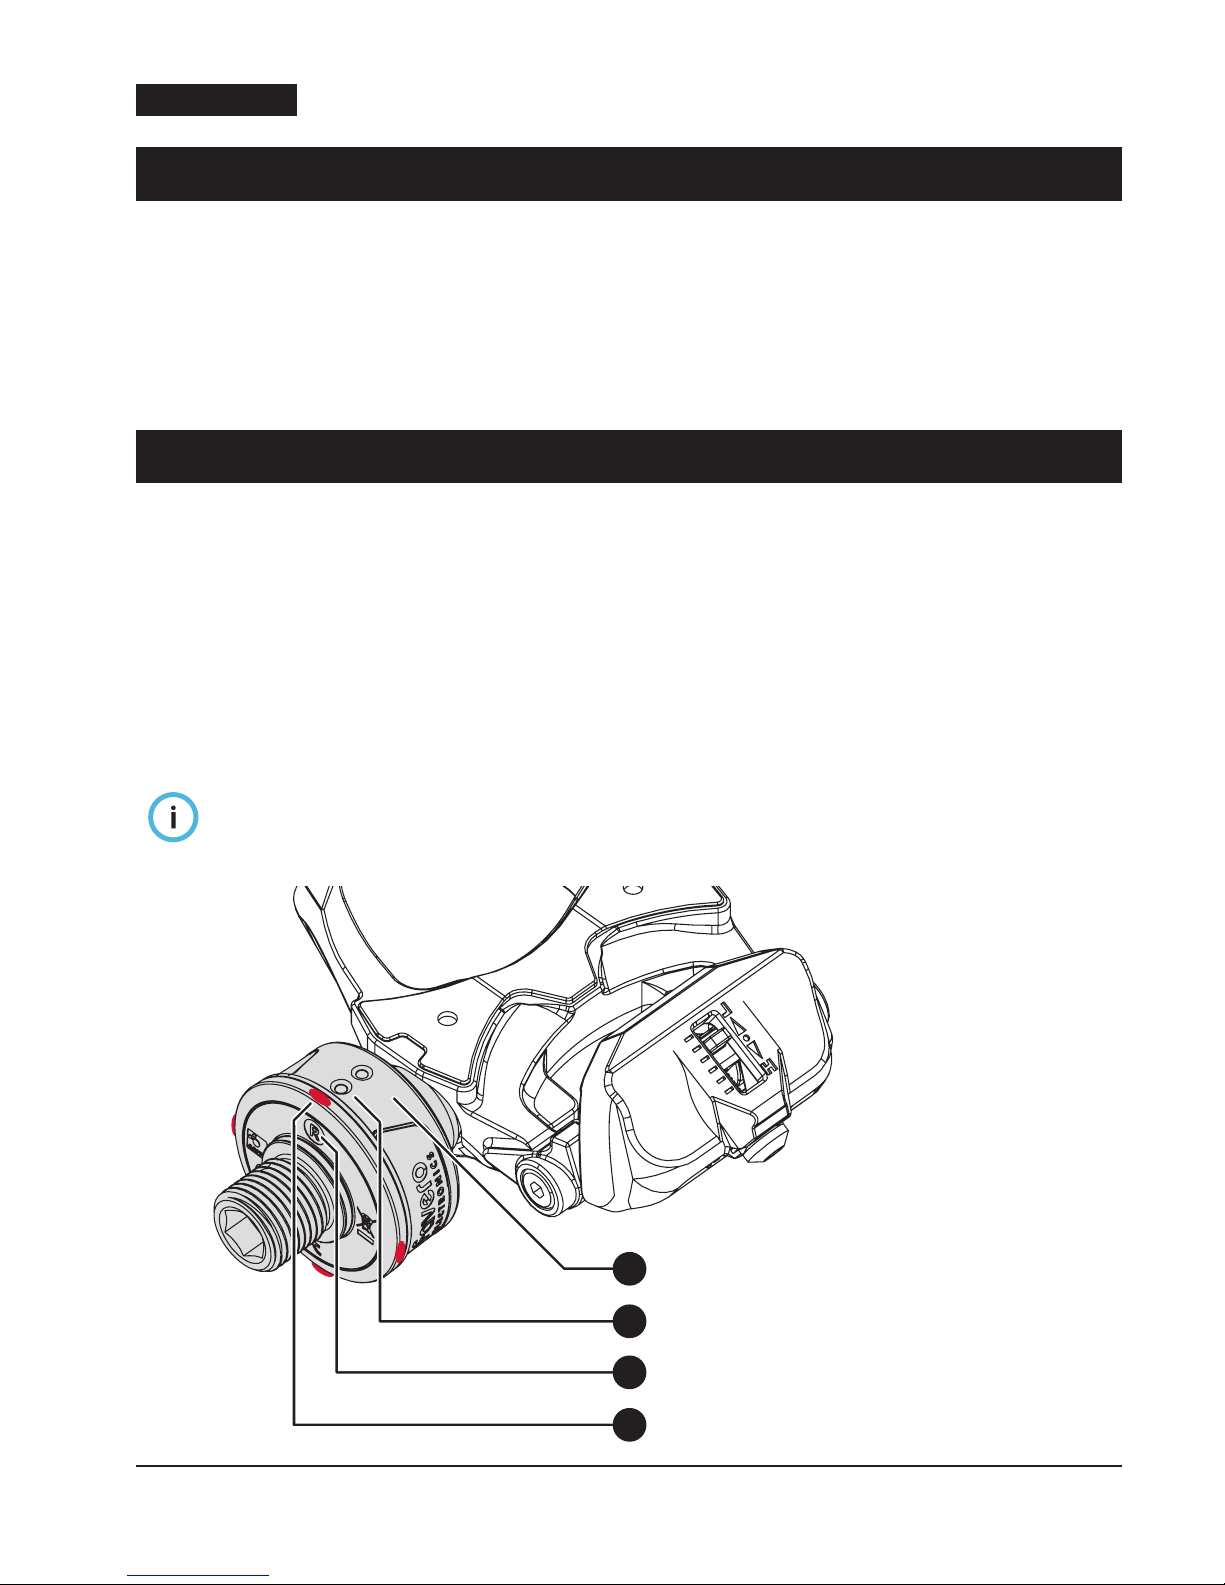
b
c
d
a
4 LEDs, one every 90°
Left pedal (L) or right pedal (R) indication
Connector for battery charging
Sensor
3
FAVERO Electronics - 0259-0902 Assioma user manual _Rev10 - EN-IT-DE
ENGLISH
2. Package content
• Assioma pair of pedals with sensor (1 sensor for Assioma UNO, 2 sensors for Assioma DUO).
• 1 battery charger with EU, US, UK, AU plug adaptors ( IEC Types C, A, G ,I ).
• 2 m USB/micro USB cable (1 cable for Assioma UNO,2 cables for Assioma DUO).
• Magnetic charging connector (1 connector for Assioma UNO,2 connectors for Assioma DUO).
• 2 red cleats (6° oat), 1 8 mm hexagonal wrench, 4 washers.
• User manual, Safety instructions, Warranty information.
3. Product description
Assioma is a pedal for racing bicycles with a quick clip system, provided with power
sensor to measure the force applied to the pedal during pedal stroke.
This pedal includes the function of cadence meter and can calculate the power of a
single leg in real time, sending it to the bike computer.
It is provided with a 50 hour rechargeable battery and is designed to guarantee many
years of use. Therefore, there are no openings with gaskets for the replacement of the
battery.
Assioma is fully sealed (IP67) thanks to its case without openings and all its internal
components are immersed in a special lling resin.
For radio communication, Assioma is compatible with the ANT+ standard and
Bluetooth v4.0 standard, or later version. The use of Bluetooth v4.0 in
smartphones started in 2011 - 2012.
b
c
d
a
4 LEDs, one every 90°
Left pedal (L) or right pedal (R) indication
Connector for battery charging
Sensor
4. Warnings
Please carefully read this manual and the safety instructions before installing
the product. An incorrect installation may lead to accidents and possible
damage to things and/or injury to people.
If you have any doubts about your ability to install the product, we recommend
you to ask for the assistance of a specialized mechanic. An incorrect installation
may cause or result in irreparable damage to the product which shall not be
covered by the warranty. Before starting to ride, check that the force necessary
to release your shoe from the pedal is suitable.
Visit the YouTube channel: Favero Cycling to see the detailed video installation.
https://www.youtube.com/Favero_cycling
5. Quick start
1. Switching on Assioma (Chap. 6).
2. Activating Assioma (Chap. 7).
3. Fixing the pedals to the crank-arms (Chap. 8).
4. Cleat xing, shoe position check and cleat release force adjustment (Chap. 9).
5. Bike computer conguration (Chap. 10).
• Pairing Assioma to the bike computer (Chap. 10.1).
• Conguration of power elds (Chap. 10.2).
• Crank-arm length (Chap. 10.3).
6. Manual zero offset (Chap. 11).
7. Using Assioma for the rst time on road or rollers (Chap. 12).
6. Switching on Assioma
Assioma will automatically switch on by turning the pedals or starting to ride and will
automatically switch off after 5 minutes of inactivity.
When using for the rst time, Assioma can only be switched on by connecting it
to the battery charger with the supplied cable for a few seconds. If the LEDs do
not blink, charge the battery as indicated in Chap. 13.
For LED behavior read Chap. 18.
7. Activating Assioma
Assioma must be activated to measure the power and cadence. If it is not activated,
such measuring will not be performed.
The activation also determines the start of the warranty period, allows updating the

4FAVERO Electronics - 0259-0902 Assioma user manual _Rev10 - EN-IT-DE
ENGLISH
software and sending diagnostic reports to check the correct operation of the product.
Activation is obtained with the specic “Favero Assioma” app, available both for iOS
and Android. The app can be downloaded free of charge.
Make sure that your smartphone is compatible with the Bluetooth v4.0
standard or later versions, and that your internet connections is active.
Open the app and follow the instructions to perform the search, the connection to
your device and the activation.
For more information, read the FAQs on the website: cycling.favero.com.
8. Fixing the pedals to the crank-arms
8.1. Washer use
The washers supplied are only necessary in the following cases:
• The crank-arm producer requires the use of a washer.
• The crank-arm has a recessed seat and one or two washers must be used to ensure a
free space between sensor and crank-arm.
Pressing the sensor against the crank-arm when tightening the pedal may
damage it. This operation would invalidate the warranty. If necessary, use 1 or 2
washers to ensure a free space of at least 1 mm between the sensor and
crank-arm.
If a cadence sensor is tted near the pedal, remove it to avoid any contact with
the Assioma sensor.
≥ 1 mm
Crank-arm
with recessed seat
0 mm
5
FAVERO Electronics - 0259-0902 Assioma user manual _Rev10 - EN-IT-DE
ENGLISH
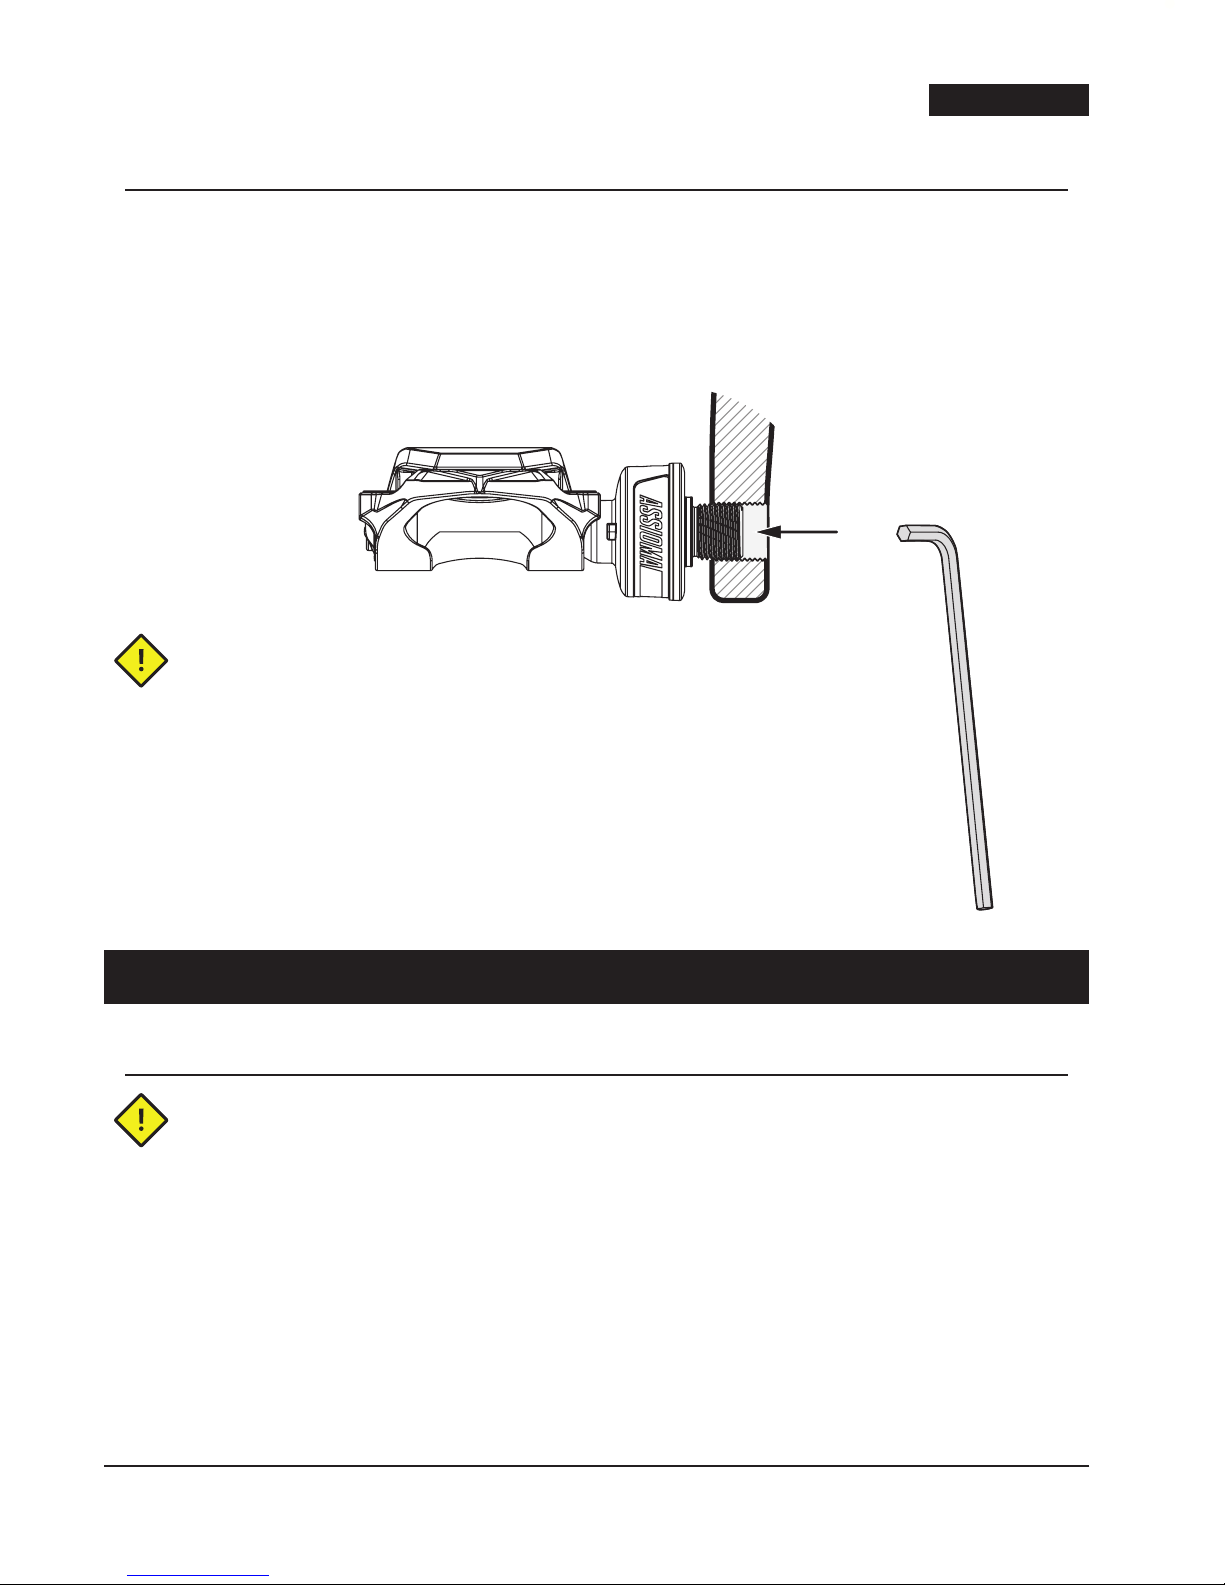
8.2. Tightening the pedals
Before tightening the pedals, apply a thin layer of grease to the pedal axle thread.
Tighten the pedal to the crank-arm using the supplied 8 mm hexagonal wrench at a
tightening torque of about 35-40 Nm (25-30 ft lb), a standard torque for the tightening
of many pedals. If the crank-arm producer species a different tightening torque,
apply it.
Pay attention to the rotation direction:
• Tighten the left pedal
counter-clockwise
(facing the pedal).
• Tighten the right pedal
clockwise
(facing the pedal).
9. Cleat xing, shoe position check and cleat release force adjustment
9.1. Cleat xing
Use only the supplied cleats (red cleats, oat 6°) or original LOOK Kéo cleats.
The use of non-original LOOK kéo compatible cleats may be unsuitable and any
damage to the product will not be covered by the warranty.
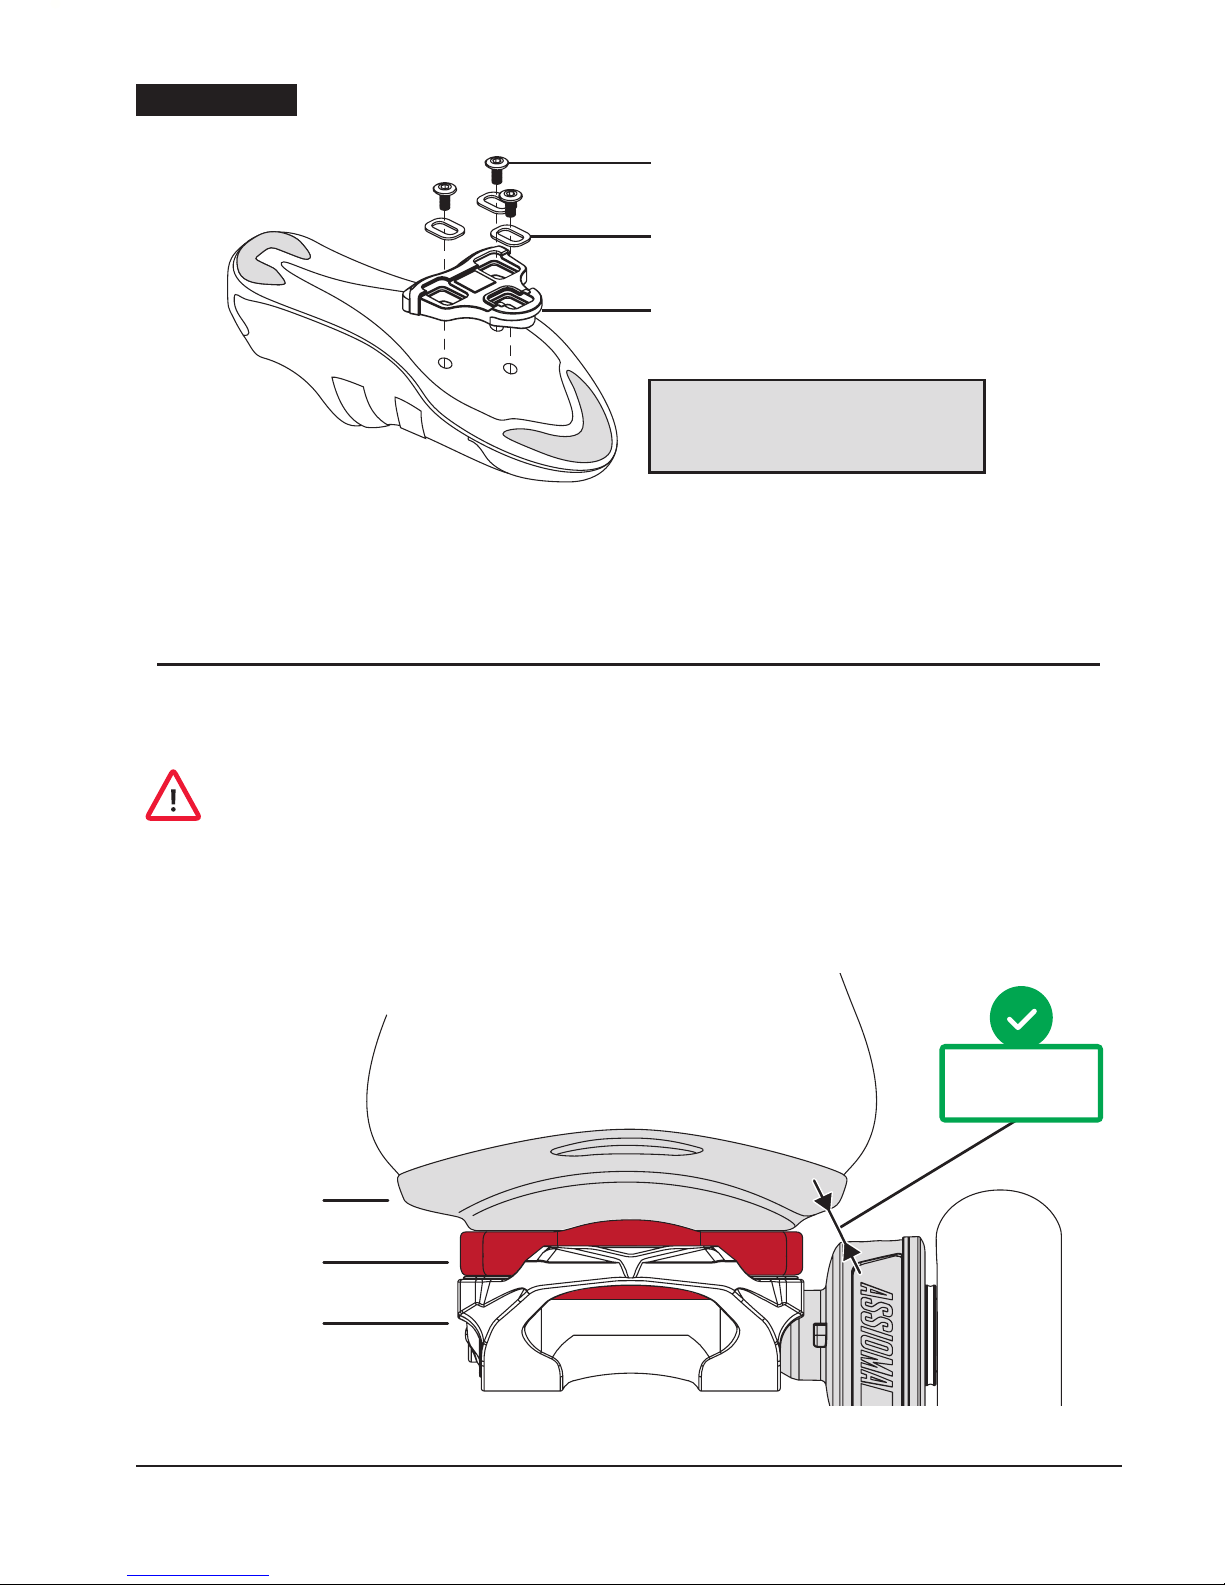
To x the cleats, use the supplied screws and washers.
Align the cleat in the preferred position and tighten the screws with a tightening force of
4÷6 Nm (3÷4.5 ft lb), as for most of the cleats on the market.
6FAVERO Electronics - 0259-0902 Assioma user manual _Rev10 - EN-IT-DE
ENGLISH
Black cleats are also available for separate purchase
(oat 0°), Art. 771-40.
9.2. Shoe position check
Thanks to its reduced dimensions, the sensor never comes into contact with the shoe
even when large size or at-soled footwear is worn.
Before starting to ride, check that the distance between the shoe and the sensor
is at least 2 mm. Do not use the product if the sensor is in contact with the shoe,
the shoe cover or the cleat, as it can be damaged and this would invalidate the
warranty.
If the distance between the sensor and the shoe is less than 2 mm, move the cleat to the
most appropriate position or insert spacer Art.771-45 between the cleat and the shoe sole.
Washers
Cleat
Tightening torque:
4÷6 Nm (3÷4.5 ft lb)
Fixing screws
Cleat
≥ 2 mm
Shoe
Assioma

7
FAVERO Electronics - 0259-0902 Assioma user manual _Rev10 - EN-IT-DE
ENGLISH
9.3. Cleat release force adjustment
Before starting to ride, try to release the shoe several times and make sure that
the release force is suitable.
10. Bike computer conguration
10.1. Pairing Assioma to the bike computer
The pairing procedure associates Assioma to the bike computer to start the radio
communication between the two devices.
Please read the bike computer manual to learn how it performs the search and
pairing of a power sensor. Make sure that Assioma is switched on before
proceeding (Chap. 6).
Each Assioma has a unique 5-digit ANT+ ID identication number (written on the
packaging). This number identies Assioma in the list of devices which can be
paired with the bike computer.
Bike computers with ANT+ technology need only to be paired with the left pedal.
The left pedal will transmit the data collected by the associated right pedal too.
Bike computers, or other devices, with Bluetooth technology and Cycling Power
Prole (CPP) need to be paired with both the left and the right pedal.
The name of the right-sided Assioma will be recognizable by the R ID identication
number (indicated outside the box).
The spring tension can be adjusted using the
screw shown in the picture. To increase the
tension turn clockwise;
to decrease the tension, turn counter-clockwise.
Use a 3 mm wrench (not supplied).
Increase
Decrease
Adjust the tension
of the spring depending
on your needs.
8FAVERO Electronics - 0259-0902 Assioma user manual _Rev10 - EN-IT-DE
ENGLISH
Important warnings to avoid communication problems during the pairing:
• Make sure that there are no other power meters switched on nearby
(10 meters).
• The bike computer must be within 2 m from Assioma.
10.2. Conguration of power elds
Once the pairing procedure has been completed (Chap. 10.1), it is possible to congure
the bike computer so that it displays the power data in the preferred way: please refer
to the bike computer manual.
It is recommended to at least set the following parameters: 3 second power, 30 second
power, cadence, 30 second average balance.
10.3. Crank-arm length
The crank-arm length affects power calculation: Assioma must know this length. An
incorrect value will lead to incorrect power values.
Please refer to the bike computer manual to learn how to set the crank-arm length.
Use the Favero Assioma app only if it is not possible to set the crank-arm length on the
bike computer.
Setting the crank-arm lenght via the Favero Assioma app is useless if the bike
computer already provides this setting.
11. Manual zero offset
Each Assioma sensor is factory calibrated to ensure its guaranteed precision under any
operating conditions, including ambient temperature variations, for which automatic
compensation from -10°C to +60°C is active. For this reason, the user does not have to
calibrate the device.
However, it is important to periodically perform a “manual zero offset” to eliminate
any measurement variations which may have occurred over time, due to mechanical
adjustments or impacts.
Perform a manual zero offset adjustment any time the pedals are reinstalled and, for
maximum precision, any time you use them.
The zero offset function is often indicated in bike computers with the term of
“calibration”.

9
FAVERO Electronics - 0259-0902 Assioma user manual _Rev10 - EN-IT-DE
ENGLISH
How to perform a manual zero offset:
• Switch Assioma and the bike computer on.
• Release the shoes from the pedals and make sure that they are not in contact with
anything.
• Place the crank-arms in the vertical position.
• Read the bike computer manual to learn how to:
• Open the power sensor menu.
• Press the “Calibration” or “Zero Offset” button.
• Make sure that the zero offset adjustment was successful; usually the
display shows a conrmation message or a 0 (zero).
• Repeat the operation if an error occurs.
Sometimes the zero offset is slowed down or prevented if other ANT+ sensors
(e.g. cardio band, cadence sensor) are enabled but switched off on the bike
computer, as the bike computer searches them but cannot nd them. In this case,
it is necessary to switch them on, or disable them temporarily on the bike
computer.
12. Using Assioma for the rst time on road or rollers
On the rst installation, Assioma will not send any power data to the bike computer
until it has completed the internal self-calibration. Assioma self-calibrates while
cycling by making a few tens of complete pedal strokes. To speed up the procedure, it
is advisable to cycle seated, at a uniform pace and on a leveled road. Self-calibration
can be considered completed once Assioma sends the power data to the bike
computer.
13. Battery charge
Assioma has an internal rechargeable lithium battery, with an approximately 50
hour life span. The capacity of each battery is tested during the manufacturing
process.
The battery life is very long thanks to the low number of battery charges required.
If you use Assioma for 15 hours a week, it is sufcient to charge it once every 3 weeks.
The battery can also be charged when it is only partially discharged: this will further
increase its life span.
If the product is not used for long periods of time, charge the battery anyway at
least every 3 months in order to avoid the risk of irretrievably damaging the
product.
When the battery of a pedal runs low, the bike computer will display a warning. The
remaining battery life, after a low battery warning, will be of about 8 hours.

10 FAVERO Electronics - 0259-0902 Assioma user manual _Rev10 - EN-IT-DE
ENGLISH
To charge the batteries, follow the procedure below for each sensor:
• Connect the battery charger supplied to an electrical socket.
• Connect the USB cable supplied to the battery charger.
• Insert the micro USB connector into the magnetic connector (see the picture).
• If the sensor contacts are wet or dirty, dry or clean them with a dry cloth.
• Connect the magnetic connector to the pedal as indicated in the picture: the LEDs
switch on and remain switched on during the entire recharging. Once recharging has
been completed, the LEDS will blink every 0.5 seconds.
Recharging a completely discharged battery takes about 6 hours.
Recharge at a temperature ranging between 5°C and 40°C. Beyond this range,
recharging is blocked to protect battery functionality.
If necessary, Assioma can also be charged with a common smartphone battery
charger, instead of using the one supplied.
When a socket for battery charger is not available, a common “power bank” can be
used. To charge two sensors at the same time, use a model with 2 USB ports. Some
models are not able to fully charge the battery as their minimum charge current is
higher than 50 mA.
Micro USB connector
Magnetic charging
connector

11
FAVERO Electronics - 0259-0902 Assioma user manual _Rev10 - EN-IT-DE
ENGLISH
14. Transforming Assioma UNO into Assioma DUO
Assioma UNO measures the power only on the left pedal. It is possible to buy the right
pedal with the sensor (art. 772-51) at a later date and therefore pass to a system equal
to Assioma DUO. The left pedal must be paired to the new right pedal using the Favero
Assioma app.
15. Removing the pedals
To remove the pedal, use the supplied 8 mm hexagonal wrench:
• Unscrew the LEFT pedal CLOCKWISE (facing it).
• Unscrew the RIGHT pedal COUNTER-CLOCKWISE (facing it).
16. Reinstalling the pedals (on another bicycle)
Any time the pedals are moved from one bicycle to another, a manual offset must be
performed (Chap. 11).
Once the pedals are reinstalled, the power and cadence data displayed on the bike
computer are no longer reliable until Assioma performs an internal self-calibration.
Assioma self-calibrates while cycling by making a few tens of pedal turns. To speed up
the procedure, it is advisable to ride seated, at a uniform pace and on a leveled road.
17. Compatible bike computers
Assioma is compatible with any ANT+ bike computers with Bike Power (PWR) prole.
For the complete list of the ANT+ certied products, visit the website:
http://www.thisisant.com/directory/ (select “Bike Computers” in the Categories menu).
It is advisable to install the latest rmware version available from the bike
computer manufacturer.
If you buy a new bike computer, we suggest the purchase of a model having a
“CT” (Crank Torque) ANT+ prole, which ensures a better stability of the power
being displayed.

12 FAVERO Electronics - 0259-0902 Assioma user manual _Rev10 - EN-IT-DE
ENGLISH
18. LEDs behavior
Fast and continuous blinking for 3
seconds
• indicates that Assioma is being switched
on.
Short blinking every 3 seconds • indicates that Assioma is switched on.
Fixed light • indicates that the battery is being
charged.
Short blinking every 0.5 seconds • indicates that the battery charging has
been completed.
19. Inspection and maintenance
Carefully inspect the product before starting a cycling session; check all parts
for damage, cracks, loose parts and signs of wear. Do not use the product unless
you have carefully checked and replaced any worn or damaged parts.
If the product is not in perfect conditions, its use may be the cause of accidents,
damage to things and/or injuries to people, as well as the cause of early
degradation of the product and its performance.
Clean Assioma with a damp cloth.
Do not use aggressive chemicals such as: gasoline, gas oil and petrol by-products in
general, alcohol, industrial or all-purpose degreasers, etc. Do not use high pressure
cleaners.
Periodically check that the end cap (Chap. 25) is correctly tightened. Before each
cycling session, check that the pedals and cleats are properly working. If the
cleats are worn out, they may cause accidents.
Do not attempt to open or disassemble the sensor as you may damage it and
invalidate the warranty. Assistance must be carried out only by a specialized
technician, authorized by Favero Electronics.
20. Spare parts
For more information on spare parts, visit the website cycling.favero.com.

13
FAVERO Electronics - 0259-0902 Assioma user manual _Rev10 - EN-IT-DE
ENGLISH
21. Product troubleshooting
Over- or underrated power
• Perform a zero offset with the bike computer (Chap. 11).
• Check if there is any contact between the shoe , or shoe cover, and the sensor
(Chap. 9.2).
• Check the setting of the crank-arm length (Chap. 10.3).
Faulty left/right balancing
• Perform a zero offset with the bike computer (Chap. 11).
• Check if there is any contact between the shoe, or shoe cover, and the sensor
(Chap. 9.2).
Cadence and power are not displayed
• Activate the product (Chap. 7).
• Congure the bike computer (Chap. 10).
• Ride uniformly to allow self-calibration (Chap. 12).
The LEDs do not switch on
• Fully charge the product (Chap. 13).
• Make sure that the battery charger and the cables supplied are correctly
working (Chap. 13) or use a common smartphone battery charger.
There is no connection to the Favero Assioma app
• Enable the Bluetooth connection on your smartphone.
• Make sure that the smartphone is compatible with the Bluetooth v4.0
standard or later versions.
• Disable and again enable the Bluetooth connection on your smartphone.
The force necessary to engage and release the shoe from the pedal is not the one
wanted
• Adjust the tension of the springs using the adjusting screw (Chap. 9.3).
For more information, read the FAQs on the website: cycling.favero.com.

14 FAVERO Electronics - 0259-0902 Assioma user manual _Rev10 - EN-IT-DE
ENGLISH
22. Copyright
Copyright 2017. All rights reserved.
It is forbidden to reproduce this manual in full or in part unless explicit written
consent is obtained from Favero Electronics.
The manufacturer reserves the right to improve or modify the product and this manual
without any obligation of prior notice to private users or organizations. Assioma® is a
registered trademark of Favero Electronics. LOOK and Kéo trademarks belong to LOOK
Cycle International. All other trademarks and registered trademarks are the property
of their corresponding owners.
23. Warranty
All the information related to the product warranty are contained in the “Warranty”
leaet supplied with Assioma or which can also be downloaded from the
cycling.favero.com website.
24. Technical features
Product code: Assioma UNO (art. 772-01),
power sensor installed only on the left pedal
Assioma DUO (art. 772-02),
power sensor installed on both pedals
Radio protocol: ANT+ PWR (CT + PO) prole, Bluetooth v4.0
Transmitted data: power (watt), cadence (rpm),
L/R balance % (only for Assioma DUO),
torque effectiveness (TE), pedal smoothness (PS)
Minimum and maximum power: 0 - 2000 W
L/R balance: 0-100% (only for Assioma DUO)
Minimum - maximum cadence: 30 - 180 rpm
Power measuring accuracy: ± 2%
Cadence sensor: internal, built-in
Internal battery: rechargeable lithium battery with a 50 hour life
Total pedal weight with sensor: 149.5 g
Pedal weight without sensor: 125 g
15
FAVERO Electronics - 0259-0902 Assioma user manual _Rev10 - EN-IT-DE
ENGLISH
Pedal axle material: AISI 630 H900 stainless steel
Pedal axle threading: 9/16"-20 TPI
Bearings: no.3 sealed cartridge bearings
Operating temperature: -10 / +60 °C
Battery charging temperature: +5 / +40 °C
Protection degree: IP67
Certications: CE, FCC, RoHS, ANT+, BLE
Reference standards: EN14781, EN60950
Compatible cleats: FAVERO red cleats (art. 771-42), black cleats (art. 771-40),
LOOK Kéo cleats (only original).
Max cyclist weight: 120 Kg 1
Warranty: 2 years
1 This product has been designed for weights no higher than those clearly specied.
A person exceeding the weight limit herein specied will use this product at his/her own risk.
This product is ANT+ certied and complies with the ANT+ specications:
www.thisisant.com/directory
This product is certied to be a Bluetooth low energy technology product.
16 FAVERO Electronics - 0259-0902 Assioma user manual _Rev10 - EN-IT-DE
ENGLISH
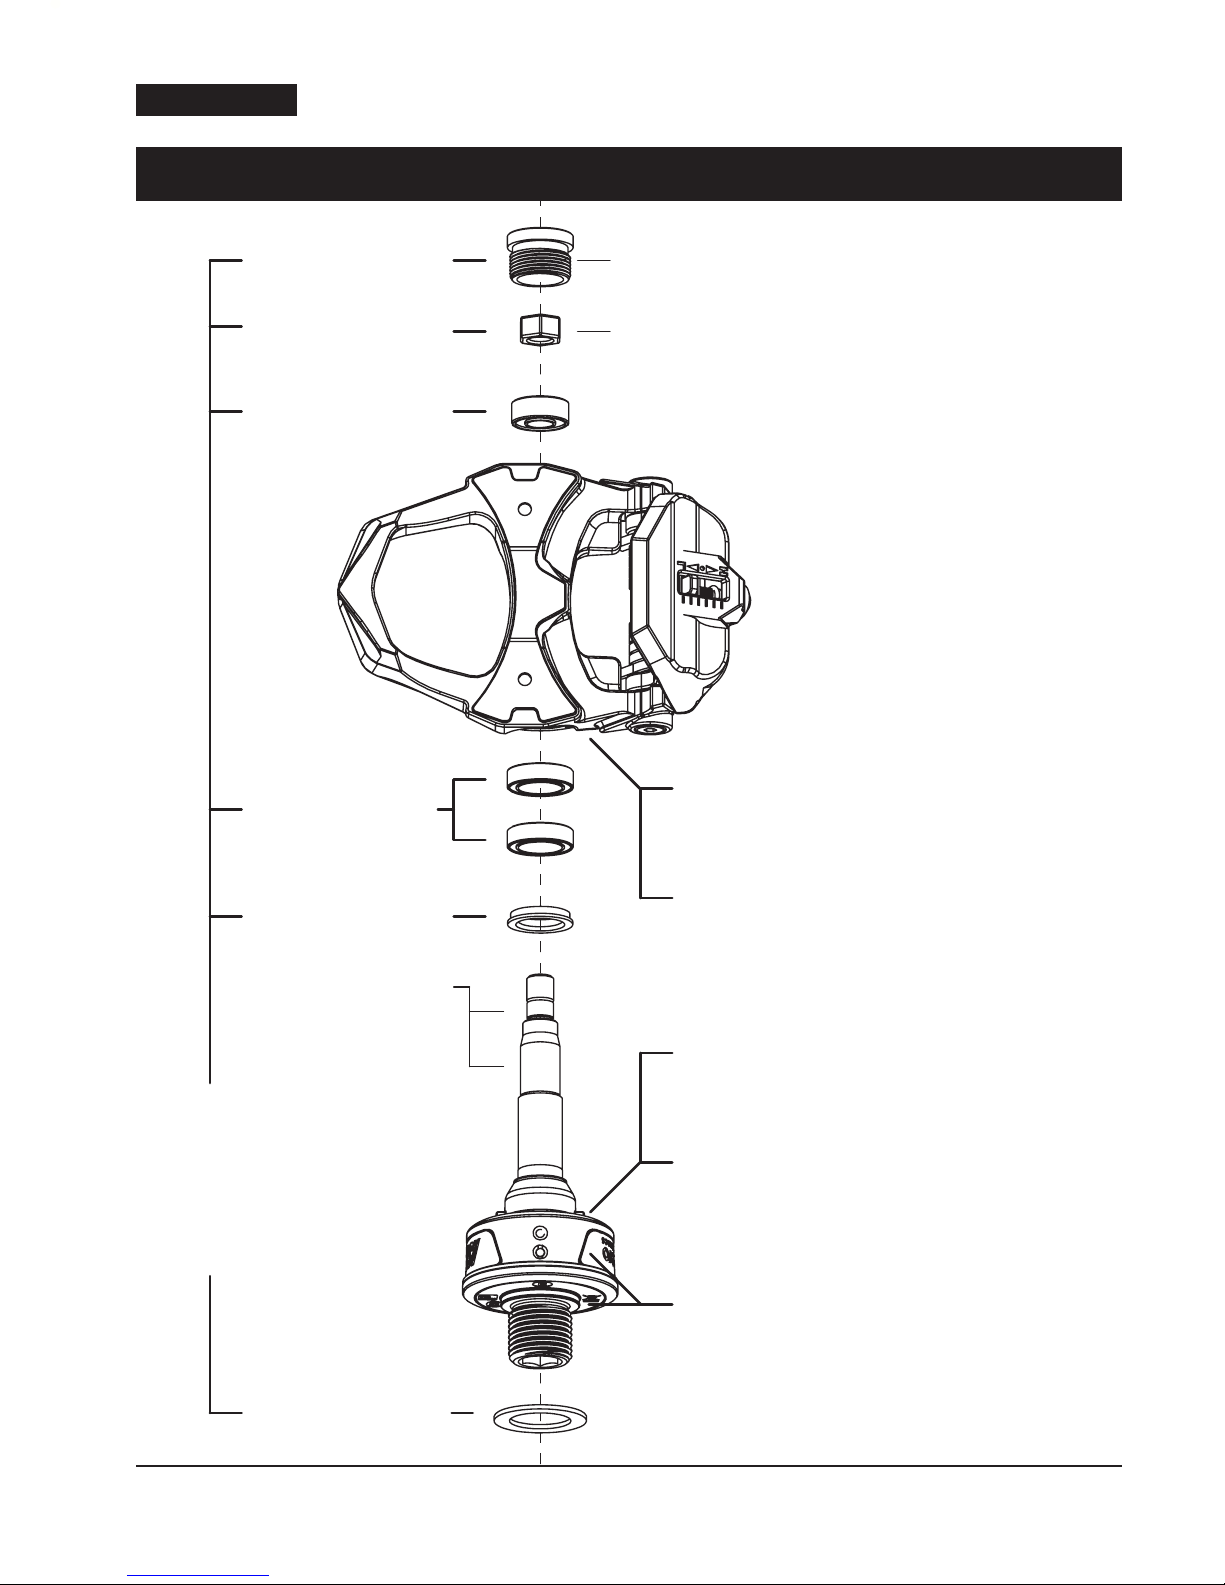
25. Exploded view of the components
Set of adhesive labels
Art. 772-94
• Tightening torque 2-3 Nm.
• Clockwise closing direction both for right and left
pedal
• Tightening torque 8-10 Nm.
• Clockwise closing direction for left pedal.
• Counter-clockwise closing direction for right pedal.
• Use a 9 mm socket wrench (CH9) with max. 13 mm
outer diameter
End cap (2-3 Nm)
M6 nut (8-10 Nm)
6/13 bearing
10/15 bearing Left pedal body
Art. 772-62
Right pedal body
Art. 772-63
Oil retainer
Grease the axle
with lithium grease
Assioma sensor on left axle
Art. 772-64
Bearing set, M6 nuts,
oil seal, end caps, washers
Art. 772-72
Assioma sensor on right axle
Art. 772-65
14x20x1 washer
17
FAVERO Electronics - 0259-0902 Assioma user manual _Rev10 - EN-IT-DE
ITALIANO
ITALIANO -MANUALE D’USO
Sommario
1. Versioni
Assioma UNO pedale sinistro con sensore di potenza,
pedale destro senza sensore
Art.
772-01
Assioma DUO pedali sinistro e destro con sensore di potenza Art.
772-02
1. Versioni 17
2. Contenuto della confezione 18
3. Descrizione del prodotto 18
4. Avvertenze 19
5. Avvio veloce 19
6. Accensione di Assioma 19
7. Attivazione di Assioma 19
8. Fissaggio dei pedali alle pedivelle 20
9. Fissaggio tacchette, verica posizione scarpa e regolazione sgancio tacchette 21
10. Congurazione del ciclocomputer 23
11. Azzeramento manuale (zero offset) 24
12. Primo utilizzo di Assioma su strada o sui rulli 25
13. Ricarica della batteria 25
14. Trasformazione da Assioma UNO a Assioma DUO 27
15. Rimozione dei pedali 27
16. Installazioni successive dei pedali (cambio di bicicletta) 27
17. Ciclocomputer compatibili 27
18. Comportamento dei LED 28
19. Controlli e manutenzione 28
20. Ricambi 28
21. Risoluzione delle anomalie di funzionamento 29
22. Copyright 30
23. Garanzia 30
24. Caratteristiche tecniche 30
25. Disegno esploso dei componenti 32

18 FAVERO Electronics - 0259-0902 Assioma user manual _Rev10 - EN-IT-DE
ITALIANO
2. Contenuto della confezione
• Assioma coppia di pedali con sensore (1 sensore per Assioma UNO, 2 sensori per Assioma DUO).
• 1 caricabatterie con spine EU, US, UK, AU ( IEC Types C, A, G ,I ).
• Cavo USB/micro USB da 2 m (1 cavo per Assioma UNO,2 cavi per Assioma DUO).
• Connettore magnetico per ricarica (1 connettore per Assioma UNO,2 connettori per Assioma DUO).
• 2 tacchette rosse (6°), 1 chiave esagonale da 8 mm, 4 rondelle.
• Manuale d’uso, Informativa sulla sicurezza, Informazioni sulla garanzia.
3. Descrizione del prodotto
Assioma è un pedale per bici da corsa con sistema di aggancio rapido, dotato di
sensore per la misurazione della forza applicata al pedale durante la pedalata.
Integra la funzione di cadenzimetro e calcola la potenza della singola gamba in tempo
reale, inviandola al ciclocomputer.
Incorpora una batteria ricaricabile che consente una autonomia di funzionamento di
circa 50 ore ed è progettata per garantire molti anni di utilizzo. Non vi sono quindi
aperture con guarnizioni per la sostituzione della batteria.
Assioma è completamente ermetico (IP67) grazie alla mancanza di aperture
dell’involucro e all’inglobamento in una speciale resina riempitiva di tutti i suoi
componenti interni.
Per la comunicazione via radio, Assioma è compatibile con lo standard ANT+ e
Bluetooth v4.0 o successiva. L’utilizzo del Bluetooth v4.0 è iniziata negli
smartphone nel 2011 - 2012.
b
c
d
a
4 LED, uno ogni 90°
Indicazione del pedale sinistro (L) o destro (R)
Connettore per la ricarica della batteria
Sensore
Other manuals for ASSIOMA UNO
1
This manual suits for next models
1
Table of contents
Languages:
Other Favero Measuring Instrument manuals

Popular Measuring Instrument manuals by other brands


WIKA
WIKA CPH6200-S1 operating instructions

DITEC
DITEC Lab9 user manual

Trimax
Trimax Vulcan instructions

CLA-VAL
CLA-VAL X144D e-FlowMeter Quick Start Installation & Removal Instructions

Johnson Level & Tool
Johnson Level & Tool 1889-0600 instruction manual

GLI International
GLI International P53 Operating instructions manual