Featherweight Scooter User manual

1
Featherweight Scooter -
Lightest Electric Scooter 37 lbs.
Owner’s Manual

2
Instructions before Use 3
1.0 Safety Guidelines 4
2.0 PRE-RIDE SAFETY CHECK 5
3.0 SPECIFICATION 6
5.0 OPERATING YOUR SCOOTER 8
5.1 STARTING 8
5.2 STEERING 9
5.3 DRIVING ON INCLINES, HILLS, SLOPES, AND RAMPS 9
5.4 Fold the Scooter 9
6.0 Operation - Fitting the Battery Box 11
6.1 Insert Battery Box 11
7.0 Remove Battery Box 11
8.0 Operation - Freewheel Lever 11
9.0 Operation - Batteries and Charging 13
9.1 General Information and Instructions on Charging 13
9.2 Charging your Batteries - Warning 14
9.3 How to charge your batteries 16
10.0 EMI / RFI 17
11.0 DAILY CHECKING 18
11.1 Regular Checking Record 19
11.2 Tires 19
12.0 Maintenance 19
13.0 Basic Troubleshooting 20
14.0 Flash Codes 20
17.0 Warranty 21
17.2 One-Year Limited Warranty 22
17.3 Batteries 22
17.4 Warranty Exclusions 22
17.5 Service Checks and Warranty Service 23

3
Instructions before Use
●Please read this manual carefully before using the item and ensure all parts
are in good condition.
●Please consciously obey traffic rules to ensure your safety and others.
●Please drive carefully and don’t carry pillion for passengers.
●Do not disassemble the battery, motor, or controller by yourself.
●Please purchase the original parts from an authorized agent if you need
replacements. The warranty card will not be valid if the product was modified
or is not using genuine parts.
●For safety reasons, please do not give the electric scooter to children,
pregnant women, or other people who are not suitable to use the electric
scooter.

4
1.0 Safety Guidelines
WARNING! An authorized Provider or qualified technician must perform the initial setup of
this scooter and must perform all of the procedures in this manual. The symbols below are
used throughout this owner's manual and on the scooter to identify warnings and
important information. It is very important for you to read them and understand them
completely.
WARNING! Indicates a hazardous situation that could result in serious injury or death if it
is not avoided.
CAUTION! Indicates a hazardous situation that could result in minor or slight injury if it is
not avoided.
IMPORTANT! Indicates a hazardous situation that could result in damage to property if it
is not avoided.
USEFUL TIP! Recommendations and information for efficient, trouble-free use. Your
scooter is a state-of-the-art life-enhancement device designed to increase mobility. We
provide an extensive variety of products to best fit the individual needs of the scooter user.
Please be aware that the final selection and purchasing decision regarding the type of
scooter to be used is the responsibility of the scooter user who is capable of making such
a decision and his/her health care professional (i.e., medical doctor, physical therapist,
etc.).
The contents of this manual are based on the expectation that a mobility device expert has
properly fitted the scooter to the user and has assisted the prescribing health care
professional and/or the authorized provider in the instruction process for the use of the
product.
There are certain situations, including some medical conditions, where the scooter user
will need to practice operating the scooter in the presence of a trained attendant. A trained
attendant can be defined as a family member or care professional specially trained in
assisting a scooter user in various daily living activities.

5
As you begin using your scooter during daily activities you will probably encounter
situations in which you will need some practice. Simply take your time and you will soon
be in full and confident control as you maneuver through doorways, on and off elevators,
up and down ramps, and over moderate terrain.
Additional general information can be found on the supplemental information sheets and
booklets included in your Owner’s Package. Please fully read and review the information,
and keep it readily available for future reference.
2.0 PRE-RIDE SAFETY CHECK
Get to know the feel of your scooter and its capabilities. We recommend that you perform
a safety check before each use to make sure your scooter operates smoothly and safely.
Perform the following inspections before using your Travel Scooter:
●Check the condition of the tires. Make sure they are not damaged or excessively
worn.
●Check all electrical connections. Make sure they are tight and not corroded.
●Check all harness connections. Make sure they are secured properly.
●Check the battery condition meter to ensure the batteries are fully charged.
●Ensure the manual freewheel lever is in drive mode before sitting on the Travel
Scooter.
If you discover a problem, contact your authorized Provider for assistance.
WARNING!
Never exceed the maximum permissible load –see 3.0 Specifications and never use the
scooter to transport more than one person.
WARNING!
Never drive the scooter under the influence of medication or alcohol.
WARNING!

6
Never attempt to get onto or off your scooter without first removing the key from the key
switch. This will prevent the scooter from moving if accidental throttle control lever contact
is made.
WARNING!
Never drive the scooter with the tiller lock in the locked position.
3.0 SPECIFICATION
Weight Capacity
265 lbs.
Overall Size
40”x22”x36”(LxWxH)
Size after folding
37.5”x22”x18”(LxWxH)
Front Wheel
6”x2” (plastic hub)
Rear Wheel(mm)
10”x2” (pneumatic tire ,one-piece hub)
MAX Speed
5 mph
Grade Ability
≤8°
Static stability
≥6°
Dynamic Stability
≥6°
Spanning Ability(mm)
≤60
Travel Range (Max)
7.5 Miles
Turning Radius (Min)
5.1 feet
Ground Clearance(mm)
3”
Weight(kg)(exclude battery)
37 lbs.
Brake system
Electromagnetic brake
Driving system
Rear wheel (differential) drive
Controller
PG
Battery
25.2V/10Ah(Lithium)
Motor power(VA)
120W Brushless motor

7
Charger
Automatic protective type charger(29.4V 2A)
WARNING! Never operate the scooter unless the tiller is raised, the teeth are fully
engaged and the tiller adjustment bolt fully tightened and securely positioned.
Indicates the voltage of the batteries(13):
●Green –batteries are fully charged.
●Yellow –batteries are half full.
●Red –batteries need charging.
●Beeping sound continues –batteries need to charge. Please re-charge the
batteries.
Key Switch(14)
This turns the power on and off your scooter.
●Insert the key into the key switch.
●Turn the key clockwise to turn on your scooter's power. The battery indicator will
light up to indicate that the power is on.
●Turn the key counterclockwise to turn off your scooter’s power. The battery
indicator light will turn off to indicate the power is off.
Horn Button: (15)
This button activates a warning horn. Your scooter must be turned on for the horn to be
operational. Do not hesitate to use the warning horn to prevent an accident or injury.
Throttle Control Lever –Forward/Back: (16)
This lever allows you to control the forward speed and the reverse speed of your scooter
up to the maximum speed that you pre-set with the speed adjustment dial. Place your right
hand on the right hand tiller handle and your left hand on the left hand tiller handle.
To move forward, use either of the following:
●Use your left thumb to push the left side of the throttle control lever.
●Use your right hand fingers to pull back on the right side of the throttle control lever.
To move backward, use either of the following:

8
●Use your right thumb to push the right side of the throttle control lever.
●Use your left hand fingers to pull back on the left side of the throttle control lever.
Release the lever and allow your scooter to come to a complete stop before pushing the
other side of the lever to move in reverse. When the scooter is moving in reverse, the
reverse beeper will sound. When the throttle is completely released, it automatically
returns to the center “stop” position and engages your scooter’s brakes.
Speed Adjustment Dial(17)
This dial allows you to preselect and limit your Scooter’s top speed in the range of 0mph –
5mph:
●The image of the snail represents the slowest speed setting.
●The image of the hare represents the fastest speed setting.
5.0 OPERATING YOUR SCOOTER
5.1 STARTING
1. Make sure you are seated safely and properly on your scooter.
2. Turn the speed adjustment dial fully counterclockwise to the slowest setting.
3. Insert the key into the key switch.
4. Turn the key clockwise to the ‘’On’’ position.
5. Place your hands on the hand grips:
i. Pull-on the left hand grip to steer your scooter to the left.
ii. Pull-on the right hand grip to steer your scooter to the right.
6. Move the tiller to the center position to drive straight ahead.
7. Slowly engage the throttle control lever to gently accelerate your scooter forward by
either:
i. Use your left thumb to push the left side of the throttle control lever
forward.
ii. Use your right hand fingers to pull back on the right side of the throttle
control lever.

9
8. To stop releasing the throttle control lever to allow your scooter to stop gradually.
The electronic brakes will automatically engage when your scooter comes to a stop.
5.2 STEERING
1. Place both hands on the handgrips of the tiller, turn the tiller to the right to travel
right –never turn at high speeds as this will result in loss of control.
2. Turn the tiller to the left to turn left –never turn at high speeds as this will result in
loss of control.
3. Make sure to maintain sufficient clearance when turning your scooter so that the
rear wheels will be clear of any obstacles.
4. Show even greater caution when steering in reverse.
WARNING! Turning your scooter too sharply at high speed will cause loss of control and
balance and will result in the scooter tipping over resulting in serious injury or death.
5.3 DRIVING ON INCLINES, HILLS, SLOPES, AND RAMPS
●When driving your scooter, never descend or climb a gradient that is greater than
recommended –see 3.0 Specifications. Failure to do so could result in serious
injury or death.
●When driving up a ramp, curb, or incline - lean forward to move the center of gravity
of the scooter forward for maximum stability and safety.
●Drive with extreme caution when attempting to drive up or down any incline, access
ramp, etc, always drive at a slow speed.
●Always drive straight up or straight down an incline, ramp, slope, etc.
●Never drive across (traverse) an incline, ramp, etc., in any direction –Driving
across an incline, ramp, etc. could result in turning the scooter over resulting in
serious injury or death.
●Try to keep your scooter moving when climbing or descending an incline. If you
have to stop, restart and accelerate slowly and carefully.
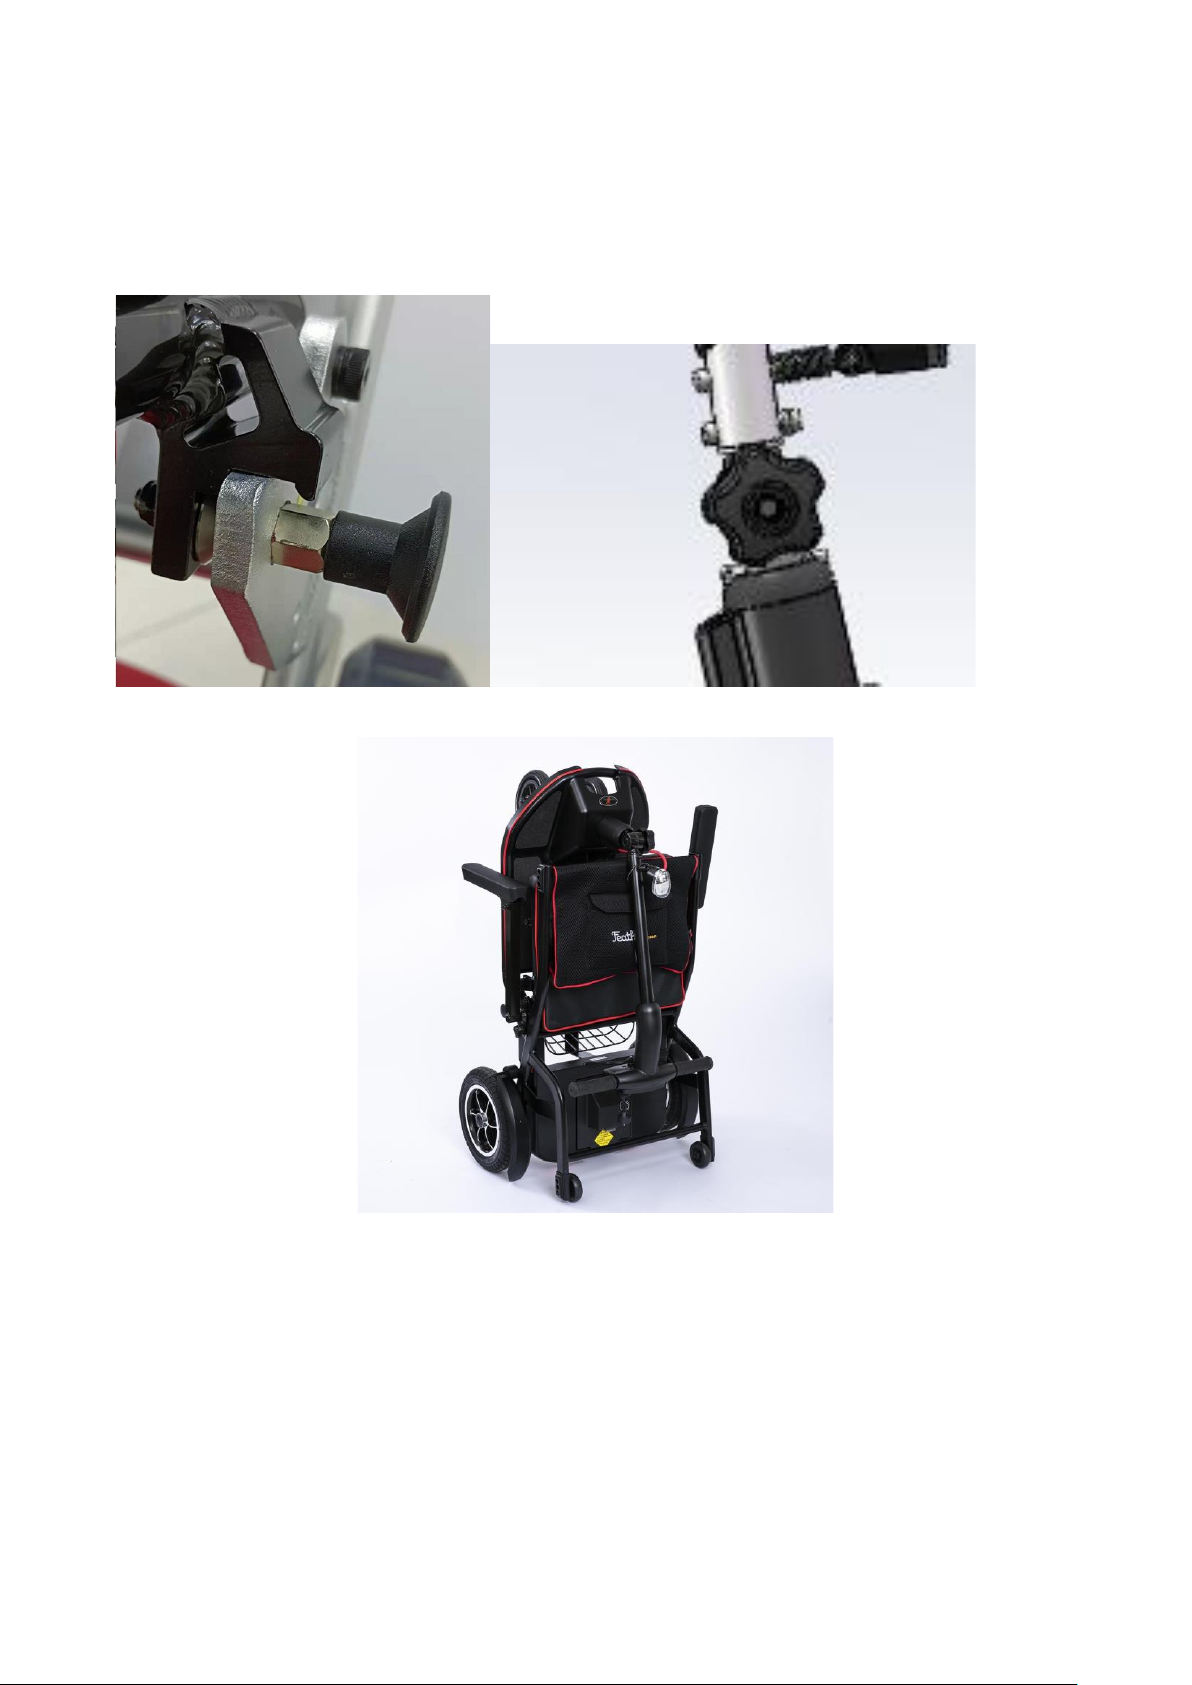
5.4 Fold the Scooter
To fold the scooter pull out the fold knob as shown below, [Fig5.4.1] at the same time
gently lower the seat back down into its folded position,Now with the seat folded,
loosen off the tiller adjuster knob and gently lower the tiller into the folded position.
10
[Fig 5.4.2] The tiller handles should be able to rest between the chassis as shown
below. Re-tighten the tiller knob to hold the tiller into position. This will then allow you
to pull the scooter on its rear tip wheels as shown in 6.4 Storage and Travel.
CAUTION! Lifting weight beyond your physical capability may result in physical injury. Ask
for assistance when necessary while disassembling or assembling your scooter.
11
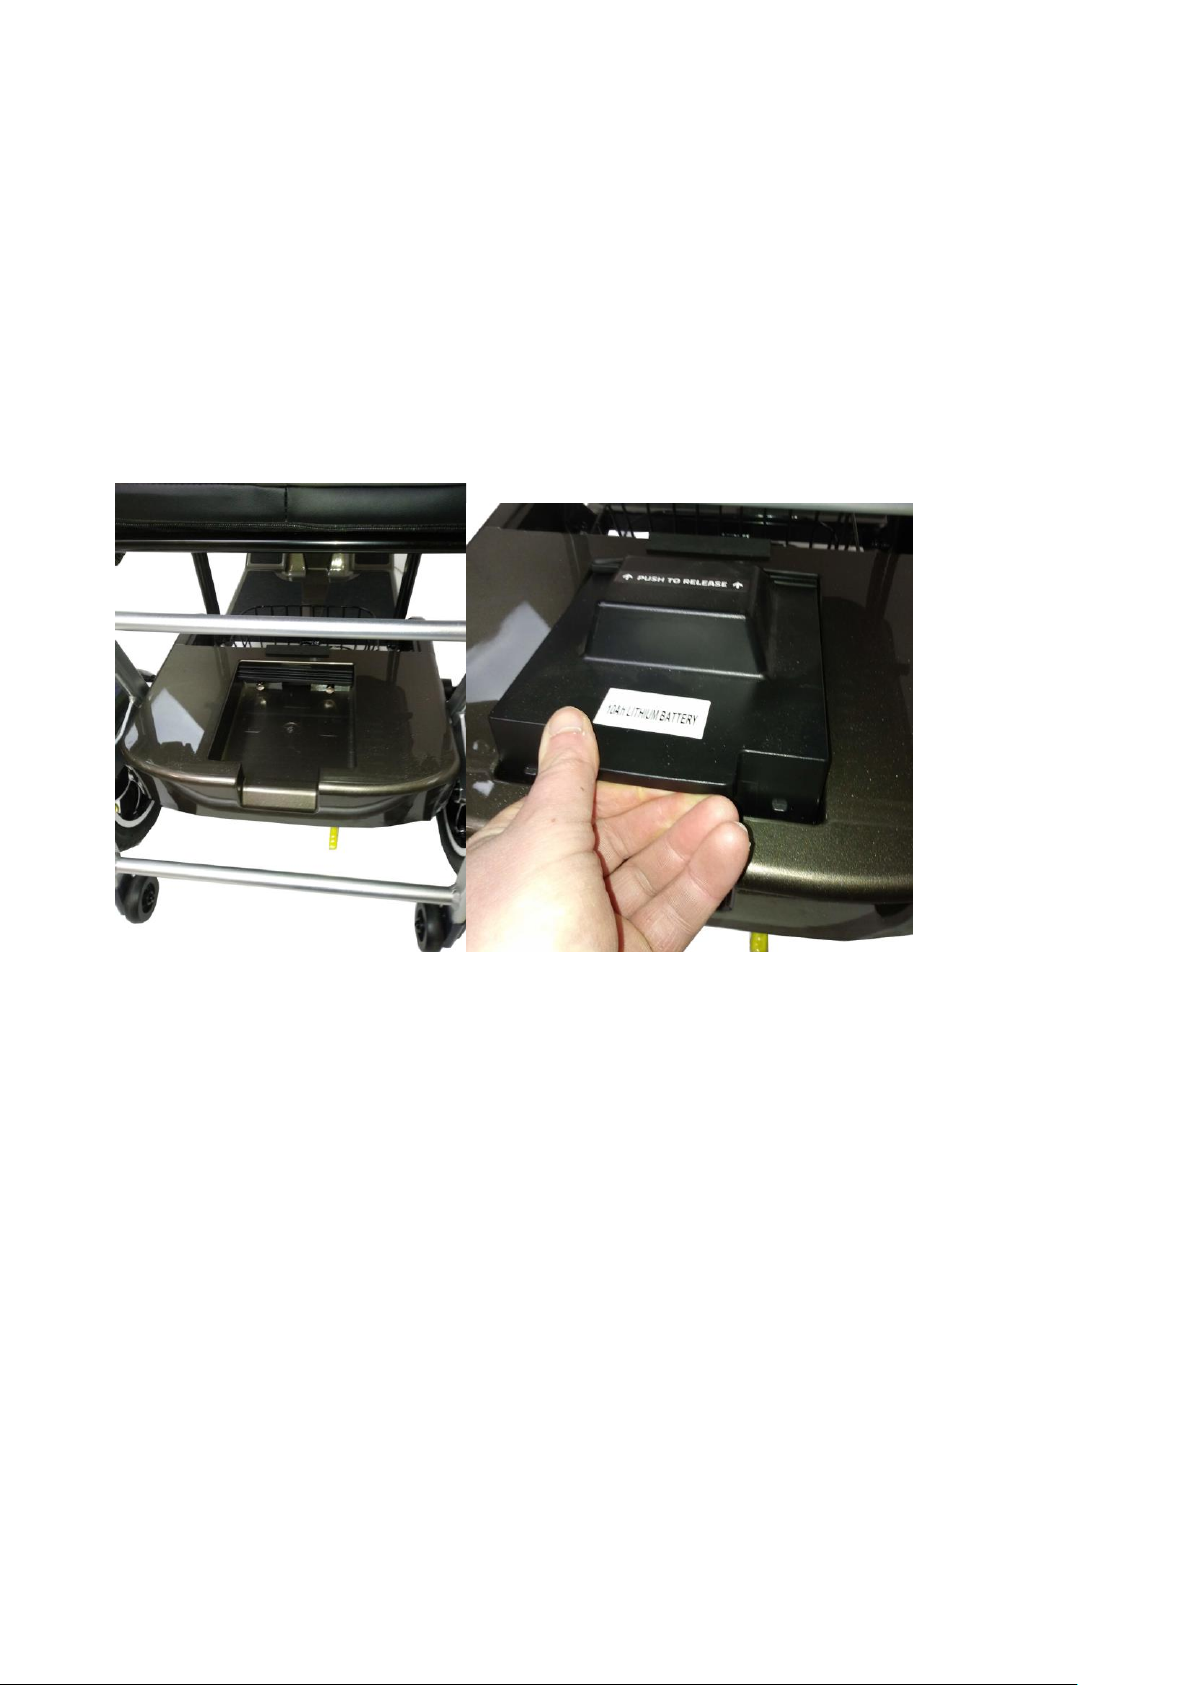
6.0 Operation - Fitting the Battery Box
6.1 Insert Battery Box
To insert the battery box, simply place it into position and push forwards as shown below,
[Fig 6.1.0] gently lowering into position. Make sure the rubber protector flap remains on
top of the battery box.
[Fig 6.1.0] [Fig 6.2.0]
7.0 Remove Battery Box
To remove the battery box, push the box forwards against the sprung connectors and then
lift up to release the box. [Fig 6.2.0]
8.0 Operation - Freewheel Lever
The Freewheel lever on the scooter is located on the rear section of the scooter. Before
driving the scooter needs to be put into the drive position. The two positions are:
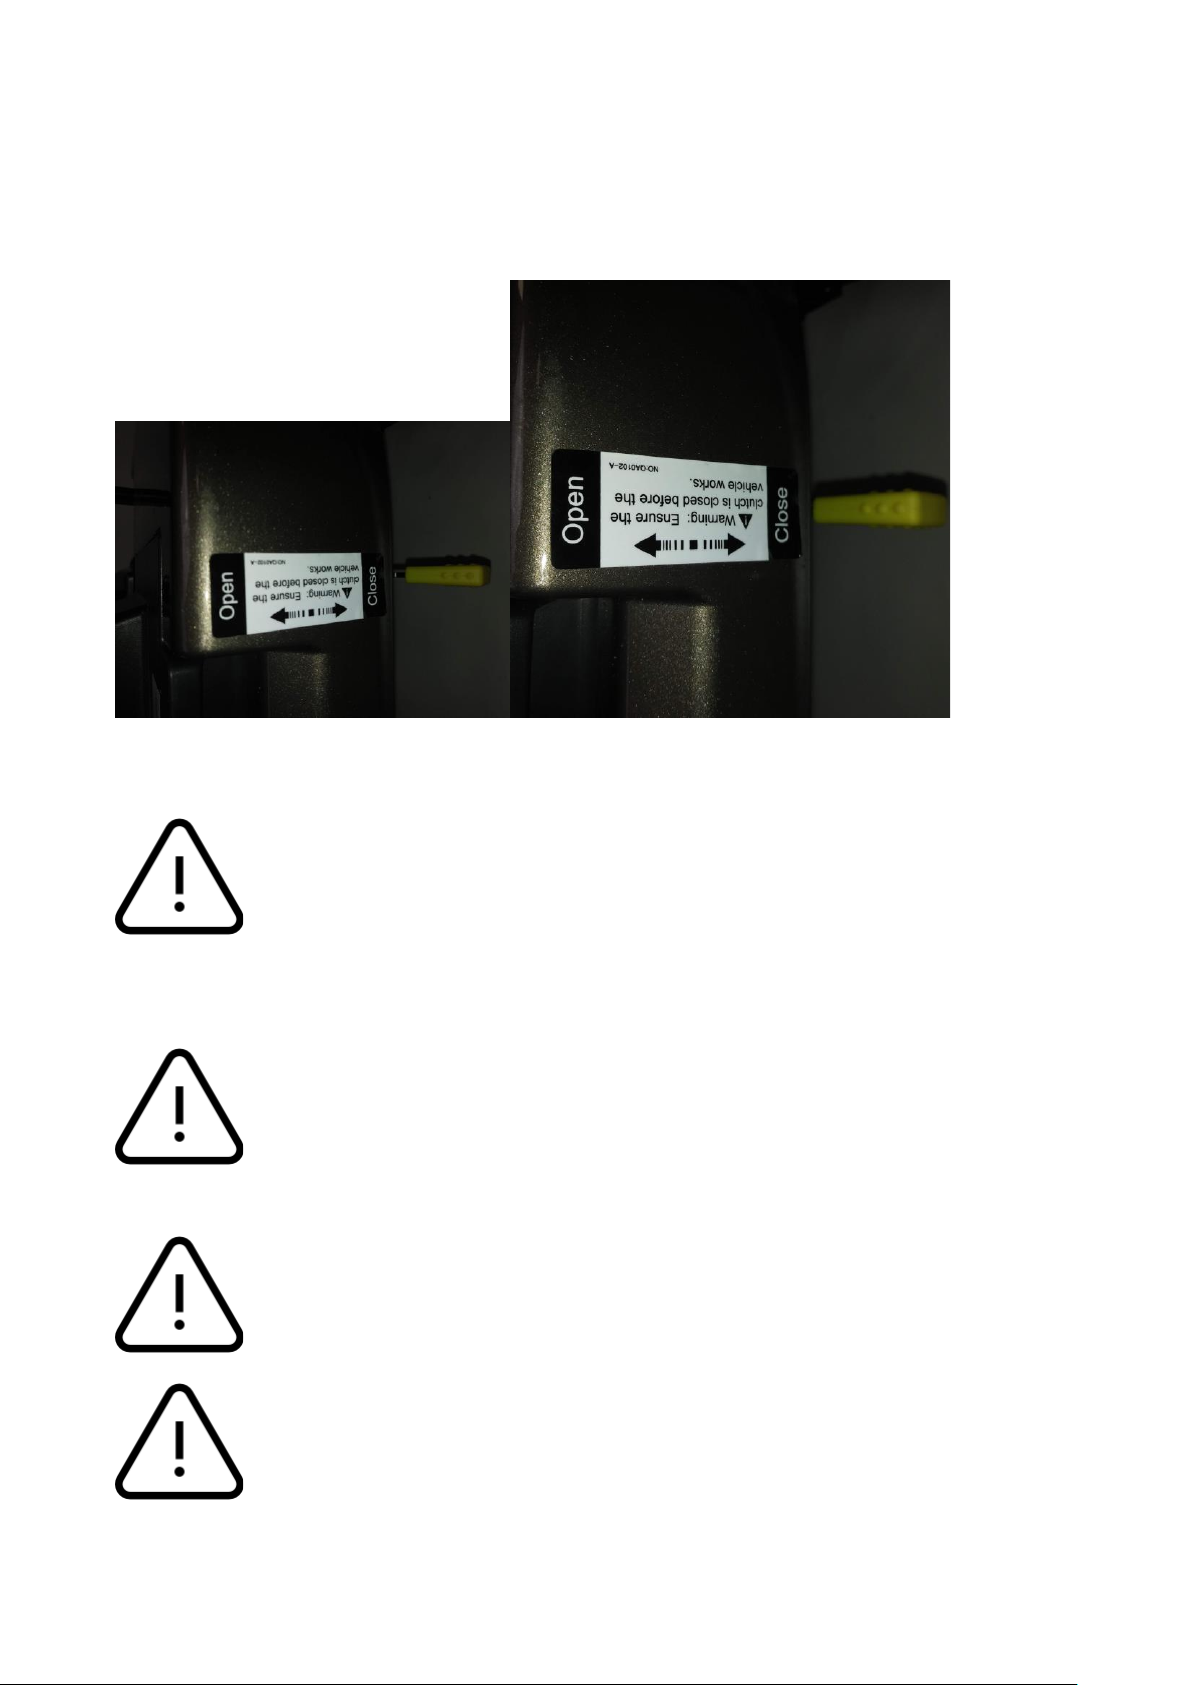
12
1. Drive position - is indicated by ‘Closed’ - pull the lever backward for this position.
[Fig 8.0.1]
2. Freewheel position - is indicated by ‘Open’ – push the lever forwards for this position.
[Fig 8.0.2]15
[Fig 8.0.1] [Fig 8.0.2]
WARNING! Before placing your scooter into or taking it out of freewheel
mode, remove the key from the key switch. Never sit on the scooter when it is in freewheel
mode. Never put your scooter in freewheel mode on any incline.
WARNING! When your scooter is in freewheel mode, the braking system is
disengaged.
WARNING! Disengage the drive motors only on a level surface.
WARNING! Ensure the key is removed from the key switch.

13
WARNING! Stand to the side of the scooter to engage or disengage
freewheel mode. Never sit on a scooter to do this.
WARNING! After you have finished pushing your scooter, always return it to
the drive mode to lock the brakes
9.0 Operation - Batteries and Charging
9.1 General Information and Instructions on Charging
Your Scooter requires a 1 x lithium battery that is sealed and maintenance free. The
battery is recharged by the supplied off-board charging system.
●Fully charge your travel scooter’s battery for at least 10 to 12 hours before using it
for the first time. The new battery will be at its full capacity after having run through
approx. 10-20 charging cycles (break-in period). This break-in period is necessary
to fully activate the battery for maximum performance and longevity.
●Keep the battery fully charged to keep your scooter running smoothly. Charge the
battery daily after every discharge even after partial discharge. Depending on the
level of discharge, it can take up to 12 hours until the battery is fully charged again.
●If the battery indicator has reached the red LED range, charge the battery for 16
hours minimum, ignoring the charge complete display!
●Even if the scooter is unused for a long time, the battery should have a 24 hour
charge once a week to make sure that it is fully charged.
●Do not cycle your battery at a low state of charge without regularly recharging it
fully.
●Do not charge your battery under extreme temperatures. High temperatures above
30°C is not recommended for charging as well as low temperatures below 10°C.

14
●You cannot overcharge the battery when using the charger supplied with your
vehicle, or a charger that has been approved by 1800Wheelchair.
●Protect your charger from sources of heat such as heaters and direct sunlight. If the
battery charger overheats, the charging current will be reduced, and the charging
process delayed.
9.2 Charging your Batteries - Warning
WARNING! Risk of explosion and electric shock if batteries are charged when
incorrectly wired. Never attempt to open or disassemble the battery box. If the batteries do
not appear to be working correctly, contact your authorized provider.
WARNING! Risk of explosion and destruction of batteries if the wrong battery
charger is used. Only use the battery charger supplied with your vehicle or a charger that
has been approved by 1800Wheelchair. Never charge 10 Ah batteries with a 5 Ah battery
charger. Always use a 2 Ah battery charger.
WARNING! Do not use or store the battery near sources of heat such as a fire
or heater.
WARNING! Never attempt to open or disassemble the charger. If the battery
charger does not appear to be working correctly, contact your authorized provider.
WARNING! Risk of short circuit and electric shock if the battery charger has
been damaged. Never use the charger if it has been dropped or damaged.

15
WARNING! Do not use the battery if it gives off an odor, generates heat, or
appears abnormal in any way. If the battery is in use or being recharged, remove it from
the device or charger immediately and discontinue use.
WARNING! Risk of electric shock and damage to the battery charger if it gets
wet. Always protect the battery charger from water and always charge in a dry
environment.
WARNING! Risk of electric shock and damage to the batteries –Never
attempt to recharge the batteries by attaching cables directly to the battery terminals.
WARNING! Risk of fire and electric shock if a damaged extension cable is
used. Only use an extension cable if it is absolutely necessary. If you have to use an
extension cable make sure it is in good condition.
WARNING! Risk of injury if using the scooter during charging. Do not attempt
to recharge the batteries and operate the scooter at the same time. Do not sit in the
scooter while charging the batteries.
WARNING! Chargers are selected precisely for particular applications and are
specially matched to the type, size, and chemical formulation of specific batteries. For the
safest and most efficient charging of your scooter’s batteries, we recommend the use of
the charger supplied as original equipment with your product only. Any charging method
resulting in batteries being charged individually is especially prohibited.

16
WARNING! Never attempt to disassemble the battery from the battery box or
refit the battery. Contact your authorized provider.
WARNING! If your battery charger has not been tested and approved for
outdoor use, then do not expose it to adverse or extreme weather conditions. If the battery
charger is exposed to adverse or extreme weather conditions, then it must be allowed to
adjust to different environmental conditions before use indoors. Refer to the manual
supplied with the battery charger for more information.
WARNING! Never use or store the battery where it is exposed to high
temperatures. Leaving the battery in a car on a hot day or in an area of direct sunlight
such as a window will reduce battery performance and shorten service life.
9.3 How to charge your batteries
• Make sure you read and understand the battery chargers user manual if supplied, as
well as the safety notes on the charger.
• Turn off the scooter power and remove the key.
• Remove the battery box from the scooter.
• Slide away the cover of the charger outlet point either positioned on the front of the
battery box (Fig9.3.1)

17
[Fig 9.3.1]
• Put the charger plug into the outlet point
• Do not switch on the battery charger until all the plugs are in the position
• The LED light on the battery charger will show amber while charging
• The LED light on the battery charger will show green when batteries are fully charged
• Turn off the mains power to the charger before removing the charger plug from the
charging outlet.
10.0 EMI / RFI
The rapid development of electronics, especially in the area of communications, has
saturated our environment with electromagnetic (radio) waves that are emitted by
television transmitters, cellular phones, citizen’s band radios (CB’s), amateur radios (ham
radios), wireless computer left, microwave transmitters, paging transmitters, etc. These
electromagnetic (EM) waves are invisible and increase in strength the closer one gets to
the source of transmission. When these energy waves act upon electrical devices and
cause them to malfunction or to function in an erratic or uncontrolled manner, they are
referred to as Electromagnetic Interference (EMI) or Radio Frequency Interference (RFI).

18
EMI / RFI and your scooter
All electrically powered vehicles, including scooters, are susceptible to Electromagnetic
Interference / Radio Frequency Interference (EMI / RFI). This interference could result in
abnormal, unintended movement of your scooter.
WARNING! Unintended movement or brake release can cause an accident or injury.
The FDA has determined that each make and model of a scooter can resist EMI / RFI to a
certain level. The higher the level of resistance, the greater the degree of protection from
EMI / RFT –measured in volts per meter (V/m). The FDA has also determined that current
technology is capable of providing 20 V/m of resistance to interference. This product has
been tested and has passed an immunity level of 20 V/m.
EMI / RFI recommendations
●Do not turn on or use hand-held personal electronic communication devices such
as cellular phones, walkie-talkies, and CB radios while your scooter is turned on;
●Be aware of any nearby transmitters (radio, television, microwave, etc.) on your
intended route and avoid operating your scooter close to any of those transmitters;
●Turn off the power if your scooter is going to be in a stationary position for any
length of time;
●Be aware that adding accessories or components or modifying your scooter may
make it more susceptible to EMI / RFI;
WARNING! Turn off your scooter as safely as possible if unintended or uncontrollable
motion occurs or if unintended park brake release occurs.
11.0 DAILY CHECKING
Check the following items before driving. If you find anything abnormal, contact your
scooter dealer for a further inspection before using it.

19
11.1 Regular Checking Record
To make sure your scooter is in good condition, go to your scooter dealer regularly.
11.2 Tires
The condition of the tires depends on how you drive and use your scooter.
Inspecting Tire Treads
Please check the tread depth regularly. Replace the tires when the tread depth is less
than 0.5 mm.
12.0 Maintenance
Do not use water, oil, or other chemical solutions to clean your scooter. Be sure NOT to
spray the scooter with the water as this can damage the electronic components.
Please clean the scooter by wiping it with either a dry or moist cloth.
Please take the scooter to authorized dealers for repairs and adjustments. Improper
adjustments could lead to accidents and scooter malfunction.

20
13.0 Basic Troubleshooting
This table is only a guide to aid you in getting your scooter operating, should you have any
problems. If you are unable to get your scooter operating, please contact your Scooter
Dealer.
14.0 Flash Codes
Scooter Controller Internal Diagnostics
The diagnostic flash codes for your scooter are designed to help you perform basic
troubleshooting quickly and easily. A diagnostic flash code flashes from the Power
light in the event one of the conditions listed below develops.
Table of contents
Popular Mobility Aid manuals by other brands

Moretti
Moretti Mopedia MP167 instruction manual

Pride
Pride Go-Chair owner's manual

DEMARTA VIRGINIO
DEMARTA VIRGINIO 01.03.5L user manual

COMPASS HEALTH
COMPASS HEALTH Carex Classics quick start guide

Handicare
Handicare LinidoSolutions LI2614.300 Series manual

Sunrise Medical
Sunrise Medical Guardian Pro 400 Series User instruction manual


