Feellife Air Flow 1 User manual

Instruction for Use
Nasal Rinse
Air Flow 1
Issue date: November 22, 2021
Doc: RD-UM-027-1
Rev.: V1.0


..............................................................................
...........................................................................
...........................................................................
............................................................................
.............................................................................
3
English
Deutsch
Français
Español
ltaliano
4~16
17~30
31~44
45~58
59~72
Content

4
Instruction for Use
Nasal Rinse
Air Flow 1

5
..............................................................
........................................................
............................................................
.....................................................
..............................................
................................................................................
...................................
.........................................................
..................................................................
.............................................
I. Product Structure
Ⅱ. Product Information
Ⅲ. Device Inspection
IV. Installation and Usage
V. Cleaning and Disinfection
Ⅵ. Notice
Ⅶ. Quality Assurance Instructions
Ⅷ. Signs and symbols
IX. Packing Lists
Ⅹ. Manufacturer Information
6
6
8
9
11
12
14
14
15
16
Content

6
I. Product Structure
Cover
Rinsing Nozzle
Water Storage Tank
Main Unit
Power button
“+” button (to increase the rinsing rate)
“-” button (to decrease the rinsing rate)
Charging Interface
Rinsing Head
Tubing
Ⅱ. Product Information
1. Specification
Product Name
Product Model
Power source
Power consumption
Nasal Rinse
Air Flow 1
DC 3.7V (Lithium Battery) or DC 5.0V
with AC adapter
< 6.0 W
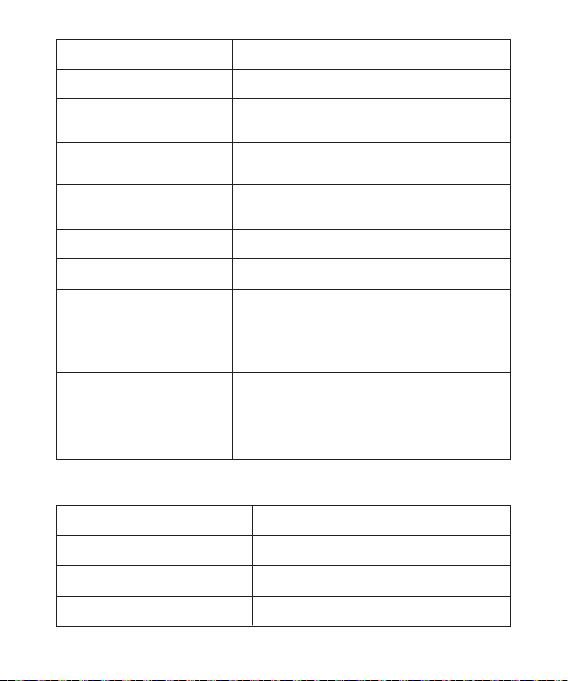
High speed spray rate
Low speed spray rate
Frequency pulse spray
rate
Continuous working
hour
Water storage tank
capacity
Weight(g)
Dimension(mm)
Working environment
Storage/delivery
environment
10mL/min(deviation±3mL/min)
7mL/min(deviation±3mL/min)
5mL/min(deviation±3mL/min)
>30min
25ml
191g(With battery)
175(L)×65(W)×56(H)
Temperature: 5℃~40℃;
Relative Humidity: ≤80% R.H.
Non-condensing; Atmospheric
Pressure: 86kPa~106kPa
Temperature: -20℃~55℃;
Relative Humidity: ≤93% R.H.
Non-condensing; Atmospheric
Pressure: 70kPa-106kPa
7
2. Description for Indicator
Green light keeps on
Blue light flashes 5 times
Blue light keeps flashing
Blue light keeps on
Working
Low power indicator
Charging
Full charged

8
Ⅲ. Device Inspection
Ensure the packing of device is intact, take out of the device and the
accessories gently and check the following to confirm:
1. The appearance of the main unit and accessories are undam-
aged.
2. The attached items and documents are consistent with the
packing list.
3. Press the Power Button to activate the device, if the device would
work normally, green light keeps on. After the confirmation is
complete, prepare the connection of the accessory. And save the
packing for future transportation or storage.
4. The device is powered by the 3.7V built-in batteries. Please
charge the device when blue light flashes 5 times.
5. To charge the device, please connects the device to the attached
Charging Cable, and connects the cable to a Power
Adapter(5V/1A).
6. The indicator would keep flashing with blue light while charging
the device.
7. 120 minutes are required to fully charge the device. The indicator
would keep on with blue light once full charged.
8. Please use an adapter which is for mobile phones or buy an
adapter which output is DC 5V 1A.
Note:
1) When the device is used for the first time, it must be pre-charged
for about 30 minutes.
2) If the device will not be used for a long time, please charge and
discharge the device at least once every three months.
Warning:
1) Please dispose of used batteries in accordance with local
environmental protection requirements. Do not dispose of them with
household waste to avoid pollution to the surrounding environment.

IV. Installation and Usage
1. Before using, clean and disinfect all the components, such as
Rinsing Nozzle, Water Storage Tank. We suggest the Rinsing
Nozzle is designed for single user. There are 2 pieces for different
size. You can choose one which is suitable for you.
2. Prepare: The user should place this device and all the
components near the wash basin, so that can convenient to use.
3. Fill with liquid: Remove the Rinsing Head by rotation, filling the
Wash Water Tank (the side with a Tubing, shown as the figure
below.) with nasal wash liquidat least 2ml,less than 25ml.), and
assemble it back to the Main Unit.We recommend that you do not
use homemade salt mixtures for nasal irrigation, as they may have
inaccurate concentrations and lead to discomfort, just like a burning
or stinging sensation, or even nasal congestion.
Remove the
Rinsing Head
Add the nasal wash
liquid into the cup.
Do not exceed the
maximum line.
4. Bend your head and lean over the wash basin. Put the Rinse
Nozzle right to the one side of the nasal cavity. Keep your mouth
open and place the upper lip snugly against your nostril. Keep
breathe normally and keep quiet and relax during rinsing.
9
2) Do not disassemble or repair equipment or components privately.
Do not disassemble or replace batteries privately. For replacing the
battery, please contact the distributor or manufacturer.

Do not swallow or spit during rinsing.
10
5. Choose a desired mode: By pressing the buttons ”+” & ”-” to set
the desired rinsing rate. We recommend that you start with the
lowest rate. The device would enter the “Low speed spray rate"
mode when activated. Short press the “+” button to switch the
rinsing mode in the order of “High speed spray rate”” Frequency
pulse spray rate”. When setting to the corresponding mode, the
green indicator light under the buttons will on.
Low speed means that the flow rate has less impact than other
modes, which is suitable for the elderly and children, as well as
those with damaged nasal mucosa, and is gentler; high speed
means regular flushing, which is used according to personal
acceptance.
Frequency pulse is a short pulse wave generated according to
current and voltage signals, and water flow is also in the form of a
pulse wave. The pulse form is more conducive to nasal cavity
cleaning and cleaning, and it can be used by people of all ages.
6. The wasted water will flow back to the Wash Water Tank (the
side without Tubing). After rinsing, you should pour out the wasted
water. Usually, clean one nasal cavity needs 10ml-25ml wash water.
You can adjust it according to your own situation and doctor's
advice. Rinse the other side of the nasal cavity as above. After
rinsing, press Power Switch to power off. Pour out the residual liquid
from the Water Storage Tank. (Shown as the figure below.)

7. After complete all the steps, use a clean tissue suck up the
residual solution in your nasal cavity gently. If applicable, sniff in any
residual solution in the nasal cavity once or twice. This may clean
out the area at the back of your nasal cavity. Generally, the fluid in
your sinuses will flow out about 20 minutes later when the cilia are
activated.
11
Note:
1) Please moderately bend your head forward during the rinsing
process.
2) 10-25ml nasal wash liquid is enough to rinse one side nasal
cavity. You may adjust the volume according to your own situation.
3) The temperature of the nasal wash liquid should be moderate (15
℃~35℃is best), and it is recommended to use the device indoors
at 18℃~35℃.
4) Please do not use nasal wash liquid with low temperature(<10℃)
or high temperature(>40℃).
5) After use, press the Power Switch on the front of the Main Unit to
shut down the device. After shutting down, pour out the residual
liquid, clean and disinfect the device, and prepare for next use.
V. Cleaning and Disinfection
Before and after use, be sure to clean and disinfect all the
necessary components. We suggest the rinsing nozzle is for
single-use.
• Fill the water storage tank with distilled, commercially bottled or
cooled water to run the machine to flush out any residual solution.
• Remove the water storage tank, rinsing nozzle, and cover from the
device, wash them with warm water.
• After cleaning, use medical gauze to suck up the water, keep them
thoroughly dry.
• Clean the device external and electrical electrodes with clean
medical gauze.

• Keep the device in the environment that is dry and clean to avoid
pollution.
• For regular use, follow one of the below disinfecting protocols
every 1 to 2 weeks:
1) Household Bleach Disinfection Protocol
Add the household bleach disinfection protocol into the water
storage tank and then run the solution out through the machine until
the solution is used up.
Fill with fresh water and run three to four full cycles, or until the
solution no longer has the bleach smell.
12
Caution:
Do not use high concentration bleach to disinfect as this will
damage rinsing nozzle.
2) Vinegar Disinfection Protocol
Immerse the rinsing nozzle in solution that is consist of 1 part white
vinegar and 3 parts hot water and soak for 30 minutes. And then fill
with fresh water to run three or four cycles to remove the vinegar
smell. Dry all parts completely.
3) Hydrogen Peroxide cleaning protocol
Immerse the rinsing nozzle in solution that is consist of 1 part
hydrogen peroxide and 3 parts hot water and soak for 30 minutes.
And then fill with fresh water to run three or four cycles to remove
the smell. Dry all parts completely.
Ⅵ. Notice
1. Please keep the device in a clean and dry place. Cotton, dust,
etc. may cause the Rinsing Nozzle and Tubing to be clogged and
Caution:
a.The equipment waterproof classification is IP22, the main unit
can’t be washed by flowing water so as to prevent the ingress of
water.
b. The disinfectant residues should be cleaned thoroughly to assure
safe use next time.

13
fail to spray. If clogging occurs, please use the gentle flowing water
to clean the Rinse Nozzle and the Tubing to tackle the problem.
2. Please uses the original accessories and parts supplied by the
manufacturer.
3. The device would be damaged if it’s placed at an extremely high
temperature (such as microwave oven, stove), extremely low
temperature (such as in a refrigerator). If damages occur, please
contact the distributor or manufacturer.
4. The device may be damaged if it suffers a violent impact. If
damages occur, please contact the distributor or manufacturer.
5. Please keep the device away from pets, insects, or children to
prevent the device from being bitten or damaged. If damages occur,
please contact the distributor or manufacturer.
6. When the device is taken out from the highest or lowest storage
temperature, it should be placed for half an hour before use.
Note:
1) Ensure to disinfect the device by following Clean and Disinfection
after each use. If the components Tubing and Rinsing Nozzle of the
device are seriously contaminated. please replace them with new
components. Please choose the original accessories. Please
replace the Rinsing Nozzle when it cracks or when you feel
uncomfortable. We provide 2 pieces for different size, please check
the number after opening the package. You can choose one which
is suitable for you.
2) It’s prohibited to use disinfectant or detergents containing
Benzene, diluent, or flammable chemicals to clean or disinfect the
device.
3) After use or during cleaning and disinfecting, please ensure the
device is turned off and dis-connect to the power source.
4) Keep small accessories, such as Cover, Rinsing Nozzle and
Tubing carefully.
Ⅶ. Quality Assurance Instructions
1. After the device is packaged, and under the conditions of storage
and use regulations, if the device fails to work normally within 1 year
from the date of purchase of the device, please contact the
distributor or manufacturer for after-sales services.
2. The device shall not be repaired by users. All repairs should be
handled by the technical department/staff recognized by the
manufacturer. During the warranty period, all defective components
can be repaired and replaced free of charge. All man-made faults
are not covered by the warranty.
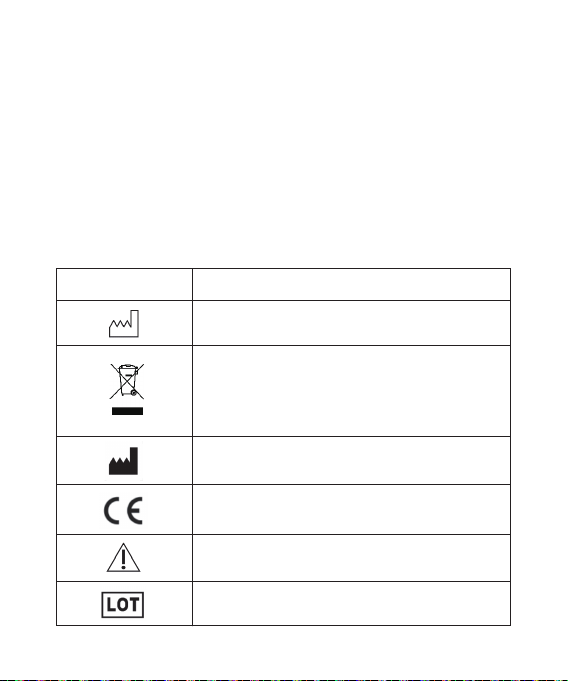
Ⅷ. Signs and symbols
General symbol Description / title
Date of manufacture
When this device life expires, the end users
should discard this device according to the
requirements from the local environment
protection authority.
Manufacturer information
CE identification
Caution
Batch code
14
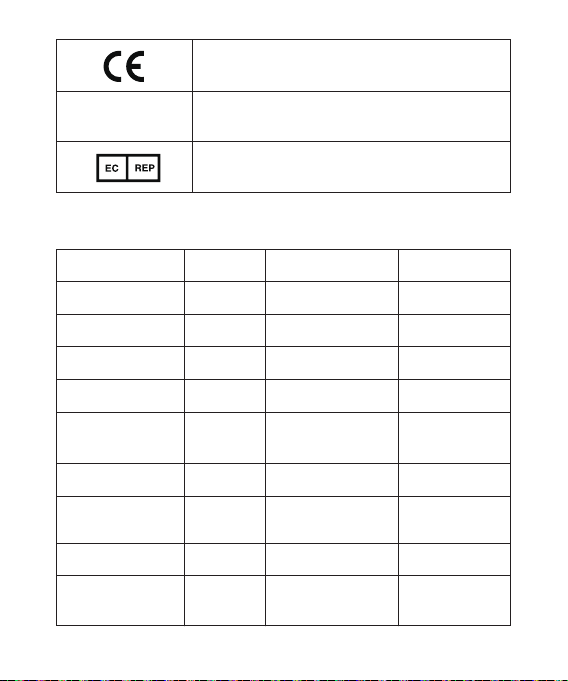
CE identification
Degree of protection against the
ingress of water.
Authorized representative in
the European Community
IP22
15
IX. Packing Lists
Quantity
1
2
1
1
1
1
1
1
1
Name
Main Unit
Rinsing Nozzle
Tubing
Cover
Water Storage
Tank
Power Cable
Instruction For
Use
Warranty Card
Certificate of
Inspection
If configure or not
√
√
√
√
√
√
√
√
√
/
/
/
Specifications

FEELLIFE HEALTH INC.
Room 1903, Building A, No.9 Furong Road, Tantou
Community, Songgang Subdistrict, Bao' an District, Shenzhen
518104 Guangdong, China.
Tel.: +86-755-66867080
After-sales Service: FEELLIFE HEALTH INC.
Email: [email protected]
Life Expectancy: 3 years
16
Ⅹ. Manufacturer Information
Kingsmead Service B.V.
Zonnehof 36,2632 BE,Nootdorp,Netherland

17
Gebrauchsanweisung
Nasensekretsauger
Air Flow 1

18
.................................................................
...........................................
....................................................
............................................
..........................................
.............................................................................
..................................
..................................................
.........................................................................
.................................................
I. Produktstruktur
II. Informationen zum Produkt
III. Inspektion des Geräts
IV. Installation und Gebrauch
V. Reinigung und Desinfektion
VI. Hinweis
VII. Qualitätssicherungsanweisung
VIII. Zeichen und Symbole
IX. Packlisten
X. Angaben zum Hersteller
19
20
21
22
25
26
27
28
29
30
Inhaltsverzeichnis

19
I. Produktstruktur
Deckel
Spüldüse
Wasserbehälter
Hauptgerät
Hauptschalter
Taste „+“ (Erhöhen der Spülleistung)
Taste „-“ (Senken der Spülleistung)
Ladeschnittstelle
Spülkopf
Schlauch
II. Informationen zum Produkt
1. Spezifikation
Produktname
Produktmodell
Stromquelle
Stromverbrauch
Nasensekretsauger
Air Flow 1
DC 3,7V (Lithium-Batterie) oder DC
5,0V mit AC-Adapter
<6.0 W

Hohe
Sprühgeschwindigkeit
Niedrige
Sprühgeschwindigkeit
Frequenz-Im-
puls-Sprühmenge
Kontinuierliche
Betriebsstunden
Volumen des
Wasserbehälters
Gewicht (g)
Abmessung (mm)
Arbeitsumfeld
Lagerung/
Lieferungsumfeld
10ml/min (Abweichung ± 3ml/min)
7ml/min (Abweichung ± 3ml/min)
5ml/min (Abweichung ± 3ml/min)
>30min
25ml
191g (mit Batterie)
175(L)x65(B)x56(H)
Temperatur: 5℃bis 40℃;
Relative Luftfeuchtigkeit: ≤80% R.F.
Nicht kondensierend; Atmosphärischer
Druck: 86kPa bis 106kPa
Temperatur: -20℃bis 55℃;
Relative Luftfeuchtigkeit: ≤93% R.F.
Nicht kondensierend; Atmosphärischer
Druck: 70kPa bis 106kPa
20
2. Beschreibung über den Indikator
Grünes Licht leuchtet dauerhaft
Blaues Licht blinkt 5 Mal
Blaues Licht blinkt ständig
Blaues Licht leuchtet dauerhaft
In Betrieb
Anzeige für niedrigen
Batteriestand
Im Ladevorgang
Vollständig aufgeladen
Table of contents
Languages:
Other Feellife Respiratory Product manuals


Popular Respiratory Product manuals by other brands


Sundstrom
Sundstrom SR 500 Instructions for use

Kempi
Kempi FreshAir Flow Control operating manual

ResMed
ResMed Positive AirwAy Pressure Device S8 Auto 25 user guide

BMC
BMC 3B Siesta user manual

Trudell Medical International
Trudell Medical International AEROCHAMBER PLUS FLOW-VU quick start guide

Scott
Scott RIT-PAK III Operating and maintenance instructions


