manuals.online logo
Brands
  1. Home
  2. •
  3. Brands
  4. •
  5. FeiYu Tech
  6. •
  7. Camera Accessories
  8. •
  9. FeiYu Tech FY G4 User manual

FeiYu Tech FY G4 User manual

FEIYU-EN-3
FY G4 is suitable for GoPro 4/GroPro 3+/GroPro 3, also can be compatible
with GoPro LCD backpack and the cameras with the same size.
EN
Function
Interface Function
Button
Video Input
And
Camera
Charging
Interface
Power
Switch
Pitch Axis Roll Axis
Indicator
Heading Axis
M2 Knurled
Thumb Screw
If the indicator light flashes red,
the Gimbal will not work correctly
due to an error.
Please install the suitable camera first before power on the Gimbal.
Please upgrade the firmware to V1.13 or above version.
Attention !
1Beginner Guide
2 Product Appearance Instructions
4Standard And Optional Accessories
6
6
Operation Instructions
3
Special Working Condition (Inversion Mode)
When in any working mode, press the function button for three times in succession, the
Gimbal will enter into the inversion mode and switch to the Heading following mode automatically. Invert the Gimbal to capture more excited
scenes easily by switching mode combination. When in inversion working condition press the function button for three times in succession to reset
the Gimbal back to the original state.
Manual Pulling Locking
The pitching can be adjusted 8 seconds after the Gimbal has been started. Within the Heading Follow and Heading
Lock Mode the pitching can be adjusted to the desired angle manually, wait in this position up to 0.5 second until the current angle is adjusted.
Standby Mode
Press the function button for 3 seconds, then the motor will stop working and the LED of the function button will light constantly.
This indicates that the Gimbal is in the standby mode. Single press the function button the Gimbal will be awakened immediately.
Level Calibration
The pitch and roll angle can be adjusted to level by G4 Remote Control without connect to the computer. Details of the
operation please refer to chapter
Heading Follow Speed Mode Configuration
The follow speed of the heading can be configurate by G4 Remote Control without
connect to the computer. Details of the operation please refer to chapter
Reset
Four press the function button in succession within any working mode, the gimbal will reset to the original state.
If any comments or suggestions please do not hesitate
to e-mail us directly : [email protected]
Please choose one way
to install the GoPro camera
Installation
Method
LR
Insert The Batteries
Remove the power switch
cap, insert two 18350
batteries into the handle.
Install The Camera
Install the GoPro camera by the
special Thumb Screw. And make
sure it is fixed well.
Power On
Confirm the camera is
installed well,then press
the power button to turn
on the Gimbal.
Mode Switching
When the Gimbal is working, you
can press the function button to
switch among the three working
modes and a special working
condition.
(Details of working modes please refer
to the instructions of working modes)
Function Button Working Mode Instructions
Operation
Double Press
Single Press
Long Press
For 1 Second
LED Status
Single Flashes
Double Flashes
On Constantly
Function Explanation
Operation Again Function Of Operation Again
Heading Follow Mode
Heading And Pitch Follow Mode
Three Press Three Press again
Other operation is arbitrary
Single press again
Single Flashes Inversion Mode Exit inversion mode to original state
Exit standby mode ,
and awaken immediately
Heading Lock Mode
Long Press
For 3 Second On Constantly
Standby Mode
Four Press Single Flashes Reset
Function Button Instructions
Heading, Pitch and Roll are all locked to
Use for switch
the working
mode and
realize other
functions
The working mode and function
can be identified by the LED status
Heading Follow Mode Camera Pitch and Roll Angles remain
Heading And Pitch Follow Mode Camera Roll Angle remains
Heading Lock Mode
Roll
Pitch
Heading
constant, heading follows the handheld position.
constant. Heading and Pitch follow the handheld position.
point at one position.
Indicator Explanation
LED Status Explain
Blue light flashes
three times Full Power
Blue light flashes
twice Enough Power
Blue light flashes
once Low Power
Blue light keeps
flashing No Power
Charger
Input: DC 5V
Output: DC 4.2V
USB Cable
USB Connector
Extension Knurled
Thumb Screw
Name
Remote
Control
Battery
Extender
Extension
Bar
Realize the heading & pitch angle adjustment,
mode switching, level calibration and heading
follow speed configuration from a distance.
Extend the capacity space for battery to
make the runtime longer.
Spiral design of the extension bar can be
perfect combination with G4 power switch;
Extended length is optional, it will help to
enjoy a different visual easily.
Function Description
Optional Accessories
Correct Method for Using USB Data Cable
Battery Charging:
Connect The Computer:
Put the Mini-USB terminal of the USB cable
into the Mini-USB interface of the charger and the USB terminal to
the power adapter which with the USB interface(Equipped by users)
If needed connect to the EU connector (Equipped by users).
Please remove the batteries first,
then insert the Mini-USB terminal into the function interface on the
Gimbal and the USB terminal to the USB connector. Afterwards
connect the device with the computer to do firmware updates or
parameter configuration.
Further information can be found in the chapter of the
Function Interface Instructions.
Please refer to the method of proper usage
mentioned below. Otherwise the device
itself or other equipments can be damaged
!
Standard Accessories
Type: 18350
Rechargeable
Battery
USB
Mini-USB
Camera Charging Cable
Video Output Cable
7Video And Camera Charging Interface
9Initialize The FY-G4 Gimbal
5
Function Interface Instructions
6G4 Remote Control Instructions (Optional Item)
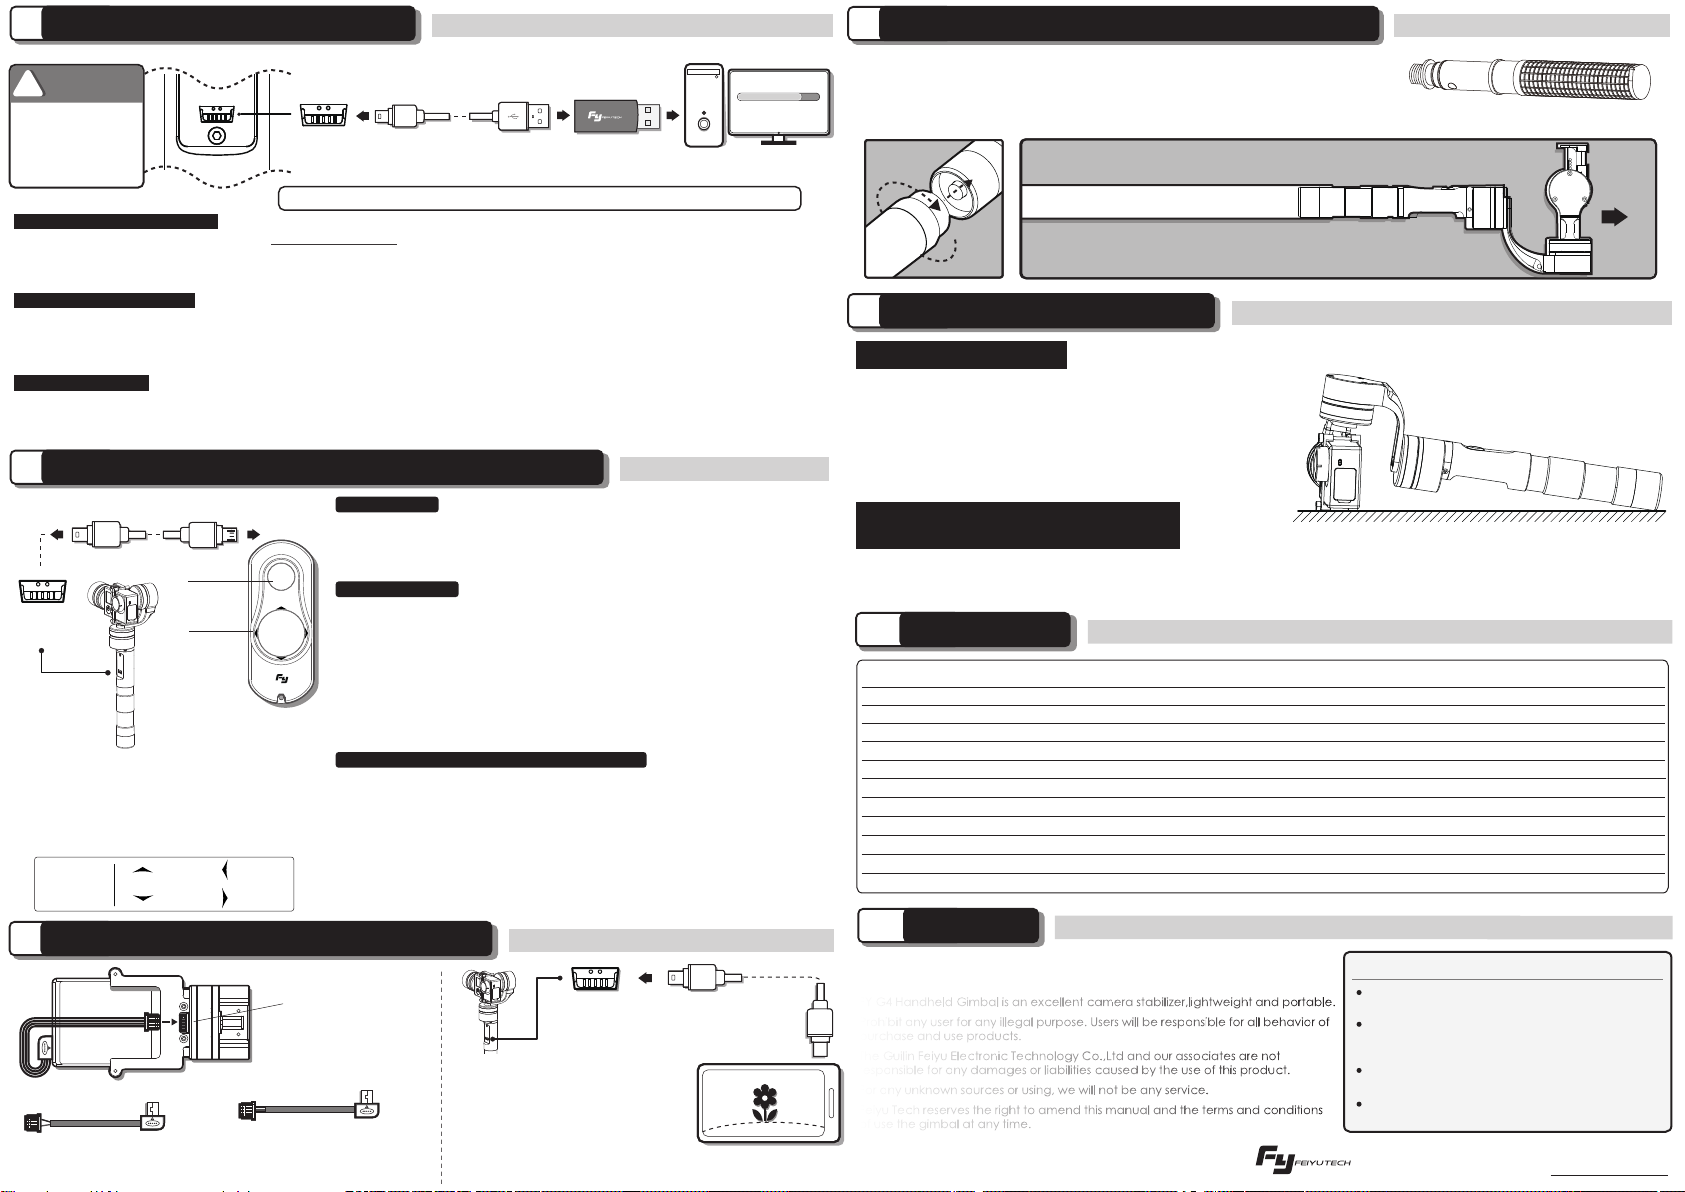
8Extension Bar Instructions (Optional Item)
11 Attention
10 Specification
Working Voltage
Static Attitude Tracking Accuracy
Motion Attitude Tracking Accuracy
Overload Current Protection
Pitch Angle
Roll Angle
Heading Angle
Heading Angle
Pitch Following Rate
Heading Following Rate
Weight
Gimbal In Static Mode
Motor Overload<2G
Handheld In Horizontal
Handheld In Vertical
Without Batteries & Camera
6.0V
0.01
0.1
-160(Down)
-50
-160(Left)
-50
2°/ Sec
3°/ Sec
265g
8.4V
0.02
0.2
800mA
0(Horizontal)
0(Horizontal)
17.0V
0.05
0.5
+160(Up)
+50
+160
+50
75°/ Sec
150°/ Sec
Motionless Flat Surface
1. Install the camera properly.
2. Place the Gimbal on stationary flat and keep motionless.
3. Power on the Gimbal.
4. The Gimbal is activated and it will be initialized automatically.
Afterward pick up the Gimbal and start working with it.
Initialization Instructions
FY-G4 needs to be initialized whenever the
following situations appear after power on
FY G4 Handheld Gimbal is an excellent camera stabilizer,lightweight and portable.
Prohibit any user for any illegal purpose. Users will be responsible for all behavior of
purchase and use products.
The Guilin Feiyu Electronic Technology Co.,Ltd and our associates are not
responsible for any damages or liabilities caused by the use of this product.
For any unknown sources or using, we will not be any service.
Feiyu Tech reserves the right to amend this manual and the terms and conditions
of use the gimbal at any time.
DISCLAIMER
Function
Interface
With the special designed switch, the extension bar can be added directly.
Allows to shoot the distance images more easily.
Special design allows for flexible extension.
Please visit the official website of Feiyu Tech
to get related information: www.feiyu-tech.com
Items Min Standard Max Remarks
Please Remove
The Batteries
Before
Upgrading
USB Cable USB Connector
Aenon: Make sure that the connecon to the computer is done by the USB connector
1. After power on, the angle of pitch is not level with the horizon line.
2. After power on, the angle of roll is not parallel with the horizon line.
3. When the gimbal is in heading lock, the angle of heading moves frequently (heading is not stationary).
Extension Bar Diagram
Analog Monitor Cable
( Equipped By Users )
Analog Monitor
( Equipped By Users )
Function
Interface
This interface can be
output 5 voltage and
input analog video
signal of GoPro
WARNING WARNING
!
Upgrade........
PC
Remote
Control
Function
Interface
USB Data Cable For RC
Connect the G4 Remote Control to the
function interface, heading & pitch angle
adjustment and mode switching can be
operated from a distance.
Function
Button
Direction
Button
Note: The function button on the Gimbal will
be disabled after connect the G4 Remote Control
Connect the video output cable,
input analog video signal of GoPro
camera and output via the function
interface on the gimbal.
Connect the camera charging
cable, power supply for the
GoPro camera.
Note: The analog monitor is
equipped by users.
After connect the video output cable,
the analog monitor can be connected
to the function interface for displaying.
The LED of the function button will fast flashing
if the initialization succeed.
Note:
UP LEFT
RIGHTDOWN
Direction
Button
Connecting the G4 Remote Control , the gimbal can make level calibration by
G4 RC without connect to the computer. Six press the function button in
succession in any working mode, Gimbal will enter the Level Calibration Mode.
The pitch angle can be adjusted by the“UP”and“DOWN”button, the
heading angle can be adjusted by the “LEFT” and “RIGHT” button.
After finish the level calibration , single press the function button on the RC, the
Gimbal will exit the level calibration mode then enter the standby mode and
save the parameters automatically. Single press the function button on the RC
again the gimbal will be awakened immediately.
Level Calibration
Angle Control
Hold the“RIGHT”button and four press the function button in succession at
the same time, the Gimbal will accelerate the heading follow speed.
Hold the“LEFT”button and four press the function button in succession at the
same time, the Gimbal will slow down the heading follow speed. When
successfully configurate the heading follow mode the Gimbal will enter the
standby mode and save the parameters automatically. Single press the function
button on the RC again the Gimbal will be awakened immediately.
There are three heading follow speed modes for optional: “SLOW”mode,
“NORMAL”mode , “FAST” mode. Default setting is“NORMAL” mode.
Configuration can be done within any working mode.
Heading Following Speed Mode Configurate
Within the Heading Follow Mode and Heading Lock Mode, pitch angle can be
controlled by the“UP”and “DOWN”button on the G4 Remote Control.
Within the Heading Lock Mode, Heading angle can be controlled by the“LEFT”
and“RIGHT”button .
Note: Please make sure that Gimbal initialized successfully.
Please visit the official website of Feiyu Tech: www.feiyu-tech.com to download the USB driver, firmware upgrade software and the latest
firmware then unzip the RAR file. Remove the batteries and refer to the connection diagram to connect the gimbal with the computer.
Please refer to the manual of update operation to upgrade, otherwise the Gimbal can not work normally.
The heading follow speed can be configurated through parameter setting software. Users can adjust to the desired following speed mode
according to the requirements of filming scene. Three modes for optional: “SLOW” mode, “NORMAL” mode , “FAST” mode.
Default setting is “NORMAL” mode.
The Gimbal attitude can be calibrated through parameter setting software. Users can adjust the pitch and roll in a small angle to achieve more
accuracy filming scene. Please insert the batteries then refer to the connection diagram to connect the gimbal with the computer for calibration.
Firmware Upgrade Instruction
Parameters Configuration
Gimbal Calibration
Attention : Please make sure that the connection to the computer is done by the USB connector.
Please assemble the gimbal according
to the diagram correctly .
Please upgrade firmware and configurate
parameters with the standard configuration
USB date cable.
Please charge battery with the standard
configuration charger.
Please install the camera well before power
on the Gimbal.
ATTENTION
Camera charging cable Video output cable
Optional adjustable extension bar like the right picture. Adjustable Extension Bar

Other FeiYu Tech Camera Accessories manuals

FeiYu Tech AKFI User manual

FeiYu Tech

FeiYu Tech AKFI User manual

FeiYu Tech G6 User manual

FeiYu Tech

FeiYu Tech G6 User manual

FeiYu Tech MiNi 3D User manual

FeiYu Tech

FeiYu Tech MiNi 3D User manual

FeiYu Tech G360 User manual

FeiYu Tech

FeiYu Tech G360 User manual

FeiYu Tech a1000 User manual

FeiYu Tech

FeiYu Tech a1000 User manual

FeiYu Tech G3 Steadycam User manual

FeiYu Tech

FeiYu Tech G3 Steadycam User manual

FeiYu Tech SCORP 2 User manual

FeiYu Tech

FeiYu Tech SCORP 2 User manual

FeiYu Tech SPG 2 User manual

FeiYu Tech

FeiYu Tech SPG 2 User manual

FeiYu Tech FY-G3 Ultra User manual

FeiYu Tech

FeiYu Tech FY-G3 Ultra User manual

FeiYu Tech G4 Plus User manual

FeiYu Tech

FeiYu Tech G4 Plus User manual

FeiYu Tech G360 Quick start guide

FeiYu Tech

FeiYu Tech G360 Quick start guide

FeiYu Tech G6 User manual

FeiYu Tech

FeiYu Tech G6 User manual

FeiYu Tech SPG User manual

FeiYu Tech

FeiYu Tech SPG User manual

FeiYu Tech Vimble 2A Installation guide

FeiYu Tech

FeiYu Tech Vimble 2A Installation guide

FeiYu Tech WG2 User manual

FeiYu Tech

FeiYu Tech WG2 User manual

FeiYu Tech G6 User manual

FeiYu Tech

FeiYu Tech G6 User manual

FeiYu Tech A2000 User manual

FeiYu Tech

FeiYu Tech A2000 User manual

FeiYu Tech G6 Plus Installation guide

FeiYu Tech

FeiYu Tech G6 Plus Installation guide

FeiYu Tech WG2 Quick start guide

FeiYu Tech

FeiYu Tech WG2 Quick start guide

FeiYu Tech SPG User manual

FeiYu Tech

FeiYu Tech SPG User manual

FeiYu Tech AK Series User manual

FeiYu Tech

FeiYu Tech AK Series User manual

FeiYu Tech G4S User manual

FeiYu Tech

FeiYu Tech G4S User manual

FeiYu Tech FY WG2 User manual

FeiYu Tech

FeiYu Tech FY WG2 User manual

FeiYu Tech G6 Plus User manual

FeiYu Tech

FeiYu Tech G6 Plus User manual

Popular Camera Accessories manuals by other brands

Sony Sports pack SPX-TRX operating instructions

Sony

Sony Sports pack SPX-TRX operating instructions

Sanyo UF653450R Specifications

Sanyo

Sanyo UF653450R Specifications

US BATTERY US1800 XC2 user manual

US BATTERY

US BATTERY US1800 XC2 user manual

UPOWER Ecoline UE-24Li10 manual

UPOWER Ecoline

UPOWER Ecoline UE-24Li10 manual

Husqvarna 100-B380X Operator's manual

Husqvarna

Husqvarna 100-B380X Operator's manual

NEC N8103-102 user guide

NEC

NEC N8103-102 user guide

ZERO-X ZX-G2 user manual

ZERO-X

ZERO-X ZX-G2 user manual

Cartoni MASTER 65 User Manual/Maintenance

Cartoni

Cartoni MASTER 65 User Manual/Maintenance

Deka FastCharge F35 operating instructions

Deka

Deka FastCharge F35 operating instructions

KAPtery SliderPro 200 user guide

KAPtery

KAPtery SliderPro 200 user guide

JVC GR DVP 1 user manual

JVC

JVC GR DVP 1 user manual

KAPtery Redstone Rig Kit Assembly and Use Guidelines

KAPtery

KAPtery Redstone Rig Kit Assembly and Use Guidelines

Brookstone 322179p manual

Brookstone

Brookstone 322179p manual

Aquatica Digital Aqua View 20054 instruction manual

Aquatica Digital

Aquatica Digital Aqua View 20054 instruction manual

GreenWorks GLW300 Operator's manual

GreenWorks

GreenWorks GLW300 Operator's manual

PROAIM P-PTBH-01 Assembly manual

PROAIM

PROAIM P-PTBH-01 Assembly manual

Funsnap Capture p manual

Funsnap

Funsnap Capture p manual

KERN PCB-A01 Battery Installation

KERN

KERN PCB-A01 Battery Installation

manuals.online logo
manuals.online logoBrands
  • About & Mission
  • Contact us
  • Privacy Policy
  • Terms and Conditions

Copyright 2025 Manuals.Online. All Rights Reserved.