Feiyu Scorp Mini 2 User manual

- 3 -
EN User manual
Scan the QR code to get the latest user manual or download it from
the ocial website.
https://www.feiyu-tech.com/feiyu-scorp-mini-2/
Download the App
When mounting mirrorless camera, pocket camera or action camera on gimbal for shooting,
please download "Feiyu SCORP".
When mounting smartphone on gimbal for shooting, please download "Feiyu ON".
Scan the QR code to download the app, or search for "Feiyu SCORP", "Feiyu ON" in the App
Store or Google Play.
* Feiyu SCORP: Requires iOS 11.0 or above, Android 6.0 or above.
Feiyu ON: Requires iOS 12.0 or above, Android 8.0 or above.
iOS Android
Feiyu SCORP Feiyu ON Feiyu SCORP Feiyu ON
2. Getting started
2.1 Charging
Please fully charge the battery before power on the gimbal for the rst time.
Charging with USB-C cable, supports quick charge.
EN Quick Start Guide
1. Overview
* Not include camera/ smartphone.
[35]
[34]
[16]
[18] [19][17]
[5]
[28]
[27]
[30]
[31]
[29]
[26]
[25]
[20] [24]
[37]
[15] [36]
[3]
[2]
[27][32] [33][17]
[4]
[38]
[27]
[22]
[23]
[12]
[14]
[13]
[21]
[9]
[11]
[10]
[6]
[7]
[8]
[1]
[1] Power button
[2] Trigger button
[3] Handle
[4] F2 button
[5] Touch screen
[6] Shutter button
[7] Mode button
[8] Joystick
[9] F1 button
[10] FPV button
[11] Knob function switching button
[12] Multifunction knob
[13] Anti-drop lock for slider
[14] Quick release plate lock
[15] Fixed plate
[16] Slider lock
[17] Anti-drop lock
[18] Quick release plate
[19] Slider
[20] Slide arm
[21] Slider lock
[22] Roll axis
[23] Roll lock
[24] Tilt axis
[25] Tilt lock
[26] Cross arm
[27] 1/4 inch thread hole
[28] Camera for tracking module
[29] Indicator light for tracking module
[30] Extension port
[31] Camera control port/USB-C Power Output Port ①
[32] Anti-drop lock for sliding arm
[33] M6 threaded hole
[34] Lens holder
[35] Lens holder screw
[36] Versatile arm
[37] Pan axis
[38] Pan lock
① Supports charging for shooting devices compatible with the USB power supply protocol.

- 4 -
EN
2.2 Adjust the gimbal to gimbal balancing position
The gimbal is folded by default, please unlock all the three axes and adjust the gimbal to
gimbal balancing position, and then lock the three axes.
1
2
3
Gimbal folded position Gimbal balancing position
2.3 Installing xing accessories
When using cameras, phones, and other shooting devices, you need to install the xing
accessories rst.
[1] [2] [3] [4]
+++
[5] [6]
[1] Fixed Plate
[2] Slider
[3] Quick release plate+
screw
[4] Lens holder+ screw
[5] GoPro adapter+ screw
[6] Smartphone holder
Equipped
devices
Fixing
accessories Installation reference
Mirrorless
camera Horizontal
mounting: [1]
Vertical
mounting: [2]
Horizontal mounting : [1] + [2] + [3] + [4]
Vertical mounting : [2] + [3] + [4]
Pocket camera Horizontal mounting : [1] + [2] + [3]
Vertical mounting : [2] + [3]
Action camera Horizontal mounting : [1] + [2] + [3] + [5]
Vertical mounting :[2] + [3] + [5]
Smartphone [6] [6]
Install the xed plate [1]: Unlock ①, slide ②into the slot, and lock ①.
11
2
You can also install the slider [2] or smartphone holder [6] in the same way.
1 1
3. Mounting the shooting equipment
Take camera mounting as an example.
Before mounting the camera, make sure the camera is ready for shooting (Install the camera
lens, and the lens cover should be removed, the memory card and battery needs to be
inserted to the camera, and battery is fully charged) , complete all the steps which mentioned
in chapter "2. Getting started" and the gimbal is adjusted to gimbal balancing position.
Make sure the gimbal is powered o or in sleep mode before mounting the camera.
3.1 Attach the quick release plate
Attach the quick release plate to camera by tightening
the screw.
If the camera doesn't have the 1/4-20 inch screw hole,
please put the camera on mount adapter, which has
1/4-20 inch screw hole, and then follow the steps above
to mount it.
Users can mount smartphone into the optional
smartphone holder, and follow the steps above to install
it on the gimbal.

- 5 -
EN
3.2 Install lens holder (Optional)
Install the lens holder on the quick release plate if needed, the rubber of the lens holder must
be directly under the lens. It is recommended to use the lens holder when using a long or
heavy lens.
3.3 Mount camera on gimbal
Unlock ①, slide ② into the slot, lock ①, loosen ③, slide ④ into the slot as indicated, adjust
the camera forward and backward until roughly balanced, then tighten ③.
4
11
3
2
It is recommended to push the camera against the tilt axis. Unlock ① to move the camera left
or right according to camera's width to adjust, then lock ① .
1
1
4. Gimbal balancing
Please balance the gimbal before shooting. Take camera mounting
as an example. Make sure the camera and lens are ready for shooting,
and the gimbal is powered o or in sleep mode before balancing. It is
recommended to hold up the camera rst, then move the slide
arm, cross arm and vertical arm. Tutorial Videos
4.1 Balancing the tilt axis
4.1.1 Balancing the vertical tilt
a. Unlock the tilt lock ① , and loosen the slide arm
lock ②.
b. Rotate the tilt axis so that the camera lens is pointing
upward. Check the direction which the lens tilts to.
c. If the lens tilts to one side, then the camera is that
side heavy, move the slide arm ③ to the opposite
direction, until the camera is steady pointing upward.
d. Tighten the slide arm lock ② while holding the
camera.
3
1
2
4.1.2 Adjust depth for the tilt axis
a. Rotate the tilt axis so that the camera lens is pointing
forward. Check the direction which the lens tilts to.
b. If the lens tilts to one side, then the camera is that
side heavy, unlock the quick release plate lock ① and
then move the quick release plate to the opposite
direction, until the camera is steady pointing forward.
c. Lock the quick release plate lock ① while holding the
camera.
The tilt axis is balanced when the camera is steady
while tilted up or down by 45° .
1
2
4.2 Balancing the roll axis
a. Unlock the roll lock ① , check the direction which the
camera tilts to.
b. If the camera tilts to one side, then the camera is that
side heavy, loosen the cross arm lock knob ②and then
move the cross arm to the opposite direction, until the
camera can stay still and horizontal to the ground.
c. Tighten the cross arm lock knob ②.
The roll axis is balanced when the camera can stay still
and horizontal to the ground.
3
2
1

- 6 -
EN
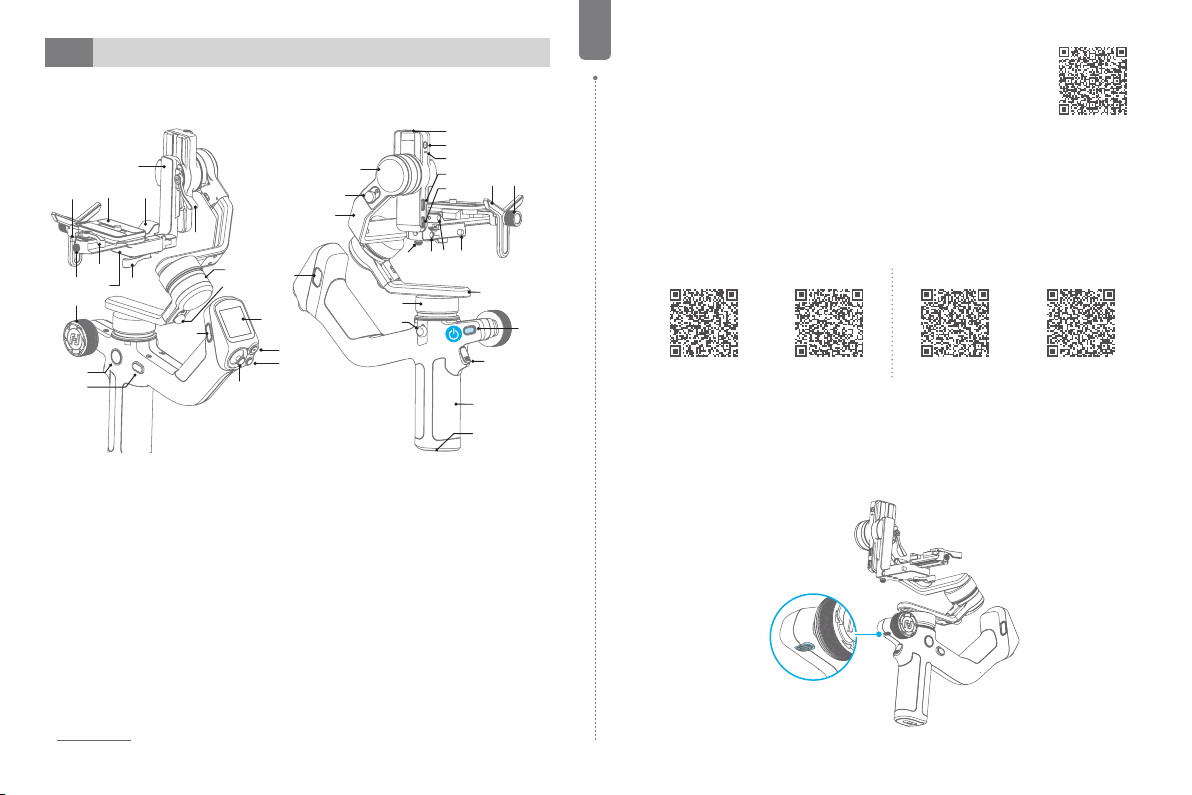
4.3 Balancing the pan axis
a. Unlock the pan lock ①. Hold the tripod,
and tilt the gimbal forward until it is
horizontal to the ground.
b. If the camera tilts to one side, then the
camera is that side heavy, loosen the vertical
arm lock knob ② and then move the vertical
arm ③ to the opposite direction, until the
camera can stay still and horizontal to the
ground.
c. Tighten the vertical arm lock knob ②.
The pan axis is balanced when the camera
can stay still and horizontal to the ground.
3
1
2
5. Operation
5.1 Power ON/ OFF
Before power on the gimbal, make sure you have balanced gimbal, and unlocked all the three
axes. If you haven't unlocked all the 3 axes, gimbal will enter sleep mode to protect itself.
Please single tap power button to wake up gimbal after unlocked all the 3 axes.
! Please set motor power rst after powering on gimbal for the rst time or after changing a
new camera/lens.
Long press the power button and release it when you hear the beep sound to power on/o.
5.2 Follow mode introduction
PF: Pan follow, only the pan axis follows the movement of user's hand.
PTF: Pan and tilt follow, where both the pan and tilt axes follow the movement of user's hand, but roll
axis does not.
FPV: Pan, tilt and roll follow, where all 3 axes follow the movement of user's hand.
Lock: All 3 axes do not follow the movement of user's hand, gimbal keeps the direction of the camera
xed.
FFW: Flash follow, where all 3 axes follow the movement of user's hand in high follow speed.
5.3 Button operation
Power button
Long press: Power on/o
Single tap: Wake up(In sleep
mode)/Battery level display
(When powered o)
Double tap: Enter sleep mode
Mode button
Single tap: PF mode(Default)
/PTF/FPV (Switch in turn)
Tap ve times: Horizon
calibration
Joystick
Push:
(1) Control the movement of
the tilt and pan axes.
(2) Control album (In Feiyu ON
App)
Trigger button
Single tap:Face tracking (In
Feiyu ON App)
Double tap: Recenter
Triple tap: Enter/Exit sele
mode (Pan axis turn 180° )
Tap four times: Switch roll
axis to back/front (Useful for
reducing obstruction of front/
rear camera when shooting)
Press and hold: Lock mode
(Release to exit)
You can custom the function via
APP
Shutter button
Camera Connected
Press half way: Focus
Single tap (Fully): Start/stop
recording
Long press (Fully): Take
photo
Phone Connected
Press half way: Focus (Feiyu
ON App)
Single tap (Fully): Shutter
Long press (Fully): Switch
among video/ photo mode
(Feiyu ON App)
FPV button
Single tap: Enter/Exit FPV
mode
F1 button
Single tap: Enter/exit album
(In Feiyu ON App )
Double tap: Enter/exit portrait
mode
Triple Tap: AI power on/o
Long Press: Enter/Exit AI
tracking (With AI Power enabled)

- 7 -
EN
F2 button
Single tap:
(1) Lock/Unlock screen (In
home page)
(2) Return to home page (In
other pages)
Double tap: Enter FFW mode
Long Press: Enter motor
power auto tuning
Multifunction knob
Turn:
(1) Control the movement of
the roll, tilt and pan axes.
(2) Control electronic focus/
zoom (The smartphone requires
the use of the Feiyu ON App)
(3) Contol focus motor.
(4) Adjust the parameter in the
touch screen.
Set current control option as
option (1) or (2) or (3) through
long press the knob function
switching button or swipe up in
home page.
Knob function switching
button
Single tap:
(1) Switch the control
object while controlling the
movement of the 3 axes (Tilt/
Pan/Roll)
(2) When in electronic focus/
zoom control state, single tap
to switch between electronic
focus and electronic zoom
(The smartphone requires the
use of the Feiyu ON App)
Long press: Switch the control
options of Multifunction knob
in turn (The movement of the
3 axes, electronic focus/zoom)
Key Combinations:
Long press F1 button + F2 button: Clear
bluetooth
*(1) When using a camera or the original camera app on your smartphone to capture photos or videos,
some features may require specic camera or smartphone support. You can visit the ocial website to
check the list of compatible devices: https://www.feiyu-tech.com/feiyu-scorp-mini-2/
(2) We recommend using this product in conjunction with the Feiyu ON / Feiyu SCORP App.
5.4 Touch screen operation
Motor power
PTF
Follow speed
Scenario
Home page
Motor power
Use auto tune to adjust the motor power automatically, or adjust motor power for
each axis manually.
Follow speed
User can select dierent gimbal follow speed proles, or custom follow speed.
Follow mode
Select gimbal follow mode
PF PTF FPV Lock FFW
Scenario
Scenario-based functional application.
Joystick setting
Gimbal setting
Bluetooth setting
ISO
1.6
2.2
2400
1800
3200
1 60
/
/
/
F Shutter
DPI FPS
Focus motor
Pan
Knob settings
Tilt Roll
Swipe from right to left
Joystick, gimbal and
more settings
Swipe from left to right
Shooting parameters
settings
Swipe up
Multifunction knob
settings
- Return to previous menu: Swipe to right
5.5 AI Tracking
Under AI Power-On State, the following controls are available:
AI Gesture Control
OK gesture (Left or right hand): Start tracking/Stop tracking
Start tracking with the green light stays on.Repeat this gesture, stop
tracking, enter standby mode with the red light stays on.Two gestures
must be separated by 3 seconds
or Thumbs opposite direction: Stop tracking
Stop tracking, enter standby mode with the red light stays on.
Spread palm (Left or right hand): Shutter
When the smartphone is in photo/video mode:
Take photo or start recording after a 3-second countdown with beep
sound.
After started the recording, do the gesture again to stop recording

- 8 -
EN
Double L-Shaped gestures: Custom framing
Start framing, green light blinks fast. When the subject moves to the desired
position, perform this gesture again to complete framing, and the green
light stays on.
Button control
Long press F1 button: Start tracking/Stop tracking
Triple tap F1 button: AI power on/o
6. Specications
Product name Feiyu SCORP-Mini 2 3-Axis Handheld Gimbal for Camera
Product model FeiyuF1-2
Max. Tilt Range +163° ~-155°(±3°)
Max. Roll Range +70° ~-250°(±3°)
Max. Pan Range 360°
Weight About 852g (Not including tripod)
Payload Capability About 1200g (Well-balanced)
Battery life ≤ 10 Hours*
Battery 2500mAh
Operating Voltage 6.8V-8.4V
Compatible Mirrorless camera and pocket camera ( Sony, Canon, Nikon, Panasonic,etc.
For specic camera and lens compatibility, please refer to the ocial website's
compatibility list.) , action camera like GoPro, and smartphone (Width:
52mm~82mm, thickness: < 8.9mm)
*Experimental conditions: Payload about 1000g, balanced, in Pan Follow mode on standby
Accessories
[1] USB-C Charging Cable x1
[2] USB-C to Micro Camera Control Cable x1
[3] USB-C to USB-C Camera Control Cable x1
[4] USB-C to TRS2.5 Camera Control Cable x1
[5] USB-C to Multi Camera Control Cable x1
[6] USB-C to 2.5mm Camera Control Cable
(DC2.5mm) x1
[7] USB-C to TRS3.5 Camera Control Cable x1
[8] USB-C to Mini Camera Control Cable x1
[9] Tripod x1
[10] Fixed plate x1
[11] Slider x1
[12] Quick release plate x1
[13] Lens holder x1
[14] Focus motor support rod x1
[15] Smartphone holder x1
[16] Long thumb screw x1
[17] Gopro adapter x1
[18] Lens holder screw x1
[19] Camera xed screw x1
[20] Fixed screw for support rod x1
Kit Version Additions:
[21] Wireless ll light x1
[22] Expandable module x1
[23] Carbon ber rod x1
[24] Storage bag x1
Table of contents
Other Feiyu Camera Accessories manuals
Popular Camera Accessories manuals by other brands

Powerfix Profi
Powerfix Profi 280231 Operation and safety notes

Cisco
Cisco Webex Quad Camera Cable Cover installation guide

SCT
SCT RCM Series installation instructions

Kessler
Kessler CineDrive Turntable Conversion Kit installation guide

Schwaiger
Schwaiger SF70 User instructions

Opticron
Opticron Digital Compact Camera Kits Product information & user guide