Ferguson DAB+100 User manual

DAB+100
Table of contents
ABOUT THE INSTRUCTION MANUAL .......................................................................................... 2
1. Connecting, starting up, s itching on and off .................................................................................. 3
2. Connecting and operating USB devices and SD memory cards ...................................................... 4
3. DAB: operating DAB radio (digital radio) ....................................................................................... 4
4. FM: operating FM radio ................................................................................................................... 5
5. ALARM/SNOOZE: setting alarms and snooze mode ...................................................................... 5
TECHNICAL SPECIFICATION .......................................................................................................... 7
1

DAB+100
ABOUT THE INSTRUCTION MANUAL
Ferguson Sp. z o.o. has made every effort to provide the most current information about its
products. Ferguson Sp. z o.o. does not grant any guarantee as to the contents of the present
instruction manual and disclaims any implied guarantees concerning market value or suitability for
specific purposes. The information contained herein is an instruction intended to enable the correct
usage and maintenance of the device.
Ferguson Sp. z o.o. reserves itself the right to introduce amendments, changes or translations of the
instruction manual ithout prior notification thereof. For this reason, e recommend you regularly
visit our ebsite in order to obtain the latest information.
MARKINGS AND SIGNS APPLIED TO THE RECEIVER
Risk of electric shock - do not open. This
notice arns the user not to open the receiver
housing. The housing may be opened solely by
authorized service technicians.
CE logo.
The logo informs that the receiver conforms to the
terms and conditions of Directive 2004/108/EC
concerning observance by Member States of
provisions regulating electromagnetic
compatibility, and to the terms and conditions of
Directives 2006/95/EC concerning observance by
Member States of provisions regulating lo voltage
electricity and safety ith relation to the handling
and operation of electrical equipment.
When this crossed-out heeled bin symbol is
attached to a product it means that the product
is covered by the European Directive
2002/96/EC. Please inform yourself about the
local separate collection system for electrical
and electronic products.
Please act according to your local rules and do
not dispose of your old products ith your
normal household aste.
Correct disposal of your old product helps to
prevent potential negative consequences for the
environment and human health.
R&TTE Hereby Ferguson Sp. z o.o., declares that the
device is in compliance ith the essential
requirements and other relevant provisions of
Directive 1999/5/EC. You can find the Declaration
of Conformity on .deklaracje.ferguson.pl
This product has been designed, tested and
manufactured according the European R&TTE
directive 1999/5/EC.
Double insulation logo.
This logo informs that the deviceis an electrically
safe device, provided that it is used in accordance
ith the recommendations set for ard in the
chapter concerning safety.
Your product contains batteries covered by the
European Directive 2006/66/EC, hich cannot
be disposed ith normal household aste.
Please inform yourself about the local rules on
separate collection of batteries because correct
disposal helps to prevent negative
consequences for the environmental and human
health.
Hot surface mark
CAUTION: HOT SURFACE. DO NOT TOUCH.
The top surface over the internal heat sink may
become hot hen operating this product
continuously. Do not touch hot areas, especially
around the “Hot surface mark” and the top panel.
Your product is designed and manufactured
ith high quality materials and components,
hich can be recycled and reused.
When this logo is attached to a product, it means a
financial contribution has been paid to the
associated national recovery and recycling system.
2
DAB+100
QUICK START GUIDE
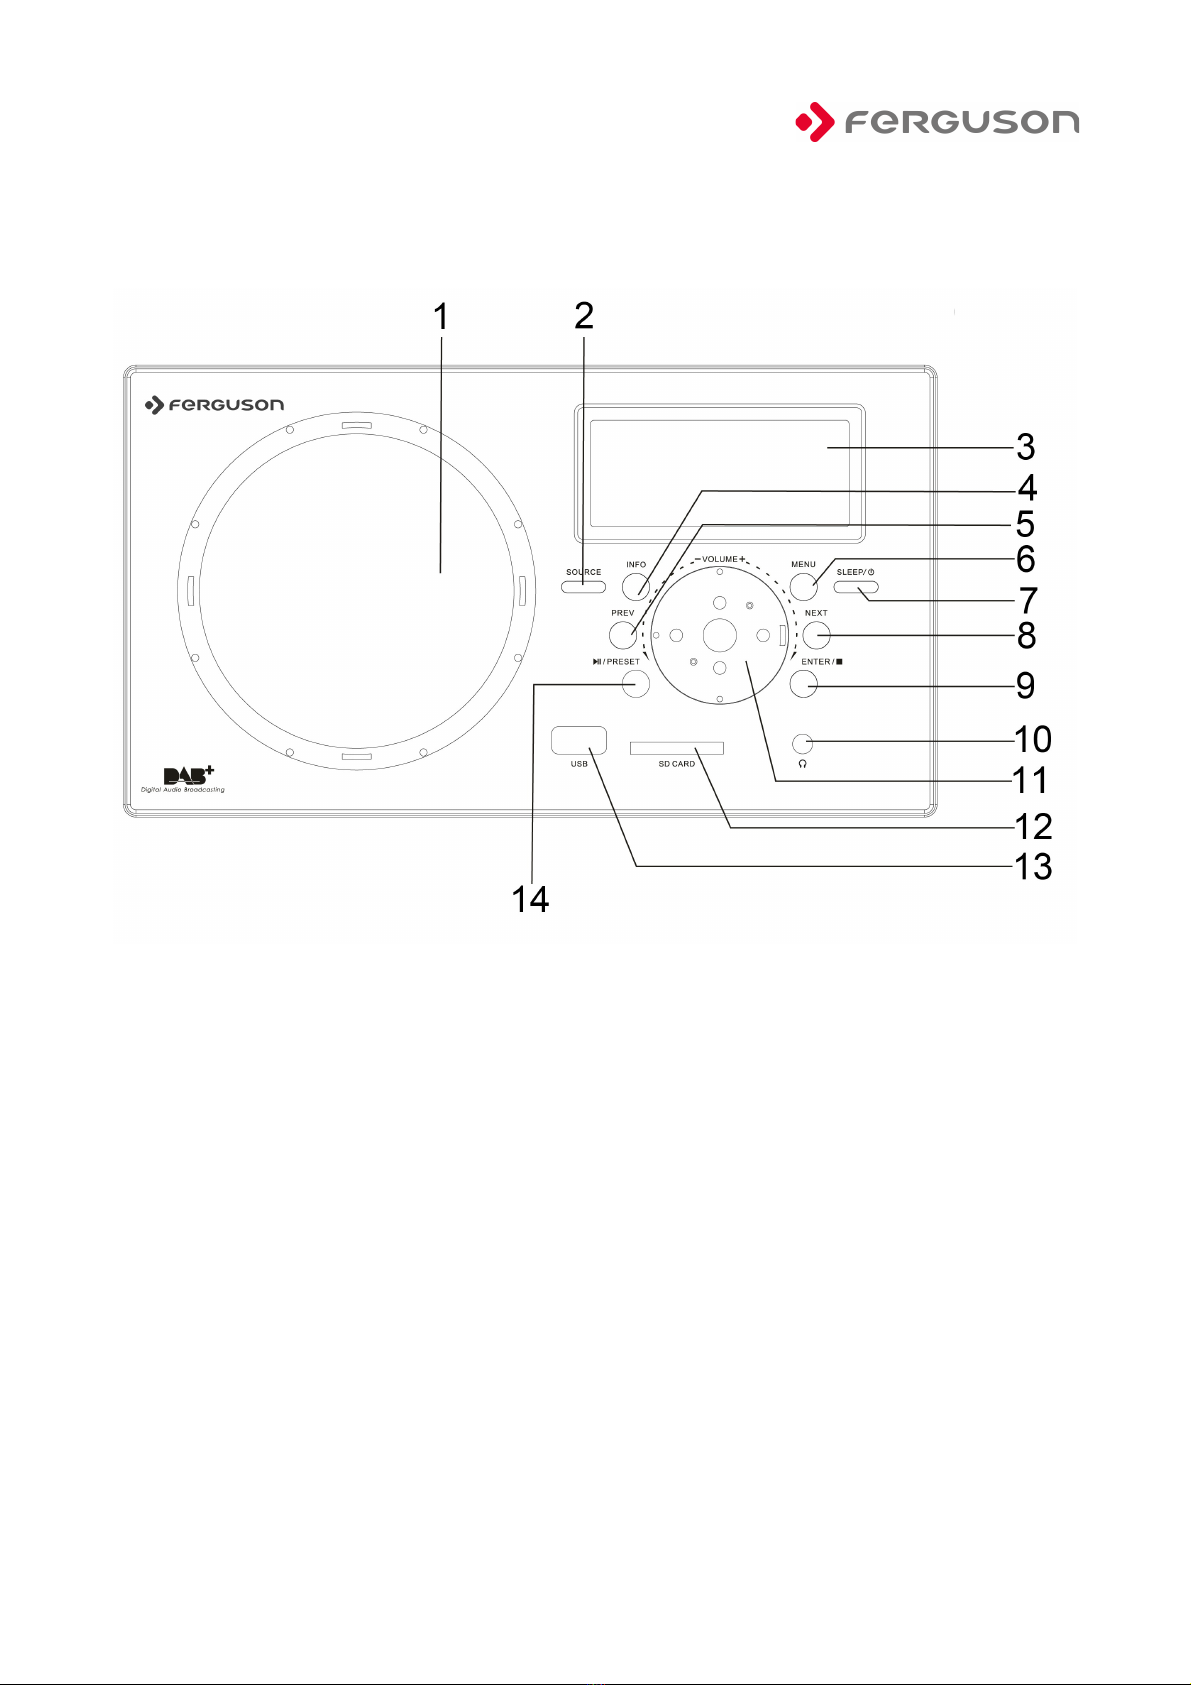
1. Connect ng, start ng up, sw tch ng on and off
1. SPEAKER
2. SOURCE
3. DISPLAY SCREEN
4. INFORMATION
5. PREVIOUS
6. MENU
7. SLEEP/STANDBY
8. NEXT
9. ENTER / ■ STOP
10. EARPHONE PORT
11. VOLUME
12. SD CARD READER
13. USB PORT
14. PRESET/PLAY/PAUSE
3

DAB+100
•Connect the mains plug DC 12V IN on the back side of the unit to a all socket to po er
the device and fully extend the telescopic aerial FM on the back side of the unit for optimal
radio reception.
•A elcome message from Ferguson follo ed by time and date ill appear on the display.
The time and date on the display are automatically updated hen you turn on the DAB radio
for the first time.
•Press and hold the SLEEP/STANDBY button to turn on and off the unit after use. When
turned on, the unit automatically restores the last used mode of operation.
•Turn the VOLUME KNOB to adjust the volume level.
2. Connect ng and operat ng USB dev ces and SD memory cards
•Plug-in the USB stick directly or use an USB-extension cable hich is not longer than 25
cm.
•Connect a USB device to the USB PORT or/and insert an SD memory card into the SD
CARD PORT.
•Press the SOURCE button repeatedly to select the USB or SD operating mode respectively.
Your radio automatically detects the USB device or SD memory card.
•Press the PLAY/PAUSE Ml button to stop and resume the playback
•Press the STOP ■ button to terminate the playback.
•Press the PREV or NEXT button to skip to the previous or next track.
3. DAB: operat ng DAB rad o (d g tal rad o)
•Press the SOURCE button repeatedly to select the DAB operating mode.
•Your radio automatically starts searching for available DAB stations. All radio stations
found are stored as a list. Once the scan is over, the radio starts playing the first station from
the list.
•Press the PREV or NEXT button to scroll through the list of DAB stations. Press the
ENTER button to tune in to the DAB station selected.
•To redo the full scan, press the MENU button and the PREV or NEXT button to select the
STATION SCAN menu item. Press the ENTER button and then the PREV or NEXT button
to select the FULL SCAN menu item. Press the ENTER button to start the full scan.
•To store a DAB radio station in your DAB favourite list, tune in to the desired radio station
and press the PRESET button.
•Press the PREV or NEXT button to select a memory number for the station. After ards,
press and hold the ENTER button to confirm the settings. You can store up to 10 radio
stations in your DAB favourite list.
•To s itch on a preset radio station, press the PRESET button and then PREV or NEXT
button to scroll through your DAB favourite list.
4

DAB+100
•Press the ENTER button to tune in to the preset station selected.
4. FM: operat ng FM rad o
•Press the SOURCE button repeatedly to select the FM operating mode.
•Press and hold the PREV or NEXT button to find and play the previous or next available
radio station in the FM frequency range.
•To store a FM radio station in your FM favourite list, tune in to the desired radio station and
press the PRESET button.
•Press the PREV or NEXT button to select a memory number for the station. After ards,
press and hold the ENTER button to confirm the settings. You can store up to 10 radio
stations in your FM favourite list.
•To s itch on a preset radio station, press the PRESET button and then PREV or NEXT
button to scroll through your FM favourite list.
•Press the ENTER button to tune in to the preset station selected.
5. ALARM/SNOOZE: sett ng alarms and snooze mode
•If necessary, press and hold the SLEEP/STANDBY button to s itch the unit into the
standby mode.
•Press the MENU button repeatedly to select the alarm setup interface. The ALARM 1
STATUS menu item and the ON option ill flash. If necessary, rotate the VOLUME
BUTTON to select ON option. Press the ENTER button to activate the 1st alarm.
•Rotate the VOLUME BUTTON to set the hour digits of the alarm time and press the
ENTER button to confirm. In the same ay, you can set the minute digits and the frequency
of the alarm time as ell as the alarm mode.
•Once the 1st alarm settings are done, the alarm logo appears in the display.
•To set the 2nd alarm, press the MENU button repeatedly until the ALARM 2 STATUS menu
item appears on the display, and repeat the steps 2 and 3.
•Press the ENTER button once to turn off the alarm sound.
•If you have selected the BUZZER option as the alarm sound, you can activate the SNOOZE
mode: rotate the VOLUME KNOB in any direction hen the alarm is ringing. The signal
ill be off and the alarm ill be repeated after 3 min.
6. SLEEP TIME: Automat c sw tch off
•You can use the SLEEP TIME function to set an amount of time after hich
•the unit ill automatically s itch into the standby mode (s itch off):
•While the radio is on, press the SLEEP/STANDBY button repeatedly to select one of the
follo ing time periods for the sleep time function: 10, 15, 30, 45, 60, 90 or 120 min.
•After having selected the desired sleep time option, do not touch any button for a fe
seconds. The settings ill be saved and the unit ill return to the normal playing status.
5

DAB+100
•When the set time has elapsed, the unit ill automatically s itch to the standby mode.
•Press the SLEEP/STANDBY button to s itch on the unit again.
6

DAB+100
Important note:
This device is equipped ith an energy saving mode: if no signal is given during 15 minutes the
device ill s itch automatically into standby mode in order to save energy (ErP 2 standard). Please
note that lo volume setting in the audio source may be recognized as„no audio signal": this ill
affect the capability of signal detection from the device and can also originate an automatic s itch
into standby mode. If this happens please reactivate the audio signal transmission or increase the
volume setting on the audio source player (MP3 player, etc.), in order to resume playback. Please
contact the local service center if the problem remains.
TECHNICAL SPECIFICATION
Input line: 12V DC
Po er consumption in standby mode: <1 att
Max Po er Consumption: 20 Watts
DAB + frequencies range: 174.928 MHz 239.200 MHz ~
FM Frequency Range: 87.5MHz ~ 108 MHz
Dimension (cm): 23,5 x 14 x 14,5 cm
Net Weight: 1,7 Kg
DOWNLOADABLE SOFTWARE
Ferguson has taken every effort to provide users ith soft are updates in order to ensure that the
parameters of the sadevice are up to date. Ferguson reserves itself the right to amend, change or
modify the soft are used in the device as it shall choose and ithout prior notification. The latest
version of the soft are is available on the ebsite http:// .ferguson-digital.eu
7
Table of contents
Other Ferguson Radio manuals

Ferguson
Ferguson i300 User manual

Ferguson
Ferguson Regent i100s User manual

Ferguson
Ferguson Regent I100 User manual

Ferguson
Ferguson DAB+150 User manual

Ferguson
Ferguson REGENT i500s User manual

Ferguson
Ferguson REGENT i350s+ User manual

Ferguson
Ferguson REGENT i350s User manual

Ferguson
Ferguson FRG-R121D User manual


