Ferm MD-500 User manual

Ferm BV • P.O. Box 30159 • 8003 CD Zwolle, The Netherlan s • www.ferm.com 0405-11
UK Subject to change
D Änderungen vorbehalten
NL Wijzigingen voorbehouden
F Sous réserve de modifications
H Változtatás jogát fenntartjuk
CZ Změny vyhrazeny
R äÓÏ·ÌËfl Ferm ÔÓÒÚÓflÌÌÓ Òӂ¯ÂÌÒÚ‚Û
ÂÚ ‚˚ÔÛÒ͇ÂÏÛ ˛ ² ÔÓ‰ÛÍˆË˛.
èÓÁÚÓÏÛ ‚ ÚÂıÌË ÂÒË ı‡‡ÍÚÂËÒÚËÍË
ÏÓ„ÛÚ ‚ÌÓÒËÚ¸Òfl ·ÂÁ Ô‰‚‡ËÚÂθÌÓ„Ó
ۂ‰ÓÏÎÂÌËfl.
rt.nr. BLM1002
MD-500
UK
D
NL
F
H
USERS M NU L 05
GEBR UCHS NWEISUNG 14
GEBRUIKS NWIJZING 24
MODE D’EMPLOI 33
H SZNÁL TI UT SÍTÁS 43
êìäéÇéÑëíÇé èé ùäëèãìÄíÄñàà
47
www.ferm.com
R

Ferm 75
ACCESSORY LIST MD-500
CCESSORY NR FUNCTION
LOWER CASE 330957 WITH STORE POSSIBILITIESAND CUTTING TRAY
3-JAW CHUCK 330955 CLAMPING PIECES OF WORK WHICH ARE ROUND
4-JAW CHUCK 330956 CLAMPING PIECES OF WORK WHICH ARE NOT ROUND
STEADY REST 33096 TURNING LONG PIECES OF WORK
FOLLOW REST 330965 TURNING LONG AND THIN PIECES OF WORK
FACE PLATE 330968 FIXING PIECES WHICH ARE NOT ROUND
ACCESSORIES-SET 400375 AS DELIVERED WITH MACHINE
CENTER 400368 MT-3
CENTER 400369 MT-
INSIDE BASIN 3-JAW 400377 SET
OUTSIDE BASIN 3-JAW 400376 SET
V-BELT TENSION 400374 COMPLETE
GEAR RACK 400346 STEEL
GEAR RACK 400366 SYNTHETIC
INCH GEAR WHEEL SET 330961 THREAD CUTTING
CHANGE WHEEL SCISSORS 40031 STEEL
HANDWHEEL 400404 SYNTHETIC FOR LONGITUDINAL ADJUSTMENT
MOTOR 400336 COMPLETE
V- BELT 800170 10 X 710 MM
V- BELT 800114 10 X 790 MM
V- BELT 800197 10 X 890 MM
SWITCH 400343 COMPLETE UNIT WITH RELAY
TRANSMISSION/LOCK NUT *)
SLIDE SPINDLES, SLIDE NUTS *)
BALL- AND ROLLER BEARINGS *)
REVOLVING CENTER 330557 MT-
DRILL CHUCK 13 MM 330 40 SELF-STRETCHING, J CONNECTION
DRILL CHUCK 16 MM 330 50 SELF-STRETCHING B-18 CONNECTION
ADAPTOR B-18/MT- 330 97 FOR DRILL CHUCK 16 MM
CHISELS 10 X 10 MM 331466 5 PARTS HM, LENGHT 160 MM
CHISELS 1 X 1 MM 331464 5 PARTS HM, 180 MM
CHISELS 16 X 16 MM 331465 5 PARTS HM, 180 MM
TAPER SHANK DRILLS 33 407 9 PARTS: MT- : 14.5, 16, 18, 0 AND MM.
MT-3: 4, 6, 8, 30 MM.
TAPER SHANK DRILLS 33 409 10 PARTS: MT- : 14.5, 15, 16, 17, 18, 19, 0, 1,
AND 3 MM
MORSE TAPER 330180 FROM MT-4 TO MT-3
MORSE TAPER 330185 FROM MT-3 TO MT-
MORSE TAPER 330190 FROM MT-4 TO MT-
*) These part are not always in stock. Ask your local Ferm-dealer.
2Ferm
Fig. 1
Fig. 2
Fig. 3
Fig. 4
Fig. 5
Fig. 6
Fig. 7
Fig. 8

74 Ferm
4.17 BEARING (LEAD SCREW) 400344
4. 3 THRUST BEARING 400345
4. 4 RACK MD-500 400346
4. 4 RACK MD-500 400367
4. 4 RACK 400366
5.01 GEAR 51 400347
5.0 GEAR 68 400348
5.03 GEAR 5 400349
5.04 GEAR 75 400350
5.05 GEAR 76 400351
5.06 GEAR 4 40035
5.07 GEAR 4 400353
5.08 GEAR 76 400354
5.09 GEAR 56 400355
5.10 GEAR 56 400356
5.11 CHANGE WHEEL 30 400357
5.1 CHANGE WHEEL 4 400358
5.13 CHANGE WHEEL 49 400359
5.14 CHANGE WHEEL 8 400360
5.15 CHANGE WHEEL 63 400361
5.16 CHANGE WHEEL 70 40036
5.17 CHANGE WHEEL 84 400363
5.18 CHANGE WHEEL 98 400364
5.19 CHANGE WHEEL 105 400365
- CENTER MC-3 400368
- CENTER MC- 400369
- 3-JAW CHUCK 400370
- 4-JAW CHUCK 400371
- V-BELT TENSION ROLLER 40037
- MICRO SWITCH FOR DOOR 400373
- V-BELT Z31 (10 X 790) 800114
- V-BELT Z 8 (10 X 710) 800170
- V-BELT Z35 (10 X 890) 800197
The reference numbers refer to the 5 annexes indicated with the numbers 0 1 2 3 4 5.
The number in front of the point refers to the Annex the number behind the point refers to the part.
So reference 4.07 refers to Annex 4 part 7.
Ferm 3
Fig. 9
Fig.
Fig.
Fig.
Fig.
Fig.
Fig.
Fig.

Ferm 73
SPARE PARTS LIST MD-500
REF NR DESCRIPTION FERM NR
0.01 SHEARS 400311
0.0 INTERMEDIATE GEAR SPINDLE 40031
1.01 LOCKING HANDLE 400300
1.03 CLAMPING NUT 400301
1.05 SPINDLE 40030
1.06 SPINDLE BEARING 400303
1.07 HANDWHEEL FOR SUPPORT 400304
1.08 COVER PLATE 400305
1.09 SPINDLE NUT 400306
1.10 TAIL STOCK 400307
1.11 PINOLE MT- 400308
1.1 BASEPLATE / BEDPLATE 400309
1.13 LOCKING BOLT 400310
.0 PRESS HANDLE 400313
.03 HOLDER COMPLETE 400314
.04 AXLE PIN TOOL HOLDER 400315
.05 TOOL SUPPORT (TOP) 400316
.06 SUNK KEY 400317
.09 SPINDLE 400318
.14 HANDLE 400319
.16 NUT (TOOL SLIDE) 4003 0
.17 TOOL SLIDE (UNDER) 4003 1
.18 LOCKING BOLT 4003
. 0 TURNING PIN 4003 3
. 1 KEY CROSS SLIDE 4003 4
3.01 HANDLE 4003 5
3.04 SPINDLE 4003 6
3.05 SPINDLE NUT 4003 7
3.10 BASEPLATE CROSS SLIDE 4003 8
3.11 HOLLOW KEY 4003 9
3.13 LONGIDUTINAL DIRECTION SPINDLE 400330
3.15 HAND WHEEL 400331
3.17 HALF NUT LEVER 40033
3.18 HALF NUT MECHANISM 400333
3. 1 LONGIDITUNAL DIRECTION SPINDLE (INTERNAL) 400334
3. BEARING 400335
4.03 MOTOR 400336
4.04 MOTOR PULLEY 400337
4.07 HEADSTOCK WITH COVER 400338
4.08 MAIN SPINDLE 400339
4.10 MAIN SPINDLE PULLEY 400340
4.11 INTERMEDIATE PULLEY 400341
4.1 TENSION ROLLER 40034
4.16 SWITCH 400343
4Ferm
Fig. B
Fig. A

72 Ferm
ANNEX 5 - PARTS LIST BED/HEADSTOCK
M IN SH FT NR P RT/TOOTH PITCH/MOD. SPEC./DIM.
1 GEAR WHEEL/51 /1 /D8
GEAR WHEEL/68 /1 /D8
3 GEAR WHEEL/ 5 /1 /D8
4 GEAR WHEEL/75 /1 /D8
5 GEAR WHEEL/76 /1 /D8
6 GEAR WHEEL/ 4 /1 /D8
7 GEAR WHEEL/ 4 /1 /D8
8 GEAR WHEEL/76 /1 /D8
9 GEAR WHEEL/56 /1 /D8
10 GEAR WHEEL/56 /1 /D8
CH NGE WHEELS
11 GEAR WHEEL/30 /1 /D8
1 GEAR WHEEL/4 /1 /D8
13 GEAR WHEEL/49 /1 /D8
14 GEAR WHEEL/ 8 /1 /D8
15 GEAR WHEEL/63 /1 /D8
16 GEAR WHEEL/70 /1 /D8
17 GEAR WHEEL/84 /1 /D8
18 GEAR WHEEL/98 /1 /D8
19 GEAR WHEEL/105 /1 /D8
SUPPORT
0 GEAR WHEEL/17 /1 /D8
1 GEAR WHEEL/51 /1 /D8
GEAR RACK / *) /L4 5
3 GEAR WHEEL/17 / *) /D8
4 LOCK NUT M3/ *) /L30
5 STARTING SHAFT *) /L4 5
6 WASHER NUT M / *)
7 SPINDLE *)
8 WASHER NUT M / *)
9 SPINDLE *)
T ILSTOCK/REITSTOCK
30 WASHER NUT M / /L 7 *)
31 SPINDLE /L50 *)
*) This parts are already mentioned in the list op parts.
5
BENCH L THE MD-500
THE NUMBERS IN THE FOLLOWING TEXT
CORRESPOND WITH THE PICTURES AT PAGE 2
TECHNIC L SPECIFIC TIONS
THE MD-500 IS DELIVERED IN THE
FOLLOWING B SE PERFORM NCE
Machinebed with prism conductor, ferme head with
main shaft and drive for automatic longitudinal feed and
thread cutting, tail stock with sliding tube and transverse
adjustment, electro motor with start/stop- and sense of
rotation switch, support with lock case, combined with
starting/lead screw, cross slide with rotating plate and
tool slide, fourfold tool holder with index pin, 3-chuck
with extra exterior basins and measuring certificate,
drive protection case, 7 change wheels, 3 driving-belts,
centers, 3 open-end spanners, socket head wrenches,
catch pin and a tightening-wrench chuck.
Excluded under-carriage (art. nr.330956).
USE
The metal lathe has been designed for processing,
mechanically removing metal, of ferrous and non-
ferrous metals, synthetics and wood. The metal lathe is
meant for semi-professional use and for leisure
interests.
S FETY INSTRUCTIONS
The following symbols are used in these instructions for
use:
Denotes risk of personal injury loss of life or
damage to the tool in case of non-observance of
the instructions in this manual.
Denotes risk of electric shock.
Carefully read this manual before using the machine.
Make sure that you know how the machine functions and
how to operate it. Maintain the machine in accordance
with the instructions to make sure it functions properly.
Keep this manual and the enclosed documentation with
the machine.
When using electric machines always observe the
safety regulations applicable in your country to
re uce the risk of fire, electric shock an personal
injury. Rea the following safety instructions an
also the enclose safety instructions.
Keep these instructions in a safe place!
At the design of the machine is made allowance for the
requirements for a safe use. Every change, adaptation,
reconstruction or other adaptation use can cancel the
safety of the object. Besides the guarantee will expire
through this.
Before, after and during working with the lathe a number
of safety rules have to be taken. By the presence of
turning parts and sharp objects very severe injury can
arise. Especially the bits of the turning chuck are very
dangerous.
• The lathe has been designed for manufacturing
unruly material and so it has to be able to develop a
lot of power.
That is why touching turning parts is perilous. For
this reason unlawfully, undesirably or unintentionally
switching on the machine has to be prevented, for
example by the pushed in locking of the emergency
stop valve by means of a small padlock.
• By the elastic working of the chisel metal parts can be
shoot away with a big power at the most unexpected
moments.
• Protection of the eyes is very important. Make it a
habit to wear special safety glasses when you are in
the space where the lathe stands. Buy yourself a
professional and tested copy which you can wear for a
long time and if need be for visitors a cheaper one but
this one also has to be a good performance.
• If you take care of a cheerful workshop you can
prevent for example gripping in the machine or falling
by stumbling over flinging about material.
• Be very careful when you make turning pieces of
work with the hands.
• When you want to polish a surface turning then take
a long piece of polish paper which you can place half
around the piece of work with the ends to your
direction.
Mains voltage | 30 Volt
Mains frequency | 50 Hz
Absorbed power | 370 Watt
Center height | 110 mm
Center distance | 500 mm
Max. turndiameter above bed | 00 mm
Max. turndiameter above |
support | 115 mm
Culvert and recording main |
shaft | 18 mm, MT-3
Number of speeds main shaft | 6
No load speeds main shaft | 1 0- .000/min
Automatic start | 11 mm, 0.04 - 0,3
Thread cutting (right) | 11 mm, M0.4 - M3
Distance toolholder |
centerline measured vertically | 15 mm
Rotating plate movement: | 360º
Graduation rotating plate: | ± 45º
Movement tool cut | 70 mm
Movement cross slide | 115 mm
Movement end slide | 500 mm
Graduation slide screws | 0.04 mm
Recording and |
stroke slide tube | MT- , 50 mm
Graduation slide tube | 0.05 mm
Weight | 115 kg
Sound pressure Lwa | 70.0 dB(A)
Vibration value | .8 m/s
Ferm 5

Ferm 71
4
ANNEX 4 - PARTS LIST BED/HEADSTOCK
NR P RT
1 BED
MOTOR BASE PLATE
3 MOTOR
4 MOTOR PULLEY
5 GUARD
6 MOUNTING PLATE
7 HEADSTOCK WITH COVER
8 MAINS SPINDLE
9 BEARING COVER
10 MAIN SPINDLE PULLEY
11 IDLER
1 TENSION PULLEY
13 BOLTS WITH RING
14 CHUCK HEADSTOCK
15 OIL CUP
16 SWITCH
17 LONGITUDINAL AND TRAERSE MOTION BEARING
18 LONGITUDINAL TRAVERSE (LATHE SPINDLE
19 BEARING HOUSING DRIVE SHAFT
0 DRIVE SHAFT LONGITUDINAL AND TRANSVERSE MOTION
1 BUSH
CASTLE LOCKING NUTS
3 AXIAL THRUST BEARING
4 GEAR RACK
• Never turn the ends around the fingers never push
sand-paper on the piece of work with your hands.
• By turning edges of the piece of work exist which are
sharp as a razor. These edges have to be smoothed
off with a file or a trimming hook.
• Never remove chipcurls with your hands
Use a little hook which has been made by yourself of
thread or buy a professional chips hook.
• Never grip over the turning machine or chuck when
during turning something falls in or behind the bed.
Always first stop the machine. See that the covering
plate lies on the opening in the bed.
• A good lighting prevents that you operate the
machine from too close by.
• If you apply strip light you have to make allowance for
the so-called strobosto scopic effect. Through this a
turning object seems to stand still. A solution is the use
of double armatures by which a phase shifting of the
two strip lights has been accomplished.
• Emergency stop
If a dangerous situation arises unexpectedly, for
example if a badly exerted piece of work seems to get
loose during turning, you van use the emergency
stop by giving a tap on the yellow cover of the safety
switch, marked “STOP”. The machine now stops
without pushing in the switch button yourself.
ELECTRIC L S FETY
Always check that the power supply corresponds to
the voltage on the rating plate.
Replacing cables or plugs
Immediately throw away old cables or plugs when they
have been replaced by new ones. It is dangerous to insert
the plug of a loose cable in the wall outlet.
INST LL TION
SP CE
Next to a good maintenance it is very important the
machine is installed drily, as the machine has been built
up for de biggest part of metal. Spaces can become moist
by insufficient or a wrong ventilation, burning not
regularly or by raced walls and lifting moisture.
Condensation of moisture on the metal is caused by
suddenly raising the temperature in a cold space. See
that the temperature is equable.
UNP CKING ND INST LLING
The machine is packed in a strong case which you can
dismantle to six flat parts which can be put away easily.
These parts can be saved in case you have to transport
the lathe, for example for repair or for a removal. After
you have opened the case the lathe has to be detached
from the pallet. For this you have to remove two nuts, in
each bedfoot one. Later the nuts can be used again. For
lifting up the lathe you may call in the help of an assistent,
this depends on the weight. Before you begin you have to
arrange how to lift the machine. You should rather put
the machine from the pallet on the permanent
destination at one go. The best thing is to grip the
machine at the ends of the bed, so do not grip it on the
heads, transporter, change wheel case or motor! The
apparatus weights roughly 115 kg. For reducing the
weight temporary a number of parts can be removed
carefully, like the tail stock, the turning plate with
building and the discs from iron cast. The lathe has to be
level and it has to be installed on a strong bottom. If you
make an under-carriage yourself you can use a steel U-
profile of sufficient lenght, on which you can sold or
screw a leg construction. You can also use a strong
wooden lower case with a strengthened and flat upper
blade, for example by means of a piece of multiple
worktop. The conditi on is that the formation has to be
stiff in every directions and that it cannot fling about,
bend or wobble. The lathe is fixed with two bolts M10 in
the special gaps in both bottom plates.
You can take the following precautionary measures
for preventing that small roughnesses still cause
tension on the bed if you tighten the two bolts. You draw the
place of the two bottom platesand the two assembling gaps
and you assemble two bolts M10 in the foundation. Put on the
drawn places a layer epoxy filling. Install a plastic foil on this.
See that the bolts stay clear! Then install the workbench on the
drawn place. Use the two bolts for this as the conductor. Let
down the bed on the foil and then harden the filling. After that
you can provide the bolts with the nuts which are also used for
the transport and then you can tighten these ones again.
ELECTRIC L CONNECTION
After the motor has been installed permanently a
connection to the electrical installation has to be made.
The machine has been made for use on the existing 30
Volts alternating current mains and hasn’t a power
bigger than other big household equipment with a
motor. Have an earthed power point installed in the
nearness of the machine and see that the lead can be
guided to the contact without cracks and pulls. If need be
an earthed extension cable can be used, but see that the
cable is unrolled entirely and that it is not in the way.
6Ferm

70 Ferm
3
ANNEX 3 - PARTS LIST TRAVERSING/APRON
NR P RT
1 HANDWHEEL LEVER
SOCKET HEAD SCREWW
3 SPINDLE BEARING
4 SPINDLE
5 SPINDLE NUT
6 CASTLE LOCKING NUT
7 VERNIER
8 SOCKET HEAD SCREWS
9 SOCKET HEAD SCREWS
10 CROSS SLIDE BASE
11 KEY
1 APRON
13 SHAFT FOR LEFT AND RIGHT HAND MOTION
14 BEARING COVER PLATE
15 HANDWHEEL
16 BEARING COVER PLATE
17 HALF NUT LEVER
18 HALF NUT MECHANISM
19 LEADSCREW AND HALF NUT GUIDE
0 EYE BOLTS AND KEYS
1 SHAFT FOR LEFT AND RIGHT HAND MOTION/RING
BEARING WITH SOCKET HEAD BOLTS
3 GEAR WHEEL FOR LEFT AND RIGHT HAND MOTION
BEFORE OPER TION
For transport the machine has been greased with a layer
which prevents rust. This layer has no greasing function
and has to be removed with clothes. You can do this with
a solvant which is not aggressive, for example turpentine
or petroleum. When you are acquainted with metal-
working machines you can dismantle, control and oil
several spare parts with a light and universel machine-oil,
for example sewing-machine oil (sour free). Afterwards
you finish the complete maintenance table of chapter 14
‘maintenance’.
DJUSTMENT
Fig.5 & 15
Tab.1
The lathe has been adjusted to a minimum margin by the
factory. Because of transport some adjustments can be
changed. On the other hand the machine has been
designed in such a way that any appearing margin can be
lifted.
This margin is also caused by wear end tear as a
consequence of an intensif use. If re-adjustment does not
have an effect anymore, the part is worned and has to be
moved.
If all preparations have been done the machine can be
connected to the mains by putting the plug into the
power point. Beforehand check if the mains switch is
“OFF” and check if the turning directions is “RIGHT”.
Watch the gauge once more and see if the oil level has
not changed and if necessary you have to fill it till the
gauge half-full. See that there is no paper or cleaning-rag
for the ventilati on openings of the motor. Check the
three-jaw and see that the basins cannot come out of the
jaw.
Put the jaw-wrench on a permanent place
Open the protection case and check the position and
tension of the belts. For running on trial the lowest
turning speed has to be chosen. You may shift the front
belt, watch fig.5 and 15.
Push in the switch and have the machine turned during
0 minutes. Check regularly if the head bearings in the
headstock and the motor do not become hot by
stopping the machine and putting a hand on both side of
the headstock and on the motor body. Immediately stop
if you hear a deviating noise and if you feel an abnormal
heath development( more than handwarm) and first con
tact your supplier.
Then switch over to a higher speed and have the machine
also function a few minutes on this speed. Do this again
with a reversed turning direction. If no problems have
arisen, the machine is ready for use.
WORKING METHOD
Fig.1
Removing metal takes place by pushing under control a
chisel point or a boring point in the piece of work
through which small pieces of material - chips - are cut
away. For this the piece of work has to make a turning
movement between two fixed turning points- the
headstock and the tail stock (watch fig.1) - which lie on a
very precise, imaginary line: the centerline(4). This can
be turned off paral lelly to the centerline over the whole
lenght, by carrying the chisel which has been fixed on the
support(5) in a certain tempo along the turning piece of
work. This has to be done in a straight line, with the
hands or automatically with the transmission(6).
For removing material of the piece of work, power is
needed. This power is transmitted from the motor to an
empty shaft in the headstock: the main shaft ( ). In
connection with the maximum motorcapacity the
quantity material which has to be taken - the chip
thickness and the width of chip- has to be adapted. If the
number of revolutions lowers too much, the starting
depth or the rate of speed has to be lowered. Otherwise
there is a chance of motor damage, shorter tool life of
the chisel or the chisel rupture. The diameter of the
piece of work is also influences this. If you have a diamter
of 100 mm more power is needed for cutting a chip of 1
mm than at a diameter of 10 mm.
Spare part
Spindle tool slide
Tool slide
Spindle cross
slide
Cross slide
Transmission/
starting shaft
Tailstock
Lifting a margin
Loosen the front lock
nut, distort the back
lock nut clockwise, until
margin is minimum, turn
back a fourth part and
tighten the front lock
nut.
Loosen the lock nuts,
tightening the adjusting
nuts clockwise until
margin is minimum,
tighten lock nuts
Watch spindle tool
support
Watch tool slide idem
Loosen front lock nut
and tighten hindmost
lock nut until margin is
no longer noticeable,
turn back a quarter part
and tighten the
front lock nut
Loosen clamping nut,
unscrew both adjus-
ting nuts on both sides
a quarter part.
Move head with
adjusting screws until
the mark signs on the
right side of the head
correspond, tighten the
adjusting screws again a
bit without moving the
head, fix-ing the
clamping nut.
Recoures
Hook
spanners
Screw-driver,
open end
wrench
Idem
Idem
Idem
Screw-driver,
open end
wrench
Ferm 7

Ferm 69
2
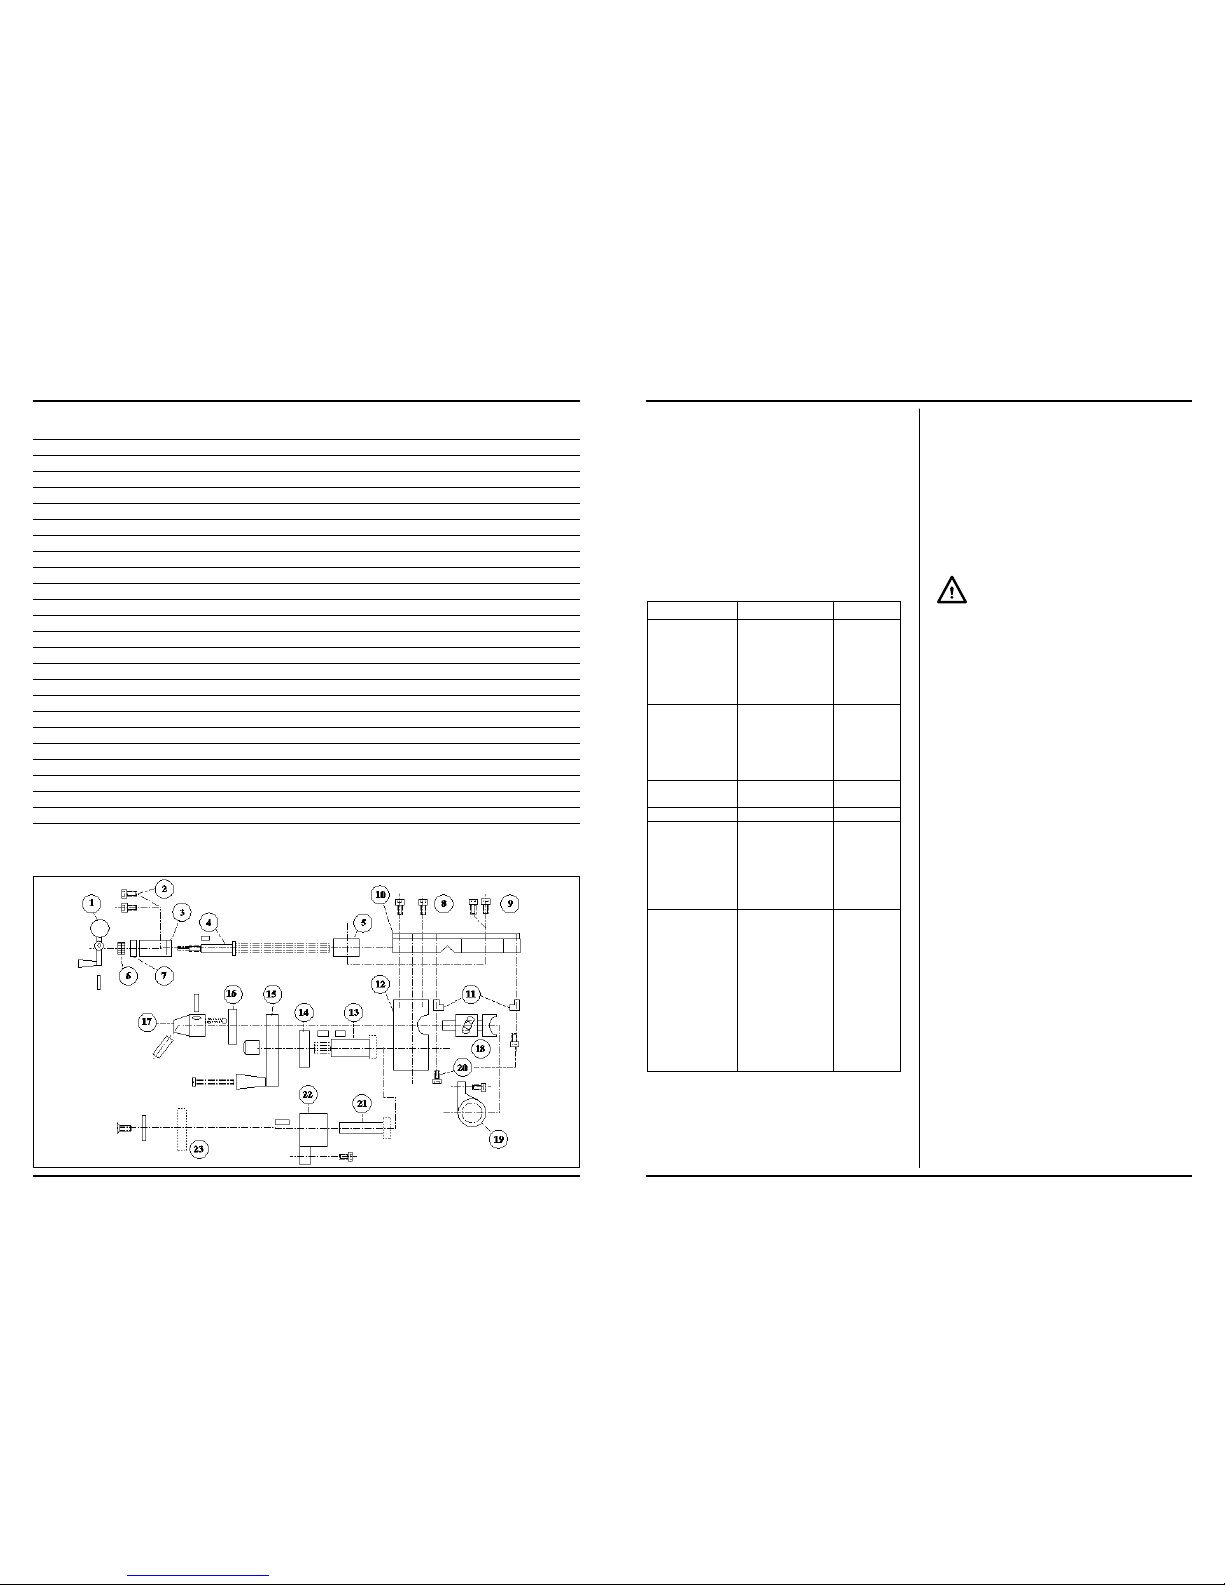
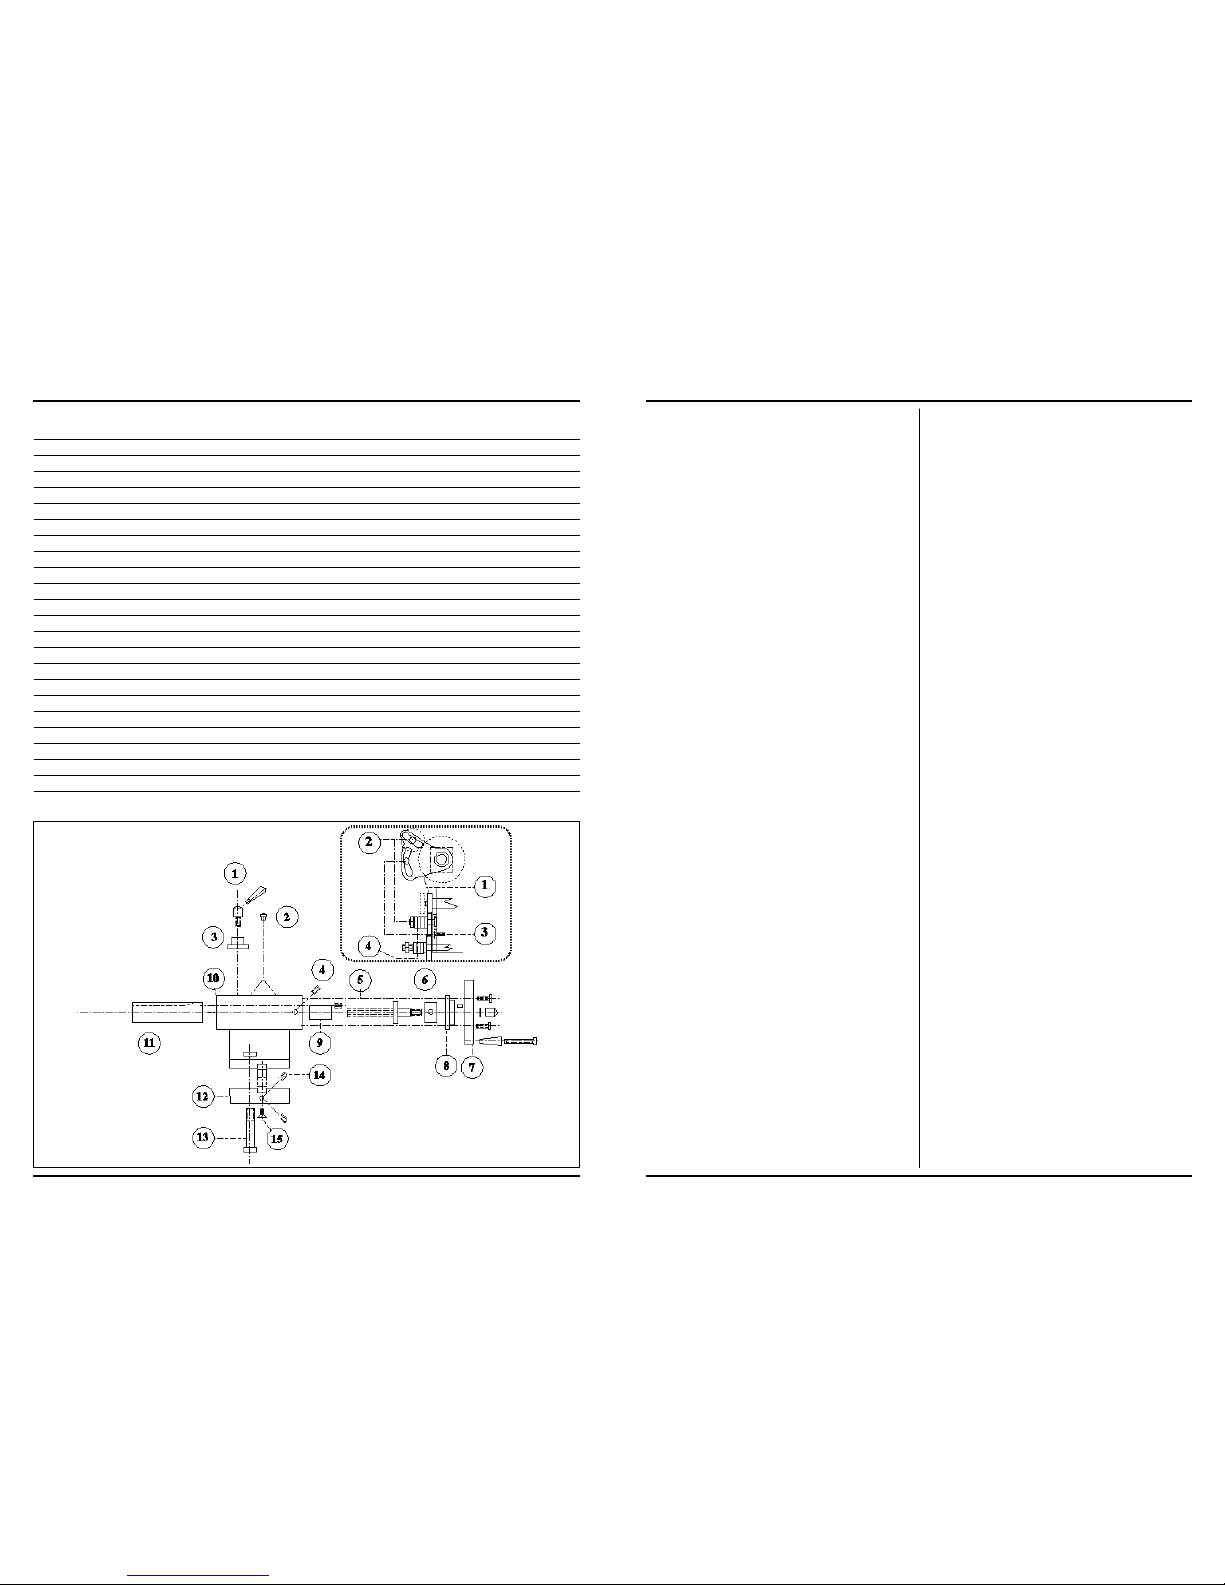
ANNEX 2 - PARTS LIST TOOLSLIDE
NR P RT
1 CLAMPING SCREWS
CLAMP LEVER
3 TOOL POST
4 TOOL POST PIN
5 TOOL SLIDE TOP
6 KEY
7 ADJUSTING BOLT
8 SPINDLE NUT
9 SPINDLE
10 SUNK KEY
11 SPINDLE BEARING
1 SOCKET HEAD SCREWS
13 CASTLE LOCKING NUT
14 HANDWHEEL LEVER
15 VERNIER
16 DRIVING PLATE LOCK NUT
17 TOOL SLIDE BASE
18 CLAMPING BOLT
19 DRIVING PLATE BASE
0 PIN DRIVING PLATE
1 CROSS SLIDE KEY
When the tail stock (8) is placed next to the centerline
because of cross adjustment, an outward conical plane is
turned. An extra processing possibility over the lenght
axle is cutting a screw-thread. A special chisel cuts a
spiral deepening in the outline of the piece of work. A
part of the outline keeps on standing and this height
difference forms the ultimate screw-thread. Next to
turning over the lenght axle, the ends of a piece of work
can also be processed, for example for making them flat
and straight. Short pieces of work can be fixed at one
side in a fixed turning-point, the three-jaw chuck, and on
the other side be processed at right angles to the
centerline. The basins of the chuck see to maintenance
of an imaginary centerline. By having occurred the chisel
replace ment under an angle by adjustment of the chuck,
inward and outward conical planes can be turned. With
this strain borings can also be made in levelled surfaces.
For that a drill chuck has to be bought separately. This
drill chuck with morse cone peg has to be installed in the
sliding tube (7) of the tail stock. Then the gaps can be
screwn out until the desired depht, diameter and form.
The precision of the pieces of work is first and
particularly depen dant of expertness and
experience. During turning many factors can influence the
end result like the sort and the condition of the chisels the
nature of the material you want to process the turn and
starting speed the fixation of the piece of work the drafting
and the condition of the machine. With the MD-500 it is
possible to manufacture prolonged pieces of work with a big
accuracy if all circumstances are perfect.
FOR THE BEGINNING TURNER
During turning big powers on certain parts can be
developed. If you use the machine incorrect these parts
can be damaged or deformed and wear end tear faster,
even if they have been made and designed very expertly
and carefully. Through this the accuracy of the machine
will decrease strongly, which directly influences the
quality and tahe preciseness of your pieces of work. So it
is important that the apparatus is tended in an expert
way. Recommended is, if you are not a skilled turner, to
start with simple pieces of work and to try the different
possibilities of the lathe with trial pieces of work. It is
instructive to look at skilled turners, because you are not
that fast a perfect turner! For pre venting
disappointments you have to become familiar with the
basic principles of turning. Turning is not for nothing a
profession. You can find referencebooks about metal
working and metal turning in the library or in a book-
shop. Besides model-building magazines write about this
subject regularly. The best is getting into possession of a,
if need be obsolete, technical text-book. In this book is
told about the general principles of turning and many
things worth knowing and handy summaries of problems
with possible causes and solutions.
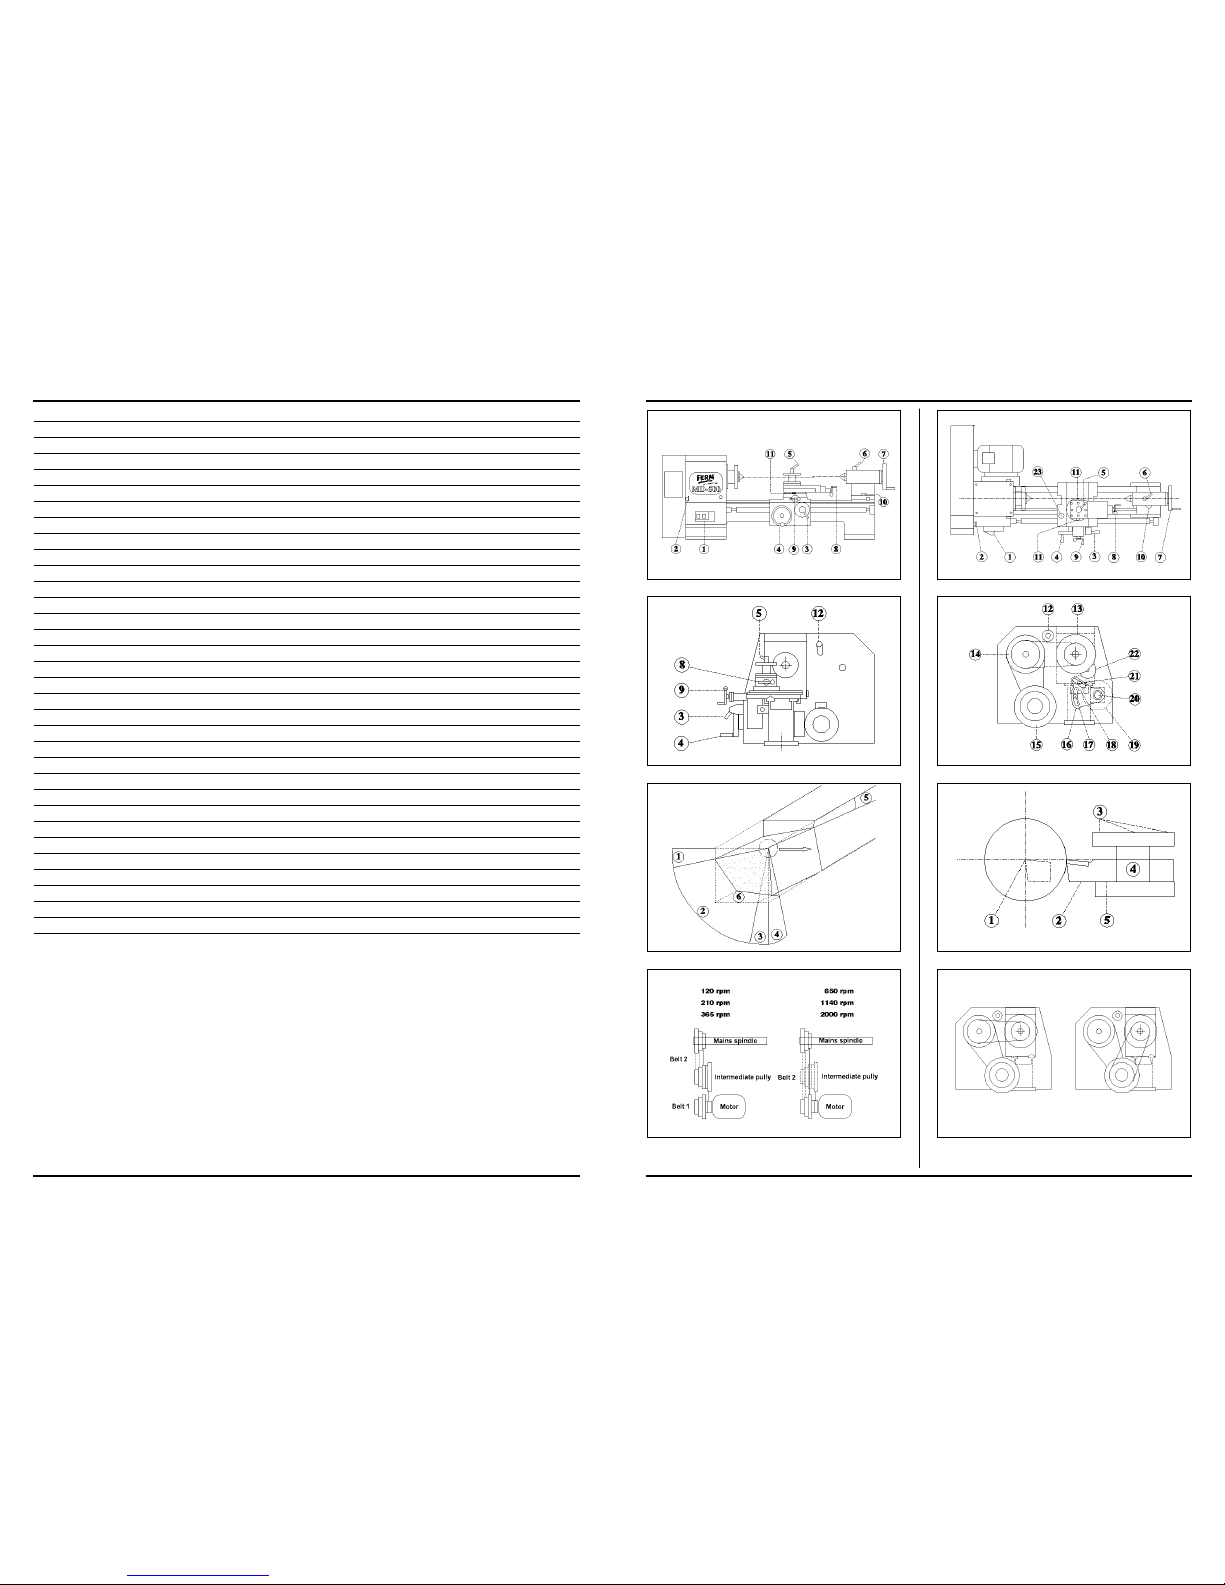
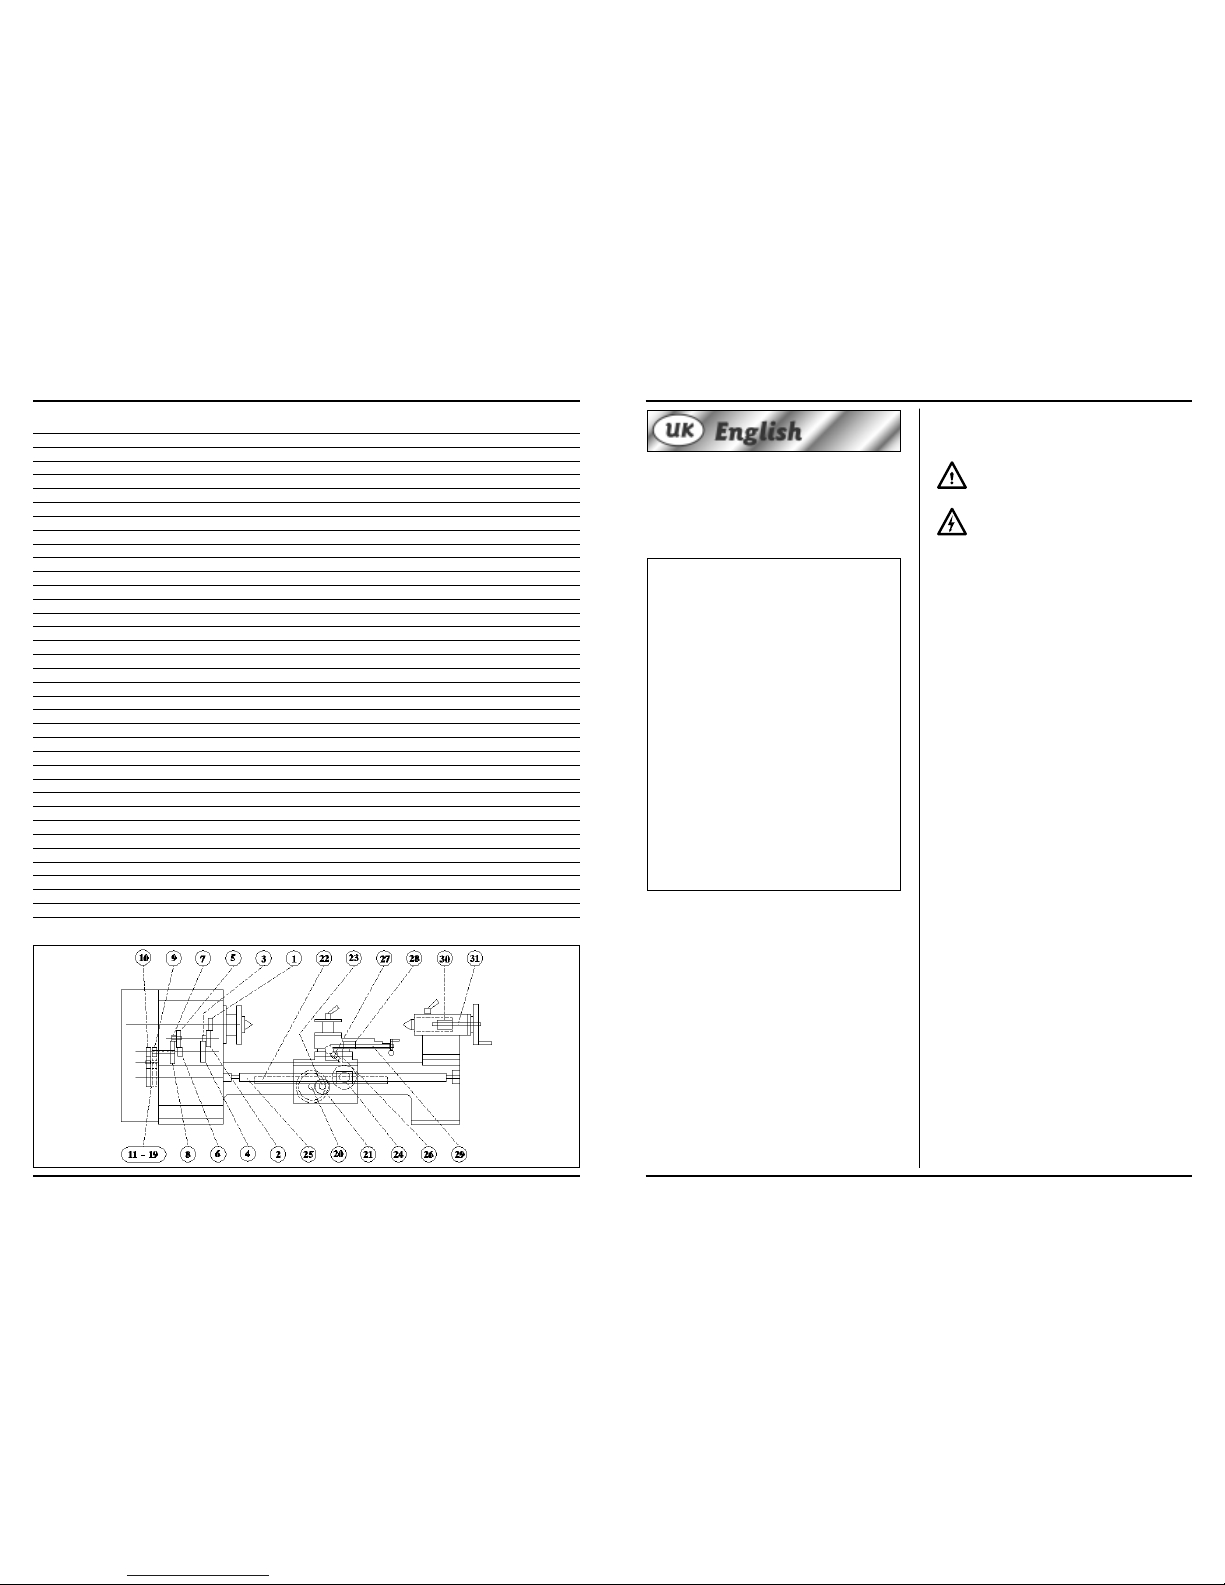
FUNCTION OF THE M CHINE
Fig.1
For a good understanding of the working of the machine
this one can for conve nience sake be divided in a number
of main groups and components, all with a special
function. Watch fig.1.
THE M CHINE BED
Fig.2
The machine bed connects all these parts and has next to
it also other important functions. The bed (3) has been
manufactured of highgrade grey cast iron and it is
provided with several filled cross ties. Because of the
design and the applied sorts of material tremblings are
better absorbed and deforming because of charge is
minimum. The bed is provided with two sliding surfaces
sharpened very precisely, for the conducting of support
and tail stock. These conduc tings, one prismatic and one
flat, see to maintenance of the centerline(4).watch fig. .
THE MOTOR
The attached alternating current motor is a carbon
brushless 1-phase squirrel- cage motor with starting
condenser. The motor is maintenancefree and does not
need a special treatment. By means of V-belts and plural
belt discs, the pulleys, the movement of the motor is
transmitted to the mains axis.
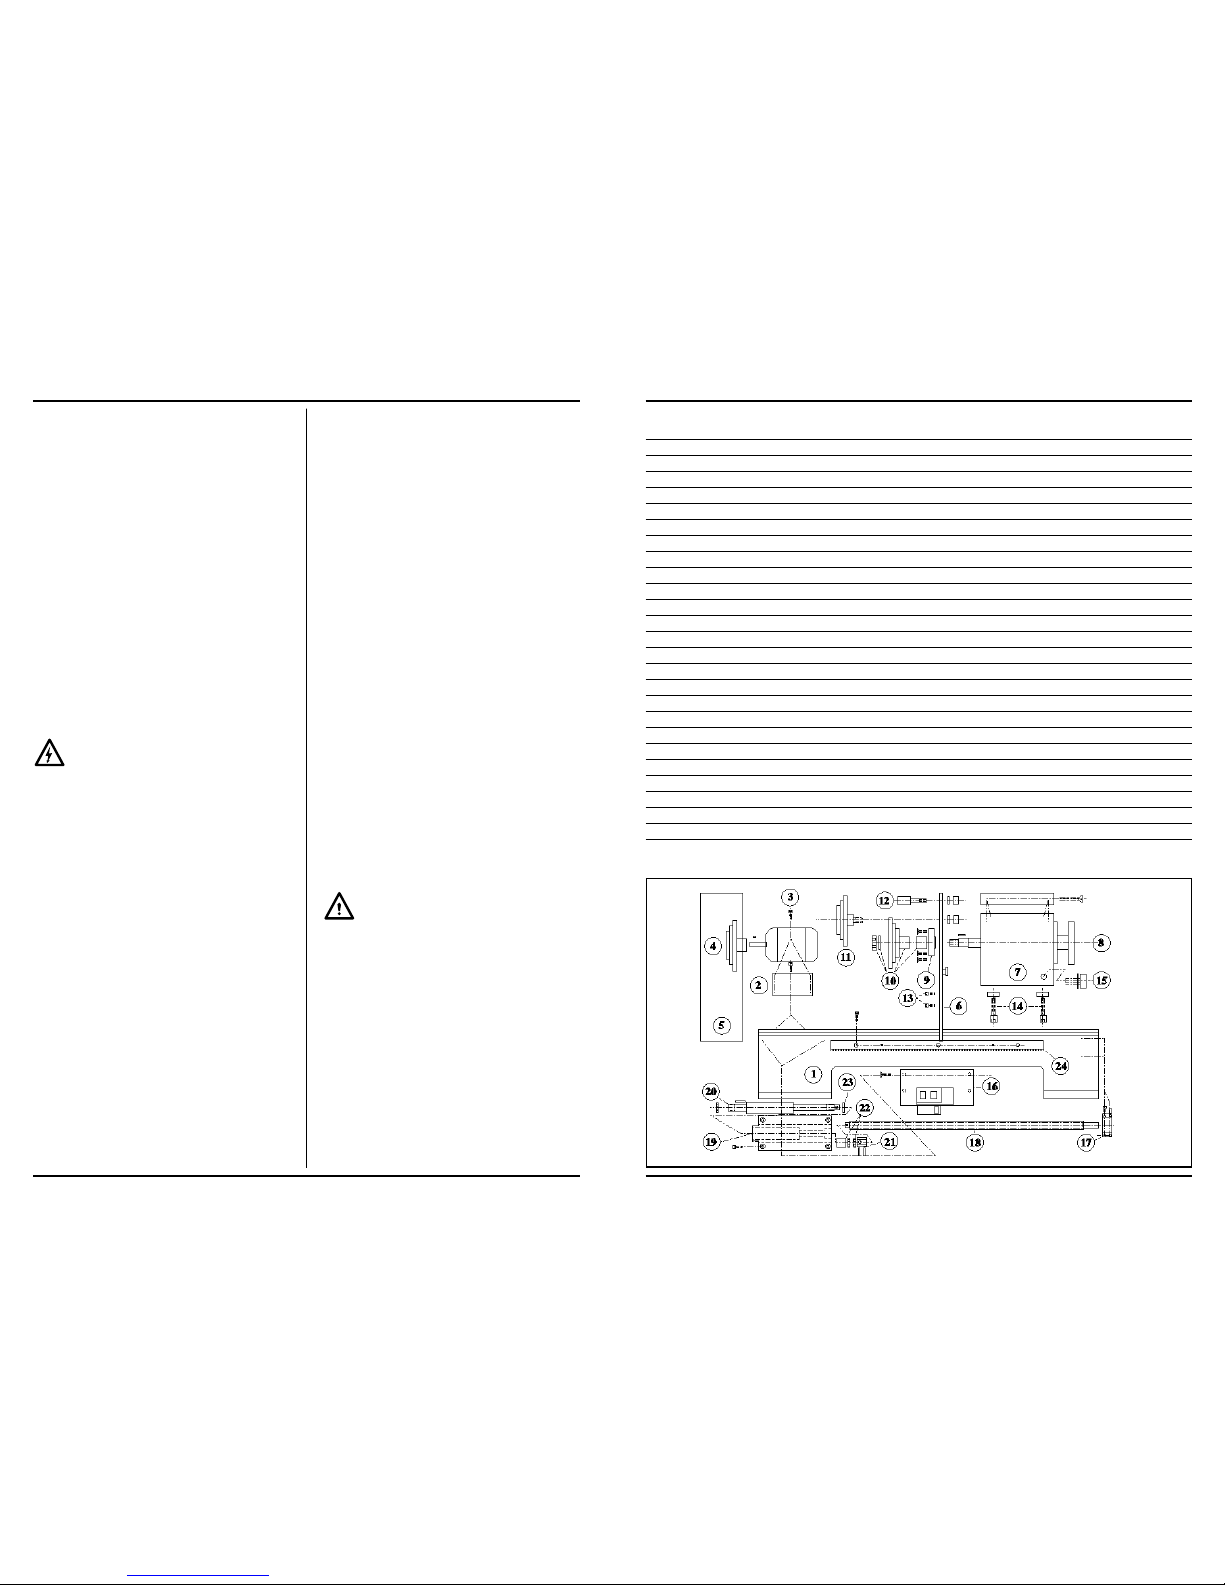
THE HE DSTOCK
Fig.A
The poured headstock(1) has been fixed on the bed with
a prism conducting and two face plates. On the back side
is an oil draining nut. The cover is remo vable for
inspection and for putting oil. At the bottom of the head
you can find a system of turning axis and toothed wheels.
Because of these toothed wheels the speed of the main
shaft is retarded and transmitted to a double, coaxial
output axis. On this axis you can find the driving gear for
the start and the driving gear for the thread-cutting,
watch fig.B. In the head you can find the most important
part of the machine, the main shaft( ).
This one has been fixed revolving with two conical roller
bearings in an O- drafting. All turning parts in the head
are lubricated by means of an oil bath. The level of this is
readable in the window on the front side. The main shaft
has been provided with a going on boring with on the
right side a fixing flange and a morse cone, for
respectively the chucks and the center.
THE SUPPORT
Fig.1
On the sliding surfaces on the bed the support(5) has been
fixed which sees that conducting tools along the piece of
work is checked. First the support consists of a bed slide
with lock case. This slide lies on the bed and serves as
movement in the lenght direction. This movement can
occur with the hands or automatically by the
transmission/feeding axis(6). In the last case the coach bolt
has to be closed in the lock case. On the bed slide a second
slide has been installed which takes care of the chisel
movement in cross direction. By means of a spindle with
follow nut this slide can be moved or adjusted. On the
cross slide a chuck has been installed. With this the upper
slide or tool slide can be adjusted under an angle. The third
and upper slide, tool slide, can be replaced in any desired
direction over a distance of 70 mm and it follows every
movement of all underlying slides also the chuck. On top of the tool
slide a tool holder has been installed. In this tool can be exerted to a
point height of maximum 15 mm, the vertical distance to the
centerline. The tool holder has a fourfold absorption and has an
indexing pin with four click points. Through this can be changed of
chisel very fast without having to adjust again.
8Ferm

68 Ferm
1
ANNEX 1 - PARTS LIST TAILSTOCK/SHEARS
NR P RT
T ILSTOCK
1 CLAMP LEVER
BALL NIPPLES
3 CLAMPING NUT
4 LOCKING SCREW
5 SPINDLE
6 SPINDLE BEARING
7 HANDWHEEL
8 COVER PLATE
9 SPINDLE NUT
10 TAILSTOCK
11 SLIDING BUSH
1 BED
13 CLAMPING BOLT
14 ADJUSTING SCREWS
15 NUT
SHE RS
1 SHEARS
IDLER SHAFT
3 LOCKING BOLT
4 SPACING RING
THE T IL STOCK
Fig.1
The end of the centerline is formed by the tail stock (8).
The axis of the fixed and tail stock are exactly in each
others extension. Depending on the lenght of the piece
of work the head can be moved over the bed and it can
be fixed. With the slide bush (7), in which a center has to
be installed, the piece of work can be exerted fixed and
revolving right on the centerline. If you turn back the
slide bush, the center is automatically untied. The body
of the head has been divided. The upper part can be
adjusted sideways with regard to the upper part by
means of adjusting screws. Through this an adjustment
next to the centerline can be obtained. Normal
movements in the lenght direction do not have side ways
adjustments as a consequence.
THE COMBINED
TR NSMISSION/ST RTING XLE
Fig.3 & 4
For a good surface quality a correct and particularly a
constant rate of turnover in the longitudinal direction is
important. For longer pieces of work this is almost
impossible with your hands. By closing the lock nut the
support is coupled with the thread on the transmission.
When the transmission has been switched on this one
has been coupled to the main shaft in his turn. With this a
coupling is made with an intermediate wheel between
the drive wheel of the transmission and the drive wheel
for the longitudinal feed on the headstock. This happens
because of an adjustment of the change wheel scissors,
watch fig. 3 and 4.
At each rotation of the main shaft the support will move
itself over a certain distance along the bed. This distance
depends on the wire haste and the chosen wheel change
on the transmission. By chosing another wheel change
the star ting speed can be adapted.
With thread-cutting the same happens in principle,
however with a much bigger support movement with a
much lower main shaft speed. In this case a coupling has
to be made with the thread-cutting driving gear of the
headstock. The positioning of the gear wheels happens
by the installation of the rings on the starting axle and
intermediate wheel axle of the scissors. In this case
change of the change wheel on the transmission makes
possible a choice of the haste of the thread which has to
be cut. On the transmission is no automatic cut out. So
switch this one off for preventing that the chisel runs
against the chuck.
THE DRIVE
Fig.5
Since the applied motor has a fixed and relatively high
number of revolutions the transmission has been done in
such a way that this reduces the numbers of revolutions
at the same time. Besides, with the application of plural
pulleys and an intermediate pulley this number of
revolutions is variable in six successive steps.
For lifting up possible belt tension differences the
bearing-mounted belt pressure roll has been made
variable. Watch fig.5. For reaching the three highest
spindle speeds the front belt has to be shifted from the
intermediate-pulley to the motor pulley. The
intermediate gear keeps driven and serves as flywheel
for catching load variations.
B SIC PRINCIPLES OF THE TURNING
Before you can start turning, you have to know the most
important basic under standings. Otherwise there is a
change that the wrong turning speed or the wrong chisel
is chosen. With a number of tables and rules making the
machine ready for turning is easier.
CL MPING
Fig.6 - 8
Clamping the piece of work has to happen with care. Put
the piece of work in the chuck as far as possible and
clamp this one with the tightening wrench. If you clamp
too hard the chuck, basins or the piece of work can be
damaged. The same applies for the sliding tube. Tighten
this one with your hands, strong but not by force. Some
clamping examples by which also the use of bores and
chisel is made clear, can be seen in fig.6, 7 and 8.
The represented standard three-chuck is self-centring.
Through this the axis of a small piece of work falls exactly
on the centerline, even if the dead centre is not used.
With a chuck belongs an inside basin (represented) and
an outside basin. These ones are used for inside clamping
of bigger diameters. Every basin has in the chuck the
same place. Place and basin are numbered!
In fig.6 a right side cutting chisel (up) and a right bended
roughing tool is used. The arrows indicate the starting
direction. The roughing tool can be used in longitudinal
direction and in cross direction and is often used for
quickly elimina ting many material. Fig 7. shows the use of
a left side cutting chisel (up) and a blind boring chisel.
Fig.8 shows a clamp with dead center in a tail stock. A
pointed chisel has been used for an egal finish. Under this
figure a clamping is represen ted for making a bore with a
spiral drill. Beforehand you have to pre-drill with a
center bore. This is a bore from which the shank is much
thicker than the crossing frog. The boring gap which
arises through that serves as a center gap for both the
center and the bore!
Ferm 9

Ferm 67
OPER TION OF MD-500
Fig.9 - 12
1 Combined on/of direction of rotation switch
with emergency feature blocked
Switching on the motor and chancing the direction of
stop rotation, the valve kan be blocked with a lock.
2. Drive cupboard closing
For opening and closing of the case
3. Carriage nut handle
By closing the carriage nut, the automatic starting is
switched on.
4. Handwheel longitudinal adjustment
For quickly moving the support to the left and to the
right. On the nonius can be written how big the
adjustment is in steps of 0,04 mm.
5. Clamping handle tool holder
By unloading the handle the bit block can be turned in
steps of 90 °
6. Clamping handle sliding bush
For fixing the sliding bush.
7. Handwheel sliding bush
By turning the piece of work can be clamped
between the chuck and the center; also used for
boring; on the nonius can be written how big the
adjustment is in steps of 0.05 mm.
8. Handwheel crank tool slide
for the longitudinal adjustment of the tool slide; on
the nonius can be written how big the adjustment is
in steps of 0.04 mm.
9. Handwheel crank cross slide
for the longitudinal adjustment of the cross slide; on
the nonius can be written how big the adjustment is
in steps of 0.04 mm.
10 Clamping nut tail stock
for clamping the tail stock to the bed; for clamping
the upper part to the bottomplate.
11 Clamping nuts rotary plate
After the desired corner has been adjusted the
rotary plate parts can be clamped on each other with
this.
12 V-belt tension roller
Makes it possible to change V-belts, to clamp and
shift them without dismantling the pulleys.
13 Main shaft pulley
Adjusting rotary speed.
14 Intermediate pulley
Adjusting rotary speed.
15 Motor pulley
Adjusting rotary speed.
16 Scissor
for assembling an intermediate change wheel and
being able to adjust this in three directions. Coupling
transmission
17 Clamping bolt link adjustment
By adapting the position of the quadrant the
intermediate drive wheel and the transmission
change wheel can be placed. Switching the
transmission on and off.
18 Intermediate change wheel
Direction of rotation transmission; adjusting the
transmission ratio
19 Chance wheel transmission
Adjusting transmission ratio; by means of placing
filling rings the wheel can be adjusted in axial
direction(fig.3) Longitudinal motion support.
20 Transmission/lead screw
Fixation intermediate change wheel; by means of
installing the filling rings he wheel is axial adjustable
and with the lowest shaft nut the wheel is adjustable
sideways
21 Intermediate change wheel
In front of the thread-cutting wheel, behind the star-
ting wheel
22 Drive gear wheels for start
By using this clamping device for surfacing and
thread-cutting the lock nut can stay open and the
support does not slip away; spindle and nut are less
charged then.
23 Clamping bolt cross slide
CHISELS
Fig.13
During turning a chip is cut out of the piece of work. For
this, chisels have to be sharpened in a special and sharp
form. This form depends on the chisel material and on
the material you want to cut. Watch the next table.
Tab.2
On the basis of fig. 13 the corners of this table can be taken
over on a little piece square high-speed steel for making or
re-sharpening your own chisel. In this example we are
talking about a straight, right roughing tool. The dotted
lines indicate the original form of the bar. The sum of the
angles 1, and 3 is always 90°. Angle 1 is the cutting-edge
side rake, angle the wedge angle and angle three the
clearance angle. For keeping the friction as low as possible,
two extra clearance angles have been sharpened: angle 4
and angle 6. Besides, a slope angle 5 has been installed. The
arrow indicates the starting direction. The front face is
called the minor cutting face. The main cutting face is the
part on which the arrow has been drawn. In this way all
possible chisels can sharpen themselves, by which you
have to say where the main cutting face has to be and what
the turning material has to be.
A perfectly sharpened chisel has to be placed in the tool
holder in the right way now. Fig.14 indicates a correct
placing of a pointed chisel. Point 1 is the center line. The
tip of the chisel has to stand exactly that high. If not, you
have to use bearing plates(5). The chisel always has to be
placed against the block body(4) and cannot extend
farther than 1 to 1.5 time the tool shank thickness( ).
It goes without saying that all clamping bolts (3) have to
be tightened strongly.
Chisel corners Light cut Normal cut Heavy cut
HSS HM HSS HM HSS HM
Cutting-edge
side rake
1 10 10 5 5 0
Clearance
angle
867564
Wedge
angle
70 74 73 80 79 86
10 Ferm

66 Ferm
TURNING SPEED
Fig. 15 & 16
If the chisel have been sharpened and put, the piece of
work has been clamped well, the speed of the main shaft
has to be adjusted with the V-belts, watch fig. 15 and 16.
In the subjoined table some machining speeds which
happen many times are indicated for different sorts of
chisels and materials.
Tab.3
With this table you can chose yourself for any diameter
the right speed. The only thing you have to do is fill in the
desired speed in the following formule.
v = Cutting speed in meters per minute
d = Diameter of the piece of work in mm
n = Number of revolutions in revolutions per minute
p = Constant, nl. 3,14
v = x d x n = v x 1000
1000 x d
Calculation example:
1. A round piece of silver steel of 100 mm has to be
turned with a HSS chisel. You can find in the table that
silver steel has to be turned with 3 m/min, v=3
Divide 3 .000 by 100 gives a number of revolutions
of 3 0 revolutions per minute. We put belt on the
hindmost discs of the intermediate and main shaft
pulley.
. A piece of copper of 10 mm is turned with a HM-
chisel. v= 00 and through that “n” comes far above
the maximum number of revolutions. The highest
number of revolutions can be adjusted. Belt two is
layed on the hindmost disc of the motor and main
shaft pulley.
THRE D-CUTTING
Next to the usual turning work you do with the MD-500
you can also cut screw- thread with this machine. For
this special chisel have to be used. The technique of
thread-cutting is not very simple. For reaching a correct
fit with thread-cutting, both the thread profile and the
minor and outside diameter have to be very accurate.
Therefore many turners use existing machine screw
taps. Screw plates can be used in the same way, however
a fitting holder has to be made yourself. Cutting takes
place with very low numbers of revolutions( often 70
revolutions per minute) or if need be by cranking,
turning the main shaft with your hands.
For the cutting of inchthread a separate set of
gears is required. This set is not included. This set is
available at your dealer under Nr. 330961.
The continuously repeating distance between two
permanent points of a screw thread is called the thread
haste. If you are going to cut you always have to adjust
this thread haste. This happens by chosing a certain
change wheel com bination on the scissors. In fig.17 on
the left side a single transmission for thread-cutting is
indicated ( a so-called single work) and on the right side a
double transmission for the automatical starting is
indicated( so-called double work). Through this the
support is moved over a certain distance during a
rotation of the main shaft. In the headstock two fixed
transmission have been builded in, namely 1 : 4 for thread
haste and 1 : 40 for starting, which decide the number of
revolutions of the coaxial datum axis. From this datum
the end transmission has to be calculated. For calculating
this some formulas exist, but for the sake of convenience
we already indicated the most current thread haste
dimensions in the subjoined table. All indicated wheels
are delivered automatically with the machine! Installing
or adjusting the change wheels happens by shifting the
scissors and the intermediate wheel axle and by placing
the filling rings. Adjust the change cog-wheels margin.
Tab.4
Pitch Starting Nr. of teeth per wheel
(mm) (mm) B C
0.4 0.04 49 - 105
0.5 0.05 70 - 84
0.7 0.07 70 98 84
0.8 0.08 105 98 49
1.0 0.1 98 - 4
1. 5 0.1 5 84 105 4
1.5 0.15 105 - 8
1.75 0.175 84 98 8
.0 0. 49 98 4
.5 0. 5 63 105 8
3.0 0.3 49 105 30
Turning material Chissel Turning speed
material REV/MIN
Unalloyed structural steel HSS 40 - 60
(9S20k - 60S20k) P10 140 - 160
lloyed structural steel HSS 3
Tool steel P10 11
(C80= Silversteel)
Cast Iron HSS 40
K10 100
Non-Ferrous HSS 45 - 80
(Cupper, luminium) K10 140 - 80
Ferm 11

Ferm 65
Besides, in the table - second column- is mentioned how
the starting size by means of the same change wheels can
be adjusted.
Tab.5
M INTEN NCE
Make sure that the machine is not live when
carrying out maintenance work on the benchlathe
LUBRIC TING SCHEDULE
Fig.18
Tab.6
Maintenance of the machine happens for preventing rust
and wear end tear. The maintenance consists mainly of
clearing and oiling. It certainly is not sufficient to handle
only the oil-syringe. Chips and waste of the machine
parts have to be removed very regularly, often more
times during turning. Otherwise there is the possibility it
lands between moving, slipping and turning parts. For
this reason chips bulldozers on the cross slide have been
placed. watch fig.18.
Part
Roller bearing
main shaft
Bearings and cog
wheels of speed
reduction axles in
the headstock (2)
Bearings V-belt
roller and axle
mediate
Thrust bearing
mission (13)
Change gear
wheels (12)
Gear wheels lock
with gear
rack(15)
Gear wheel
bearings lock
case, lock nut
mechanism (17)
Transmission/
starting axle (18)
Sliding surfaces
off the bed (3)
Support spindles
(8, 16)
ll ball nipples
the (5,6,9,14 and
20)
Felt in chips
bulldozers (4)
ll remaining
white parts
without cover
layer
Time/interval
After first 10 days
after 0 days and
then each 60 days
Annually
Annually
At change or
Weekly
Weekly
Daily
The same
The same
The same
The same
The same
Weekly
Lubricant
Transmission oil
SAE90:
till sight-glass is half
full(1) or lowest cog
wheels just in the
oil
The same
Universel gear
The same
Fine lubricating oil
The same
The same
The same
The same
The same
Vaseline
Inch
n/inch B C
48 70 79
40 70 84 79
3 105 98 49
498 40
0708440
16 56 84 40
14 49 105 50
1 49 98 40
11 49 105 39
8 50 105 8
12 Ferm

Ì˚ ÒÔˆˇθÌ˚ ÒÍ·ÍË ‰Îfl ÓÔËÎÓÍ, ÒÏÓÌÚËÓ‚‡Ì-
Ì˚ ̇ ÔÓÔ˜Ì˚ı ҇·Á͇ı - ÒÏÓÚË ËÒ. 18.
ë‡Ï˚ÏË ÓÚ‚ÂÚÒÚ‚ÂÌÌ˚ÏË ÏÂÒÚ‡ÏË ‚ ˝ÚÓÏ Ô·Ì fl‚Îfl-
˛ÚÒfl ‚ÂıÌË ̇ԇ‚Îfl˛ Ë ÒÚ‡ÌËÌ˚ (3), ÂÁ¸·Ó‚‡fl
˜‡ÒÚ¸ Ô‰‡˜Ë/‚‡Î‡ ÔÓ‰‚Ó‰‡ ÂÁˆ‡ (18), ¯ÔË̉ÂÎË (6
Ë 16), ‚Ò ÔÓ‚ÂıÌÓÒÚË ÒÍÓθÊÂÌËfl Ë ¯Ú˚Ë Ò‡Î‡ÁÓÍ
(7 Ë 16), ÌËÊÌflfl Ô·ÒÚË̇ Á‡‰ÌÂÈ ·‡·ÍË (19).
ëÚÛÊ͇ Ë ÓÔËÎÍË Û‰‡Îfl˛ÚÒfl ÔË ÔÓÏÓ Ë ÂÚÍË ËÎË
Ú͇Ì‚ÓÈ ÚflÔÓ˜ÍË. á‡Ô ‡ÂÚÒfl ÔËÏÂÌflÚ¸ ÒʇÚ˚È
‚ÓÁ‰Ûı, Ú‡Í Í‡Í ˝ÚÓ ÚÓθÍÓ Á‡„ÓÌËÚ ÓÔËÎÍË Â Â „ÎÛ·-
Ê ‚ ÂÎË. ëΉÛÂÚ Â„ÛÎflÌÓ ‰ÂÏÓÌÚËÓ‚‡Ú¸ ÒÍ·-
ÍË ‰Îfl ÓÔËÎÓÍ Ë ‚˚˜Ë ‡Ú¸ ÂÚÍÓÈ ‚ÓÈÎÓÍ. í‡ÍÛ˛ Û-
ÚËÌÌÛ˛ Ôӈ‰ÛÛ ÚÂıÓ·ÒÎÛÊË‚‡ÌËfl ÒÚ‡Ì͇ ÏÓÊÂÚ
Ò‡ÏÓÒÚÓflÚÂθÌÓ ‚˚ÔÓÎÌflÚ¸ Â„Ó ÓÔ‡ÚÓ. ÖÒÎË ÔË-
·„‡ÂÏ˚È Á‰ÂÒ¸ „‡ÙËÍ ·Û‰ÂÚ ËÒÔÓθÁÓ‚‡Ú¸Òfl ‰Îfl
˝ÚÓÈ ˆÂÎË, ÚÓ ËÒÍβ˜‡ÂÚÒfl ҇χ ‚ÓÁÏÓÊÌÓÒÚ¸ ÒÓ‚Â-
¯ÂÌËfl ӯ˷ÍË ËÎË ÛÔÛ ÂÌËfl ˜Â„Ó-ÎË·Ó. ÑÂÏÓÌÚ‡Ê-
Ì˚ı ‡·ÓÚ ÔÓ‚Ó‰ËÚ¸ ÔÓ ÒÚ‡ÌÍÛ Ì ÔÓÚ·ÛÂÚÒfl.
àÏÂÂÚÒfl Ò‚Ó·Ó‰Ì˚È ‰ÓÒÚÛÔ ÍÓ ‚ÒÂÏ ÒχÁÓ˜Ì˚Ï ÚÓ˜-
Í‡Ï ÒÚ‡Ì͇. Ç ÌÂÍÓÚÓ˚ı ÒÎÛ˜‡flı ‚ÒÂ-Ú‡ÍË ÏÓÊÂÚ
·˚Ú¸ Ê·ÚÂÎÂÌ ‰ÂÏÓÌÚ‡Ê ÌÂÍÓÚÓ˚ı ‰ÂÚ‡ÎÂÈ, ÂÒÎË,
̇ÔËÏÂ, ·Óθ¯Ó ÍÓ΢ÂÒÚ‚Ó ÏÂÎÍÓÈ ÒÚÛÊÍË ÔÓ-
Ô‡ÎÓ Ì‡ ÂÁˆ Ë ÔÓÔ˜Ì˚ ҇·ÁÍË ‚ ÓÔ‰ÂÎÂÌÌÓÏ
ÔÓÎÓÊÂÌËË ÒÛÔÔÓÚ‡. Ç Ú‡ÍÓÏ ÒÎÛ˜‡Â ̇ËÎÛ˜¯ËÏ
‰ÂÈÒÚ‚ËÂÏ ·Û‰ÂÚ Ôӂ‰ÂÌË ÔÓÎÌÓÈ ‡Á·ÓÍË ÒÓÓÚ-
‚ÂÚÒÚ‚Û˛ ÂÈ ‰ÂÚ‡ÎË, Ó˜ËÒÚ͇ Ë ÒχÁ͇ ‚ÒÂı  ÍÓÏ-
ÔÓÌÂÌÚÓ‚ Ë Ó·‡Ú̇fl Ò·Ó͇ ˝ÚÓ„Ó ÛÁ·. é‰Ì‡ÍÓ Â„Ó
ÔÓÚ·ÛÂÚÒfl ÔÓ‚ÚÓÌÓ Ì‡ÒÚÓËÚ¸.
ÇéáåéÜçõÖ çÖèéãÄÑäà à àï
ìëíêÄçÖçàÖ
èË ÔÓËÒÍ Ô˘ËÌ ‚ÓÁÏÓÊÌ˚ı ÌÂÔÓ·‰ÓÍ ÒΉÛÂÚ
‰Îfl ̇˜‡Î‡ ۷‰ËÚ¸Òfl, ˜ÚÓ ÒÚ‡ÌÓÍ Ì‡ıÓ‰ËÚÒfl ‚ ‰ÓÎÊ-
ÌÓÏ ÚÂıÌ˘ÂÒÍÓÏ ÒÓÒÚÓflÌËË. ÖÒÎË ˝ÚÓ Ú‡Í, Ë fl‚ÌÛ˛
Ô˘ËÌÛ ÌÂÔÓ·‰ÍË Ó·Ì‡ÛÊËÚ¸ Ì‚ÓÁÏÓÊÌÓ, ÚÓ
ÚÓ„‰‡ ÌÛÊÌÓ Ó·‡ÚËÚ¸Òfl Í ‚‡¯ÂÏÛ ÏÂÒÚÌÓÏÛ ‰ËÎÂÛ
ÍÓÏÔ‡ÌËË Ferm.
äéåèãÖäíìûôàÖ à áÄèÄëçõÖ óÄë-
íà
èË ‚ÓÁÌËÍÌÓ‚ÂÌËË Û ‚‡Ò ‚ÓÔÓÒÓ‚ ͇҇ÚÂθÌÓ ‰‡Ì-
ÌÓ„Ó ÚÓ͇ÌÓ„Ó ÒÚ‡Ì͇ ËÎË ‰Û„ÓÈ ÔÓ‰Û͈ËË Ferm
‚˚ ÏÓÊÂÚ ӷ‡ÚËÚ¸Òfl Í ‚‡¯ÂÏÛ ÏÂÒÚÌÓÏÛ ‰ËÎÂÛ
ÍÓÏÔ‡ÌËË Ferm. ùÚÓ Ú‡ÍÊ ͇҇ÂÚÒfl ÔÓ‚ÚÓÌ˚ı Á‡Í‡-
ÁÓ‚ ̇ Á‡Ô‡ÒÌ˚ ˜‡ÒÚË Ë/ËÎË ÍÓÏÔÎÂÍÚÛ˛ ËÂ.
Ç ÒÎÛ˜‡Â ÚÓ͇ÌÓ„Ó ÒÚ‡Ì͇ MD-500 ÂÒÚ¸ ‚ÓÁÏÓÊÌÓÒÚ¸
ÔÓÒÚ‡‚ÍË ÓÔ‰ÂÎÂÌÌÓ„Ó ÍÓ΢ÂÒÚ‚‡ ÍÓÏÔÎÂÍÚÛ˛-
Ëı ˜‡ÒÚÂÈ ÒÓ ÒÍ·‰ÒÍËı Á‡Ô‡ÒÓ‚. èË ˝ÚÓÏ ÒÛ ÂÒÚ-
‚ÛÂÚ ‚ÓÁÏÓÊÌÓÒÚ¸ ÓÒ̇ÒÚËÚ¸ ‚‡¯ ÒÚ‡ÌÓÍ ‚ ÚÓ˜ÌÓÒÚË
ÔÓ ‚‡¯ÂÏÛ Ê·Ì˲. ùÚË Á‡Ô˜‡ÒÚË Ë ÍÓÏÔÎÂÍÚÛ˛ ËÂ
ÏÓÊÌÓ Á‡Í‡Á‡Ú¸ ˜ÂÂÁ ‚‡¯Â„Ó ÏÂÒÚÌÓ„Ó ‰Ë· ÍÓÏ-
Ô‡ÌËË Ferm.
ÉÄêÄçíàü
ìÒÎÓ‚Ëfl Ô‰ÓÒÚ‡‚ÎÂÌËfl „‡‡ÌÚËË ËÁÎÓÊÂÌ˚ ‚ ÔË-
·„‡ÂÏÓÏ ÓÚ‰ÂθÌÓ „‡‡ÌÚËÈÌÓÏ Ú‡ÎÓÌÂ.
å˚ Ò ÔÓÎÌÓÈ ÓÚ‚ÂÚÒÚ‚ÂÌÌÓÒÚ¸˛ Á‡fl‚ÎflÂÏ, ˜ÚÓ
̇ÒÚÓfl  ËÁ‰ÂÎË ÒÓÓÚ‚ÂÚÒÚ‚ÛÂÚ
Ô˜ËÒÎÂÌÌ˚Ï ÌËÊ Òڇ̉‡Ú‡Ï
Ë ÌÓχÚË‚Ì˚Ï ‰ÓÍÛÏÂÌÚ‡Ï:
prEN12840, EN60204-1, EN55014-1,
EN61000-3-2, EN61000-3-3, EN55014-2,
EN292-1, EN292-2
Òӄ·ÒÌÓ Ô‡‚Ë·Ï:
73/23/EEC
89/336/EEC
98/37/EEC
01-02-2004
„. á‚ÓÎÎÂ, çˉ·̉˚
Ç. ä‡ÏÔıÓÙ,
éÚ‰ÂÎ ÍÓÌÚÓÎfl ͇˜ÂÒÚ‚‡
CEı
ÑÖäãÄêÄñàü ëééíÇÖíëíÇàü (RU)
64 Ferm
Critical places are the upper bed sliding surfaces(3), the
thread part on the transmission/starting shaft(18), the
spindles(6, 16), all sliding surfaces and pins of the
slidings(7, 16), the bottom plate tail stock (19).
Remove chips with a cloth or a brush. Do not use
compressed air, with this you press the chips only
farther in the angles. Regularly dismantle chips
bulldozers and brush clean the felt. This normal
maintenance of the machine can be done by the user
himself. If the subjoined schedule is handled for this,
making a mistake or forgetting something is excluded.
The machine need not be dismantled. All oiling points
are easily attainable. In certain cases it may be advisable
still dismantling the parts of the machine, for example if
many fine chips have landed on the chisel and cross slide
at a certain slide position. In that case the best you can do
is separating the concerning part entirely, cleaning the
parts, oiling the parts and putting it together again.
However the part will have to be adjusted again.
TROUBLESHOOTING
At troubleshooting you have to watch first if the lathe is
in a good condition of maintenance. If it is and you cannot
find a demonstrable reason for the troubleshooting,
then get in touch with your Ferm dealer.
CCESSORIES ND SP RE P RTS
If you would like to ask something about the lathe or
other Ferm products, you can get into touch with your
Ferm dealer. This also applies for repeated orders of
spare parts and/or accessories.
With the MD-500 a number of accessories are
deliverable from stock.
With this it is possible to equip the machine exactly as
you want. You can order these accessories via your
Ferm dealer.
GU R NTEE
The guarantee conditions can be found on the separately
enclosed guarantee card.
We declare under our sole responsibility that this
product is in conformity with the following standards or
standardized documents
prEN12840, EN60204-1, EN55014-1,
EN61000-3-2, EN61000-3-3, EN55014-2,
EN292-1, EN292-2
in accordance with the regulations.
73/23/EEC
89/336/EEC
98/37/EEC
01-0 - 004
ZWOLLE NL
W. Kamphof
Quality department
CEı
DECL R TION OF CONFORMITY (UK)
Ferm 13

ÍÓÎÂÒ‡ Ë Á‡ Ò˜ÂÚ ÛÒÚ‡ÌÓ‚ÍË ÍÓθˆÂ‚˚ı ÔÓÍ·‰ÓÍ. ç‡-
ÒÚÓÈ͇ ÒÏÂÌÌ˚ı ¯ÂÒÚÂÂÌ ‰ÓÎÊ̇ ‚˚ÔÓÎÌflÚ¸Òfl Ò
ÏËÌËχθÌ˚Ï Á‡ÁÓÓÏ.
퇷Îˈ‡ 4
äÓÏ ÚÓ„Ó, ‚Ó ‚ÚÓÓÈ ÍÓÎÓÌÍ ˝ÚÓÈ Ú‡·Îˈ˚ ÂÒÚ¸
Û͇Á‡ÌË ÔÓ Â„ÛÎËÓ‚Í ÔÓ‰‚Ó‰ÌÓ„Ó ‡Áχ ·ÂÁ ÌÂ-
Ó·ıÓ‰ËÏÓÒÚË Á‡ÏÂÌ˚ ÒÏÂÌÌ˚ı ¯ÂÒÚÂÂÌÓÍ.
퇷Îˈ‡ 5
íÖïçàóÖëäéÖ éÅëãìÜàÇÄ-
çàÖ
è‰ ̇˜‡ÎÓÏ ‚˚ÔÓÎÌÂÌËfl ‡·ÓÚ ÔÓ ÚÂıÓ·-
ÒÎÛÊË‚‡Ì˲ ̇ ÚÓ͇ÌÓÏ ÒÚ‡ÌÍ ÒΉÛÂÚ
۷‰ËÚ¸Òfl, ˜ÚÓ Ï‡¯Ë̇ Ó·ÂÒÚÓ˜Â̇.
ÉêÄîàä ëåÄáéóçõï êÄÅéí
êËÒ.18
퇷Îˈ‡ 6
íÂıÌ˘ÂÒÍÓ ӷÒÎÛÊË‚‡ÌË ÚÓ͇ÌÓ„Ó ÒÚ‡Ì͇ ÔÓ-
‚Ó‰ËÚÒfl ‰Îfl ÔÓÙË·ÍÚËÍË ÍÓÓÁËË Ë ËÁÌÓÒ‡ ‰ÂÚ‡-
ÎÂÈ. Ç ÓÒÌÓ‚ÌÓÏ, ‡·ÓÚ˚ ÔÓ ÚÂıÓ·ÒÎÛÊË‚‡Ì˲ ‚Íβ-
˜‡˛Ú ‚ Ò·fl ˜ËÒÚÍÛ Ë ÒχÁÍÛ. é‰Ì‡ÍÓ Ì‰ÓÒÚ‡ÚÓ˜ÌÓ
Ó„‡Ì˘˂‡Ú¸Òfl ÚÓθÍÓ ‡·ÓÚÓÈ Ò Ï‡ÒÎÂÌÍÓÈ. çÂÓ·-
ıÓ‰ËÏÓ Â„ÛÎflÌÓ Û‰‡ÎflÚ¸ ÒÚÛÊÍÛ, ÓÔËÎÍË Ë ÏÂÚ‡Î-
΢ÂÒÍÛ˛ ÍÓ¯ÍÛ ÓÚ ÚÛ ËıÒfl ÔÓ‰‚ËÊÌ˚ı ‰ÂÚ‡ÎÂÈ
ÒÚ‡Ì͇; ˜‡  ˝ÚÓ Ì‡‰Ó ‰Â·ڸ ‚Ó ‚ÂÏfl ‡·ÓÚ˚ ÒÚ‡Ì͇.
Ç ÔÓÚË‚ÌÓÏ ÒÎÛ˜‡Â ÂÒÚ¸ ËÒÍ, ˜ÚÓ ˝ÚË ˜‡ÒÚˈ˚ ÏÓ„ÛÚ
ÔÓÔ‡ÒÚ¸ ÏÂÊ‰Û ÔÓ‰‚ËÊÌ˚ı ËÎË ‚‡ ‡˛ ËıÒfl ˜‡Ò-
ÚÂÈ Ï‡¯ËÌ˚. ÑÎfl ˝ÚÓÈ ˆÂÎË Ì‡ ÒÚ‡ÌÍ Ô‰ÛÒÏÓÚÂ-
èÂ Ó‰Ë ÌÓÒÚ¸
èÓÒΠԂ˚ı 10
‰ÌÂÈ
èÓÒΠԂ˚ı 20
‰ÌÂÈ Ë Á‡ÚÂÏ ‡Á ‚
60 ‰ÌÂÈ
ê‡Á ‚ „Ó‰
ê‡Á ‚ „Ó‰
èË Á‡ÏÂÌ ËÎË
ÂÊẨÂθÌÓ
ÖÊẨÂθÌÓ
Öʉ̂ÌÓ
íÓ ÊÂ
íÓ ÊÂ
íÓ ÊÂ
íÓ ÊÂ
íÓ ÊÂ
ÖÊẨÂθÌÓ
íËÔ ÒχÁÍË
í‡ÌÒÏËÒÒËÓÌÌÓÂ
χÒÎÓ SAE90:
‰Ó Á‡ÔÓÎÌÂÌËfl
ÒÏÓÚÓ‚Ó„Ó Î˛˜Í‡
̇ÔÓÎÓ‚ËÌÛ (I)
ËÎË ÔÓ͇ Ò‡Ï˚Â
ÌËÊÌË ÁÛ·˜‡Ú˚Â
ÍÓÎÂÒ‡ ÚÓθÍÓ ÔÓ-
„ÛÁflÚÒfl ‚ χÒÎÓ.
ìÌË‚Â҇θ̇fl
ÒχÁ͇ ‰Îfl ÁÛ·˜‡-
Ú˚ı Ô‰‡˜
íÓ ÊÂ
íÓ ÊÂ
íÓ ÊÂ
Ç˚ÒÓÍÓ͇˜ÂÒÚ‚ÂÌ-
ÌÓ ÒχÁÓ˜ÌÓÂ
χÒÎÓ
íÓ ÊÂ
íÓ ÊÂ
íÓ ÊÂ
íÓ ÊÂ
íÓ ÊÂ
LJÁÂÎËÌ
ÑÂڇθ/ÛÁÂÎ
êÓÎËÍÓÔÓ‰¯ËÔÌËÍ
„·‚ÌÓ„Ó ‚‡Î‡
èÓ‰¯ËÔÌËÍË Ë
ÁÛ· ‡Ú˚Â ÍÓÎÂÒ‡
̇ ‚‡Î‡ı ÔÓÌËʇ˛-
˘ÂÈ Ô‰‡ Ë ÔÂ-
‰ÌÂÈ ·‡·ÍË (2)
èÓ‰¯ËÔÌËÍË Ó-
ÎË͇ ÍÎËÌÓ‚Ó„Ó
ÂÏÌfl Ë ÓÒ¸ ÔÓ
ÏÂÊÛÚÓ ÌÓ„Ó ¯ÍË-
‚‡ (11, 12)
ìÔÓÌ˚È ÔÓ‰¯ËÔ-
ÌËÍ Ô‰‡ Ë (13)
ëÏÂÌÌ˚ ÁÛ· ‡-
Ú˚Â ÍÓÎÂÒ‡ (12)
á‡ÏÓÍ ¯ÂÒÚÂÌÂÈ
Ò ÁÛ· ‡ÚÓÈ ÂÈÍÓÈ
(15)
äÓӷ͇ Á‡Ï͇
ÔÓ‰¯ËÔÌË͇ ¯ÂÒ-
ÚÂÂÌÓÍ Ë ÏÂı‡
ÌËÁÏ ÒÚÓÔÓÌÓÈ
„‡ÈÍË (17)
艇 ‡ / ÓÒ¸
ÔÓ‰‚Ó‰‡ (18)
ç‡Ô‡‚Îfl˛˘ËÂ
ÒÍÓθÊÂÌËfl
ÒÚ‡ÌËÌ˚ (7)
òÔË̉ÂÎË ÒÛÔÔÓ-
Ú‡ (8, 16)
ÇÒ ¯‡ËÍÓ‚˚Â
ÌËÔÔÂÎË (5, 6, 9, 14
Ë 20)
ÇÓÈÎÓÍ Ì‡ ÒÍ·-
͇ı ÏÂÚ‡Î. ÓÔËÎÓÍ
(4)
ÇÒ ÓÒڇθÌ˚ ‰Â-
Ú‡ÎË ·ÂÁ Á‡˘ËÚÌÓ-
„Ó ÔÓÍ˚ÚËfl
Ñ˛ÈÏÓ‚˚È
n/‰˛ÈÏ
B C
48 70 79
40 70 84 79
3 105 98 49
4 98 40
0 70 84 40
16 56 84 40
14 49 105 50
1 49 98 40
11 49 105 39
8 50 105 8
ò‡„ ÂÁ¸·˚
èÓ‰‚Ó‰ ÂÁˆ‡
äÓÎ-‚Ó ÁÛ·¸Â‚ ̇ ¯ÂÒÚÂÌ˛
(MM) (MM) B C
0.4 0.04 49 - 105
0.5 0.05 70 - 84
0.7 0.07 70 98 84
0.8 0.08 105 98 49
1.0 0.1 98 - 4
1. 5 0.1 5 84 105 4
1.5 0.15 105 - 8
1.75 0.175 84 98 8
.0 0. 49 98 4
.5 0. 5 63 105 8
3.0 0.3 49 105 30
Ferm 63
MET LLDREHM SCHINE MD-500
DIE NUMMERN IM NACHFOLGENDEN TEXT
KORRESPONDIEREN MIT DEN ABBILDUNGEN
AUF SEITE 2
TECHNISCHE D TEN
DIE MD-500 UND MD-500 WIRD GELIEFERT
IN DIE FOLGENDE B SIS USFÜHRUNG
Die MD-500 werd in der folgenden Basisausführung
geliefert: Maschinenbett mit Prismenbett, Spindelstock
mit Hauptspindel und Antrieb für automatischen
Längsvorschub und Gewindeschneiden, Reitstock mit
Reitstockspitze und Querverstellung, Elektromotor mit
Start- / Stopp- und Drehrichtungsschalter,
Werkzeugschlitten (Support) mit Schloßplatte,
kombinierter Längsvorschub, Querschlitten mit
Drehplatte und Oberschlitten, Vierfachstahlhalter mit
Indexstift, Dreibackenfutter mit extra Spannbacken und
Meßzertifikat, Antriebsschutzkasten, 7 Wechselrädern,
3 Antriebsriemen, Körnerspitzen, 3 Steckschlüsseln,
Inbusschlüsseln, Mitnehmerstift und einem
Spannfutterschlüssel.
Ohne Untergestell (Artikelnummer: 330956)
GEBR UCH
Die Metalldrehmaschine wurde zum Bearbeiten von
Eisen- und Nicht-Eisen-Metallen, Kunststoffen und Holz
entworfen und ist für Hobbyzwecke bestimmt.
SICHERHEITSVORSCHRIFTEN
The following symbols are used in these instructions for
use:
Denotes risk of personal injury loss of life or
damage to the tool in case of non-observance of
the instructions in this manual.
Denotes risk of electric shock.
Lesen Sie diese Betriebsanleitung aufmerksam, bevor Sie
die Maschine in Betrieb nehmen. Machen Sie sich
vertraut mit der Funktionsweise und der Bedienung.
Warten Sie die Maschine entsprechend den
Anweisungen, damit sie immer einwandfrei funktioniert.
Die Betriebsanleitung und die dazugehörende
Dokumentation müssen in der Nähe der Maschine
aufbewahrt werden.
Beachten beim Benutzen von Elek tromaschinen
immer ie örtlichen Sicherheitsvorschriften
bezüglich Feuerrisiko, Elektroschock un
Verletzung. Lesen Sie außer en folgen en
Hinweisen ebenfalls ie Sicherheitsvorschriften im
einschlägigen Son erteil.
Die Hinweise müssen sicher aufbewahrt wer en!
Bei der Konstruktion der Maschine wurden die
Anforderungen an eine sichere Benutzung
berücksichtigt. Jede Veränderung, Anpassung, Umbau
oder anderer Einsatz kann die Sicherheit der
Konstruktion aufheben. Außerdem verfällt dadurch die
Garantie.
Vor, während und nach dem Arbeiten mit der
Drehmaschine müssen eine Anzahl
Sicherungsmaßnahmen vorgenommen werden.
Durch das Vorhandensein drehender Teile und scharfer
Gegenstände können sehr ernste körperliche
Verletzungen entstehen. Vor allem die Spannbacken des
runddrehenden Spannfutters sind sehr gefährlich.
• Die Drehmaschine wurde entworfen, um
widerstandsfähiges Material zu bearbeiten, und
somit in der Lage zu sein, viel Kraft zu entfalten.
Das Berühren drehender Teile ist darum
lebensgefährlich. Aus diesen Gründen muß auch das
nichtgestattete, ungewünschte oder ungewollte
Einschalten der Maschine verhindert werden, zum
Beispiel durch das eingedrückt Blockieren der
Notstoppklappe mit Hilfe eines kleinen
Hängeschlosses.
• Durch die federnde Arbeitsweise des Drehstahls
können Metallteilchen mit großer Kraft in höchst
unerwarteten Momenten geradezu weggeschossen
werden.
Mains voltage | 30 Volt
Netzspannung | 30 Volt
Netzfrequens | 50 Hz
Leistungsaufnahme | 370 Watt
Körnerspitzenhöhe | 110 mm
Körnerspitzen distanz | 500 mm
Max.Drehdurchmesser |
über bett | 00 mm
Max. Drehdurchmesser |
über Support | 115 mm
Durchlaß und Aufnahme |
Hauptspindel | 18 mm, MT-3
Geschwindigkeiten |
Hauptspindel | 6
Umdrehungen Hauptspindel | 1 0- .000/min
Automatisher Vorschub | 11 mm, 0.04 - 0.3
Gewinde schneiden (rechtsum) | 11 mm, M0.4 - M3
Abstand Spannklaue |
Zentrierlinie Vertikal gemessen | 15 mm
Drehteilbewegung | 360º
Gradeinteilung Drehteil | ± 45º
Verschiebung Oberschlitten | 70 mm
Querschlitten | 115 mm
Längsschlitten | 500 mm
Gradeinteilung |
Schlittenspindeln | 0.04 mm
Aufnahme und Windung |
Reitstockspitze | MT- , 50 mm
Gradeinteilung | 0.05 mm
Gewicht | 115 kg
Geräuchspegel Lwa | 70.0 dB(A)
Vibrationspegel | .8 m/s
14 Ferm

Û„ÓΠ̇ÍÎÓ̇ 5. ëÚÂÎ͇ Û͇Á˚‚‡ÂÚ Ì‡Ô‡‚ÎÂÌË ÔÓ‰-
‚Ó‰‡ ÂÁˆ‡ Í Á‡„ÓÚÓ‚ÍÂ. è‰Ìflfl ÔÎÓÒÍÓÒÚ¸/„‡Ì¸
̇Á˚‚‡ÂÚÒfl ‚ÒÔÓÏÓ„‡ÚÂθÌÓÈ ÂÊÛ ÂÈ ÍÓÏÍÓÈ. éÒ-
ÌÓ‚ÌÓÈ ÂÊÛ ÂÈ „‡Ì¸˛ fl‚ÎflÂÚÒfl Ú‡ ˜‡ÒÚ¸, ̇ ÍÓÚÓ-
Û˛ ̇ÌÂÒÂ̇ ÒÚÂÎ͇. í‡ÍËÏ ÏÂÚÓ‰ÓÏ ÏÓ„ÛÚ Á‡Ú‡˜Ë-
‚‡Ú¸Òfl ‚Ò‚ÓÁÏÓÊÌ˚ ÂÁˆ˚, ‰Îfl ˜Â„Ó ‚Ò„‰‡ Ú·Û-
ÂÚÒfl ÓÔ‰ÂÎËÚ¸Òfl, „‰Â ·Û‰ÂÚ Ì‡ıÓ‰ËÚ¸Òfl ÓÒÌӂ̇fl
ÂÊÛ ‡fl „‡Ì¸ Ë ˜ÂÏ fl‚ÎflÂÚÒfl χÚÂˇΠ‰Îfl Ó·‡·ÓÚ-
ÍË.
í ‡ÚÂθÌÓ Á‡ÚÓ˜ÂÌÌ˚È ÂÁˆ ‰ÓÎÊÂÌ ‰ÓÎÊÌ˚Ï Ó·-
‡ÁÓÏ ‚ÒÚ‡‚ÎflÚ¸Òfl ‚ ‰Âʇ‚ÍÛ. êËÒ. 14 ÔÓ͇Á˚‚‡ÂÚ
ÒÔÓÒÓ· Ô‡‚ËθÌÓÈ ÛÒÚ‡ÌÓ‚ÍË ÔËÍÓÓ·‡ÁÌÓ„Ó ÂÁˆ‡.
èÛÌÍÚ 1 fl‚ÎflÂÚÒfl ˆÂÌÚÓ‚ÓÈ ÎËÌËÂÈ. ǯË̇ ÂÁˆ‡
‰ÓÎÊ̇ ·˚Ú¸ ‡ÒÔÓÎÓÊÂ̇ ̇ ÚÓ˜ÌÓ Ú‡ÍÓÈ Ê ‚˚ÒÓ-
ÚÂ, ‚ ÔÓÚË‚ÌÓÏ ÒÎÛ˜‡Â ÒΉÛÂÚ ËÒÔÓθÁÓ‚‡Ú¸ ÔӉͷ-
‰Ó˜Ì˚ Ô·ÒÚËÌ˚ (5). êÂÁˆ ‰ÓÎÊÂÌ ‡ÁÏ ‡Ú¸Òfl,
ÔË΄‡fl Í ÚÂÎÛ ·ÎÓ͇ (4) Ë ÌËÍÓ„‰‡ Ì ‰ÓÎÊÂÌ ‚˚ÒÚÛ-
Ô‡Ú¸ ‰‡Î ˜ÂÏ Ì‡ 1-1,5 ‚Â΢ËÌ˚ ÚÓÎ ËÌ˚ ı‚ÓÒÚÓ‚Ë-
͇ (2). ë‡ÏÓ ÒÓ·ÓÈ ‡ÁÛÏÂÂÚÒfl, ˜ÚÓ ‚Ò Á‡ÊËÏÌ˚Â
·ÓÎÚ˚ (3) ‰ÓÎÊÌ˚ ·˚Ú¸ ÚÛ„Ó Á‡ÚflÌÛÚ˚.
ëäéêéëíú íéäÄêçéâ éÅêÄÅéíäà
êËÒ. 15 Ë 16
ÖÒÎË ÂÁˆ˚ Á‡ÚÓ˜ÂÌ˚ Ë ÛÒÚ‡ÌÓ‚ÎÂÌ˚, ‡ Á‡„ÓÚӂ͇
‰ÓÎÊÌ˚Ï Ó·‡ÁÓÏ Á‡ÍÂÔÎÂ̇, Ú·ÛÂÚÒfl ‚˚ÒÚ‡‚ËÚ¸
ÒÍÓÓÒÚ¸ „·‚ÌÓ„Ó ‚‡Î‡ Ò ÔÓÏÓ ¸˛ ÍÎËÌӂˉÌ˚ı
ÂÏÌÂÈ (ÒÏÓÚË ËÒ. 15 Ë 16). Ç ‡ÒÔÓÎÓÊÂÌÌÓÈ ÌËÊÂ
Ú‡·Îˈ Ô˂‰ÂÌ˚ ÌÂÍÓÚÓ˚ ËÁ ̇˷ÓΠ˜‡ÒÚÓ
‚ÒÚ˜‡˛ ËıÒfl Á̇˜ÂÌËÈ ÒÍÓÓÒÚË Ó·‡·ÓÚÍË ‰Îfl
‡Á΢Ì˚ı ÚËÔÓ‚ ÂÁˆÓ‚ Ë ‚ˉӂ χÚ¡·.
퇷Îˈ‡ 3
ë ÔÓÏÓ ¸˛ ˝ÚÓÈ Ú‡·Îˈ˚ ‚˚ ÏÓÊÂÚ ҇ÏË ‚˚·Ë‡Ú¸
Ô‡‚ËθÌÛ˛ ÒÍÓÓÒÚ¸ ‰Îfl β·Ó„Ó ÔÓËÁ‚ÓθÌÓ„Ó ‰Ë-
‡ÏÂÚ‡. Ç‡Ï ÌÛÊÌÓ ÚÓθÍÓ ÔÓ‰ÒÚ‡‚ËÚ¸ ÌÂÓ·ıÓ‰ËÏÓÂ
Á̇˜ÂÌË ÒÍÓÓÒÚË ‚ ÒÎÂ‰Û˛ Û˛ ÙÓÏÛÎÛ.
v = ëÍÓÓÒÚ¸ Ó·‡·ÓÚÍË ‚ ÏÂÚ‡ı ‚ ÏËÌÛÚÛ
d = ÑˇÏÂÚ Á‡„ÓÚÓ‚ÍË ‚ ÏËÎÎËÏÂÚ‡ı
n = ëÍÓÓÒÚ¸ ‚‡ ÂÌËfl ‚ Ó·ÓÓÚ‡ı ‚ ÏËÌÛÚÛ
p = äÓÌÒÚ‡ÌÚ‡, ‡ ËÏÂÌÌÓ 3,14
v = π x d x n =v x 1000
1000 πx d
èËÏ ‡Ò ÂÚ‡:
1. èÛÚÓÍ ÍÛ„ÎÓÈ ÒÚ‡ÎË-Ò·flÌÍË ‰Ë‡ÏÂÚÓÏ
100 ÏÏ ‰ÓÎÊÂÌ ·˚Ú¸ Ó·‡·ÓÚ‡Ì ÂÁˆÓÏ ËÁ ·˚ÒÚ-
ÓÂÊÛ ÂÈ ÒÚ‡ÎË. àÁ Ú‡·Îˈ˚ ‚ˉÌÓ, ˜ÚÓ Òڇθ-
Ò·flÌ͇ ‰ÓÎÊ̇ Ó·‡·‡Ú˚‚‡Ú¸Òfl ÒÓ ÒÍÓÓ-
ÒÚ¸˛ 32 Ï/ÏËÌ, v = 32.
ê‡Á‰ÂÎË‚ 32000 ̇ 100, ÔÓÎÛ˜‡ÂÏ ˜ËÒÎÓ Ó·ÓÓÚÓ‚,
‡‚ÌÓ 320 Ó·./ÏËÌ. å˚ Ӊ‚‡ÂÏ ÍÎËÌӂˉÌ˚È
ÂÏÂ̸ 2 ̇ Ò‡Ï˚ ‰‡Î¸ÌË ‰ËÒÍË ¯Í˂ӂ ÔÓÏÂ-
ÊÛÚÓ˜ÌÓ„Ó Ë ÓÒÌÓ‚ÌÓ„Ó ‚‡ÎÓ‚.
2. å‰Ì˚È ÔÛÚÓÍ ‰Ë‡ÏÂÚÓÏ 10 ÏÏ ‰ÓÎÊÂÌ ÔÓÈÚË
ÚÓ͇ÌÛ˛ Ó·‡·ÓÚÍÛ ÂÁˆÓÏ ËÁ ڂ‰ÓÒÔ·‚ÌÓÈ
ÒÚ‡ÎË. V= 200 Ë ËÁ-Á‡ ˝ÚÓ„Ó n ‚˚ıÓ‰ËÚ ‰‡ÎÂÍÓ Á‡
Ô‰ÂÎ˚ χÍÒËχθÌÓ„Ó ˜ËÒ· Ó·ÓÓÚÓ‚. é‰Ì‡ÍÓ
χÍÒËχθÌÓ ˜ËÒÎÓ Ó·ÓÓÚÓ‚ ÏÓÊÂÚ ·˚Ú¸ ̇ÒÚ-
ÓÂÌÓ. äÎËÌӂˉÌ˚È ÂÏÂ̸ 2 ̇Í·‰˚‚‡ÂÚÒfl ̇
Ò‡Ï˚È ‰‡Î¸ÌËÈ ‰ËÒÍ ˝ÎÂÍÚÓ‰‚Ë„‡ÚÂÎfl Ë ¯ÍË‚
„·‚ÌÓ„Ó ‚‡Î‡.
çÄêÖáäÄ êÖáúÅõ
ëÚ‡ÌÓÍ MD-500, ÔÓÏËÏÓ Ó·˚˜Ì˚ı ‚ˉӂ ÚÓ͇ÌÓÈ
Ó·‡·ÓÚÍË, Ú‡ÍÊ ÔÓÁ‚ÓÎflÂÚ ‚˚ÔÓÎÌflÚ¸ ̇ÂÁÍÛ
ÂÁ¸·˚. ÑÎfl ˝ÚÓ„Ó ‰ÓÎÊÂÌ ËÒÔÓθÁÓ‚‡Ú¸Òfl ÒÔˆˇθ-
Ì˚È ÂÁˆ. íÂıÌË͇ ̇ÂÁÍË ÂÁ¸·˚ ÌÂÔÓÒÚ‡. èË
̇ÂÁÍ ÂÁ¸·˚, ˜ÚÓ·˚ ‰ÓÒÚ˘¸ ‰ÓÎÊÌÓÈ ÔÓÒ‡‰ÍË,
Ó˜Â̸ ÚÓ˜Ì˚ÏË ‰ÓÎÊÌ˚ ·˚Ú¸ Ò‡Ï ÔÓÙËθ ÂÁ¸·˚, ‡
Ú‡Íʠ ‚ÌÛÚÂÌÌËÈ Ë ‚̯ÌËÈ ‰Ë‡ÏÂÚ˚. èÓ˝ÚÓÏÛ
ÏÌÓ„Ë ÚÓÍ‡Ë ËÒÔÓθÁÛ˛Ú ÒÚ‡ÌÓ˜Ì˚ ÏÂÚ˜ËÍË. í‡-
ÍËÏ Ê ӷ‡ÁÓÏ ÏÓ„ÛÚ ËÒÔÓθÁÓ‚‡Ú¸Òfl Ô·¯ÍË, Ӊ̇-
ÍÓ ‰Îfl ˝ÚÓ„Ó Ú·ÛÂÚÒfl Ò‡ÏÓÒÚÓflÚÂθÌÓ ËÁ„ÓÚÓ‚ËÚ¸
ÔÓ‰ıÓ‰fl Û˛ ‰Âʇ‚ÍÛ. ç‡ÂÁ͇ ÓÒÛ ÂÒÚ‚ÎflÂÚÒfl
ÔË Ó˜Â̸ ÌËÁÍÓÈ ÒÍÓÓÒÚË ‚‡ ÂÌËfl (Ó·˚˜ÌÓ 70
Ó·./ÏËÌ) ËÎË, ÔË ÌÂÓ·ıÓ‰ËÏÓÒÚË, ÔÓÒ‰ÒÚ‚ÓÏ ‚‡-
ÂÌËfl „·‚ÌÓ„Ó ‚‡Î‡ ‚Û˜ÌÛ˛.
ÑÎfl ̇ÂÁÍË ‰˛ ÏÓ‚Ó ÂÁ¸·˚ Ú·ÛÂÚÒfl ÓÚ-
‰ÂθÌ˚ ̇·Ó ÁÛ·˜‡Ú˚ı ÍÓÎÂÒ, ÍÓÚÓ˚ ÌÂ
‚ıÓ‰ËÚ ‚ Òڇ̉‡ÚÌ˚ ÍÓÏÔÎÂÍÚ ÔÓÒÚ‡‚ÍË ‰‡ÌÌÓ„Ó
ÒÚ‡Ì͇. ùÚÓÚ Ì‡·Ó ÏÓÊÌÓ Á‡Í‡Á‡Ú¸ Û ‚‡¯Â„Ó ÏÂÒÚÌÓ-
„Ó ‰Ë· ÔÓ‰ ‹ BLA1006.
èÓÒÚÓflÌÌÓ ‡ÒÒÚÓflÌË ÏÂÊ‰Û ‰‚ÛÏfl ‡Ì‡Îӄ˘Ì˚ÏË
ÚӘ͇ÏË ‚ËÌÚÓ‚ÓÈ ÂÁ¸·˚ ̇Á˚‚‡ÂÚÒfl ¯‡„ÓÏ ÂÁ¸·˚.
è‰ ÚÂÏ, Í‡Í ÔËÒÚÛÔËÚ¸ Í Ì‡ÂÁÍ ÂÁ¸·˚, ÒΉÛÂÚ
ÛÒÚ‡ÌÓ‚ËÚ¸ ‚Â΢ËÌÛ ˝ÚÓ„Ó ¯‡„‡ ÂÁ¸·˚. ùÚÓ ÓÒÛ Â-
ÒÚ‚ÎflÂÚÒfl ÔÓÒ‰ÒÚ‚ÓÏ ‚˚·Ó‡ ÓÔ‰ÂÎÂÌÌÓÈ ÍÓÏ-
·Ë̇ˆËË ÔÂÂıÓ‰Ì˚ı ÁÛ·˜‡Ú˚ı ÍÓÎÂÒ „ËÚ‡˚. ç‡ ËÒ.
17 Ò΂‡ Ô‰ÒÚ‡‚ÎÂ̇ Ó‰ËÌӘ̇fl Ô‰‡˜‡ ‰Îfl ̇-
ÂÁÍË ÂÁ¸·˚ (Ú.Ì. Ó‰Ë̇Ì˚È ÏÂı‡ÌËÁÏ), ‡ ÒÔ‡‚‡ -
‰‚ÓÈ̇fl Ô‰‡˜‡ ‰Îfl ‡‚ÚÓχÚ˘ÂÒÍÓ„Ó ÔÓ‰‚Ó‰‡
(Ú.Ì. ‰‚ÓÈÌÓÈ ÏÂı‡ÌËÁÏ). èÓÒ‰ÒÚ‚ÓÏ ˝ÚÓ„Ó ÒÛÔ-
ÔÓÚ ÔÂÂÏ ‡ÂÚÒfl ̇ ÓÔ‰ÂÎÂÌÌÓ ‡ÒÒÚÓflÌË ‚Ó
‚ÂÏfl ‚‡ ÂÌËfl „·‚ÌÓ„Ó ‚‡Î‡. Ç ÔÂÂ‰Ì˛˛ ·‡·ÍÛ
‚ÒÚÓÂÌ˚ ‰‚ ÙËÍÒËÓ‚‡ÌÌ˚ Ô‰‡˜Ë, ‡ ËÏÂÌÌÓ 1:4
‰Îfl ¯‡„‡ ÂÁ¸·˚ Ë 1:40 ‰Îfl ÔÓ‰‚Ó‰‡ ÂÁ¸·˚, ÍÓÚÓ˚Â
ÓÔ‰ÂÎfl˛Ú ÒÍÓÓÒÚ¸ ‚‡ ÂÌËfl ‰Îfl ÍÓ‡ÍÒˇθÌÓÈ
ÓÒ‚ÓÈ ·‡Á˚. éÚ ˝ÚÓÈ ÓÒ‚ÓÈ ·‡Á˚ ‰ÓÎÊ̇ ‡ÒÒ˜ËÚ˚-
‚‡Ú¸Òfl ÍÓ̘̇fl Ô‰‡˜‡. ÑÎfl Ú‡ÍËı ‡Ò˜ÂÚÓ‚ ÒÛ Â-
ÒÚ‚Û˛Ú ÒÔˆˇθÌ˚ ÙÓÏÛÎ˚, ÌÓ ‚ ˆÂÎflı Û‰Ó·ÒÚ‚‡ ‚
Ô˂‰ÂÌÌÓÈ ÌËÊ ڇ·Îˈ ̇ÏË ÛÊ Ô˂‰ÂÌ˚ ̇-
Ë·ÓΠ¯ËÓÍÓ ÔËÏÂÌËÏ˚ ‚Â΢ËÌ˚ ‰Îfl ¯‡„‡
ÂÁ¸·˚. ÇÒ Û͇Á‡ÌÌ˚ ¯ÂÒÚÂÌË ÔÓÒÚ‡‚Îfl˛ÚÒfl ÒÚ‡Ì-
‰‡ÚÌÓ ‚ÏÂÒÚ ÒÓ ÒÚ‡ÌÍÓÏ! ìÒÚ‡Ìӂ͇ Ë Â„ÛÎËӂ͇
ÒÏÂÌÌ˚ı ¯ÂÒÚÂÂÌ ÓÒÛ ÂÒÚ‚ÎflÂÚÒfl ÔÓÒ‰ÒÚ‚ÓÏ ÔÂ-
ÂÏ ÂÌËfl „ËÚ‡˚ Ë ÓÒË ÔÓÏÂÊÛÚÓ˜ÌÓ„Ó ÁÛ·˜‡ÚÓ„Ó
é·‡·‡Ú˚‚‡ÂÏ˚È å‡Ú¡ΠëÍÓÓÒÚ¸
χÚ¡ΠÂÁˆ‡ Ó·‡·ÓÚÍË
çÂ΄ËÓ‚‡Ì̇fl
é·/ÏËÌ.
ÍÓÌÒÚÛ͈ËÓÌ̇fl Òڇθ Åêë 40 - 60
(9S20k - 60S20k) P10 140 - 160
ã„ËÓ‚‡Ì̇fl Åêë 3
ÍÓÌÒÚÛ͈ËÓÌ̇fl Òڇθ P10 11
àÌÒÚÛÏÂÌڇθ̇fl Òڇθ
(ë80= Òڇθ-Ò·flÌ͇)
óÛ„ÛÌ Åêë 40
K10 100
ñ‚ÂÚÌ˚ ÏÂÚ‡ÎÎ˚ Åêë 45 - 80
(ω¸, ‡Î˛ÏËÌËÈ) K10 140 - 80
62 Ferm
• Die Beschützung der Augen ist darum auch sehr
wichtig. Machen Sie es sich zur Gewohnheit um
immer in dem Raum in dem die Drehmaschine
aufgestellt ist eine speziell erhältliche
Sicherheitsbrille zu tragen. Kaufen Sie für sich selbst
eine professionelle und getestete Brille die Sie länger
hintereinander tragen können und für Besucher
nötigenfalls eine etwas preiswertere aber ebenfalls
gute Ausführung.
• Durch einen aufgeräumten Arbeitsplatz vermeiden
Sie zum Beispiel in die Maschine zu greifen oder zu
fallen weil Sie über rumfliegendes Material stolpern
könnten.
• Seien Sie sehr vorsichtig beim manuellen Bearbeiten
drehender Werkstücke.
• Wenn Sie eine Oberfläche drehend feinschleifen
wollen nehmen Sie dann ein ausreichend langes
Stück Schleifpapier das Sie halb um das Werkstück
legen und mit den Enden zu Ihnen.
• Die Enden nie um die Finger wickeln nie mit der
Hand Schleifpapier auf das Werkstück drücken.
• Durch das Drehen entstehen messerscharfe Ränder
am Werkstück. Diese Ränder erst mit einer Feile oder
einem Abgrater abgraten.
• Während des Drehens nie mit den Fingern
Drehspäne entfernen
Benutzen Sie hierzu einen aus Draht selbst
gefertigten Spänehaken oder kaufen Sie einen
professionellen Spänehaken.
• Falls während des Drehens etwas in oder hinter das
Bett fällt, nie über die drehende Maschine oder das
Spannfutter hinweg greifen.
Immer erst die Maschine abschalten. Sorgen Sie
dafür, daß das Abdeckplättchen auf der Öffnung im
Bett liegt.
• Gute Beleuchtung verhindert, daß Sie die Maschine
von zu nahe bedienen.
• Bei Einsatz von Leuchtstoffröhren muß mit dem
sogenannten stroboskopischen Effekt gerechnet
werden. Hierdurch kann ein sich drehender
Gegenstand optisch stillstehen. Eine Lösung ist der
Einsatz doppelter Armaturen wobei eine
Phasenverschiebung beider Leuchtstoffröhren
zustandegebracht ist.
• Notstopp.
Wenn sich unerwartet eine gefährliche Situation
ergibt, zum Beispiel, wenn ein nicht gut
eingespanntes Werkstück sich während des
Drehens zu lösen droht, können Sie den Notstopp
gebrauchen, indem Sie einen leichten Schlag auf den
gelben Deckel des Sicherheitsschalters (mit STOP
gekennzeichnet) geben. Hierdurch stoppt die
Maschine, ohne daß Sie den Schalterknopf selbst
eindrücken müssen.
ELEKTRISCHE SICHERHEIT
Überprüfen Sie immer ob Ihre Netzspannung der
des Typenschilds entspricht.
ustauschen von Kabeln oder Steckern
Entsorgen Sie alte Kabel oder Stecker, unmittelbar
nachdem Sie durch neue ersetzt sind. Das Anschließen
eines Steckers eines losen Kabels an eine Steckdose ist
gefährlich.
INST LL TION
UFSTELLR UM
Da die Maschine zum größten Teil aus Metall gebaut ist,
ist neben gutem Unterhalt die Aufstellung in trockener
Umgebung nötig. Räume können durch unvollständige
oder verkehrte Ventilation, nicht regelmäßiges Heizen
oder durchschlagende Mauern oder aufsteigende Nässe
feucht werden. Kondensation durch Feuchtigkeit auf
Metall entsteht durch zu plötzliche
Temperaturerhöhung in einem kalten Raum, zum
Beispiel, wenn man in diesem Raum arbeiten will. Sorgen
Sie für eine gleichmäßige Temperatur.
USP CKEN UND UFSTELLEN
Die Maschine ist in einer robusten Kiste verpackt, die Sie
in 6 flache, bequem unterzubringende Teile zerlegen
können. Diese Teile können Sie für den Fall bewahren,
daß Sie die Drehmaschine transportieren müssen, z. B.
zu Reparatur oder Umzug. Nachdem Sie die Kiste
geöffnet haben, muß die Drehmaschine von der Palette
gelöst werden. Hierzu entfernen Sie zwei Muttern, in
jedem Bettfuß eine. Die Muttern können Sie später
erneut gebrauchen. Zum Hochheben der
Drehmaschine sollten Sie mit Rücksicht auf das Gewicht
die Hilfe einer zweiten Person in Anspruch nehmen.
Sprechen Sie vorher genau ab, wie Sie hochheben
wollen. Die Drehmaschine sollte am besten ohne
Absetzen von der Palette auf den definitiven Standort
gesetzt werden. Sie können die Maschine am besten bei
den Enden des Bettes packen, also nicht an den Stöcken,
Vorschub, Wechselradkasten oder Motor! Die
Maschine wiegt ca. 115 kg. Um das Gewicht zeitweise zu
vermindern, können einige Unterteile erst vorsichtig
entfernt werden, wie der Reitstock, die Drehplatte mit
Aufbau und die gußeisernen Riemenscheiben. Die
Drehmaschine muß waagerecht und auf einem soliden
Untergrund aufgestellt werden. Beim Selbstbau eines
Untergestells können Sie zum Beispiel stählerne U-
Profile von ausreichender Länge benutzen, an die Sie
eine Fußkonstruktion schweißen oder schrauben. Auch
können Sie einen kräftigen hölzernen Unterkasten mit
einem verstärkten und flachen Oberblatt benutzen, z.B.
einem Stück Kunststoff-Anrichtblatt. Bedingung ist in
jedem Fall, daß die Konstruktion in allen Richtungen
versteift sein muß. Sie darf weder schlingern, noch
durchbiegen oder wackeln.
Die Drehmaschine wird mit zwei M10 Bolzen in den
speziellen Löchern in beiden Fußplatten festgeschraubt.
Um zu verhindern daß geringe Unebenheiten
beim Festziehen der zwei Bolzen doch noch
Spannungen am Bett verursachen können können Sie die
folgenden Vorsorgemaßnahmen treffen. Sie zeichnen den
Platz der beiden Fußplatten und der zwei Montagelöcher an
und Sie montieren zwei Bolzen M10 in den Untergrund.
Legen Sie auf die angezeichneten Stellen eine Lage
Epoxyfüllmittel. Bringen Sie hierauf eine Plastikfolie an.
Sorgen Sie dafür daß die Bolzen sauber bleiben! Stellen Sie
die Drehmaschine auf die angezeichnete Stelle. Benutzen Sie
hierzu die beiden Bolzen als Führung. Lassen Sie das Bett auf
die Folie sacken und das Füllmittel aushärten. Danach
können Sie die Muttern die auch für den Transport
verwendet wurden auf die Bolzen drehen und festziehen.
Ferm 15

ùäëèãìÄíÄñàü ëíÄçäÄ
MD-500:
êËÒ.9 - 12
1. äÓÏ·ËÌËÓ‚‡ÌÌ˚È ÔÂÂÍβ˜‡ÚÂθ ̇ԇ‚ÎÂÌËfl
‚‡ ÂÌËfl Ò ÙÛÌ͈ËÂÈ ‡‚‡ËÈÌÓÈ ·ÎÓÍËÓ‚ÍË
ÇÍβ˜ÂÌË ˝ÎÂÍÚÓ‰‚Ë„‡ÚÂÎfl Ë ÔÂÂÍβ˜ÂÌËÂ
̇ԇ‚ÎÂÌËfl ‚‡ ÂÌËfl Ò ‚ÓÁÏÓÊÌÓÒÚ¸˛ ‡‚‡ËÈ-
ÌÓÈ ÓÒÚ‡ÌÓ‚ÍË. äÎ‡Ô‡Ì ÏÓÊÂÚ ·ÎÓÍËÓ‚‡Ú¸Òfl Á‡-
ÔÓÌ˚Ï ÛÒÚÓÈÒÚ‚ÓÏ.
2. á‡ÏÓÍ ÍÓÓ·ÍË Ô‰‡˜
ÑÎfl ÓÚÍ˚‚‡ÌËfl Ë Á‡ÔˇÌËfl ÍÓÓ·ÍË.
3. ê˚˜‡„ „‡ÈÍË Ò‡Î‡ÁÓÍ
èÓÒ‰ÒÚ‚ÓÏ Á‡ÔˇÌËfl ˝ÚÓÈ „‡ÈÍË ‚Íβ˜‡ÂÚÒfl
‡‚ÚÓχÚ˘ÂÒ͇fl ÔÓ‰‡˜‡.
4. å‡ıӂ˘ÓÍ ÔÓ‰ÓθÌÓ„Ó ÔÂÂÏ ÂÌËfl
ÑÎfl ·˚ÒÚÓ„Ó ÔÂÂÏ ÂÌËfl ÒÛÔÔÓÚ‡ ‚ÎÂ‚Ó Ë
‚Ô‡‚Ó; ̇ ÌÓÌËÛÒ ÔÓ͇Á˚‚‡ÂÚÒfl ‚Â΢Ë̇ ÔÂÂ-
Ï ÂÌËfl Ò ¯‡„ÓÏ 0,04 ÏÏ.
5. á‡ÊËÏ̇fl ÛÍÓflÚ͇ ‰Âʇ‚ÍË ÂÁˆ‡.
éÚÊËχÌËÂÏ ÛÍÓflÚÍË Ô‡ÚÓÌ ‰Âʇ‚ÓÍ ÏÓÊÂÚ
ÒÚÛÔÂ̘‡ÚÓ ÔÂÂÍβ˜‡Ú¸Òfl ‚ ÔÓÎÓÊÂÌËfl ˜ÂÂÁ
90°.
6. á‡ÊËÏ̇fl ÛÍÓflÚ͇ ÔËÌÓÎË Á‡‰ÌÂÈ ·‡·ÍË.
ÑÎfl ÙËÍÒ‡ˆËË ÔËÌÓÎË Á‡‰ÌÂÈ ·‡·ÍË.
7. å‡ıÓ‚ËÍ ÔËÌÓÎË Á‡‰ÌÂÈ ·‡·ÍË.
èÓÒ‰ÒÚ‚ÓÏ ‚‡ ÂÌËfl ˝ÚÓ„Ó Ï‡ıÓ‚Ë͇ Á‡„ÓÚÓ‚-
͇ ÏÓÊÂÚ Á‡ÊËχڸÒfl ÏÂÊ‰Û ÍÛ·˜ÍÓ‚˚Ï Ô‡ÚÓ-
ÌÓÏ Ë ˆÂÌÚÓÏ; ÍÓÏ ÚÓ„Ó, ÓÌ ËÒÔÓθÁÛÂÚÒfl ÔË
Ò‚ÂÎÂÌËË; ̇ ÌÓÌËÛÒ ÔÓ͇Á˚‚‡ÂÚÒfl Á̇˜ÂÌË ÔÂ-
ÂÏ ÂÌËfl Ò ¯‡„ÓÏ 0,05 ÏÏ.
8. å‡ıÓ‚ËÍ Ò‡Î‡ÁÓÍ ÒÛÔÔÓÚ‡.
ÑÎfl ÔÓ‰ÓθÌÓ„Ó ÔÂÂÏ ÂÌËfl ‚ÂıÌÂ„Ó ÒÛÔ-
ÔÓÚ‡. ç‡ ÌÓÌËÛÒ ÔÓ͇Á˚‚‡ÂÚÒfl Á̇˜ÂÌË ÔÂÂ-
Ï ÂÌËfl Ò ¯‡„ÓÏ 0,04 ÏÏ.
9. å‡ıÓ‚ËÍ ÔÓÔ˜Ì˚ı ҇·ÁÓÍ ÒÛÔÔÓÚ‡.
ÑÎfl ÔÓ‰ÓθÌÓ„Ó ÔÂÂÏ ÂÌËfl ÔÓÔ˜ÌÓ„Ó
ÒÛÔÔÓÚ‡. ç‡ ÌÓÌËÛÒ ҘËÚ˚‚‡ÂÚÒfl ‚Â΢Ë̇ ÔÂ-
ÂÏ ÂÌËfl Ò ¯‡„ÓÏ 0,04 ÏÏ.
10. á‡ÊËÏ̇fl „‡È͇ Á‡‰ÌÂÈ ·‡·ÍË
ÑÎfl ÙËÍÒËÓ‚‡ÌËfl Á‡‰ÌÂÈ ·‡·ÍË Í ÒÚ‡ÌËÌÂ; ‰Îfl
ÔËÊËχ ‚ÂıÌÂÈ ˜‡ÒÚË Í ÓÔÓÌÓÈ ÔÎËÚÂ.
11. á‡ÊËÏÌ˚ „‡ÈÍË ÔÓ‚ÓÓÚÌÓÈ Ô·ÒÚËÌ˚
èÓÒΠ‚˚ÒÚ‡‚ÎÂÌËfl ÌÂÓ·ıÓ‰ËÏÓÈ ‚Â΢ËÌ˚ ۄ·
Ò ÔÓÏÓ ¸˛ ÌËı ÏÓ„ÛÚ Á‡ÊËχڸÒfl ‰ÂÚ‡ÎË ÔÓ‚Ó-
ÓÚÌ˚ı Ô·ÒÚËÌ ‰Û„ ̇ ‰Û„Â.
12. ç‡ÚflÊÌÓÈ ÓÎËÍ ÍÎËÌÓ‚Ó„Ó ÂÏÌfl
éÌ ÔÓÁ‚ÓÎflÂÚ Á‡ÏÂÌflÚ¸, Á‡ÊËχڸ Ë ÔÂÂÏ ‡Ú¸
ÍÎËÌÓ‚˚ ÂÏÌË ·ÂÁ ÌÂÓ·ıÓ‰ËÏÓÒÚË ‰ÂÏÓÌڇʇ
¯Í˂ӂ.
13. òÍË‚ „·‚ÌÓ„Ó ‚‡Î‡
ê„ÛÎËӂ͇ ÒÍÓÓÒÚË ‚‡ ÂÌËfl.
14. èÓÏÂÊÛÚÓ˜Ì˚È ¯ÍË‚
ê„ÛÎËӂ͇ ÒÍÓÓÒÚË ‚‡ ÂÌËfl.
15. òÍË‚ ˝ÎÂÍÚÓ‰‚Ë„‡ÚÂÎfl
ê„ÛÎËӂ͇ ÒÍÓÓÒÚË ‚‡ ÂÌËfl.
16. ÉËÚ‡‡
ÑÎfl ÏÓÌڇʇ ÔÓÏÂÊÛÚÓ˜ÌÓÈ ÒÏÂÌÌÓÈ ¯ÂÒÚÂ-
ÂÌÍË Ë ‚ÓÁÏÓÊÌÓÒÚË Â „ÛÎËÓ‚ÍË ÔÓ ÚÂÏ Ì‡-
Ô‡‚ÎÂÌËflÏ; ‚ıÓʉÂÌË ‚ Á‡ˆÂÔÎÂÌËÂ Ò Ô‰‡-
˜ÂÈ.
17. ê„ÛÎËӂ͇ Á‚Â̇ Á‡ÊËÏÌÓ„Ó ‚ËÌÚ‡
Å·„Ó‰‡fl ÔÓ‰ÒÚÓÈÍ ÁÛ·˜‡ÚÓ„Ó ÒÂÍÚÓ‡, ÏÓÊÂÚ
ÛÒڇ̇‚ÎË‚‡Ú¸Òfl ÔÓÏÂÊÛÚÓ˜ÌÓ Ô˂ӉÌÓ ÁÛ·-
˜‡ÚÓ ÍÓÎÂÒÓ Ë ÁÛ·˜‡ÚÓ ÍÓÎÂÒÓ ÔÂÂÍβ˜ÂÌËfl
Ô‰‡˜Ë. ÇÍβ˜ÂÌËÂ Ë ÓÚÍβ˜ÂÌË Ô‰‡˜Ë.
18. èÓÏÂÊÛÚӘ̇fl ÒÏÂÌ̇fl ¯ÂÒÚÂÌfl
èÂÂÍβ˜ÂÌË ̇ԇ‚ÎÂÌËfl ‚‡ ÂÌËfl; ̇ÒÚÓÈ-
͇ Ô‰‡ÚÓ˜ÌÓ„Ó ˜ËÒ·.
19. ëÏÂÌ̇fl ¯ÂÒÚÂÌfl Ô‰‡˜Ë
ê„ÛÎËӂ͇ Ô‰‡ÚÓ˜ÌÓ„Ó ˜ËÒ·; ÔÓÒ‰ÒÚ‚ÓÏ
ÛÒÚ‡ÌÓ‚ÍË ÔÓÍ·‰Ó˜Ì˚ı ÍÓΈ ˝ÚÛ ¯ÂÒÚÂÌ˛
ÏÓÊÌÓ Â„ÛÎËÓ‚‡Ú¸ ÔÓ ÓÒË (ËÒ. 3); ÔÓ‰‰ÂÊË‚‡-
ÂÚ ÔÓ‰ÓθÌÓ ÔÂÂÏ ÂÌËÂ.
20. 艇˜‡ /ıÓ‰Ó‚ÓÈ ‚ËÌÚ
îËÍÒ‡ˆËfl ÔÓÏÂÊÛÚÓ˜ÌÓÈ ÒÏÂÌÌÓÈ ¯ÂÒÚÂÌË.
èÓÒ‰ÒÚ‚ÓÏ ÛÒÚ‡ÌÓ‚ÍË ÔÓÍ·‰Ó˜Ì˚ı ÍÓΈ ˝Ú‡
¯ÂÒÚÂÌfl „ÛÎËÛÂÚÒfl ÔÓ ÓÒË, ‡ ÔË ÔÓÏÓ Ë „‡È-
ÍË ÌËÊÌÂ„Ó ‚‡Î‡ ¯ÂÒÚÂÌfl „ÛÎËÛÂÚÒfl ‚ ·ÓÍÓ-
‚˚ı ̇ԇ‚ÎÂÌËflı.
21. èÓÏÂÊÛÚӘ̇fl ÒÏÂÌ̇fl ¯ÂÒÚÂÌfl
è‰ ÂÁ¸·Ó̇ÂÁÌ˚Ï ÍÓÎÂÒÓÏ, ÔÓÁ‡‰Ë ÁÛ·˜‡ÚÓ-
„Ó ÍÓÎÂÒ‡ ÔÓ‰‚Ó‰‡.
22. è˂ӉÌ˚ ¯ÂÒÚÂÌË ‰Îfl ÔÓ‰‚Ó‰‡
èÓÒ‰ÒÚ‚ÓÏ ËÒÔÓθÁÓ‚‡ÌËfl ˝ÚÓ„Ó Á‡ÊËÏÌÓ„Ó
ÛÒÚÓÈÒÚ‚‡ ‰Îfl Ó·‡·ÓÚÍË ÔÓ‚ÂıÌÓÒÚË Ë Ì‡ÂÁ-
ÍË ÂÁ¸·˚ Á‡ÔÓ̇fl „‡È͇ ÏÓÊÂÚ ÓÒÚ‡‚‡Ú¸Òfl ÓÚ-
Í˚ÚÓÈ, ‡ ÒÛÔÔÓÚ Ì ·Û‰ÂÚ ÓÚıÓ‰ËÚ¸. òÔË̉Âθ
Ë „‡È͇ Ú‡ÍËÏ Ó·‡ÁÓÏ ÔÓ‰‚„‡˛ÚÒfl ÏÂ̸¯ËÏ
̇„ÛÁ͇Ï.
23. á‡ÊËÏÌÓÈ ‚ËÌÚ ÔÓÔ˜ÌÓ„Ó ÒÛÔÔÓÚ‡
êÖáñõ
êËÒ.13
èË ÚÓ͇ÌÓÈ Ó·‡·ÓÚÍÂ Ò Á‡„ÓÚÓ‚ÍË ÒÌËχÂÚÒfl
ÒÚÛÊ͇. ÑÎfl ˝ÚÓ„Ó ÂÁˆ˚ ‰ÓÎÊÌ˚ Á‡Ú‡˜Ë‚‡Ú¸Òfl ÔÓ
ÒÔˆˇθÌÓÈ ÍÓÌÙ˄ۇˆËË Ë ‰Ó ÓÒÚÓ„Ó ÒÓÒÚÓflÌËfl.
ùÚ‡ ÍÓÌÙ˄ۇˆËfl Á‡‚ËÒËÚ ÓÚ Ï‡Ú¡·, ËÁ ÍÓÚÓÓ„Ó
ËÁ„ÓÚÓ‚ÎÂÌ ÂÁˆ, Ë ÓÚ ÚËÔ‡ χÚ¡· ‰Îfl Ó·‡·ÓÚ-
ÍË. ëÏÓÚËÚ ÒÎÂ‰Û˛ Û˛ Ú‡·ÎˈÛ.
퇷Îˈ‡ 2
èÓθÁÛflÒ¸ ‰‡ÌÌ˚ÏË Ú‡·Îˈ˚ ̇ ËÒ. 13, ÔÓÙËÎË Â-
ÊÛ Ëı Û„ÎÓ‚ ËÁ Ì ÏÓÊÌÓ ÔÂÂÌÂÒÚË Ì‡ Ì·Óθ¯ÓÈ
Í‚‡‰‡ÚÌ˚È ÍÛÒÓÍ ËÁ ·˚ÒÚÓÂÊÛ ÂÈ ÒÚ‡ÎË ‰Îfl ÔË-
ÏÂÌÂÌËfl ‚ ͇˜ÂÒÚ‚Â ¯‡·ÎÓ̇ ÔË ËÁ„ÓÚÓ‚ÎÂÌËË Ë Á‡-
ÚӘ͠ÒÓ·ÒÚ‚ÂÌÌ˚ı ÚÓ͇Ì˚ı ÂÁˆÓ‚. á‰ÂÒ¸ ‚ ͇˜ÂÒÚ-
‚ ÔËχ ˜¸ ˉÂÚ Ó ÔflÏÓÏ Ô‡‚ÓÒÚÓÓÌÌÂÏ Ó·-
‰ËÓ˜ÌÓÏ ÂÁˆÂ. èÛÌÍÚË̇fl ÎËÌËfl ÔÓ͇Á˚‚‡ÂÚ ÔÂ-
‚Ó̇˜‡Î¸ÌÛ˛ ÙÓÏÛ ÔÛÚ͇ ÔÓ‰ ÂÁˆ. ì„Î˚ 1, 2 Ë 3
ÒÛÏχÌÓ ‚Ò„‰‡ Ó·‡ÁÛ˛Ú Û„ÓÎ 90°. ì„ÓÎ 1 fl‚ÎflÂÚÒfl
·ÓÍÓ‚˚Ï Ô‰ÌËÏ Û„ÎÓÏ ÂÁ‡ÌËfl, Û„ÓÎ 2 - ÍÎËÌÓ‚˚Ï
Û„ÎÓÏ Ë Û„ÓÎ 3 - Á‡‰ÌËÏ Û„ÎÓÏ.
ÑÎfl ÔÓ‰‰ÂÊÍË ÚÂÌËfl ̇ ÏËÌËχθÌÓ ‚ÓÁÏÓÊÌÓÏ
ÛÓ‚ÌÂ, Á‡Ú‡˜Ë‚‡˛ÚÒfl   ‰‚‡ ‰ÓÔÓÎÌËÚÂθÌ˚ı Á‡‰-
ÌËı ۄ· - Û„ÓÎ 4 Ë 6. äÓÏ ÚÓ„Ó, ‰Ó·‡‚ÎflÂÚÒfl  Â
ã„ÍËÈ é·˚˜Ì˚È
íflÊÂÎ˚È
íËÔ Û„Î‡ ÂÁˆ‡ ÂÊËÏ ÂÊËÏ ÂÊËÏ
Åêë
íëë
Åêë
íëë
Åêë
íëë
ÅÓÍÓ‚ÓÈ Ô‰ÌËÈ
Û„ÓÎ ÂÁ‡
1 10 10 5 5 0
ᇉÌËÈ Û„ÓÎ
8 6 7 5 6 4
äÎËÌÓ‚˚È Û„ÓÎ
70 74 73 80 79 86
Ferm 61
ELEKTRISCHER NSCHLUß
Nachdem die Maschine endgültig aufgestellt ist, muß ein
Anschluß an die Elektroinstallation erfolgen. Die
Drehmaschine ist für das bestehende 30 Volt
Wechselstromnetz ausgelegt und hat kein größeres
Vermögen als andere große Haushaltsapparate mit
Motor. Lassen Sie eine geerdete Wandsteckdose in
unmittelbarer Nähe der Drehmaschine installieren und
sorgen Sie dafür, daß das Elektrokabel der Maschine
ohne Knicke oder Spannungen zur Steckdose geführt
werden kann. Nötigenfalls kann ein geerdetes
Verlängerungskabel benutzt werden. Achten Sie aber
darauf, daß das Kabel vollständig ausgerollt ist und es
nicht im Weg liegt oder hängt.
VOR IN BETRIEBN HME
Zum Transport wurde die Maschine mit einer speziellen
rostabwehrenden Lage eingeschmiert. Diese Lage hat
keine schmierende Wirkung und muß mit Lappen
entfernt werden. Sie können dies mit einem nicht
agressiven Lösemittel tun, z. B. Terpentin oder
Petroleum. Abhängend von Ihrer Kenntnis von
Metallbearbeitungsmaschinen können Sie die
verschiedenen Unterteile demontieren, kontrollieren
und mit einem leichten Maschinenöl (zum Beispiel
säurefreiem Nähmaschinenöl) einölen. Danach führen
Sie die komplette Unterhaltstabelle aus Kapitel 13
“Unterhalt” sorgfältig aus.
UFSTELLUNG
Abb.5 & 15
Tab.1
Wenn alle Vorbereitungen getroffen sind, kann die
Maschine durch Einstöpseln des Steckers in die
Steckdose ans Stromnetz angeschlossen werden.
Ersatzteil
Spindel
oberschlitten
Oberschlitten
Spindel
Querschlitten
Querschlitten
Vorschub/
leitspindel
Reitstock
Spiel aufheben
Vordere Sicherungsmutter
lösen, hintere Sicherungsmutter
im Uhrzeigersinn verdrehen, bis
Spiel minimal ist, Vierteldrehung
zu-rückdrehen und vordere
Sicherungsmutter andrehen.
Sicherungsmuttern lösen,
Stellschrauben im Uhrzeigersinn
andrehen, bis Spiels minimal ist.
Sicherungsmuttern anziehen.
Siehe spindel
Drehstahlsupport
Siehe Oberschlitten
Vordere Sicherungsmutter
lösen und hintere
Sicherungsmutter andrehen, bis
Spiel nicht mehr merkbar ist,
Viertelschlag zuruckdrehen und
vordere Sicherungs-mutter
anziehen.
Klemmmutter lösen, beide
Stellschrauben an beiden Seiten
der Fußplatte einen
Viertelschlag losdrehen, Reit-
stock mit Stellschrauben
verschieben, bis die
Markierungen auf der rechten
Seite des Reitstocks
übereinstim-men,
Stellschrauben wieder leicht
andrehen, ohne den Reitstock
zu verschieben,
Klemmutter festklemmen.
Recources
Hook
spanners
Screw-driver,
open end
wrench
Idem
Idem
Idem
Screw-driver,
open end
wrench
16 Ferm

χÂÚÒfl. äÓÔÛÒ Ô‰ÌÂÈ ·‡·ÍË ‡Á‰ÂÎÂÌ Ì‡ ˜‡ÒÚË.
ÇÂıÌflfl ˜‡ÒÚ¸ ÔÓÒ‰ÒÚ‚ÓÏ Â„ÛÎËÓ‚Ó˜Ì˚ı ‚ËÌÚÓ‚
ÏÓÊÂÚ Â„ÛÎËÓ‚‡Ú¸Òfl ‚ ÒÚÓÓÌ˚ ÓÚÌÓÒËÚÂθÌÓ
ÌËÊÌÂÈ ˜‡ÒÚË. Å·„Ó‰‡fl ˝ÚÓÏÛ ‚ÓÁÏÓÊ̇ ̇ÒÚÓÈ͇
‚ ÔÓÎÓÊÂÌË fl‰ÓÏ Ò ˆÂÌÚËÛ˛ ÂÈ ÎËÌËÂÈ. é·˚˜-
Ì˚ ÔÂÂÏ ÂÌËfl ‚ ÔÓ‰ÓθÌÓÏ Ì‡Ô‡‚ÎÂÌËË Ì ‚ÎÂ-
ÍÛÚ Á‡ ÒÓ·ÓÈ ÌÂÓ·ıÓ‰ËÏÓÒÚË ·ÓÍÓ‚ÓÈ Â„ÛÎËÓ‚ÍË.
äéåÅàçàêéÇÄççõâ ìáÖã «èÖêÖÑÄ-
óÄ/ÇÄã èéÑÇéÑÄ»
êËÒ.3 Ë 4
ÑÎfl ÔÓÎÛ˜ÂÌËfl ıÓÓ¯Â„Ó Í‡˜ÂÒÚ‚‡ ÔÓ‚ÂıÌÓÒÚË
ËÏÂÂÚ Á̇˜ÂÌË ԇ‚ËθÌÓÒÚ¸ Ë, ÔÂʉ ‚Ò„Ó, ÌÂËÁ-
ÏÂÌÌÓÒÚ¸ ÒÍÓÓÒÚË ÔÓ‰‡˜Ë. èË ‡·ÓÚ ‚ Û˜ÌÓÏ Â-
ÊËÏÂ Ò ‰ÎËÌÌ˚ÏË Á‡„ÓÚӂ͇ÏË ˝ÚÓ ÔÓ˜ÚË Ì‚ÓÁÏÓÊ-
ÌÓ. èÓÒ‰ÒÚ‚ÓÏ ÙËÍÒ‡ˆËË Á‡ÔÓÌÓÈ „‡ÈÍË ÒÛÔÔÓÚ
‚ıÓ‰ËÚ ‚ Á‡ˆÂÔÎÂÌËÂ Ò ÂÁ¸·ÓÈ Ô‰‡˜Ë. äÓ„‰‡ ÔÂ-
‰‡˜‡ ‚Íβ˜‡ÂÚÒfl, ÚÓ Ó̇ ‚ Ò‚Ó˛ Ә‰¸ ÒÓ‰ËÌfl-
ÂÚÒfl Ò ÓÒÌÓ‚Ì˚Ï ‚‡ÎÓÏ. èË ˝ÚÓÏ ÒÓÁ‰‡ÂÚÒfl Á‡ˆÂÔÎÂ-
ÌËÂ Ò ÔÓÏÂÊÛÚÓ˜Ì˚Ï ÁÛ·˜‡Ú˚Ï ÍÓÎÂÒÓÏ ÏÂÊ‰Û ‚Â-
‰Û ËÏ ÍÓÎÂÒÓÏ Ô‰‡˜Ë Ë ‚Â‰Û ËÏ ÍÓÎÂÒÓÏ ÔÓ-
‰ÓθÌÓÈ Ì‡Ô‡‚Îfl˛ ÂÈ ‚ Ô‰ÌÂÈ ·‡·ÍÂ. ùÚÓ ÔÓ-
ËÒıÓ‰ËÚ ·Î‡„Ó‰‡fl ̇ÒÚÓÈÍ „ËÚ‡˚ ÒÏÂÌÌ˚ı ¯ÂÒ-
ÚÂÂÌÓÍ (ÒÏ. ËÒ. 3 Ë 4).
èË Í‡Ê‰ÓÏ ÔÓ‚ÓÓÚ „·‚ÌÓ„Ó ‚‡Î‡ ÒÛÔÔÓÚ ÔÂÂ-
Ï ‡ÂÚÒfl ̇ ÓÔ‰ÂÎÂÌÌÓ ‡ÒÒÚÓflÌË ‚‰Óθ ÒÚ‡ÌË-
Ì˚. ùÚÓ ‡ÒÒÚÓflÌË Á‡‚ËÒËÚ ÓÚ ÂÁ¸·˚ Ë ‚˚·‡ÌÌÓ„Ó
ÁÛ·˜‡ÚÓ„Ó ÍÓÎÂÒ‡ ̇ Ô‰‡˜Â. èÓÒ‰ÒÚ‚ÓÏ ‚˚·Ó‡
‰Û„Ó„Ó ÒÏÂÌÌÓ„Ó ÁÛ·˜‡ÚÓ„Ó ÍÓÎÂÒ‡ ÏÓÊÂÚ ·˚Ú¸ ÔÓ‰-
„ÛÎËÓ‚‡Ì‡ ‚Â΢Ë̇ ÒÍÓÓÒÚË ÔÓ‰‡˜Ë.
èË Ì‡ÂÁÍ ÂÁ¸·˚, ‚ ÔË̈ËÔÂ, ÔÓËÒıÓ‰ËÚ ÚÓ ÊÂ
Ò‡ÏÓÂ, Ӊ̇ÍÓ Ò „Ó‡Á‰Ó ·Óθ¯ËÏ ÔÂÂÏ ÂÌËÂÏ
ÒÛÔÔÓÚ‡ ÔË ·ÓΠÌËÁÍÓÈ ÒÍÓÓÒÚË „·‚ÌÓ„Ó ‚‡Î‡. Ç
˝ÚÓÏ ÒÎÛ˜‡Â ‰ÓÎÊÌÓ ÔÓËÒıÓ‰ËÚ¸ ÒÓ‰ËÌÂÌË Ò
ÂÁ¸·Ó̇ÂÁÌ˚Ï Ô˂ӉÓÏ Ô‰ÌÂÈ ·‡·ÍË. èÓÁË-
ˆËÓÌËÓ‚‡ÌË ÁÛ·˜‡Ú˚ı ÍÓÎÂÒ ÓÒÛ ÂÒÚ‚ÎflÂÚÒfl ·Î‡-
„Ó‰‡fl ÛÒÚ‡ÌÓ‚Í ÍÓΈ ̇ ‚‡ÎÛ ÔÓ‰‚Ó‰‡ ÂÁˆ‡ Ë Ì‡
ÓÒË ÔÓÏÂÊÛÚÓ˜ÌÓ„Ó ÁÛ·˜‡ÚÓ„Ó ÍÓÎÂÒ‡ „ËÚ‡˚. Ç
˝ÚÓÏ ÒÎÛ˜‡Â ÔÂÂıÓ‰ ÒÏÂÌÌÓ„Ó ÁÛ·˜‡ÚÓ„Ó ÍÓÎÂÒ‡ ̇
Ô‰‡˜Â ‰Â·ÂÚ ‚ÓÁÏÓÊÌ˚Ï ‚˚·Ó ¯‡„‡ ̇ÂÁ‡ÂÏÓÈ
ÂÁ¸·˚. 艇˜‡ Ì ËÏÂÂÚ ‡‚ÚÓχÚ˘ÂÒÍÓ„Ó ‚˚Íβ-
˜‡ÚÂÎfl. èÓ˝ÚÓÏÛ ‚˚ ‰ÓÎÊÌ˚ Ò‡ÏË ÓÒÛ ÂÒÚ‚ÎflÚ¸ Ò‚ÓÂ-
‚ÂÏÂÌÌÓ ÓÚÍβ˜ÂÌË ‚Ó ËÁ·ÂʇÌË ÍÓÌÚ‡ÍÚ‡ ÂÁ-
ˆ‡ Ò Ô‡ÚÓÌÓÏ.
èêàÇéÑ
êËÒ.5
í‡Í Í‡Í ÔËÏÂÌflÂÏ˚È ˝ÎÂÍÚÓ‰‚Ë„‡ÚÂθ ӷ·‰‡ÂÚ
ÙËÍÒËÓ‚‡ÌÌÓÈ Ë ÓÚÌÓÒËÚÂθÌÓ ‚˚ÒÓÍÓÈ ÒÍÓÓÒÚ¸˛
‚‡ ÂÌËfl, ÚÓ ÍÓÌÒÚÛ͈Ëfl Ô‰‡˜Ë ÛÒÚÓÂ̇ Ú‡Í,
˜ÚÓ·˚ ‚ ÚÓ Ê ‚ÂÏfl ÔÓÌËʇڸ ÒÍÓÓÒÚ¸ ‚‡ ÂÌËfl.
äÓÏ ÚÓ„Ó, Á‡ Ò˜ÂÚ ËÒÔÓθÁÓ‚‡ÌËfl ÌÂÒÍÓθÍËı ¯ÍË-
‚Ó‚ Ë ÔÓÏÂÊÛÚÓ˜ÌÓ„Ó ¯ÍË‚‡ ÒÍÓÓÒÚ¸ ‚‡ ÂÌËfl
ËÏÂÂÚ 6-¯‡„Ó‚Û˛ ÔÓÒΉӂ‡ÚÂθÌÛ˛ „ÛÎËÓ‚ÍÛ.
ÑÎfl ÛÒÚ‡ÌÂÌËfl ‚ÓÁÏÓÊÌÓÈ ‡ÁÌˈ˚ ̇ÚflÊÂÌËfl
ÂÏÌÂÈ Ô‰ÛÒÏÓÚÂÌÓ Ì‡Î˘Ë ÔÂÂÏÂÌÌÓ„Ó ÔË-
ÊËÏÌÓ„Ó ÂÏÂÌÌÓ„Ó ÓÎË͇, ÒÏÓÌÚËÓ‚‡ÌÌÓ„Ó Ì‡
ÔÓ‰¯ËÔÌËÍ (ëÏ. ËÒ. 5). ÑÎfl ‰ÓÒÚËÊÂÌËfl ÚÂı ‚˚Ò-
¯Ëı ÒÍÓÓÒÚÂÈ ¯ÔË̉ÂÎfl Ò‡Ï˚È Ô‚˚È ÂÏÂ̸ ÒÎÂ-
‰ÛÂÚ ÔÂÂÒÚ‡‚ËÚ¸ Ò ÔÓÏÂÊÛÚÓ˜ÌÓ„Ó ¯ÍË‚‡ ̇ ¯ÍË‚
‰‚Ë„‡ÚÂÎfl. èÓÏÂÊÛÚÓ˜Ì˚È Ô˂Ӊ fl‚ÎflÂÚÒfl ‚‰Ó-
Ï˚Ï Ë ÒÎÛÊËÚ ‚ ͇˜ÂÒÚ‚Â «Ï‡ıÓ‚Ë͇» ‰Îfl ÍÓÏÔÂÌÒ‡-
ˆËË ËÁÏÂÌÂÌËÈ Ì‡„ÛÁÍË.
éëçéÇçõÖ èêàçñàèõ íéäÄêçéâ éÅ-
êÄÅéíäà
è‰ ̇˜‡ÎÓÏ ÚÓ͇ÌÓÈ Ó·‡·ÓÚÍË Ç˚ ‰ÓÎÊÌ˚
ËÏÂÚ¸ Ô‰ÒÚ‡‚ÎÂÌËÂ Ó ‚‡ÊÌÂȯËı ·‡ÁÓ‚˚ı ÔÓÌflÚË-
flı. Ç ÔÓÚË‚ÌÓÏ ÒÎÛ˜‡Â ÂÒÚ¸ ËÒÍ ‚˚·Ó‡ ÌÂÔ‡‚Ëθ-
ÌÓÈ ÒÍÓÓÒÚË Ó·‡·ÓÚÍË ËÎË Ì‚ÂÌÓ„Ó ÂÁˆ‡. Å·-
„Ó‰‡fl ·Óθ¯ÓÏÛ ˜ËÒÎÛ Ú‡·Îˈ Ë Ô‡‚ËÎ ÔÓˆÂÒÒ
ÔÓ‰„ÓÚÓ‚ÍË ÒÚ‡Ì͇ Í ÚÓ͇ÌÓÈ Ó·‡·ÓÚÍ ӷ΄˜‡ÂÚ-
Òfl.
áÄäêÖèãÖçàÖ áÄÉéíéÇäà
êËÒ.6 - 8
èӈ‰ۇ Á‡ÚflÊÍË Á‡„ÓÚÓ‚ÍË ‰ÓÎÊ̇ ÓÒÛ ÂÒÚ‚-
ÎflÚ¸Òfl Ò ÓÒÚÓÓÊÌÓÒÚ¸˛. ÇÒÚ‡‚¸Ú Á‡„ÓÚÓ‚ÍÛ ‰Ó ÛÔÓ-
‡ ‚ Á‡ÊËÏÌÓÈ Ô‡ÚÓÌ Ë Á‡ÚflÌËÚ ԇÚÓÌ Ò ÔÓÏÓ ¸˛
ÒÔˆˇθÌÓ„Ó Á‡ÊËÏÌÓ„Ó Íβ˜‡. èË Ó˜Â̸ ÚÛ„ÓÏ Á‡-
Úfl„Ë‚‡ÌËË ÏÓ„ÛÚ ·˚Ú¸ ÔÓ‚ÂʉÂÌ˚ Ò‡Ï Ô‡ÚÓÌ, „Ó
ÍÛ·˜ÍË ËÎË Á‡„ÓÚӂ͇. ùÚÓ Ú‡ÍÊ ‡ÒÔÓÒÚ‡ÌflÂÚÒfl
̇ ˆÂÌÚ Á‡‰ÌÂÈ ·‡·ÍË. Ö„Ó ÒΉÛÂÚ ÒËθÌÓ Á‡ÍÛÚËÚ¸
‚Û˜ÌÛ˛, ÌÓ ÌÂ Ò ˜ÂÁÏÂÌ˚Ï ÛÒËÎËÂÏ. çÂÍÓÚÓ˚Â
ÔËÏÂ˚ Á‡ÚflÊÍË Á‡„ÓÚÓ‚ÍË, ÔË ÍÓÚÓ˚ı Ó‰Ë̇ÍÓ-
‚Ó ÔÓÌflÚÌ˚Ï ÒÚ‡ÌÓ‚ËÚÒfl ËÒÔÓθÁÓ‚‡ÌË ҂ÂÎ Ë ÂÁ-
ˆÓ‚, Ç˚ ÏÓÊÂÚ ۂˉÂÚ¸ ̇ ËÒ. 6, 7 Ë 8.
èÓ͇Á‡ÌÌ˚È Ì‡ ËÒÛÌÍ Òڇ̉‡ÚÌ˚È ÚÂıÍÛ·˜ÍÓ-
‚˚È Ô‡ÚÓÌ fl‚ÎflÂÚÒfl Ò‡ÏÓˆÂÌÚÛ˛ ËÏÒfl. Å·„Ó‰‡fl
˝ÚÓÏÛ ÓÒ¸ ÍÓÓÚÍÓÈ Á‡„ÓÚÓ‚ÍË ÚÓ˜ÌÓ ÒÓ‚Ô‡‰‡ÂÚ Ò
ˆÂÌÚËÛ˛ ÂÈ ÎËÌËÂÈ, ‰‡Ê ÂÒÎË Ì ËÒÔÓθÁÛÂÚÒfl
ÔÓÚË‚ÓÔÓÎÓÊÌ˚È ÛÔÓÌ˚È ˆÂÌÚ. ä Á‡ÊËÏÌÓÏÛ Ô‡-
ÚÓÌÛ ÓÚÌÓÒËÚÒfl ‚ÌÛÚÂÌÌflfl (ÔÓ͇Á‡Ì‡ ̇ ËÒÛÌÍÂ) Ë
‚̯Ìflfl ÚӘ͇ „ÛÎËÓ‚ÍË ÍÛ·˜Í‡. èÓÒΉÌË ËÒ-
ÔÓθÁÛ˛ÚÒfl ‰Îfl ‚ÌÛÚÂÌÌÂ„Ó Á‡ı‚‡Ú‡ Á‡„ÓÚÓ‚ÓÍ Ò
·Óθ¯ËÏ ‰Ë‡ÏÂÚÓÏ. ä‡Ê‰˚È ÍÛ·˜ÓÍ ‚ Ô‡ÚÓÌÂ
ËÏÂÂÚ Ò‚Ó ÔÓÒÚÓflÌÌÓ ÏÂÒÚÓ. ë‡ÏË Â„ÛÎËÓ‚Ó˜-
Ì˚ ÚÓ˜ÍË ÍÛ·˜Í‡ Ë Ëı ÏÂÒÚ‡ ÔÓÌÛÏÂÓ‚‡Ì˚!
ç‡ ËÒ. 6 ÔÓ͇Á‡ÌÓ ËÒÔÓθÁÓ‚‡ÌË ԇ‚ÓÒÚÓÓÌÌ„Ó
ÂÁˆ‡ (̇‚ÂıÛ) ‰Îfl Ó·‡·ÓÚÍË ·ÓÍÓ‚ÓÈ ÔÓ‚ÂıÌÓÒ-
ÚË Ë Ô‡‚Ó„Ó ËÁÓ„ÌÛÚÓ„Ó ˜ÂÌÓ‚Ó„Ó ÂÁˆ‡. ëÚÂÎÍË
Û͇Á˚‚‡˛Ú ̇ԇ‚ÎÂÌË ÔÓ‰‚Ó‰‡ ÂÁˆ‡. óÂÌÓ‚ÓÈ
ÂÁˆ ÏÓÊÂÚ ÔËÏÂÌflÚ¸Òfl Í‡Í ‚ ÔÓ‰ÓθÌÓÏ, Ú‡Í Ë ‚
ÔÓÔ˜ÌÓÏ Ì‡Ô‡‚ÎÂÌËË Ë Á‡˜‡ÒÚÛ˛ ËÒÔÓθÁÛÂÚÒfl ‚
͇˜ÂÒÚ‚Â Ó·‰ËÓ˜ÌÓ„Ó ‰Îfl ·˚ÒÚÓ„Ó Û‰‡ÎÂÌËfl ·Óθ-
¯Ó„Ó ÍÓ΢ÂÒÚ‚‡ χÚ¡·. êËÒ. 7 ÔÓÁ‚ÓÎflÂÚ Û‚Ë‰ÂÚ¸
ÒÔÓÒÓ· ËÒÔÓθÁÓ‚‡ÌËfl ΂ÓÒÚÓÓÌÌÂ„Ó ÂÁˆ‡ (̇-
‚ÂıÛ) ‰Îfl Ó·‡·ÓÚÍË ·ÓÍÓ‚ÓÈ ÔÓ‚ÂıÌÓÒÚË Ë ÂÁˆ‡
‰Îfl ‡ÒÒ‚ÂÎË‚‡ÌËfl ÌÂÒÍ‚ÓÁÌ˚ı ÓÚ‚ÂÒÚËÈ. êËÒ. 8 ËÎ-
βÒÚËÛÂÚ Á‡ÊËÏ ÌÂÔÓ‰‚ËÊÌ˚Ï ˆÂÌÚÓÏ Á‡‰ÌÂÈ
·‡·ÍË. ÑÎfl ˜ËÒÚÓ‚ÓÈ Ó·‡·ÓÚÍË ËÒÔÓθÁÛÂÚÒfl ÔËÍÓ-
Ó·‡ÁÌ˚È ÂÁˆ. çËÊ Ô‰ÒÚ‡‚ÎÂÌ Á‡ı‚‡Ú ÒÔˇθ-
ÌÓ„Ó Ò‚Â· ‰Îfl ‚˚Ò‚ÂÎË‚‡ÌËfl ÓÚ‚ÂÒÚËfl. 艂‡-
ËÚÂθÌÓ ÒΉÛÂÚ Ì‡ÏÂÚËÚ¸ ÓÚ‚ÂÒÚËÂ Ò ÔÓÏÓ ¸˛
ˆÂÌÚÓ‚Ó˜ÌÓ„Ó Ò‚Â·. ñÂÌÚÓ‚Ó˜ÌÓ ҂ÂÎÓ - ˝ÚÓ
Ú‡ÍÓ ҂ÂÎÓ, ı‚ÓÒÚÓ‚ËÍ ÍÓÚÓÓ„Ó „Ó‡Á‰Ó ÚÓÎ Â,
˜ÂÏ ÍÂÒÚÓ‚Ë̇. èÓÎۘ˂¯ÂÂÒfl ÔÓÒΠڇÍÓ„Ó ‡ÁÏÂ-
ÚÓ˜ÌÓ„Ó Ò‚ÂÎÂÌËfl ÓÚ‚ÂÒÚË ÒÎÛÊËÚ ˆÂÌÚËÛ˛-
ËÏ ÓÚ‚ÂÒÚËÂÏ, Í‡Í ‰Îfl ÛÔÓÌÓ„Ó ˆÂÌÚ‡, Ú‡Í Ë ‰Îfl
҂·.
60 Ferm
Kontrollieren Sie vorab, ob der Netzschalter AUS und
die Drehrichtung nach RECHTS steht. Überprüfen Sie
nochmals das Peilglas, ob der Ölstand nicht verändert ist
und füllen Sie gegebenenfalls so viel Öl nach, bis das
Peilglas halb voll ist. Sorgen Sie dafür, daß kein Papier
oder Putzlappen vor den Lüftungsöffnungen des Motors
liegt. Kontrollieren Sie das Dreibackenfutter und sorgen
Sie dafür, daß die Spannbacken nicht aus dem
Spannfutter fliegen können.
Legen Sie den Spannfutterschlüssel an einen
festen Platz
Öffnen Sie den Schutzkasten und kontrollieren Sie und
Position und Spannung der Riemen. Vor dem
Probedrehen muß die niedrigste Drehgeschwindigkeit
gewählt werden. Eventuell den vordersten Riemen
verlegen (siehe Fig. 5 und 15). Drücken Sie den Schalter
ein und lassen Sie die Maschine 0 Minuten lang laufen.
Kontrollieren Sie regelmäßig, ob die Hauptlager des
Spindelstocks und des Motors nicht warm werden,
indem Sie die Maschine stoppen und eine Hand auf beide
Seiten des Spindelstocks und des Motorgehäuses legen.
Stoppen Sie direkt bei abweichenden Geräuschen und
unnormaler Wärmeentwicklung ( mehr als handwarm)
und nehmen Sie erst Kontakt mit Ihrem Lieferanten auf.
Schalten Sie jetzt auf höhere Geschwindigkeiten und
lassen Sie die Maschine darauf wiederum einige Minuten
laufen. Tun Sie dies nochmals mit umgekehrter
Drehrichtung.
Wenn keine Probleme entstanden sind, ist die Maschine
einsatzbereit.
RBEITSWEISE
Abb.1
Das Verspanen erfolgt, indem eine Drehstahlspitze oder
eine Bohrspitze unter Kontrolle in das Werkstück
gedrückt wird, wodurch kleine Stückchen Metall- Späne
weggeschnitten werden. Hierzu muß das Werkstück
zwischen zwei festen Drehpunkten (dem Spindelstock
und Reitstock), die auf einer sehr präzisen gedachten
Linie liegen, eine drehende Bewegung machen (siehe
Abb. 11): die Zentrierlinie. Durch den Drehstahl, der auf
dem Support(5) befestigt ist, in einer geraden Linie per
Hand oder automatisch mit dem Vorschub(6) in einem
bestimmten Tempo am sich drehenden Werkstück
entlangzuführen, kann es über die gesamte Länge parallel
zur Zentrierlinie längsgedreht werden.
Um vom Werkstück Material wegnehmen zu können, ist
Kraft nötig. Diese Kraft wird vom Motor zu einer hohlen
Achse im Spindelstocküberbracht: die Hauptachse oder
Hauptspindel ( ).Im Zusammenhang mit dem
maximalen Motorvermögen, muß die Menge des
abzudrehenden Materials - die Spanstärke und
Spanbreite - angepaßt werden. Wenn die Tourenzahl zu
sehr fällt, muß entweder die Vorschubtiefe oder
Vorschubschnellheit verringert werden. Sonst besteht
die Gefahr von Motorschaden, kürzere Lebensdauer
des Drehstahls oder Drehstahlbruch. Auch der
Durchmesser des Werkstücks spielt hierbei eine Rolle.
Bei einem Durchmesser von 100 mm ist mehr Kraft
nötig, um einen Span von 1 mm zu schneiden als bei
einem Durchmesser von 10 mm.
Wenn der Reitstock (8) durch Querverstellung neben
die Zentrierlinie gebracht wird, kann eine äußere
konische Fläche gedreht werden. Eine extra
Bearbeitungsmöglichkeit beim Längsdrehen ist das
Schneiden eines Gewindes. Ein spezieller Drehstahl
schneidet eine spiralförmige Vertiefung in den Umfang
des Werkstückes. Ein Teil des Umfangs bleibt stehen
und der Höhenunterschied bildet das schließliche
Gewinde. Neben dem Längsdrehen können auch die
Enden eines Werkstückes plangedreht werden, zum
Beispiel, um sie flach und gerade zu machen. Kurze
Werkstücke können an einer Seite in einem festen
Drehpunkt, dem Dreibackenfutter befestigt werden
und an der anderen Seite rechtwinklig zur Zentrierlinie
bearbeitet werden. Die Spannbacken des Backenfutters
sorgen für Handhabung der gedachten Zentrierlinie.
Durch die Drehstahlverschiebung unter einem Winkel
durch Verstellen des Drehteils stattfinden zu lassen,
könnenaus- und inwendige konische Flächen gedreht
werden. In flache Oberflächen können mit dieser
Einspannung auch Bohrungen gemacht werden. Dazu
muß ein extra anzuschaffender Bohrkopf mit
Morsekegel in der Reitstockspitze (7) des Reitstocks
plaziert werden. Die Löcher können danach bis zur
gewünschten Tiefe, Durchmesser und Form ausgebohrt
werden.
Die Präzision des Werkstückes ist zuerst und vor
allem abhängig von Fachkenntnis und Erfahrung.
Beim Drehen können viele Faktoren das Endresultat
beeinflussen wie zum Beispiel Art und Zustand der
Drehstähle die Art des zu bearbeitenden Materials die
Dreh- und Ansetzgeschwindigkeiten die Befestigung des
Werkstücks die Aufstellung und der Zustand in der sich die
Maschine befindet. Mit der MD-500 ist es möglich
langlebige Werkstücke mit großer Präzision anzufertigen
wenn alle Umstände perfekt sind.
FÜR DEN BEGINNENDEN DREHER
Beim Drehen können große Kräfte auf bestimmte
Unterteile einwirken. Bei nicht korrektem Gebrauch
können diese Unterteile beschädigt oder verformt
werden und viel schneller verschleißen, selbst wenn sie
noch so fachkundig entworfen und gefertigt wurden.
Hierdurch wird die Genauigkeit der Drehmaschine
stark abnehmen, was einen direkten Einfluß auf die
Qualität und Präzision Ihrer Werkstücke hat. Es ist also
wichtig, daß die Maschine fachgerecht bedient wird.
Angeraten wird, wenn sie kein erfahrener Dreher sind,
mit einfachen Werkstücken zu beginnen und die
verschiedenen Möglichkeiten der Drehmaschine mit
Probearbeiten auszuprobieren. Es ist lehrreich,
erfahrenen Drehern zuzusehen, denn kein Meister ist
vom Himmel gefallen! Um Enttäuschungen zu
vermeiden, müssen Sie sich die Basisprinzipien des
Drehens erst einmal zu eigen machen. rehen ist nicht
umsonst ein Fachberuf.
Ferm 17

Ë ËÁ„ÓÚÓ‚ÎÂÌ˚. èÓ ˝ÚÓÈ Ô˘ËÌ ÒÛ ÂÒÚ‚ÂÌÌÓ ÒÌË-
ʇÂÚÒfl ÚÓ˜ÌÓÒÚ¸ ÚÓ͇ÌÓ„Ó ÒÚ‡Ì͇, ˜ÚÓ Ì‡ÔflÏÛ˛
‚ÎËflÂÚ Ì‡ ÚÓ˜ÌÓÒÚ¸ Ë Í‡˜ÂÒÚ‚Ó Ç‡¯Ëı Á‡„ÓÚÓ‚ÓÍ. í‡-
ÍËÏ Ó·‡ÁÓÏ, ‚‡ÊÌ˚Ï Ù‡ÍÚÓÓÏ fl‚ÎflÂÚÒfl ‰ÓÎÊÌ˚È
ÛıÓ‰ Ë Ôӂ‰ÂÌË ÚÂıÓ·ÒÎÛÊË‚‡ÌËfl ÒÚ‡Ì͇. ÖÒÎË Ç˚
  Ì ӘÂ̸ ÓÔ˚ÚÌ˚È ÚÓ͇¸, ÚÓ ÂÍÓÏẨÛÂÏ Ç‡Ï
̇˜Ë̇ڸ Ò ÔÓÒÚ˚ı Á‡„ÓÚÓ‚ÓÍ Ë ÓÔÓ·Ó‚‡Ú¸ ‡Á΢-
Ì˚ ‚ÓÁÏÓÊÌÓÒÚË ÒÚ‡Ì͇ Ò ÔÓÏÓ ¸˛ ÔÓ·Ì˚ı ‚ˉӂ
Ó·‡·ÓÚÍË. é˜Â̸ ÔÓÎÂÁÌ˚Ï fl‚ÎflÂÚÒfl ̇·Î˛‰ÂÌËÂ
Á‡ ‡·ÓÚÓÈ ÓÔ˚ÚÌ˚ı ÚÓ͇ÂÈ, ÔÓÚÓÏÛ ˜ÚÓ Ï‡ÒÚ‡ÏË
Ì Óʉ‡˛ÚÒfl, χÒÚ‡ÏË ÒÚ‡ÌÓ‚flÚÒfl! ÇÓ ËÁ·ÂʇÌËÂ
‡ÁÓ˜‡Ó‚‡ÌËÈ ÒΉÛÂÚ ‚ ÔÂ‚Û˛ Ә‰¸ ÓÒ‚ÓËÚ¸
·‡ÁÓ‚˚ ÔË̈ËÔ˚ ÚÓ͇ÌÓÈ Ó·‡·ÓÚÍË. èÓÙÂÒÒËfl
ÚÓ͇fl Ì ڇ͇fl ÔÓÒÚ‡fl, Í‡Í ÏÓÊÂÚ ÔÓ͇Á‡Ú¸Òfl.
ä‡Í Ô‡‚ËÎÓ, ‚ ·Ë·ÎËÓÚÂ͇ı Ë ÍÌËÊÌ˚ı χ„‡ÁË̇ı Ç˚
̇ȉÂÚ ‚ ‰ÓÒÚ‡ÚÓ˜ÌÓÏ ÍÓ΢ÂÒÚ‚Â ÒÔ‡‚Ó˜ÌÛ˛ ÎË-
Ú‡ÚÛÛ ÔÓ ÏÂÚ‡ÎÎÓÓ·‡·ÓÚÍÂ. äÓÏ ÚÓ„Ó, ÒÛ ÂÒÚ-
‚Û˛Ú ÊÛ̇Î˚ ÔÓ ÏÓ‰ÂÎËÓ‚‡Ì˲, ÍÓÚÓ˚ „ÛÎfl-
ÌÓ Ô˯ÛÚ Ì‡ ˝ÚÛ ÚÂÏÛ. çÓ Â Â ÎÛ˜¯Â, ÂÒÎË Ç˚ ÔËÓ·-
ÂÚÂÚ ÚÂıÌ˘ÂÒÍËÈ Û˜Â·ÌËÍ, Ì ·Â‰‡, ‰‡Ê ÂÒÎË ÌÂ-
ÒÍÓθÍÓ ÛÒڇ‚¯ËÈ. Ç ÌÂÏ, ÔÓÏËÏÓ Ó· Ëı ÔË̈Ë-
ÔÓ‚ ÚÓ͇ÌÓÈ Ó·‡·ÓÚÍË, ËÏÂÂÚÒfl ·Óθ¯Ó ÍÓ΢Â-
ÒÚ‚Ó ˆÂÌÌÓÈ ËÌÙÓχˆËË Ë ÔÓÎÂÁÌ˚ı Ó·ÁÓÓ‚ ÔÓ-
·ÎÂÏ Ò ‚ÓÁÏÓÊÌ˚ÏË Ô˘Ë̇ÏË Ë Ëı ¯ÂÌËflÏË.
èêàçñàè êÄÅéíõ ëíÄçäÄ
êËÒ. 1
óÚÓ·˚ ‡ÒÒÏÓÚÂÚ¸ ÔË̈ËÔ ‡·ÓÚ˚ ÒÚ‡Ì͇, ÎÛ˜¯Â
‚ÒÂ„Ó ‡Á·ËÚ¸ Â„Ó Ì‡ ÌÂÒÍÓθÍÓ ÓÒÌÓ‚Ì˚ı „ÛÔÔ Ë
ÍÓÏÔÓÌÂÌÚÓ‚ Ò ÒÓÓÚ‚ÂÚÒÚ‚Û˛ ËÏË ÒÔˆËÙ˘ÂÒÍËÏË
ÙÛÌ͈ËflÏË (ÒÏ. ËÒ. 1).
ëíÄçàçÄ ëíÄçäÄ
êËÒ. 2
ëÚ‡ÌË̇ ÒÚ‡Ì͇ ÒÓ‰ËÌflÂÚ ‚Ò ˝ÚË ‰ÂÚ‡ÎË Ë ÔÓÏËÏÓ
‚ÒÂ„Ó Ó·Î‡‰‡ÂÚ Ë ‰Û„ËÏË ‚‡ÊÌ˚ÏË ÙÛÌ͈ËflÏË. ëÚ‡-
ÌË̇ (3) ËÁ„ÓÚÓ‚ÎÂ̇ ËÁ ‚˚ÒÓÍÓ͇˜ÂÒÚ‚ÂÌÌÓ„Ó ÒÂÓ-
„Ó ˜Û„Û̇ Ë ÓÒ̇ Â̇ ÌÂÒÍÓθÍËÏË ÒÔÎÓ¯Ì˚ÏË ÔÓÔÂ-
˜Ì˚ÏË ˝ÎÂÏÂÌÚ‡ÏË ÊÂÒÚÍÓÒÚË. Å·„Ó‰‡fl ÍÓÌÒÚ-
Û͈ËË Ë ÚËÔÛ ÔËÏÂÌÂÌÌÓ„Ó Ï‡Ú¡· ÔÓËÒıÓ‰ËÚ
ÎÛ˜¯Â ÔÓ„‡¯ÂÌË ‚Ë·‡ˆËË, ‡ ‚˚Á˚‚‡ÂÏ˚ ̇„ÛÁ-
ÍÓÈ ‰ÂÙÓχˆËË Ò‚Ó‰flÚÒfl Í ÏËÌËÏÛÏÛ. ëÚ‡ÌË̇ ÓÒ-
̇ Â̇ ‰‚ÛÏfl ÓÚ¯ÎËÙÓ‚‡ÌÌ˚ÏË Ò ‚˚ÒÓÍÓÈ ÚÓ˜ÌÓÒ-
Ú¸˛ ÔÓ‚ÂıÌÓÒÚflÏË ÒÍÓθÊÂÌËfl ‰Îfl ÔÂÂÏ ÂÌËfl
ÒÛÔÔÓÚ‡ Ë Á‡‰ÌÂÈ ·‡·ÍË. ùÚË Ì‡Ô‡‚Îfl˛ ËÂ, Ӊ̇
ÔËÁχÚ˘ÂÒ͇fl, ‰Û„‡fl ÔÎÓÒ͇fl ÔÓ ÙÓÏÂ, Ó·ÂÒÔÂ-
˜Ë‚‡˛Ú ÔÓÒÚÓflÌÒÚ‚Ó ˆÂÌÚËÛ˛ ÂÈ ÎËÌËË (4). ëÏÓ-
ÚË ËÒ. 2.
ùãÖäíêéÑÇàÉÄíÖãú
ëÚ‡ÌÓÍ ÓÒ̇ ÂÌ Ó‰ÌÓÙ‡ÁÌ˚Ï ‡ÒËÌıÓÌÌ˚Ï ˝ÎÂÍÚ-
Ó‰‚Ë„‡ÚÂÎÂÏ ÔÂÂÏÂÌÌÓ„Ó ÚÓ͇ Ò ÍÓÓÚÍÓ-Á‡ÏÍÌÛ-
Ú˚Ï ÓÚÓÓÏ, ·ÂÁ Û„ÓθÌ˚ı ÂÚÓÍ Ë Ò ÔÛÒÍÓ‚˚Ï ÍÓÌ-
‰ÂÌÒ‡ÚÓÓÏ. т˄‡ÚÂθ Ì Ú·ÛÂÚ ÚÂıÌ˘ÂÒÍÓ„Ó Ó·-
ÒÎÛÊË‚‡ÌËfl Ë Ì ÌÛʉ‡ÂÚÒfl ‚ ͇ÍÓÏ-ÎË·Ó ÒÔˆˇθ-
ÌÓÏ ÛıÓ‰Â. ë ÔÓÏÓ ¸˛ ÍÎËÌӂˉÌ˚ı ÂÏÌÂÈ Ë ÏÌÓ-
„Ó‰ËÒÍÓ‚˚ı ÂÏÂÌÌ˚ı ¯Í˂ӂ ‚‡ ÂÌË ‰‚Ë„‡ÚÂÎfl
Ô‰‡ÂÚÒfl ̇ „·‚ÌÛ˛ ÓÒ¸.
èÖêÖÑçüü ÅÄÅäÄ
êËÒ. A
ãËÚ‡fl Ô‰Ìflfl ·‡·Í‡ (1) Á‡ÍÂÔÎÂ̇ ̇ ÒÚ‡ÌËÌ ÔÓ-
Ò‰ÒÚ‚ÓÏ ÔËÁχÚ˘ÂÒÍÓÈ Ì‡Ô‡‚Îfl˛ ÂÈ Ë ‰‚Ûı
Ô·̯‡È·. ç‡ Ó·‡ÚÌÓÈ ÒÚÓÓÌ ̇ıÓ‰ËÚÒfl χÒÎÓÒ-
ÔÛÒÍ̇fl „‡È͇. ä˚¯Í‡ ÏÓÊÂÚ ÒÌËχڸÒfl ‰Îfl ÔÓ‚Â-
‰ÂÌËfl ËÌÒÔÂ͈ËÓÌÌ˚ı ‡·ÓÚ Ë ÔÓÔÓÎÌÂÌËfl χÒ·. Ç
ÌËÊÌÂÈ ˜‡ÒÚË Ô‰ÌÂÈ ·‡·ÍË ‡ÒÔÓ·„‡ÂÚÒfl ÒËÒÚÂ-
χ ‚‡ ‡˛ ËıÒfl ‚‡ÎÓ‚ Ë ÁÛ·˜‡Ú˚ı ÍÓÎÂÒ. èÓÒ‰ÒÚ-
‚ÓÏ ˝ÚËı ÁÛ·˜‡Ú˚ı ÍÓÎÂÒ ÒÍÓÓÒÚ¸ „·‚ÌÓ„Ó ‚‡Î‡ ÔÓ-
ÌËʇÂÚÒfl Ë Ô‰‡ÂÚÒfl ̇ Ò‰‚ÓÂÌÌÛ˛ ÍÓ‡ÍÒˇθÌÛ˛
‚˚ıÓ‰ÌÛ˛ ÓÒ¸. ç‡ ˝ÚÓÈ ÓÒË Ì‡ıÓ‰flÚÒfl Ô˂Ӊ̇fl
¯ÂÒÚÂÌfl ‰Îfl ÔÓ‰‚Ó‰‡ Ë Ô˂Ӊ̇fl ¯ÂÒÚÂÌfl ‰Îfl ̇-
ÂÁÍË ÂÁ¸·˚ (ÒÏ. ËÒ. Ç). ç‡ Ô‰ÌÂÈ ·‡·Í ‡ÒÔÓ-
ÎÓÊÂ̇ ‚‡ÊÌÂȯ‡fl ˜‡ÒÚ¸ ÒÚ‡Ì͇ - „·‚Ì˚È ‚‡Î (2).
éÌ Á‡ÍÂÔÎÂÌ Ò ‚ÓÁÏÓÊÌÓÒÚ¸˛ ‚‡ ‡Ú¸Òfl ÔË ÔÓÏÓ-
Ë ‰‚Ûı ÍÓÌ˘ÂÒÍËı ÓÎËÍÓ‚˚ı ÔÓ‰¯ËÔÌËÍÓ‚ ‚ Á‡-
ÏÍÌÛÚÓÈ ÒËÒÚÂÏ ÓÚÍ˚ÚÓÈ ÒχÁÍË. ÇÒ ‚‡ ‡˛ ËÂ-
Òfl ‰ÂÚ‡ÎË ÒχÁ˚‚‡˛ÚÒfl ‚ χÒÎflÌÓÈ ‚‡ÌÌÂ. ìÓ‚Â̸
χÒ· ÏÓÊÌÓ ÍÓÌÚÓÎËÓ‚‡Ú¸ ˜ÂÂÁ ÓÍÓ¯ÍÓ Ì‡ ÔÂ-
‰ÌÂÈ ÒÚÓÓÌÂ. É·‚Ì˚È ‚‡Î ËÏÂÂÚ ÒÍ‚ÓÁÌÓ ÓÚ‚Â-
ÒÚËÂ, Ë Â„Ó Ô‡‚‡fl ÒÚÓÓ̇ ÓÒ̇ Â̇ ÍÂÔÂÊÌ˚Ï
Ù·̈ÂÏ Ë ÍÓÌÛÒÓÏ åÓÁ ‰Îfl Á‡ÊËÏÌÓ„Ó Ô‡ÚÓ̇ Ë
ÛÔÓÌÓ„Ó ˆÂÌÚ‡ ÒÓÓÚ‚ÂÚÒÚ‚ÂÌÌÓ.
ëìèèéêí
êËÒ. 1
ç‡ Ì‡Ô‡‚Îfl˛ Ëı ÒÍÓθÊÂÌËfl ̇ ÒÚ‡ÌËÌ Á‡ÍÂÔÎÂÌ
ÒÛÔÔÓÚ (5). éÌ Óڂ˜‡ÂÚ Á‡ ÍÓÌÚÓθ ÔÂÂÏ ÂÌËfl
ËÌÒÚÛÏÂÌÚ‡ ‚‰Óθ Á‡„ÓÚÓ‚ÍË. ë Ó‰ÌÓÈ ÒÚÓÓÌ˚ ÒÛÔ-
ÔÓÚ ÒÓÒÚÓËÚ ËÁ ÔÓ‰ÓθÌ˚ı ҇·ÁÓÍ Ò Ù‡ÚÛÍÓÏ ÒÛÔ-
ÔÓÚ‡. ùÚË Ò‡Î‡ÁÍË Ì‡ıÓ‰flÚÒfl ÌÂÔÓÒ‰ÒÚ‚ÂÌÌÓ Ì‡
ÒÚ‡ÌËÌÂ Ë Óڂ˜‡˛Ú Á‡ ÔÂÂÏ ÂÌË ‚ ÔÓ‰ÓθÌÓÏ
̇ԇ‚ÎÂÌËË. ùÚÓ ÔÂÂÏ ÂÌË ÏÓÊÂÚ ÓÒÛ ÂÒÚ‚-
ÎflÚ¸Òfl Í‡Í ‚ Û˜ÌÓÏ, Ú‡Í Ë ‚ ‡‚ÚÓχÚ˘ÂÒÍÓÏ ÂÊËχı
ÔÓÒ‰ÒÚ‚ÓÏ ‚‡Î‡ ÔÓ‰ÓθÌÓÈ ÔÓ‰‡˜Ë (6). Ç ÔÓÒΉ-
ÌÂÏ ÒÎÛ˜‡Â ·ÓÎÚ Ò Í‚‡‰‡ÚÌ˚Ï ÔÓ‰„ÓÎÓ‚ÍÓÏ ‰ÓÎÊÂÌ
Á‡ÔˇڸÒfl ‚ Ù‡ÚÛÍ ÒÛÔÔÓÚ‡. ç‡ ÔÓ‰ÓθÌ˚ı Ò‡-
·Á͇ı ÒÏÓÌÚËÓ‚‡Ì˚ ‚ÚÓ˚ ҇·ÁÍË, ÍÓÚÓ˚ ÓÚ‚Â-
˜‡˛Ú Á‡ ÔÂÂÏ ÂÌË ÂÁˆ‡ ‚ ÔÓÔ˜ÌÓÏ Ì‡Ô‡‚ÎÂ-
ÌËË. ë ÔÓÏÓ ¸˛ ¯ÔË̉ÂÎfl ÒÓ ÒΉfl ÂÈ „‡ÈÍÓÈ ˝ÚË
҇·ÁÍË ÏÓ„ÛÚ ÔÂÂÏ ‡Ú¸Òfl ËÎË Â„ÛÎËÓ‚‡Ú¸Òfl. ç‡
ÔÓÔ˜Ì˚ı ҇·Á͇ı ÒÏÓÌÚËÓ‚‡Ì Ô‡ÚÓÌ, ÔÓÒ‰-
ÒÚ‚ÓÏ ÍÓÚÓÓ„Ó ˝ÚË ‚ÂıÌË ҇·ÁÍË ËÎË ÂÁˆÓ‚˚Â
҇·ÁÍË ÏÓ„ÛÚ ·˚Ú¸ ‚˚ÒÚ‡‚ÎÂÌ˚ ̇ ÓÔ‰ÂÎÂÌÌ˚È
Û„ÓÎ. íÂÚ¸Ë, Ò‡Ï˚ ‚ÂıÌË ÂÁˆÓ‚˚ ҇·ÁÍË, ÏÓ„ÛÚ
ÔÂÂÏ ‡Ú¸Òfl ‚ β·ÓÏ ÌÛÊÌÓÏ Ì‡Ô‡‚ÎÂÌËË Ì‡ ‡Ò-
ÒÚÓflÌË 70 ÏÏ Ë ÔÓ‚ÚÓfl˛Ú ‚Ò ÔÂÂÏ ÂÌËfl ‰Û„Ëı
ÌËÊ ‡ÒÔÓÎÓÊÂÌÌ˚ı ҇·ÁÓÍ, ‡ Ú‡ÍÊ ԇÚÓ̇.
ë‚ÂıÛ Ì‡ ҇·Á͇ı ÂÁˆ‡ ÒÏÓÌÚËÓ‚‡Ì‡ ‰Âʇ‚͇
ÂÁˆ‡. Ç ÌÂÈ ÏÓ„ÛÚ Á‡ÊËχڸÒfl ÂÁˆ˚ ‰Ó χÍÒËχθ-
ÌÓÈ ÚÓ˜ÍË ÔÓ ‚˚ÒÓÚ 15 ÏÏ, ‡‚ÌÓÈ ‡ÒÒÚÓflÌ˲ ÔÓ
‚ÂÚË͇ÎË ‰Ó ˆÂÌÚËÛ˛ ÂÈ ÎËÌËË. ÑÂʇ‚͇ ËÏÂ-
ÂÚ ÔÓÒ‡‰Ó˜Ì˚ ÏÂÒÚ‡ ‰Îfl ˜ÂÚ˚Âı ÂÁˆÓ‚ Ë ‰ÂÎËÚÂθ-
Ì˚È Ô‡Îˆ ̇ 4 ÔÓÁˈËË ÔÂÂÍβ˜ÂÌËfl. Å·„Ó‰‡fl
˝ÚÓÏÛ ÏÓÊÌÓ ·˚ÒÚÓ ÔÂÂıÓ‰ËÚ¸ Ò Ó‰ÌÓ„Ó ÂÁˆ‡ ̇
‰Û„ÓÈ ·ÂÁ ÌÂÓ·ıÓ‰ËÏÓÒÚË Ôӂ‰ÂÌËfl „ÛÎËÓ‚-
ÍË.
áÄÑçüü ÅÄÅäÄ
êËÒ.1
äÓ̘̇fl ÚӘ͇ ˆÂÌÚËÛ˛ ÂÈ ÎËÌËË ‡ÒÔÓ·„‡ÂÚ-
Òfl ‚ Á‡‰ÌÂÈ ·‡·Í (8). éÒË Ô‰ÌÂÈ ·‡·ÍË Ë Á‡‰ÌÂÈ
·‡·ÍË ÒÓ‚Ô‡‰‡˛Ú ÔË Ëı ÔÓ‰ÎÂÌËË ‰Û„ ÓÚ ‰Û„‡. Ç
Á‡‚ËÒËÏÓÒÚË ÓÚ ‰ÎËÌ˚ Á‡„ÓÚÓ‚ÍË Ô‰Ìflfl ·‡·Í‡ ÏÓ-
ÊÂÚ ÔÂÂÏ ‡Ú¸Òfl ÔÓ ÒÚ‡ÌËÌÂ Ë ÙËÍÒËÓ‚‡Ú¸Òfl ̇
ÌÂÈ. ë ÔÓÏÓ ¸˛ ÔËÌÓÎË Á‡‰ÌÂÈ ·‡·ÍË (7), ‚ ÍÓÚÓ˚ı
‰ÓÎÊÂÌ ÛÒڇ̇‚ÎË‚‡Ú¸Òfl ÛÔÓÌ˚È ˆÂÌÚ, Á‡„ÓÚӂ͇
ÏÓÊÂÚ ÙËÍÒËÓ‚‡Ú¸Òfl ̇ ˆÂÌÚËÛ˛ ÂÈ ÓÒË Ò ‚ÓÁ-
ÏÓÊÌÓÒÚ¸˛ ‚‡ ÂÌËfl. èË ÓڂӉ ̇Á‡‰ ҇·ÁÓÍ
Á‡‰ÌÂÈ ·‡·ÍË ÛÔÓÌ˚È ˆÂÌÚ ‡‚ÚÓχÚ˘ÂÒÍË ÓÚÊË-
Ferm 59
Über Metallbearbeiten finden sie in Bibliotheken und
Buchläden oft genug Nachschlagwerke. Außerdem gibt
es Modellbauzeitschriften, die regelmäßig über dieses
Thema schreiben. Noch besser ist es, wenn Sie in den
Besitz eines technischen Studienbuches kommen
können, selbst, wenn es etwas veraltert ist. Darin steht
neben den allgemeinen Prinzipien des Drehens viel
Wissenswertes und gut brauchbare Übersichten von
Problemen mit möglichen Ursachen und Lösungen.
Stellen Sie zum Fräsen von Kunststoff-Werkstücken
immer auf eine niedrige Drehzahl ein.
FUNKTIONSWEISE DER M SCHINE
Abb.1
Um einen guten Einblick in die Funktionsweise der
Maschine zu erhalten, kann man sie am besten in eine
Anzahl Hauptgruppen und Komponenten mit jeweils
spezifischen Funktionen unterteilen. (Siehe Abb. 1).
D S M SCHINENBETT
Abb.2
Das Maschinenbett verbindet alle Unterteile und hat
daneben auch noch andere wichtige Funktionen. Das
Bett (3) ist aus hochwertigem grauem Gußeisen
angefertigt und hat diverse angegossene
Querverstärkungen. Durch die Konstruktion und die
angewendete Materialart werden Vibrationen besser
absorbiert und sind Verformungen durch Belastung
minimal. Das Bett hat zwei sehr präzise geschliffene
Gleitflächen zum Führen von Support und Reitstock.
Diese Führungen, eine prismatische und eine flache,
sorgen für die Einhaltung der Zentrierlinie (4). Siehe
Abb. .
DER MOTOR
Der angebaute Wechselstrommotor ist ein
kohlebürstenfreier 1-Phase-Wechselstrom- Motor mit
Startkondensator. Der Motor ist unterhaltsfrei und
bedarf keiner speziellen Behandlung. Mit Keilriemen und
mehrfachen Riemenscheiben, wird die Bewegung des
Motors auf die Hauptspindel übertragen.
DER SPINDELSTOCK
Abb.A
Der gegossene Spindelstock (1) ist mit einer
Prismaführung und zwei Spannplatten auf dem Bett
befestigt. An der Rückseite sitzt eine Ölablaßmutter.
Der Deckel kann zur Inspektion und zum Ölen
abgenommen werden. Unten im Spindelstock befindet
sich ein System drehender Achsen und Zahnräder.
Durch diese Zahnräder wird die Geschwindigkeit der
Hauptspindel vermindert und auf eine doppelte coaxiale
Ausgangsachse übertragen. Auf dieser Achse befindet
sich das Antriebszahnrad für den Vorschub und das
Antriebszahnrad zum Gewindeschneiden (siehe Figur
B). Im Spindelstock sitzt das wichtigste Unterteil der
Maschine, die Hauptspindel ( ). Sie ist mit zwei
konischen Rollenlagern in einer O-Aufstellung befestigt.
Alle drehenden Teile im Spindelstock werden in einem
Ölbad geschmiert. Der Ölstand ist im Fenster an der
Vorderseite ablesbar. Die Hauptspindel besitzt eine
durchgehende Bohrung mit einem Befestigungsflansch
und einem Morsekonus an der rechten Seite für
respektive die Spannbacken und die Körnerspitze.
DER SUPPORT
Abb.1
An den Gleitführungen auf dem Bett ist der Support (5)
befestigt. Er sorgt für das kontrollierte Gleiten des
Werkzeugs am Werkstück entlang. Der Support
besteht zum einen aus einem Längsschlitten mit
Schloßplatte. Dieser Schlitten liegt direkt auf dem Bett
und sorgt für die Verschiebung in der Längsrichtung.
Diese Verschiebung kann per Hand oder automatisch
durch den Längsvorschub (6) erfolgen. Im letzten Fall
muß die Schloßmutter im Schloßkasten geschlossen
werden. Auf dem Längsschlitten ist ein zweiter Schlitten
angebracht, der für die Drehstahlverschiebung in
Querrichtung sorgt. Mittels einer Spindel mit
Folgemutter kann dieser Schlitten verschoben oder
eingestellt werden. Auf dem Querschlitten ist ein
Drehteil angebracht. Hiermit kann der Oberschlitten
oder Drehstahlschlitten in eine Gradeinstellung
gebracht werden. Der dritte und oberste Schlitten, der
Oberschlitten, kann in jeder gewünschten Richtung in
einer Länge von 70 mm verschoben werden und folgt
jeder Bewegung aller darunter liegenden Schlitten sowie
des Drehteils. Oben auf dem Drehstahlschlitten ist eine
Spannplatte angebracht. Hierin können Werkzeuge bis
zu einer Punkthöhe von maximal 15 mm eingespannt
werden, dem vertikalen Abstand zur Zentrierlinie. Die
Spannplatte ist ein Vierfachstahlhalter mit Fixierungs-
möglichkeiten. Hierdurch kann der Drehstahl schnell
gewechselt werden, ohne neu eingerichtet werden zu
müssen.
DER REITSTOCK
Abb.1
Der Endpunkt der Zentrierlinie wird durch den
Reitstock (8) gebildet. Die Herzlinien von Spindelstock
und Reitstock liegen genau in der Verlängerung
voneinander. Abhängend von der Länge des
Werkstückes kann der reitstock über das Bett
verschoben und befestigt werden. Mit der
Reitstockspitze (7), in der eine Körnerspitze angebracht
werden muß, kann das Werkstück genau auf der
Zentrierlinie fixiert drehbar eingespannt werden. Beim
Zurückdrehen der Reitstockspitze wird die
Körnerspitze automatisch losgedrückt. Der Körper des
Reitstocks ist geteilt. Das oberste Teil kann mit
Stellschrauben in Bezug auf das Oberteil seitlich verstellt
werden. Hierdurch ist eine Einstellung neben der
Zentrierlinie möglich. Normale Verschiebungen in der
Längsrichtung haben keine seitliche Verstellung zur
Folge.
KOMBINIERTER LÄNGSVORSCHUB
Abb.3 & 4
Für eine gute Oberflächenqualität ist eine richtige und
vor allem gleichbleibende Vorschubgeschwindigkeit von
Bedeutung. Für längere Werkstücke ist dies per Hand
beinah nicht möglich. Durch Schließen der Schloßmutter
wird der Support mit dem Gewinde auf der Leitspindel
gekoppelt. Wenn die Leitspindel zugeschaltet ist, ist sie
ihrerseits an die Hauptspindel gekoppelt. Hierbei wird
mit einem Zwischenrad eine Kupplung hergestellt
zwischen dem Antriebsrad der Leitspindel und dem
Antriebsrad der Längsführung im Spindelstock. Dies
passiert durch Verstellung der Wechselradschere.
(Siehe Abb. 3 und 4).
18 Ferm

퇷Îˈ‡ 1
чÌÌ˚È ÚÓ͇Ì˚È ÒÚ‡ÌÓÍ ËÏÂÂÚ Á‡‚Ó‰ÒÍÛ˛ „ÛÎË-
Ó‚ÍÛ Á‡ÁÓÓ‚ ̇ Ëı ÏËÌËχθÌÓ Á̇˜ÂÌËÂ. Ç ÔÓ-
ˆÂÒÒ ڇÌÒÔÓÚËÓ‚ÍË ÒÚ‡Ì͇ ÌÂÍÓÚÓ˚ ̇ÒÚÓÈ-
ÍË ÏÓ„ÎË Ì‡Û¯ËÚ¸Òfl.
ë ‰Û„ÓÈ ÒÚÓÓÌ˚, ÍÓÌÒÚÛ͈Ëfl ÒÚ‡Ì͇ ÔÓÁ‚ÓÎflÂÚ ÛÒ-
Ú‡ÌËÚ¸ β·˚ ‚ÓÁÌËͯË ÌÂÊ·ÚÂθÌ˚ Á‡ÁÓ˚.
á‡ÁÓ˚ ÏÓ„ÛÚ Ú‡ÍÊ ‚ÓÁÌË͇ڸ ‚ ÂÁÛθڇÚ ÂÒÚÂÒÚ-
‚ÂÌÌÓ„Ó ËÁÌÓÒ‡ ‰ÂÚ‡ÎÂÈ ‚ ÂÁÛθڇÚ ËÌÚÂÌÒË‚ÌÓÈ
˝ÍÒÔÎÛ‡Ú‡ˆËË ÒÚ‡Ì͇. ÖÒÎË ÔÓ‰ÒÚÓÈ͇ Ì ÔËÌÓÒËÚ
ÂÁÛθڇڇ, ˝ÚÓ Á̇˜ËÚ, ˜ÚÓ ‰Âڇθ ËÁÌÓÒË·Ҹ Ë ÚÂ-
·ÛÂÚ Á‡ÏÂÌ˚ ̇ ÌÓ‚Û˛.
ÖÒÎË ‚Ò ÔÓ‰„ÓÚÓ‚ËÚÂθÌ˚ ‡·ÓÚ˚ Ôӂ‰ÂÌ˚, ÒÚ‡-
ÌÓÍ ÏÓÊÌÓ ÔÓ‰Íβ˜‡Ú¸ Í ˝ÎÂÍÚÓÒÂÚË ÔÓÒ‰ÒÚ‚ÓÏ
ÔÓÏ ÂÌËfl ¯ÚÂÍÂÌÓÈ ‚ËÎÍË ‚ ÓÁÂÚÍÛ. 艂‡Ë-
ÚÂθÌÓ ÒΉÛÂÚ Û·Â‰ËÚ¸Òfl, ˜ÚÓ ÒÂÚ‚ÓÈ ‚˚Íβ˜‡ÚÂθ
̇ıÓ‰ËÚÒfl ‚ ÔÓÎÓÊÂÌËË «OFF» (Çõäã), Ë ˜ÚÓ Á‡‰‡ÌÓ
èêÄÇéÖ Ì‡Ô‡‚ÎÂÌË ‚‡ ÂÌËfl. èӂ¸Ú   ‡Á
Ë̉Ë͇ÚÓÌ˚È „·ÁÓÍ, Ì ËÁÏÂÌËÎÒfl ÎË ÛÓ‚Â̸ χÒ-
·; ‚ ÒÎÛ˜‡Â ÌÂÓ·ıÓ‰ËÏÓÒÚË, ‰ÓÎÂÈÚ χÒ· ‰Ó ÒÂÂ-
‰ËÌÌÓÈ ÓÚÏÂÚÍË Á‡ÔÓÎÌÂÌËfl. ì·Â‰ËÚÂÒ¸, ˜ÚÓ Ì‡ ‚ÂÌ-
ÚËÎflˆËÓÌÌ˚ı ÓÚ‚ÂÒÚËflı ‰‚Ë„‡ÚÂÎfl Ì ÎÂÊ‡Ú ÌË͇-
ÍË ·Ûχ„Ë Ë ‚ÂÚÓ¯¸. èӂ¸Ú ÚÂıÍÛ·˜ÍÓ‚˚È Á‡-
ÊËÏÌÓÈ Ô‡ÚÓÌ Ë Û·Â‰ËÚÂÒ¸ ‚ ÚÓÏ, ˜ÚÓ ‰ÓÔÓÎÌËÚÂθ-
Ì˚ ÚÓ˜ÍË Â„ÛÎËÓ‚ÍË ÔÓ˜ÌÓ ÒˉflÚ ‚ ÍÛ·˜Í‡ı.
ê‡Á‚Ó‰ÌÓ Íβ˜ Í·‰ËÚ ‚Ò„‰‡ ‚ ÔÓÒÚÓflÌÌÓÂ
ÏÂÒÚÓ!
éÚÍÓÈÚ Á‡ ËÚÌ˚È ÍÓÊÛı Ë Ôӂ¸Ú ‡ÒÔÓÎÓÊÂ-
ÌËÂ Ë Ì‡ÚflÊÂÌË ÂÏÌÂÈ. ÑÎfl ÔÓ·ÌÓÈ ÔÓ„ÓÌÍË ÒÎÂ-
‰ÛÂÚ ‚˚·‡Ú¸ Ò‡ÏÛ˛ ÌËÁÍÛ˛ ÒÍÓÓÒÚ¸ ‚‡ ÂÌËfl.
åÓÊÌÓ Ú‡ÍÊ ÔÂÂÏÂÒÚËÚ¸ Ô‰ÌËÈ ÂÏÂ̸ (ÒÏÓÚ-
Ë ËÒ. 5 Ë 15).
ç‡ÊÏËÚ ‚˚Íβ˜‡ÚÂθ Ë ‰‡ÈÚ ÒÚ‡ÌÍÛ ÔÓ‡·ÓÚ‡Ú¸ ‚
Ú˜ÂÌË 20 ÏËÌÛÚ. ê„ÛÎflÌÓ ÔÓ‚ÂflÈÚÂ, Ì ̇„‚‡-
˛ÚÒfl ÎË ÍÓÂÌÌ˚ ÔÓ‰¯ËÔÌËÍË Ô‰ÌÂÈ ·‡·ÍË Ë
‰‚Ë„‡ÚÂÎfl, ‰Îfl ˜Â„Ó ÔÓÒΠÓÒÚ‡ÌÓ‚ÍË ÒÚ‡Ì͇ ÒΉÛÂÚ
ÔËÎÓÊËÚ¸ ÛÍÛ Ò Ó·ÂËı ÒÚÓÓÌ Ô‰ÌÂÈ ·‡·ÍË Ë
ÍÓÔÛÒ‡ ‰‚Ë„‡ÚÂÎfl. èË ÔÓfl‚ÎÂÌËË ÔÓÒÚÓÓÌÌËı ¯Û-
ÏÓ‚ Ë ÌÂÓ·˚˜ÌÓ„Ó ‚˚‰ÂÎÂÌËfl ÚÂÔ· (‚˚¯Â ÚÂÏÔ‡-
ÚÛ˚ ˜ÂÎӂ˜ÂÒÍÓ„Ó Ú·) Ú·ÛÂÚÒfl Ò‡ÁÛ Ê ÓÚÍβ-
˜ËÚ¸ ÒÚ‡ÌÓÍ Ë Ò‚flÁ‡Ú¸Òfl Ò Ç‡¯ËÏ ÔÓÒÚ‡‚ ËÍÓÏ.
á‡ÚÂÏ ÌÛÊÌÓ ‚Íβ˜ËÚ¸ ÒÚ‡ÌÓÍ Ì‡ ·ÓΠ‚˚ÒÓÍÓÈ ÒÍÓ-
ÓÒÚË Ë ‰‡Ú¸ ÂÏÛ ÔÓ‡·ÓÚ‡Ú¸   ÌÂÒÍÓθÍÓ ÏËÌÛÚ.
èÓÒΠ˜Â„Ó ÒΉÛÂÚ ÔÓ‚ÚÓËÚ¸ ˝ÚÓ Ò Ó·‡ÚÌ˚Ï Ì‡-
Ô‡‚ÎÂÌËÂÏ ‚‡ ÂÌËfl. ÖÒÎË ÌË͇ÍËı ÔÓ·ÎÂÏ Ì ‚ÓÁ-
ÌËÍÎÓ, ÚÓ ÒÚ‡ÌÓÍ „ÓÚÓ‚ Í ‡·ÓÚÂ.
ëèéëéÅ êÄÅéíõ
êËÒ.1
ëÌflÚË ÏÂڇη ÓÒÛ ÂÒÚ‚ÎflÂÚÒfl ÔÓÒ‰ÒÚ‚ÓÏ ÍÓÌ-
ÚÓÎËÛÂÏÓ„Ó ÔËÊËχ ÓÒÚËfl ÂÁˆ‡ ËÎË ÍÓ̈‡
҂· Í Á‡„ÓÚÓ‚ÍÂ, ·Î‡„Ó‰‡fl ˜ÂÏÛ ÒÂÁ‡˛ÚÒfl χ-
ÎÂ̸ÍË ˜‡ÒÚ˘ÍË Ï‡Ú¡· - ÒÚÛÊ͇. ÑÎfl ˝ÚÓ„Ó Á‡-
„ÓÚӂ͇ ‰ÓÎÊ̇ ÓÒÛ ÂÒÚ‚ÎflÚ¸ ‚‡ ‡ÚÂθÌ˚ ‰‚ËÊÂ-
ÌËfl ÏÂÊ‰Û ‰‚ÛÏfl ÙËÍÒËÓ‚‡ÌÌ˚ÏË ÚӘ͇ÏË ‚‡ Â-
ÌËfl - Ô‰ÌÂÈ ·‡·ÍÓÈ Ë Á‡‰ÌÂÈ ·‡·ÍÓÈ - (ÒÏ. ËÒ. 1),
ÍÓÚÓ˚ ̇ıÓ‰flÚÒfl ̇ Ó˜Â̸ ÚÓ˜ÌÓÈ ‚ÓÓ·‡Ê‡ÂÏÓÈ
ÎËÌËË - ˆÂÌÚËÛ˛ ÂÈ ÎËÌËË (4). í‡Í‡fl Ó·ÚӘ͇ ÔÓ-
ËÁ‚Ó‰ËÚÒfl ÔÂÂÏ ÂÌËÂÏ ÔÓ ‚ÒÂÈ ‰ÎËÌ ԇ‡ÎÎÂθ-
ÌÓ Í ˆÂÌÚËÛ˛ ÂÈ ÎËÌËË ÂÁˆ‡, Á‡ÍÂÔÎÂÌÌÓ„Ó Ì‡
ÒÛÔÔÓÚ (5), Ò ÓÔ‰ÂÎÂÌÌÓÈ ÒÍÓÓÒÚ¸˛ ‚‰Óθ ‚‡-
‡˛ ÂÈÒfl Á‡„ÓÚÓ‚ÍË. ùÚ‡ ÓÔ‡ˆËfl ‚˚ÔÓÎÌflÂÚÒfl ÔÓ
ÔflÏÓÈ ÎËÌËË ‚Û˜ÌÛ˛ ËÎË ‚ ‡‚ÚÓχÚ˘ÂÒÍÓÏ ÂÊË-
ÏÂ Ò Ô‰‡˜ÂÈ (6).
ÑÎfl ÒÌflÚËfl χÚ¡· Ò Á‡„ÓÚÓ‚ÍË ÌÂÓ·ıÓ‰ËÏÓ ÛÒË-
ÎËÂ. ùÚÓ ÛÒËÎË Ô‰‡ÂÚÒfl ÓÚ ‰‚Ë„‡ÚÂÎfl Í ÔÓÎÓÏÛ ‚‡-
ÎÛ ‚ Ô‰ÌÂÈ ·‡·Í - „·‚ÌÓÏÛ ‚‡ÎÛ (2). Ç Á‡‚ËÒËÏÓÒ-
ÚË ÓÚ Ï‡ÍÒËχθÌÓÈ ÏÓ ÌÓÒÚË ‰‚Ë„‡ÚÂÎfl ‰ÓÎÊÌÓ
·˚Ú¸ ÒÓÓÚ‚ÂÚÒÚ‚ÂÌÌÓ ÓÔ‰ÂÎÂÌÓ ÍÓ΢ÂÒÚ‚Ó ÒÚ‡˜Ë-
‚‡ÂÏÓ„Ó Ï‡Ú¡· - ÚÓÎ Ë̇ Ë ¯ËË̇ ÒÚÛÊÍË. ÖÒÎË
ÍÓ΢ÂÒÚ‚Ó Ó·ÓÓÚÓ‚ ÒËθÌÓ Ô‡‰‡ÂÚ, ÌÂÓ·ıÓ‰ËÏÓ
ÛÏÂ̸¯ËÚ¸ ÎË·Ó Ì‡˜‡Î¸ÌÛ˛ „ÎÛ·ËÌÛ Ó·‡·ÓÚÍË, ÎË·Ó
ÒÍÓÓÒÚ¸ ÔÓ‰‡˜Ë. Ç ÔÓÚË‚ÌÓÏ ÒÎÛ˜‡Â ‚ÓÁÌË͇ÂÚ
ÓÔ‡ÒÌÓÒÚ¸ ÔÓ‚ÂʉÂÌËfl ˝ÎÂÍÚÓ‰‚Ë„‡ÚÂÎfl, ÒÓ͇-
ÂÌË ÒÓ͇ ÒÎÛÊ·˚ ËÎË ÔÓÎÓÏ͇ ÂÁˆ‡. èË ˝ÚÓÏ
‰‡Ê ‰Ë‡ÏÂÚ Á‡„ÓÚÓ‚ÍË Ë„‡ÂÚ Óθ. èË ‰Ë‡ÏÂÚÂ
100 ÏÏ, ˜ÚÓ·˚ ÒÌflÚ¸ ÒÚÛÊÍÛ ÚÓÎ ËÌÓÈ 1 ÏÏ, Ú·Û-
ÂÚÒfl ·Óθ¯Â ÛÒËÎËfl, ˜ÂÏ ÔË ‰Ë‡ÏÂÚ Á‡„ÓÚÓ‚ÍË 10
ÏÏ.
ÖÒÎË Á‡‰Ì˛˛ ·‡·ÍÛ (8) ‡ÒÔÓÎÓÊËÚ¸ fl‰ÓÏ Ò ˆÂÌÚË-
Û˛ ÂÈ ÎËÌËÂÈ ÔÓÒ‰ÒÚ‚ÓÏ ÔÓÔ˜ÌÓÈ Â„ÛÎË-
Ó‚ÍË, ÚÓ ÏÓÊÌÓ ‚˚ÚÓ˜ËÚ¸ ‚ÌÂ¯Ì˛˛ ÍÓÌ˘ÂÒÍÛ˛
ÔÓ‚ÂıÌÓÒÚ¸. ÑÓÔÓÎÌËÚÂθÌ˚Ï ‚ˉÓÏ Ó·‡·ÓÚÍË,
‚ÓÁÏÓÊÌ˚Ï ÔË ÔÓ‰ÓθÌÓÈ ÚÓ͇ÌÓÈ ÔÓÚÓ˜ÍÂ, fl‚-
ÎflÂÚÒfl ̇ÂÁ͇ ‚ËÌÚÓ‚ÓÈ ÂÁ¸·˚. ëÔˆˇθÌ˚È Â-
Áˆ ̇ÂÁ‡ÂÚ Òԡ΂ˉÌÛ˛ ͇̇‚ÍÛ ÔÓ ÍÓÌÚÛÛ Á‡-
„ÓÚÓ‚ÍË. ó‡ÒÚ¸ ÔÓ‚ÂıÌÓÒÚË ÍÓÌÚÛ‡ ÓÒÚ‡ÂÚÒfl ̇ ÏÂ-
ÒÚÂ, ‡ ‡ÁÌˈ‡ ‚˚ÒÓÚ ‚ ËÚÓ„Â Ó·‡ÁÛÂÚ ÂÁ¸·Û. ç‡fl‰Û
Ò ÔÓ‰ÓθÌÓÈ ÔÓÚÓ˜ÍÓÈ ÏÓÊÌÓ Ú‡ÍÊ ӷ‡·‡Ú˚-
‚‡Ú¸ Ë ÚÓˆ˚ Á‡„ÓÚÓ‚ÍË, ̇ÔËÏÂ, ˜ÚÓ·˚ Ôˉ‡Ú¸ ËÏ
ÔÎÓÒÍÛ˛ Ë ÔflÏÛ˛ ÙÓÏÛ. äÓÓÚÍË Á‡„ÓÚÓ‚ÍË ÏÓ„ÛÚ
ÍÂÔËÚ¸Òfl ‚ ÙËÍÒËÓ‚‡ÌÌÓÈ ÚӘ͠ÍÂÔÎÂÌËfl (ÚÂı-
ÍÛ·˜ÍÓ‚ÓÏ Ô‡ÚÓÌÂ) Ò Ó‰ÌÓÈ ÒÚÓÓÌ˚, ‡ Ò ‰Û„ÓÈ
ÒÚÓÓÌ˚ - Ó·‡·‡Ú˚‚‡Ú¸Òfl ÔÂÔẨËÍÛÎflÌÓ ÔÓ ÓÚ-
ÌÓ¯ÂÌ˲ Í ˆÂÌÚËÛ˛ ÂÈ ÎËÌËË. ÑÓÔÓÎÌËÚÂθÌ˚Â
„ÛÎËÓ‚Ó˜Ì˚ ÚÓ˜ÍË ÍÛ·˜ÍÓ‚ Ô‡ÚÓ̇ Ó·ÂÒÔ˜Ë-
‚‡˛Ú Û‰ÂʇÌË Á‡„ÓÚÓ‚ÍË Ì‡ ‚ÓÓ·‡Ê‡ÂÏÓÈ ˆÂÌÚ-
ËÛ˛ ÂÈ ÎËÌËË. èÓÒ‰ÒÚ‚ÓÏ ‡ÁÏ ÂÌËfl ÂÁˆ‡
ÔÓ‰ Û„ÎÓÏ ÔË ÔÓÏÓ Ë Â„ÛÎËÓ‚ÍË Á‡ÊËÏÌÓ„Ó Ô‡-
ÚÓ̇ ÏÓÊÂÚ ÔÓËÁ‚Ó‰ËÚ¸Òfl ÚÓ͇̇fl ‡ÒÚӘ͇
‚̯ÌËı Ë ‚ÌÛÚÂÌÌËı ÍÓÌ˘ÂÒÍËı ÔÓ‚ÂıÌÓÒÚÂÈ. ë
ÔÓÏÓ ¸˛ ˝ÚÓ„Ó Á‡ÊËχ ‚ Ó‚ÌÓÈ ÔÓ‚ÂıÌÓÒÚË ‰‡ÊÂ
ÏÓÊÌÓ ÔÓÚ‡˜Ë‚‡Ú¸ ÓÚ‚ÂÒÚËfl. ÑÎfl ˝ÚÓ„Ó ÒÔˆˇθ-
ÌÓ ÔËÓ·ÂÚ‡ÂÏ˚È Ò‚ÂÎËθÌ˚È Ô‡ÚÓÌ Ò ÍÓÌÛÒÓÏ
åÓÁ ‰ÓÎÊÂÌ ·˚Ú¸ ‡ÁÏ ÂÌ ‚ ÔËÌÓÎË (7) Á‡‰ÌÂÈ
·‡·ÍË. á‡ÚÂÏ ÓÚ‚ÂÒÚËfl ÏÓ„ÛÚ ‡ÒÒ‚ÂÎË‚‡Ú¸Òfl ‰Ó ÌÂ-
Ó·ıÓ‰ËÏÓÈ „ÎÛ·ËÌ˚, ‰Ë‡ÏÂÚ‡ Ë ÙÓÏ˚.
íÓ˜ÌÓÒÚ¸ Ó·‡·ÓÚÍË Á‡‚ËÒËÚ ‚ ÔÂ‚Û˛ Ó˜Â-
‰¸ Ë ÔÂʉ ‚ÒÂ„Ó ÓÚ ÔÓÙÂÒÒËÓ̇θÌ˚ı
̇‚˚ÍÓ‚ Ë ÓÔ˚Ú‡. èË ÚÓ͇ÌÓ Ó·‡·ÓÚÍÂ
‡Á΢Ì˚ هÍÚÓ˚ ÏÓ„ÛÚ Ó͇Á‡Ú¸ ‚ÎËflÌË ̇ ÍÓ̘-
Ì˚ ÂÁÛθڇÚ, ̇ÔËÏÂ, ÚËÔ Ë ÒÓÒÚÓflÌË ÂÁˆ‡,
ÚËÔ Ó·‡·‡Ú˚‚‡ÂÏÓ„Ó Ï‡Ú¡·, ÒÍÓÓÒÚ¸ Ó·‡-
·ÓÚÍË Ë ÒÍÓÓÒÚ¸ ÔÓ‰‡˜Ë ÂÁˆ‡, ÍÂÔÎÂÌË Á‡„ÓÚÓ‚ÍË,
ÍÓÌÒÚÛ͈Ëfl Ë ÒÓÒÚÓflÌË ҇ÏÓ„Ó ÒÚ‡Ì͇. åÓ‰Âθ
ÒÚ‡Ì͇ MD-500 Ó·ÂÒÔ˜˂‡ÂÚ ‚ÓÁÏÓÊÌÓÒÚ¸ ÚÓ͇-
ÌÓ Ó·‡·ÓÚÍË Á‡„ÓÚÓ‚ÓÍ ·Óθ¯Â ‰ÎËÌ˚ Ò ‚˚ÒÓÍÓ
ÚÓ˜ÌÓÒÚ¸˛, ÂÒÎË ‚Ò ‰Û„Ë ÛÒÎÓ‚Ëfl ˉ‡θÌ˚.
Ñãü çÄóàçÄûôÖÉé íéäÄêü
èË ÚÓ͇ÌÓÈ Ó·‡·ÓÚÍ ̇ ÓÔ‰ÂÎÂÌÌ˚ ‰ÂÚ‡ÎË
ÏÓ„ÛÚ ‚ÓÁ‰ÂÈÒÚ‚Ó‚‡Ú¸ ·Óθ¯Ë ̇„ÛÁÍË. èË ÌÂÔ‡-
‚ËθÌÓÈ ˝ÍÒÔÎÛ‡Ú‡ˆËË ÒÚ‡Ì͇ ˝ÚË ˝ÎÂÏÂÌÚ˚ ÏÓ„ÛÚ
·˚Ú¸ ÔÓ‚ÂʉÂÌ˚ ËÎË ‰ÂÙÓÏËÓ‚‡Ì˚ Ë ÔÓ‰‚„‡-
˛ÚÒfl ·ÓΠÁ̇˜ËÚÂθÌÓÏÛ Ë ·˚ÒÚÓÏÛ ËÁÌÓÒÛ, ‰‡ÊÂ
ÂÒÎË ÓÌË ‚˚ÒÓÍÓÔÓÙÂÒÒËÓ̇θÌÓ ÍÓÌÒÚÛËÓ‚‡Ì˚
58 Ferm
Bei jeder Umdrehung der Hauptspindel verschiebt sich
der Support über einen bestimmten Abstand am Bett
entlang. Dieser Abstand hängt vom Gewinde und dem
gewählten Wechselrad auf der Leitspindel ab. Durch ein
anderes Wechselrad zu wählen, kann die
Vorschubgeschwindig-keit angepaßt werden. Beim
Gewindeschneiden passiert im Prinzip dasselbe, jedoch
mit einer viel größeren Supportverschiebung bei einer
viel niedrigeren Hauptspindelschnellheit . In diesem Fall
muß eine Kupplung gemacht werden mit dem
Gewindeschneide-Antriebsrad des Spindelstocks. Die
Positionierung der Zahnräder passiert durch Plazieren
der Ringe auf der Leitspindel und Zwischenradachse der
Schere. Veränderung des Wechselrades auf der
Leitspindel macht in diesem Fall das Wählen der
Gewindesteigung des zu schneidenden Gewindes
möglich. Auf der Leitspindel sitz kein automatischer
Abschalter. Schalten Sie sie darum rechtzeitig aus, damit
der Drehstahl nicht gegen das Spannfutter läuft.
DER NTRIEB
Abb.5
Da der angepaßte Motor über eine feste und relativ hohe
Tourenzahl verfügt, ist die Transmission so ausgelegt,
daß sie sofort die Tourenzahl verringert. Außerdem ist
durch den Einsatz mehrfacher Riemenscheiben und
einer Zwischenriemenscheibe die Tourenzahl noch in
sechs aufeinander folgenden Stufen regulierbar. Um
eventuelle Riemenspannungsunterschiede aufzuheben,
ist die gelagerte Riemenspannungsrolle verstellbar
eingerichtet. Siehe Abb. 5. Um die drei höchsten
Spindelschnellheiten zu erreichen, muß der vorderste
Riemen vom Zwischenrädersatz zum Motorrädersatz
verlegt werden. Das Zwischenrad bleibt stets
angetrieben und dient als Flugrad zum Auffangen von
Belastungsvariationen.
GRUNDPRINZIPIEN DES DREHENS
Bevor mit dem Drehen begonnen werden kann, müssen
Sie Kenntnis der wichtigsten Basisbegriffe haben. Anders
besteht die Möglichkeit, daß zum Beispiel nicht die
richtige Drehgeschwindigkeit oder der richtige
Drehstahl gewählt wird. Mit einer Anzahl Tabellen und
Faustregeln wird das Drehfertigmachen der Maschine
erleichtert.
UFSP NNEN
Abb.6 - 8
Das Aufspannen des Werkstückes muß sehr sorgfältig
passieren. Das Werkstück so weit wie möglich in das
Spannfutter einsetzen und das Futter mit dem
Spannschlüssel spannen. Bei zu festem Spannen können
Backenfutter, Spannbacken oder Werkstück beschädigt
werden. Dasselbe gilt für die Reitstockspitze. Sie muß
mit der Hand kräftig, aber nicht mit Gewalt angedreht
werden. Einige Aufspannbeispiele, bei denen gleich auch
der Gebrauch von Bohrern und Drehstählen deutlich
wird, stehen in Abb. 6, 7 und 8.
Das abgebildete Standard-Dreibackenfutter ist
selbstzentrierend. Hierdurch deckt sich die Herzlinie
eines kurzen Werkstückes genau mit der
Zentrierungslinie, auch wenn die Gegenkörnerspitze
nicht benutzt wird. Zum Spannfutter gehören
Innenbacken (abgebildet) und Außenbacken. Diese
werden zum inwendigen Festklemmen größerer
Durchmesser gebraucht. Jede Spannbacke hat im
Backenfutter ihren stets selben, festen Platz. Platz und
Spannbacken sind numeriert! In Abb. 6 wird ein rechter
Seitenschneidedrehstahl (oben) benutzt und ein rechter
gebogener Schruppstahl. Die Pfeile geben die
Ansatzrichtung an. Der Schruppstahl kann in Längs- oder
Querrichtung benutzt werden und wird oft gebraucht,
um schnell viel Material abzudrehen. Abb. 7 läßt den
Gebrauch eines linken Seitenschneidestahls (oben) und
eines Bohrstahls für Sacklöcher sehen. Abb. 8 zeigt eine
Einspannung mit Gegenzentrierung im Reitstock. Es
wird ein Punktstahl zum Glätten gebraucht. Darunter ist
eine Aufspannung zum Anfertigen einer Bohrung mit
einem normalen Spiralbohrer dargestellt. Vorab immer
erst mit einem Zentrierbohrer vorbohren. Dies ist ein
Bohrer, bei dem der Schaft viel dicker ist als die Spitze.
Das Bohrloch, das dadurch entsteht, ist als
Zentrierungsloch sowohl für die Körnerspitze als auch
für den Bohrer gedacht!
Ferm 19

Ì˚ ÒÚ‡ÌÓÍ Ì‡ ‡ÁϘÂÌÌ˚ ÏÂÒÚ‡. é·‡ ·ÓÎÚ‡ ËÒÔÓθ-
ÁÛ˛ÚÒfl ‚ ͇˜ÂÒڂ ̇ԇ‚Îfl˛˘Ëı. ч Ú ÒÚ‡ÌËÌÂ
ÒÂÒÚ¸ ̇ ÔÎÂÌÍÛ Ë Á‡Ú‚‰ÂÚ¸ Á‡ÔÓÎÌËÚÂβ. èÓÒÎÂ
˝ÚÓ„Ó ÏÓÊÌÓ Ú‡ÍÊ ̇‚ÂÌÛÚ¸ Ë Á‡ÚflÌÛÚ¸ „‡ ÍË, ÍÓ-
ÚÓ˚ ËÒÔÓθÁÓ‚‡ÎËÒ¸ ‰Îfl Ô‚ÓÁÍË.
èéÑäãûóÖçàÖ ùãÖäíêàóÖëäéâ óÄëíà
èÓÒΠÚÓ„Ó Í‡Í ÒÚ‡ÌÓÍ ÓÍÓ̘‡ÚÂθÌÓ ÒÚ‡ˆËÓ̇ÌÓ
ÛÒÚ‡ÌÓ‚ÎÂÌ, ‰ÓÎÊÌÓ ·˚Ú¸ ‚˚ÔÓÎÌÂÌÓ ˝ÎÂÍÚ˘ÂÒÍÓÂ
ÔÓ‰Íβ˜ÂÌËÂ. íÓ͇Ì˚È ÒÚ‡ÌÓÍ ‡ÒÒ˜ËÚ‡Ì Ì‡ ÒÛ Â-
ÒÚ‚Û˛  ÒÂÚ‚Ó ÔÂÂÏÂÌÌÓ ̇ÔflÊÂÌË 230 Ç Ë
Â„Ó ÔÓÚ·ÎflÂχfl ÏÓ ÌÓÒÚ¸ Ì Ô‚˚¯‡ÂÚ ÏÓ ÌÓÒ-
ÚË ËÌ˚ı Ó·˚˜Ì˚ı ÍÛÔÌ˚ı ·˚ÚÓ‚˚ı ÔË·ÓÓ‚ Ò ˝ÎÂÍ-
ÚÓ‰‚Ë„‡ÚÂÎÂÏ. Ç ÌÂÔÓÒ‰ÒÚ‚ÂÌÌÓÈ ·ÎËÁÓÒÚË ÓÚ ÚÓ-
͇ÌÓ„Ó ÒÚ‡Ì͇ ÌÛÊÌÓ ÒÏÓÌÚËÓ‚‡Ú¸ Á‡ÁÂÏÎÂÌÌÛ˛
ÓÁÂÚÍÛ Ë ÔÓÁ‡·ÓÚËÚ¸Òfl Ó ÚÓÏ, ˜ÚÓ·˚ ¯ÌÛ ˝ÎÂÍÚÓ-
ÔËÚ‡ÌËfl ÒÚ‡Ì͇ ÔÓ‰‚Ó‰ËÎÒfl Í ÓÁÂÚÍ ·ÂÁ ͇ÍËı-ÎË-
·Ó ËÁ„Ë·Ó‚ Ë Ì‡ÚflÊÂÌËfl. èË ÌÂÓ·ıÓ‰ËÏÓÒÚË ÏÓÊÌÓ
ËÒÔÓθÁÓ‚‡Ú¸ Á‡ÁÂÏÎÂÌÌ˚È Û‰ÎËÌËÚÂθÌ˚È Í‡·Âθ.
íÓ„‰‡ ÒΉÛÂÚ Ó·ÂÒÔ˜ËÚ¸, ˜ÚÓ·˚ ͇·Âθ ·˚Î ÔÓÎÌÓ-
ÒÚ¸˛ ‡ÁÏÓÚ‡Ì Ë Ì Ï¯‡ÎÒfl ÔÓ‰ ÌÓ„‡ÏË.
èÖêÖÑ çÄóÄãéå êÄÅéíõ
ÑÎfl Ô‚ÓÁÍË ÒÚ‡ÌÓÍ ·˚Î ÔÓÍ˚Ú ÒÎÓÂÏ ÒÔˆˇθ-
ÌÓÈ ‡ÌÚËÍÓÓÁËÈÌÓÈ ÒχÁÍË. ùÚÓ ‚ ÂÒÚ‚Ó Ì ӷ-
·‰‡ÂÚ ÒχÁ˚‚‡˛ ËÏ ˝ÙÙÂÍÚÓÏ Ë ‰ÓÎÊÌÓ ·˚Ú¸ Û‰‡-
ÎÂÌÓ Ò ÔÓÏÓ ¸˛ ‚ÂÚÓ¯Ë. ùÚÓ ÏÓÊÌÓ Ò‰Â·ڸ ÔË ÔÓ-
ÏÓ Ë Ì‡„ÂÒÒË‚ÌÓ„Ó ‡ÒÚ‚ÓËÚÂÎfl, ̇ÔËÏÂ, ÒÍË-
Ôˉ‡‡ ËÎË ÍÂÓÒË̇. Ç Á‡‚ËÒËÏÓÒÚË ÓÚ ‚‡¯Â„Ó ÛÓ‚-
Ìfl Á̇ÌËÈ Ó ÏÂÚ‡ÎÎÓÓ·‡·‡Ú˚‚‡˛ Ëı ÒÚ‡Ì͇ı Ç˚ ÏÓ-
ÊÂÚ ‰ÂÏÓÌÚËÓ‚‡Ú¸ ÌÂÍÓÚÓ˚ ‰ÂÚ‡ÎË ÒÚ‡Ì͇, ÔÓ-
‚ÂËÚ¸ Ëı Ë ÒχÁ‡Ú¸ ΄ÍËÏ Ï‡¯ËÌÌ˚Ï Ï‡ÒÎÓÏ (̇-
ÔËÏÂ, Ó·ÂÒÒÂÂÌÌ˚Ï Ï‡ÒÎÓÏ ‰Îfl ¯‚ÂÈÌ˚ı χ¯ËÌ).
èÓÒΠ˝ÚÓ„Ó ÒΉÛÂÚ Ú ‡ÚÂθÌÓ ‚˚ÔÓÎÌËÚ¸ Ú·ӂ‡-
ÌËfl Ú‡·Îˈ˚ ÔÓ ÛıÓ‰Û Á‡ ÒÚ‡ÌÍÓÏ ËÁ „·‚˚ 14 «íÖ-
ïéÅëãìÜàÇÄçàÖ».
êÖÉìãàêéÇäÄ
êËÒ. 5 Ë 15
ÑÂڇθ/ìÁÂÎ
òÔË̉Âθ
҇·ÁÓÍ
ÒÛÔÔÓÚ‡
ë‡Î‡ÁÍË
ÒÛÔÔÓÚ‡
òÔË̉Âθ
ÔÓÔÂÂ ÌÓ„Ó
ÒÛÔÔÓÚ‡
èÓÔÂÂ Ì˚È
ÒÛÔÔÓÚ
艇 ‡/‚‡Î
ÔÓ‰‚Ó‰‡
ᇉÌflfl ·‡·Í‡
ìÒÚ‡ÌÂÌË Á‡ÁÓ‡
éÒ··ËÚ¸ ÔÂÂ‰Ì˛˛
ÒÚÓÔÓÌÛ˛ „‡ÈÍÛ, ÒÓ„ÌÛÚ¸
Á‡‰Ì˛˛ ÒÚÓÔÓÌÛ˛ „‡ÈÍÛ ÔÓ
˜‡ÒÓ‚ÓÈ ÒÚÂÎÍ ‰Ó
Ó·‡ÁÓ‚‡ÌËfl ÏËÌËχθÌÓ„Ó
Á‡ÁÓ‡. éÚ‚ÂÌÛÚ¸ ̇Á‡‰ ̇
˜ÂÚ‚ÂÚ¸ Ó·ÓÓÚ‡ Ë Á‡ÚflÌÛÚ¸
ÔÂÂ‰Ì˛˛ ÒÚÓÔÓÌÛ˛ „‡ÈÍÛ.
éÒ··ËÚ¸ ÒÚÓÔÓÌ˚ „‡ÈÍË,
Á‡Úfl„Ë‚‡fl „ÛÎËÓ‚Ó˜Ì˚Â
„‡ÈÍË ÔÓ ˜‡ÒÓ‚ÓÈ ÒÚÂÎÍ ‰Ó
Ó·‡ÁÓ‚‡ÌËfl ÏËÌËχθÌÓ„Ó
Á‡ÁÓ‡; Á‡ÚÂÏ Á‡ÚflÌÛÚ¸
ÒÚÓÔÓÌ˚ „‡ÈÍË.
ëÏÓÚË „‡ÙÛ "òÔË̉Âθ
҇·ÁÓÍ ÒÛÔÔÓÚ‡"
ëÏÓÚË „‡ÙÛ "ë‡Î‡ÁÍË
ÒÛÔÔÓÚ‡"
éÒ··ËÚ¸ ÔÂÂ‰Ì˛˛
ÒÚÓÔÓÌÛ˛ „‡ÈÍÛ Ë Á‡ÚflÌÛÚ¸
Ò‡ÏÛ˛ ‰‡Î¸Ì˛˛ Á‡‰Ì˛˛
ÒÚÓÔÓÌÛ˛ „‡ÈÍÛ ‰Ó ÚÂı ÔÓ,
ÔÓ͇ Á‡ÁÓ Ì ÒÚ‡ÌÂÚ
‚ËÁۇθÌÓ ÌÂÁ‡ÏÂÚÌ˚Ï; Á‡ÚÂÏ
ÔÓ‚ÂÌÛÚ¸ ̇Á‡‰ ̇ ˜ÂÚ‚ÂÚ¸
Ó·ÓÓÚ‡ Ë Á‡ÚflÌÛÚ¸ ÔÂÂ‰Ì˛˛
ÒÚÓÔÓÌÛ˛ „‡ÈÍÛ.
éÒ··ËÚ¸ Á‡ÊËÏÌÛ˛ „‡ÈÍÛ,
ÓÚ‚ËÌÚËÚ¸ ‰‚Â
„ÛÎËÓ‚Ó˜Ì˚ „‡ÈÍË Ò
Ó·ÂËı ÒÚÓÓÌ Ì‡ ˜ÂÚ‚ÂÚ¸.
èÂÂÏÂÒÚËÚ¸ ÔÂÂ‰Ì˛˛ ·‡·ÍÛ
Ò Â„ÛÎËÓ‚Ó˜Ì˚ÏË ·ÓÎÚ‡ÏË
‰Ó ÒÓ‚Ï ÂÌËfl ÓÚÏÂÚÓÍ Ì‡
Ô‡‚ÓÈ ÒÚÓÓÌ ·‡·ÍË. ë΄͇
Á‡ÚflÌÛÚ¸ „ÛÎËÓ‚Ó˜Ì˚Â
·ÓÎÚ˚ ÔË ÌÂÔÓ‰‚ËÊÌÓÏ
ÔÓÎÓÊÂÌËË ·‡·ÍË Ë Á‡ÚflÌÛÚ¸
Á‡ÊËÏÌÛ˛ „‡ÈÍÛ.
èËÒÔÓÒÓ·ÎÂ
ÌËfl
Ñ‚‡ Íβ˜‡ ‰Îfl
ÍÛ„Î˚ı „‡ÂÍ
éÚ‚ÂÚ͇,
ÓÊÍÓ‚˚È
„‡Â˜Ì˚È Íβ˜
ÚÓ ÊÂ
ÚÓ ÊÂ
ÚÓ ÊÂ
éÚ‚ÂÚ͇,
ÓÊÍÓ‚˚È
„‡Â˜Ì˚È Íβ˜
Ferm 57
BEDIENUNG DER MD-500
Abb.9 - 12
1. Kombinierter n/ us-/Vor-
/Rücklaufschalter
Einschalten des Motors und mit
Notstoppeinrichtung Umschalten der Drehrichtung
Die Klappe kann mit einem kleinen Schloß gesichert
werden.
2. ntriebskastenverschluß
Zum Öffnen und Schließen des Kastens
3. Schloßmutterhebel
Durch Schließen der Schloßmutter wird der
automatische Vorschub eingeschaltet.
4. Längsschlittenhandrad
Zum schnellen Verschieben des Support von links
nach rechts; auf dem Nonius kann abgelesen werden,
wie groß die Verstellung ist, in Stufen von 0,04 mm.
5. Klemmhebel
Durch Lösen des Hebels kann der
DrehVierfachstahlhalter stahlblock in Stufen von 90
Grad gedreht werden.
6. Spannhebel Reitstock
Zum Festspannen dess Reitstocks.
7. Reitstockpinole-Handrad
Durch drehen kann das Werkstück zwischen
Backenfutter und Zentrierer geklemmt werden;
außerdem gebraucht beim Bohren; auf dem Nonius
kann abgelesen werden, wie groß die Verstellung ist,
in Stufen von 0,05 mm
8. Oberschlittenhandrad
Für die Längsverstellung des Oberschlittens. Auf
dem Nonius kann abgelesen werden, wie groß die
Verstellung ist, in Stufen von 0,04 mm.
9. Querschlittenhandrad
Für die Längsverstellung des Querschlittens. Auf
dem Nonius kann abgelesen werden, wie groß die
Verstellung ist, in Stufen von 0,04 mm.
10.Klemm-Muttern Reitstock
Zum Klemmen des Reitstocks an das Bett; Zum
Klemmen des Oberstücks an die Fußplatte.
11.Klemm-Muttern Drehteil
Nachdem der gewünschte Winkel eingestellt ist,
können hiermit die Drehplattenteile aufeinander
geklemmt werden.
12.Keilriemenspannrolle
Sie macht es möglich, Keilriemen zu wechseln, zu
spannen und zu verlegen, ohne die Rädersätze zu
demontieren.
13.Hauptspindelrädersatz
Einstellen Drehgeschwindigkeit
14.Zwischenrädersatz
Einstellen Drehgeschwindigkeit
15.Motorrädersatz
Einstellen Drehgeschwindigkeit
16.Schere
Zum Montieren eines Zwischenwechselrades und
zum Verstellen in drei Richtungen; Kuppeln
Leitspindel.
17.Klemmschraube
Durch anpassen des Standes der Schere,
Scherenverstellung können das Zwischen-,
Antriebs- und Leitspindelwechselrad gestellt
werden.An-/und Abschalten der Leitspindel.
18.Zwischenwechselrad
Drehrichtung Leitspindel; Einstellen des
Transmissionsverhältnisse.
19.Wechselrad Leitspindel
Einstellen Transmissionsverhältnis; mittels
Anbringen von Füllringen ist das Rad axial verstellbar
(Abb. 3), Längsbewegung Support.
20.Vorschub /Leitspindel
Vor dem Gewindeschneiderad, hinter dem
Vorschubrad.
21.Zwischenwechselradachse
Durch diese Klemmeinrichtung beim Plandrehen zu
benutzen, kann die Schloßmutter offen bleiben, ohne
daß der Support weggleitet. Spindel und Mutter
werden dadurch viel weniger belastet.
22. ntriebszahnräder für Vorschub und
Gewindeschneiden
Befestigung Zwischenwechselrad; mittels Anbringen
von Füllringen ist das Rad axial verstellbar und mit
der unteren Achsenmutter ist das Rad seitlich
verstelbar.
23.Klemschraube Längsschlitten
DREHSTÄHLE
Fig.13
Beim Drehen wird ein Span aus dem Werkstück
geschnitten. Dafür müssen Drehstähle in eine spezielle
und scharfe Form geschliffen werden. Diese Form hängt
ab vom Drehstahlmaterial und vom zu schneidenden
Material. Sie folgende Tabelle.
Tab.2
Anhand der Abb. 13 können die Winkel aus dieser
Tabelle auf einem Stückchen VierkantSchnellschnittstahl
(HSS) übernommen werden, um selbst einen Drehstahl
anzufertigen und nachzuschleifen. Es geht hier als
Beispiel um einen geraden rechten Schruppstahl. Die
gestrichelten Linien geben die ursprüngliche Form des
Stabes an. Die Winkel 1, und 3 ergeben zusammen
immer 90 Grad. Winkel 1 heißt Spanwinkel, Winkel ist
der Keilwinkel und Winkel 3 der Freilwinkel. Um die
Reibung so niedrig wie möglich zu halten, sind noch zwei
extra Freiwinkel geschliffen: Winkel 4 und 6. Außerdem
wurde ein Neigungswinkel 5 angebracht. Der Pfeil gibt
die Vorschubrichtung an. Die vorderste Fläche wird
Hilfsschneidefläche genannt. Die Hauptschneidefläche
ist das Teil, auf dem der Pfeil gezeichnet ist. Auf diese
Weise können Sie alle möglichen Drehstähle selbst
schleifen, wobei Sie immer festlegen müssen, wo die
Hauptschneidefläche sein soll und was das Drehmaterial
ist.
Drehstahlwinkel Leichte Normale Schwere
schnitt schnitt schnitt
HSS HM HSS HM HSS HM
Spannwinkel
1 10 10 5 5 0
Freiwinkel
867564
Keilwinkel
70 74 73 80 79 86
20 Ferm
Table of contents
Languages:
Other Ferm Lathe manuals