Ferno 156 User manual

Users’ Manual
June 2019
Pub. No. 234-1845-01
Model 156
Roller System
Read this Manual and Retain
for Future Reference

© Ferno-Washington, Inc. / 234-1845-01 / June 2019
2
USERS’ MANUALS
To request additional free users’ manuals,
contact Ferno Customer Relations, your Ferno
distributor, or www.ferno.com.
Disclaimer
This manual contains general instructions for the use, operation
and care of this product. The instructions are not all-inclusive. Safe
and proper use of this product is solely at the discretion of the user.
Safety information is included as a service to the user. All other safety
measures taken by the user should be within and under consideration
of applicable regulations and local protocol. Training on the proper use
of this product must be provided before using this product in an actual
situation.
Retain this manual for future reference. Include it with the product in
the event of transfer to new users. Additional free copies are available
upon request from Customer Relations.
Proprietary Notice
The information disclosed in this manual is the property of Ferno-
Washington, Inc., Wilmington, Ohio, USA. Ferno-Washington, Inc.
reserves all intellectual property rights, proprietary design rights,
manufacturing rights, reproduction use rights, and sales use rights
thereto, and to any article disclosed therein except to the extent those
rights are expressly granted to others or where not applicable to vendor
proprietary parts.
Limited Warranty Statement
The products sold by Ferno are covered by a limited warranty, which
is printed on all Ferno invoices. The complete terms and conditions of
the limited warranty, and the limitations of liability and disclaimers,
are also available upon request by calling Ferno at 1.800.733.3766 or
1.937.382.1451.
Ferno Customer Relations
For ordering assistance or general information:
CANADA AND THE U.S.A.
Telephone (Toll-free) 1.877.733.0911
Telephone 1.937.382.1451
Fax (Toll-free) 1.888.388.1349
Fax 1.937.382.1191
Internet www.ferno.com
ALL OTHER LOCATIONS
For assistance or information, please contact your Ferno distributor. If
you do not have a Ferno distributor, please contact Ferno Customer
Relations:
Ferno-Washington, Inc., 70 Weil Way
Wilmington, Ohio 45177-9371, U.S.A.
Telephone Country Code +1.937.382.1451
Fax Country Code +1.937.382.6569
Internet www.ferno.com
The Serial Label is located on the center bar, under the roller system.
Serial Number
1.937.382.1451

© Ferno-Washington, Inc. / 234-1845-01 / June 2019 3
TABLE OF CONTENTS
Ferno Customer Relations ________________________________ 2
1 - Safety Information _____________________________________ 4
1.1 Warning__________________________________________ 4
1.2 Notice ___________________________________________ 4
1.3 Tip ______________________________________________ 4
1.4 Bloodborne Disease Notice __________________________ 4
1.5 Symbol Glossary ___________________________________ 4
2 - Operator Focus ________________________________________ 5
2.1 Operator Training __________________________________ 5
3 - About the Roller System_________________________________ 5
3.1 Description _______________________________________ 5
3.2 General Specications ______________________________ 5
3.3 Components ______________________________________ 6
4 - Installation ____________________________________________ 7
4.1 Before Installing the Mounting Plates __________________ 7
4.2 Installing the Mounting Plates ________________________ 8
5 - Using the Roller System ________________________________ 10
5.1 Before Placing the Roller System In Service_____________ 10
5.2 General Guidelines for Use__________________________ 10
5.3 Using a Mortuary Cot with the Roller System ___________ 10
5.4 Using a Casket with the Roller System_________________ 11
5.5 Removing and Replacing the Roller System in a Vehicle __ 11
6 - Maintenance _________________________________________ 12
6.1 Maintenance Schedule_____________________________ 12
6.2 Disinfecting and Cleaning the Patient Restraints ________ 12
6.3 Disinfecting the Roller System _______________________ 12
6.4 Cleaning the Roller System__________________________ 12
6.5 Inspecting the Roller System ________________________ 13
7 - Parts, Service, Accessories ______________________________ 13
7.1 U.S.A. and Canada_________________________________ 13
7.2 Worldwide_______________________________________ 13
7.3 Accessories ______________________________________ 13
Training Record__________________________________________ 14
Maintenance Record _____________________________________ 15
Section Page Section Page

© Ferno-Washington, Inc. / 234-1845-01 / June 2019
4
1 SAFETY INFORMATION
1.1 Warning
Warning safety alerts indicate a potentially hazardous situation that, if
not avoided, could result in injury or death.
1.4 Bloodborne Disease Notice
To reduce the risk of exposure to blood or other potentially infectious
materials when using the roller system, follow the disinfecting and
cleaning instructions in this manual.
Safety Information
1.3 Tip
Tips provide recommendations for easier use of the product.
WARNING
Untrained operators can cause injury or be injured. Permit
only trained personnel to operate the roller system.
Improper use of the roller system can cause injury. Use the
roller system only for the purpose described in this manual.
Failure to use the mounting plates (provided) can cause
injury. Install and use the mounting plates and roller
system as described in this manual.
Improper installation can cause injury. Install the mounting
plates and roller system as described in this manual.
Modifying the roller system can cause injury and damage.
Use the roller system only as designed by Ferno.
Attaching improper items to the roller system can cause
injury. Use only Ferno-approved items on the roller system.
Improper operation can cause injury. Operate the roller
system only as described in this manual.
Improper maintenance can cause injury. Maintain the
roller system only as described in this manual.
Improper parts and service can cause injury. Use only Ferno
parts and Ferno-approved service on the roller system.
Modifying the roller system can cause injury and damage.
Use the roller system only as designed by Ferno.
Attaching improper items to the roller system can cause
injury. Use only Ferno-approved items on the roller system.
Improper securing of the cot or casket can allow it to move
in the vehicle and cause injury. Secure the roller system,
cot and/or casket in the vehicle as described in this manual.
1.2 Notice
Notices emphasize important, but not hazard-related information.
Failure to follow Notices could result in product or property damage.
NOTICE
1.5 Symbol Glossary
The symbols dened here are used on the roller system and/or in this’
manual. Ferno uses symbols recognized by the International Standards
Organization (ISO), American National Standards Institute (ANSI) and
the mortuary services industry.
Manufacturer Authorized Representative in the
European Community
Product meets
European Union Standards
Load Capacity
(Safe Working Load in
pounds, kilograms, stone)
1000 lb
454 kg
71.4 st
General Warning of
Potential Injury
Read the Users’Manual

© Ferno-Washington, Inc. / 234-1845-01 / June 2019 5
2 OPERATOR FOCUS
2.1 Operator Training
Operator using the roller system:
● must read and understand this manual.
● must have training on proper use of the roller system.
● must have a training on mortuary-service procedures.
● must have the physical ability to perform required functions
related to the use of the roller system (e.g., loading and unloading
a casket or mortuary cot into and out of the roller system).
● must practice with the roller system before using it with a casket
or mortuary cot.
● must keep training records. For a sample training record sheet, see
“Training Record” on page 14.
Operator Focus, About the Roller System
WARNING
Untrained operators can cause injury or be injured. Permit
only trained personnel to operate the roller system.
3 ABOUT THE ROLLER SYSTEM
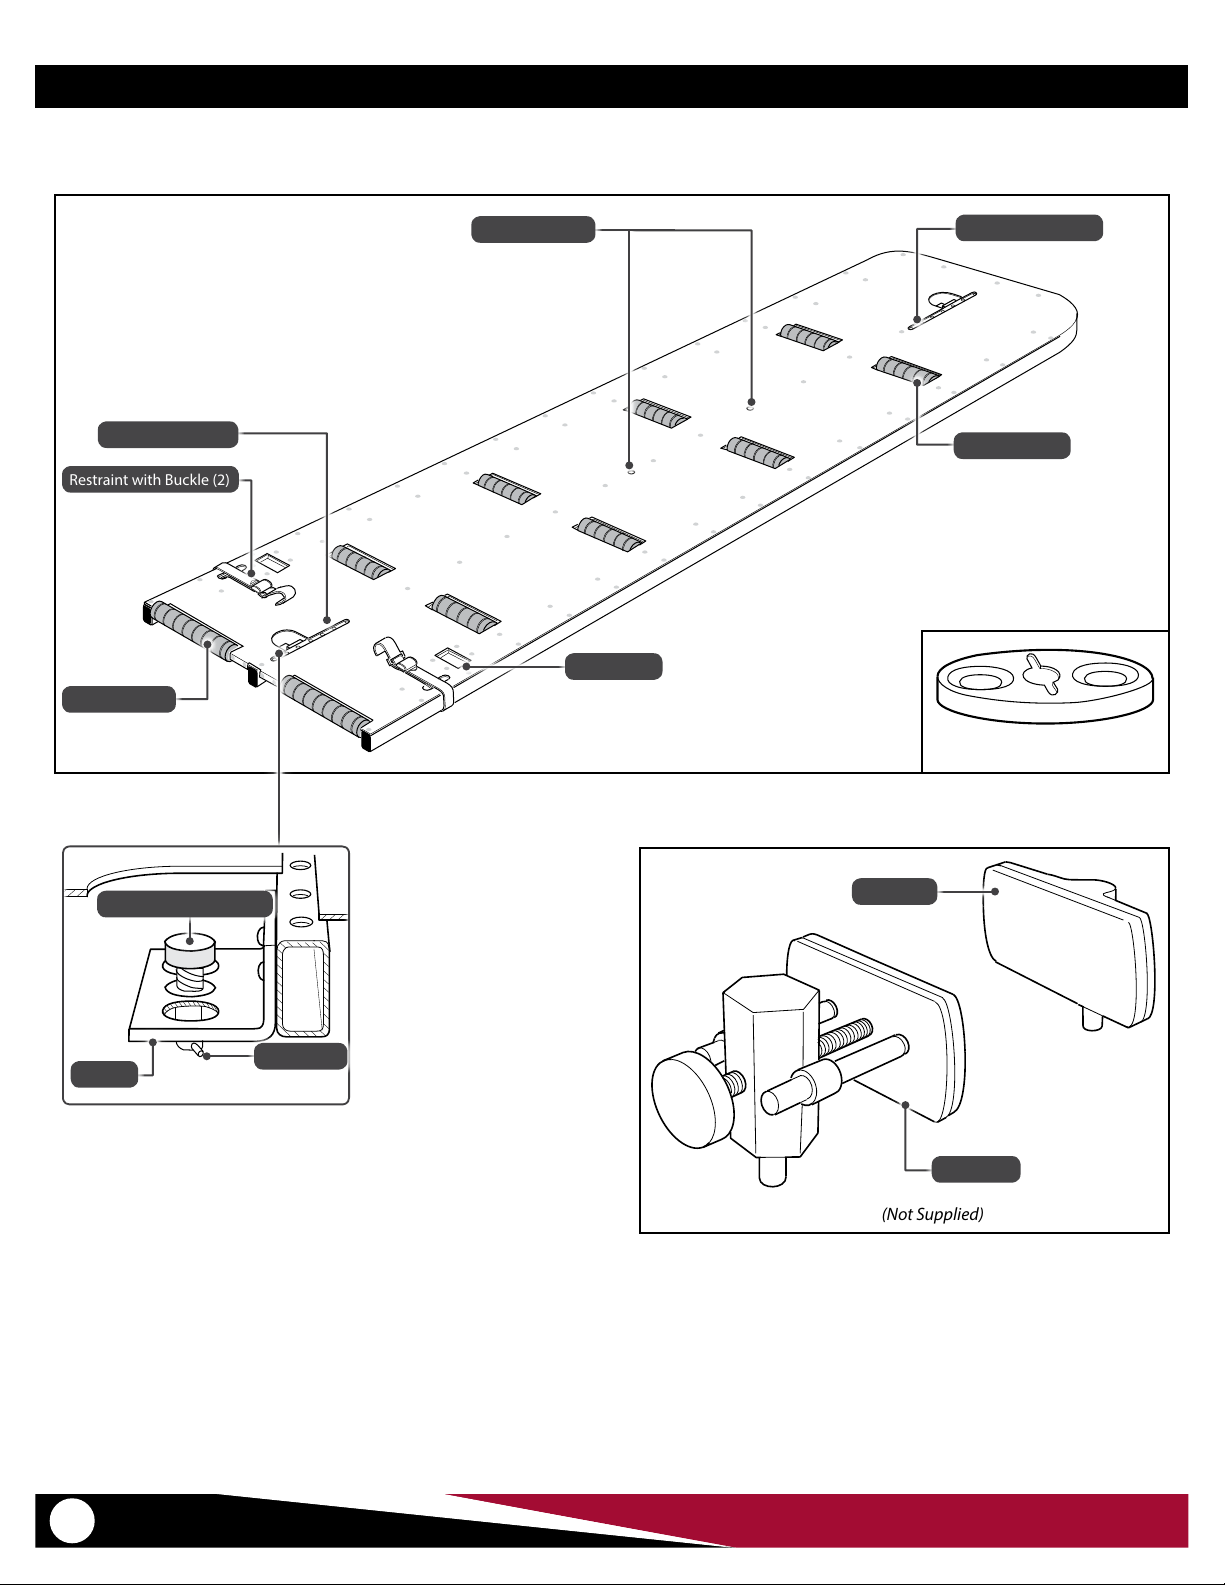
3.1 Description
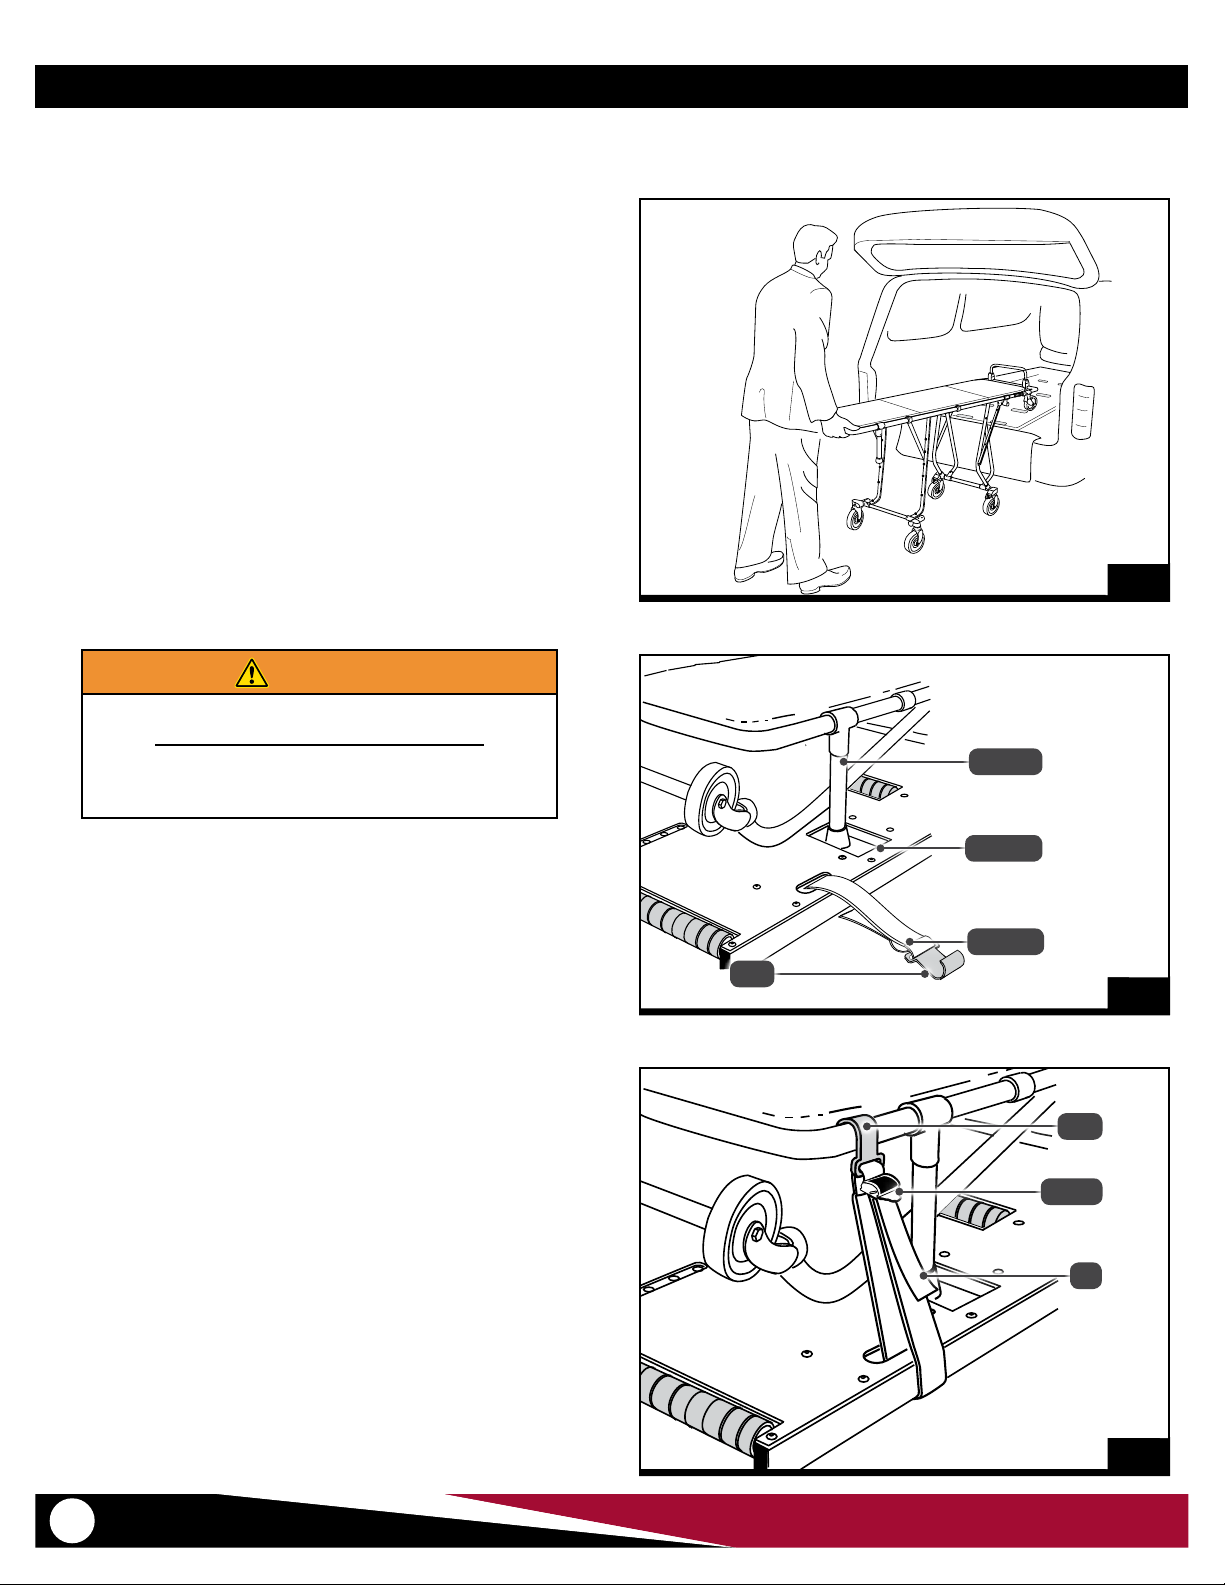
The Ferno®Model 156 Roller system (called the roller system in this
manual) is a mortuary device designed to ease the loading, unloading,
and transporting of caskets and mortuary cots in a ground-based
vehicle. It is for professional use by trained mortuary-service operators.
Bier pins (not supplied, available separately) and restraints help limit the
movement of a casket or mortuary cot in the vehicle during transport.
The roller system secures to mounting plates installed on the oor of
the vehicle. The roller system can be easily removed so the vehicle can
be used for other purposes.
Features include 10 rollers (8 short and 2 long), two quick-release knobs,
two cot restraints, and a variety of bier-pin attachment points to allow
the use of caskets of dierent lengths.
COMPATIBILITY
● Ferno® Model 23 Cot Series
● Ferno® Model 24 Cot Series*
● Ferno® Model 27 Cot Series
Note:The roller system is not compatible with Ferno® 24-MAXX or
24-MiniMAXX series cots.
WARNING
Improper use of the roller system can cause injury. Use the
roller system only for the purpose described in this manual.
3.2 General Specications
Specications for the roller system are shown in the tables at right.
General specications are rounded. Metric conversions are calculated
before rounding the Imperial measurement.
Ferno reserves the right to change specications without notice. For
more information, contact Ferno Customer Relations or your Ferno
distributor (page 2).
Specications Imperial Metric
Load Capacity 1000 lb 454 kg
Load Capacity (UK) 71.4 st
Weight 41 lb 18.6 kg
Construction Aluminum with Steel Hardware
Length 89 in 226 cm
Width 24 in 61 cm
Height 2 in 5 cm
Load Capacity
Inspect the roller system if the load capacity
has been exceeded. See “Inspecting the
Roller System”on page 13.
1000 lb
454 kg
71.4 st

© Ferno-Washington, Inc. / 234-1845-01 / June 2019
6
About the Roller System
3.3 Components
Post Cup (2)
Bracket
Lock Pin (2)
Restraint with Buckle (2)
Mounting Plate (2)
Roller System
Rear Bier Pin Holes
Front Bier Pin Holes
Short Roller (8)
Bier Pin Hole (2)
Bier Pin (Not Supplied)
Stationary
Adjustable
Long Roller (2)
Lock Knob Assembly (2)

© Ferno-Washington, Inc. / 234-1845-01 / June 2019 7
4 INSTALLATION
Installation
4.1 Before Installing the Mounting Plates
● The roller system attaches to mounting plates installed on the
vehicle oor.
● Installing the mounting plates requires the skills of a mechanic
familiar with vehicle construction.
● Before installing the roller system, consult the vehicle manufacturer
regarding the location of wiring, oxygen or fuel lines, and other
elements under the vehicle oor, and about the vehicle warranty.
● Determine the location to install the roller system in the vehicle.
Install the roller system in the center of the vehicle, or, if the vehicle
interior is wide enough, two roller systems (sold separately) may be
installed side-by-side (Figure 1 or Figure 2).
WARNING
Failure to use the mounting plates (provided) can cause
injury. Install and use the mounting plates and roller
system as described in this manual.
Improper installation can cause injury. Install the mounting
plates and roller system as described in this manual.
Modifying the roller system can cause injury and damage.
Use the roller system only as designed by Ferno.
Attaching improper items to the roller system can cause
injury. Use only Ferno-approved items on the roller system.
NOTICE
Inspect the underside of the vehicle for anything (wiring,
brake lines, fuel tank, oxygen lines or other elements) that
might interfere with the installation.
Loose items and debris on the vehicle oor can interfere with
the operation of the roller system. Keep the oor clear.
Contact the Manufacturer
Contact the vehicle manufacturer for advice
on avoiding obstructions such as the fuel
tank, oxygen lines, etc.
Also seek advice on installing support
structure if needed, including backing plate
positioning, material, and thickness.
1
2

© Ferno-Washington, Inc. / 234-1845-01 / June 2019
8
2 MARK THE MOUNTING POSITION
1. Position one or both roller system(s) on the oor at the desired
location(s), with the long rollers and post cups at the rear of the
vehicle. Load and unload a cot on the roller system, then a casket,
while checking the following (Figure 4):
○ If two roller systems will be installed, conrm they will not
interfere with each other
○ Conrm the cot and/or casket load easily onto the roller system.
If two roller systems will be installed, conrm that cots and/or
caskets can be loaded onto each.
○ Check the vehicle rear door for a lip or other obstruction that could
interfere with loading. If interference is found, contact Ferno for
assistance. See“Ferno Customer Relations”on page 2.
○ Conrm the rear doors close securely when the roller system(s)
are carrying cots and/or caskets.
○ Conrm that mounting the roller system(s) at the desired
locations will not damage or interfere with electrical wiring,
brake lines, the fuel tank, or other vehicle elements.
2. Mark the mounting points on the oor through the mounting
plates.
3. If the vehicle oor is carpeted, use a grease pencil to trace the
edge of the mounting plate on the oor, then cut and remove a
square section of carpeting to allow the mounting plate to sit at
on the oor.
4.2 Installing the Mounting Plates
1 ATTACH THE MOUNTING PLATES TO THE TABLE
1. To attach a mounting plate, turn a lock knob and align the lock pin
with the slot in a mounting plate (Figure 3).
2. Push the lock knob down, inserting the lock pin through the slot.
Turn the lock knob ¼ turn until the mounting plate is attached.
3. Turn the mounting plate to align the holes in the mounting plate
with the holes in the bracket. These holes are used to mark the
location of the screw holes.
4. Repeat with the other mounting plate.
Installation
3
Lock Knob
Bracket
Lock Pin
Mounting Plate
Slot
4
NOTICE
Drilling through carpet may unravel the carpet. If the oor is
carpeted, use a grease pencil to mark the mounting plate and
mounting locations on the oor. Cut out a square section of
carpet around the mounting plates before drilling.

© Ferno-Washington, Inc. / 234-1845-01 / June 2019 9
Installation
3 INSTALL THE MOUNTING PLATES
Before drilling through the vehicle oor, contact the vehicle
manufacturer for advice on:
● avoiding obstructions such as the fuel tank, oxygen lines, etc.
● installing support structure if needed, including backing plate
positioning, material, and thickness.
● determining the appropriate length and type of fasteners to secure
the mounting plate to the oor of your vehicle.
Ferno recommends you drill a pilot hole through the vehicle oor at
each mounting point (Figure 5) to conrm the mounting holes are at
the expected locations. Then, use an appropriate-size drill bit, fasteners
and/or other tools to install the mounting plates to the oor (Figure 6).
5
6

© Ferno-Washington, Inc. / 234-1845-01 / June 2019
10
5 USING THE ROLLER SYSTEM
5.1 Before Placing the Roller System
In Service
● Before use, personnel who will work with the roller system must
read and understand this manual. Appropriate skills and training
are also required. See “Operator Focus”on page 5.
● Set up the roller system. See“Installation” on page 7.
● Conrm that the roller system operates properly. See “Inspecting
the Roller System” on page 13.
5.2 General Guidelines for Use
● The roller system is for professional use only.
● Use the roller system only as described in this manual.
● Follow standard mortuary procedures when using the roller system.
WARNING
Improper operation can cause injury. Operate the roller
system only as described in this manual.
Improper securing of the cot or casket can allow it to move
in the vehicle and cause injury. Secure the roller system,
cot and/or casket in the vehicle as described in this manual.
Using the Roller System
5.3 Using a Mortuary Cot with the
Roller System
1. Remove the bier pins (not supplied) from the roller system.
2. Load the mortuary cot into the vehicle and onto the roller system,
following the instructions in the cot users’ manual (Figure 7).
3. Push the cot forward until the cot posts rest in the roller system
post cups (Figure 8).
4. Hook a restraint over the cot frame and pull the tab to tighten the
restraint (Figure 9).
5. Repeat with the other restraint.
6. To unload the cot, loosen the restraint by pulling the buckle up.
Unhook the restraint from the cot frame.
7. Unload the cot from the vehicle, following the instructions in the
cot users’ manual.
7
9
Buckle
Tab
Hook
8
Restraint
Cot Post
Post Cup
Hook

© Ferno-Washington, Inc. / 234-1845-01 / June 2019 11
5.5 Removing and Replacing the
Roller System in a Vehicle
1. To remove the roller system from the vehicle, push down and
turn a lock knob 1/4 turn until the lock pin is released from the
mounting plate (Figure 11).
2. Repeat with the second lock knob.
3. Lift the roller system out of the vehicle.
4. To replace the roller system in the vehicle, align a lock pin with the
slot in a mounting plate (Figure 12).
5. Push the lock knob down to insert the lock pin through the slot.
Turn the lock knob left or right ¼ turn to secure the lock pin in the
mounting plate.
6. Repeat with the second lock knob.
5.4 Using a Casket with the
Roller System
1. Place a stationary bier pin (not supplied) in one of the front bier-
pin holes.
2. Load the casket onto the roller system and push the casket
against the stationary bier pin.
3. Place an adjustable bier pin (not supplied) in one of the rear bier-
pin holes (Figure 10). Tighten the adjustable bier pin to secure the
casket on the roller system.
4. To unload the casket from the vehicle, remove the adjustable bier
pin and roll the casket o the roller system.
Using the Roller System
10
Adjustable Bier Pin
11
12
Lock Pin

© Ferno-Washington, Inc. / 234-1845-01 / June 2019
12
6 MAINTENANCE
6.1 Maintenance Schedule
The roller system requires regular maintenance. Set up and follow a
maintenance schedule. The table at right represents minimum intervals
for maintenance.
Keep maintenance records. For a sample record sheet, see“Maintenance
Record”on page 15.
When using maintenance products, follow the manufacturers’ directions
and read the manufacturers’material safety data sheets.
6.2 Disinfecting and Cleaning
the Patient Restraints
To remove the patient restraints from the roller system (Figure 13):
1. To remove the restraints from the roller system, use a small at-
blade screwdriver to pry o the buckle cover.
2. Unthread the restraint from the buckle and roller system.
3. Place the restraints in a mesh laundry bag. Machine wash them
on cold/cold using the delicate cycle and a mild detergent. Allow
them to air dry.
4. Thread the restraints through the buckle as shown in Figure 13.
○ Insert the loose end of the strap through the slot in the roller
system (1) and around the edge of the roller-system frame (2).
○ Orient the buckle as shown. Thread the loose end of the strap
over the buckle roller (3) and under the buckle tab (4).
○ Orient the buckle cover as shown and attach to the buckle.
6.3 Disinfecting the Roller System
Wipe all surfaces with disinfectant. Follow the disinfectant manufacturer’s
instructions for application method and contact time. Ferno recommends
you inspect the roller system for damage as you disinfect it.
WARNING
Improper maintenance can cause injury. Maintain the
roller system only as described in this manual.
Minimum
Maintenance Each Use As Needed Monthly
Disinfecting (this page) •
Cleaning (this page) •
Inspecting (page 13) • •
NOTICE
Disinfectants and cleaners containing bleach, phenolics, or
iodines can cause damage. Do not use products containing
these chemicals.
Maintenance
13
Buckle Cover
1
2
3
4
Roller
Tab
Strap
Buckle
6.4 Cleaning the Roller System
1. Remove the restraints.
2. Hand clean all surfaces of the roller system with warm water and
a mild detergent.
3. Rinse with warm, clear water. Dry the roller system with a towel or
allow it to air-dry.

© Ferno-Washington, Inc. / 234-1845-01 / June 2019 13
Maintenance, Parts, Service Accessories
6.5 Inspecting the Roller System
Have your service’s equipment maintenance personnel inspect the
roller system regularly. Follow the checklist at right and operate the
roller system through all its functions as described in this manual.
If inspection shows damage or excessive wear, remove the roller system
from service until repair is made. See“Parts and Service”below.
Inspection Checklist
● Are all components present?
● Is the roller system free of excessive wear?
● Are the mounting plates securely attached to the oor?
● Does the roller system attach securely to the mounting
plates?
● Do all moving parts operate smoothly and properly?
● Is the restraint webbing in good condition with no cuts
or frayed edges?
● Are the restraint buckles free of visible damage and do
they operate properly?
7 PARTS, SERVICE, ACCESSORIES
7.1 U.S.A. and Canada
In the United States and Canada, to order parts or for professional
repair, contact EMSAR®– the only agent authorized by Ferno to manage,
service, and repair Ferno products.
Telephone (Toll-Free) 1.800.73.EMSAR
Telephone 1.937.383.1052
Fax +1.937.383.1051
Internet www.EMSAR.com
7.2 Worldwide
To order Ferno parts, and for professional repair, contact your Ferno
distributor. Your distributor is the only agent authorized by Ferno to
manage, service, and repair Ferno products.
WARNING
Improper parts and service can cause injury. Use only Ferno
parts and Ferno-approved service on the roller system.
Modifying the roller system can cause injury and damage.
Use the roller system only as designed by Ferno.
7.3 Accessories
Ferno oers a full line of accessories approved for use with the roller
system. Follow all instructions in accessory users’ manuals. Keep the
instructions with this manual.
When using accessories, be aware of any special considerations which
may be aected by the addition of the accessory/accessories to the
roller system.
Contact Ferno Customer Relations (page 2) or your Ferno distributor for
product information.
Description Part Number
Model 575 Bier Pin Storage Plate 081-5750
Model 576 Bier Pin Set (1 stationary, 1 adjustable) 069-5760
Model 577-A Adjustable Bier Pin 069-5770
Model 577-S Stationary Bier Pin 069-5780

© Ferno-Washington, Inc. / 234-1845-01 / June 2019
14
Training Record
Date Printed Name Signature
Training Method Trainer
Initials
Read
Manual
Video/
Online Hands-On
TRAINING RECORD

© Ferno-Washington, Inc. / 234-1845-01 / June 2019 15
Date Maintenance Performed By
Maintenance Record
MAINTENANCE RECORD

Aviation
Military
Mortuary
EMS
Rescue
70 Weil Way
Wilmington, OH 45177
© Ferno-Washington, Inc. | 234-1845-01 | June 2019
Table of contents
Other Ferno Automobile Accessories manuals