FFS Brands EQVIBATCHT User manual

1
Set and forget bun size and temperature adjustment.
Small foot print fits on a standard half size counter top.
Toasts up to 12 Heals and Crowns per cycle.
Digital LED timer and LED indicators to illustrate cycle time and
temperature ready.
Audible buzzer at end of every toasting cycle.
Non – stick Toasting platens
Batch Toaster
EQVIBATCHT

2
BATCH TOASTER SPECIFICATION PAGE
Dimensions
Height
Width
Depth
Machine
342mm
436mm
583mm
Weight 20kg
Electrical
Running Amps
Connection Type
International
1 phase, 50Hz AC, 230v, 2.5Kw
11 Amps
BSCHUKO 2/3 PIN PLUG
N/A

3
Your “VIZU BATCH TOASTER” has been tested and checked for proper operation before
leaving the factory.
Upon delivery please check the unit for damage, unpack the box ensuing that you retain all
packaging until you are satisfied that the unit is working order and complete with all
accessories. Once satisfied remove all protective plastic from the unit and dispose or recycle
packaging as appropriate.
If you find the unit is damaged or not in working order please contact the carrier of Fast Food
Systems, repackage your Vizu Product and File the damage claim form at the back of this
manual.
Damage must be reported within 7 days of delivery
GENERAL DESCRIPTION
This Vizu Batch Toaster has been designed to seal burger buns by Caramelising the inner
sides of each bun to ensuring a uniform product in terms of size, colour and moisture.
ASSEMBLY INSTRUCTIONS
Remove all packaging from the unit.
Peel off all protective plastic from the metal.
Wash Tray, Spatula and Top cover in warm, soapy water and dry them thoroughly.
Refit cleaned parts.
INSTALLATION
Position the Vizu Batch toaster in in desired position, close to a suitable electrical supply.
The unit is supplied with a 3 pin UK plug, connect to power supply.
CARAMALISING
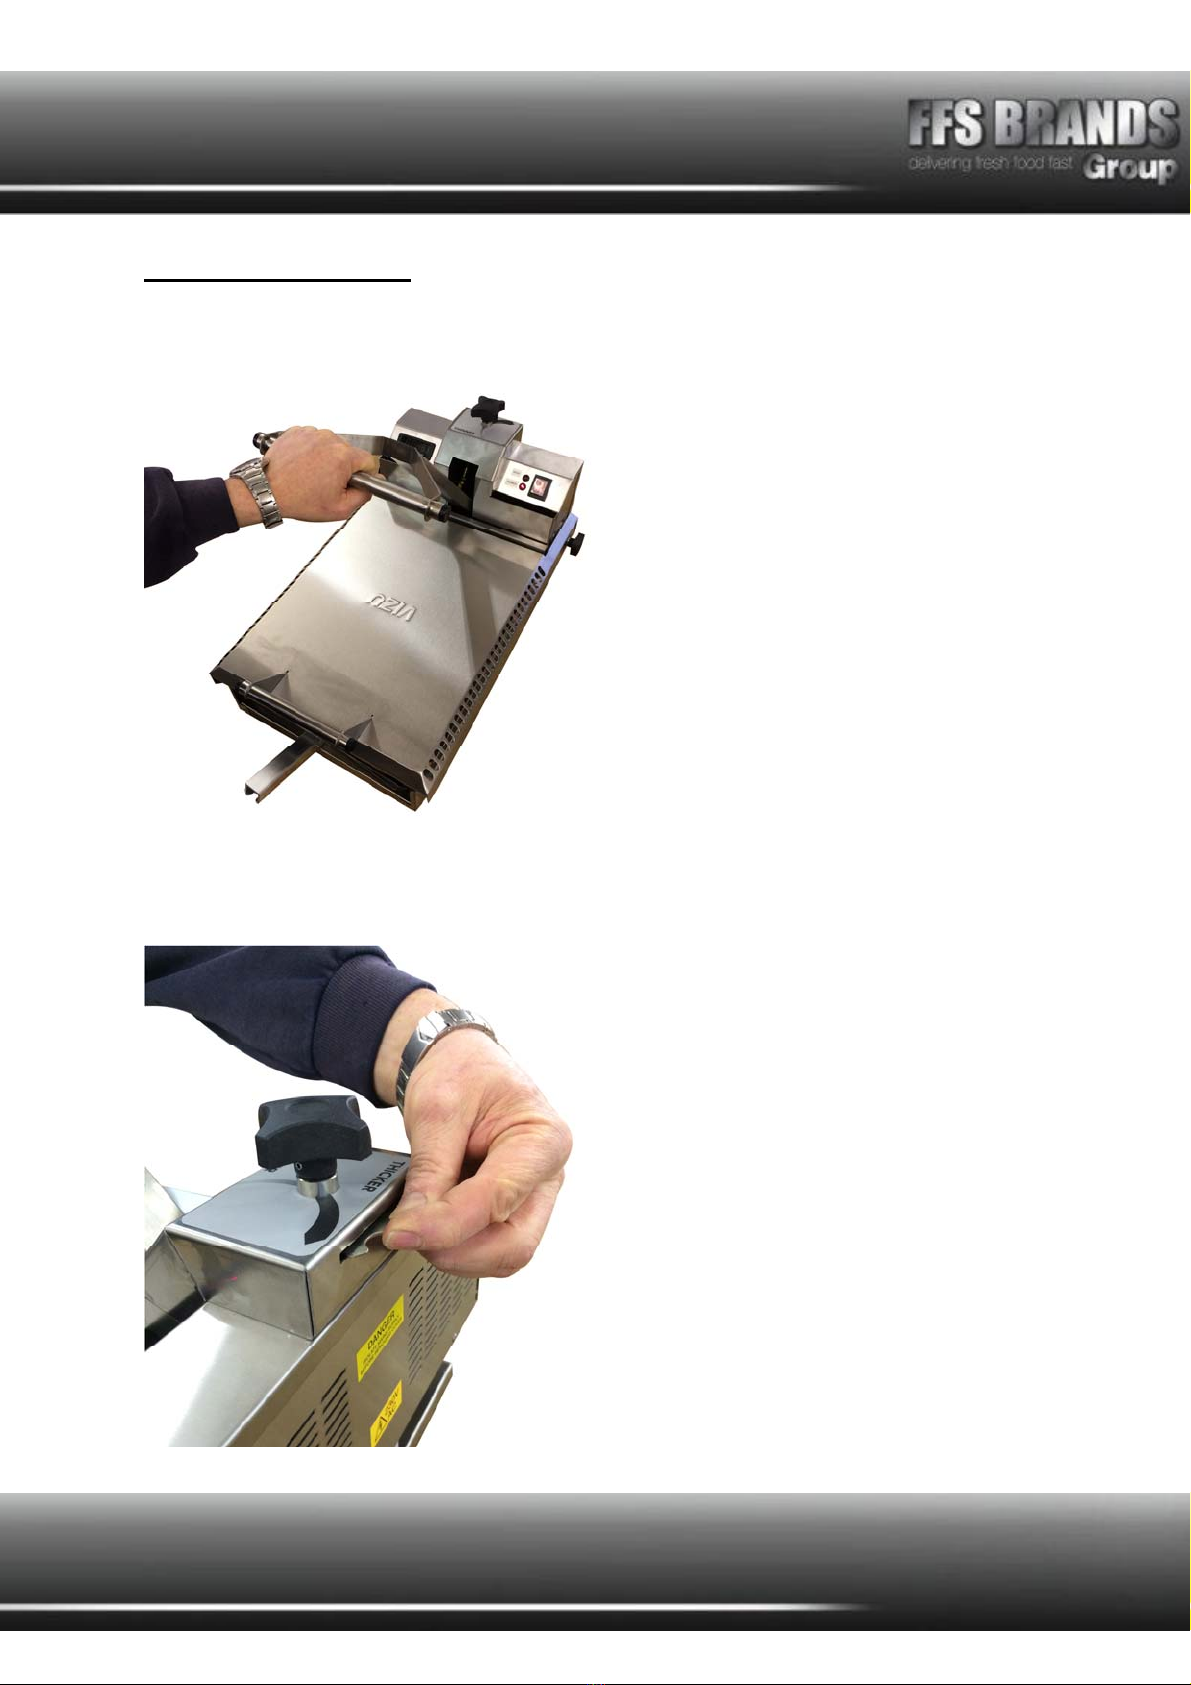
1. Plug in and switch on at the wall socket.
2. The RED LED power indicator indicates the machine is connected to the power
supply.
3. Adjust the platen to the correct size setting while the machine is cool.
4. The Red Rocker switch allows power to pass to the heating element, select position
“On”.
5. The temperature is controlled by the mechanical thermostat which is factory set to
220 degrees Celsius and is located within the toaster.

4
6. The Temperature Red LED will illuminate, when it is off the toaster is at the desired
temperature.
7. The time cycle is set at the factory default of 45 seconds. This will illuminate when
Red Rocker switch is “On”
8. Load the platen with buns, heels are loaded on the top using the Spatula, while
Crowns are loaded on the bottom using the tray.
9. Raising the lower tray will activate the timer, at the completion of the cycle the buzzer
will sound.
10. Remove the buns.
NOTE – THE BUNS WILL CONTINUE TO CARAMELISE UNTIL
REMOVED.
5
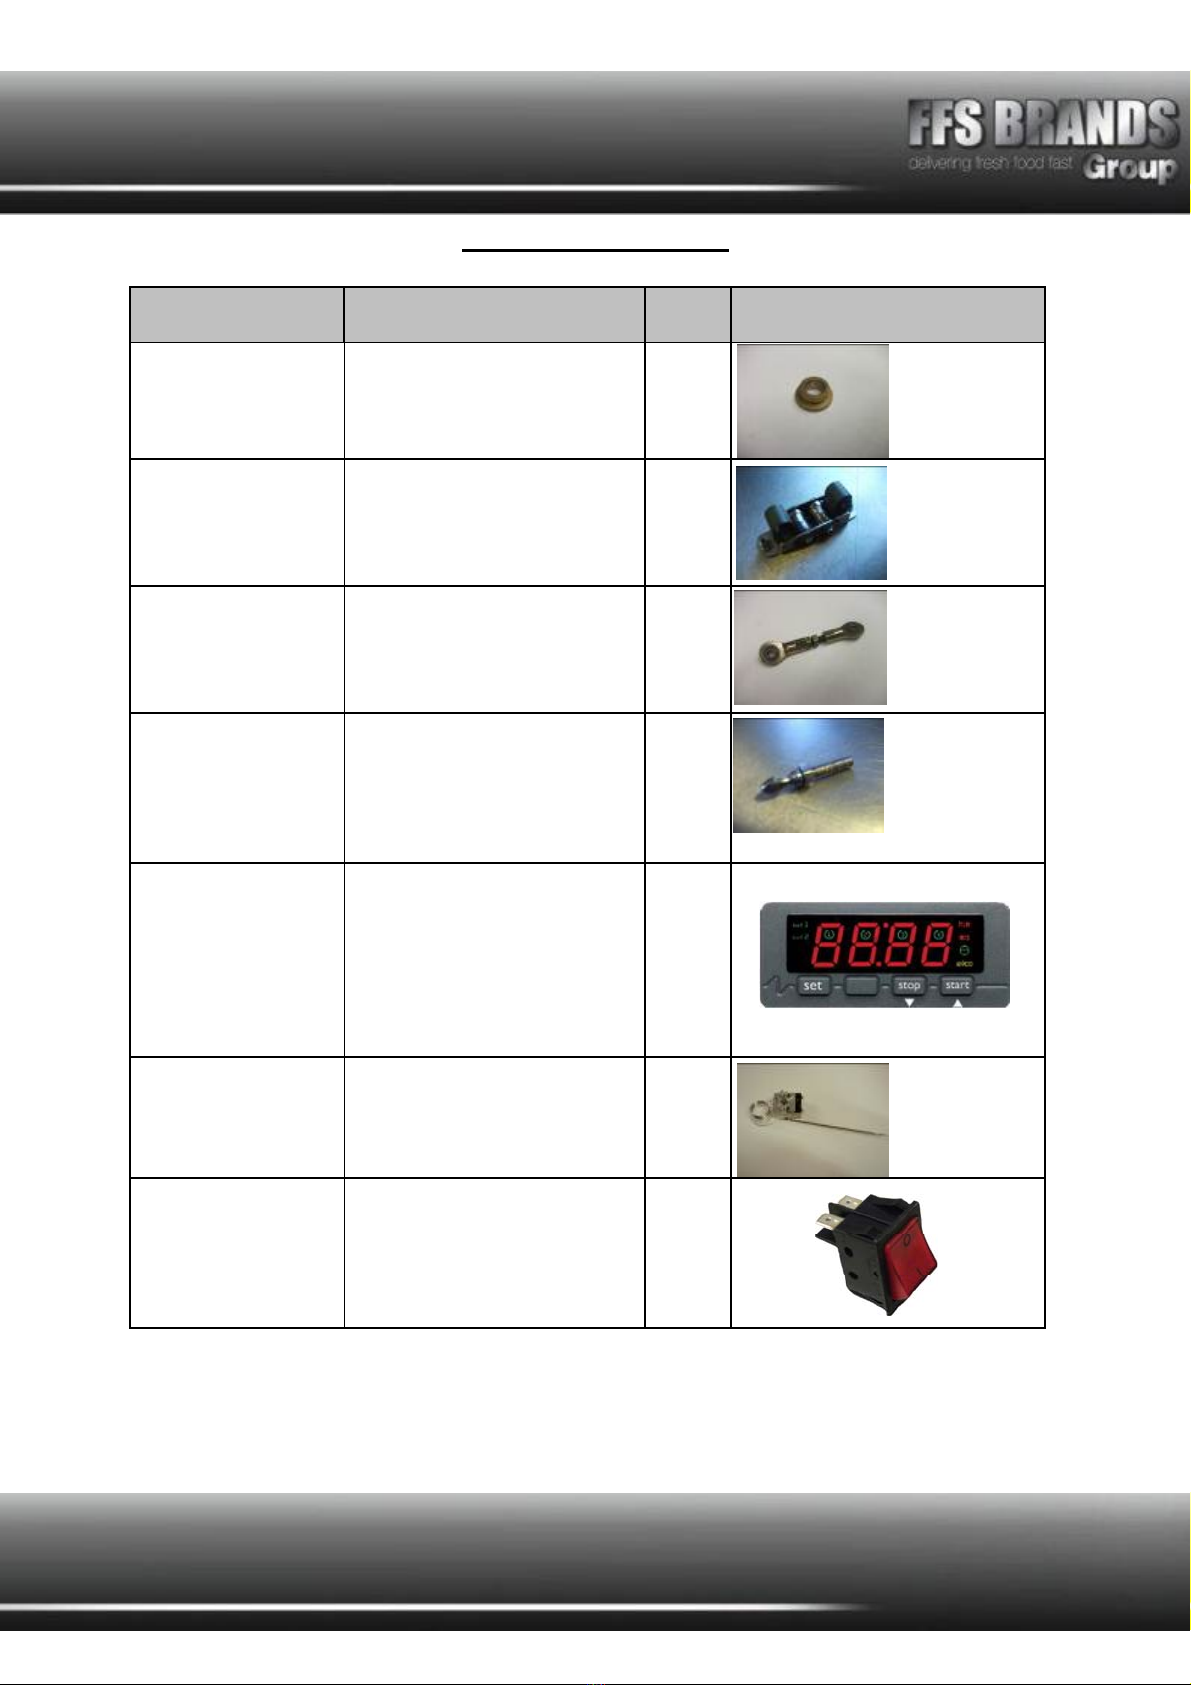
PLATEN ADJUSTMENT:
1. Lock the toaster in the cooking position.
2. Unlock the adjustable mechanism by rotating the locking wheel.

6
3. Rotate the black knob up or down until the platen and cooking surface are the
desired distance apart.
4. Retighten the locking wheel to lock the adjustable mechanism into position.

7
CLEANING INSTRUCTIONS
1. Switch off the toaster and remove electrical cord from the wall supply and allow the
unit to cool.
2. Once cool remove the top cover, spatula and tray. Wash in hot soapy water and dry
thoroughly.
3. Wipe all external surfaces with proprietary stainless steel cleaner or warm damp cloth
– dry thoroughly.
4. Replace parts and dry.
DO NOT USE ANY ABRASIVE MATERIALS OR SCOURING PADS AND
DO NOT USE BLEACH.

8
WIRING DIAGRAM
9
SPARE PARTS LIST
Part Code Description Qty Illustration
MF OBF081206 8MM FLANGED OILITE
BUSH 4
MF ROC003 ROLLER CATCH 1
MFVC27 M6 LINKAGE BUSH 2
MF DOC011
M6 ROLLER STUD 1
MFTIMER DIGITAL TIMER 1
MF 5513069500 MECHANICAL
THERMOSTAT 1
VISW17
RED SWITCH
1

10
Part Code Description Qty Illustration
VILE14 SWITCH MEMBRANE 1
MF374-1029 LED INDICATOR 2
MF617-3031 BUZZER 1
MF456-4659 ROLLER MICRO SWITCH 1
NCXXSSRC
SOLID STATE RELAY 1
MFMOQB6 BLUE DIAL 1
MFMICAELEMEN
T MICA ELEMENT 1
MFFASTFEET RUBBER FEET 4

11
FAULT FINDING
Any servicing must only be carried out by qualified personnel.
Unit must be removed from electrical supply before servicing.
Problem Probable Cause Solution
1. Red LED Power indicator is
not illuminated.
Wall socket switched
OFF.
Fuse in plug faulty.
Power supply failed.
Switch ON.
Replace fuse.
Check power supply
2. Red rocker switch is not
illuminated.
Machine is not
connected to power
supply.
Red rocker is in OFF
(O) position.
Red rocker switch
faulty.
Connect to power
supply.
Switch ON.
Replace switch.
3. Machine does not heat up. No supply to
mechanical
thermostat.
Loose/faulty wiring or
connection to element.
Thermostat is faulty.
Machine has
overheated.
See section 1 and 2.
Identify fault and
correct.
Replace thermostat.
Allow machine to cool
down.
4. No illuminated display on
counter. See section1 & 2
Faulty timer
See section 1& 2
Replace timer.
5. Counter does not count. See section 1 & 2
Push Switch is loose /
misaligned.
Loose/faulty wiring or
connection between
push switch and timer.
See section 1 & 2
Check nut is tight and
aligned to slider
carriage.
Identify fault and
correct.

12
EQVIBATCHT EXPLODED

13
Terms and Conditions
Claims
No claim shall be entertained by the Company unless made in writing. Claims arising from
damage or partial loss in transit must reach the Company within 7 days from the date of
delivery. Claims for non-delivery must reach the Company within 10 days from the date of
dispatch. All other claims must reach the Company within 7 days. Damaged goods must be
retained for inspection/collection.
Returns
The Company does not operate a returns policy unless the goods are defective:
In circumstances where the Company agrees to accept return of goods, a charge of 25% of
the invoice value will be made.
14
Damage claim form
Machine: BATCH TOASTER
Product code: EQVIBATCHT
Customer name……………………………………………………………
Date of delivery……………………………………………………………
Machine serial number…………………………………………………
Damage comments………………………………………………………
……………………………………………………………………………………………………………
……………………………………………………………………………………………………………
……………………………………………………………………………………………………………
…………………
Please indicate on the picture where the unit is damaged
Courier name…………………………………………………………………
Please cut this page out and post to Fast Food Systems
(The address is on the back of this manual)

15
Warranty
UNITED KINGDOM AND REPUBLIC OF IRELAND
Excepting where otherwise specified all products are subject to 12 months parts and labour
warranty. Goods found defective will be repaired, credited or replaced without charge
according to the terms of the Company’s standard warranty, provided written notice is given
within the guarantee period. In no case will the company be liable for repairs made without
it’s knowledge or sanction, or for indirect damage, or any consequential loss or expense
incurred by purchasers.
Fast Food Systems Ltd, warrants to the original purchaser that the equipment supplied to be
free from defective materials or workmanship for a period of 12 (twelve) months.
The following are NOT covered by warranty:
1. Failure or breakdown caused by incorrect installation.
2. Adjustment or calibration of controls - this is a routine maintenance function.
3. Abuse or misuse, including cleaning.
4. Warranty labour is only carried out during normal working hours; calls out of hours
may be subject to surcharges.
5. The warranty will commence either on installation or 1 (one) month from date of
dispatch - whichever is the sooner.
7. Warranty on spare parts purchased for equipment outside of the warranty period is 3
(three) months from date of sale.
8. Any faulty spare parts replaced under warranty must be returned with 7 days of
supply.
9. Warranty is non-transferable.
Fast-Food-Systems Ltd will not be held responsible, financially or otherwise, for any loss of
business as a result of equipment breakdown.

16
Fast Food Systems Limited
Manufacturer & Distributor of Catering Equipment
Unit 1 Headley Park 9 Headley Road East
Woodley Reading Berkshire RG5 4SQ
Tel: 0118 944 1100 Fax: 0118 944 0350
Website: www.fast-food-systems.com
ISSUE: 14/FEBRUARY/2014
Machine serial number……………………
Inspection ID ……………………………
Date of Manufacture ……/………/………
Commissioning date……/………/……
Model Number………………………………
Table of contents
Other FFS Brands Commercial Food Equipment manuals


Popular Commercial Food Equipment manuals by other brands


Diamond
Diamond AL1TB/H2-R2 Installation, Operating and Maintenance Instruction

Salva
Salva IVERPAN FC-18 User instructions

Allure
Allure Melanger JR6t Operator's manual

saro
saro FKT 935 operating instructions

Hussmann
Hussmann Rear Roll-in Dairy Installation & operation manual

Cornelius
Cornelius IDC PRO 255 Service manual

Moduline
Moduline HSH E Series Service manual

MINERVA OMEGA
MINERVA OMEGA DERBY 270 operating instructions

Diamond
Diamond OPTIMA 700 Installation, use and maintenance instructions

Diamond
Diamond G9/PLCA4 operating instructions

Cuppone
Cuppone BERNINI BRN 280 Installation

Arneg
Arneg Atlanta Direction for Installation and Use