FIAMETTA RAPID COAL HS-17CE01 User manual

1
RAPID COAL
Charcoal BBQ with Electric Ignition
Instruction Manual
Model: HS-17CE01
WARNING
Read these instructions carefully before use!
FOR OUTDOOR USE ONLY
DO NOT PLACE ARTICLES ON OR AGAINST THIS APPLIANCE
DO NOT OPERATE THIS APPLIANCE BEFORE READING THE INSTRUCTION BOOKLET
DO NOT STORE CHEMICALS, FLAMMABLE MATERIALS OR SPRAYAEROSOLS NEAR THIS APPLIANCE
DO NOT OPERATE THIS APPLIANCE INDOORS
DO NOT OPERATE THIS APPLIANCE IN AN ENCLOSED AREA
DO NOT LIGHT OR OPERATE WITH A COVER ON

2
TABLE OF CONTENTS
SAFETY INSTRUCTIONS …………………………………………………………………………………..….… 3
ASSEMBLY STEPS………………………………………………………………………………………………… 4
HOW TO USE THE BBQ…………………………………………………………………………………………. 14
HOW TO USE THE ROTISSERIE………………………………………………………………………………. 15
BUILT IN STORAGE……………………………………………………………………………………………… 15
COOKING FOR THE FIRST TIME……………………………………………………………………………… 15
COOKING TIPS ……………………………………………………………………………………… …………..16
PERIODIC CLEANING……………………………………………………………………………………… ……16
STORAGE WHEN NOT IN USE………………………………………………………………………………… 16
TROUBLESHOOTING …………………………………………………………………………………………… 17
WIRING DIAGRAM.................................................................................................................................... 18
NOTES…………………………………………………………………………………………………….……….. 19
WARRANTY………………………………………………………………………………………………….…….. 21

3
SAFETY INSTRUCTIONS
IMPORTANT: Read the assembly instructions of this booklet before removing the
contents of the carton.
1. This BBQ is an OUTDOOR APPLIANCE ONLY. It must NOT be used indoors.
2. READ ALL OPERATING INSTRUCTIONS BEFORE USE.
3. Do not perform any servicing on the BBQ yourself. Servicing can only be carried out by authorized
technicians.
4. Do not store chemicals or flammable materials near this appliance.
5. Unsupervised children should not be near the BBQ while cooking or during warm up or cool down.
6. People with flammable clothing such as nylon etc. should keep well away from the BBQ when it is
operating.
7. Do not leave the BBQ unattended while fuel is alight in the BBQ.
9. Particular care must be taken when adding charcoal to the hot BBQ to prevent burns.
10. This BBQ should not be located under overhead combustible construction or roof covering,proper
clearances must be maintained at all times from combustible construction and/or materials, with
MINIMUM clearances as follow:
From all sides: 1000 mm
Overhead: 1500 mm
11. This appliance is not intended for use by persons (including children) with reduced physical, sensory or
mental capabilities, or lack of experience and knowledge, unless they have been given supervision or
instruction concerning use of the appliance by a person responsible for their safety.
12. Children should be supervised to ensure that they do not play with the appliance.
13. Always wear shoes and protective clothing while operating this BBQ. The BBQ is hot while in use and will
remain so for some time after use. Always wear protective mitts and avoid touching hot surfaces at all
times.
14. Never move the BBQ when it is in use. Allow to cool before moving or storing.
15. Avoid using the BBQ in very windy conditions.
16. Always fully extinguish ash before disposal.
17. Note the heat of the fire may discolour the BBQ over a period of time.
18. Improper installation, amendment, service or maintenance may cause property damage, personal injury or
death.
19. Remove promotional stickers (where fitted) from the BBQ before use.
20. Keep a bucket of water nearby for emergencies.
21. Locate and use BBQ on flat, level surfaces only.
22. If the supply cord is damaged, it must be replaced by the manufacturer, its service agent or similarly
qualified persons in order to avoid hazard.
4
ASSEMBLY STEPS
2
1
3
5
6
77
9
10 11
12
13
14
15
17
19
16
4
6
3
12
4
8
5
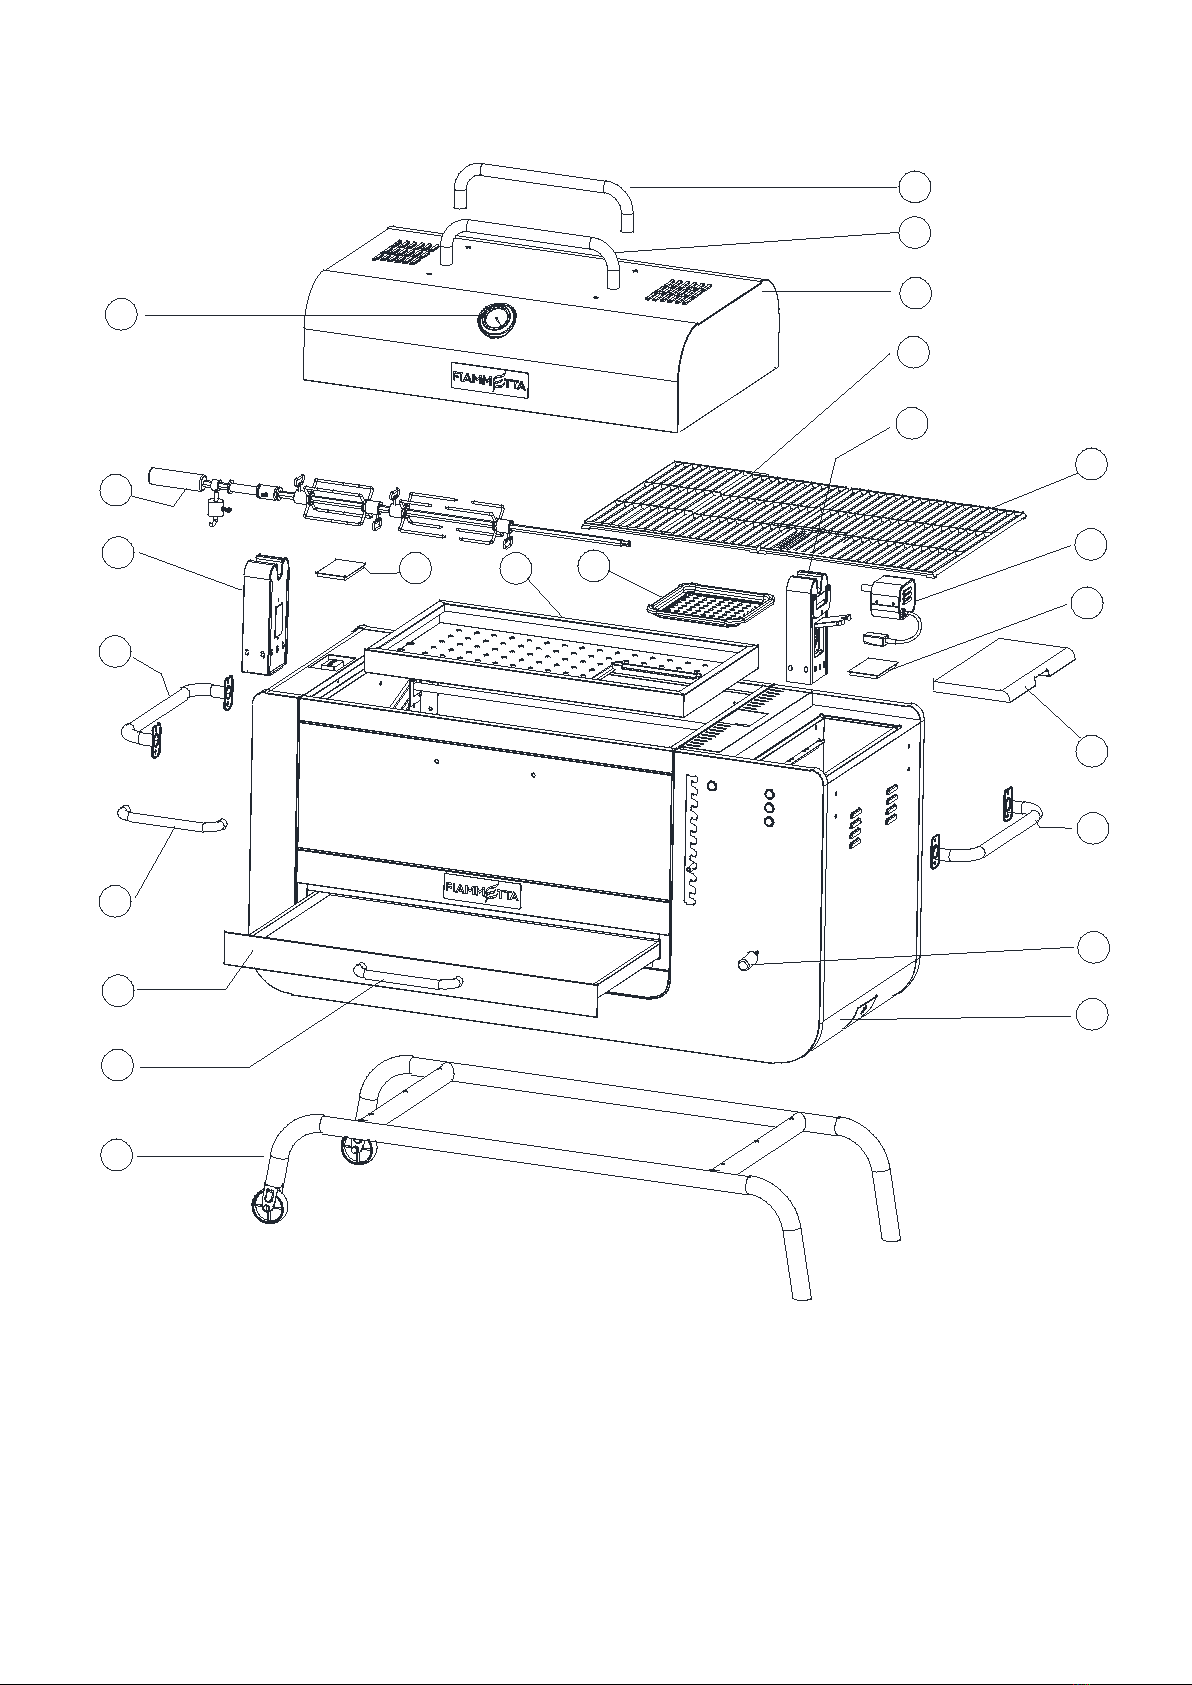
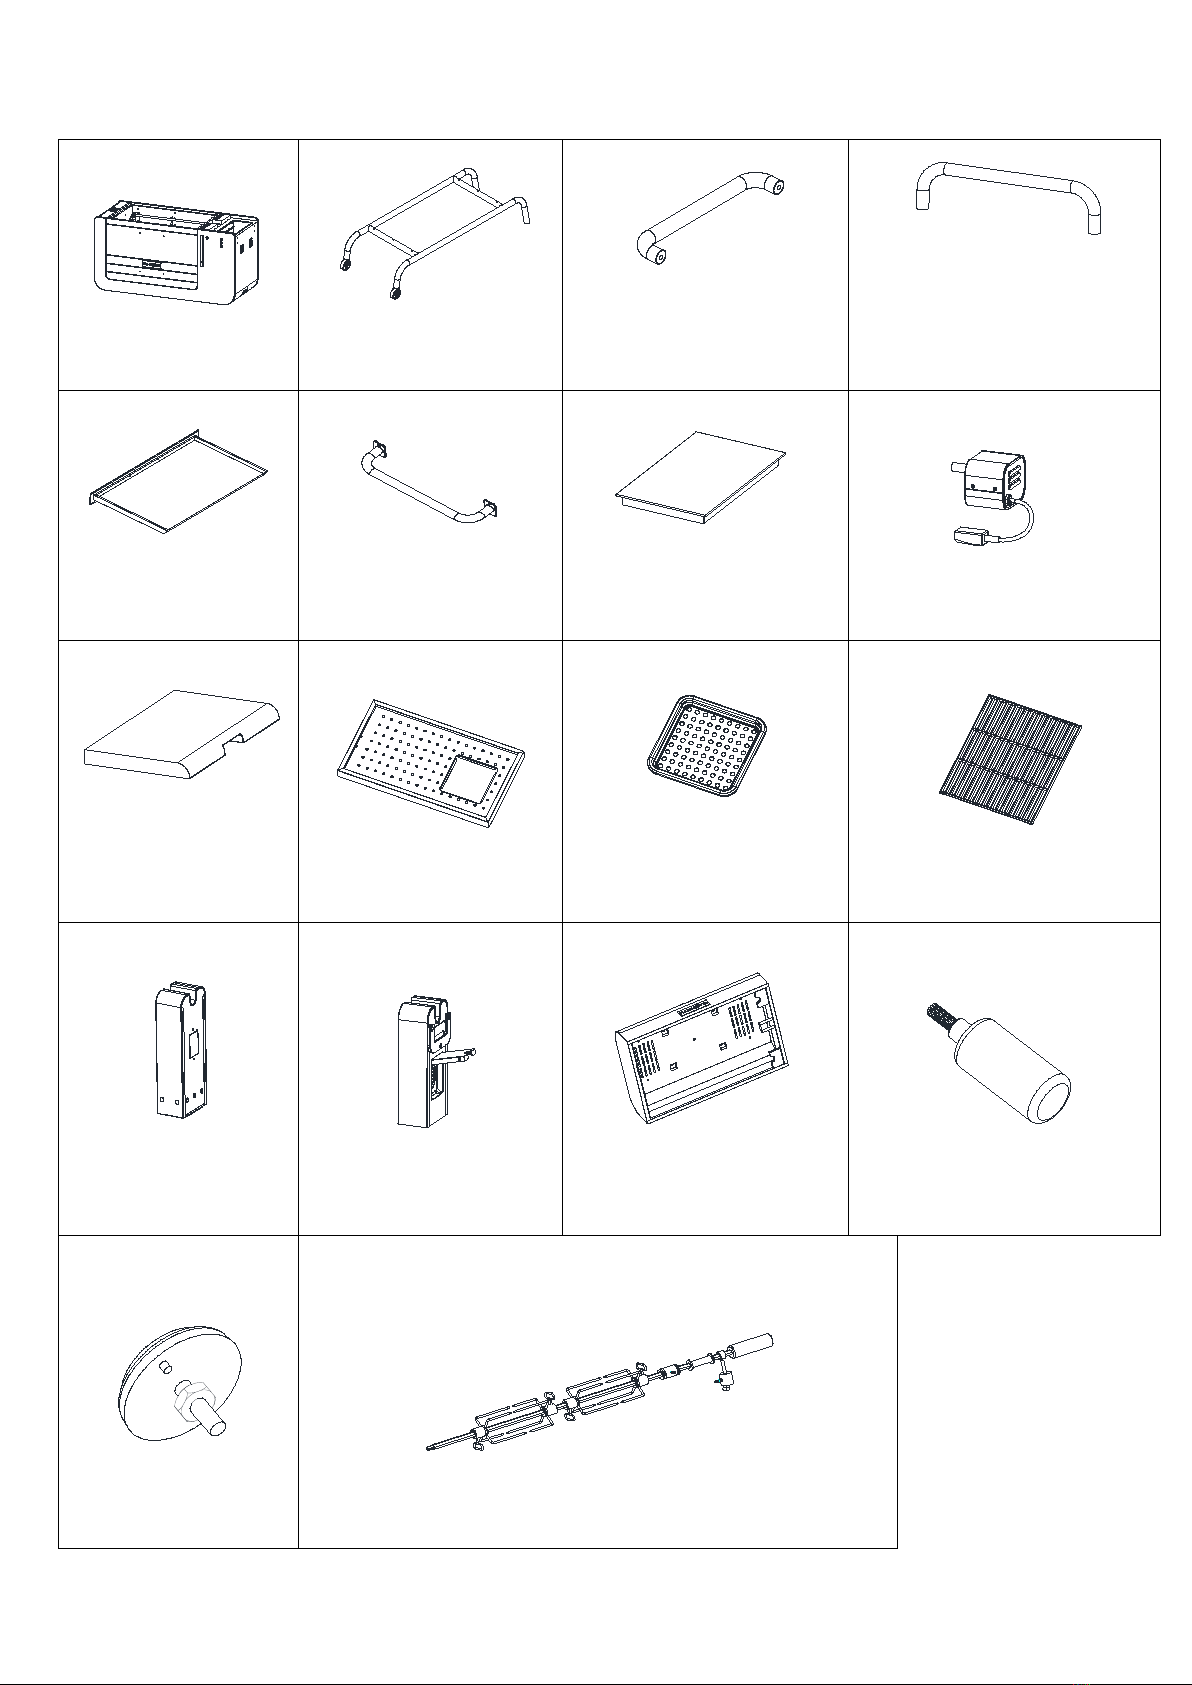
Parts list
1 Charcoal BBQ body
2 Feet with casters
3 Ash tray handle / Door
handle
4 Hood handle x 2
5 Ash tray
6 Body handle x 2
7 Cover of square hole x 2
8 Motor
9 Bamboo table
10 Charcoal tray
11 Ignition charcoal tray
12 Cooking grill x 2
13 Left Rotisserie post
14 Right Rotisserie post
15 Hood
16 Handle of lifting bar
17 Thermometer
18 Rotisserie sets

6
Hardware Pack
Always wear gloves during assembly of this BBQ.
STEP 1
Assemble the charcoal BBQ body (1) and feet with casters (2) use bolt (A) 6pcs as shown.
2
1
A
Bolt:M6*55
6PCS B
Bolt:M6*12
16PCS
7
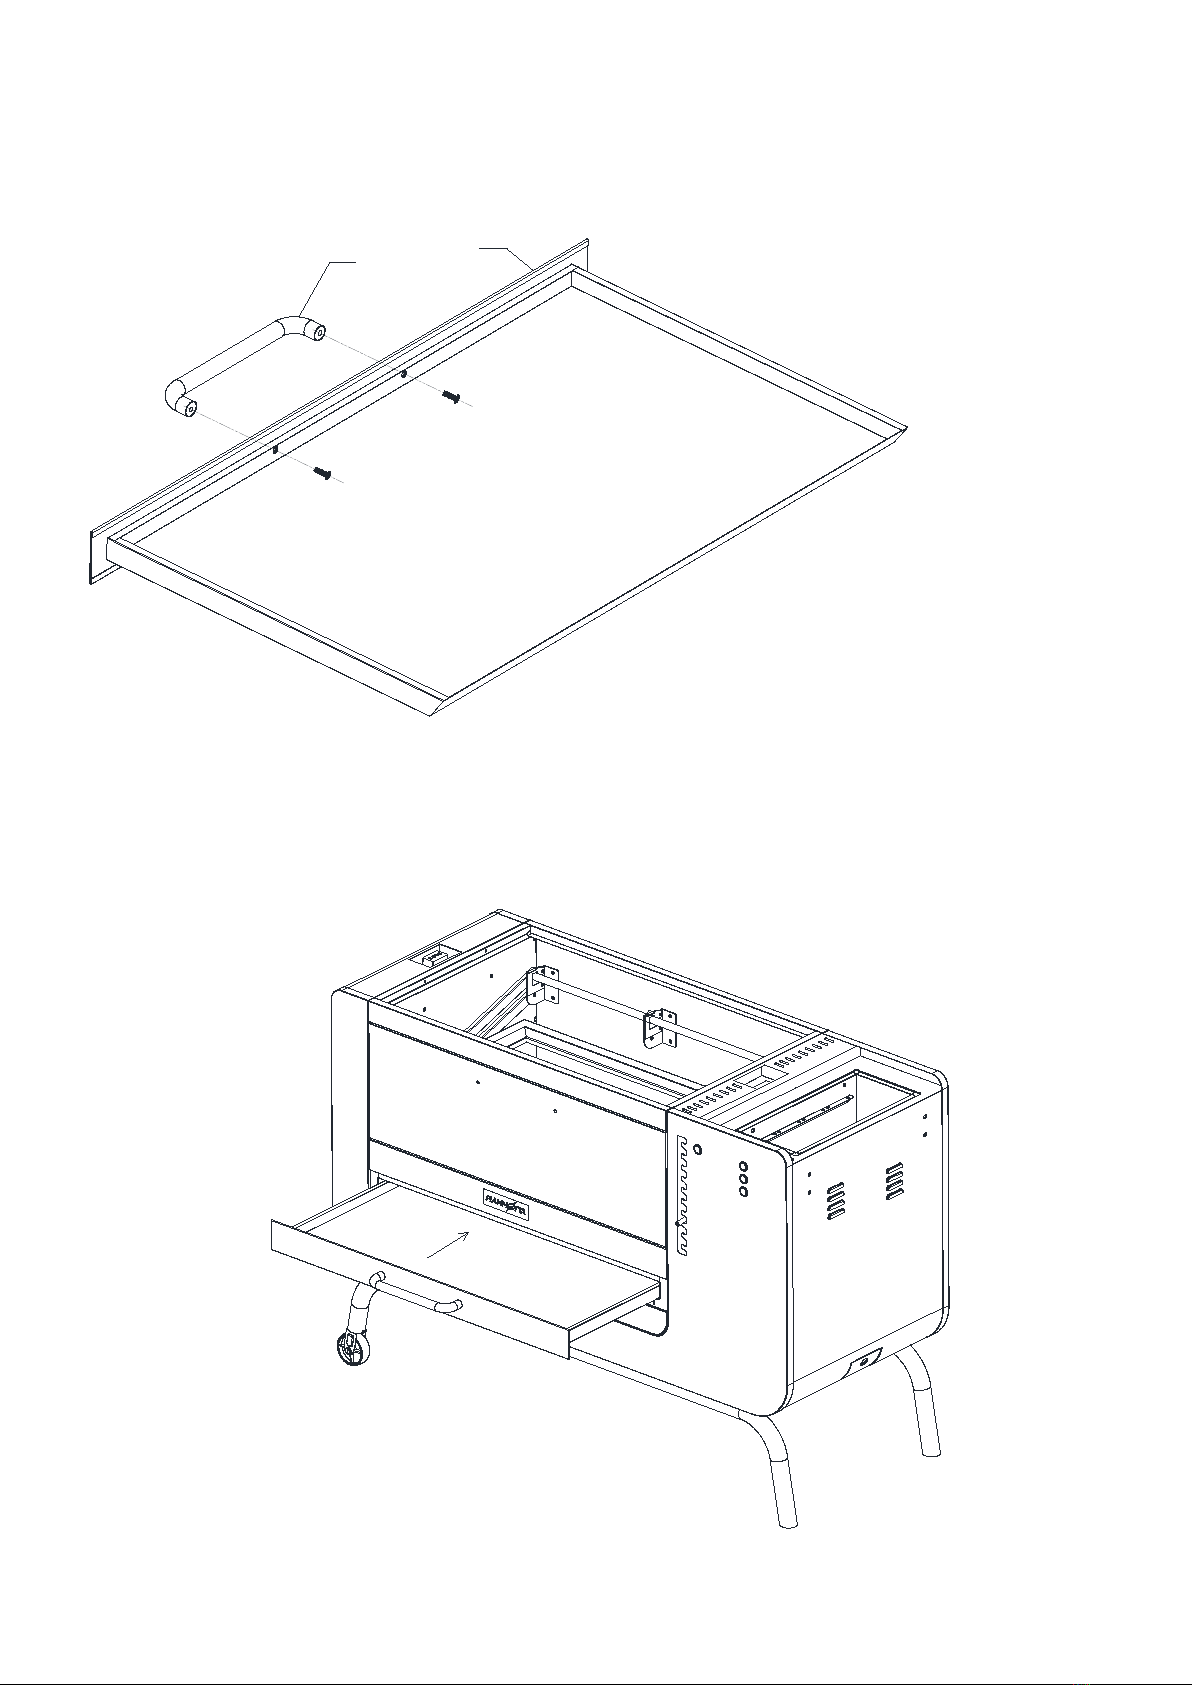
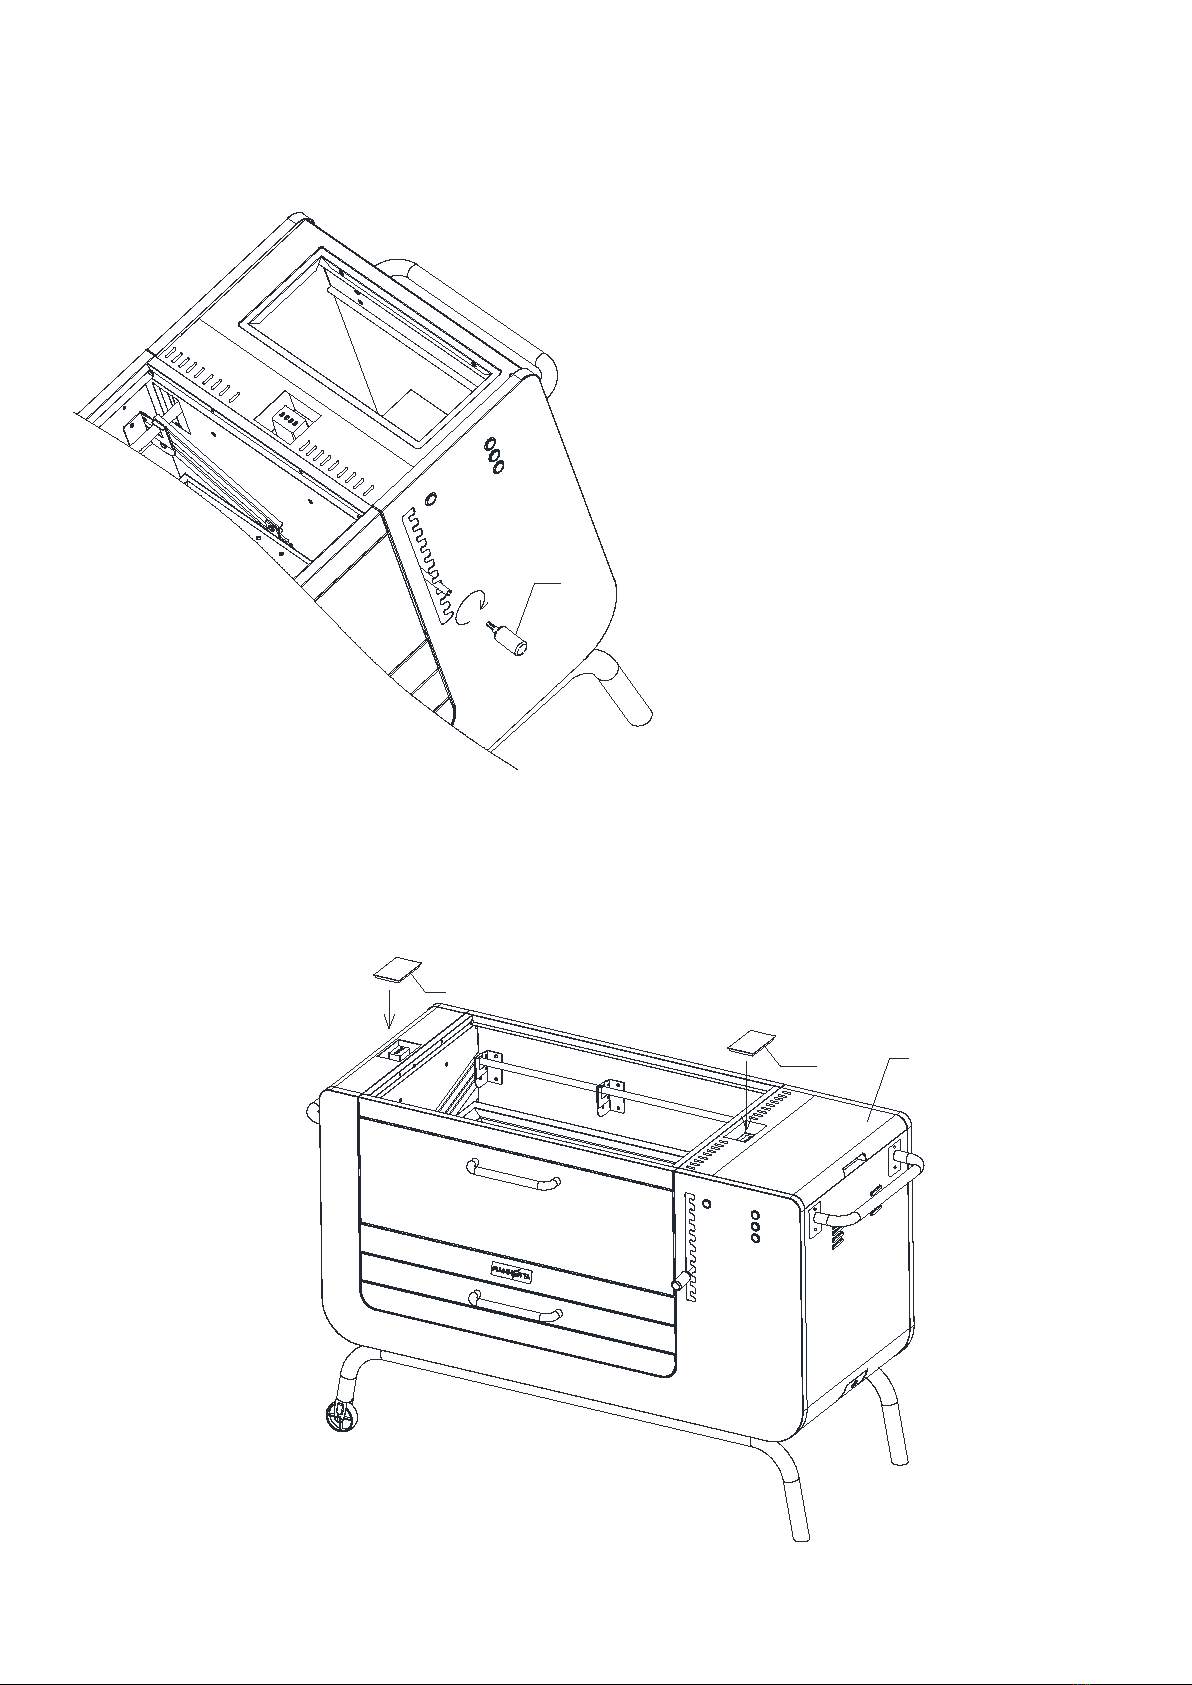
STEP 2
Assemble the ash tray handle (3) and ash tray (5) use bolt (B) 2pcs as shown.
STEP 3
Insert the complete ash tray into the charcoal BBQ body.
35
8
STEP 4
Open the charcoal tray door, assemble the door handle (3) on the charcoal tray door use bolt (B) 2pcs
as shown.
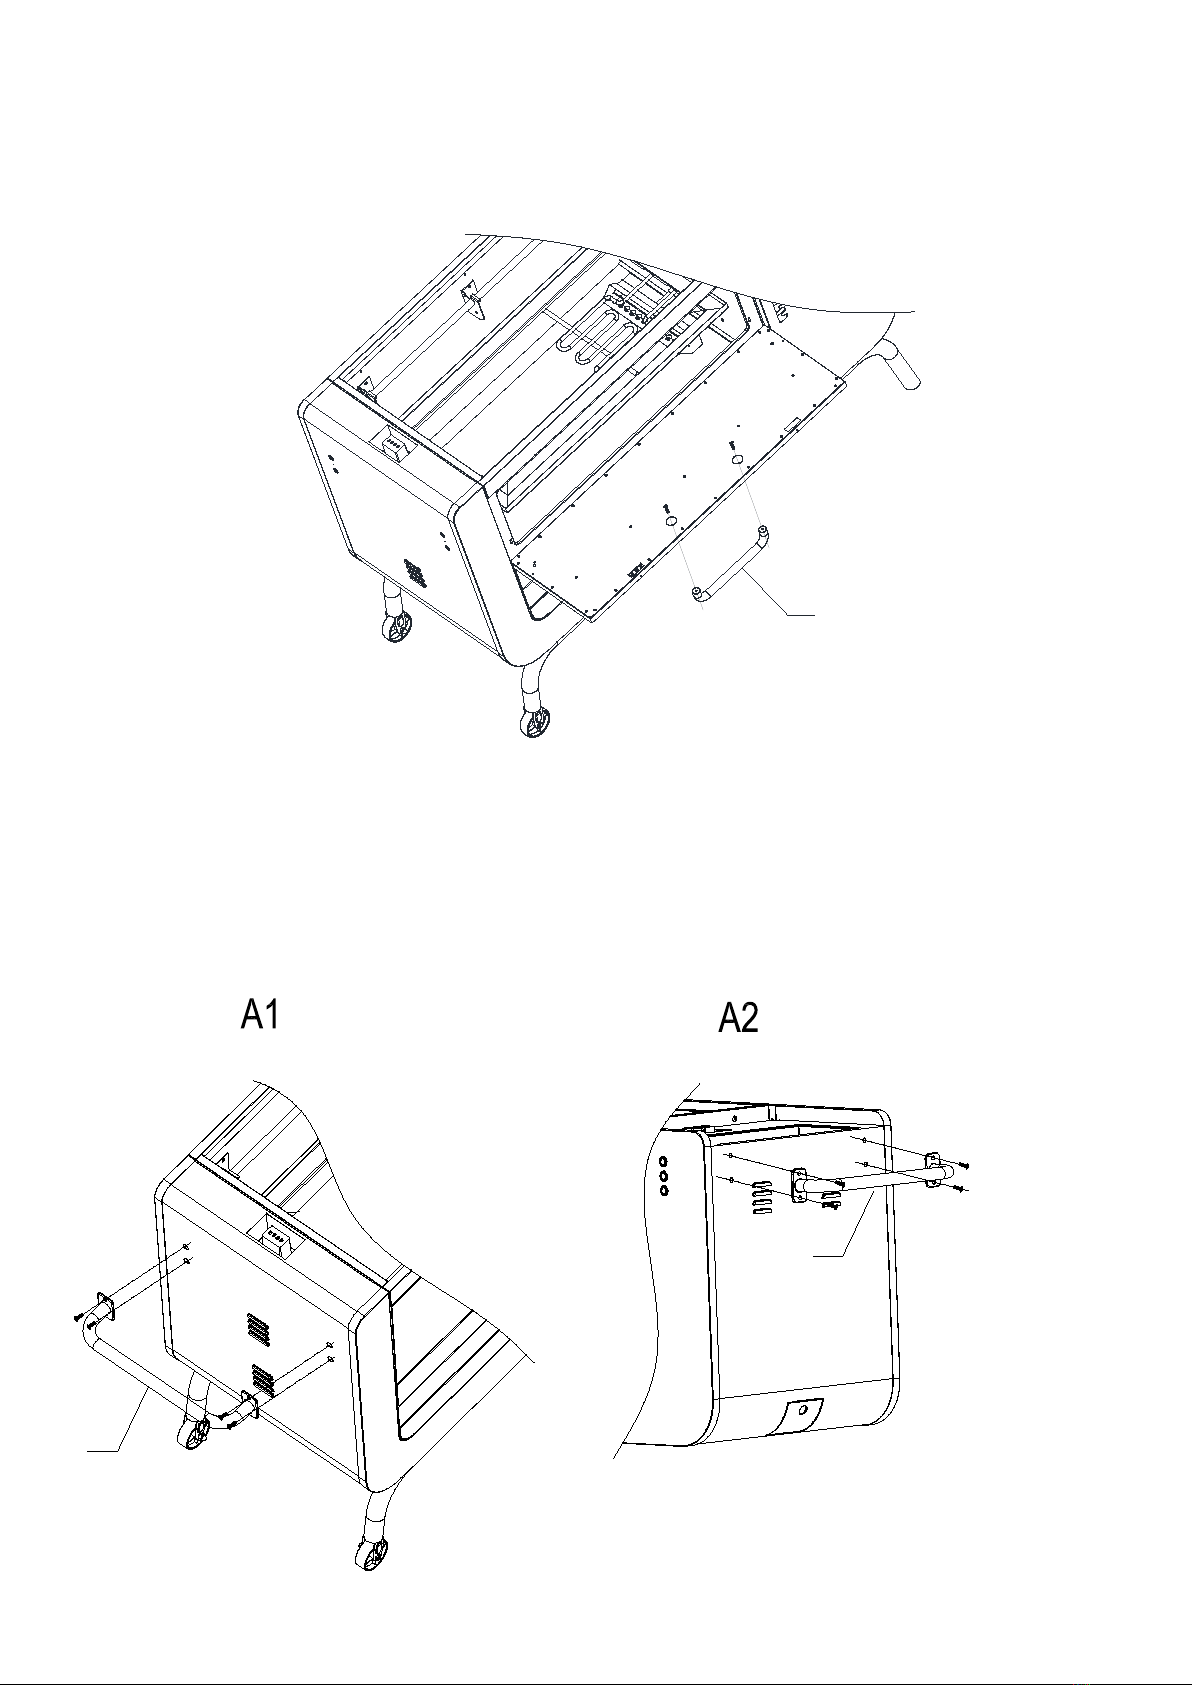
STEP 5
According photo (A1), assemble the body handle (6) on the left side panel use bolt (B) 4pcs as shown.
According photo (A2), assemble the body handle (6) on the right-side panel use bolt (B) 4pcs as
shown.
3
6
6
9
STEP 6
Assemble the handle of lifting bar (16) as shown.
STEP 7
Insert the cover of square hole (7) and bamboo table (9) as shown.
16
7
79
10
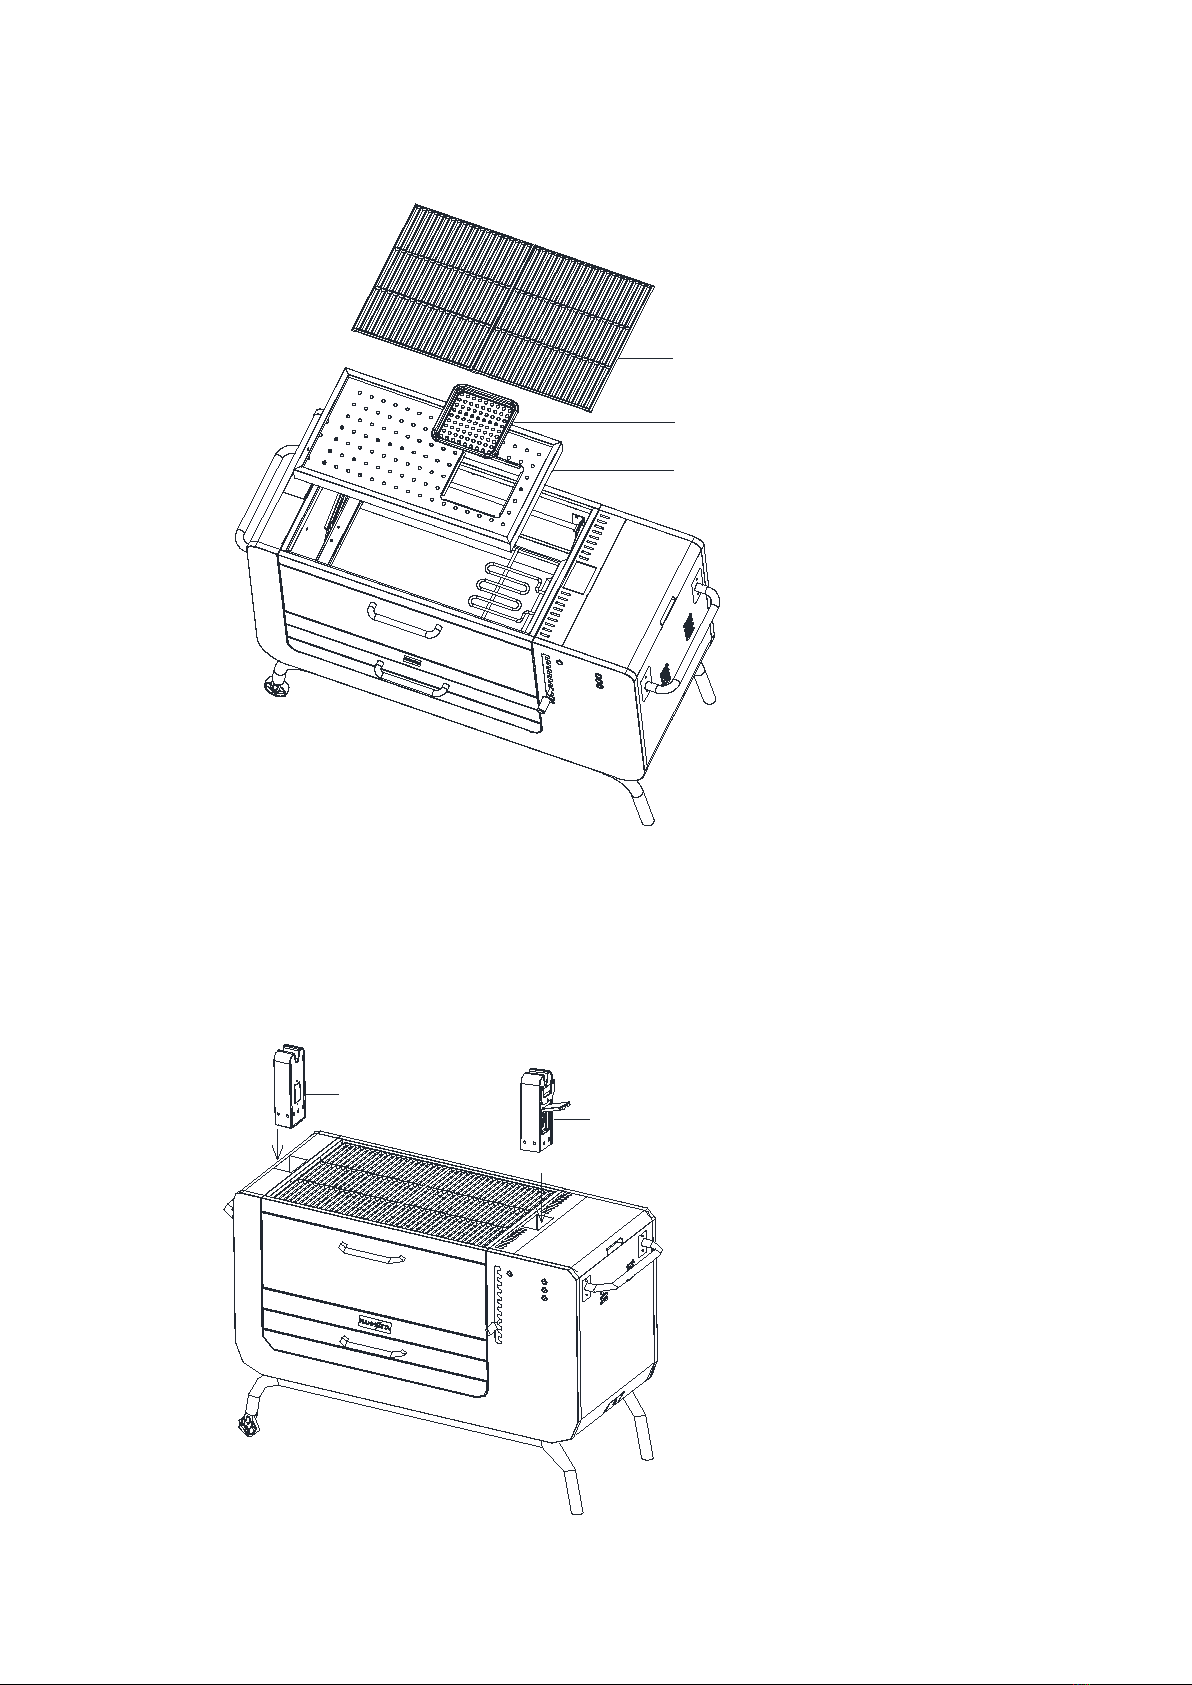
STEP 8
Insert charcoal tray (10) and ignition charcoal tray (11) and cooking grills (12) on the charcoal BBQ as shown.
STEP 9
Remove the cover of square hole (7) then insert the left rotisserie post (13) and the right rotisserie post (14)
on the charcoal BBQ as shown.
12
11
10
13 14

11
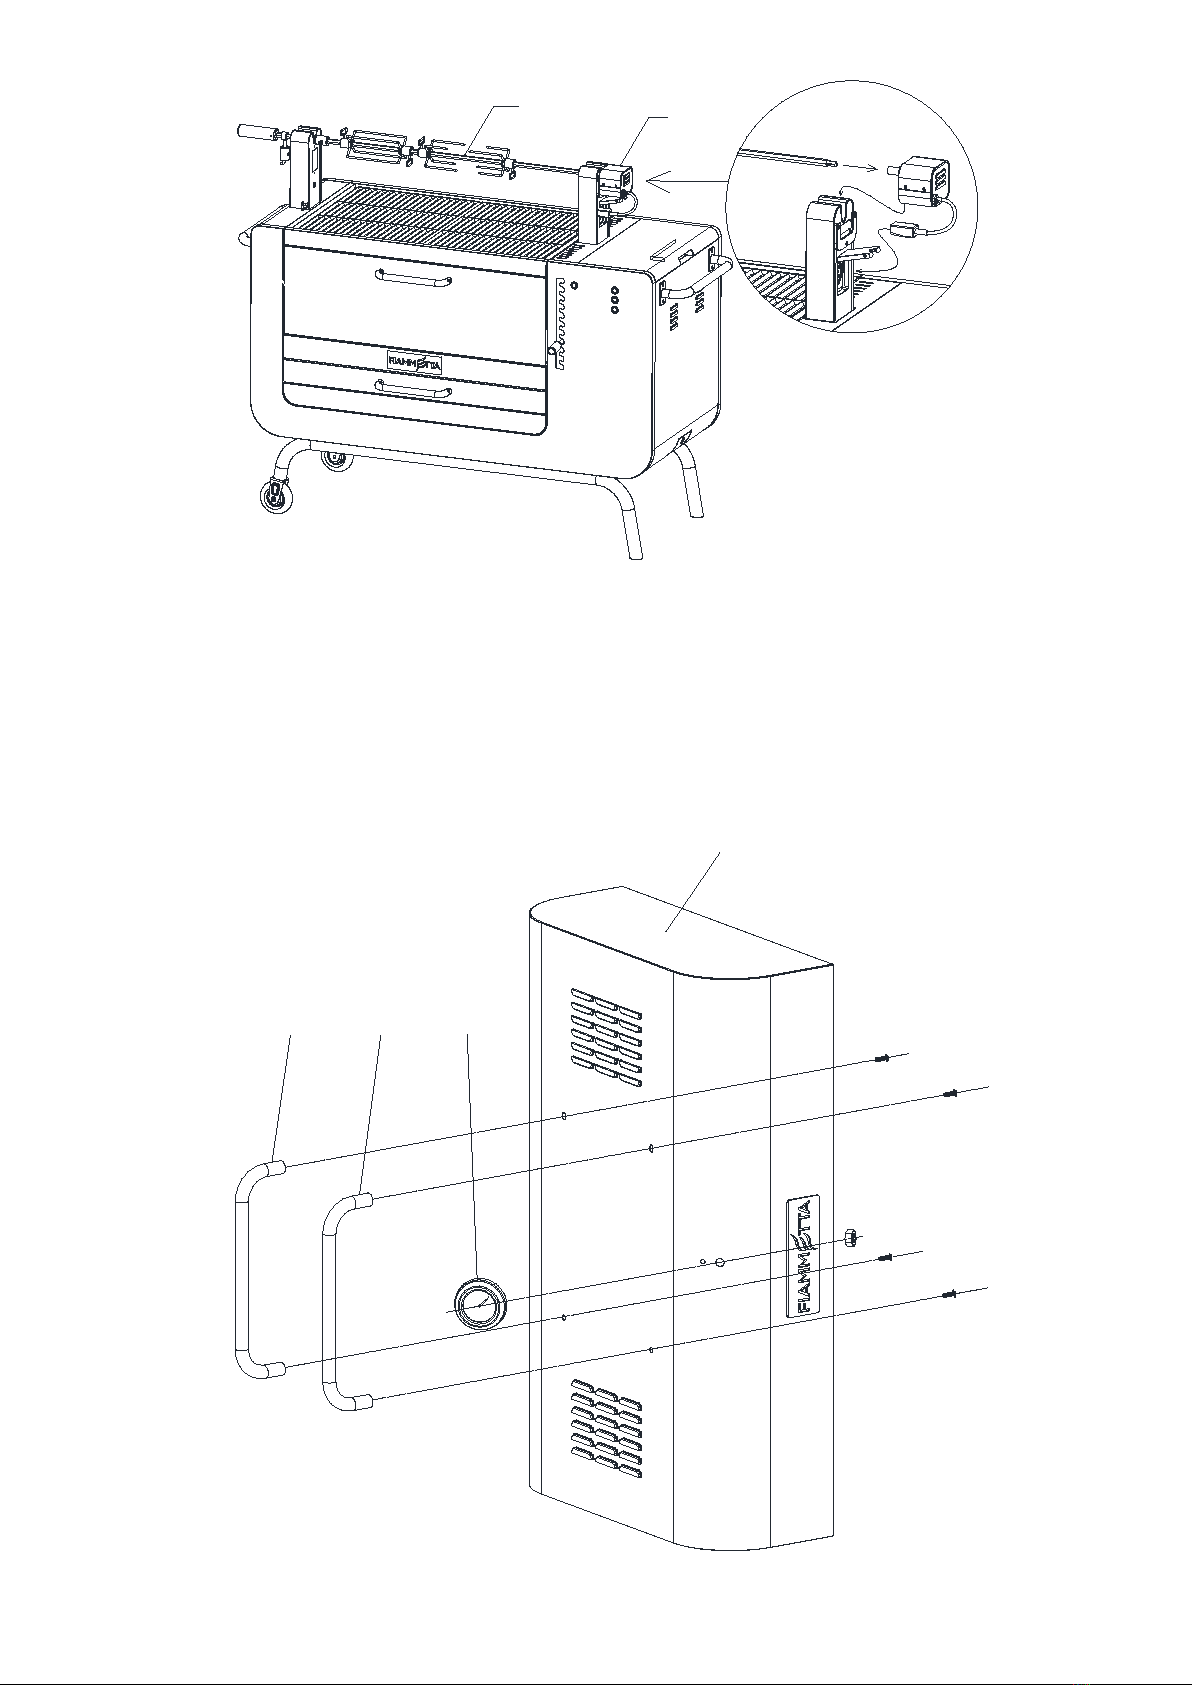
STEP 10
Assemble the (A),(B), (C), (D), (E), (E)as below photo shown.
Note: If no use part (A) and (B), we can put the parts into the positions as photo (F) and (G) as shown.
Assemble the motor (8) on the right rotisserie post (14) and put the rotisserie bar into motor as second
photo shown.
18
12
STEP 11
Assemble hood handle (4) on the hood (15) use bolt (B) 4pcs as shown.
Assemble the thermometer (17) on the hood (15) as shown.
8
19
4417
15

13
Fully assembled
14
HOW TO USE THE BBQ
•Remove the power lead from the compartment at the back of the BBQ and connect it to a power outlet.
•Lower the charcoal tray to the lowest level.
•Open the front door and load the charcoal tray with the desired amount of charcoal.
•The maximum fuel load is 3kg for open grilling and rotisserie, or 1kg when roasting with a closed hood.
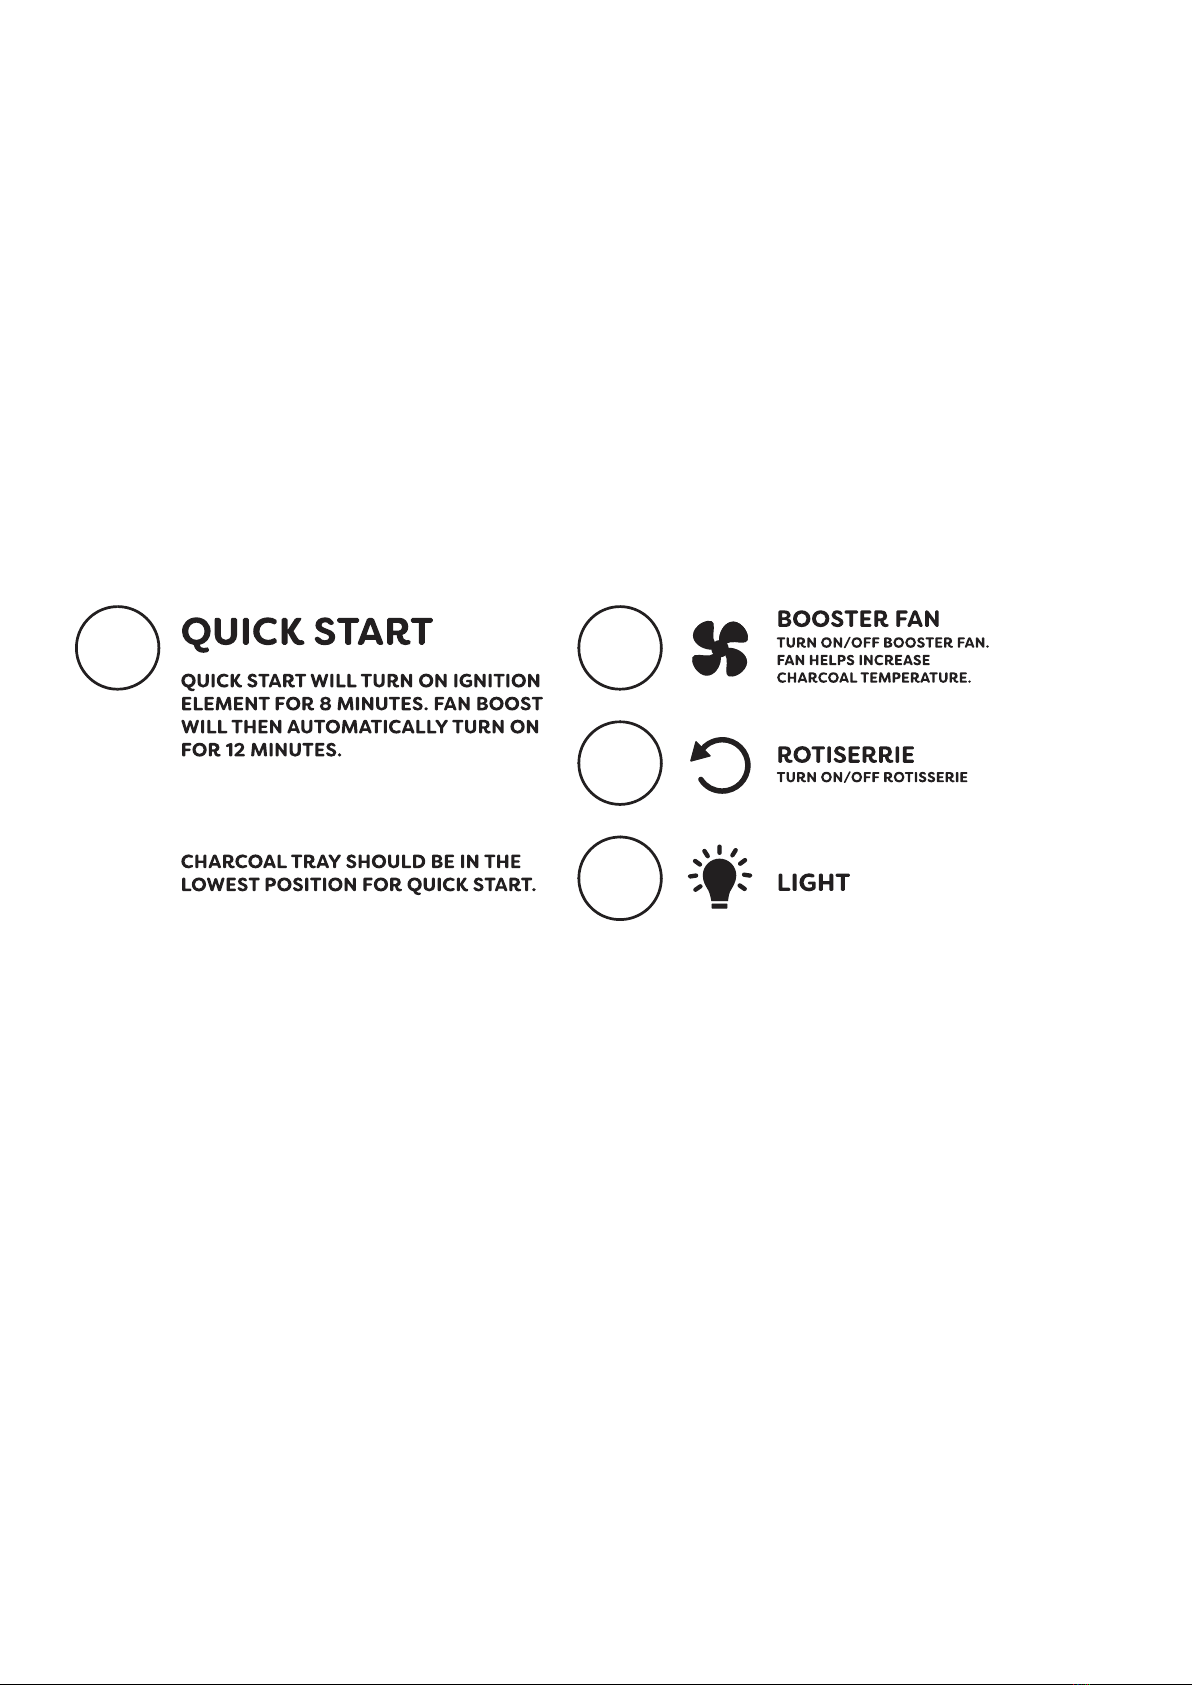
•Push the quick start button and the BBQ will automatically control the ignition element and booster fan to
light the charcoal in the shortest possible time.
•When the charcoal in the automatic lighting area is alight, use a stoker to distribute the lit charcoal. This
will reduce the time to light the remaining charcoal.
•Use the lever to raise the charcoal tray to the desired height.
•Activate the rotisserie and/or the light by the push buttons located on the control panel (shown below).
•The fan will operate automatically as part of the Quick Start function as indicated by the flashing fan
LED.
•The BBQ is generally ready for cooking when the coals form a white ash on the surface. This is the
optimum time for cooking.
•Add charcoal via front door as required to maintain heat. Lower the Charcoal grate before adding
charcoal.
•To boost heat at any time, the fan can also be started manually.
•Cook with or without the hood, but do not use hood when fully loaded with charcoal. The maximum
charcoal load for roasting below the hood is 1kg.
•The rotisserie posts are removable to provide a clear area for grilling. When the rotisserie posts have
been removed, ensure to fit the caps over the post holes to prevent foreign matter from entering.

15
HOW TO USE THE ROTISSERIE
•Install the meat to be cooked on the rotisserie shaft and secure the meat with the prongs.
•The maximum load is 12kg evenly distributed on the shaft.
•Install the solid fuel and start the BBQ as described above.
•When the coals have ashed over, install the rotisserie shaft preloaded with meat and adjust the balance
weight to maintain an even rotation.
•Adjust the height of the Charcoal grate to set the cooking temperature. Observe the cooking process to
ensure the meat does not catch fire from flare ups. Add fuel gradually if necessary, to maintain heat.
BUILT IN STORAGE
•There is a storage area below the timber cutting board. The rotisserie prongs are stowed here.
•The rotisserie skewer is stowed in the base of the BBQ. To remove it, open the access door on the right
side of the BBQ.
•After use, stow the power lead in the compartment provided at the back of the BBQ and close the
compartment door.
COOKING FOR THE FIRST TIME
The cooking surfaces are coated with a non-toxic coating during the manufacturing process. This coating will
wear off completely over time. Its purpose is to help protect your BBQ during transport and storage.
It is necessary to season the BBQ grill. Firstly wash cooking surfaces with a mild soap and warm water solution
and dry thoroughly prior to seasoning. Use a brush to lightly coat the grill with either a cooking or vegetable oil.
Light the BBQ with a full charcoal load as per instructions and leave the BBQ for about 30 minutes after all the
charcoal is alight. The coating may come off at this time. Now clean the surface again and repeat for the
reverse side of the grill. The grill is now seasoned and ready for use. This process only needs to be done the
first time you use the BBQ. For ongoing protection of the cooking surfaces, keep the cast iron grills oiled with a
cooking oil spray when not in use.
When adding charcoal, there is no need to activate the quick start because the new charcoal will light directly
from the charcoal which is already burning. When adding charcoal, ensure to add it gradually to prevent
overloading the BBQ with fuel.
Never overload the BBQ with fuel, it may cause permanent damage.
The BBQ may have an unpleasant odour during the first use and this is normal. To avoid this odour during
cooking, we recommend the BBQ is burnt in with a full fuel load prior to cooking food for the first time.

16
COOKING TIPS
•Strong winds can affect the cooking performance of your BBQ so factor in this element when positioning
your BBQ outdoors for cooking.
•Avoid continually turning the meat over. When cooking internal juices rise to the surface of the meat and
then settle. Each time you turn the meat over, the juices are lost.
•Avoid burning or charring food.
•Allow meat to rest before serving.
•Never use your BBQ in a garage, porch, shed, breezeway or any other enclosed area. Your BBQ is to be
used outdoors only.
PERIODIC CLEANING
Your BBQ will look better and last longer if you keep it clean.
Grease can build up on the frame itself. Most of it can be cleaned off with hot water and a soapy cloth. Use a
non-caustic cleanser for more stubborn stains.
You should remove the spent ash after every use. Never touch the hot surfaces of the BBQ for cleaning until the
BBQ has cooled down completely.
Never hose down the BBQ with a garden hose or a high pressure washer.
STORAGE WHEN NOT IN USE
1. Store the BBQ in a cool dry place.
2. If you intend to leave your BBQ outside make sure it is protected from the elements by a heavy-duty cover
(not included).
3. For ongoing protection of the cooking surfaces, keep the cast iron grills oiled with a cooking oil spray when
not in use.

17
TROUBLESHOOTING
Problem
Solution
Solid fuel is not igniting.
Use a stoker to locate solid fuel over the ignition charcoal tray. The
fuel will light over the ignition charcoal tray first, then spread to the
remainder of the fuel on the charcoal tray.
Use a stoker to move solid fuel close together to promote cross
lighting of the fuel load.
Don’t use solid fuel which has deteriorated or has absorbed
moisture. Repurchase fresh solid fuel.
Clean charcoal tray and ignition charcoal tray to remove the built
up of spent solid fuel which can interfere with the transfer of fan
forced air and heat from the electric lighting element.
Too much heat, food is getting burnt. Do not overload the BBQ. The maximum fuel load is 3kgs for
normal use, and 1kg when using the roasting hood.
Food on the rotisserie catches on fire.
Lower the charcoal tray level or use a stoker to move charcoal out
of the path of dripping fat.
Power supply interrupted.
Check the circuit breaker at your home, it may require resetting.
Try a different power outlet which has less appliances connected
on the circuit.
Rotisserie stopped during use.
Do not overload the rotisserie. The maximum load on the shaft is
12kgs.
18
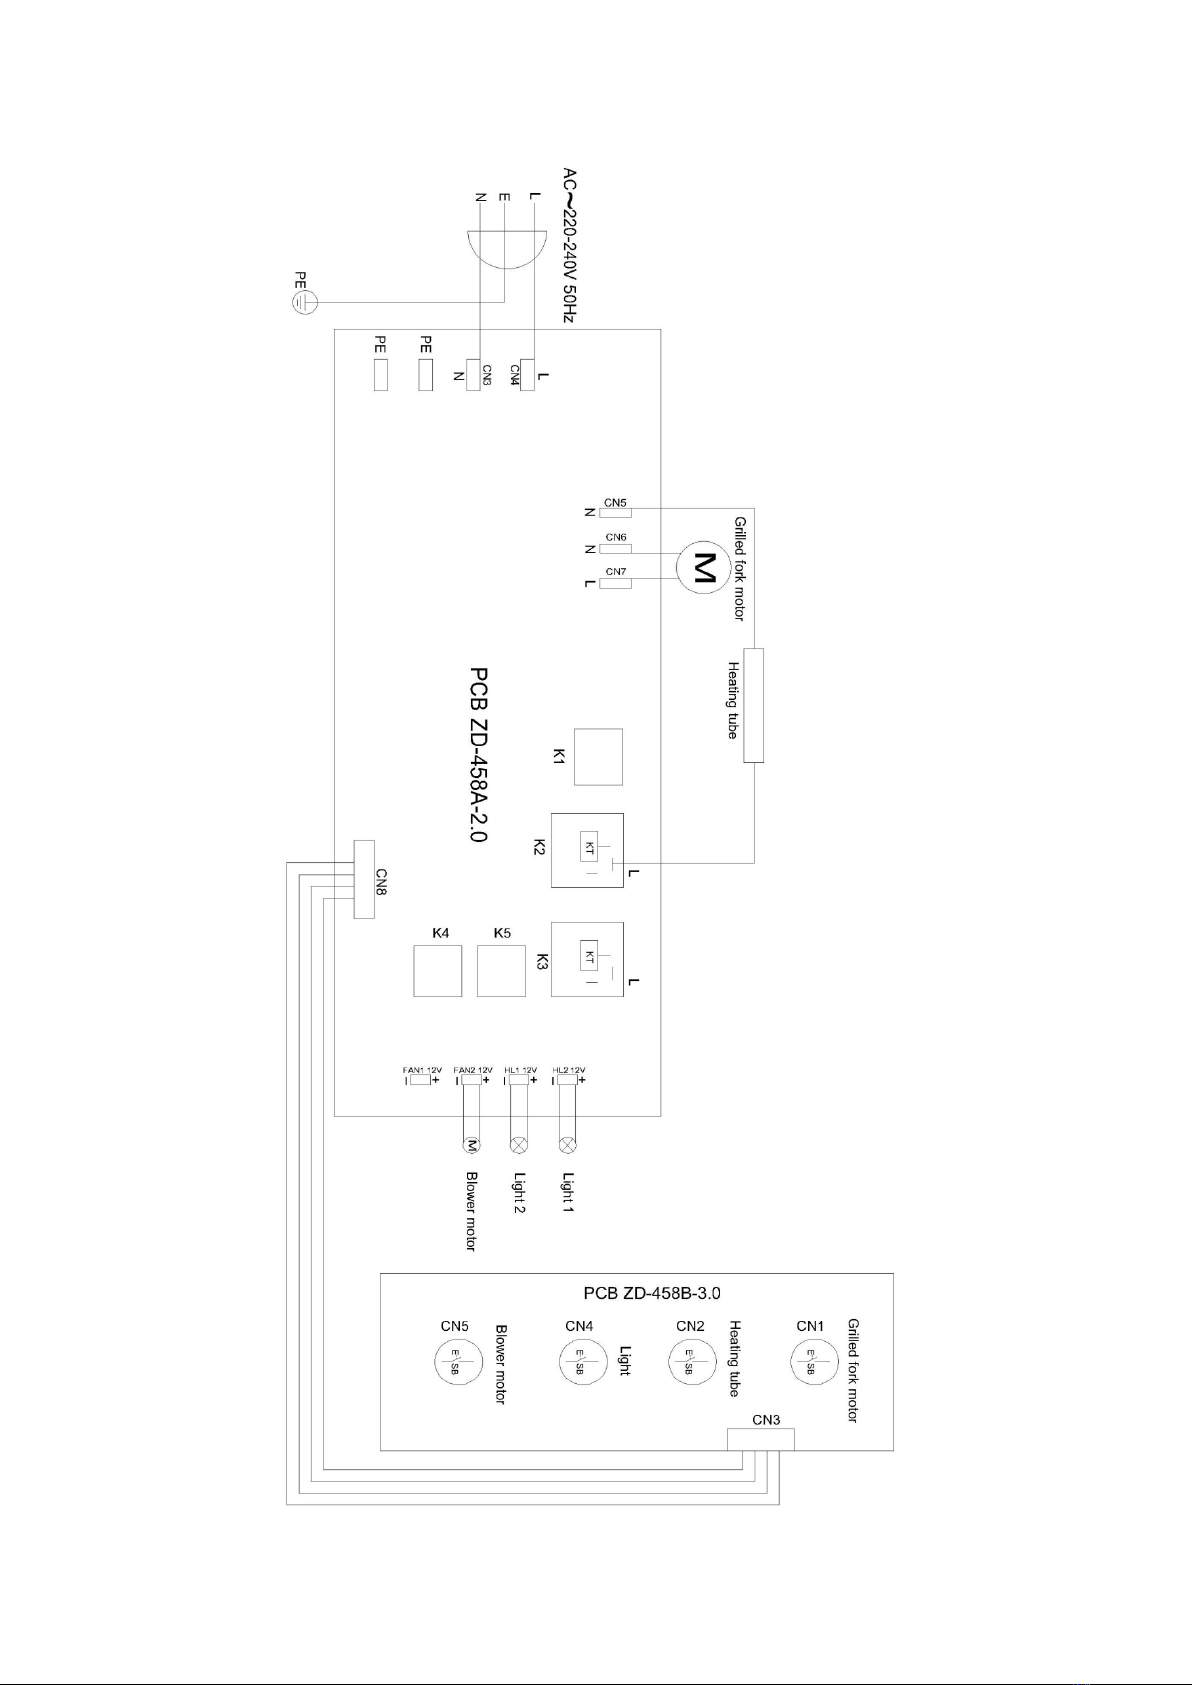
WIRING DIAGRAM

19
NOTES
________________________________________________________________________________________
________________________________________________________________________________________
________________________________________________________________________________________
________________________________________________________________________________________
________________________________________________________________________________________
________________________________________________________________________________________
________________________________________________________________________________________
________________________________________________________________________________________
________________________________________________________________________________________

20
________________________________________________________________________________________
________________________________________________________________________________________
________________________________________________________________________________________
________________________________________________________________________________________
________________________________________________________________________________________
________________________________________________________________________________________
Table of contents


