FibberservCL FSSEG-X3 User manual
!
(3) User Guide for Installation of Smart
Home Devices
!!!
Home Automation All-in-One Hassle Free Installation Multiple Control Devices
!

USER GUIDE
FSSEG-X3 Smart Gateway
Quick Start Guide
1. Introduction
The FSSEG-X3 Smart Gateway acts as a central platform for your smart home
system.
It allows you to add up to 50 Smart Devices into the system.
It connects to the Internet, to be controlled by the mobile app.
2. Get to know your device
2.1. FSSEG-X3 at a glance
!
"
Models are available in these sockets
!
2.2. Buttons
“Z” button
•Permits device pairing
•Resets the ZigBee network!
Wi-Fi button
•Resets the Wi-Fi network
•Switches between cloud mode and AP (Access Point) mode
•Opens WPS mode
Reset button
•Restarts the gateway
•Resets the gateway
2.3.LED Indicator
The LED indicator status is as below:
3. Get started
To get started, you will need:
•FSSEG-X3 Smart Gateway
•Wi-Fi router with Internet access
•The Fiberserv mobile app
Then follow the steps below:
Step 1: Insert the Smart Gateway into a power socket. Turn it on, and wait for the LED light to start
flashing purple (means the gateway is in AP mode)!
Tip: If the LED indicator is not flashing purple, please reset the FSSEG-X3 gateway to default
factory settings by pressing and holding down the reset button with pin key tool for ten seconds.
Step 2: Ensure your smartphone is connected to the Wi-Fi
Step 3: Install the Fiberserv mobile app from Google “play store” or Apple “App store”.
Note: Refer to Manual 2 - User Guide for Installation of Fiberserv Mobile App
Step 4: Create a new account
Step 5: Add devices to the smart gateway!
Tap the “Adding new devices” of the mobile app to allow other ZigBee devices to join the network.
Tip: You can also press the “Z” button for two seconds until the LED indicator turns solid blue. Then
the Smart Gateway will allow other devices to join its network so that you can use the mobile app to
control the devices.
LED Status
What it means
Purple LED solid
Device Initialization/Searching for Wi-Fi router.
Purple LED solid / Purple LED flashing
Gateway is in AP mode
Orange LED flashing
1) Gateway has connected to router;
2) Gateway is in STA mode
Blue LED solid
Gateway is in joining mode which means that it will allow other
Zigbee devices to join its network
Blue LED flashing
Gateway is in Cloud mode which means that it is connecting to the
cloud server
Orange LED and Blue LED flashing
alternately
Zigbee or Wi-Fi Error

4. FAQ
Q1. How to reset the ZigBee network?
Note: If you reset the ZigBee network, all the ZigBee devices paired with the gateway will be lost.!
A1: Press the “Z” button and the reset button (use a pin key tool) at the same time simultaneously to
reset the ZigBee network. If the reset is successful, the LED indicator will flash purple five times.
Q2. How to reset the Wi-Fi network?
Note: if you reset the Wi-Fi network, all the Wi-Fi settings will be cleared, but the ZigBee pairing
information will be maintained.!
A2: Press the Wi-Fi button and the reset button (use a pin key tool) at the same time simultaneously
to reset Wi-Fi network. If the reset is successful, the LED indicator will flash purple five times.
Q3. How to restart the Smart Gateway?!
A3: Use a pin key tool to press the reset button to restart the gateway.
Q4. How to return the Smart Gateway to default factory settings?
Note: if the gateway is returned to default factory settings, all the data stored including the ZigBee
pairing information and Wi-Fi settings will be lost.!
A4: Use a pin key tool to press and hold the reset button for ten seconds until the LED indicator
flashes purple five times to return the gateway to default factory setting.
Q5. How to add more devices into the gateway?!
A5: Tap the “Adding new devices” of the mobile app to allow other ZigBee devices to join its
network.!
Tip: You could also press the “Z” button until the blue LED indicator turns solid blue to allow ZigBee
devices to join the network, then set the ZigBee devices into pairing mode following the relevant
user guides.
Q6. How can I use this system locally when the Internet is not available?!
A6: As long as your phone is connected to the same Wi-Fi as the Smart Gateway, everything should
work as normal.
Q7. How can I use this system in the place that has no Wi-Fi router?
A7: You can only use the system locally on Android device by following the steps below;
Step 1: Connect your smartphone to the Wi-Fi hotspot of the FSSEG-X3 Smart Gateway which
starts with “ZB” and ends in six digits.
Step 2: Open the mobile app and tap “Direct Link” at the bottom left. Then the app will connect to
your system directly.
SAFETY NOTICE for GATEWAY and ALL DEVICES (listed in this manual)
!
WARNING: Failure to follow these safety notices could result in fire, electric shock, other injuries, or
damage to the device or other property. Read all the safety notices below before using the device.
•Avoid high humidity or extreme temperatures.
•Avoid long exposure to direct sunlight or strong ultraviolet light.
•Do not drop or expose the unit to intense vibration.
•Do not disassemble or try to repair the unit yourself.
•Do not expose the unit or its accessories to flammable liquids, gases or other explosives.
Refer to FCL TRAINING MANUAL - PRODUCT SPECS for Hardware & Software
specifications.
TRUE SENSE OF SECURITY
FSDWS312 ZigBee Door/Window Sensor
Quick Start Guide
1. Introduction
The FSDWS312 Door/Window Sensor detects if your door or window is open or closed. It allows
you to receive notifications remotely from the mobile app and can be used to trigger an alarm.
2. Get to know your device
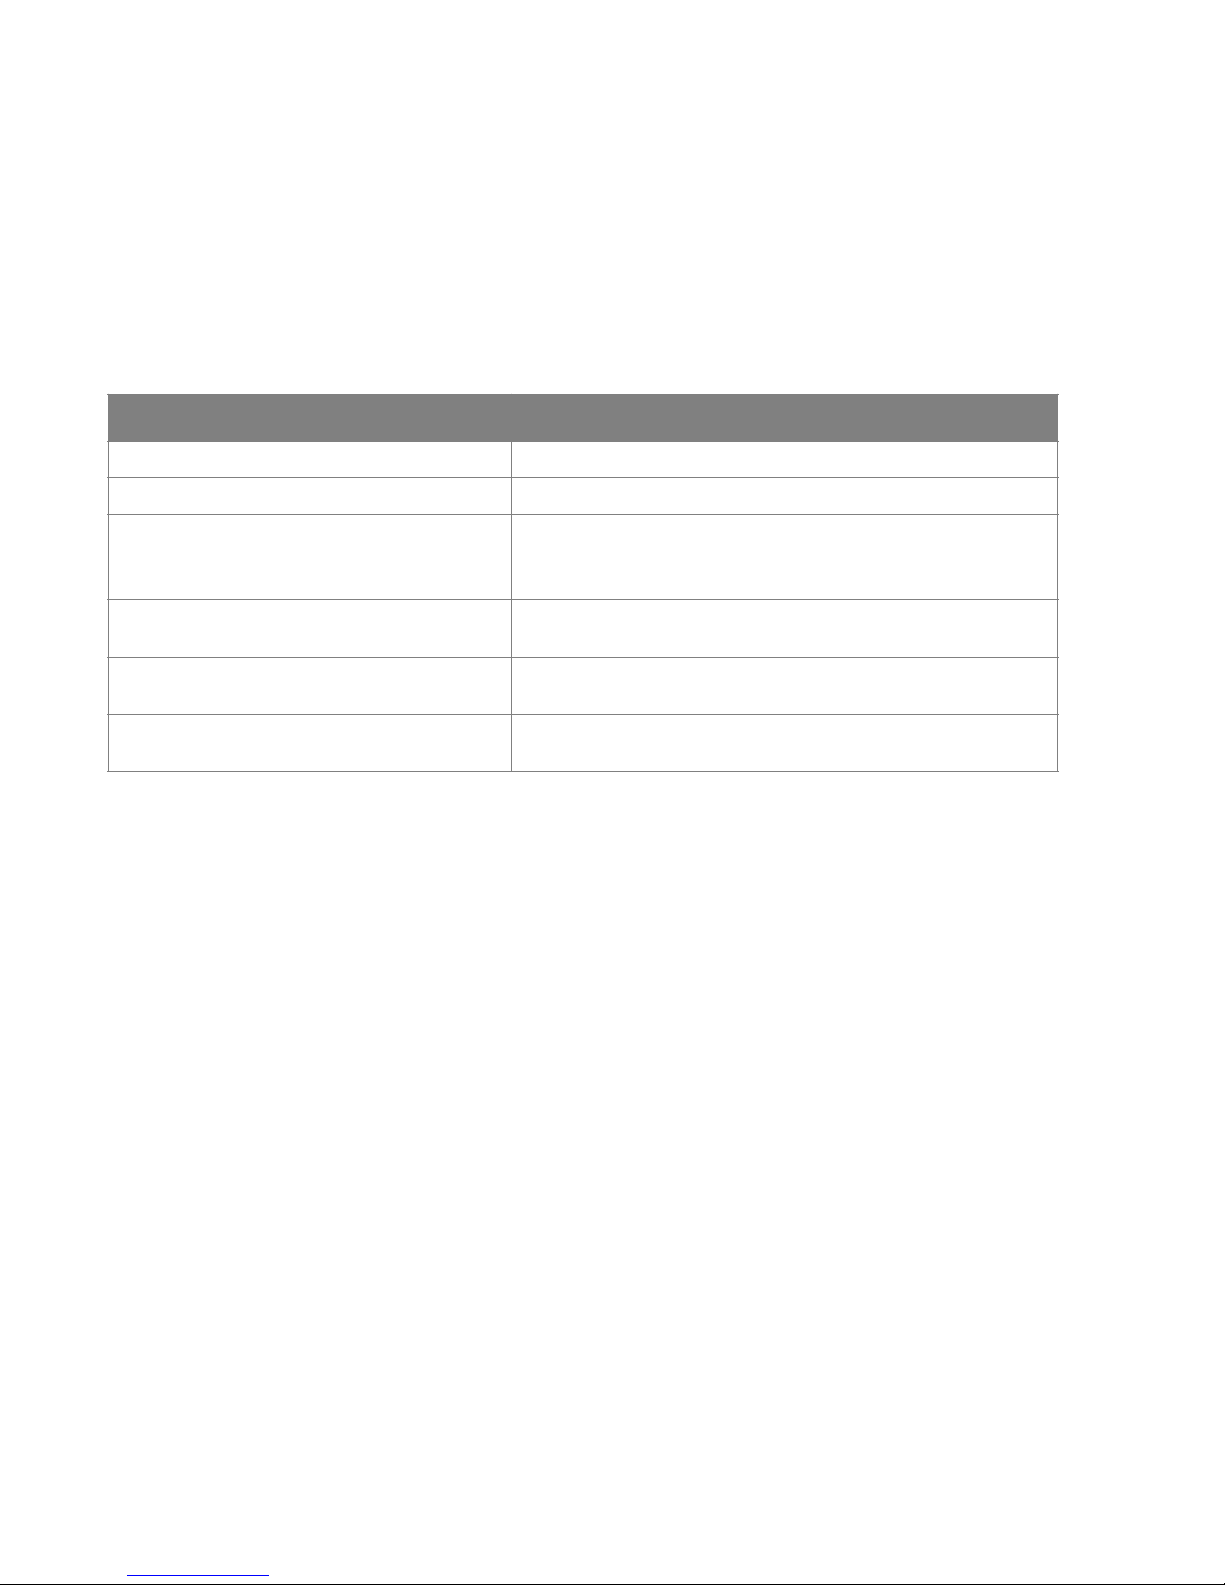
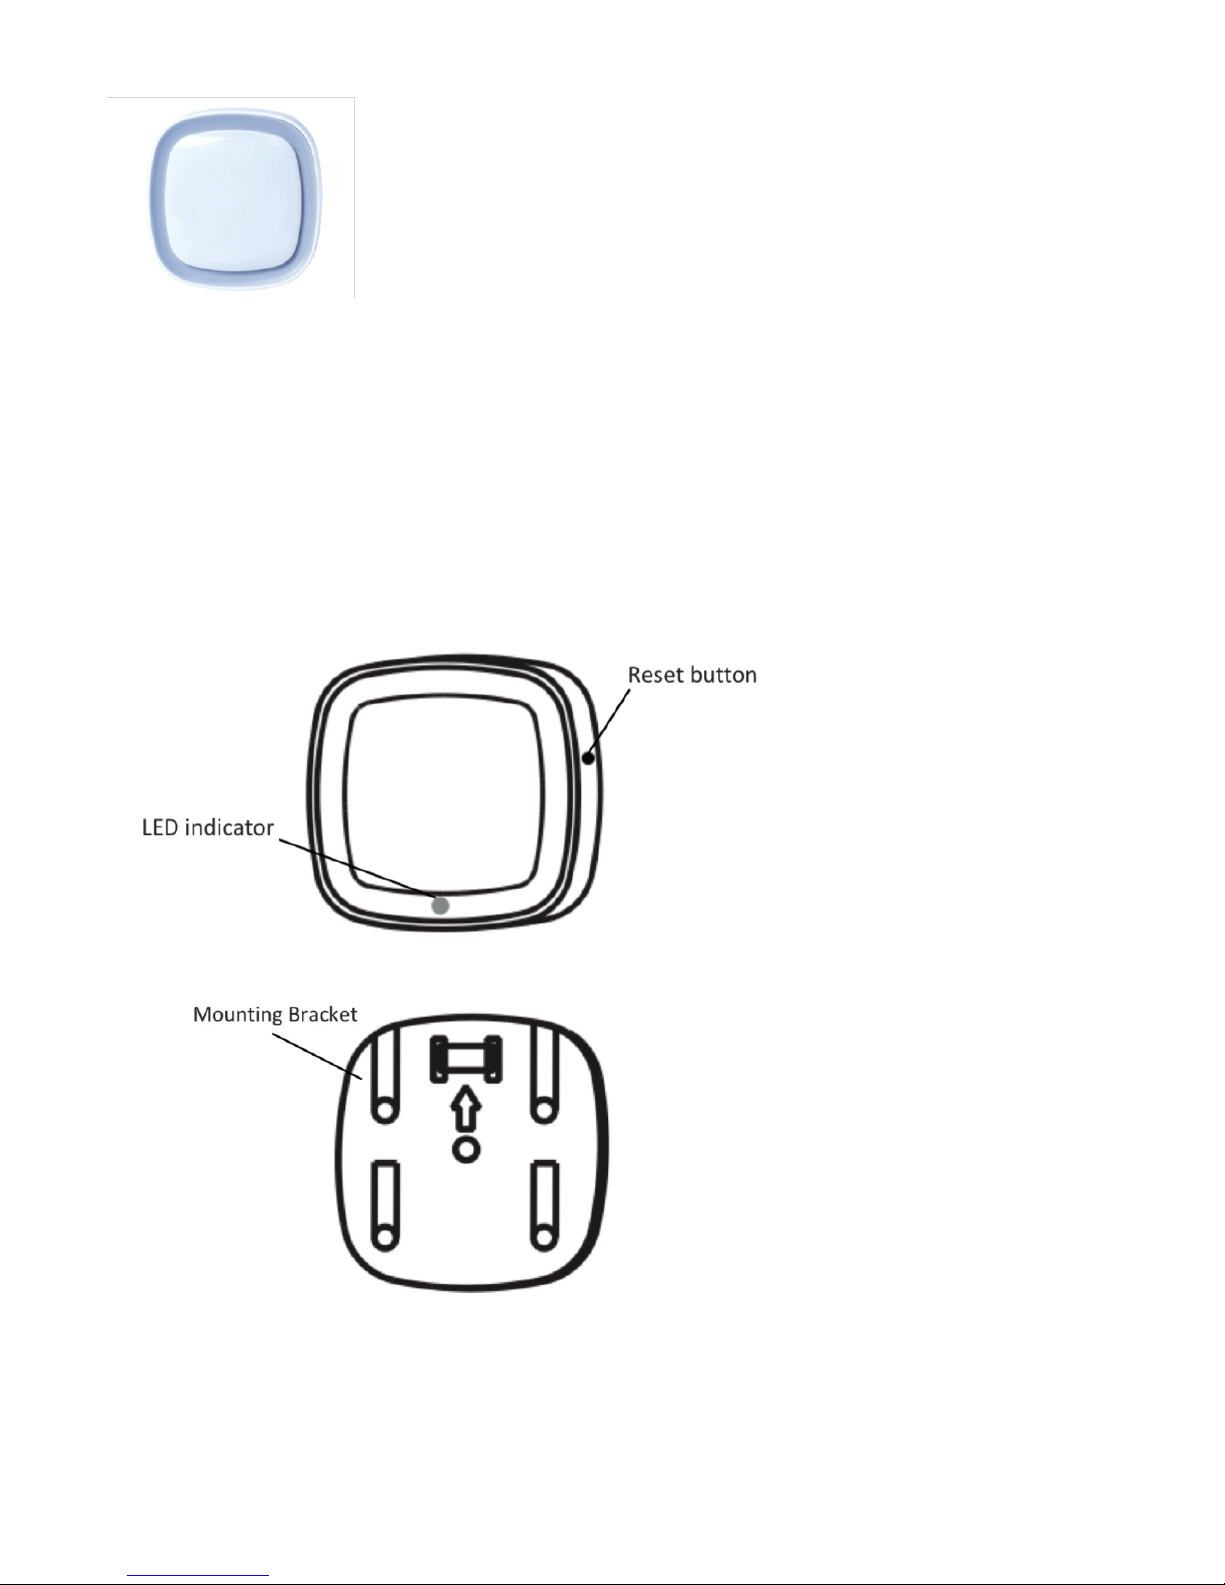
2.1. FSDWS312 at a glance
!
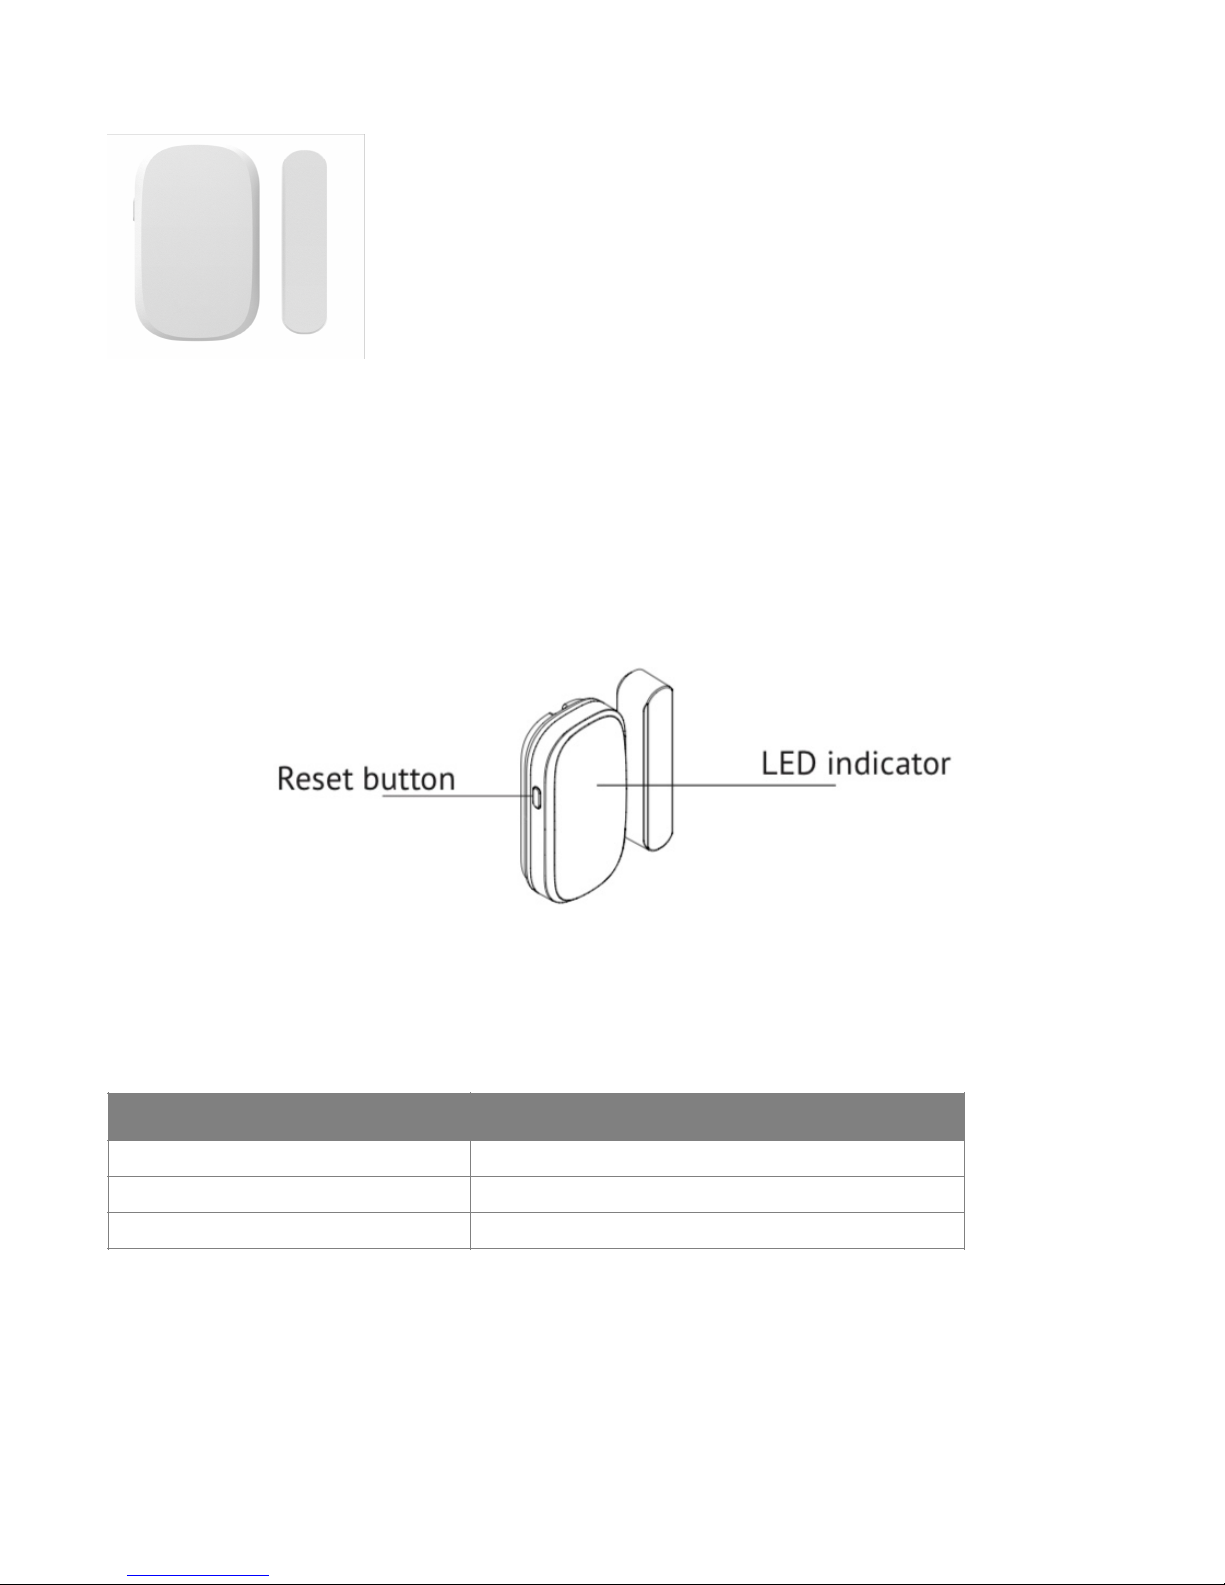
2.2. Reset button
Press and hold the reset button for ten seconds until the LED indicator flashes green three times to reset to
default factory setting.
2.3. LED Indicator
The LED indicator status is as below:
3. Get started
3.1. To get started, you will need:
•FSSEG-X3 Smart Gateway
•FSDWS312 Door/Window Sensor
•The Fiberserv mobile app
LED Status
What it means
Red LED flashing three times
Device has not joined a network.
Green LED flashes three times
Joining a network or return to factory settings.
Red LED flashes once
Alarm is triggered
3.2 Connect to Gateway’s network
1: Power on the Door/Window Sensor. Press the reset button and the LED indicator will flash red
three times indicating the sensor is ready to join the gateway's network
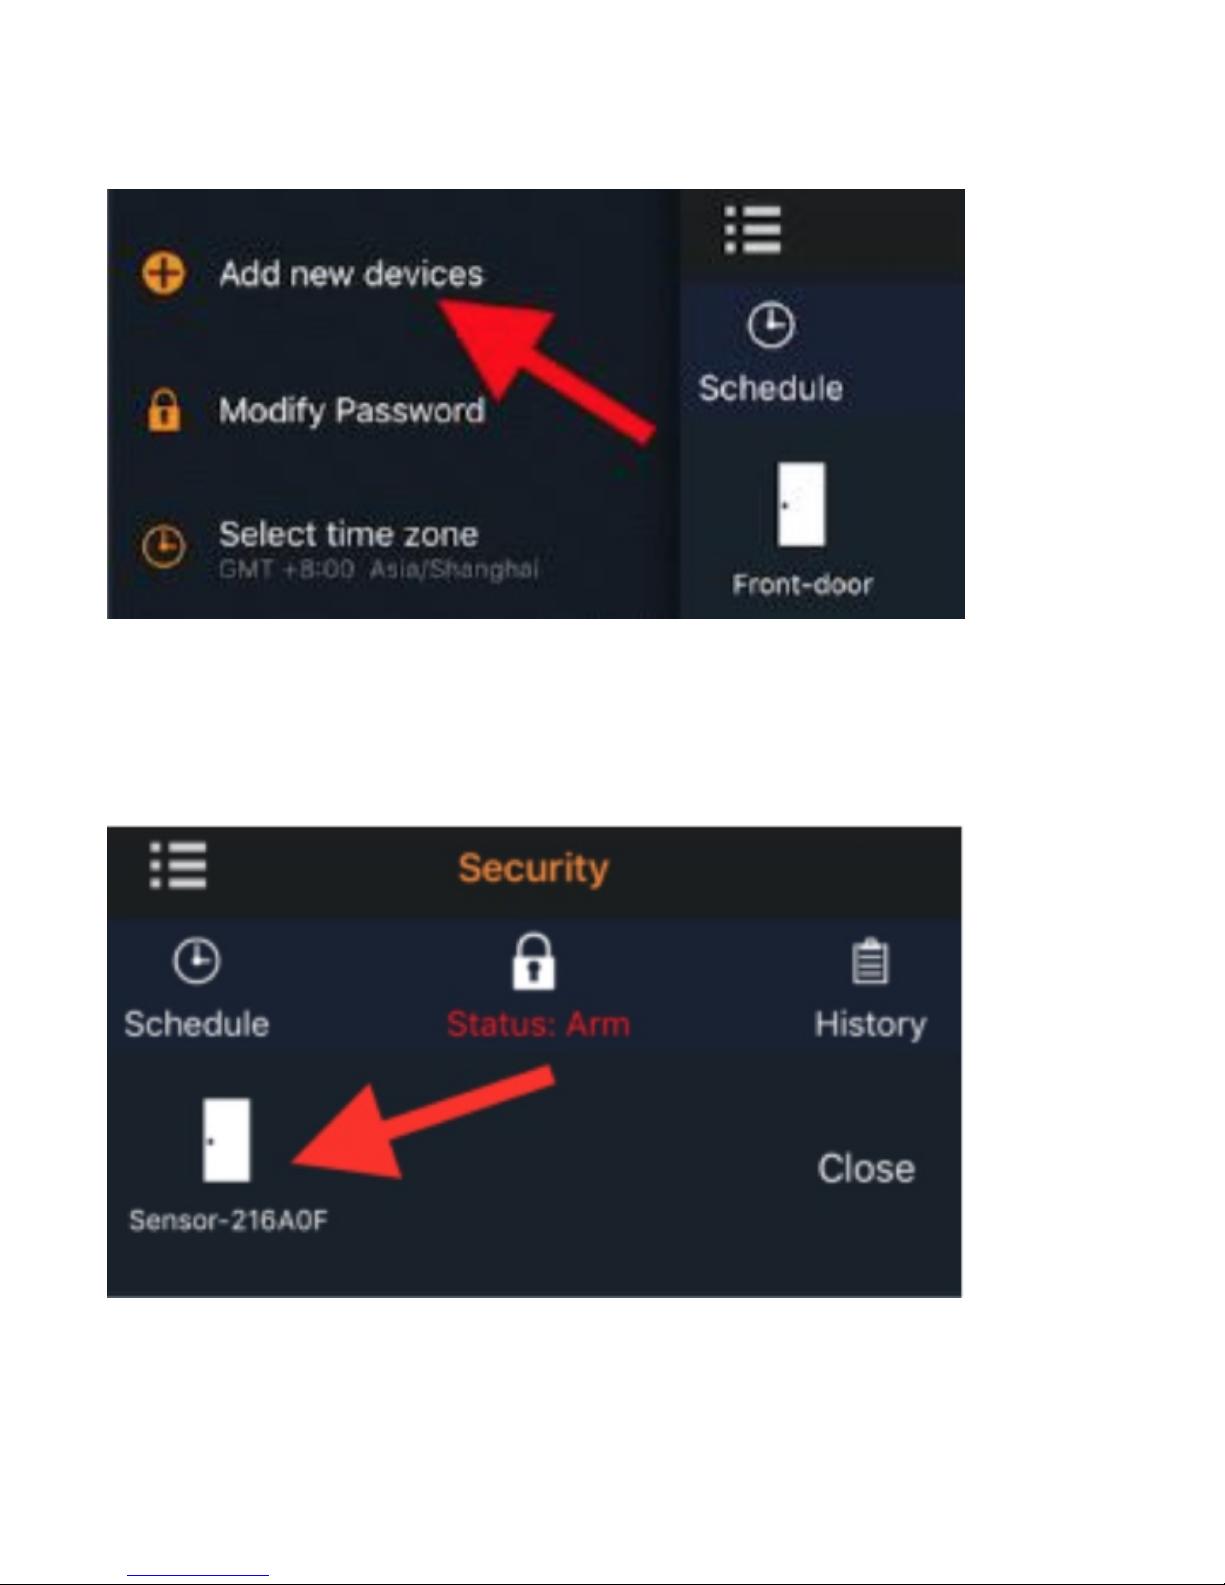
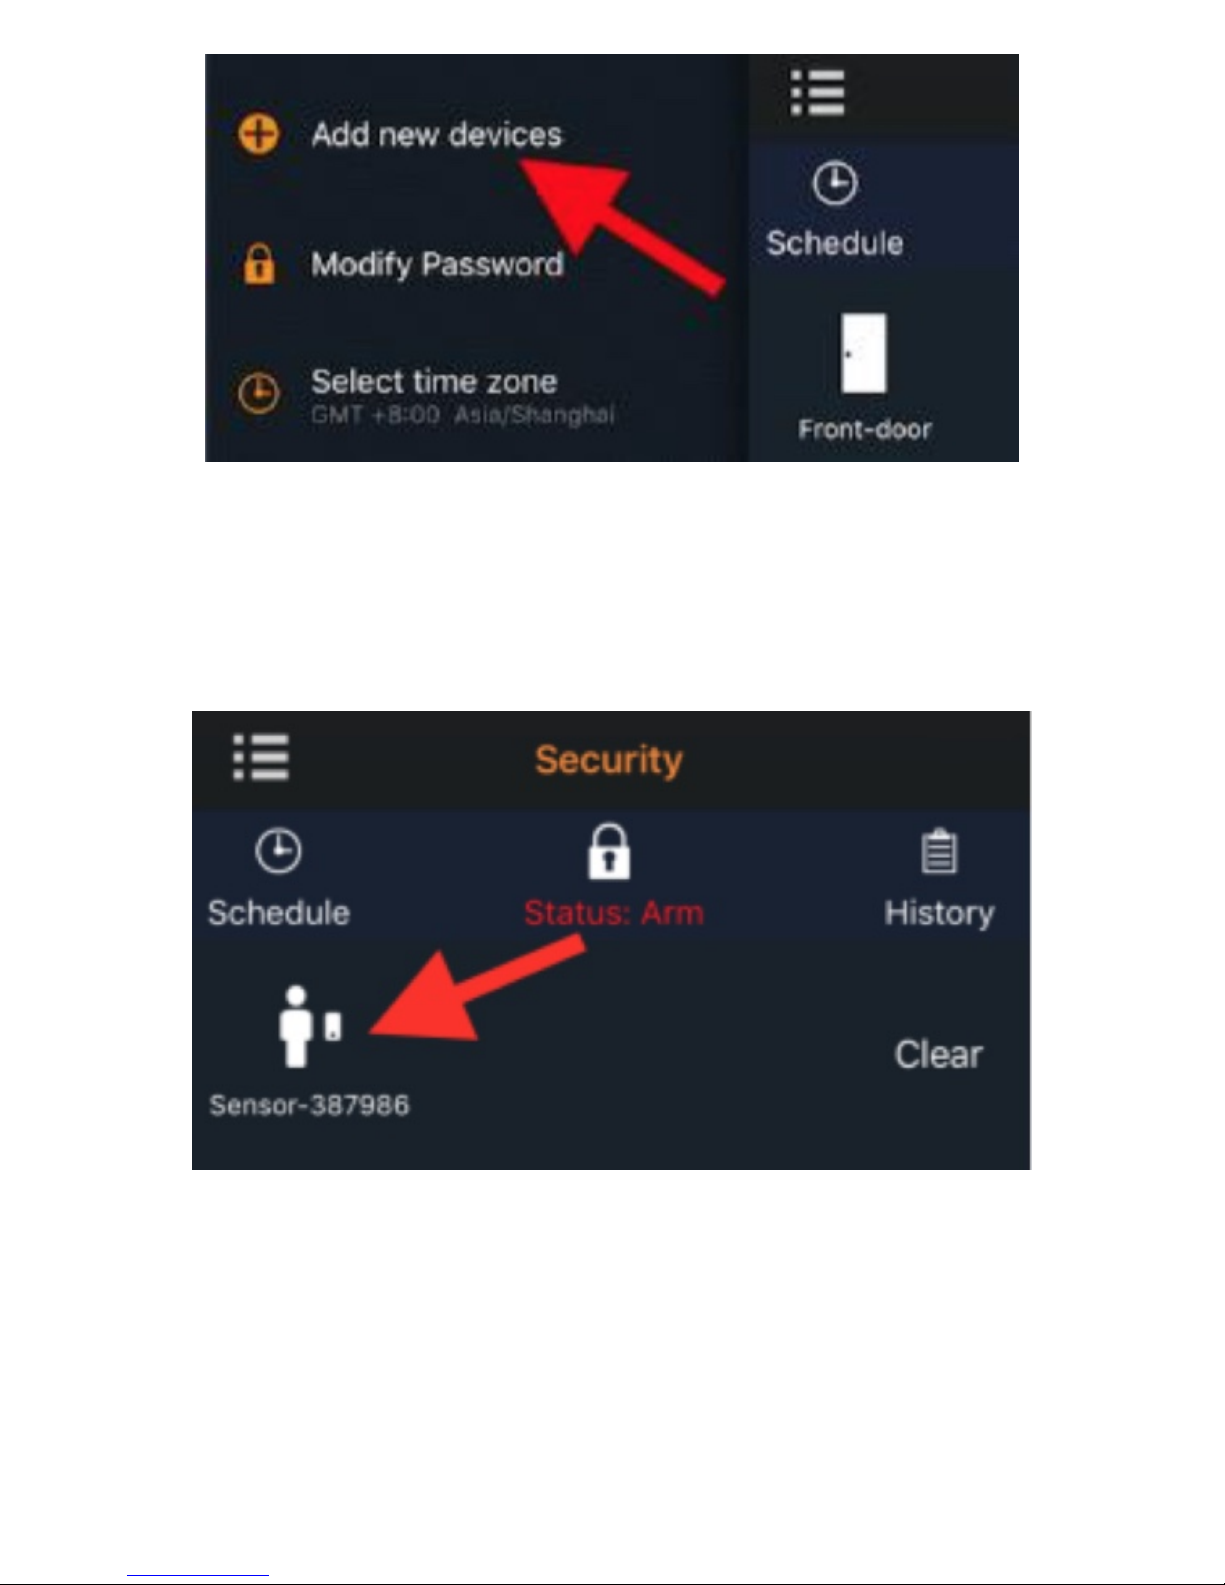
2: Select “Add new devices” in the app menu.
!
Tip: You can also press the “Z” button of the gateway for two seconds until the LED indicator turns
solid blue.
3: The sensor will join the gateway’s network automatically. The LED indicator will flash green for
three times when it has successfully joined.
4: Now you can see the Door/Window Sensor under the Security Tab in the mobile app.
!
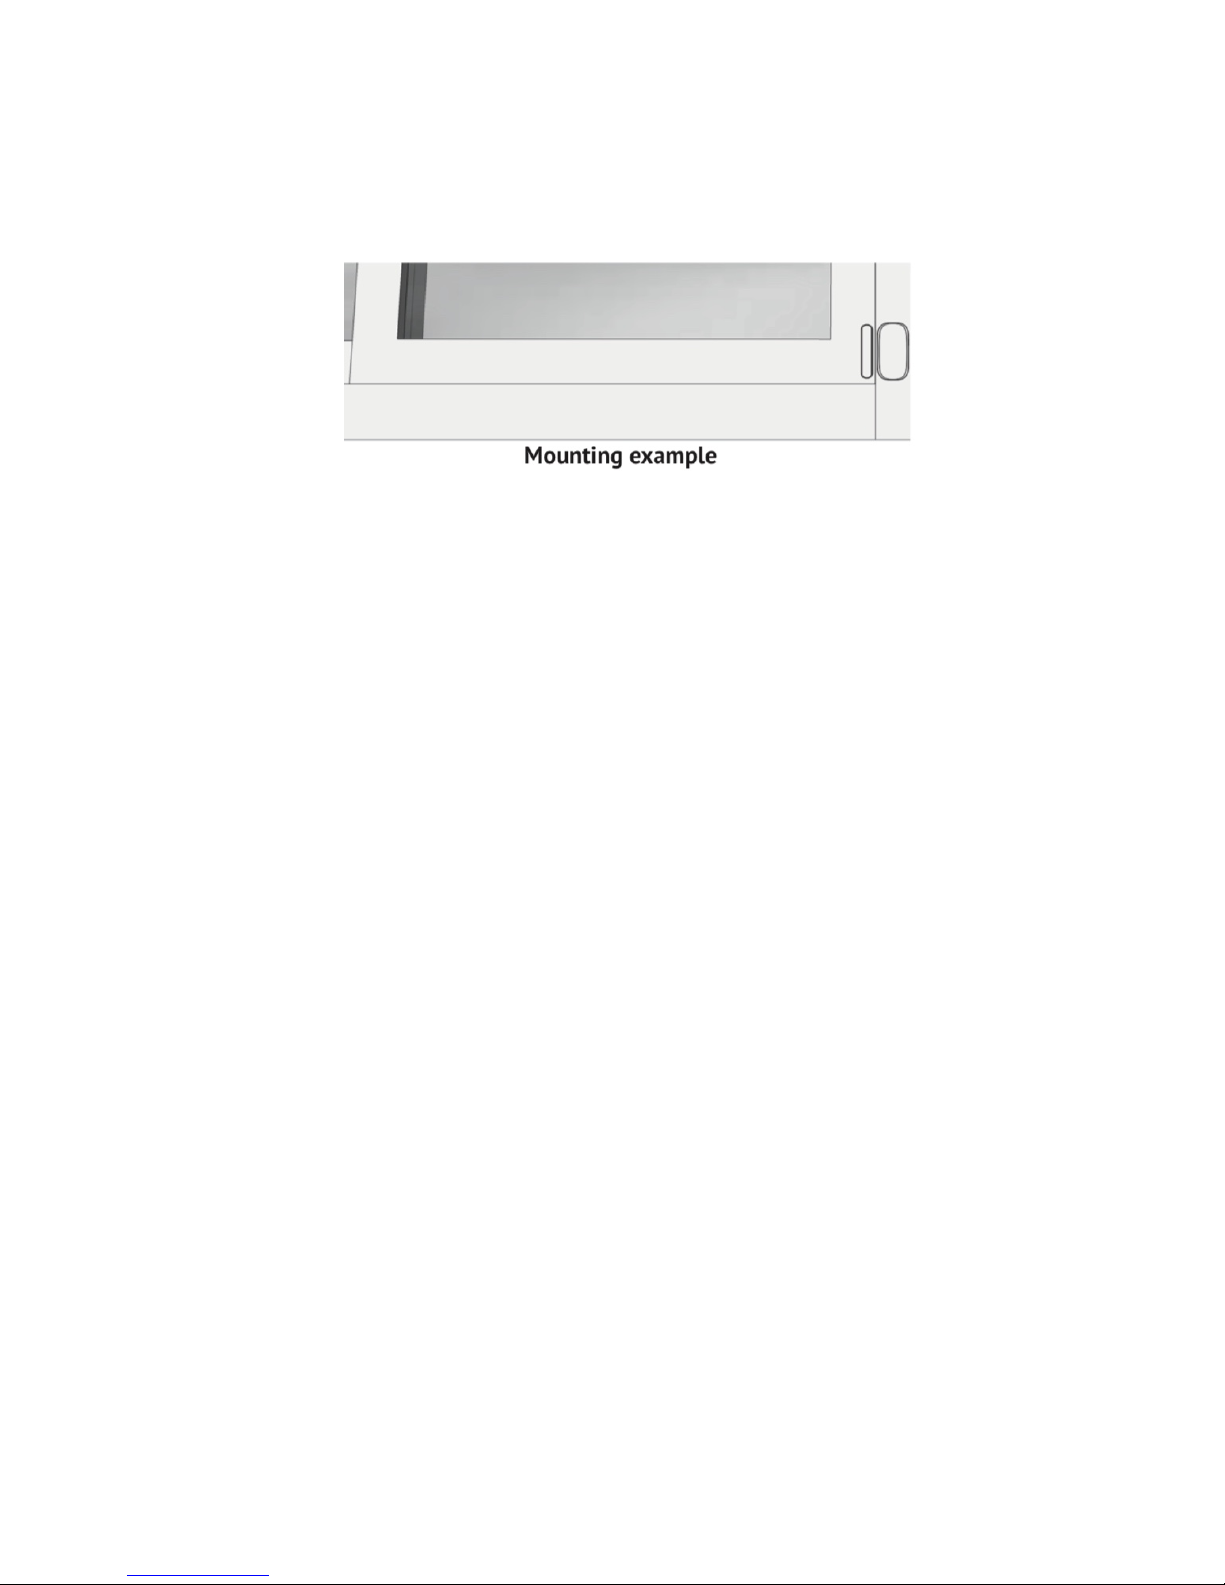
3.3 Mounting instructions
1. Make sure that the surface is clean to ensure good bonding.
2. Peel off the liner on the double-sided tape and place the sensor on the door/window. Be sure
that the two sensor parts should be within 1/8” of each other when the door/window is closed.
Please refer to the mounting example below.
!
4. FAQ
Q1. How can I return the device to factory default settings?
A1: Press and hold the reset button until the LED flashes red three times.
Refer to FCL TRAINING MANUAL - PRODUCT SPECS for Technical specifications."
TRUE SENSE OF SECURITY
FSPIR303 ZigBee Motion Sensor
Quick Start Guide
1. Introduction
The FSPIR303 ZigBee motion sensor detects movement in your property. It allows you to receive
notifications from the mobile app when movement is detected. This can be used to trigger an alarm
or a light etc.
2. Get to know your device
2.1. FSPIR303 at a glance
!
!
2.2. Reset button
•Set the device to join the ZigBee network.
•Reset this device to factory default settings.

2.3. LED Indicator
The LED indicator status is as below:
2.4. Sensing range (Above view)
!
2.5. Sensing range (Side view)
!
3. Get started
3.1. To get started, you will need:
•FSSEG-X3 Smart Gateway
•FSPIR303 Motion Sensor
•The Fiberserv mobile app
Then follow the steps below:
Step 1: Remove the pull tab to power on the device. The LED indicator will be flashing red
indicating the device is in its warm-up state. After 30 seconds, the LED will turn off and warm-up
complete.
Tip: If the there is no battery inside, please install a CR123A battery.
Step 2: Select “Add new devices” in the menu of the app.
LED Status
What it means
Green LED flashes
The device is prepared to join a network (when you press and
hold the reset button for two seconds).
Green LED flashes six times
The device leaves the network (when you press and hold the
reset button to return it to default factory settings).
Red LED flashes once
The device has detected movement.
!
Tip: You can also press the “Z” button of the gateway for two seconds until the LED indicator turns
solid blue.
Step 3: Use a pin key tool to press and hold the reset button for two seconds until the LED flashes
green to add it to the system.
The LED will turn solid for a while when pairing is successful.
Ensure it is successful added by checking the app.
!
Step 4: Install the device
Note: The position of the device effects the range and performance of the sensor. Please see
sensing range 2.4 and 2.5
Option 1: Please ensure all surfaces are clean, dry, flat and the temperature is over 10c before
attempting to place the devices, or the adhesive will not be fully effective.
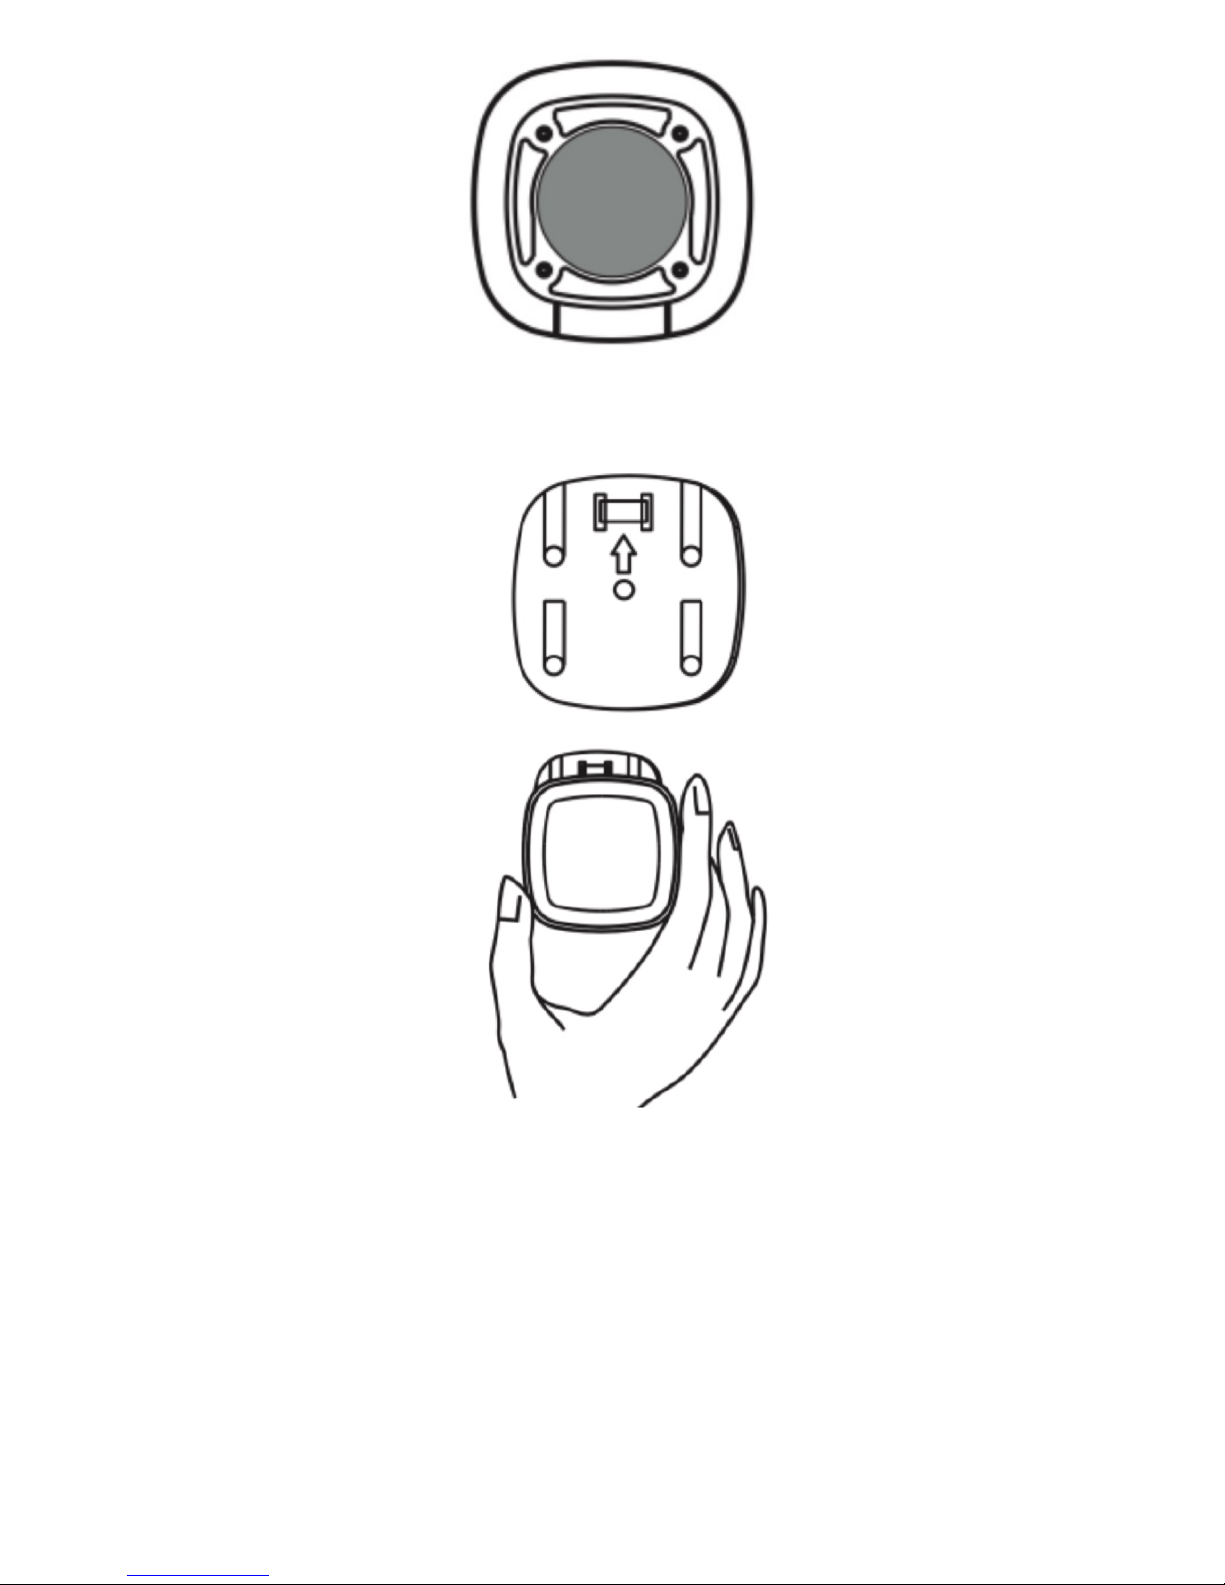
!
Option 2: Follow the diagrams below to fix the bracket and put the detector onto the bracket.
!
!
Your motion sensor is now ready for use.
4. FAQ
Q1. How can I return the device to factory default settings?
A1: Use a pin key tool to press and hold the reset button for five seconds until the LED flashes six
times.
Refer to FCL TRAINING MANUAL - PRODUCT SPECS for Technical specifications.

TRUE SENSE OF SECURITY
FSIPC804 Fixed IP Camera
Quick Start Guide
1. Introduction
The IP Camera allows you to monitor your home anywhere using your mobile phone. It is designed
with a high definition processing chip that gives high quality, fast loading images day and night.
!

!
2. Get started
21. To get started, you will need:
•FSSEG-X3 Smart Gateway
•FSIPC804 IP Camera
•The Fiberserv mobile app
2.2 Set up your IP camera
1. Connect your IP camera to the USB power adaptor and apply power.
2. The LED indicator will flash blue after the IP camera is powered on. If not, reset the camera by
pressing the reset button for three seconds.
3. Go to the video module !of the mobile app, tap the QR code icon !Scan the
QR code on the back of the IP camera (you can also manually input the device ID under the QR
code), then tap "Next".
4. For Android, the mobile phone will now connect to the IP camera's Wi-Fi hotspot automatically.
For iOS, go to Settings and choose the IP camera's Wi- Fi and go back to the app.
5. From a list of available Wi-Fi networks, choose a network and enter the password on the next
screen to connect the IP camera to the internet.
6. Once connected to the internet, the IP camera will be added to the mobile app automatically.
You are now able to see live video from the camera.
Refer to FCL TRAINING MANUAL - PRODUCT SPECS for Technical specifications.
COST SAVINGS & ENERGY EFFICIENCY
FSLED622 CCT Tunable LED Bulb
Quick Start Guide
1. Introduction
The FSLED622 ZigBee CCT Tunable LED bulb allows you to do the following from the mobile app:
•Switch it ON and OFF
•Adjust its brightness
•Adjust its colour
•Adjust its temperature
•Set an on/off schedule
2. Get started
2.1 To get started, you will need:
•FSSEG-X3 Smart Gateway
•FSLED622 CCT Tunable LED Bulb
•The Fiberserv mobile app
Then follow the steps below:
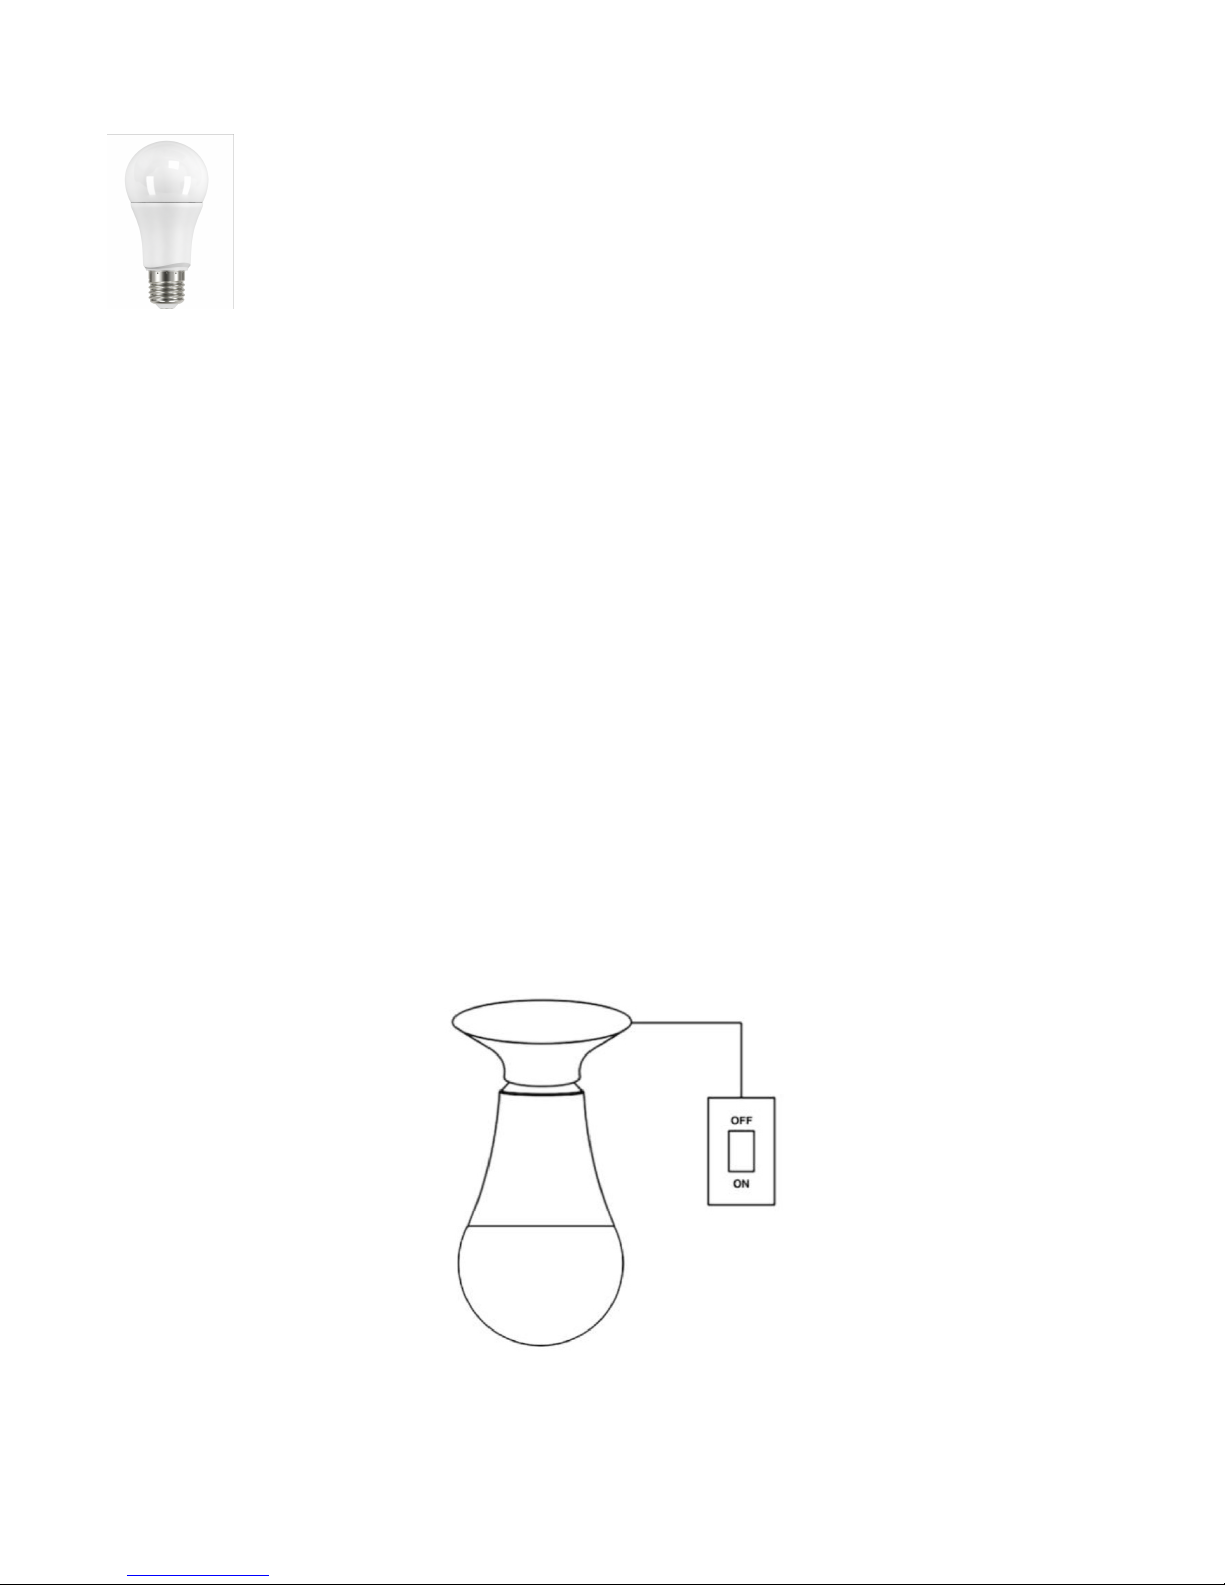
Step 1: Turn OFF the light switch
!
Step 2: Fit the LED622 LED Bulb into the light or lamp socket.
Step 3: Turn ON the switch and check if the LED622 LED Bulb flashes twice, if so follow the below
steps, otherwise, please refer to the FAQ section.
Step 4: Turn OFF the Switch

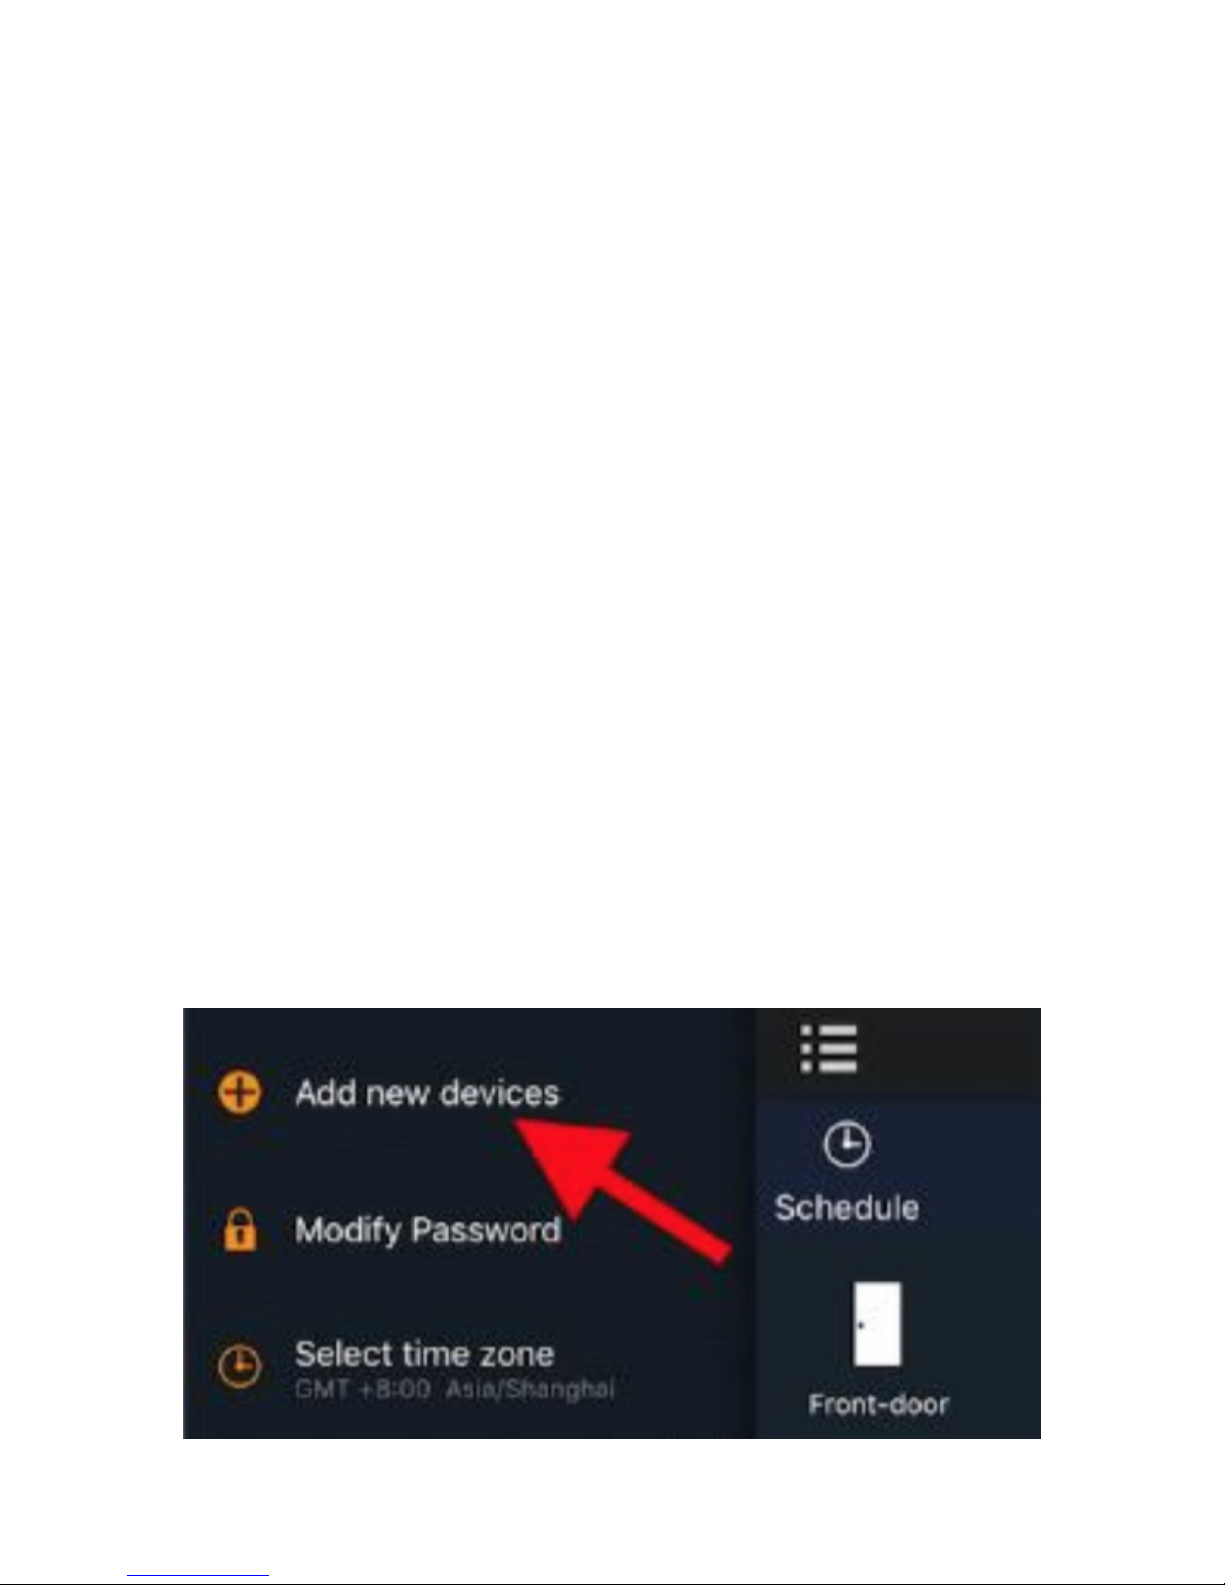
Step 5: Select “Add new devices” in the menu of the app.
!
Step 6: Turn ON the switch, the LED622 LED Bulb will flash twice.
Step 7: The LED622 will try to pair with the gateway.
The LED622 LED Bulb will flash once more when pairing is successful.
Please go to the app to check if it is paired successfully.
!
You are now able to control the LED622 LED Bulb using the mobile app.
•Turn ON/OFF
•Adjust the adjust brightness
•Adjust the colour and temperature
3. FAQ
Q1. How can I return this device to default factory settings?
A1: Toggle the power to the LED622 LED bulb off, on, off, on, off, on, off, on, off, on, off, on (six on
and six off) in slow succession. The LED will flash twice if it successfully returns to the factory
default settings.
Q2. Can I use a dimmer switch to control this LED622 LED bulb rather than the mobile app?
A2: Yes. Please see the SLC603 dimmer switch user guide.
Refer to FCL TRAINING MANUAL - PRODUCT SPECS for Technical specifications.

COST SAVINGS & ENERGY EFFICIENCY
FSSLC603 Remote Control
Quick Start Guide
1. Introduction
The FSSLC603 ZigBee Dimmer Switch is designed to control the following features of a CCT
Tunable LED bulb:
•Turn on/off the LED bulb
•Adjust the brightness of the LED bulb
•Adjust the colour and temperature of the LED bulb
2. Get to know your device
2.1. FSSLC603 at a glance
!
!
2.2. Buttons Introduction
Rotary button
•Turn ON and OFF the LED bulb.
•Adjust the brightness of the LED bulb.
•Adjust the colour and temperature of the LED bulb.
Reset button
•Return the device to default factory settings.
•Set the device into pairing mode to pair with an LED bulb.
Release Catch
•Push and turn in the direction of the arrow to remove from the back plate. This will allow battery
fitment and replacement.
Color Temperature/Brightness selector switch
•Select colour and temperature adjustment
•Select brightness adjustment
3. Get started
To get started, you will need:
•A SEG-X3 Smart Gateway
•A LED622 ZigBee CCT Tunable LED bulb
•A SLC603 ZigBee Dimmer Switch
•The Fiberserv mobile app
Then follow the steps below:
Step 1: Install the batteries
Remove the device from its back plates as described previously, fit the batteries and re-assemble.
Step 2: Check the switch status
Press the rotary button and check if the LED indicator light is flashing red.
Tip: if not, please return it to default factory settings by using a pin key tool to press and hold the
reset button for ten seconds until the LED indicator flashes twice.
!
Tip: for this step, you could also press the “Z” button of the gateway for two seconds until the LED
indicator turns solid blue.
Step 4: Use a pin key tool to press the reset button. Then the Dimmer Switch will try to join the
gateway based system.
Step 5: Check if the Dimmer Switch is added into the gateway.
When the Dimmer Switch is added into the gateway based system successfully, the LED indicator
will be flashing green three times.
After pairing, please press the rotary button and check if the LED indicator is off indicating that it is
added into the system.
Tip: If the LED is still flashing, it means that the SLC603 Dimmer Switch hasn’t added into the
gateway. You will need to repeat the process from step 2.
Step 6: Bind with the CCT Tunable LED bulb LED622
Note: please make sure the LED622 is also added into the same gateway based system and can
be controlled by the mobile app before you continue.
(1) Make sure the LED bulb is powered on.
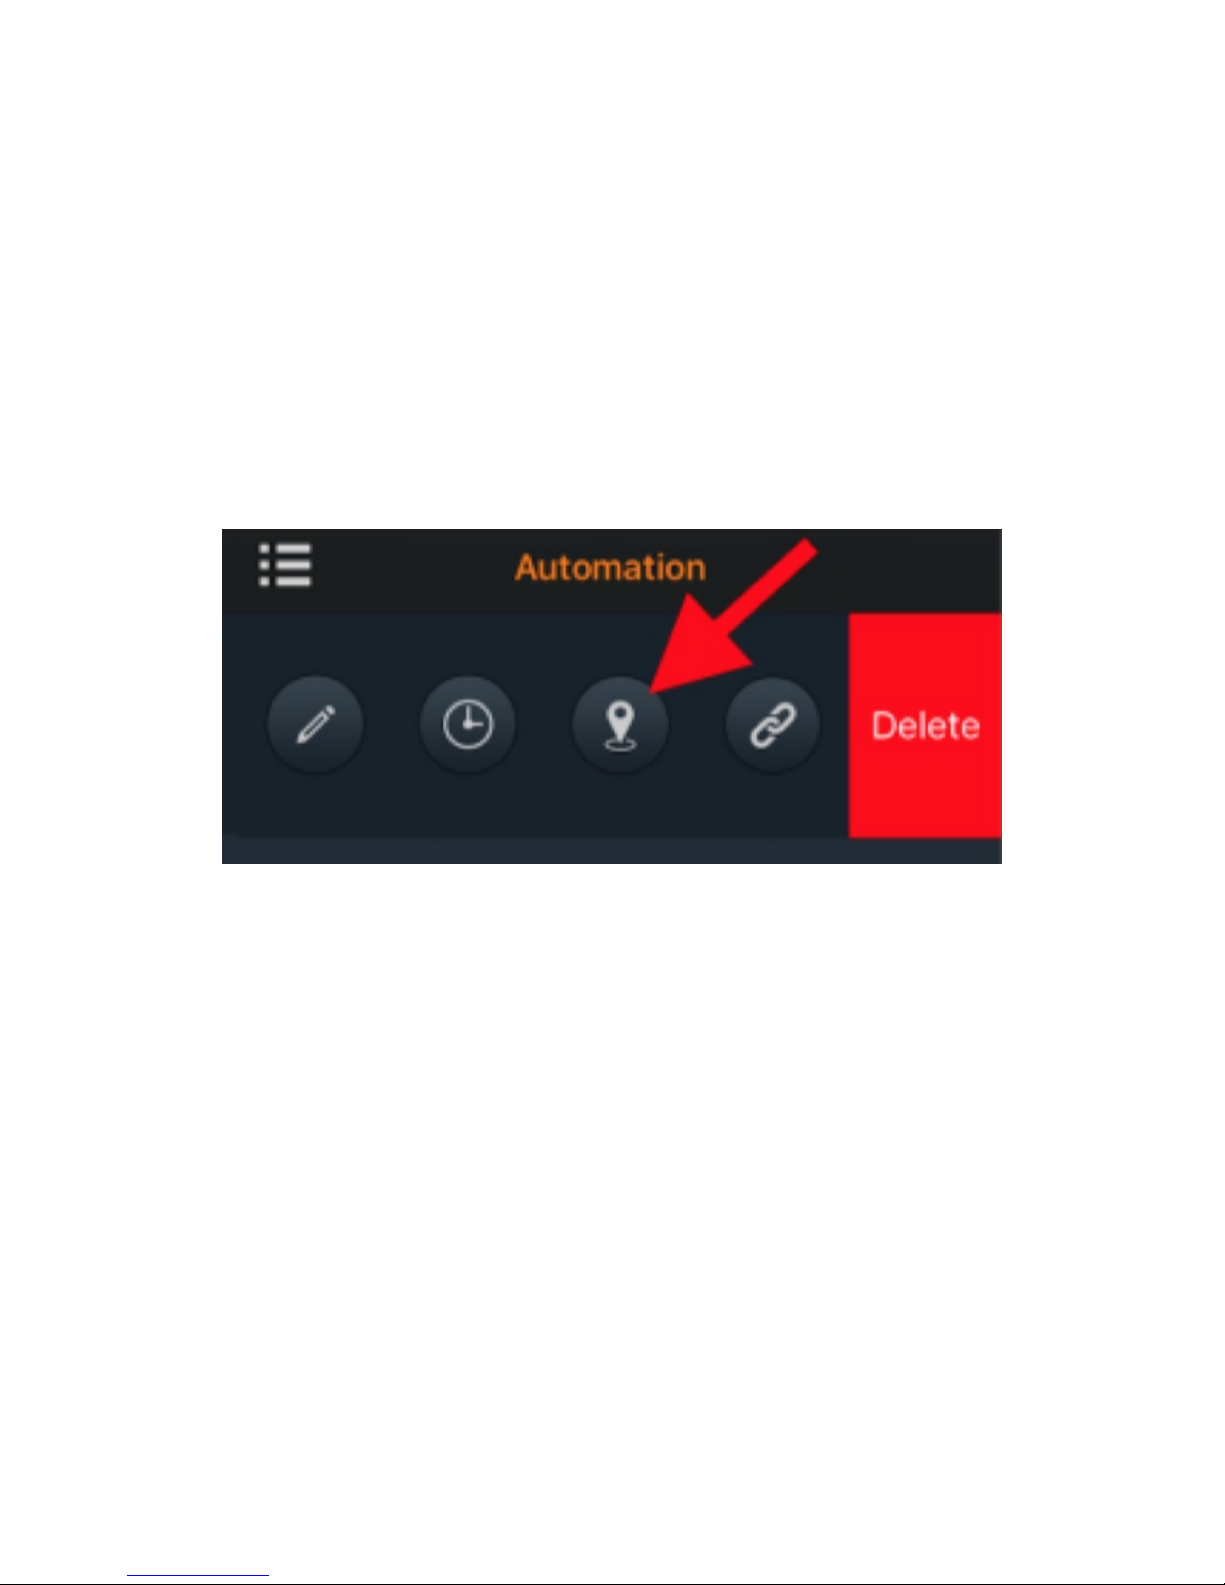
(2) Go to the “Automation” section, tap “Edit” (Android phone) or swipe from left to right (iPhone),
tap “Identify”. The LED bulb will flash during the “Identify” process.
!
(3) Press and hold the reset button of the Dimmer Switch for three seconds until green LED flashes
three times.
(4) After successful pairing, the LED bulb will stop flashing, and the LED indicator of the Dimmer
Switch will flash three times.
You are now able to control the LED bulb using the Dimmer Switch.
4. FAQ
Q1. How can I return this device to default factory settings?
A1: Please use a pin key tool to press and hold the reset button for ten seconds until the LED
indicator flashes twice.
Q2. Can I use this device to control a CCT tunable LED bulb without a gateway and the mobile
app?
A2: Yes. But the LED bulb needs to be based on standard ZigBee Lighting Link profile such as
LED622. If you have a LED622, please use this device and follow the instructions below.
Note: All the below devices need to be returned to default factory settings before you continue.
(1) Place the Dimmer Switch near to the LED622 Bulb, press and hold the reset button of the
Dimmer Switch for about three seconds until the LED flashes green three times.
(2) If pairing is successful, the LED622 bulb will flash several times.
Refer to FCL TRAINING MANUAL - PRODUCT SPECS for Technical specifications.

COST SAVINGS & ENERGY EFFICIENCY
FSWSP404 Smart Plug US
Quick Start Guide
1. Introduction
The Smart plug FSWSP404 allows you to switch your devices on and off and allows you to
measure power and record total used power in kilowatt hours (kWh) wirelessly via your mobile App.
•Converts any home appliance into a ‘smart’ device, such as lamps, heaters, fans, window A/
Cs, etc.
•Controls your home devices on/off globally via the mobile app.
2. Get to know your device
2.1. FSWSP404 at a glance
!
Reset button
• Reset. Press and hold the Reset button for ten seconds until the LED indicator flashes three times
to restore the smart plug to default factory settings.
• Pair mode. Press and hold the Reset button for about three seconds until the LED indicator
flashes three times. Then, you can pair the lighting switch with another device.
LED indicator
The LED status gives the following information:

!
Get started
3.1 To get started, you will need:
•A SEG-X3 Gateway
•FSWSP404 Smart Plug
•The Fiberserv mobile app.
3.2 Connect to the gateway’s network
1. Set your gateway to permit joining. (Add new device).
2. Plug in the smart plug and the LED indicator will start flashing (reset it if not).
3. The smart plug will join the gateway automatically and the LED indicator will turn steady when
successfully joined.
Note: If the smart plug fails to join the gateway's network within one minute, simply reset it and retry.
3.3 Plug the appliance into the smart plug
1. Plug your appliance into the smart plug’s socket, so you can remotely switch it on/off
2. Check real-time energy usage via your mobile App.
Refer to FCL TRAINING MANUAL - PRODUCT SPECS for Technical specifications.
Safety Notice
WARNING: Failure to follow these safety notices could result in fire, electric shock, other injuries, or
damage to the Smart Plug and other property. Read all the safety notices below before using the
Smart Plug.
•Avoid high humidity or extreme temperatures.
•Avoid long exposure to direct sunlight or strong ultraviolet light.
•Do not drop or expose the unit to intense vibration.
•Do not disassemble or try to repair the unit on yourself.
•Do not expose the unit or its accessories to flammable liquids, gases or
•other explosives.
This manual suits for next models
14
Table of contents


