FIBRO 2480.00.91.42 User manual

OPERATING INSTRUCTIONS
WPM GATEWAY IOT
2480.00.91.42
Operating instructions WPM Gateway IoT

Document: Operating instructions
Document number: 2.7549.00.1220.0100000
Revision: R12-2020
Version: V01
Language:
In the German language, this document is the original version in the EU language of the manufacturer and is labelled
with the German national flag.
In the language of a country of use, this document is a translation of the original version and labelled with the national
flag of the country of use.
This document is referred to as "instructions" in the following text.
Number of pages in this manual including the title page: 76
These instructions are valid for the product
2480.00.91.42
WPM Gateway IoT
This document was created by
FIBRO GMBH
August-Läpple-Weg
DE 74855 Hassmersheim
Phone: +49 (0) 62 66 73 0
Fax: +49 (0) 62 66 73 237
E-mail: [email protected]
Internet: www.fibro.de
© All rights to this document are subject to copyright of the author.
Without the prior written permission of FIBRO GMBH, this document must not be copied or
reproduced, either in full or in part.
The instructions are intended only for the operator of the described IoT device only
and must therefore not be made available to uninvolved third parties - in particular to competitors.

Operating instructions WPM Gateway IoT 3/76
Contents
1 Introduction . . . . . . . . . . . . . . . . . . . . . . . . . . . . . . . . . . . . . . . . . . . . . . . . . . . . . . . . . . . . . . . . . . . . . 5
1.1 Intended use . . . . . . . . . . . . . . . . . . . . . . . . . . . . . . . . . . . . . . . . . . . . . . . . . . . . . . . . . . . . . . . . 5
1.2 Disclaimer of liability . . . . . . . . . . . . . . . . . . . . . . . . . . . . . . . . . . . . . . . . . . . . . . . . . . . . . . . . . . 6
1.3 Purpose of the document. . . . . . . . . . . . . . . . . . . . . . . . . . . . . . . . . . . . . . . . . . . . . . . . . . . . . . . 6
1.4 Target group. . . . . . . . . . . . . . . . . . . . . . . . . . . . . . . . . . . . . . . . . . . . . . . . . . . . . . . . . . . . . . . . . 6
1.5 Autor's rights . . . . . . . . . . . . . . . . . . . . . . . . . . . . . . . . . . . . . . . . . . . . . . . . . . . . . . . . . . . . . . . . 7
2 Safety . . . . . . . . . . . . . . . . . . . . . . . . . . . . . . . . . . . . . . . . . . . . . . . . . . . . . . . . . . . . . . . . . . . . . . . . . . 8
2.1 Safety instructions . . . . . . . . . . . . . . . . . . . . . . . . . . . . . . . . . . . . . . . . . . . . . . . . . . . . . . . . . . . . 8
2.2 General instructions . . . . . . . . . . . . . . . . . . . . . . . . . . . . . . . . . . . . . . . . . . . . . . . . . . . . . . . . . . . 8
2.3 Protective measures . . . . . . . . . . . . . . . . . . . . . . . . . . . . . . . . . . . . . . . . . . . . . . . . . . . . . . . . . . 9
3 Product description . . . . . . . . . . . . . . . . . . . . . . . . . . . . . . . . . . . . . . . . . . . . . . . . . . . . . . . . . . . . . . 10
3.1 Supplied components . . . . . . . . . . . . . . . . . . . . . . . . . . . . . . . . . . . . . . . . . . . . . . . . . . . . . . . . 10
3.2 Properties. . . . . . . . . . . . . . . . . . . . . . . . . . . . . . . . . . . . . . . . . . . . . . . . . . . . . . . . . . . . . . . . . . 10
3.3 Interfaces and LED indicators . . . . . . . . . . . . . . . . . . . . . . . . . . . . . . . . . . . . . . . . . . . . . . . . . . 11
3.4 Voltage supply . . . . . . . . . . . . . . . . . . . . . . . . . . . . . . . . . . . . . . . . . . . . . . . . . . . . . . . . . . . . . . 12
3.5 Inputs and outputs . . . . . . . . . . . . . . . . . . . . . . . . . . . . . . . . . . . . . . . . . . . . . . . . . . . . . . . . . . . 12
3.6 System requirements . . . . . . . . . . . . . . . . . . . . . . . . . . . . . . . . . . . . . . . . . . . . . . . . . . . . . . . . . 13
3.7 Licensing . . . . . . . . . . . . . . . . . . . . . . . . . . . . . . . . . . . . . . . . . . . . . . . . . . . . . . . . . . . . . . . . . . 14
3.8 Operating modes and functions . . . . . . . . . . . . . . . . . . . . . . . . . . . . . . . . . . . . . . . . . . . . . . . . . 14
3.8.1 Functions in Basic mode . . . . . . . . . . . . . . . . . . . . . . . . . . . . . . . . . . . . . . . . . . . . . . . . 14
3.8.2 Functions in Professional mode. . . . . . . . . . . . . . . . . . . . . . . . . . . . . . . . . . . . . . . . . . . 15
3.8.3 Functions in Administrator mode . . . . . . . . . . . . . . . . . . . . . . . . . . . . . . . . . . . . . . . . . . 15
4 Assembly . . . . . . . . . . . . . . . . . . . . . . . . . . . . . . . . . . . . . . . . . . . . . . . . . . . . . . . . . . . . . . . . . . . . . . 16
5 Commissioning . . . . . . . . . . . . . . . . . . . . . . . . . . . . . . . . . . . . . . . . . . . . . . . . . . . . . . . . . . . . . . . . . 17
5.1 Initial commissioning . . . . . . . . . . . . . . . . . . . . . . . . . . . . . . . . . . . . . . . . . . . . . . . . . . . . . . . . . 17
5.1.1 Network settings . . . . . . . . . . . . . . . . . . . . . . . . . . . . . . . . . . . . . . . . . . . . . . . . . . . . . . 17
5.1.2 Commissioning the WPM Gateway . . . . . . . . . . . . . . . . . . . . . . . . . . . . . . . . . . . . . . . . 19
5.1.3 Setting the time . . . . . . . . . . . . . . . . . . . . . . . . . . . . . . . . . . . . . . . . . . . . . . . . . . . . . . . 20
5.2 Network connection . . . . . . . . . . . . . . . . . . . . . . . . . . . . . . . . . . . . . . . . . . . . . . . . . . . . . . . . . . 21
5.2.1 NetFIELD Device Manager . . . . . . . . . . . . . . . . . . . . . . . . . . . . . . . . . . . . . . . . . . . . . . 23
5.2.2 Network signal strength . . . . . . . . . . . . . . . . . . . . . . . . . . . . . . . . . . . . . . . . . . . . . . . . . 23
6 User management configuration . . . . . . . . . . . . . . . . . . . . . . . . . . . . . . . . . . . . . . . . . . . . . . . . . . . 24
6.1 Create users . . . . . . . . . . . . . . . . . . . . . . . . . . . . . . . . . . . . . . . . . . . . . . . . . . . . . . . . . . . . . . . 24
6.2 Editing a user . . . . . . . . . . . . . . . . . . . . . . . . . . . . . . . . . . . . . . . . . . . . . . . . . . . . . . . . . . . . . . . 26
6.3 Deleting a user. . . . . . . . . . . . . . . . . . . . . . . . . . . . . . . . . . . . . . . . . . . . . . . . . . . . . . . . . . . . . . 26
6.4 Changing a user password . . . . . . . . . . . . . . . . . . . . . . . . . . . . . . . . . . . . . . . . . . . . . . . . . . . . 27
7 Using the WPM Gateway . . . . . . . . . . . . . . . . . . . . . . . . . . . . . . . . . . . . . . . . . . . . . . . . . . . . . . . . . . 28
7.1 WPM Gateway – Login . . . . . . . . . . . . . . . . . . . . . . . . . . . . . . . . . . . . . . . . . . . . . . . . . . . . . . . 28
7.2 WPM Gateway – Display information . . . . . . . . . . . . . . . . . . . . . . . . . . . . . . . . . . . . . . . . . . . . 29
7.3 Main menu . . . . . . . . . . . . . . . . . . . . . . . . . . . . . . . . . . . . . . . . . . . . . . . . . . . . . . . . . . . . . . . . . 30

4/76 Operating instructions WPM Gateway IoT
7.4 Data holder . . . . . . . . . . . . . . . . . . . . . . . . . . . . . . . . . . . . . . . . . . . . . . . . . . . . . . . . . . . . . . . . 31
7.4.1 Data holder – Overview . . . . . . . . . . . . . . . . . . . . . . . . . . . . . . . . . . . . . . . . . . . . . . . . . 31
7.4.2 Data holder – Details . . . . . . . . . . . . . . . . . . . . . . . . . . . . . . . . . . . . . . . . . . . . . . . . . . .33
7.4.3 Data holder – Sensors – Details . . . . . . . . . . . . . . . . . . . . . . . . . . . . . . . . . . . . . . . . . . 42
7.5 Free sensors – Overview . . . . . . . . . . . . . . . . . . . . . . . . . . . . . . . . . . . . . . . . . . . . . . . . . . . . . . 44
7.6 Current activities . . . . . . . . . . . . . . . . . . . . . . . . . . . . . . . . . . . . . . . . . . . . . . . . . . . . . . . . . . . . 45
7.7 Export diagram data. . . . . . . . . . . . . . . . . . . . . . . . . . . . . . . . . . . . . . . . . . . . . . . . . . . . . . . . . . 46
8 Set up WPM Gateway. . . . . . . . . . . . . . . . . . . . . . . . . . . . . . . . . . . . . . . . . . . . . . . . . . . . . . . . . . . . . 47
8.1 Data holder – Changing parameters . . . . . . . . . . . . . . . . . . . . . . . . . . . . . . . . . . . . . . . . . . . . . 47
8.2 Data holder – Assigning free sensors . . . . . . . . . . . . . . . . . . . . . . . . . . . . . . . . . . . . . . . . . . . .48
8.3 Data holder – Tool screen assignment. . . . . . . . . . . . . . . . . . . . . . . . . . . . . . . . . . . . . . . . . . . . 50
8.4 Positioning sensors on the tool screen . . . . . . . . . . . . . . . . . . . . . . . . . . . . . . . . . . . . . . . . . . .51
8.5 Sensors – Changing parameters . . . . . . . . . . . . . . . . . . . . . . . . . . . . . . . . . . . . . . . . . . . . . . . .52
9 WPM Gateway Administration . . . . . . . . . . . . . . . . . . . . . . . . . . . . . . . . . . . . . . . . . . . . . . . . . . . . . 54
9.1 WPM Gateway Settings . . . . . . . . . . . . . . . . . . . . . . . . . . . . . . . . . . . . . . . . . . . . . . . . . . . . . . . 54
9.1.1 License and license key. . . . . . . . . . . . . . . . . . . . . . . . . . . . . . . . . . . . . . . . . . . . . . . . . 55
9.1.2 Assigning/changing the WPM Gateway name. . . . . . . . . . . . . . . . . . . . . . . . . . . . . . . . 55
9.1.3 WPM Gateway certificates. . . . . . . . . . . . . . . . . . . . . . . . . . . . . . . . . . . . . . . . . . . . . . . 55
9.2 Managing email settings . . . . . . . . . . . . . . . . . . . . . . . . . . . . . . . . . . . . . . . . . . . . . . . . . . . . . . 56
9.3 Setting the filter for Press mode. . . . . . . . . . . . . . . . . . . . . . . . . . . . . . . . . . . . . . . . . . . . . . . . . 58
9.4 Connecting press control . . . . . . . . . . . . . . . . . . . . . . . . . . . . . . . . . . . . . . . . . . . . . . . . . . . . . . 59
9.4.1 Connection via EtherCat or Profinet . . . . . . . . . . . . . . . . . . . . . . . . . . . . . . . . . . . . . . . 59
9.4.2 Connection with an OPC UA Client . . . . . . . . . . . . . . . . . . . . . . . . . . . . . . . . . . . . . . . . 60
9.4.3 Setting up MQTT proxy . . . . . . . . . . . . . . . . . . . . . . . . . . . . . . . . . . . . . . . . . . . . . . . . . 62
9.5 WPM Gateway – Operating statistics . . . . . . . . . . . . . . . . . . . . . . . . . . . . . . . . . . . . . . . . . . . . 63
9.6 Reset Administrator password . . . . . . . . . . . . . . . . . . . . . . . . . . . . . . . . . . . . . . . . . . . . . . . . . . 64
10 Maintenance . . . . . . . . . . . . . . . . . . . . . . . . . . . . . . . . . . . . . . . . . . . . . . . . . . . . . . . . . . . . . . . . . . . . 65
10.1 WPM Gateway – Update . . . . . . . . . . . . . . . . . . . . . . . . . . . . . . . . . . . . . . . . . . . . . . . . . . . . . . 65
10.2 Data holder – Updating firmware . . . . . . . . . . . . . . . . . . . . . . . . . . . . . . . . . . . . . . . . . . . . . . . . 66
10.3 Sensor – Updating firmware . . . . . . . . . . . . . . . . . . . . . . . . . . . . . . . . . . . . . . . . . . . . . . . . . . . 67
10.4 Changing the battery . . . . . . . . . . . . . . . . . . . . . . . . . . . . . . . . . . . . . . . . . . . . . . . . . . . . . . . . . 68
11 Disposal . . . . . . . . . . . . . . . . . . . . . . . . . . . . . . . . . . . . . . . . . . . . . . . . . . . . . . . . . . . . . . . . . . . . . . . 69
11.1 Disposing of the battery . . . . . . . . . . . . . . . . . . . . . . . . . . . . . . . . . . . . . . . . . . . . . . . . . . . . . . . 69
12 Indexes . . . . . . . . . . . . . . . . . . . . . . . . . . . . . . . . . . . . . . . . . . . . . . . . . . . . . . . . . . . . . . . . . . . . . . . . 70
12.1 Third-party products. . . . . . . . . . . . . . . . . . . . . . . . . . . . . . . . . . . . . . . . . . . . . . . . . . . . . . . . . . 70
12.2 Glossary. . . . . . . . . . . . . . . . . . . . . . . . . . . . . . . . . . . . . . . . . . . . . . . . . . . . . . . . . . . . . . . . . . . 70
12.3 Index of figures . . . . . . . . . . . . . . . . . . . . . . . . . . . . . . . . . . . . . . . . . . . . . . . . . . . . . . . . . . . . . 71
12.4 Index of tables . . . . . . . . . . . . . . . . . . . . . . . . . . . . . . . . . . . . . . . . . . . . . . . . . . . . . . . . . . . . . . 72
13 Appendix. . . . . . . . . . . . . . . . . . . . . . . . . . . . . . . . . . . . . . . . . . . . . . . . . . . . . . . . . . . . . . . . . . . . . . . 73
13.1 Personal notes . . . . . . . . . . . . . . . . . . . . . . . . . . . . . . . . . . . . . . . . . . . . . . . . . . . . . . . . . . . . . . 73
14 Index . . . . . . . . . . . . . . . . . . . . . . . . . . . . . . . . . . . . . . . . . . . . . . . . . . . . . . . . . . . . . . . . . . . . . . . . . . 74

Operating instructions WPM Gateway IoT 5/76
Introduction
1 INTRODUCTION
Read through these instructions carefully before use and store them.
These instructions contain the following important information on the product:
• Proper use
• Safety
• Mounting
•Use
• Maintenance
• Disposal
Proper use also involves
• Reading these instructions
• Complying with the safety information they contain
• Complying with the applicable documents
• Complying with the maintenance requirements
Give these instructions to the user after mounting is complete, and give them to the new owner
if the product is sold.
1.1 Intended use
The product WPM Gateway is part of a WPM System.
A WPM system is a customer-specific combination of hardware and software for wireless pres-
sure monitoring .
In the following text of these instructions, the product WPM Gateway is referred to as IoT device.
On the IoT device, the WPM software is installed, which only works in conjunction with the as-
sociated components.
With the product WPM Gateway, active WPM pressure sensors and data holders in the receiv-
ing area of the Gateway can be identified, observed and evaluated or re-parametrised with the
corresponding Professional authorisation level.
Any other use of the product WPM Gateway is considered improper.

6/76 Operating instructions WPM Gateway IoT
Introduction
1.2 Disclaimer of liability
FIBRO GMBH guarantees the described function of the product as stated in advertising and
product information.
Further product properties are not confirmed. FIBRO GMBH assumes no liability for efficiency
and flawless functioning if the product is used for a purpose other than the one addressed in the
chapter “Proper use”. Compensation for damage is generally precluded.
If this product is used in environments for which it is not suitable or which do not fulfil the tech-
nical standards, FIBRO GMBH shall not be held responsible for the consequences.
FIBRO GMBH assumes no liability for damage to facilities and systems near the product caused
by a defect in the product or an error in these instructions.
FIBRO GMBH is not responsible for the violation of patents and/or the rights of third parties out-
side of the Federal Republic of Germany.
FIBRO GMBH is not responsible for damage caused by improper operation and failure to follow
the instructions provided in this document.
FIBRO GMBH is not liable for lost profit and subsequent damage resulting from failure to comply
with safety and warning notes.
The products from FIBRO GMBH are state of the art in science and technology.
FIBRO GMBH continually conducts studies of the products and the market in order to continu-
ally improve and further develop its products.
1.3 Purpose of the document
These instructions describe the operation of the product and contain important information on
correct use.
Read these instructions before working on or with the product. The instructions contain import-
ant information for your personal safety. All persons who work on or with the product at some
phase in the product’s life must read and understand the instructions.
The instructions must be available at the location where the product is used and throughout its
entire lifespan. They must be given to the new owner if the product is sold.
The safety notes in the individual chapters must be observed.
These instructions and the other applicable documents are not subject to an automatic change
service.
We reserve the right to make changes to the data and figures mentioned in these instructions
due to technical developments. FIBRO GMBH can supply the current issue.
1.4 Target group
These instructions are oriented towards persons who commission, configure, operate and main-
tain the product WPM Gateway.

Operating instructions WPM Gateway IoT 7/76
Introduction
1.5 Autor's rights
The product WPM Gateway and these instructions are protected by copyright. Reproduction
without approval shall be prosecuted in court.
We reserve all rights to these instructions, including reproduction and/or copying in all imagin-
able forms, e.g. by photocopying, printing, copying to any data media whatsoever and in trans-
lated form.
These instructions may be reprinted only with written approval from FIBRO GMBH.
The technical state at the time of the delivery of the product WPM Gateway and the associated
instructions shall be decisive if no other information is provided.
We reserve the right to make technical changes without giving special notice. Earlier instructions
shall lose their validity. The general sales and delivery conditions of
FIBRO GMBH apply.
The products, names and logos mentioned serve informational purposes only and may be trade-
marks of the respective owner. This shall require no special indication.

8/76 Operating instructions WPM Gateway IoT
Safety
2SAFETY
2.1 Safety instructions
These instructions contain safety notices intended to draw attention to possible dangers that
should be observed to prevent injury.
The pertinent text describes
• the type of danger
• the source of danger
• the options for preventing injuries
• the consequences in case of non-observance of the warning notices
The safety instructions are emphasised by a colour signal bar with warning triangle and signal
word.
The signal bars have the following meaning:
DANGER!
A safety notice on a red signal bar with the signal word DANGER designates a hazard
with a high risk level which, if not avoided, will result in death or severe injury.
WARNING!
A safety notice on an orange signal bar with the signal word WARNING designates a haz-
ard with a medium risk level which, if not avoided, might result in death or severe injury.
CAUTION!
A safety notice on a yellow signal bar with the signal word CAUTION designates a hazard
with a low risk level which, if not avoided, could result in minor or moderate injury.
2.2 General instructions
In addition to the safety notices, these instructions contain information that must be observed to
prevent property damage.
The pertinent text describes
• the possible reason for property damage
• the possibilities for preventing property damage
Notices of possible property damage are emphasised by a blue signal bar and the signal word
ATTENTION.
NOTICE
Notices for the prevention of property damage are not related to possible injuries.

Operating instructions WPM Gateway IoT 9/76
Safety
2.3 Protective measures
NOTICE
Protective measures against unauthorised access
If a service employee from FIBRO GMBH requires access to the Gateway for service and sup-
port, the following instructions regarding access to company networks must be observed:
In order to access the web front-end of the FIBRO application, the service employee from
FIBRO GMBH must access the network of the Gateway.
In order to ensure that the service employee from FIBRO GMBH cannot access the rest of
the company network, the Gateway should be disconnected from the network in this case
and direct access should be established via network cable from the service employee's
notebook to the Gateway.
Alternatively, suitable Protective measures (firewall, network segments) must be taken to
ensure that no unauthorised access can take place.

10/76 Operating instructions WPM Gateway IoT
Product description
3 PRODUCT DESCRIPTION
3.1 Supplied components
The product consists of the components
• WPM Gateway
–IoT device
– Power supply unit
– WPM software
•LAN cable
• Quick Start Guide
3.2 Properties
Product features
The product WPM Gateway is an IoT device.
The IoT device has the WPM software installed, which only works in conjunction with the asso-
ciated components.
WPM software
With the WPM software active, WPM pressure sensors and data holders in the receiving range
of the WPM Gateway can be identified, observed and evaluated or re-parametrised with the cor-
responding Professional authorisation level.
Connection possibilities
The WPM Gateway can be integrated into the IT infrastructure via various connection options.
In addition, the WPM Gateway supports various Industry standards
(OPC UA, EtherCAT, Profinet) for connecting external devices.
Operating instructions WPM Gateway IoT 11/76
Product description
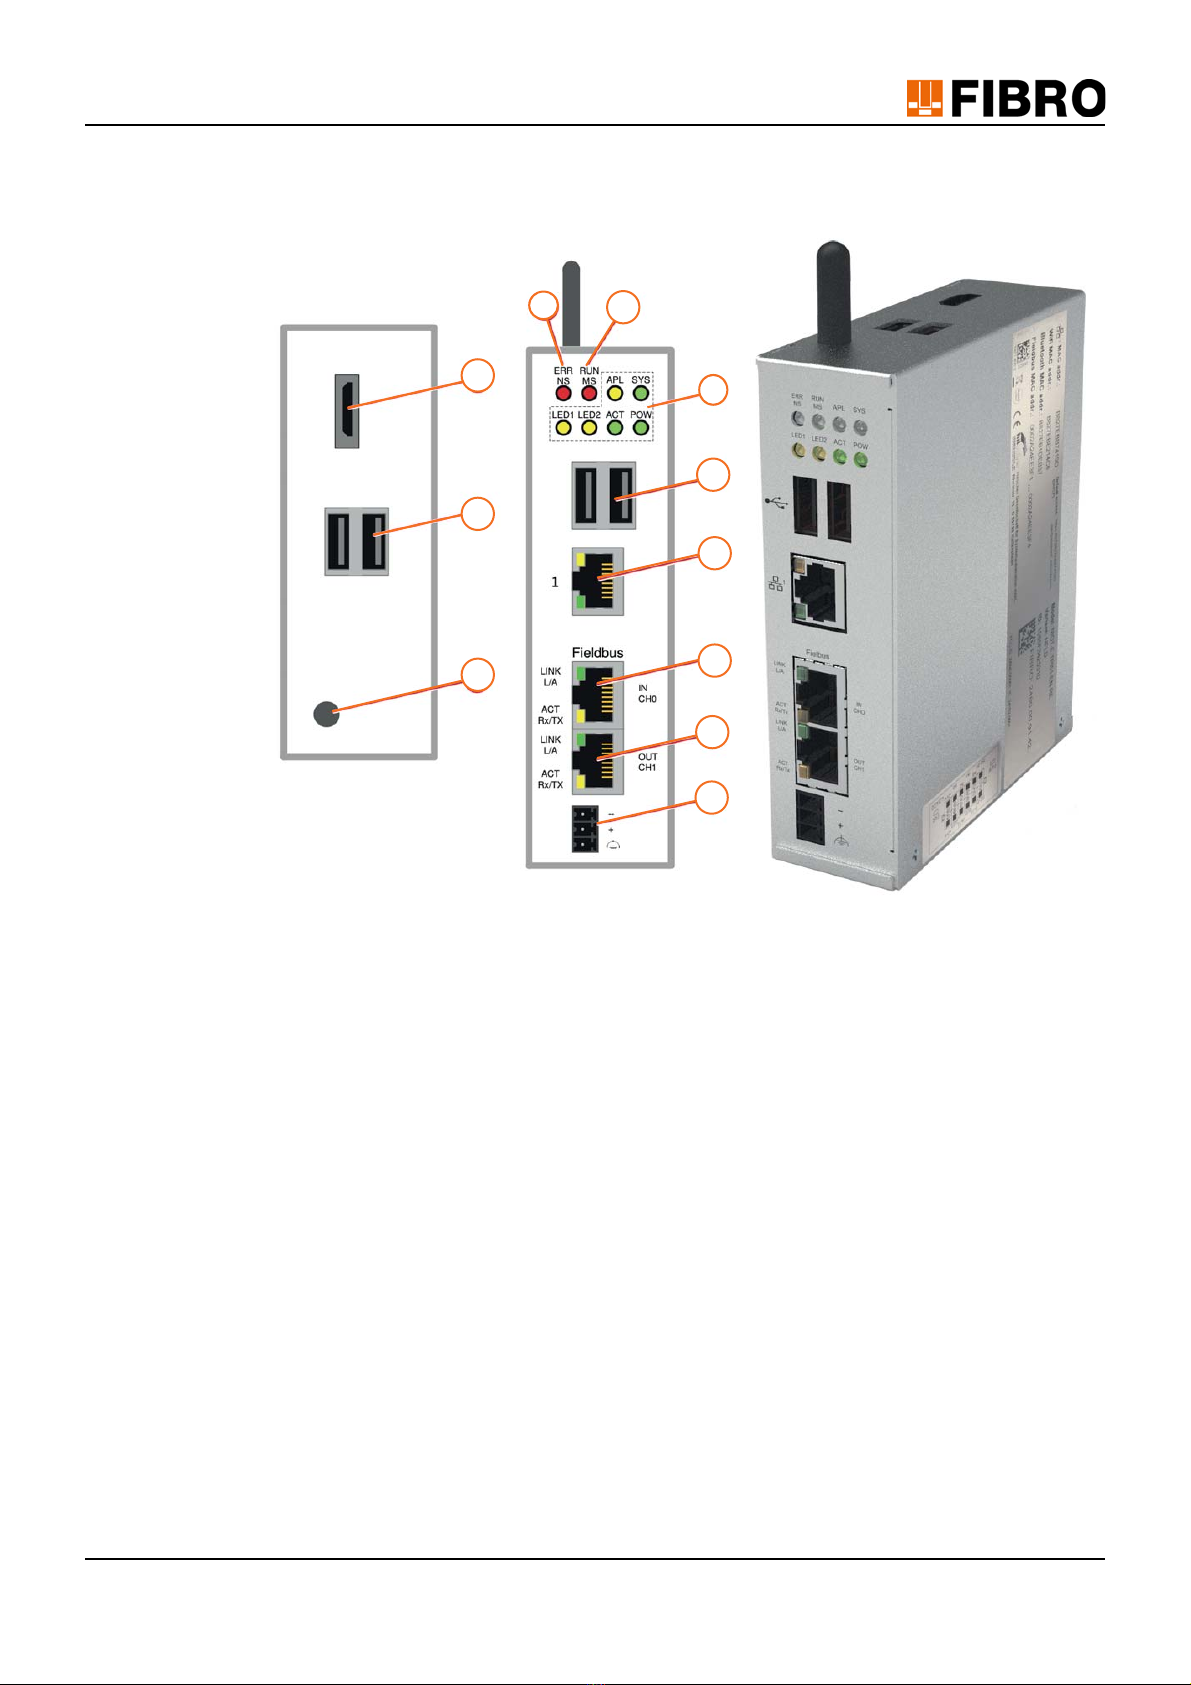
3.3 Interfaces and LED indicators
Fig. 3-1 Interfaces and LED indicators
1 HDMI output
2 USB connectors
3 Antenna
4 Status of the fieldbus
5 Status of the fieldbus
6 Status of the fieldbus
7 USB connectors
8 LAN connection
9 EtherCAT or Profinet Connector
10 EtherCAT output
11 Power connection
1
2
3
6
7
8
9
10
11
5
4

12/76 Operating instructions WPM Gateway IoT
Product description
3.4 Voltage supply
The IoT device must be supplied with a voltage of 24 VDC by a suitable power supply unit.
3.5 Inputs and outputs
Connector for digital inputs and digital outputs
The IoT device has digital inputs and digital outputs for connecting additional components. The
exact function of the inputs/outputs is described on the Web interface of the WPM Gateway in
a Quick-Start Guide.
The connectors for the inputs/outputs are located on the Connector on the bottom of the IoT de-
vice.
Fig. 3-2 Digital inputs/digital outputs
0 VDC Power supply
24 VDC Power supply
Functional earthing
-
+
Operating instructions WPM Gateway IoT 13/76
Product description
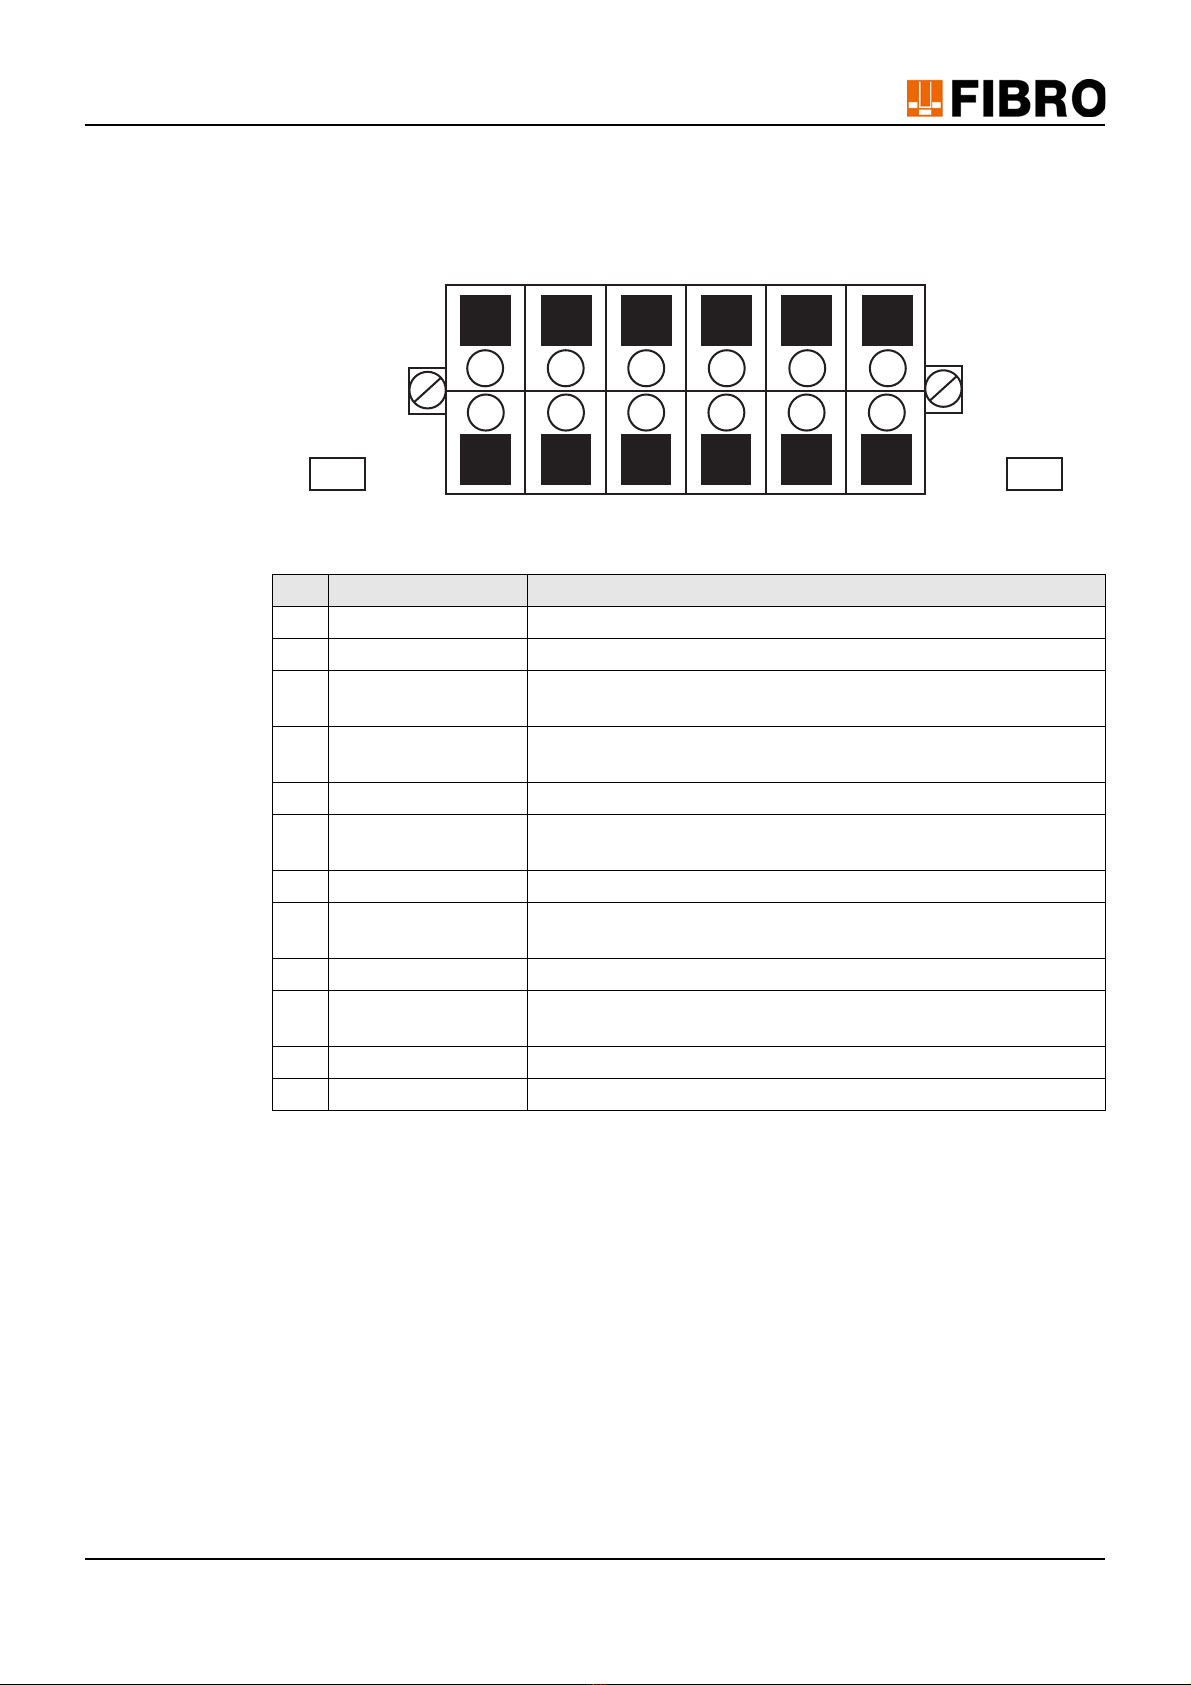
Pin assignment of the digital inputs and digital outputs
A label is attached to the IoT device with the Connection diagram of the digital inputs and digital
outputs.
Fig. 3-3 Connection diagram for digital inputs/digital outputs
Tab. 3-1 Pin assignment digital inputs/digital outputs
3.6 System requirements
The WPM software runs entirely on the WPM Gateway. The access to it takes place via a web
browser. The following browsers support the operation of the WPM software:
• Google Chrome as of version 86.0.4240.75. (recommended)
• Mozilla Firefox from version 81.0.1 (recommended)
• Microsoft Edge as of version 86.0.622.38
• Microsoft Internet Explorer as of version 11.1082.18362.0
PIN Marking Function
1 ISO-0V Reference potential external power supply (isolated)
2 ISO-0V Reference potential external power supply (isolated)
3 IN0 Keyswitch (Initiates the pairing process with the data holder)
when engaged
4 OUT0 Green – Data holder connected and no warnings or errors on any
sensors
5 IN1 Not used
6 OUT1 Yellow – Data holder connected – Warning present on one or
more sensors
7 IN2 Not used
8 OUT2 Red – Data holder connected – Error present on one or more
sensors
9 IN3 Not used
10 OUT3 Blue – Flashes with ongoing coupling process/lit continuously
upon successful connection
11 +24 VDC +24 VDC external power supply
12 +24 VDC +24 VDC external power supply
ISO-0V OUT0 OUT1 OUT2 OUT3 +24 VDC
ISO-0V IN0 IN1 IN2 IN3 +24 VDC
PWR ERR
4DI4D0
1
2
3
4
5
6
7
8
9
10
11
12

14/76 Operating instructions WPM Gateway IoT
Product description
3.7 Licensing
WPM is subject to a license agreement with FIBRO GMBH. The system will not function until a
valid license has been stored by an Administrator in the WPM software of the WPM Gateway.
To apply for a license and enter the license key, see the section Applying for a New License in
chapter 9.1.1 "License and license key" on page 55.
To transfer the license to another WPM Gateway, or to renew the license, please contact your
sales partner at FIBRO GMBH.
3.8 Operating modes and functions
The WPM Gateway can be operated at the following authorisation levels:
• Basic mode
• Allows read access to data holders and sensors. For more information on the scope of
functions, see Chapter 3.8.1 "Functions in Basic mode" on page 14.
• Professional mode
• Extension of the basic authorisation level with permission for device management. For
more information on the scope of functions, see Chapter 3.8.2 "Functions in Profession-
al mode" on page 15.
• Administrator mode
• All authorisations to manage the WPM software on the WPM Gateway. For more infor-
mation on the scope of functions, see Chapter 3.8.3 "Functions in Administrator mode"
on page 15.
3.8.1 Functions in Basic mode
In Basic mode, the following functions are available:
• Display all data holders
• Display data holder properties
• Display data holder sensor overview
• Display data holder chart diagram with limit values
• Display data holder bar chart with limit values
• Display top/bottom data holder tool screen with tool screen download
• Display data holder configuration
• Activate/deactivate data holder
• Activate/deactivate data holder Press mode
• Display sensor properties
• Display sensor measured values; total overview of statuses with chart diagram
• Activate/deactivate sensor
• Display free sensor overview
• Display the user Administration for all users
• Change the language setting
• Select notifications
• Change the password

Operating instructions WPM Gateway IoT 15/76
Product description
3.8.2 Functions in Professional mode
In addition to the functions in Basic mode, the following additional functions are available inPro-
fessional mode:
1) Configure the data holder
2) Configure the data holder tool screen
3) Update the data holder firmware
4) Assign the data holder sensor
5) Configure the sensor
6) Reset the sensor to factory settings
7) Update sensor firmware
3.8.3 Functions in Administrator mode
In addition to the functions in Professional mode, the following additional functions are available
in Administrator mode:
• Gateway Administration
– Request a license
– Save/change the license key
– Update WPM Gateway software
– Configure the mail server notifications
– Configure thresholds/delays for the Press mode filter
– Configure Fieldbus EtherCAT/Profinet/OPC UA
– Activate the configuration of MQTT proxy
– Display Docker statistics
– Display telegraph statistics
• Create/edit/delete user access to WPM Gateway

16/76 Operating instructions WPM Gateway IoT
Assembly
4 ASSEMBLY
The installation of the IoT device is described in separate installation instructions.
• 2.7551.00.1220. Installation instructions for the WPM Gateway IoT Device
The information in these installation instructions must be observed during installation.
The selection of a suitable installation site is the responsibility of the operator.

Operating instructions WPM Gateway IoT 17/76
Commissioning
5 COMMISSIONING
5.1 Initial commissioning
5.1.1 Network settings
As default, the WPM Gateway is preset with the static IP address 10.10.10.10 . This IP address
can be changed by a network Administrator when integrating the WPM Gateway into the com-
pany IT infrastructure.
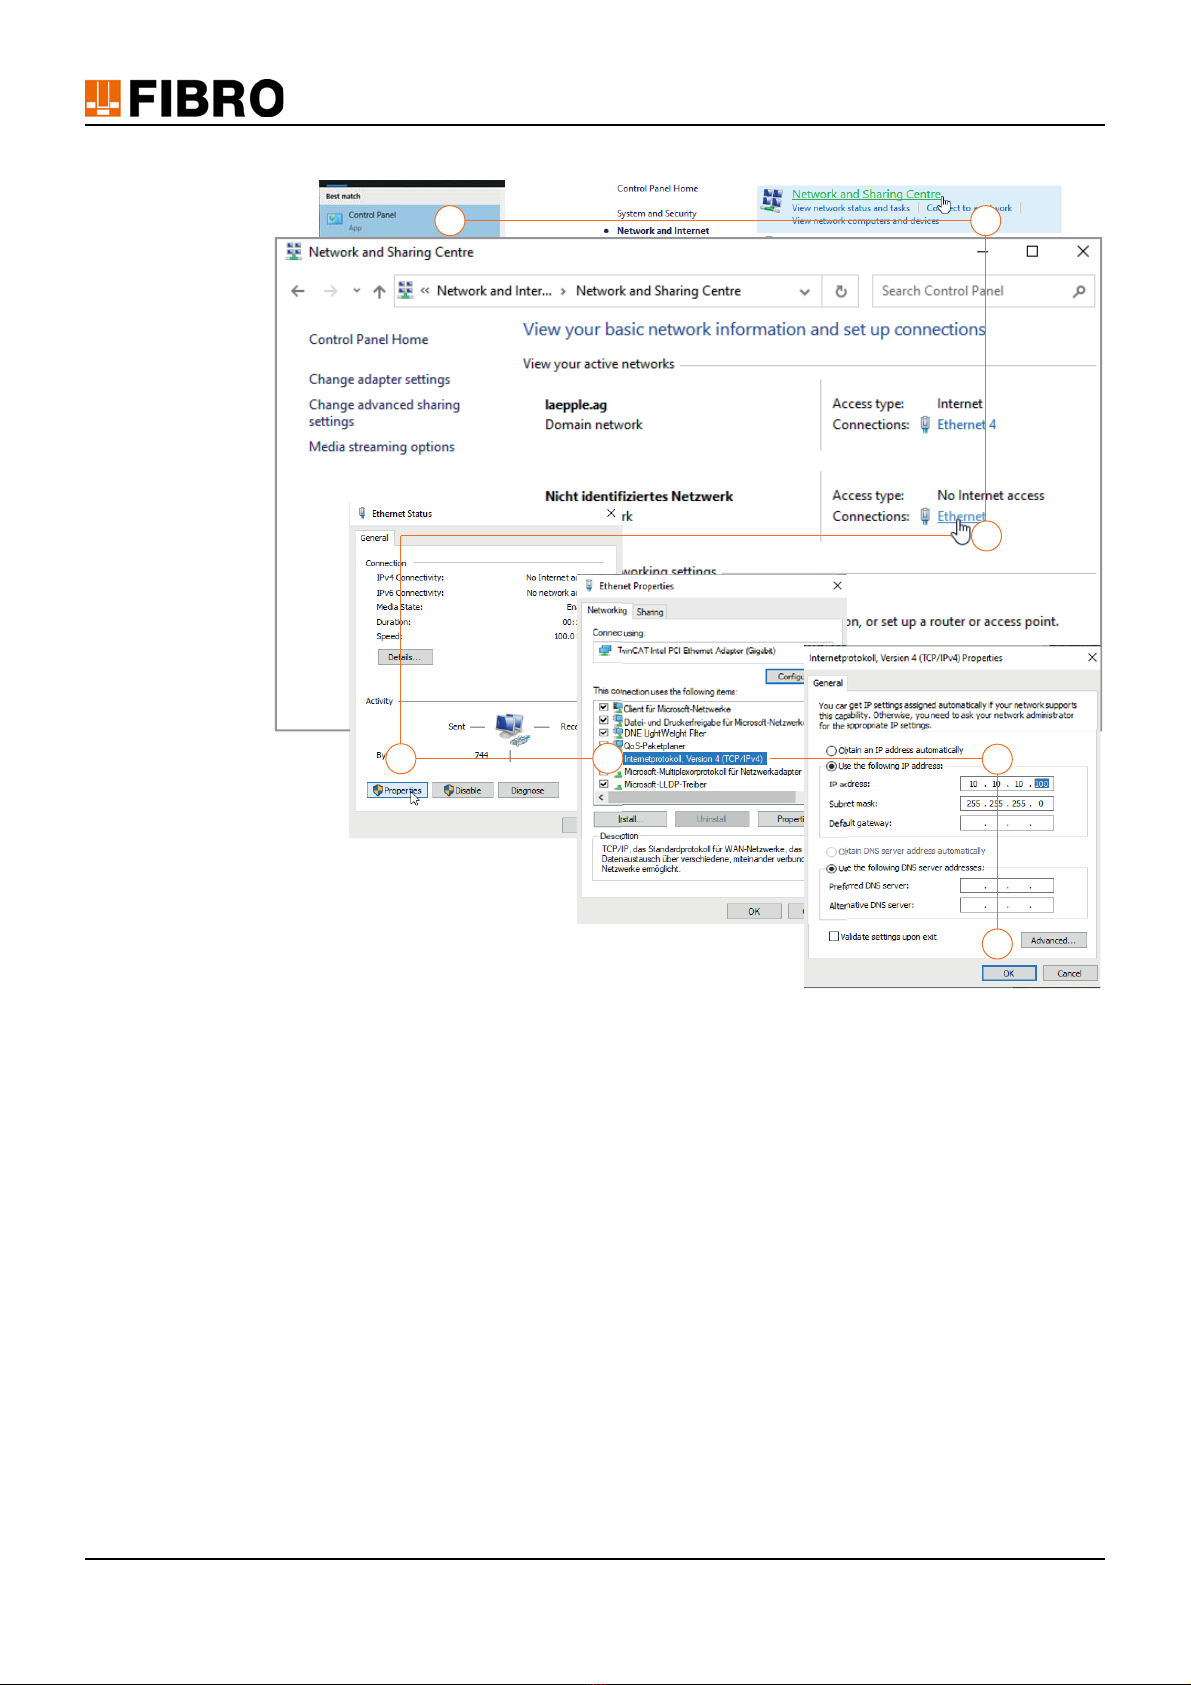
To be able to access the WPM Gateway, the PC with which access is to be made must be man-
ually set to a fixed IP address.
The selection of the fixed IP address is at the discretion of the user.
For the following descriptions, the IP address 10. 10. 10. 100 is used.
1) Open thecontrol panel of the PC.
2) Open the Network and Sharing Center.
3) Open an Ethernet connection.
4) Open the properties in the selection window Ethernet Status .
5) In the selection window Ethernet Properties open the Internet Protocol, Version 4 (TCP/
IPv4).
6) In the Internet Protocol, Version 4 (TCP/IPv4) selection window, configure the following set-
tings:
• Use the following IP address
• IP address 10. 10. 10. 100
• Subnet mask 255. 255. 255. 0
7) Confirm settings with OK.
18/76 Operating instructions WPM Gateway IoT
Commissioning
Fig. 5-1 Setting a fixed IP address on the PC
1. 2.
3.
4. 5.
7.
6.
Operating instructions WPM Gateway IoT 19/76
Commissioning
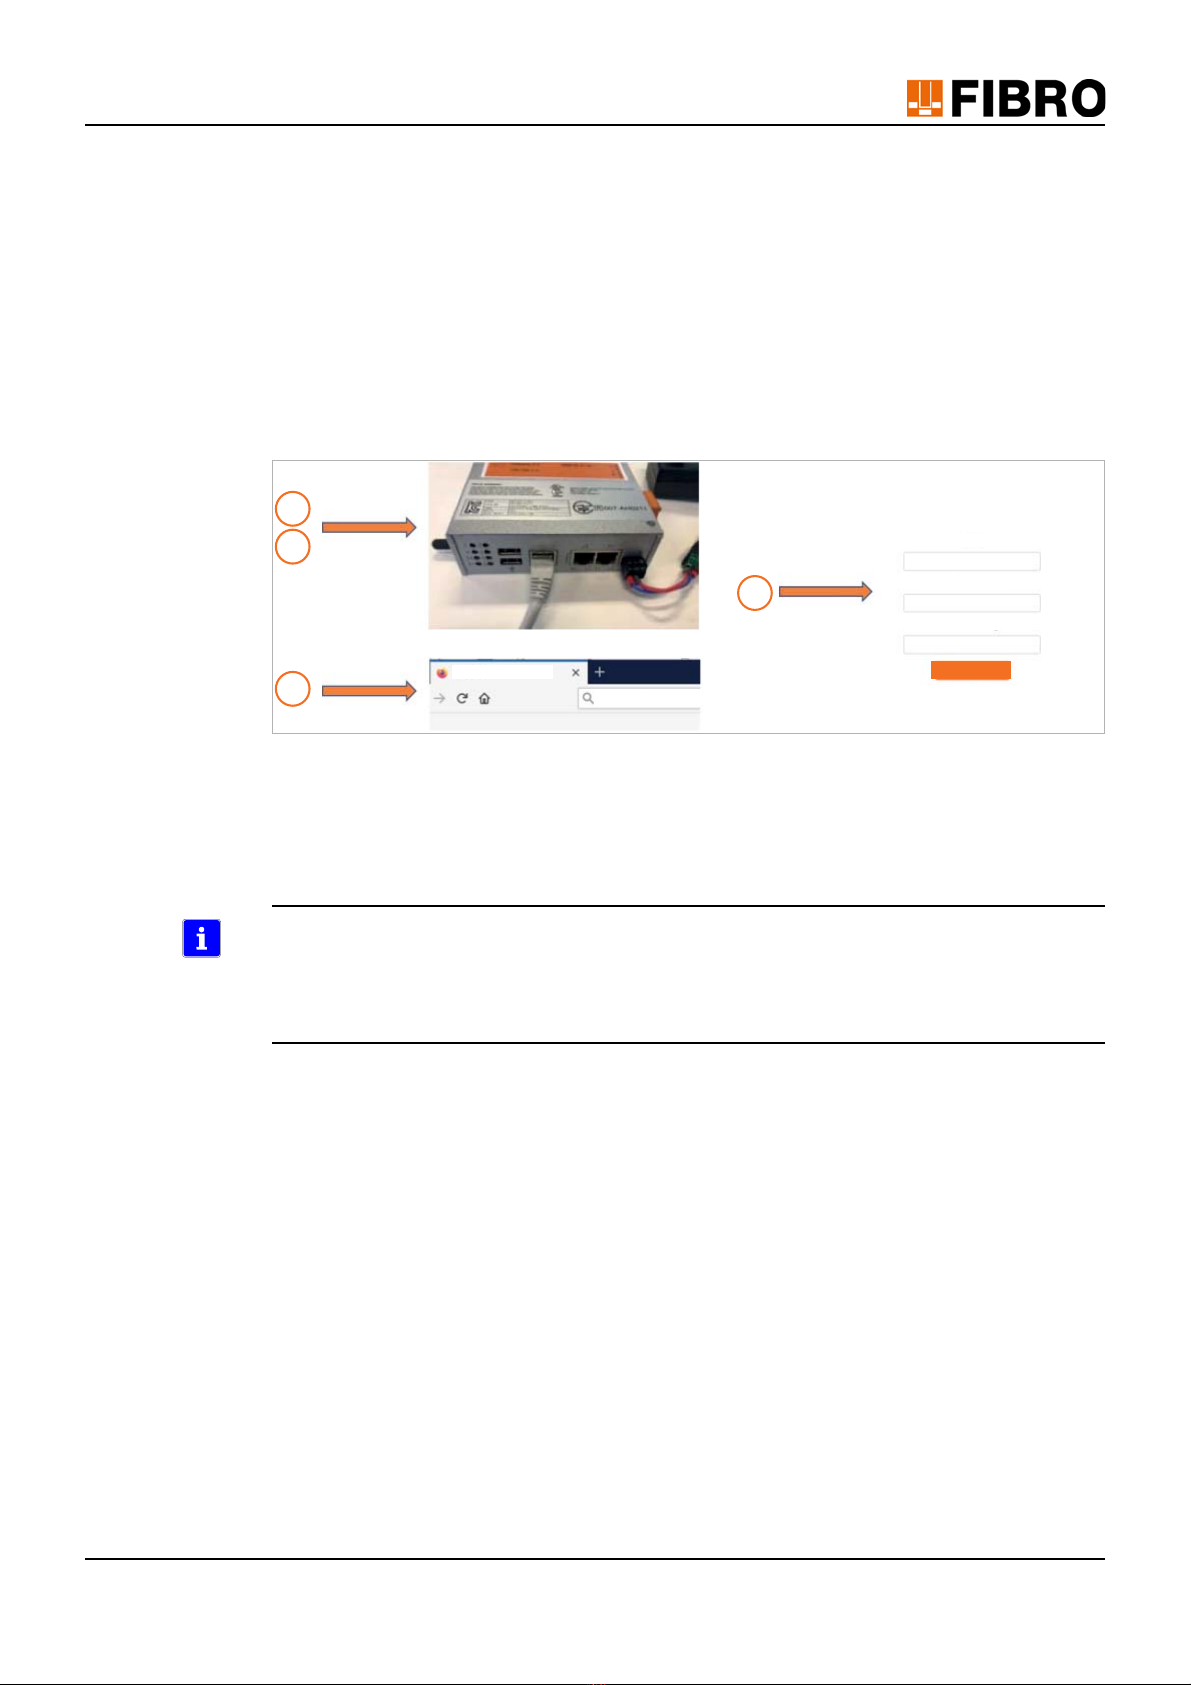
5.1.2 Commissioning the WPM Gateway
After the network settings have been set up on the PC, the WPM Gateway can be put into op-
eration.
1) Connect the WPM Gateway to the power supply via the power supply unit.
2) Connect the WPM Gateway to the PC via a LAN cable.
3) Open the Web browser and enter the IP address http://10.10.10.10 of the WPM Gateway
specified in the network setting.
4) When access for the first time, the WPM Gateway Administrator must be set up.
– Enter the email address of the Administrator.
– Enter the password of the Administrator.
Fig. 5-2 Commissioning the WPM Gateway
With the WPM GatewayAdministrator account, additional users with different permissions can
then be set up on the web interface of the WOM Gateway (see Chapter 6.1 "Create users" on
page 24).
WPM devices (sensors and data holders) that are within range of the WPM Gateway should be
visible.
To enable the full functionality, a WPM Gateway license must be applied for under the Adminis-
tration menu item (see Applying for a new license in Chapter 9.1.1 "License and license key" on
page 55).
The WPM Gateway must be set to the correct time in order for the recorded data to be usable
(see Chapter 5.1.3 "Setting the time" on page 20).
1
2
3
4
http://10.10.10.10
Set up gateway
Please create your initial gateway administrator
Password
Email
Conrm Password
New Tab Create user

20/76 Operating instructions WPM Gateway IoT
Commissioning
5.1.3 Setting the time
If the WPM Gateway is not connected to the internet or cannot obtain the time via NTP, it must
be ensured that the current time is set.
For this purpose, the appropriate setting can be made in the Admin Panel.
• Open the Admin Panel at http://10.10.10.10:8080 in the browser.
• The first time you log in, use the username admin and the password wpmg8way.
• Follow the prompt to change this one-time access data.
•Use the System/System time buttons to open the Change System Time window.
• Enter date and current time and confirm with Change .
Fig. 5-3 Setting the time
Table of contents
Other FIBRO Gateway manuals

Popular Gateway manuals by other brands


Entone
Entone Magi 400 Specification sheet

Computime
Computime Salus Controls iTG310 quick guide

EchoLife
EchoLife DU8245W quick start

ChamSys
ChamSys 10Scene Installation and configuration guide

Anywire
Anywire AnyWireASLINK B2G28-E1 user manual

Bove Technology
Bove Technology WALRUS Installation & user guide